
Don't wanna be here? Send us removal request.
Statistics
We looked inside some of the posts by techhow-blog1 and here's what we found interesting.
Average Info
Notes Per Post
1
Likes Per Post
1
Reblog Per Post
0
Reply Per Post
0
Time Between Posts
10 days
Number of Posts By Type
Link
2
Text
3
Last Seen Tumblr Blogs


Fun Fact
Total funding amounts to $125.3M.
Link
Have you ever thought that you can enjoy your PC view on your Samsung smart tv wirelessly? You have no idea how to do it. Read out this TechHow article to Mirror PC To Samsung Smart TV.
0 notes
Text
How To Screen Mirroring Windows 10 To Samsung Smart TV Wirelessly
If you have Samsung Smart TV and want to mirror your Windows PC to it, then just follow the steps given below:

1. Switch on your Samsung Smart TV and use the remote to select ‘Tools’. On the screen, from the menu which comes up, select ‘Network.’

2. In the side menu, got to ‘Screen Mirroring’ and choose it.

3. In the next window, go to ‘Device Manager’ and select it.

4. Your PC name should come up as a connected device. If it does not, connect your Smart TV to your laptop before proceeding.
5. Next, go back to the previous menu and select ‘Screen Mirroring.’ Your TV has been set up.

6. Now, in your laptop, open settings. Run a search if you can’t find it or use the ‘Window’+’i’ buttons.

7. Select the devices to option from the icon menu which appears.

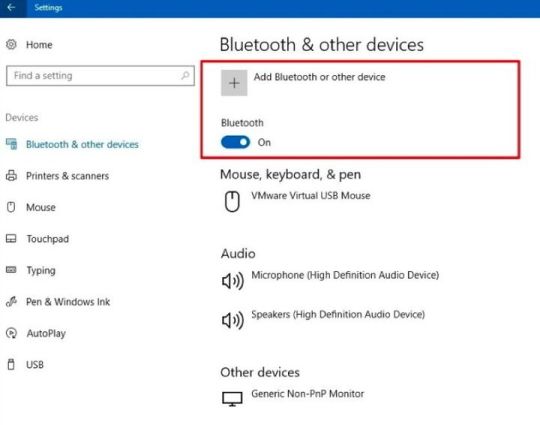
8. Select the ‘Bluetooth and other devices’ preference from the list menu on the left and click on ‘Add Bluetooth or other devices.’
9. In the window which opens next, select ‘Wireless display or docks’ to connect your Samsung Smart TV.

10. Your laptop will search for your TV. Click on it when it shows up to connect your TV to your PC.
11. Now open ‘Settings’ again and select ‘System’ this time.

12. This will by default open up the display section. Scroll to find the ‘Multiple displays’ section.

13. From the drop-down menu, select ‘show only on 1’.

14. This is the end of the process to Mirror PC To Samsung Smart TV. Your Smart TV is now wirelessly mirroring your PC.
Contact Us:-
Email: [email protected]
Website: https://www.techhow.org/
0 notes
Text
How To Access The BIOS On Windows 10
BIOS (Basic Input Output System) is a software that is installed on the motherboard of your system. You can not control all settings after getting into the Windows. Some settings like which windows to install, in which mode to run Windows, Boot order of device etc. In Windows earlier versions it was easy to directly access BIOS by pressing F2 or F8 or F12 etc function key.

But Windows 10 login is fast and the steps to get into BIOS is different. Now in some devices, you will get UEFI in place of BIOS. Let’s see in this TechHow article how to access the BIOS or UEFI in Windows 10 in detail?
Step 1. To Access BIOS Windows 10, switch on your Windows 10 laptop and go to ‘Settings.’ You will find it somewhere in the bottom left side of the screen when you click on the Windows icon in the taskbar.

Step 2. In the ‘Settings’ menu, find ‘Update and Security’ and click on it.
Step 3. In the new page that opens, from the list menu on the left side, go to ‘Recovery’ and click on it.

Step 4. From the options that now show up on the right, under the ‘Advanced Setup’ section, click the ‘Restart Now’ button.

Step 5. A new menu will appear tilled ‘Choose an Option.’ Got to Troubleshoot and click on it.

Step 6. Once again, select ‘Advanced Options.’

Step 7. Doing this will take you to another set of options. Here, click on ‘UEFI Firmware Settings’.

Step 8. Last, you will be asked to restart your Windows 10 laptop to change your Firmware settings. Do so.

That is it. Once the PC restarts, you will be taken to the BIOS.
Contact Us:-
Email: [email protected]
Website: https://www.techhow.org/
0 notes
Link
Are you not comfortable with default language on facebook? And do you want to Change Language Of Facebook but not known Where is Language Setting on Facebook? Read this article for step by step process.
0 notes
Text
How To Change Language On Facebook
Tech How explain you How To Change Facebook Language. Follow these following steps:
1. Open the official Facebook website in your browser.
2. Enter your account details and ‘Log In’ to your account.
3. Click on the small inverted triangular symbol available on the right side corner of your screen.

4. In the drop-down menu that unfolds, select ‘Settings’.
5. Doing this will redirect you to your ‘General Account Settings’ Facebook page.

6. In the column on the left side, find the ‘Language’ option and click on it to Change Language Of Facebook.
7. It will land you to the ‘Language Settings’ page.

8. The first row asks you the language you want to Change Language Of Facebook in. The language presently chosen will be displaced. Click on ‘Edit’ to change this language.
9. This will open a scroll menu giving you the option to choose from about 100 languages.

10. Here select your language and click on ‘Save Changes.’

11. According to TechHow, your Facebook language has now been changed.
Contact Us:-
Email:- [email protected]
Website: https://www.techhow.org/
1 note
·
View note