
Don't wanna be here? Send us removal request.
Statistics
We looked inside some of the posts by technical-info and here's what we found interesting.
Average Info
Notes Per Post
97
Likes Per Post
12
Reblog Per Post
85
Reply Per Post
0
Time Between Posts
3 months
Number of Posts By Type
Text
16
Photo
1
Last Seen Tumblr Blogs


Fun Fact
Tumblr Inc. is using 66 technologies for its website.
Text
Flickr Tutorial
This is a tutorial on how to upload your photos to Flickr as well as how to create Albums in Flickr. I've prepared this tutorial for you guys as a reminder just in case you've forgotten since the last time.
(NOTE 1 : Flickr will only accept jpg files. It will not accept RAW files such as NEF, CR2, DNG, or other RAW formats.. If you are having trouble uploading and you shot with a DSLR camera, make sure the files you are uploading are jpgs.)
(NOTE 2: There is also a Flickr mobile app which may require a differ process to upload your photos.)
You'll need to upload your photos to your Flickr Photostream, them make an Album for this Week / Assignment and name it "Assignment 2". Put your 10 photos in this Album.
You do NOT need to add your photos to the Class Flickr Group yet but you do need to upload them to your own Flickr. We will involve the Flickr Group during class but not before discussing the photos.
The Flickr Photostream is basically every photo that you have uploaded to Flickr over time. It's all of your photos. Organizing these photos is done by making "Albums" in Flickr.
Here's How you upload photos to your Photostream as well as make Albums.

Upload your Photos to Flickr
Press the little Cloud/Upload button in the upper right of the screen when you'r eon Flickr.

Then you have to select your photos to upload.

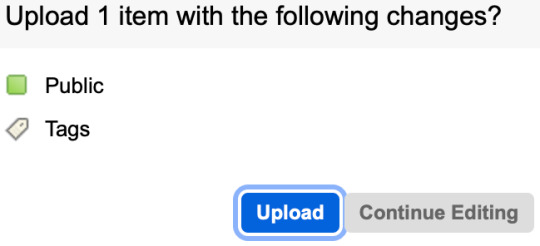
Then confirm in the upper right corner again using the blue button, "Upload 1 Photo" (or a different number)

Then confirm one more time by pressing the Blue Upload button. Make sure that your photos are set to "Public" as opposed to Private or we won't be able to see your photos. If you don't change anything along the way of uploading you should be fine.
The photos will now be successfully in your Flickr's photostream.
Next, make an Album with your photos.
Click the Albums tab on your Flickr photostream
Create an album by pressing the Blue button "Go to Camera Roll"

Click on a few photos to select the ones you want to put in the album. You'll see a check on the selected photos as you select them.

At the bottom of the page click "Add to Album"

Next, press the Create New Album button (text)

Name the Album

Press the Blue "Create" button.

Press Done. Do not try to reselect the group or name the group at this step. Just press the Done button. (This step is confusing because the interface and sequence of choices at this stage were not thought out very well.)

You will now have made your first album and can see it by clicking on the Albums tab.

Making future albums is much easier and pretty straight forward.
You just go to the Albums tab and press the New Album button.

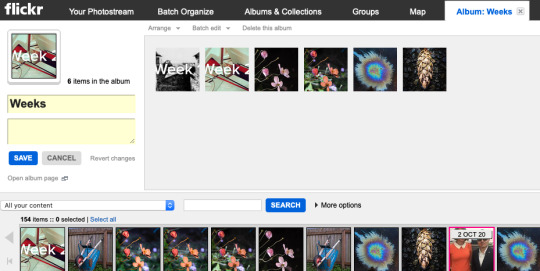
If you need to go back and edit any Albums, Click on the Album and press the "Edit in Organizer" blue text.

You will then be able to drag new photos from the bottom into your album, delete photos by dragging them away, or rename your Album.
Let me know if you have any questions.
- Phillip
1 note
·
View note
Text
The Basics of Photography (The technical things)
Originally posted on Photo Intro w15
Lens Focal Lengths & Angles of View
Assuming that you are using these lenses on a camera with a “full frame” sensor or one that is roughly 35mm in size, here is how the lenses would be categorized. Wide Angle Lenses: 17mm 28mm Normal Lenses: 50mm Telephoto Lenses: (…anything beyond 50mm) 85mm 135mm 300mm 500mm 1000mm Smaller camera sensors, such as an APSC size sensor, effect the ratio of a lens’ coverage. On an APSC size sensor, because it is smaller and the lens coverage is smaller, a 30mm lens would be about the same view as the 50mm lens on a full-frame sensor camera.
Aperture / ƒ Stops
These are the standard ƒ stop settings. Some digital cameras now give you the option of in between ƒ stops.. such as ƒ6.3 or ƒ7.1 which are both in between ƒ5.6 and ƒ8. Some lenses can are capable of ƒ32 ƒ45 & ƒ64. At ƒ64, virtually everything in the photo will be in focus. All you ever want to know about ƒ stops.. http://en.wikipedia.org/wiki/F-number
Depth of Field / ƒ stop comparison. Two photographs have been taken and in both, the focus point is the pedals of the flower in the center of the frame. The two photographs have been merged into one and split diagonally. The upper left corner shows what the photo looks like at ƒ32..(more is in focus, giving it a large depth of field) and the bottom right corer shows the photograph at ƒ5… (less is in focus, giving it a shallow depth of field).
Shallow Depth of Field ( ƒ2 )
Notice how the image gets grainier as the ISO number increases.
Fast Shutter Speed = 1/1000
Very Slow Shutter Speed = 2 hours. (The camera is also on a tripod.)
This is what a histogram might look like on the back of a camera's LCD display.
Proper Exposure The following diagrams explain how the three factors of exposure (shutter speed, ƒ stop, and ISO) effect each other to make a properly exposed photograph, according to your camera’s light meter. Essentially, once the camera's light meter has determined what the measured amount of light is, you use shutter speed, aperture, and ISO together to let only a certain amount of light through to the camera. You can interchange any one of the settings of the 3 factors: shutter speed, aperture, & ISO.. but if you adjust one, you must consider how the other two are effected and if they need to be adjusted in response to the balance the 1st adjustment...
White Balance & Color Temperature Light will be different color depending on it's source and circumstance. Sunlight is bluer light than indoor light from a lightbulb. Daylight at noon is bluer than daylight at sunset or sunrise, which is more orange. These colors of light are measure in degrees Kelvin. For example daylight is usually around 5500ªK. Indoor light is usually around 3000ªK. You can prepare your camera for the kind of light that is available by using the White Balance setting. Your camera can also be set to auto but sometimes it's not always accurate. AWB = Auto White Balance.
OK. That's basically it as far as the mechanics of camera operation go. Go take some photos.
0 notes
Text
Exposure Review
Aim your camera and look at your camera’s light meter to see if the picture needs to be brighter or darker. Activate the light meter by pressing the button half way down.
Review:
BRIGHTNESS
Shutter Speed: Faster shutter speed (1/1000) = darker photo Slower shutter speed (1/8) = brighter photo
ƒ Stop: Higher ƒ number (ƒ22) = darker photo Small ƒ number (ƒ5.6) = brighter photo
ISO: Lower ISO number (ISO 100) = darker photo Higher ISO number (ISO 800) = brighter photo
——
VISUAL RESULT (other than Brightness)
Shutter Speed: Faster shutter speed (1/1000) = freezes motion Slower shutter speed (1/8) = blurs motion
ƒ Stop: Small ƒ number (ƒ5.6) = shallow depth of field / less is in focus Large ƒ number (ƒ22) = large depth of field / more is in focus
ISO: Lower ISO number (ISO 100) = Clean/Smooth image Higher ISO number (ISO 1600) = Grainy/Noisy image

19 notes
·
View notes
Text
Adobe Lightroom & Photoshop ***Free Alternatives
Here is a free alternative to Adobe Lightroom that will work on all computer platforms.. https://www.darktable.org/
Here is a free alternative to Adobe Photoshop: https://www.gimp.org/
4 notes
·
View notes
Text
Aperture (ƒ) = Like Pupils
https://www.youtube.com/watch?v=YIKm3Pq9U8M

2 notes
·
View notes
Text
“M” Manual Mode Controls
When you place your camera dial on the “M” setting, you are now shooting in fully manual mode. You’ll also want to check that your ISO is not set to “Auto ISO” Remember that you’ll use the light meter to indicate if you need to make the photo darker or brighter. You’ll activate the light meter by pushing the shutter button half way down. I’ve listed some links below to short videos on how to change your camera settings using the dials and buttons.
For Canon Cameras, • Change the Shutter Speed: https://www.youtube.com/results?search_query=change+shutter+speed+canon+ • Change ƒ-stop: https://www.youtube.com/results?search_query=change+f+stop+canon+ • Change ISO: https://www.youtube.com/results?search_query=change+ISO+canon+
For Nikon Cameras, • Change the Shutter Speed: https://www.youtube.com/results?search_query=change+shutter+speed+nikon+ • Change the ƒ-Stop: https://www.youtube.com/results?search_query=change+f+stop+nikon+ • Change ISO: https://www.youtube.com/results?search_query=change+ISO+nikon+
7 notes
·
View notes
Text
Night Photography Tips

Here are a few tips for night photography and astrophotography that are pretty useful if you're ever curious about it in the future. Check the weblinks below. There are some great tips and tricks on focusing, and and getting the correct exposures. One trick I found was for when some light is still available in the sky, focus on something in the distance at infinity, which basically means really far away, and then mark that place on your lens by attaching some tape to hold it in the same focus spot for later. It’s really hard to focus in the dark and this may help people if you cant see.
Check out the link for other tips for exposure settings:
http://www.wta.org/news/signpost/star-photography-tips
&
Here’s a ton more info about night photography from the same photographer:
https://www.davemorrowphotography.com/p/tutorial-shooting-night-sky.html
4 notes
·
View notes
Text
Exposure Review
Aim your camera and look at your camera’s light meter to see if the picture needs to be brighter or darker. Activate the light meter by pressing the button half way down.
Review:
BRIGHTNESS
Shutter Speed: Faster shutter speed (1/1000) = darker photo Slower shutter speed (1/8) = brighter photo
ƒ Stop: Higher ƒ number (ƒ22) = darker photo Small ƒ number (ƒ5.6) = brighter photo
ISO: Lower ISO number (ISO 100) = darker photo Higher ISO number (ISO 800) = brighter photo
------
VISUAL RESULT (other than Brightness)
Shutter Speed: Faster shutter speed (1/1000) = freezes motion Slower shutter speed (1/8) = blurs motion
ƒ Stop: Small ƒ number (ƒ5.6) = shallow depth of field / less is in focus Large ƒ number (ƒ22) = large depth of field / more is in focus
ISO: Lower ISO number (ISO 100) = Clean/Smooth image Higher ISO number (ISO 1600) = Grainy/Noisy image
19 notes
·
View notes
Text
Camera Accessories
Here are a few camera accessories that may be of interest.
Giottos Rocket Blaster Dust-Removal Tool = $10 Link to buy

Lenspen Optical Cleaning Tool =$8 Link to buy

1 note
·
View note
Text
Purchasing Adobe Lightroom
We will use Adobe Lightroom periodically in class. It’s available on the computers present in the classroom and can be used for free. However, If you would like to have a copy on your own computers, you’ll have to purchase it from adobe. Upon last checking, you can call Adobe or go to their website and search for education purchase. I text chatted with them about this..
How much is the student rate at this point for adobe lightroom? There is no discount available for Lightroom only. However they can get Photoshop and Lightroom with Photography plan that will cost them $9.99 per month Or they can get Lightroom with CC all app plan in $19.99 per month. They can place the order directly on the website or they can contact us for the purchase 800-585-0774
0 notes
Text
Using Instagram

To use Instagram for class,
You’ll need to download the app to your phone.
Take your photos and send them to your phone. Upload to Instagram.
You can use your phone to take photos but make them good. Feel free to continue to use your SLR cameras to take photos if you prefer. They will be higher quality photos. You can email them to your phone and then upload to Instagram if you are doing that.
This is a long video but it tells all you ever wanted to know about instagram.
https://www.youtube.com/watch?v=C81zwCHw1Y8
Let me know if you guys have any questions.
1 note
·
View note
Text
Camera and Memory Card Equipment Checkout

Shown above: Canon Rebel - DSLR Camera ( Has fully manual controls, switchable to automatic when needed.)
IT Helpdesk:
Room LB2-218 in the Library building Phone Number: 425-352-3456 Email: [email protected]
Hours: M – Th: 7am-10pm Fri: 7am-5pm Sat: 9am-5pm Sunday: Closed
** Must have UWB ID present to check out equipment.
** Must have all parts of equipment present to return. Students are responsible for replacing lost or broken equipment.
Last two weeks of the quarter get very busy so equipment become harder to check out. Go early as opposed to the last minute
Equipment Available:
Cameras = Canon Rebel – SLR Digital Camera. 12 Megapixels. (50 cameras available to campus students)
Can be checked out for 7 days at a time. They must be brought back to be checked back in. After they have had time to check and inventory the returned camera (usually about an hour), you may check it out again if no one else is before you.
Tip: Some former students have said that they have good luck getting the cameras again if they return it in the morning before a class and then go back a few hours later after there class is over to check it out again.
Memory Cards & Memory Card readers = 32mb, 16mb, and 8mb cards available.

If there aren’t any SLR cameras available, you can check out the point-and-shoot cameras as a last resort.

5 notes
·
View notes
Text
Printing (Preparing a File)
If you are wanting to make a print of a digital photo, you can use Lightroom to prepare it for printing. In general, you want to export a higher resolution file for printing than you would export for general web use. You can use Lightroom to export a jpg file and you want it to be 300 ppi (pixels per inch). Anything between 200ppi and 300ppi will print out with high quality. 300ppi is better.
Here is what the Export Screen and settings should look like when you export files from Lightroom to print.
(After you’ve exported the files, you can copy them to a small flash-drive and take them to Bartell, Walgreens, or Costco, etc... for printing.)

Here’s the same Export menu again with highlighted areas of importance to check when you export...

1 note
·
View note
Text
A Good Camera
In our class you will need to have a camera similar to this one. You need to have access to a camera with manual controls as apposed to a fully automatic or simple camera. It does not have to be an DSLR Camera (Digital Single Lens Reflex Camera) but you will learn the most about using a camera if you have an DSLR. ART 114, Intro to Digital Photography I - lntro to digital camera use, photography basics, photographic visualization, composition, lighting, and minimal editing. Students must provide their own digital camera with five or more mega-pixels, Auto, Auto-P, Aperture Priority, Shutter Priority, and full manual Exposure Modes.
This camera is currently selling for about $399 with a lens. Canon Rebel T5

If you buy it on Amazon, there are several different options for purchasing a kit with the camera. There is a deluxe accessory bundle which includes a lens and a memory card. Make sure you select “DELUXE ACCESSORY BUNDLE” as opposed to “BASE.” Let me know if you have any questions. Here’s the link:
Amazon
http://www.amazon.com/Canon-Rebel-EF-S-18-55mm-Digital/dp/B00IB1BTWI/ref=sr_1_3?ie=UTF8&qid=1428443441&sr=8-3&keywords=canon+t3

9 notes
·
View notes
Photo

Basics of Exposure Cheat Sheet
This is a good reference sheet to show what each control does to your photograph.
6 notes
·
View notes