
Where gamedev stories are laid to rest. Brought to you by TheBeardPhantom
Don't wanna be here? Send us removal request.
Statistics
We looked inside some of the posts by thebeardphantom and here's what we found interesting.
Average Info
Notes Per Post
5
Likes Per Post
4
Reblog Per Post
1
Reply Per Post
0
Time Between Posts
3 months
Number of Posts By Type
Text
2
Photo
3
Last Seen Tumblr Blogs


Fun Fact
In Q3 of 2020, 31% of US users access the Tumblr app daily.
Text
Multi-Dimensional Game Events
I'm currently working on a prototype for a project and needed a super flexible and reusable event system. I took some inspiration from Far Cry's dynamic, emergent systems (and this wonderful GMTK video) and made this... thing (GIF at 1/4 speed):

Breakdown
So what the heck is happening here?
Well, right now I call them "pings", but they are definitely worthy of a more descriptive name in the future. They act as a "multi-dimensional event system" for games. They aren't 4D in the way that you're probably thinking, however. The basic gist is:
A ping is fired off in code and added to an internal list to be regularly "pulsed".
Every "pulse", all ping listeners within range of the ping that can respond are notified.
Each valid responder will receive a notification every pulse unless it returns a response, after which it will no longer be considered as a responder for that specific ping.
So, how are these useful? In so many ways I never even realized until I implemented this system. Here's a few examples of the types of problems this solves in my current project:
AI senses. This works for sight, hearing, heck, even smell. For example, the player's feet can create pings for each step.
Reduces coupling. Pings can have any amount of data associated with them, and can thus track the "source" of the ping. I use this to, for example, have the player create a "wants reload" ping with a very small radius. The player's gun will pick up this ping and trigger the reload. Using this model, the player doesn't need a reference to the gun. The gun's resulting "reload" ping can be then picked up by nearby enemies, as if they are "hearing" the reload and know to fire on the now vulnerable player. It's also picked up by the UI, which can show a reload animation in the HUD.
Extremely easy to write debug tools for. The above GIF shows how much information can be very easily visually parsed by rendering debug gizmos.
It should be noted that this system separates the concerns of "listening" and "responding" -- they are two separate interfaces. This is because a single listener might be able to hear multiple different types of pings.
Now with all of that out of the way, time to dive deeper into the individual elements of the equation: pings, listeners, and responders.
Pings
Ping is an abstract class that you create a derived class from, such as TakingCoverPing, or ReloadingWeaponPing. They are basically like regular code driven events, except with 5 distinctive differences. Pings by default are:
Positional: They have a 3D position in the world.
Radial: They are spherical in shape and have a radius.
Temporal: They have a start time and duration.
Continual: They don't have to just be fired once. Instead they “pulse” at a regular, custom interval (if desired).
Global: Responders don't register to specific instances of these pings. I'll get into this more later.
There are some hidden bonuses that can be derived from the above properties. For example, since pings are positional and radial you can calculate a signal attenuation value for any 3D position. When used with AI senses this attenuation value can then be fed into RNG systems to determine if an enemy "heard" a sound that they were a bit far away from.
The continual nature of these events isn't a very widely applicable property, but does allow for very slick implementations of specific behaviors. A good example can be found in the Hitman games (specifically the trilogy started in 2016). Any weapon not in an expected location will attract the attention of NPCs. Instead of engineering a specific AI sense to accomplish this, weapons that are dropped outside of specific locations could create a ping with an infinite duration and regular pulse rate. While you still would need to write the response behavior, you don't need specific code to have the AI pick up on these sort of gameplay conditions.
By default Pings can also store the source GameObject that fired the ping. This is used by the debug visualizers to draw a line from the ping to the object that created it. It's also used by many of the responders to determine if specific pings are relevant to them. Going back to the gun reloading example, each gun only responds to a WantsReloadPing if the source of the ping is in their transform hierarchy (in this case it's the character that wants the reload).
Listening
Listeners inherit from the IPingListener interface, which just describes the listener's Position and Radius.
Yep, just like pings, listeners are also positional and radial in nature. This means that determining which listeners can "hear" a ping is done via a very simple sphere overlap check.
Where L is listener, P is ping, p is position and r is radius:

This is a very important distinction between pings and other event systems. In a typical Observer-pattern-like event system, each handler registers itself to specific instances of events. It will always receive a callback for those instances of those events as long as it remains registered.
A typical event bus implementation will remove the coupling between the owner (publisher) of the event and the handler (subscriber). Instead, anything can fire an event of any type via the event bus, which then selects handlers based on the type of event. This is also known as the Mediator pattern.
Pings are closer to an event bus in nature. However, with regards to selecting handlers in this system, I refer to this process as "Listener Discovery" due to how varying the resulting list of handlers can be based on game state.
Some of the information derived during listener discovery is stored in a struct called PingLocality and passed to the responder. It stores the square distance from the listener to the ping, as well as the attenuation of the ping based on the listener's position.
Its very easy to abuse listener setup to achieve more flexible behavior. For example, a global listener just needs a radius of float.PositiveInfinity (this is how the UI listens to events in the world). Listeners can be attached to transforms by returning transform.position as the Listener's Position property.
Responding
The inheritor of IPingListener will also need to inherit at least once from IPingResponder<T> in order to do anything beyond "hear" an event. This interface looks like this:
public interface IPingResponder<in T> where T : Ping { void RespondToPing(T ping, in PingLocality locality, ref PingResponse response); }
The first two arguments have been discussed, but the last needs explanation. As I previously mentioned, whether or not a listener will continue to receive notifications about a nearby ping is related to the response given. PingResponse is an enum with 3 values:
None: This responder needs further notifications for future pulses for this ping.
Acknowledge: The responder no longer needs to know about this ping.
SoftAcknowledge: A very specific response, I'll explain in a bit.
When the system receives a "none" response, it'll make sure to notify that responder again during the ping's next pulse. If it receives a "acknowledge" response, it'll log some information about the acknowledgement, and add that responder to the ping's list of acknowledgers to ensure that it's ignored during future pulses. A "soft acknowledge" is like a "none" response, except it is logged in the same way as an "acknowledge" response. Again, this is very specific and is only used for cases where you want to know that the ping was potentially relevant to a receiver.
As a reminder, the primary reason why listening and responding are treated as separate concerns is so classes can inherit multiple times from IPingResponder<T> with different types for T. This allows a single object to respond to multiple different types of pings without having to specify unique listener position and radius values for each response.
Wrap Up
Everything above can be summarized into this potentially overwhelming flow chart:
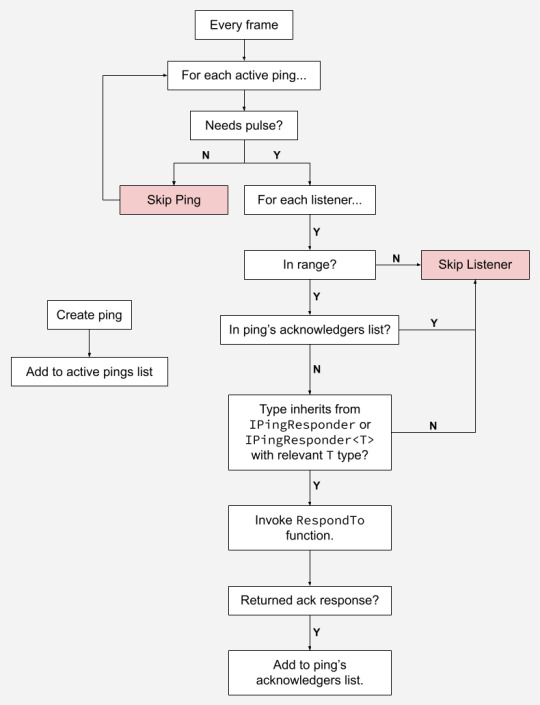
That's about it! There's some other details not really worth mentioning, such as using object pooling for Ping subclass instances, or potential future optimizations on listener discovery (i.e. using an octree). I also plan on writing a "history visualizer" to show historical ping information. This is important due to how transitory these pings can get.
I'm curious to know what people think about this sort of system. If you want to chat about it, here's where you can find me.
1 note
·
View note
Photo

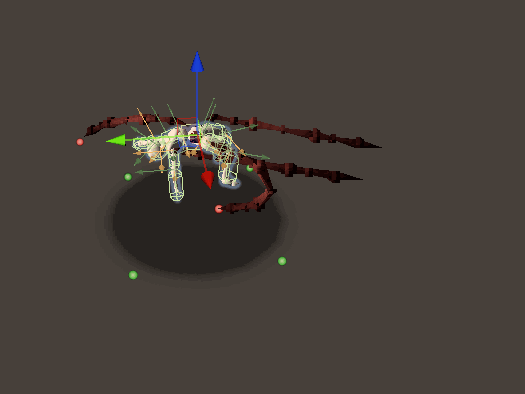
The Early Evolution of an Enemy
Idea for an enemy: a physically simulated corpse that sprouts spider-like legs. Uses procedural animation to walk along terrain.
I based my implementation off of this wonderful post on Reddit.
First prototype. Lots of issues here. Legs look bad, animation isn’t correct, ragdoll would look better upside down. Also lots of hidden bugs that won’t pop up until later.

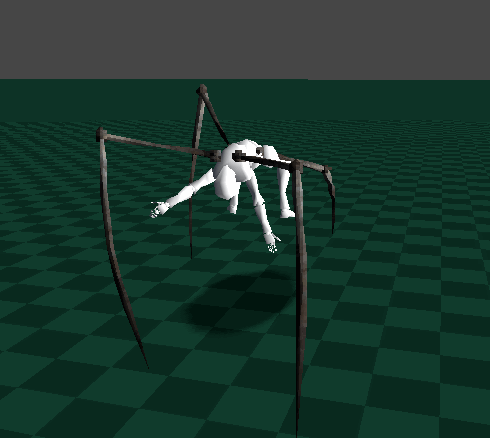
Attempt at improving animation. Still syncs up weirdly:

At this point I try to see what happens if I let the enemy steer. This is the result, which in my head was it just dancing to this classic tune from Chicago:
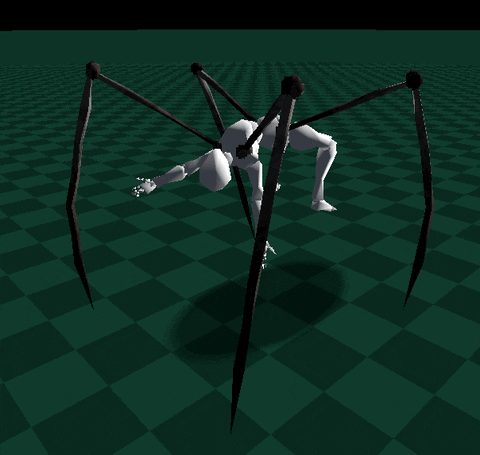
I decided to not try and fix the bug, and instead focus on getting the leg animation correct. Doing so meant I had to implement step 8 in the guide, not moving a leg if its two neighbors are also moving. That lead to this:

My partner informed me that the legs look like garbage, and she helped me design some new ones based off of spiders like the Golden Orb Silk Weaver. I also tweaked the movement such that the front legs should move further than the back legs, and do so a bit slower. I also added some (exaggerated here) bobbing during movement:
You know what would make everything creepier? Random twitching. I relocated the legs to the limbs such that the IK would kick in and compensate for the twitching:
The current version of this creepy boi. Now he stays 1.5m off of the surface below him, as well as locking the IK targets to that same surface.
1 note
·
View note
Photo

A mini guide to easy 2D tint masking in Unity!
First, make a single-channel texture to use as your mask:

Next, add it as a secondary texture in the sprite editor window:
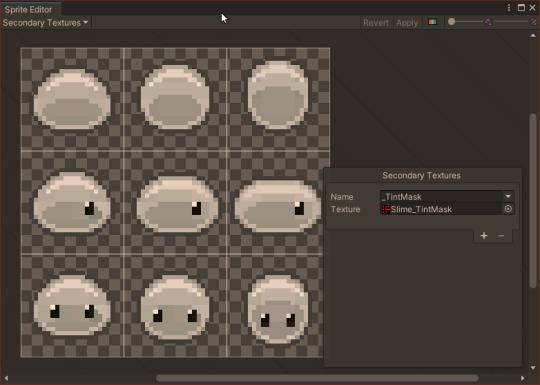
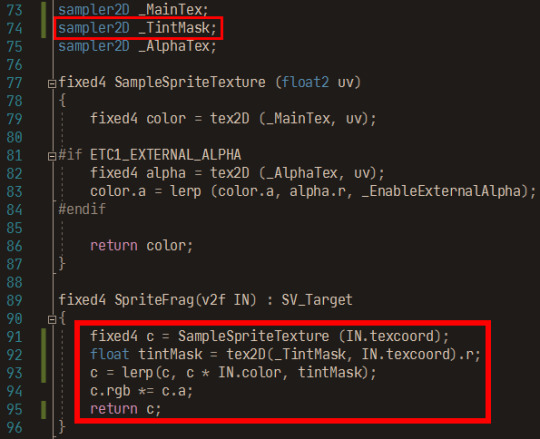
Finally, create a variant of a sprite shader and simply reference and use the mask via the name you chose in the previous step! No need to expose the tint mask as a shader property, it will be automatically set by SpriteRenderer:
Assets
https://opengameart.org/content/slime-monster-24x24
https://opengameart.org/content/tiny-16-basic
0 notes
Photo

Accidentally stumbled upon the benefits of wrapping Mathf.SmoothDamp in a struct.
https://gist.github.com/thebeardphantom/65d2d0b5dd7a969b5a3863b084a443f8
0 notes
Text
Unity 2018 and PlayerLoop
Introduction
This is a repost of a blog post I made on my old website, pretty much all of this information still applies in 2020!
Before Unity 5.X (specifically 5.0), control over the application lifecycle was basically nonexistent. For application startup/initialization code you could’ve created a script that was sorted earliest in the Script Execution Order window and used Awake, but you would’ve ran into issues. An object with that script would need to exist in any scene that required that initialization code to run, a state that is really difficult to maintain while in the editor. It’s too easy to forget that object needs to be around, and that functionality needs to be explained to other developers working on the project.
With Unity 5.0 we were provided RuntimeInitializeOnLoad, an attribute placed on a static function which is then executed automatically at runtime consistently. Its a foolproof way of ensuring that some code always executes, regardless of scene setup. In 5.2 an optional argument in form of the RuntimeInitializeLoadType enum was added, allowing developers to decide if the marked function should execute before or after the initial scene is loaded (before the Awake message is sent). With this single feature it suddenly became viable to use Unity without scenes, slightly closer to using a game framework, such as MonoGame.
However, the systems that are updated each frame (some more often) were still out of reach. These systems are otherwise known as the main/game update loop. Systems could not be disabled for performance, reordered for preference, and, most importantly, new arbitrary systems could not be added into the update loop. Of course you could always use functions like Update, FixedUpdate and LateUpdate to hook into the built in update systems, but these always occurred inbetween Unity’s internal systems, beyond user control.
With Unity 2018.1, the PlayerLoop and PlayerLoopSystem classes and the UnityEngine.Experimental.PlayerLoop namespace have been introduced, allowing users to remove and reorder engine update systems, as well as implement custom systems.
The Default PlayerLoop
The first step to understanding the PlayerLoop is to find a way of viewing what the out-of-the-box loop is actually made of. You can get the default loop thusly:
PlayerLoopSystem loop = PlayerLoop.GetDefaultPlayerLoop()
PlayerLoopSystem is a struct that is organized in a recursive, tree-like structure. From this object you can get some information about the system:
type: For default systems this is a System.Type object that acts as a representation of what update system this is. These types are only used as identifiers, and don’t actually contain anything. For example, the type of the PlayerLoopSystem responsible for updating AI is UnityEngine.Experimental.PlayerLoop.AIUpdate. We’ll use this field later to search for built-in types from the default player loop. This field is mostly useless for custom systems, except for its use as a label for the system in the Profiler.
subSystemList: As previously stated, PlayerLoopSystem is a recursive structure, so this is an array of all of the PlayerLoopSystems underneath this system. Traversing this array recursively will let us inspect the default loop.
updateFunction: For default systems this is a pointer to the native-side function that is executed for this update system. This field is unused for custom systems.
updateDelegate: This is a C# delegate that is primarily used for custom systems. However, it seems that it is possible to use this to add a callback to default systems as well. When we implement a custom system this is where all the work will happen.
loopConditionFunction: For default systems this is a pointer to a native-side function that is executed to check if this system and all of the systems below it should be executed. This field is unused for custom systems.
The system returned by GetDefaultPlayerLoop() is somewhat bogus. The only field that has a value is subSystemList. This is because this system is used as a “root node”, which every recursive structure requires. It’s fairly trivial to write a quick recursive function to pretty-print the contents of the default loop:
[RuntimeInitializeOnLoadMethod] private static void AppStart() { var def = PlayerLoop.GetDefaultPlayerLoop(); var sb = new StringBuilder(); RecursivePlayerLoopPrint(def, sb, 0); Debug.Log(sb.ToString()); } private static void RecursivePlayerLoopPrint(PlayerLoopSystem def, StringBuilder sb, int depth) { if (depth == 0) { sb.AppendLine("ROOT NODE"); } else if (def.type != null) { for (int i = 0; i < depth; i++) { sb.Append("\t"); } sb.AppendLine(def.type.Name); } if (def.subSystemList != null) { depth++; foreach (var s in def.subSystemList) { RecursivePlayerLoopPrint(s, sb, depth); } depth--; } }
Running this gives us a pretty large tree of systems:
ROOT NODE Initialization PlayerUpdateTime AsyncUploadTimeSlicedUpdate SynchronizeInputs SynchronizeState XREarlyUpdate EarlyUpdate PollPlayerConnection ProfilerStartFrame GpuTimestamp UnityConnectClientUpdate CloudWebServicesUpdate UnityWebRequestUpdate ExecuteMainThreadJobs ProcessMouseInWindow ClearIntermediateRenderers ClearLines PresentBeforeUpdate ResetFrameStatsAfterPresent UpdateAllUnityWebStreams UpdateAsyncReadbackManager UpdateTextureStreamingManager UpdatePreloading RendererNotifyInvisible PlayerCleanupCachedData UpdateMainGameViewRect UpdateCanvasRectTransform UpdateInputManager ProcessRemoteInput XRUpdate TangoUpdate ScriptRunDelayedStartupFrame UpdateKinect DeliverIosPlatformEvents DispatchEventQueueEvents DirectorSampleTime PhysicsResetInterpolatedTransformPosition NewInputBeginFrame SpriteAtlasManagerUpdate PerformanceAnalyticsUpdate FixedUpdate ClearLines NewInputEndFixedUpdate DirectorFixedSampleTime AudioFixedUpdate ScriptRunBehaviourFixedUpdate DirectorFixedUpdate LegacyFixedAnimationUpdate XRFixedUpdate PhysicsFixedUpdate Physics2DFixedUpdate DirectorFixedUpdatePostPhysics ScriptRunDelayedFixedFrameRate ScriptRunDelayedTasks NewInputBeginFixedUpdate PreUpdate PhysicsUpdate Physics2DUpdate CheckTexFieldInput IMGUISendQueuedEvents NewInputUpdate SendMouseEvents AIUpdate WindUpdate UpdateVideo Update ScriptRunBehaviourUpdate ScriptRunDelayedDynamicFrameRate DirectorUpdate PreLateUpdate AIUpdatePostScript DirectorUpdateAnimationBegin LegacyAnimationUpdate DirectorUpdateAnimationEnd DirectorDeferredEvaluate UpdateNetworkManager UpdateMasterServerInterface UNetUpdate EndGraphicsJobsLate ParticleSystemBeginUpdateAll ScriptRunBehaviourLateUpdate ConstraintManagerUpdate PostLateUpdate PlayerSendFrameStarted DirectorLateUpdate ScriptRunDelayedDynamicFrameRate PhysicsSkinnedClothBeginUpdate UpdateCanvasRectTransform PlayerUpdateCanvases UpdateAudio ParticlesLegacyUpdateAllParticleSystems ParticleSystemEndUpdateAll UpdateCustomRenderTextures UpdateAllRenderers EnlightenRuntimeUpdate UpdateAllSkinnedMeshes ProcessWebSendMessages SortingGroupsUpdate UpdateVideoTextures UpdateVideo DirectorRenderImage PlayerEmitCanvasGeometry PhysicsSkinnedClothFinishUpdate FinishFrameRendering BatchModeUpdate PlayerSendFrameComplete UpdateCaptureScreenshot PresentAfterDraw ClearImmediateRenderers PlayerSendFramePostPresent UpdateResolution InputEndFrame TriggerEndOfFrameCallbacks GUIClearEvents ShaderHandleErrors ResetInputAxis ThreadedLoadingDebug ProfilerSynchronizeStats MemoryFrameMaintenance ExecuteGameCenterCallbacks ProfilerEndFrame
A Simple Custom PlayerLoopSystem
Creating a complete replacement system is quite easy:
[RuntimeInitializeOnLoadMethod] private static void AppStart() { var systemRoot = new PlayerLoopSystem(); systemRoot.subSystemList = new PlayerLoopSystem[] { new PlayerLoopSystem() { updateDelegate = CustomUpdate, type = typeof(PlayerLoopTest) } }; PlayerLoop.SetPlayerLoop(systemRoot); } private static void CustomUpdate() { Debug.Log("Custom update running!"); }
A few things to take notice of: It seems that root system execution is completely ignored. If you specify a value for updateDelegate on the root system it will not be executed. This is why we need to define a root node and place our system underneath. Also note that this is a complete replacement. None of the default systems are running here. If you place a dynamic physics object in the scene it won’t move. The values in the Time class won’t be updated, and neither will input. Clearly, the default player loop is extremely sensitive to changes.
Borrowing Default Systems
Just for fun, why don’t we add one default system back into the mix? We can once again use recursion to find a default system by type and include it in our subsystem list:
[RuntimeInitializeOnLoadMethod] private static void AppStart() { var defaultSystems = PlayerLoop.GetDefaultPlayerLoop(); var physicsFixedUpdateSystem = FindSubSystem<FixedUpdate.PhysicsFixedUpdate>(defaultSystems); var systemRoot = new PlayerLoopSystem(); systemRoot.subSystemList = new PlayerLoopSystem[] { physicsFixedUpdateSystem, new PlayerLoopSystem() { updateDelegate = CustomUpdate, type = typeof(PlayerLoopTest) }, }; PlayerLoop.SetPlayerLoop(systemRoot); } private static void CustomUpdate() { Debug.Log("Custom update running!"); } private static PlayerLoopSystem FindSubSystem<T>(PlayerLoopSystem def) { if (def.type == typeof(T)) { return def; } if (def.subSystemList != null) { foreach (var s in def.subSystemList) { var system = FindSubSystem(s, type); if (system.type == typeof(T)) { return system; } } } return default(PlayerLoopSystem); }
There’s more efficiency to be gained here if we’re looking for multiple systems by type, but this works for now. You’ll notice that this creates incorrect behavior; physics forces are way too powerful! That’s because we’re updating physics on a framerate dependent update loop instead of on a fixed time update loop. The FixedUpdate PlayerLoopSystem handles timing and using correct delta times for all of the subsystems beneath it, which we aren’t doing here. Fixing this would be both daunting and freeing; you could implement your own timestep! We won’t be covering that here, though.
Replacing a Default System
You may have read the 10000 Update() calls article on the official Unity blog. In this article the author discusses implementing a managed-side custom update loop as a replacement for the Update call. We can do this better by actually replacing the default Update call, which was printed in our list as Update.ScriptRunBehaviourUpdate. We can modify our previous function to replace the system we found by type with our own system, maintaining the execution order. However, PlayerLoopSystem is a struct, and will be passed by value into our function. In order to modify what we pass in, we’ll use the ref keyword:
[RuntimeInitializeOnLoadMethod] private static void AppStart() { var defaultSystems = PlayerLoop.GetDefaultPlayerLoop(); var customUpdate = new PlayerLoopSystem() { updateDelegate = CustomUpdate, type = typeof(PlayerLoopTest) }; ReplaceSystem<Update.ScriptRunBehaviourUpdate>(ref defaultSystems, customUpdate); PlayerLoop.SetPlayerLoop(defaultSystems); } private static void CustomUpdate() { Debug.Log("Custom update running!"); } private static bool ReplaceSystem<T>(ref PlayerLoopSystem system, PlayerLoopSystem replacement) { if (system.type == typeof(T)) { system = replacement; return true; } if (system.subSystemList != null) { for (var i = 0; i < system.subSystemList.Length; i++) { if (ReplaceSystem(system.subSystemList[i], replacement, toReplace)) { return true; } } } return false; }
If you create a new script with an Update() call and add it to an object in your scene, you’ll notice it won’t be called anymore. Note that this example doesn’t cover the other required steps to actually replace all of the functionality of Update(), such as creating an object management system to add and remove updatable objects from a global collection and calling update functions on them. The ideal implementation would probably use an IUpdatable interface to allow nearly any object to be included in the custom update loop (and eliminate the need for “magic methods”).
…And More
There’s certainly more to be experimented with this wonderful new access to the low level systems that literally makes Unity tick. Hopefully this post gives you a good head start to shaping Unity to fit your needs. A few quick ideas as to interesting additions that you can try to add as utility API:
Inserting systems. Some modifications to the replacement example could allow you to insert a system into a subsystem array instead of replacing it.
Explore different ways of disabling systems temporarily. If your game is in a pause menu you don’t need AI updates running!
Create a visualizer. This could be in-game or in-editor. The Profiler does list every system using the PlayerLoopSystem type field as a label, but knowing in a debug build what systems are currently enabled could be very beneficial when doing heavy customization to the default PlayerLoop.
High performance update loops. This could be used for mobile games that don’t need systems like physics, AI or XR.
Let me know what you think on Twitter or Reddit about this new API, how you might use it for your games, and what else you’re looking for in the Unity application lifecycle.
3 notes
·
View notes