
theme-info
tumblr theme info
refs and resources for tumblr theme customization
108 posts
Don't wanna be here? Send us removal request.
Last Seen Blogs
hixale
Hixale Tumbles Forward
asoftgreenwitch
🍄🌿🥀🌙🔮🧿


un-supersizeme
Un-Supersize Me

notrainystory
Not Rainy Story
Text
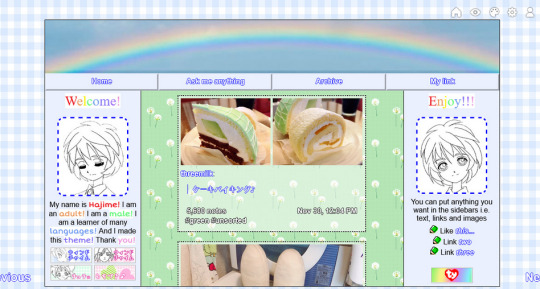

Beanie theme by Mochizuki Hajime
Previews: 1, 2, 3
Installation: Github
Notes: Preview 2 by @alpawca ♥
A theme meant to loosely resemble the old Beanie Baby website, this is a gift for @alansweep ! The theme comes built in with two sidebars, a header image and 4 links (one custom). Everything else is entirely customizable so you can put whatever you want into the sidebars including text, links, and images.
Features
7 images
39 colors
8 fonts
~31 options
3 built in links, 1 custom
Built in header image
Options
custom cursor
scrolling title
3 post sizes
redirect tag
link decorations (glow/border+etc)
cursor sparkles/hearts/stars/music notes
+etc
1K notes
·
View notes
Photo


Alternate Tumblr Controls
As some of you may have noticed, tumblr has begun rolling out new tumblr controls. They’re now huge and span the entire width of your blog.
Tumblr have been extremely careless with implementing this, since they didn’t even account for fixed headers on blog, and have just slapped this right on the top.
Anyway, this post is here as a compromise. It’s not as good as the old controls, mainly in that you need a new window to follow someone, but it’s the best we can do.
Important notes:
The follow button and share button launch popup windows, to be more convenient than opening a new tab, or going to another page in the current tab.
You will no long be able to press “edit theme” on your blog. To customise your blog go to http://tumblr.com/customize/YOURURL
You will no longer be able to delete posts from permalink pages. Instead, use the mass post editor: http://tumblr.com/mega-editor/YOURURL
You will no longer be able to edit posts from the permalink pages. Instead, you will need to go to http://tumblr.com/edit/POSTID The post ID can be identified through the permalink page url. Below is an example with the post ID highlighted in yellow.

How to install:
Simply paste this code below </body>
Finally:
Credit is not required, but if someone asks, please direct them here or to this post.
In saying that, theme makers if you use I expect some form of acknowledgement.
If you found this helpful please like and reblog.
The icons are by Anton Saputro and can be found here.
I will help with minor customisation at my discretion.
It should also be noted that I cannot predict all the code in every theme, so this may not always look as expected. In this case you can ask for customisation help.
If you prefer white tumblr controls / icons add above </style>
#tumblr-controls{-webkit-filter:invert(100%);filter:invert(100%);}
2K notes
·
View notes
Text
Smoothscroll
so someone asked me for this tutorial long back.
scrolling your blog on some browsers can be jerky (mostly chrome on win), so I found a fix.
• here’s the script & mirror 👉 add it above your </head>

and scrolling on your blog will be smooth as butter on all browsers!
- mouse wheel, middle mouse and keyboard support
- also works with embedded content
- full touchpad support
• theme makers can add this to their themes & please reblog this if it helped you. 👍
1K notes
·
View notes
Text
How to stylize the audio player
Ever wonder how theme-makers get the audio player to display just a button? And even, sometimes, a ROUNDED button?
Magically from…

To this…

Well, the concept is easy. The coding… not hard at all!
The Concept
All that is needed is to change the size of the div layer that wraps the audio player to a square, hide the overflow and have the same div layer background as your audio player. Then, you have a couple of options…
A. Circle player
Method: use rounded corners to make it into a circle.

B. Player in center of album art
Method: Absolute position the audio player div layer, set the margin top and left to position it in the center of the album.

The HTML
We are just working with the audio post variables (I am not including caption variables), so your basic codes will look something similar to the follow:
{block:Audio}
{AudioPlayerWhite}
{block:AlbumArt}<img src="{AlbumArtURL}" width="100">{/block:AlbumArt}
{/block:Audio}
Now, you need to wrap the audio player in a div layer so you can stylize it. You can use class or id, it doesn’t matter.
{block:Audio}
<div id= "audioplayer">{AudioPlayerWhite}</div>
{block:AlbumArt}
<img src="{AlbumArtURL}" width="100">
{/block:AlbumArt}
{/block:Audio}
The CSS
First, let’s make a plain square player since the CSS stylization you include for this carries throughout other looks. From this point on, you start experimenting with the CSS on how big you want the button to be, and accordingly, you adjust the height and width of the div layer, #audioplayer. There are 3 things you need to include for the div layer…
Background (matches the audio player, #000000 for black player, #E5E5E5 for the grey player and #FFFFFF for the white player)
Width
Height
Overflow:hidden;
Depending how big you want your player, you may need to add some padding so that the play button is centered in the div layer.
Here’s an example coding of just a small square player…
#player {
width:30px;
height:30px;
overflow:hidden;
}
Ok, now moving onto the circle player, all you’re adding extra to what we have so far is adding large rounded corners in the CSS so that it becomes a circle:
-moz-border-radius: 30px;
-webkit-border-radius: 30px;
border-radius: 30px;
Generally, to make it a circle, you need to adjust the radius values (in this example, 30px) to the same value as your height/width.
Ok, now what if we want it centered in an album art? Simply, position it so that it is absolute (in relative to the post) and then adjust top and left margins so that it becomes centered on your album art, like so:
#player {
width:30px;
height:30px;
overflow:hidden;
position:absolute;
margin-top:45px;
margin-bottom:45px;
}
You DO NOT need to add left and top position properties because those are in relation to the window (not post).
Now, you can customize the player however you want. A popular stylization is to make the player semi-transparent.

In that case, just add in opacity values so that the div layer isn’t 100% opaque. Like so:
opacity: 0.7;
filter:alpha(opacity=70);
-moz-opacity: 0.7;
-khtml-opacity: 0.7;
Now, in relation to the captions and playcount etc, whenever you add album art, that content is pushed down under the image. So that case, you want to stylize the album art so that it floats to the left, meaning, the content wraps around the image, and some margins so there’s some breathing space between the album art and text. My codes generally look something like this:
{block:Audio}
<div id="audioplayer">{AudioPlayerWhite} </div>
<div id="albumart">{block:AlbumArt}<img src="{AlbumArtURL}" width="100">{/block:AlbumArt}</div>
{PlayCountWithLabel}
{block:caption}<div class="caption">{caption}</div>{/block:caption}
{/block:Audio}
And then in my CSS, I’d add:
#albumart { float:left; margin:0px 7px;}
And that’s all there is to it! Happy coding ;)
2K notes
·
View notes
Photo
Alternate Tumblr Controls
As some of you may have noticed, tumblr has begun rolling out new tumblr controls. They’re now huge and span the entire width of your blog.
Tumblr have been extremely careless with implementing this, since they didn’t even account for fixed headers on blog, and have just slapped this right on the top.
Anyway, this post is here as a compromise. It’s not as good as the old controls, mainly in that you need a new window to follow someone, but it’s the best we can do.
Important notes:
The follow button and share button launch popup windows, to be more convenient than opening a new tab, or going to another page in the current tab.
You will no long be able to press “edit theme” on your blog. To customise your blog go to http://tumblr.com/customize/YOURURL
You will no longer be able to delete posts from permalink pages. Instead, use the mass post editor: http://tumblr.com/mega-editor/YOURURL
You will no longer be able to edit posts from the permalink pages. Instead, you will need to go to http://tumblr.com/edit/POSTID The post ID can be identified through the permalink page url. Below is an example with the post ID highlighted in yellow.
How to install:
Simply paste this code below </body>
Finally:
Credit is not required, but if someone asks, please direct them here or to this post.
In saying that, theme makers if you use I expect some form of acknowledgement.
If you found this helpful please like and reblog.
The icons are by Anton Saputro and can be found here.
I will help with minor customisation at my discretion.
It should also be noted that I cannot predict all the code in every theme, so this may not always look as expected. In this case you can ask for customisation help.
If you prefer white tumblr controls / icons add above </style>
#tumblr-controls{-webkit-filter:invert(100%);filter:invert(100%);}
2K notes
·
View notes
Photo

Tutorial: Pinned Post + “pin” icon
Difficulty: 2.18 / 5
Keep reading
2K notes
·
View notes
Text
Tutorial: Hover Captions
This is a tutorial for creating captions that appear on top of the images on hover and scroll if they are too long, as in my shadow theme.
Keep reading
270 notes
·
View notes
Note
hi do u think u can do a short tutorial on how to do the captions without using the unnest script using the undocs by bychloethemes? im lost on what to add and where the variables go. thanks!
hello! sure! i completely agree, they can be confusing.
here’s a basic rundown of what each line in the Captions section of the undocs does in slightly different wording:
{block:Reblogs}{/block:Reblogs} — displays whatever is between them for each reblog comment - this is the outer most set of blocks, just as {block:Post}{/block:Post} goes around the post codes{block:IsOriginalEntry}{/block:IsOriginalEntry} — displays whatever is between them for each original comment (as in, the comment was the original caption of the post){block:IsNotOriginalEntry}{/block:IsNotOriginalEntry} — displays whatever is between them for each additional comment (as in, the common was not the original caption of the post, but added on by a user who reblogged the post){block:IsActive}{/block:IsActive} — displays whatever is between them if the commenter is an active blog{block:IsDeactivated}{/block:IsDeactivated} — displays whatever is between them if the commenter has deactivated/deleted{PortraitURL-64} — the url of the commenter’s avatar{Username} — the commenter’s username{block:HasPermalink}{/block:HasPermalink} — displays whatever is between them if the comment has a permalink (as in, the reblog that added the comment has not been deleted){block:HasNoPermalink}{/block:HasNoPermalink} — displays whatever is between them if the comment doesn’t have a permalink (as in, the reblog that added the comment has been deleted){Permalink} — the permalink of the comment (as in, the url of the reblog that added the comment){Body} — the comment{block:HasAvatar}{/block:HasAvatar} — i’ve never used this before but i’m assuming this displays whatever is between them if the commenter has an avatar
you should wrap your {block:Reblogs}{/block:Reblogs} in {block:RebloggedFrom}{/block:RebloggedFrom} and include html in {block:NotReblog}{/block:NotReblog} as {block:Reblogs}{/block:Reblogs} only works for reblogged posts
here is a very basic version of unnested captions with the tumblr blocks:
{block:Caption}
{block:NotReblog}{Caption}{/block:NotReblog} {block:RebloggedFrom}{block:Reblogs}
{block:HasPermalink}{/block:HasPermalink}{Username}{block:HasPermalink}{/block:HasPermalink}
{Body}
{/block:Reblogs}{/block:RebloggedFrom}
{/block:Caption}
which produces this html structure for reblogged posts with captions:
username
comment text
you can do something similar for text posts, link post descriptions, and ask post replies!
i hope this helps! if not, ask again! i can also provide a very simple base code for the unnested captions using tumblr blocks if you’d like.
a tiny note: sometimes the blocks look funky in the tumblr editor’s preview, so be sure to have open the blog you’re making the theme on in a new tab to see how it actually looks
153 notes
·
View notes
Text
How To: Add notes to your Tumblr theme (tutorial)
This post will briefly explain how to display notes and a note count to a custom HTML Tumblr theme. You should be able to do this even with a very basic understanding of coding.
Notes are Likes, Reblogs and Replies from Tumblr users. They may be visible by default in some themes, but in others (like mine) they aren’t built in and must be added manually. I coded the notes into my theme last night, and got stuck at various points. I couldn’t find a proper tutorial to help me, but hopefully this how-to guide will help you with problems you might have along the way.
EDIT: This post accounts for half of the site’s visits. If you’re interested in similar things, check out the post on adding a scroll-to-top button. Otherwise, why not check out some of the other things I’ve posted, and see if anything else interests you?
EDIT2: I’m no longer updating this blog. If you work out how to make this work, please share your tips in the comments below, or help out other people who are stuck.
—
The basics:
Adding a #notes to the end of a post
This will add a counter of how many notes the post has, and will be visible on the main page and on the post itself.
(Code found here: http://www.tumblr.com/docs/en/custom_themes#notes)
Go to Customise
Open the “Theme” and make sure that custom HTML is enabled.
Find "{/block:Posts}“
Paste ”{block:NoteCount}“ just before ”{/block:Posts}“.
Paste ”{NoteCount}“ or ”{NoteCountWithLabel}“, depending on whether you want it to display "2” or “2 notes”.
Close the NoteCount block by pasting “{/block:NoteCount}” immediately after "{NoteCount}“
If you want it to link directly to the notes on a post, add ”<a href="{Permalink}#notes">“ before ”{NoteCount}“ and ”</a>“ afterwards.
You need to put ”{PostNotes}“ just before ”{/block:Posts}“.
In my theme, I integrated it with my Disqus comments, so it will display something like "1 note, 1 Comment and 0 Reactions”.
The code for that:
{block:NoteCount}<a href="{Permalink}#notes">{NoteCountWithLabel}</a>, {/block:NoteCount}<a class="dsq-comment-count" href="{Permalink}#disqus_thread">Comments</a></div>
Or, without Disqus comments included:
{block:NoteCount}<a href=“{Permalink}#notes”>{NoteCountWithLabel}</a>{/block:NoteCount}
–
Showing the notes after each post
This will be visible only on the post (permalink page) itself. If the post has 0 notes, it will not be shown.
Figure out where you want the notes to be placed. If you are using Disqus comments, you might prefer your notes to be before their massive comment box. You might prefer after all the Disqus code, as I did (my posts appear as: Post->Disqus Comment Box->Disqus comments->Notes).
Once you’ve decided where they should appear (for the sake of example, I’ll be talking about putting them after the Disqus comments. ), I recommend creating a division. This allows custom formatting in that specific area.
Find the end of the Disqus comments (…</script> is the end of mine). Paste <div class="notes"></div>.
Between the two tag (ie, between ’>’ and ’<’), paste “{block:PostNotes}”, followed by “{PostNotes}” and closed off with “{/block:PostNotes}”.
Around "{PostNotes}“, create a link with the code ”<a name="notes">“ before and ”</a>“ afterwards. This allows jump-to links to work (so that the ”<a href=“{Permalink}#notes”>“ from earlier will take you to the notes section of the page).
Overall, it should look like this:
<div class="notes”>{block:PostNotes}<a name=“notes”>{PostNotes}</a>{/block:PostNotes}</div>
Note: You can copy-paste that to pretty much wherever you want the notes to display on the post’s permalink page.
–
The interesting bits:
Modifying the style
Setting the appearance of notes is obviously an important part of your blog’s theme.
Go to the CSS in your theme. Basically, find “</style>”. If there is also a “{CustomCSS}” tag, place the code before that.
I can’t possible go through all permutations of changing their style, so I’ll give you an idea of what (I think) each bit of code does.
You can copy-paste the following and have the style as I’ve modified for myself (ie, as it appears on KiteZA), or you can play around and edit the variables until you’re happy with what you’ve got. My comments appear afterwards, in italics.
Code:
ol.notes{padding:0px;margin 0px 0px;list-style-type:none;border-bottom:solid 1px #ccc;font-size:11 px;}
ol.notes li.note{border-top:1px dotted #cccccc;padding:0px;font-size:11px;}
ol.notes li.note img{padding:0 px !important;}
ol.notes li.note img.avatar{vertical-align:-15px;margin-right:5px;width:16px;height:16px;}
ol.notes li.note a img.avatar{padding:0px;border-width:0 px;border:none;}
ol.notes li.note img{padding:0 px;border-width:0 px;border:none;}
ol.notes li.note span.action{font-weight:bold;}
ol.notes li.note.answer_content{font-weight:normal;}
ol.notes li.note.blockquote{padding:1 px 1 px;margin:1px 0px 0px 1px;}
ol.notes li.note.blockquote a{text-decoration:none;}
Comments:
If you want to change the style to better suit your theme, the following is an explanation of what each piece does and how you can change it.
ol.notes:
Basic style of the notes. Basic font size that I replicated all over the place because it seemed to display improperly a lot.
ol.notes li.note:
I think this is the formatting for each individual note (as opposed to the entire block of notes). Again, play around with it and see what happens. Basic CSS styling
ol.notes li.note img:
This was one of the most frustrating things to fix. Without it, all of the avatars had an unsightly grey block around them inherited from the regular pictures on the blog. As it turns out, the !important is VERY important to solve that.
ol.notes li.note img.avatar:
NB - If something goes wrong, it’s highly likely to be the vertical-align. My blog required significant realignment, most of the values I’ve seen for this are about -4 or so. EDIT THE VERTICAL-ALIGN VALUE if the avatars look strange/out of place
ol.notes li.note a img.avatar:
Honestly, I don’t know how this differs from the img.avatar above, but I’m guessing it has something to do with links
ol.notes li.note img:
I think this is unnecessary, and I just added it to try get rid of the grey blocks around the avatars
ol.notes li.note span.action:
This applies after the name, so if the note is “KiteZA liked this”, the formatting here will apply to the words “liked this”
ol.notes li.note.answer_content:
This applies to the actual reply given. If the note is “KiteZA said: ‘formatting!’” then this would apply to “formatting!”. Useful for distinguishing from the action (replying) from what they said if they replied.
ol.notes li.note.blockquote:
As far as I know, this applies to any text added in a reblog. If the note is “KiteZA reblogged and added: 'oh good, a tutorial!’” then this would apply to “'oh good, a tutorial!’”. Useful for distinguishing from the action (reblogging) from what they added on their blog.
ol.notes li.note.blockquote:
As above. To do with links shown in a reblog’s added text.
–
Adding the awesome icons found on the dashboard
Personally, I liked the icons (answer/replies), (heart/love) and (reblog). I wanted to use them for notes found on my posts, not just have them visible on the dashboard.
If you like them too, then add the following to your code just after any of the “ol.notes” found above:
ol.notes li.note.reblog{text-decoration:none;background:url (http://static.tumblr.com/thpaaos/Pi9koovm1/notes_reblog.png) top right no-repeat !important;}
ol.notes li.note.like{background:url (http://static.tumblr.com/thpaaos/xXlkoomos/notes_like.png) top right no-repeat !important;}
ol.notes li.note.reply{background:url (http://static.tumblr.com/sg847ig/EWWl9uqqw/notes_reply.png) top right no-repeat !important;}
When adding these on my blog, the reply icon was the most difficult to implement properly. To cut a long story short, copy-paste the code above. If you’re getting strange results, try using:
ol.notes li.note.reblog{text-decoration:none;background:url (http://assets.tumblr.com/images/note_reblog.png) center right no-repeat !important;}
ol.notes li.note.like{background:url (http://assets.tumblr.com/images/note_like.png) center right no-repeat !important;}
ol.notes li.note.reply{background:url (http://assets.tumblr.com/images/note_reply.png) center right no-repeat !important;}
(The top version uses a larger version, where ¾ of the image is invisible and the actual icon is in the bottom left corner. The bottom version uses just the icon itself, which might work better on some themes.)
–
Conclusion:
This code above should successfully enable notes on a custom-HTML Tumblr blog.
Whether on your main page, like http://kiteza.tumblr.com/, or on each individual post, it should appear under the posts like this:
3 notes,
And at the end of the individual post, you can see what the notes actually are:

kiteza liked this
kiteza said: …
kiteza posted this
Hope this tutorial helps!
–
Note: I cobbled together the notes on my page by seeing what other people had done, viewing the source of their Tumblr pages and teaching myself bits of HTML and CSS
Don’t understand something I’ve written? Want a step-by-step guide through the process? Want me to do it for you? Contact me over on the right, comment on this post, or reply to it. As I’m no longer updating this blog, please post in the comments below asking for help from the community. This post has had over 11,000 views - I’m sure somebody has encountered the same problem as you, and can help out. If you figured out something that wasn’t in the tutorial, please help out others by posting tips below!
234 notes
·
View notes
Text
CHANGE THE FOLLOW & DASHBOARD BUTTONS

So some of you have been wondering how did I changed the tumblr buttons of this blog. I decided to put up a tutorial on this, a detailed tutorial. So sorry if this post is too long.
It’s really easy because all you have to do is to make a new follow and dash buttons then copy and paste some codes.
I first saw a tutorial about this in this blog. I just used the image she provided, but for the codes, I didn’t use hers cause her codes are kind of incomplete.
First thing is save this image as your basis for the new follow and dashboard buttons.

Just make the new tumblr buttons on top of the image base given above. Just like what ishvi did here:

If you do not have Photoshop, you can go to this site: pixlr.com
It’s an online editing software pretty much just like the Photoshop though the features are very limited, mostly just the basics.
So once you are done with your image, save it as .PNG file. Save it separately. So you must have two images. One for the follow, then one for the dashboard.
I don’t want anyone to mess this up so I’m posting how I did it.

Repeat the same as you save the dashboard button.
CODES:
» CSS
Paste these codes under your <style type=”text/css”>
#hnefd{position:fixed; float:right; top:3px; right:0px; width:150px;}
{block:IndexPage} iframe#tumblr_controls { opacity: 0; filter: alpha(opacity=0); display:none; } {/block:IndexPage}
{block:PermalinkPage} iframe#tumblr_controls { opacity: 1; filter: alpha(opacity=100); } {/block:PermalinkPage}
The #hnefd is for the style and positioning of the buttons. There are also two iframe codes.
The one that has {block:IndexPage} is the code to make the original follow and dashboard buttons invisible on your main page. So that when you put your new buttons, it won’t overlap.
While the one with the {block:PermalinkPage} is the code to make the original buttons (the like, reblog etc..) back to its place when you go to the permalink page.
» HTML
{block:IndexPage}
<div id=”hnefd”>
<a href=”http://www.tumblr.com/follow/YOUR_TUMBLR_NAME_HERE”><img src=”IMAGE_URL_HERE”></a>
<a href=”http://www.tumblr.com/dashboard”><img src=”IMAGE_URL_HERE”></a>
</div>
{/block:IndexPage}
Copy and paste the codes above between <body> and </body> tags.
192 notes
·
View notes
Text
Fix & Move the Follow Button
1. Copy the code below.
iframe#tumblr_controls { top: 0% !important; right:0% !important; position: fixed !important;}
2. Go to Customize >> Advance and paste the code, then save and look at your page.

3. If the code still not working, go to theme docs and paste the code under <script type="text/javascript"> tags or before </style> tags
4. If you want move the button just change and adjust a number (0%).
128 notes
·
View notes
Text
Follow/Dashboard/etc Buttons
Place the code between <style type=“text/css”> and </style>
Fixed:
#tumblr_controls {position: fixed !important;
White Buttons:
#tumblr_controls {-webkit-filter: invert(100%);}
Fade in and out:
#tumblr_controls {opacity: 0.5; -webkit-transition: opacity 0.7s linear; -webkit-transition: all 0.3s ease-out; -moz-transition: all 0.3s ease-out; transition: all 0.3s ease-out;}
#tumblr_controls:hover {opacity: 1; -webkit-transition: opacity 0.7s linear; -webkit-transition: all 0.5s ease-out; -moz-transition: all 0.5s ease-out; transition: all 0.5s ease-out;}
Placement: (Change the amount of pixels to your desire)
#tumblr_controls {top: 5px; right: 5px !important; }
141 notes
·
View notes
Text
How To: Add notes to your Tumblr theme (tutorial)
This post will briefly explain how to display notes and a note count to a custom HTML Tumblr theme. You should be able to do this even with a very basic understanding of coding.
Notes are Likes, Reblogs and Replies from Tumblr users. They may be visible by default in some themes, but in others (like mine) they aren’t built in and must be added manually. I coded the notes into my theme last night, and got stuck at various points. I couldn’t find a proper tutorial to help me, but hopefully this how-to guide will help you with problems you might have along the way.
EDIT: This post accounts for half of the site’s visits. If you’re interested in similar things, check out the post on adding a scroll-to-top button. Otherwise, why not check out some of the other things I’ve posted, and see if anything else interests you?
EDIT2: I’m no longer updating this blog. If you work out how to make this work, please share your tips in the comments below, or help out other people who are stuck.
—
The basics:
Adding a #notes to the end of a post
This will add a counter of how many notes the post has, and will be visible on the main page and on the post itself.
(Code found here: http://www.tumblr.com/docs/en/custom_themes#notes)
Go to Customise
Open the “Theme” and make sure that custom HTML is enabled.
Find "{/block:Posts}“
Paste ”{block:NoteCount}“ just before ”{/block:Posts}“.
Paste ”{NoteCount}“ or ”{NoteCountWithLabel}“, depending on whether you want it to display "2” or “2 notes”.
Close the NoteCount block by pasting “{/block:NoteCount}” immediately after "{NoteCount}“
If you want it to link directly to the notes on a post, add ”<a href="{Permalink}#notes">“ before ”{NoteCount}“ and ”</a>“ afterwards.
You need to put ”{PostNotes}“ just before ”{/block:Posts}“.
In my theme, I integrated it with my Disqus comments, so it will display something like "1 note, 1 Comment and 0 Reactions”.
The code for that:
{block:NoteCount}<a href="{Permalink}#notes">{NoteCountWithLabel}</a>, {/block:NoteCount}<a class="dsq-comment-count" href="{Permalink}#disqus_thread">Comments</a></div>
Or, without Disqus comments included:
{block:NoteCount}<a href=“{Permalink}#notes”>{NoteCountWithLabel}</a>{/block:NoteCount}
–
Showing the notes after each post
This will be visible only on the post (permalink page) itself. If the post has 0 notes, it will not be shown.
Figure out where you want the notes to be placed. If you are using Disqus comments, you might prefer your notes to be before their massive comment box. You might prefer after all the Disqus code, as I did (my posts appear as: Post->Disqus Comment Box->Disqus comments->Notes).
Once you’ve decided where they should appear (for the sake of example, I’ll be talking about putting them after the Disqus comments. ), I recommend creating a division. This allows custom formatting in that specific area.
Find the end of the Disqus comments (…</script> is the end of mine). Paste <div class="notes"></div>.
Between the two tag (ie, between ’>’ and ’<’), paste “{block:PostNotes}”, followed by “{PostNotes}” and closed off with “{/block:PostNotes}”.
Around "{PostNotes}“, create a link with the code ”<a name="notes">“ before and ”</a>“ afterwards. This allows jump-to links to work (so that the ”<a href=“{Permalink}#notes”>“ from earlier will take you to the notes section of the page).
Overall, it should look like this:
<div class="notes”>{block:PostNotes}<a name=“notes”>{PostNotes}</a>{/block:PostNotes}</div>
Note: You can copy-paste that to pretty much wherever you want the notes to display on the post’s permalink page.
–
The interesting bits:
Modifying the style
Setting the appearance of notes is obviously an important part of your blog’s theme.
Go to the CSS in your theme. Basically, find “</style>”. If there is also a “{CustomCSS}” tag, place the code before that.
I can’t possible go through all permutations of changing their style, so I’ll give you an idea of what (I think) each bit of code does.
You can copy-paste the following and have the style as I’ve modified for myself (ie, as it appears on KiteZA), or you can play around and edit the variables until you’re happy with what you’ve got. My comments appear afterwards, in italics.
Code:
ol.notes{padding:0px;margin 0px 0px;list-style-type:none;border-bottom:solid 1px #ccc;font-size:11 px;}
ol.notes li.note{border-top:1px dotted #cccccc;padding:0px;font-size:11px;}
ol.notes li.note img{padding:0 px !important;}
ol.notes li.note img.avatar{vertical-align:-15px;margin-right:5px;width:16px;height:16px;}
ol.notes li.note a img.avatar{padding:0px;border-width:0 px;border:none;}
ol.notes li.note img{padding:0 px;border-width:0 px;border:none;}
ol.notes li.note span.action{font-weight:bold;}
ol.notes li.note.answer_content{font-weight:normal;}
ol.notes li.note.blockquote{padding:1 px 1 px;margin:1px 0px 0px 1px;}
ol.notes li.note.blockquote a{text-decoration:none;}
Comments:
If you want to change the style to better suit your theme, the following is an explanation of what each piece does and how you can change it.
ol.notes:
Basic style of the notes. Basic font size that I replicated all over the place because it seemed to display improperly a lot.
ol.notes li.note:
I think this is the formatting for each individual note (as opposed to the entire block of notes). Again, play around with it and see what happens. Basic CSS styling
ol.notes li.note img:
This was one of the most frustrating things to fix. Without it, all of the avatars had an unsightly grey block around them inherited from the regular pictures on the blog. As it turns out, the !important is VERY important to solve that.
ol.notes li.note img.avatar:
NB - If something goes wrong, it’s highly likely to be the vertical-align. My blog required significant realignment, most of the values I’ve seen for this are about -4 or so. EDIT THE VERTICAL-ALIGN VALUE if the avatars look strange/out of place
ol.notes li.note a img.avatar:
Honestly, I don’t know how this differs from the img.avatar above, but I’m guessing it has something to do with links
ol.notes li.note img:
I think this is unnecessary, and I just added it to try get rid of the grey blocks around the avatars
ol.notes li.note span.action:
This applies after the name, so if the note is “KiteZA liked this”, the formatting here will apply to the words “liked this”
ol.notes li.note.answer_content:
This applies to the actual reply given. If the note is “KiteZA said: ‘formatting!’” then this would apply to “formatting!”. Useful for distinguishing from the action (replying) from what they said if they replied.
ol.notes li.note.blockquote:
As far as I know, this applies to any text added in a reblog. If the note is “KiteZA reblogged and added: 'oh good, a tutorial!’” then this would apply to “'oh good, a tutorial!’”. Useful for distinguishing from the action (reblogging) from what they added on their blog.
ol.notes li.note.blockquote:
As above. To do with links shown in a reblog’s added text.
–
Adding the awesome icons found on the dashboard
Personally, I liked the icons (answer/replies), (heart/love) and (reblog). I wanted to use them for notes found on my posts, not just have them visible on the dashboard.
If you like them too, then add the following to your code just after any of the “ol.notes” found above:
ol.notes li.note.reblog{text-decoration:none;background:url (http://static.tumblr.com/thpaaos/Pi9koovm1/notes_reblog.png) top right no-repeat !important;}
ol.notes li.note.like{background:url (http://static.tumblr.com/thpaaos/xXlkoomos/notes_like.png) top right no-repeat !important;}
ol.notes li.note.reply{background:url (http://static.tumblr.com/sg847ig/EWWl9uqqw/notes_reply.png) top right no-repeat !important;}
When adding these on my blog, the reply icon was the most difficult to implement properly. To cut a long story short, copy-paste the code above. If you’re getting strange results, try using:
ol.notes li.note.reblog{text-decoration:none;background:url (http://assets.tumblr.com/images/note_reblog.png) center right no-repeat !important;}
ol.notes li.note.like{background:url (http://assets.tumblr.com/images/note_like.png) center right no-repeat !important;}
ol.notes li.note.reply{background:url (http://assets.tumblr.com/images/note_reply.png) center right no-repeat !important;}
(The top version uses a larger version, where ¾ of the image is invisible and the actual icon is in the bottom left corner. The bottom version uses just the icon itself, which might work better on some themes.)
–
Conclusion:
This code above should successfully enable notes on a custom-HTML Tumblr blog.
Whether on your main page, like http://kiteza.tumblr.com/, or on each individual post, it should appear under the posts like this:
3 notes,
And at the end of the individual post, you can see what the notes actually are:
kiteza liked this
kiteza said: …
kiteza posted this
Hope this tutorial helps!
–
Note: I cobbled together the notes on my page by seeing what other people had done, viewing the source of their Tumblr pages and teaching myself bits of HTML and CSS
Don’t understand something I’ve written? Want a step-by-step guide through the process? Want me to do it for you? Contact me over on the right, comment on this post, or reply to it. As I’m no longer updating this blog, please post in the comments below asking for help from the community. This post has had over 11,000 views - I’m sure somebody has encountered the same problem as you, and can help out. If you figured out something that wasn’t in the tutorial, please help out others by posting tips below!
234 notes
·
View notes
Text
New Mature Content Warning Overlay (And How to Get Rid of It)
More fun community label "features"! Unlike the new mandatory label for #NSFW, this one is a bigger deal to me because it affects my entire blog and it can't be avoided by just using a different tag.
Apparently on custom blog layouts, if you happen to post or reblog even a SINGLE post that's been flagged with the mature content community label, a full-page warning overlay will appear blurring out your entire blog that must be manually clicked through every single time the page is refreshed. At first I thought this was just a bug due to my older layout but I've come to realize it's not. It's a feature (as confirmed by this recent changes post) that affects all custom themes. The formatting will vary based on your own theme but here's what it looks like on my blog:

I don't know about you but I find this is stupid and annoying. If it could be dismissed once and never seen again that might be one thing, but that's not the case. The vast majority of my blog is not "mature" enough to warrant such an aggressive and invasive warning. I also think pop-ups are obnoxious in general and I'll be damned if tumblr's going to force me to have one on MY blog.
After some desperate googling for a known workaround and being unable to find even a single mention of it, I decided to take on the challenge myself. I'm not a theme coder, so apologies if there's a better way to do this, but luckily it only took me like 10 minutes to figure out a simple fix, which I'm now sharing with anyone else who may want it:
.community-label-cover__wrapper {display: none}
Just copypaste that somewhere in your CSS and goodbye pop-up!
If you're not sure how to access your theme code, check out this help article. You can also add the code via the Advanced Options menu, which is actually even better (if you can get it to work, it depends on how your theme was coded), because it will then automatically be reapplied to a lot of themes without having to remember to manually add it every time if you change your theme in the future.
Obviously this will only remove it from your own blog for anyone who may visit it. If you never want to see this warning again on other people's blogs you can also add this custom filter to your ad block:
tumblr.com##.community-label-cover__wrapper
Unfortunately I do not have an easy tutorial on hand for this one as the method will depend on your specific ad block app or extension.
Some additional notes:
After adding the theme code and saving the changes, give it a minute to update as it sometimes takes a little while for the page to refresh.
The warning overlay only seems to appear if a "mature" post is on the FIRST page of your blog, which is still annoying and makes the whole thing even more pointless and stupid because what if someone visits any other page of your blog, and oh no, happens to see "mature" content they weren't warned about?!
The warning also appears on direct links to "mature" posts.
This hack has NOTHING to do with entire blogs that have been flagged as NSFW. It only works for non-flagged blogs with custom themes that happen to have individual "mature" posts.
17K notes
·
View notes
Text
how to use style my tooltips on your themes! (for theme makers)
Keep reading
22 notes
·
View notes
Note
Hello, I was wondering if you could a tutorial on how to make the ask as bubbles as yours and tumblr's :) thank you
Hi! I was a bit vague in this reply, right? sorry. I’ll try to make a simple tutorial.
Tutorial: Asks as bubble chat with arrows
First of all, search in your theme for {block:Answer} and delete everything to {/block:Answer} including this line. Paste this code instead:
{block:Answer}
{Asker}: {Question}
{Replies}
{/block:Answer}
Now, Let’s add the css before (if you had any question css, delete it, because if the divs name are the same it can cause some trouble):
/* question start by todorokiscute */.question{width:100%;position:relative;display:flex;}.ask{width:calc(100% - 70px); /* distance between the icon and the question*/background:;/* bubble/ask color*/padding:20px;position:relative;border-radius:3px; /* rounded bubbles*/}.ask::after{content:' ';display:block;border:13px solid transparent;border-left-color:; /* arrow color */position:absolute;right:-26px;top:12px;}.asker-avatar{width:50px; /* avatar width */height:50px; /* avatar height */object-fit:cover;position:absolute;right:0;border-radius:100%; /* rounded corners */}.asker b,.asker b a{color:black;/* color of the asker’s name*/font-family:''; /* font if you want to change*/} .replies{margin:1em auto; /* make the reply block a bit distant*/}/* question end */
You can edit as much as you want to. I advice to not edit or delete the lines in bold, though. They’re very important to make the whole bubble responsive or to work altogether with the arrow. Also do not remove the credits, since I came up with this alone :)
I hope this is easy to understand though. Any doubts don’t hesitate to send me asks.
17 notes
·
View notes
Photo

THEME BASE 01
live preview
code: pastebin | freetexthost
please like and/or reblog!
80 notes
·
View notes