
theodorobrejafmp
Creative Project Development
103 posts
Don't wanna be here? Send us removal request.
Last Seen Blogs


Text
Achieving Project Criteria & Future Plans
While working on this project, I kept coming back to the learning outcomes of the assignment, as well as my pre-production planning folder, to check if I am on track with everything I planned to do, and to make sure I achieve the required criteria.

Fig.1: Pre-Production Document and Criteria
Throughout this project, I have learned multiple new techniques and workflows that got me closer to achieving industry level characters. Among the technical research I have done for the project, I have also done multiple forefront research blog posts in which I studied the workflow of different studios, giving me insight on how to achieve that level, how to make my project more appealing for the viewer/player, and how to adjust my design choices to achieve the best results.
In addition, working on this project helped me improve my management and organizational skills, having to constantly update my Gantt chart and understand how much time each task would take. This helped me achieve all my objectives from the planning folder, in the short amount of time we had. Besides the management of the project, I also achieved a detailed documentation of my process on my Tumblr page. I managed to write about useful forefront research, document my full project development showcasing my external sources, and wrote posts reflecting on my creative decisions and management.
Moreover, I got in contact with different artists, and received feedback on my work and portfolio, which also gave me a better perspective on what my career would imply in the future, and for what studios I would be the best fit.
I am really proud and happy of how this project turned out. I managed to accomplish all the goals, I made in the pre-production. In the future, I will also probably not adventure and try to create a full prototype by myself, and I will instead focus more on the details of characters. I now have a much deeper understanding of the workflows, the sculpting techniques and what my targets should be as a 3D character artist that wants to get into the industry.
0 notes
Text
10.Forefront Research-Complex Garments
Garments are the essential to create appealing and captivating characters. The clothes of a character can tell their story and much more information such as time period, location, style, and history.
With this project I have improved my garment modeling, and I managed to create much more realistic and complex characters than I ever did before. However, I still have much more to improve in order to get at an AAA game standard. As a result, I decided to do a deeper research on how does to get to that industry level.
While searching, I found this article on 80.lv from Alsu Rakhimova, and I immediately recognized the character, as it is the character who was shown in the opening screen of Marvelous Designer. I found her article a gold mine, as she talks about each step she took to create the garment of the character.
She also provides additional external sources and tips for beginners, which I found very useful. Not only she explains how she modeled the garment, she also goes into explaining how she textured the assets and what to keep in mind to achieve good quality. In my next project, I will make sure to follow this article and focus on creating an exceptional garment piece for my portfolio.
Fig.1: 80.Lv Article by Alsu Rakhimova
Looking at cloth artists on ArtStation, I found this article posted by Passion Republic, in which they show all the garments they have made for Elden Ring. I found all the cosmetics very interesting, but what attracted me the most was the quality and details of the garments, from sculpting and modeling, up to all the texturing details.
As I mentioned in previous blogs, having those modeles from multiple perspectives and showed as 3D models, it really helps me to make some targets for how my characters to should look.
Fig.2: Elden Ring Garments by Passion Republic
From my pre-production research, I found Marianna Yakimova and her YouTube tutorial regarding complex, realisitc garments. Her video helped me a lot during my production, but I still believe I have much to learn from it. In the future, I will also try to make characters who would fit this style for clothing, so I can diverse my skills and learn some of her techniques.
youtube
Fig.3: Realistic Garments Tutorial by Marianna Yakimova
To make sure I am looking at the forefront, I also researched how the top games from 2024 such as Baldur's Gate 3, made the garments for their characters. On ArtStation, I found Archy Gansior who is the 3D character artist who made one of the female garments for the game. Looking at his models was really inspiring, and I will use some of the techniques I've learned to create patterns and models like the ones he put on the garments.

Fig.4: Female Garment from Baldur's Gate 3 by Archy Gansior
In my research, I also stumbled upon an article about the importance of fashion in gaming and how the fashion industry actually influences some aspects of how we see the garments of the characters.
Fig.5: Fashion In Gaming Article from ANZU.IO
The article also talks about the advertising of brands and the marketing around it in games such as SIMs, Fortnight, GTA and many more. Because of our society, brands have adapted to new ways of promoting their name and fining new innovative collaborations. Another example is how Louis Vuitton collaborated with Riot to create a new skin for Quianna in League of Legends. Another subject they touch upon in the article is the rise of Metaverse, which is also a new factor that is influencing the digital universe and creates new opportunities to mix games with big brands.
In my future project, I will use all this gathered information to improve my skills and create advanced garments for my characters. Now I also have a better understanding of the importance and significance of clothing on characters and how it can be used as more of a prop, but a way to enhance the story of characters.
Bibliography:
Fig.1: Rakhimova, A. (2023) Designing clothes for a 3D character in Marvelous Designer, .80.Lv. 80lv. Available at: https://80.lv/articles/designing-clothes-for-a-3d-character-in-marvelous-designer/ (Accessed: August 20, 2024).
Fig.2: (No date t) Artstation.com. Available at: https://passionrepublic.artstation.com/projects/8wE4NQ (Accessed: August 20, 2024).
Fig.3: Yakimova, M. (no date) Creating realistic garment in for games & realtime render. YouTube. Available at: https://www.youtube.com/watch?v=N1c4EC0isNs&embeds_referring_euri=https%3A%2F%2Fsafe.txmblr.com%2F&embeds_referring_origin=https%3A%2F%2Fsafe.txmblr.com&source_ve_path=OTY3MTQ (Accessed: August 20, 2024).
Fig.4: (No date s) Artstation.com. Available at: https://www.artstation.com/artwork/d8ezbw (Accessed: August 20, 2024).
Fig.5: Anzu (no date) From runway to gameplay: The rise of fashion in gaming, Anzu.io. Available at: https://www.anzu.io/blog/fashion-brands-in-game-advertising (Accessed: August 20, 2024).
0 notes
Text
9. Forefront Research-Character Facial Animation
As a character artist, my target is to have an advance knowledge about all the areas that involve getting a character from 0, to a full production. So far in my projects, I have never animated the face of my characters, nor used blend shapes to practice facial expressions, as I believed it was too advanced, and I first wanted to have a strong understanding of the basics before I moved on to something as advanced.
On 80.lv, I found a found an exceptional article regarding the newest techniques used for facial animation by studios. One of the techniques presented in the article is the audio-driven facial animation. Speech Graphics is the animation house who created this technology and uses the high-fidelity facial animations and links them in real time with the sounds. This technology has been used in many top tier games such as The Last of Us 2, Hogwarts Legacy and The Callisto Protocol.
Fig.1: Game Changing Techniques for Facial Animation - Gregor Hofer
The article also goes more in depth about other technologies such as live facial recognition, phone capture, and hybrid system. This shows there is no right or wrong method, and it only depends on the target you want to achieve and the final result.
In my research, I also found an article from Maggie Dupre, in which she talks about the next-gen version of Epic Games' MetaHuman avatar tool. She talks about how the usage of this new technology and how it can help everyone to start making advanced facial captures.
Fig.2: MetaHuman Tool from Epic Games-article by Magie Durpe
To further research the new tool from Epic Games, I also researched articles to better learn how to use the facial capture tools in Unreal Engine 5. In this article from Unreal Engine, they describe the new technology they are using, and how to create a setup in the softare, in order to start using your own phone and create facial animations.
Fig.3: MetaHuman Animator Facial Capture by Unreal Engine
Facial animation is essential nowadays when it comes to bringing characters to life. Even if the actual animation process is another area than character sculpting, during my project I have learned that for 3D character artist it is essential to understand how the topology influences the realism of the animation, and vice versa. Further in my development, I will study facial expressions for characters, as well as learn how the requirements a model has for the mocap. I will also play a bit with the tools in Unreal Engine to showcase my knowledge and create attractive portfolio pieces.
Bibliography:
Fig.1: Hofer, G. (2024) Level up your facial animation: Comparing game-changing techniques, .80.Lv. 80lv. Available at: https://80.lv/articles/level-up-your-facial-animation-comparing-game-changing-techniques/ (Accessed: August 20, 2024).
Fig.2: Dupré, M. H. (2023) New videogame facial animation is so real it’s in the uncanny valley, Futurism. Available at: https://futurism.com/the-byte/videogame-facial-animation-uncanny-valley (Accessed: August 20, 2024).
Fig.3: (No date u) Unrealengine.com. Available at: https://www.unrealengine.com/en-US/blog/delivering-high-quality-facial-animation-in-minutes-metahuman-animator-is-now-available (Accessed: August 20, 2024).
0 notes
Text
Project Time Management Review
During the pre-production when I was planning the project brief, I was so excited to create a small fragment of the story I've been working on in my free time. While planning the project I adventured into planning to do a full game prototype with 4 characters, environment, gameplay and cinematic. I knew even from the beginning that it will be a lot of work involved and many hours of research, but I was determined to achieve my dream of creating my own character with full game implementation.
Even if we had to make a Gantt chart to plan our project, in the beginning I didn't have the proper perspective over how much each task would actually take, which made it hard to approximate the exact time frame. This means that during the production stage, there were times when I was behind the schedule. Luckily, I also added in the Gantt chart contingency days and milestones. While working, I realized that for me, it was very hard to follow an exact daily schedule. Instead, I applied the method I learned while working at Electronic Arts which means that we had a certain set of tasks that I would need to complete between the milestones, without worrying in what order I am working on them. This helped me be more flexible with my work while still achieving those milestones and staying on track.
Some of the tasks took much longer to complete because of unpredicted problems, or things I had to learn in order to achieve a better result. In those situations, I had to overlap some tasks, which meant that in the morning I would work on a task, while in the evening I would be working on another one, advancing both tasks at the same time.
Because I chose to work on such a big project by myself, there were times when I felt overwhelmed, and I wasn't sure if I would finish everything in time. However, with the support and guidance I received, as well as a lot of determination, I managed to achieve all my goals from the pre-production document, and create a professional final product which I am really proud of. I am sure that having this project in my portfolio will open some opportunities for me. Having two new characters with multiple garments, as well as a complex environment and a full gameplay implementation, shows my adaptability and diverse skills, which would make me a perfect candidate for a job as a junior 3D artist.
0 notes
Text
8. Forefront Research - Gaming Studios
Throughout the master course, we were encouraged to make projects that would build our portfolios and prepare us for the gaming industry. While doing that, I also started researching how senior artists build their portfolios and what are the general requirements studios have for 3D artists.
As the end of the course was getting closer, I started creating my own spreadsheet with general information that would help me such as: possible jobs, studios, events, competitions.

Fig.1: Jobs Studios Events Competitions - Spreadsheet
Gathering all this information is essential, as it helps me keep track of the jobs I apply to, and see what studios are available and possible for me to apply to. I also keep track of what competitions and events are happening, as they are perfect opportunities to meet new artists, and get in contact with producers and art directors. The gaming industry is based on connections, and many opportunities come from being recommanded by other people.
In my research, I found some studios which got my attention. Because many of my references for this project were from Diablo IV, while researching for artists, I found that most of them are from Passion Republic Studio. On their ArtStation page, I discovered they worked many of my favourite games that had a huge success in the industry such as Hogwarts Legacy, Spider-Man, Elden Ring and many more.

Fig.2: Passion Republic ArtStation Page
Their studio is based in Malaysia, which is a bit far for me. However, they have remote opportunities, which means in the future I may be able to work for them or work on projects as a freelancer.
Ubisoft is another huge AAA game studio with multiple emblematic games. I have them on my list because of their recent game realize such as Avatar Frontiers of Pandora and Star Wars Outlaws and Assassin's Creed, which are part of huge franchises.

Fig.3: Ubisoft Games Page
Looking at the top games who broke the charts in 2024, Baldur's Gate 3 was number 1 in the tier list. With a huge success, Baldur's Gate is an RPG which follows the structure of a Dungeons and Dragons digital game. It was made by Larian Studios, a Belgian gaming studios.

Fig.4:Baldur's Gate 3 by Larian Studios
Even if their headquarters are in Ghent, they also have studios in UK, Spain, Portugal and other countries, which makes them a possible studio I would apply to. The game, and the studio, became well known and received awards due to their impressive graphics and captivating story, two of the things I am searching for when looking at games and studios.
Right now, the gaming industry is in a very uncertain stage, with many lay-offs and budget cuts. Because of this, there are many studios which closed or stopped hiring new people, making it very hard for artists who are at their beginning of their journey to find a job. In addition, because the studios need to be more mindful of their resources, most of the opened jobs are directed towards lead and senior artists or art directors.
Bibliography:
Fig.2: (No date) Artstation.com. Available at: https://www.artstation.com/passionrepublic/
Fig.3: Ubisoft (no date) Ubisoft.com. Available at: https://www.ubisoft.com/en-gb/
Fig.4: Homepage - Larian Studios (no date) Larian.com. Available at: https://larian.com/
0 notes
Text
7. Forefront Research - Artists from the Industry
Throughout the production process, my artistic views and workflow has been changed by researching other artists. Three of these artists who stood up, worked on characters and garments for games that have influenced my project, such as Diablo 4, Elden Ring and League of Legends.
The first artist is Anastasios Gionis, a creature and character modeler at Blizzard Entertainment. He is the senior artist who sculpted Lilith, the emblem antagonist of Diablo IV. I am impressed by the level of the detail he achieves in the characters. Working on a complex character such as Lilith, he shows his high skills in realistically sculpting multiple areas such as cloth, hard surface armour, anatomy and other props. All these things I tried to incorporate while working on my project.

Fig.1: Lilith Diablo IV by Anastasios Gionis
He also worked on other props from the cinematic, such as the skull. He made the 3D model, but as he says, his main focus was on achieving the realistic textures of the bone and blood. Throguhout my project, I have also tried to acheive realistic textures. Most of the feedback I received from other artists was also regarding my textures, as I tend to add too much noise.

Fig.2: Cinematic Skull by Anastasios Gionis
Besides DIablo IV, he also worked on other projects such as Astropulse. From this project, I was really inspired by his model of the female character who has crystals piercing her body. The level of detail and the realism of the textures inspired me to use such techniques in my future projects.

Fig.3: Astropulse Female by Anastasios Gionis
The second artist that really inspired me is Andrea Olovic. He is a freelancer 3D character and creature artist who worked on the Divine Beast Dancing Lion from the new Elden Ring Expansion. Elden Ring has one of the best character I have seen in the gaming industry, and it takes a lot of skill and dedication to achieve this level.

Fig.4: Lion Beast from Elden Ring by Andrea Olovic
He also sculpted characters for League of Legends cinematic such as Tryndamere and Kindread from Still Here cinematic. Besides his texturing and sculpting abilities, I also admire his versatility, having a range of projects from human characters, to animals and creatures.

Fig.5 Tryndamere from Still Here Cinematic by Andrea Olovic
I was also inspired by the work he did for Magic The Gathering, with the snake who guards the sword. I also chose him as he is one of the few artists I found to be freelancers and who worked on so many big projects. This shows that at a certain level, you don't have to settle at a certain studio, and u can still be successful working on different projects.

Fig.6: Snake In Tree from Magic The Gathering - Andrea Olovic
The third artist I looked at is Patrick Liow, a senior 3D artist at Passion Republic studio. He worked on many characters and garments of Diablo 4 such as the demons from the cinematic, and some cosmetic armours.
I am really impressed by the realism and detail he puts in all his creatures and armours. For one of my future project I will definitely try to replicate the cinematic demons, using his models as reference.

Fig.7: Cinematic Demon from Diablo IV by Patrick Liow
His armours show diversity, besides hard surfaced armour and cloth, he also uses nature elements which I believe really adds a new level to designs.

Fig.8: Diablo IV Druid Cosmetic Armour by Patrick Liow
What I really liked about Patrick's portfolio was the way he showcases his project. I haven't seen this stile of showcasing characters before. It shows all the technical steps, while also positioning them in a dynamic way to make the view of the character intriguing.

Fig.9: Diablo IV Warrior Cosmetic Armour by Patrick Liow
I believe all three are part of the forefront, as they managed to achieve an outstanding level of realism and quality with their projects. In addition, they worked on innovative games which are top tier in the current gaming industry.
Looking at their workflows and seeing their models in the production stage helped me get a reference of what quality I should achieve with my characters, as well as how to present them, in order to get a job within the industry.
Bibliography:
Fig.1: (No date) Artstation.com. Available at: https://www.artstation.com/artwork/RylJqW (Accessed: August 19, 2024).
Fig.2: (No date) Artstation.com. Available at: https://www.artstation.com/artwork/OyeRzb (Accessed: August 19, 2024).
Fig.3: (No date) Artstation.com. Available at: https://www.artstation.com/artwork/Al8LO5 (Accessed: August 19, 2024).
Fig.4: (No date) Artstation.com. Available at: https://www.artstation.com/artwork/4Nogwq (Accessed: August 19, 2024).
Fig.5: (No date) Artstation.com. Available at: https://www.artstation.com/artwork/qez5rD (Accessed: August 19, 2024).
Fig.6: (No date) Artstation.com. Available at: https://www.artstation.com/artwork/WK3Z83 (Accessed: August 19, 2024).
Fig.7: (No date) Artstation.com. Available at: https://www.artstation.com/artwork/Ny6v91 (Accessed: August 17, 2024).
Fig.8: (No date) Artstation.com. Available at: https://www.artstation.com/artwork/BXdRgm (Accessed: August 19, 2024).
Fig.9: (No date) Artstation.com. Available at: https://www.artstation.com/artwork/QX93b4 (Accessed: August 19, 2024).
0 notes
Text
Forum Feedback
As adviced, I also posted my work on forums such as Polycount and 3D Hit, in order to receive feedback from other artists, and make my work seen.
Fig.1: Eclipse Ascendant Polycount Page
On Polycount I received some very useful comments which boosted my confidence, as well as helped me learn what things I should focus on in the future. The characters were appreciated, which made me very happy, as they were the main focus of the project. In the future, I should check the body proportions better.

Fig.2: Comments On The Polycount Project Post
Additional feedback that I received was for the environment and the props. In the future I should work on the textures to achieve better consistency throughout characters and environment. I also received some tips on how to make the environment look more natural and immersive.
I also posted my project on 3D Hit. So far, I haven't received any updated comments, but I am really looking forward to the upcoming feedback and critique.
https://www.3dhit.co.uk/forums/topic/32309-theodor-obreja-fmp-eclipse-ascendant/
Fig.3: 3D Hit Blog Post
Moreover, I posted the promotional video of my project on YouTube and made it public, so I can receive additional views and feedback from that end.
youtube
Fig.4: Eclipse Ascendant Promotional Video
Overall, I received very positive feedback on the project, with few useful critiques over characters. I am so proud of how this project turned out in the end, and it makes me even more happy that other people also find it intriguing and of good quality. The best compliment a game designer could receive is when someone says they are excited to play their game.
0 notes
Text
Promotional Video Blockout & Planning
At this stage, I started working on the promotional video and making a sketch of the layout. Following the given guide and examples of the past students, I built the skeleton of the presentation.
To make sure I achieve a professional level of presentation, I researched how other studios present new characters. As I am a big fan of Riot Games, I looked at their League of Legends Champion Spotlight. They have an excellent format of showcasing characters. However, instead of showing abilities, I will include details of the characters.
youtube
Fig.1: League of Legends Aurora Champion Spotlight
I am not a graphic designer, nor a video editor, so in order to still achieve a cinematic and professional look, I decided to download some good-looking templates for AfterEffects and adjust them for my project.
While researching for the best websites, I found MotionArray, which has an impressive library of video templates, as well as sound and music.
For my project, I chose the Fire Explosion Logo template by Elemental, to which I changed the logo with my own, as well as the writing.
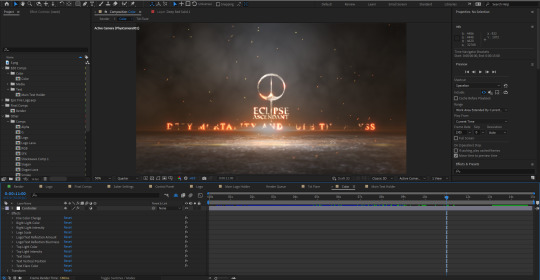
Fig.2: Fire Explosion Logo template by Elemental
In addition, I also wanted to have some title transition screens, to split my video into sections and tell the viewer what they are watching. For this, I chose the Epic Fire Logo by Egor Zen. I then took out their logo and changed the titles to match different sections of the video.

Fig.3: Epic Fire Logo by Egor Zen
I also researched how other artists present their characters and I tried to match that level. I decided to make for all the characters turntables fully textured, wireframe, and just with the normals baked. I then overlapped the renders in Premeire Pro and edited the videos to fade in and out at certain key frames, making it look like a smooth transition between the three stages of the characters.
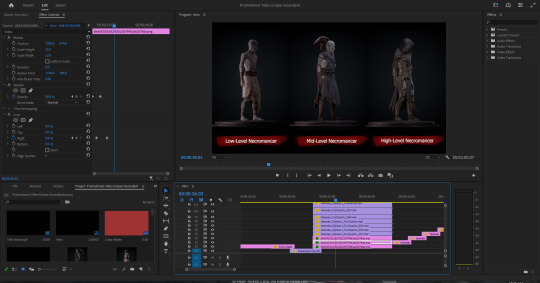
Fig.4: Necromancer Turntables
Besides the visuals, I also wanted to add intriguing music to enhance the viewer's experience and support the visuals. From MotionArray's music library, I chose Evil Rising by PegasusMusicStudio, as I thought to be the best fit for the visuals and the theme of the game, as well as allow me to voiceover without any distraction.
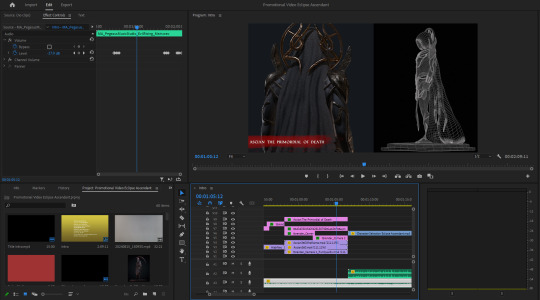
Fig.5: Music - Evil Rising by PegasusMusicStudio
I also introduced the character selection simulation I made, to better showcase the characters and present them with the animations.
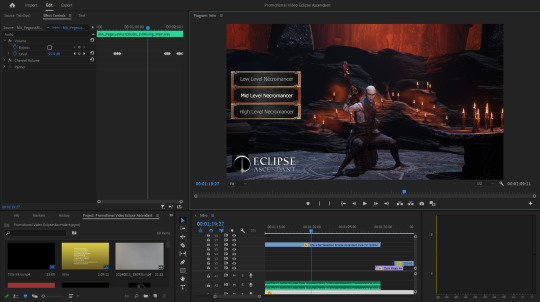
Fig.6: Character Selection Screen Simulation
Moreover, I have introduced a short compilation of the gameplay to show the abilities and spells I have created. However, this is only a small part of the video, as I wanted to focus on the characters, the gameplay being just an extra part I have done for the project.

Fig.7: Gameplay Presentation
To end the video, I made a compilation of renders with the environment to fully present the details of the temple and the altars.
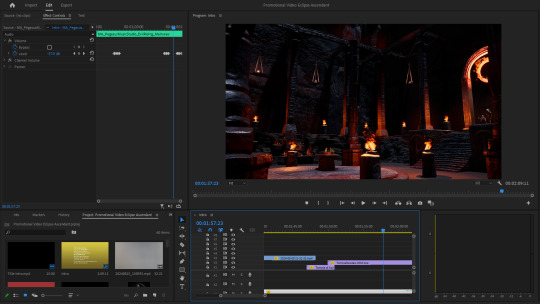
Fig.8: Temple and Altar Renders
At the advice of my teacher, I also included a short recording of myself introducing me and the project, in order to achieve a better connection with the viewer.
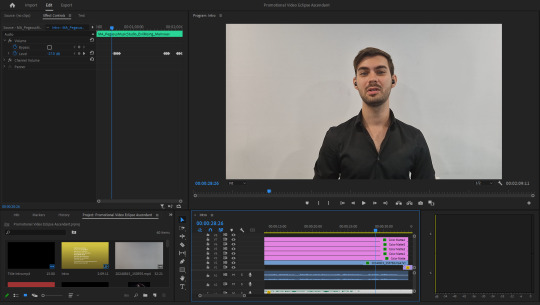
Fig.9: Self Introduction
At this stage, there are still some few tweaks I need to make for the final video. However, I am happy with how the video looks, and I am really excited to see the final promotional video at the end.
Bibliography:
Fig.1: League of Legends (no date) Aurora champion spotlight | gameplay - League of Legends. YouTube. Available at: https://www.youtube.com/watch?v=L8Za9xjMg84&t=35s&ab_channel=LeagueofLegends
Fig.2: (No date) Motionarray.com. Available at: https://motionarray.com/after-effects-templates/fire-explosion-logo-417663/
Fig.3: (No date b) Motionarray.com. Available at: https://motionarray.com/after-effects-templates/epic-fire-logo-935115/
Fig.5: (No date c) Motionarray.com. Available at: https://motionarray.com/royalty-free-music/evil-rising-1374984/
0 notes
Text
Marmoset Presentation Renders
To make the final renders of the characters for the presentation and showcase, I decided to use Marmoset, which is a standard software used by many artists.
Marmoset is a powerful software which can be used for baking, texturing and rendering. I have never used Marmoset before, but with this project I decided to learn it and achieve the same quality as other professionals. Because I already made the texture maps in Substance Painter, I only used Marmoset for the rendering process.

Fig.1: Low-Level Necromancer Marmoset
What I really liked about this software is that it allows you to render the wireframe of the models, which shows professionalism and the technical side of the characters, such as the retopology.

Fig.2: Low-Level Necromancer Texture and Wireframe Render
In addition, Marmoset allows you to import multiple fbx, which enabled me to assemble the mid-level necromancer and add his scythe, dagger and trinkets. I also decided to add the support of the pedestal to showcase the turntables renders.

Fig.3: Mid-Level Necromancer Marmoset

Fig.4: Mid-Level Necromancer Texture and Wireframe Render
One other thing that, in my opinion, makes Marmoset superior to Substance Painter when it comes to rendering, is the ability to add different lights and place them as I needed.

Fig.5: High-Level Necromancer Marmoset

Fig.6: High-Level Necromancer Texture and Wireframe Render
Moreover, I was able to add post-processing effects such as the background, the vignette effect and any other colour adjustments.

Fig.7: Ascian Marmoset

Fig.8: Ascian Texture and Wireframe Render
I am really impressed by the power of this software and I will make it part of my tools to showcase my projects. I am glad that I was able to experiment and add Marmoset to the list of things I have learned with this project.
0 notes
Text
Character Selection Renders
To better showcase the versions of the necromancer, I decided to use the three animations I previously selected and create a character selection screen.
To create the small environment for the character, I looked at other character selections and character customization screens from games, especially Diablo 4.

Fig.1: DIablo 4 Character Customization Screen
I decided to use this image as reference in order to create a similar environment to showcase my characters.
In general, I've seen that the character selection takes place in a similar environment that would already introduce the player into the theme of the game. To link the character selection with the game prototype, I decided to recreate a small part of the temple in a different Unreal Engine file, where I would render the character selection.

Fig.2: Low-Level Necromancer Character Selection Screen
I chose the location of the altar, as it was the perfect combination of plain background due to the rocks, with interesting lighting from the candles. I moved the altar table in front the right side, as well as the smoker on the left to create a better contrasting foreground, and ground the characters better into the environment.
For the mid-level and high-level necromancers, I also wanted to play with the cloth and experiment with the Chaos Cloth simulation system from Unreal Engine 5.

Fig.3: Mid-Level Necromancer Character Selection Screen
Because of the fast, dynamic movement, it as a bit hard to control the movement of the cloth, as it would start flying every time the mid-level necromancer would spin. However, I managed to adjust the controls of the simulation and I achieved a much better result.
To match the animation I chose for the high-level necromancer, I have also added some VFX from the VFX pack I have, to make it look like he summons minions through some portals.

Fig.4: High-Level Necromancer Character Selection Screen
I downloaded the minions from Mixamo, together with their idle animations. In sequencer, I then animated the VFX and the minions to spawn at the right time when the necromancer makes his animation.
Once I had all the renders done individually for each level of necromancer, I imported the image sequences in Premiere Pro where I put them together, and I've added the logo and borders with names, in order to simulate a character selection screen.

Fig.5: Compositing and Editing the Video in Premiere Pro
FInal render of the video composited with all the necromancer levels:
Fig.6: Eclipse Ascendant - Character Selection Screen
After showing it to my teachers, the feedback was that the name tags on the left side look stretched, and they don't match the quality of the renders. As a result, I am thinking of removing them, as they don't add any value to the scene, and it's just a repetitive name.
Bibliography:
Fig.1: Suther, A. (2023) Diablo IV character customization guide, TechRaptor. Available at: https://techraptor.net/gaming/guides/diablo-iv-character-customization-guide
Fig.4: https://www.mixamo.com/#/
0 notes
Text
Environment Renders
Once I was done with the hard part of programming and gameplay, I could focus on finishing the environment and making the final adjustments.
To guide the player and add secondary light, I also added torches along the stairs. This also indicates the presence of the mobs.

Fig.1: Stairs going up the mountain
I also added wall torches on at the entrance of the temple, to guide the player and also to add some light to show the design of the wall and door. In addition, I have added a rim light just on the door to force light it more. This indicates the player to interact with the door, and makes the design of the door more visible.

Fig.2: Temple Entrance
Inside of Ascian's Temple, I really wanted to capture the sanctity of the room. I focused on balancing the cold blue tones of the moon light with the warm orange light from the fire.

Fig.3: Ascian's Temple View
I kept the fires as the only light sources, as I wanted to create a mystical, ritualistic atmosphere with low lighting. I spread the fire stones evenly across the temple, in order to have an even light all around.

Fig.4: Ascian's Temple View
There is no temple without altars, so I organized the sacrificial table with all the props such as the skulls I previously made, the candles, totem, sacrificial beans, and some megascans such as books, cups and bowls, which I already talked about.

Fig.5: Ritualistic Altar
To highlight the altar, which in comparison with the temple is a lot smaller, I placed multiple candles on the rocks around the altar. This orientates the player and catches the attention.
0 notes
Text
Combat Screenshots And Gameplay
Once everything was put together, I could finally experience the whole gameplay demo and make any adjustments. I balanced mob's damage, as well as the damage the necromancer can inflict on the mobs. This way, the mobs would theoretically die from two combos.

Fig.1: Melee Combat
I also adjusted the damage to the dark spell, which now eliminates the mob in one shot.

Fig.2: Dark Spell Casting
For the healing spell, I didn't have much to adjust. I only adjusted the placement of the VFX and a bit of the colour.

Fig.3: Healing Spell

Fig.4: Door Interaction
I decided to make Ascian bigger than the necromancer, for multiple reasons. On one hand, in order to showcase his power and that he is superior to the mortal realm, being the link to the god of Death. On the other hand, I also wanted his throne to be visible in the big temple and to make it noticeable, which means Ascian had to be a good size in order to theoretically sit on that throne.

Fig.5: Necromancer and Ascian Comparison
Overall, I am so happy with what I managed to achieve with the gameplay side of this project. I have learned tremendously from doing the blueprints, and now I can say I have a much better understanding of what it actually means to implement a character in a game environment.
Fig.6: Gameplay Testing
0 notes
Text
Mobs - Blueprints
To showcase the combat and the spells, I took the mobs and their animations from Mixamo. With the help of tutorials and forums, I managed to create a basic game prototype.

Fig.1: Mixamo Mob Model and Animations
In Unreal Engine, I imported all the animations and made a basic locomotion system for the mobs, so it could blend the run and idle animation, making it functional.

Fig.2: Mob Locomotion System
Having the model and the animations set up, I started creating a simple patrol system, so the mobs could walk around and start attacking the player when being sensed.
youtube
Fig.3: AI Enemy Tutorial by Gorka Games
Using the tutorials and guides, I managed to create a basic blueprint roam system for the mobs to walk around in the constrained boxes I have placed on the map. When the player would walk in those boxes and the mobs would see the player, they would move to the player and start attacking.

Fig.4: Roam Patrol System
Moving forward, I have implemented a blueprint system which would allow the mobs to damage the player and lower their life. This was one of the most complicated parts of the blueprints. However, even if probably it's not optimized, I managed to make it work. The way this system works is that I have added a collision sphere on the hand of the mob, which would inflict damage every time it would interact with the collision box of the character.

Fig.5: Attacking System
youtube
Fig.6: Combat System Tutorial by UNF Games
Following other tutorials, I also managed to make the mobs take damage from the player and update their life, including the death animation when their life reaches zero.

Fig.7: Health Update and Take Damage System
One of the biggest problems that I am having with the mobs is that the only way I managed to receive damage from the player is when their collision box intersects with the collision box of the player. As a result, theoretically, the mobs get damage from interacting with the body of the player instead of the weapon. After trying multiple variants, I still didn't manage to make it work properly. However, I am not a technical artist, so implementing the damaging system like this is good enough for now.
Bibliography:
Fig.1: Mixamo (no date) Mixamo.com. Available at: https://www.mixamo.com/#/?genres=Combat&page=8&query=
Fig.3: Games, G. (no date b) The easiest way to make a simple enemy AI in Unreal Engine 5. YouTube. Available at: https://www.youtube.com/watch?v=xm-7m5Fw1HU&list=PLmNLrfKMXuOwWtUVn-w4_IUUgeHQFwLaL&index=10&ab_channel=GorkaGames
Fig.6: Games, U. N. F. (no date) Create a game from SCRATCH in Unreal Engine 5 in 2024 FULL COURSE - part 1. YouTube. Available at: https://www.youtube.com/watch?v=Bfzmpq1dMKA&list=PLmNLrfKMXuOwWtUVn-w4_IUUgeHQFwLaL&index=14&ab_channel=UNFGames
0 notes
Text
Playable Necromancer - Blueprints
One of the most difficult parts of the project was to create the whole blueprint system in order to make the prototype functional. Luckily I had a bit of experience with Unreal Engine blueprints, however, nothing of this level. Throughout the whole process, I had to search for tutorials and whenever I bumped into problems, I search for a solution on forums.
For the playable character, I used the main blueprint of the Unreal Engine mannequin, which is the ThirdPersonCharacter. This gave me a strong foundation with some basic functions, on top of which I built the new systems.
Firstly, I started with implementing the basic functions, such as the locomotion. Using Gorka Games' tutorial, I managed to create a full locomotion system using the animations I have previously adjusted in Cascadeur.
youtube
Fig.1: Animation System Tutorial by Gorka Games
Following the tutorial, as well as other guides, I managed to create a fully functional locomotion system with idle, walk, run, jump animations. This enabled me to explore, check how the environment looks through the eyes of the player/necromancer.

Fig.2: Necromancer Animation System
Following, I created the blueprints to enable the character to equip and unequip the scythe, as well as interacting with the doors of the temple.
youtube
Fig.3: Weapon Sockets Tutorial by Matt Courtois
I first had to create the blueprints for the character, which moves the scythe from a socket to another when pressing Q. Following, I created a set of blueprints that allows the player to spawn an invisible check area box, which would trigger the doors to open or close.

Fig.4:Equip/Unequip Weapon and Door Interact Character Blueprints
For the door interaction, I also had to create a set of blueprints which would make the door open or close when triggered by the player.

Fig.5: Door Interaction Blueprint
Once I was done with the interaction between the player and the environment, I went on to create the more complex systems for the combat, such as damage and health systems.
youtube
Fig.6: Damage and Health Systems Tutorial by Matt Aspland
Doing this was quite difficult, as I have never done any blueprint systems this complex before. However, with the help of tutorials and guides, I managed to understand the principles and create the blueprints I needed to give the playable necromancer health system.

Fig.7: Health System, Damage System and Healing Spell
With the health implemented, I also added a spell which would allow the player to heal after being damaged. On key E I created a blueprint to trigger a healing animation to match the healing system. In addition, I have added a VFX effect from the free pack, to match the animation and create a more realistic game effect.
Having these systems implemented, I moved on to create the combat and spell casting system. To create the combat system, I used the blueprints I created in the pre-production as a starting point. The melee combat system triggers a series of animations montages, which are the animations I previously adjusted in Cascadeur, and triggers them one after the other each time the player presses left click.

Fig.8: Melee Combat and Dark Spell Casting Systems
For the Dark Spell Cast, I followed a tutorial from That Skye, which shows step by step how to create the blueprints for casting projectiles.
youtube
Fig.9: Projectile Spell Tutorial by That Skye
The problems that I had with the spell casting was that the projectile would always collide with the necromancer as soon as it was cast, which made the projectile explode since casting. I managed to solve this problem by disabling the collision of the projectile with the pawn.
Even though doing blueprints and implementing all these systems is not part of a character artist's job, I believe it was very beneficial for me to understand how characters are implemented and how the systems work. Moreover, it strongly improved my logic and making connections ability, which have been proven essential in my previous jobs. Not to mention, I had an enormous satisfaction when I saw for the first time one of the characters I created fully implemented in a game prototype with full locomotion, combat, interaction and spell casting.
Bibliography:
Fig.1: Games, G. (no date) How to animate your character in Unreal Engine 5 - animation blueprints and blendspaces. YouTube. Available at: https://www.youtube.com/watch?time_continue=1&v=WUXvq6At6pE&embeds_referring_euri=https%3A%2F%2Fsafe.txmblr.com%2F&embeds_referring_origin=https%3A%2F%2Fsafe.txmblr.com&source_ve_path=Mjg2NjY
Fig.3: Animation, M. C.-T. (no date) Attach a Weapon to your Character using Sockets - Unreal Engine 5. YouTube. Available at: https://www.youtube.com/watch?t=470&v=6WjrtpCOQXo&embeds_referring_euri=https%3A%2F%2Fsafe.txmblr.com%2F&embeds_referring_origin=https%3A%2F%2Fsafe.txmblr.com&source_ve_path=OTY3MTQ
Fig.6: Aspland, M. (no date) How to damage and heal the player in Unreal Engine 5 (tutorial). YouTube. Available at: https://www.youtube.com/watch?time_continue=1&v=5Xdnx3wPNLo&embeds_referring_euri=https%3A%2F%2Fsafe.txmblr.com%2F&embeds_referring_origin=https%3A%2F%2Fsafe.txmblr.com&source_ve_path=Mjg2NjY
Fig.9: Skye, T. (no date) How to make projectile spells in unreal. YouTube. Available at: https://www.youtube.com/watch?v=DB10LR41_zA&list=PLmNLrfKMXuOwWtUVn-w4_IUUgeHQFwLaL&index=6&t=2s&ab_channel=ThatSkye
0 notes
Text
6. Forefront Research - AI in 3D Production
AI has become more and more part of our lives in direct and indirect ways. When it comes to the 3D industry, there have been many opinions when it comes to using generative AI as part of a production workflow.
In our second semester, my research paper for the Exploring Professional Practice module was based on the impact generative AI has over the gaming industry. While conducting this research, I got to interview amazing artists from the industry such as Dmitry Karasev, CEO of Clio.art, a 3D generative website; Mike Bambury who worked as an art director at Sony Playstation and Interior Night; and Gilliard Lopes, a Game Design Director who worked for Electronic Arts and NetEase Games. All three of them gave me crucial information regarding is area, and their opinions helped me have a better understanding on how AI has actually affected the industry, right from the source. My conclusion was that it is undeniable that AI had some negative effects over the industry. However, I believe that as any technological progress, it has to be understood, controlled and accepted in order to make the best out of a phenomenon that weather we want or not, it will still happen.
Since the pre-production stage of my major project, I have used AI to efficiently speed up my work and create a better foundation on top of which I could start building my project. At first, in the pre-production stage, I used MidJourney to generate concept art for my characters and the environment. This was really helpful as to create a generous amount of design from which I could choose in a very short time. However, the disadvantage of using AI for concept art is that most of the images don't make sense and even if visually it looks good, some details don't actually function in reality, such as objects with no ends or that blend together.

Fig.1: MidJourney Used For Generating Concept Art
During the production stage, I also used MidJourney to create textures to use instead of base colours for texturing and also for ritualistic patterns to add in my scene and on the characters, in order not to steal patterns from other known sources. Moreover, I generated decals and alpha masks to use for opacity masks and stencils.

Fig.2: MidJourney Used For Generating Texture, Alpha And Pattern
Besides generative AI, the software that I used also have some sort of AI integrated in their systems. For example, Accurig automatically rigs and weight paints characters only using some dots I placed as guides. In addition, Cascadeur uses some sort of AI to calculate and generate realistic physics simulations for the character animations, which create much more realistic and fluid movements using just key frames.
Currently, I extended my research and searched for other cases in which AI is used in gaming production. In his article, Afaq Ali presents a fascinating perspective over the future of gaming industry "AI promises to unlock new frontiers in terms of scale, realism, interactivity, and more that could profoundly change gaming as we know it." (Afaq Ali, 2024).
Fig.3: The Future Of Gaming Is AI Article by Afaq Ali
He presents the benefits of AI in two categories: how it will help the development of games, and how it will improve the gameplay itself.
Starting with the game development, AI could generate worlds just using inputs and directions, which we can already start seeing in the new Unreal Engine Updates. In addition, AI could generate props such as furniture, foliage, clutter items, which would accelerate the process of world building dramatically. We can already have a peak on how that would work through the procedural techniques we currently use. However, these techniques require someone to make those props beforehand, whereas with AI they would just be generated on the spot. Moreover, the author suggests that AI could drastically accelerate and improve data analysis and playtesting using algorithms and natural human behaviour, but with improved results.
When it comes to gameplay itself, Afaq argues how AI can improve realism using photorealism graphics and analysing real environments. With tools such as Nvidia GauGAN which can analyse landscape imagery to create graphics and renderings, games will offer a much more immersive experience. Another factor that would amplify the immersive experiences is the NPCs and how the player interacts with the world. With AI NPCs could have a more natural behaviour improving the user's experience.
To conclude, I believe AI will help us reach new boundaries in the near future, creating more immersive and incredibly realistic games. I have already started to experience the efficiency of AI with my own project, helping me create a project which otherwise would have needed a small team to achieve in such a short time. Even if generative AI is not yet at its best, I am sure in the future will be much more reliable.
Bibliography:
Fig.1,2: Midjourney.com. Available at: https://www.midjourney.com/home
Fig.3: Ali, A. (2024) The future of gaming is AI: How artificial intelligence is changing everything, eLearning Industry. Available at: https://elearningindustry.com/the-future-of-gaming-is-ai-how-artificial-intelligence-is-changing-everything
0 notes
Text
Megascans Props For The Temple
In addition to everything that I have sculpted, I have downloaded some megascans from quixel, in order to make the environment more realistic and full.

Fig.1: Quixel Megascans Props
To add light to the scene, I have made some fire simulations in Niagra. However, I also wanted to add elements such as torches at the entrance and alond the stairs to guide the player and add realism. As such, I decided to download an asset pack with light sources from Unreal Market.

Fig.2: Fire Torches from Unreal Market
For the exterior of the temple, I have also used some foliage from Quixel, to add more life to the scene and create diversity.

Fig.3: Quixel Foliage
Bibliography:
FIg.1:
Quixel wall mounted chain (no date) Quixel Megascans. Available at: https://quixel.com/megascans/purchased?category=3D%20asset&assetId=uiziefmdw
Quixel wooden cup (no date) Quixel Megascans. Available at: https://quixel.com/megascans/purchased?category=3D%20asset&assetId=wgymaaq
Quixel small clay jar (no date) Quixel Megascans. Available at: https://quixel.com/megascans/purchased?category=3D%20asset&assetId=ubqtabsfa
Quixel incense burner (no date) Quixel Megascans. Available at: https://quixel.com/megascans/purchased?category=3D%20asset&assetId=ubiseaifa
Quixel banquet wooden cup (no date) Quixel Megascans. Available at: https://quixel.com/megascans/purchased?category=3D%20asset&assetId=xfphaja
Quixel old damaged book (no date) Quixel Megascans. Available at: https://quixel.com/megascans/purchased?category=3D%20asset&assetId=vf1fddhiw
Quixel stained brown book (no date) Quixel Megascans. Available at: https://quixel.com/megascans/purchased?category=3D%20asset&assetId=vf1fdaaiw
Quixel old book (no date) Quixel Megascans. Available at: https://quixel.com/megascans/purchased?category=3D%20asset&assetId=wldocgo
Fig.2:
(No date b) Unrealengine.com. Available at: https://www.unrealengine.com/marketplace/en-US/product/torches-package-with-sound-light-and-particle-system?sessionInvalidated=true
Fig.3:
Quixel broom creeper (no date) Quixel Megascans. Available at: https://quixel.com/megascans/purchased?category=3D%20plant&assetId=xfqicgrqx
Quixel Rhazya (no date) Quixel Megascans. Available at: https://quixel.com/megascans/purchased?category=3D%20plant&assetId=xdjmfeqqx
Quixel wild grass (no date) Quixel Megascans. Available at: https://quixel.com/megascans/purchased?category=3D%20plant&assetId=vdilbaiia
Quixel river saltbush (no date) Quixel Megascans. Available at: https://quixel.com/megascans/purchased?category=3D%20plant&assetId=vdfpcgbia
Quixel dry weeds (no date) Quixel Megascans. Available at: https://quixel.com/megascans/purchased?category=3D%20plant&assetId=scbnI
Quixel dead shrubs (no date) Quixel Megascans. Available at: https://quixel.com/megascans/purchased?category=3D%20plant&assetId=vdknafgha
0 notes
Text
Environment Props Update
Using the blockout I made for the environment during the preproduction period, I started modeling the props that I needed to bring the environment to life.

Fig.1: Environment Blockout
For the interior of the temple, I built the columns, for which I made two different styles of the top level columns which are more structured and have runes, whereas the columns from the centre look more organic and have the logo of the eclipse.

Fig.2 Environment Props Sculpting

Fig.3: Props Textured
I also had to model the staircases on which the player would get to the temple and then to the throne. The way I modeled the stairs as sets was easier to sculpt, and it gave me a good insight of how they would look in the end. However, Because each has so many stairsteps, I had to UV unwrap each of them, which means that the resolution got really low. Implementing the feedback from my teacher and my classmates, in the future I would only model a few stairsteps, which would enable me to cover a bigger area on the UV tile, generating for resolution for each stair.

Fig.4: Stairs Sculpting

Fig.5 Stairs Textured
To showcase the ritualistic side of thetemple, I have also created an altar table with some props such as sacred beans, candles and totem, to which I will add the skulls and some books from Quixel in the final environment. Besides those, I have also modeled the pedestal from the middle of the temple, on top of which I will palce The Book of The Dead.

Fig.4: Altar Table Props Sculpting

Fig.5: Altar Table Props Textured
For the throne, I used the design from my generated canve concept with MidJourney. I tried to stay as close as possible, while also adding logic and realism to the design.

Fig.6: Throne Sculpt and Texture
0 notes