
Statistics
We looked inside some of the posts by threebeansplaytime and here's what we found interesting.
Average Info
Notes Per Post
0
Likes Per Post
0
Reblog Per Post
0
Reply Per Post
0
Time Between Posts
6 days
Number of Posts By Type
Photo
17
Last Seen Tumblr Blogs


Fun Fact
69% of Tumblr users are millennials.
Photo

Autumn 🍂 Art! Acorn/Conker/Pine Cone Paint Rolling! (With a bit of leaf printing thrown in for good measure! 😂) Here’s a fun after-school activity that you might like to try? We recently went on a woodland walk and collected lots of little autumnal treasures on our travels. Acorns, conkers, pine cones and autumn leaves all make for great natural resources to be used at home in arts and craft activities! We picked out some autumnal colours from our collection of poster paints 🎨 - orange, green, red, yellow and gold - and decided to have a go at a version of ‘marble painting’, using the natural resources we had collected in place of the marbles. We put our paper in the bottom of a shallow box and experimented by dipping the various objects in paint, then tilting the box to watch the patterns the paint made as the acorns, conkers etc rolled over the paper. We also had a go at leaf painting and printing and, towards the end of the activity, everyone decided to get really messy with some hand printing too! We spoke about how, when all the colours mixed together, the paint eventually turned brown. Just like the leaves on the trees in Autumn 🍁 Simple, fun and helped us to pass a little bit of time before bedtime! 💤 We hope you enjoy it too! #threebeansplaytime #3beansplaytime #autumnart #autumncrafts #autumncraftsforkids #acornpainting #conkerpainting #paintrolling #eyfsideas #eyfs #eyfsinspiration #eyfsactivities #funcrafts #learningthroughplay https://www.instagram.com/p/CFNgYVenfk_/?igshid=804ajdip41t9
#threebeansplaytime#3beansplaytime#autumnart#autumncrafts#autumncraftsforkids#acornpainting#conkerpainting#paintrolling#eyfsideas#eyfs#eyfsinspiration#eyfsactivities#funcrafts#learningthroughplay
0 notes
Photo
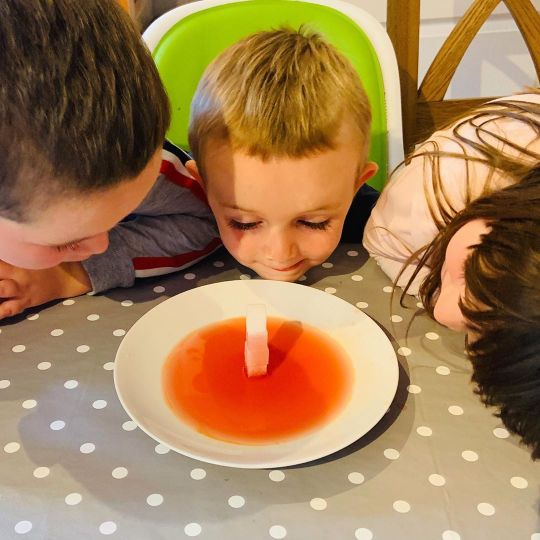
Sugar Cube Absorption Experiment 🧪 Today, the Three Beans tried out a fun and easy science experiment to take a look at the properties of different materials. We tried the Sugar Cube Absorption Experiment! If you want to give it a try too, you’ll need: 🧬 Some sugar cubes 🧬 A Plate 🧬 Water 🧬 Food colouring 🧬 Aluminium foil 🧬 Cling film 🧬 Paper 🧬 Baking parchment 🧬 Kitchen roll This experiment allows kids to learn about: 🧪Absorption 🧪Hygroscopic Behaviour 🧪Dissolving 🧪Capillary Action 🧪Changes of State 🧪Properties of Materials - specifically, Porosity Check out our page on Facebook for the full instructions of what to do by searching @ThreeBeansPlaytime #threebeansplaytime #3beansplaytime #funscience #funscienceforkids #funlearning #funlearningathome #funlearningforkids #simplescience #homelearning #homelearningfun #scienceactivities #eyfsideas #eyfsinspiration https://www.instagram.com/p/CDfOCQUnCh0/?igshid=fvfjti3e0q1s
#threebeansplaytime#3beansplaytime#funscience#funscienceforkids#funlearning#funlearningathome#funlearningforkids#simplescience#homelearning#homelearningfun#scienceactivities#eyfsideas#eyfsinspiration
0 notes
Photo

Happy 3rd Birthday, Oliver! The littlest Bean is getting bigger! 🥳 #threebeansplaytime #3beansplaytime #3rdbithday #3rdbirthdaycake #stegosaurus #stegosaurouscake #dinosaurparty #dinosaurcake #happybirthday #happyboy #growingupfast https://www.instagram.com/p/CDND11Dn6SE/?igshid=kp7ddyf8ifpz
#threebeansplaytime#3beansplaytime#3rdbithday#3rdbirthdaycake#stegosaurus#stegosaurouscake#dinosaurparty#dinosaurcake#happybirthday#happyboy#growingupfast
0 notes
Photo

Raised Salt Elmer Paintings! 🧂 🎨 🐘 You can try raised salt painting with any design. Simple shapes and patterns or large letters tend to produce the best results as anything too intricate just runs together. (We put our names, along with Elmer’s on our pictures but they looked a bit squiffy in the end, so you can see what I mean!) We decided to make raised salt Elmers because we’d been reading books about Elmer the Patchwork Elephant (a fab way to teach kids about diversity and embracing our differences), so, it tied in nicely as a bit of a theme for us; especially as Elmer is brightly coloured, just like our pictures! What Do You Need? ���️ Some card stock or water colour paper. (you can use any colour you like for the background but it needs to be thick paper or card as normal craft paper will get too wet) ✂️ PVA (white school) glue in a squeezy bottle. ✂️ Table Salt ✂️ A baking tray or similar to catch the excess salt ✂️ Liquid water colours (or water-based food colouring as an alternative) ✂️ A small-tipped paint brush, dropper or cotton bud (Q-tip) to apply the water colour What Do You Do? 🎨Place your card on the baking tray. 🎨Have the kids squeeze the outline of their desired design onto the card stock, using the PVA glue. (I drew the Elmer design on for them first to trace so they were working on their hand-eye coordination to stay close to the pattern, but, this isn’t necessary. It can be done free-hand if you prefer and whatever design you like. Just drawing free hand allows them extra freedom and creativity in the activity) 🎨Sprinkle table salt over your design. Don’t be afraid to use a lot of salt, you want to make sure the salt covers all sides of the glue. Tap off the excess salt into your tray and set aside to use again. 🎨 Now let the magic begin! Dip your paint brush/Q-tip/dropped into the water colour of your choice. Gently touch the tip of your wet paint brush to the salt. No matter how many times my kids do this they are amazed to watch the colour spread through the salt! Try not to “disturb” the glue by dragging your paint brush/applicator. 🎨Once you have finished applying the colour, leave your pictures, undisturbed, to dry out. https://www.instagram.com/p/CDCjvfCn7iT/?igshid=891w5wmi2bkm
0 notes
Photo

The Three Beans met some interesting creatures out on our walk today! A Tyrannosaurus Rex 🦖, Stegasaurous, Triceratops, Brachiosaurus 🦕 and Pteranodon! Who’d’ve thought it?! Don’t know why we’ve never noticed them before...? 🤔😂 We had lots of fun using Google to view the Dinosaurs in ‘Our Space’ and learn a few fun facts about each one whilst taking some pictures. (Though, it’s hard to get a good shot when they keep just wanting to run behind the camera to see the dinosaur! 😂...”Mummy, it’s like it’s right there, but then it’s not there?!” 😂) We tried this out a couple of months ago with various zoo animals; lions 🦁, tigers 🐅 etc. And would recommend that too, if you haven’t done it already. But, we have only recently discovered that Google have now added Dinosaurs too! 🙌🏻 Would highly recommend for any Dino-mad kids, like mine. It certainly livened up our walk and added lots of learning opportunities too 😃 If you want to try it, here’s what you need to do: You don’t need an app to do this, literally just search it on Google on the browser on your phone. 👉🏻Type the name of whichever dinosaur (or animal) you’d like to see. This link lists all the animals / dinosaurs you can view in 3D. You can now also explore planets and parts of the human body in 3D versions: https://www.google.com.au/amp/s/9to5google.com/2020/07/01/google-3d-animals-list/amp/ 👉🏻The search page has a box on it that says ‘see (whatever you searched) in your space’ then a ‘view in 3D’ button. 👉🏻Press the button and then it tells you to move your phone around. 👉🏻Keep moving your phone for a while and eventually the dinosaur appears on your phone screen with the background of wherever you are and then moves with you! 👉🏻If the background behind the Dinosaur is just grey, check you have ‘AR’ selected on the button at the top centre of the screen, not ‘object’. If you do and the background is still grey, or, if ‘AR’ is not an option, unfortunately, your phone may not be compatible. 👉🏻You can find a full list of compatible phones here: https://9to5google.com/2020/06/26/google-3d-animals-support/ 👉🏻Take a screenshot and save your picture 📸 Have Fun! https://www.instagram.com/p/CCb_JPAHwoo/?igshid=1uet7vcta724e
0 notes
Photo

Making Phonics Fun - Magic ‘Tricky’ Word Reveal! Charlie’s been working hard trying to learn his ‘tricky’ or, high-frequency, ‘sight’ words. We usually like to sing songs to help him remember these or use flash cards. Today, I thought we’d try to make it a little bit more fun. ✏️ I wrote the words on a piece of paper 📝 using a white wax crayon 🖍 (you could also try using an unlit candle 🕯) ✏️ I watered down a little poster paint 🎨 ✏️Charlie picked a piece of paper then picked a paint colour and gently brushed some of the paint over the page ✏️Since wax is oil-based and the paint is water based, then don’t mix, so, the ‘invisible’ tricky word is revealed! ✏️To keep things going, as a challenge, he then had to read the word aloud, match it to the correct flash card, find the magnetic letters to spell it, write it down 3 times, then tell me a sentence with the word in it! The more ways you can practice the same thing and the more fun you can make it, the more likely they are to actually remember it! Charlie absolutely loved this and thought it was, “So cool!” When the words ‘magically’ appeared. He kept asking to do another one and kept going, staying engaged, for much longer than we would normally spend on this. All in all, after 113 days spent trying to homeschool in lockdown for us (yes, really! 😩), I’m definitely taking this as a win! 🙌🏻😃 #threebeansplaytime #3beansplaytime #trickywords #sightwords #twinklparents #homelearningfun #homelearning #homelearningideas #phonics #phonicsfun #funlearning #homeschooling #eyfsideas #eyfsinspiration #eyfsactivities https://www.instagram.com/p/CCUqGrWHvTF/?igshid=tzt99770n4w0
#threebeansplaytime#3beansplaytime#trickywords#sightwords#twinklparents#homelearningfun#homelearning#homelearningideas#phonics#phonicsfun#funlearning#homeschooling#eyfsideas#eyfsinspiration#eyfsactivities
0 notes
Photo

Melting Chocolate 🍫 Changing State Experiment 😋 So, here’s a really easy (and tasty!) experiment for you all! The Three Beans have been learning all about ‘States of Matter’, through various activities over the last few weeks/months. We’ve been looking at the properties of solids, liquids and gases and how matter can sometimes change state...Like, when we froze our toys in blocks of ice and then freed them by melting it. Also, when we used heat from a solar oven to melt marshmallows and chocolate and make s’mores, and, when we made our own sugar crystals by allowing the water to evaporate from a saturated solution. So, this one seemed like a bit of a no-brainer really. We found a sheet on the Twinkl website (@twinklparents @twinklresources ) that laid out what we had to do for this simple Melting Chocolate Changing State Experiment. As a challenge, I made them write down what they thought would happen on the back of their worksheet before we started. Holly (age 4) wrote “I think it will melt” and Charlie (age 5) wrote, “My hypothesis is that the chocolate will melt” (they both like using the word ‘hypothesis’ but Holly decided it was too long to write! 😂) Oliver isn’t quite 3 yet, so, he skipped the writing part but was also confident in telling me that, “It’s going to melt and make my hands all sticky... then I’ll have to lick it off!” 👅😂 The sheet said that we had to take a piece of chocolate and hold it in our hand (with our hand closed) and count to 100 (which the kids enjoyed doing! Charlie, especially, is a bit obsessed with counting as high as he can now!) or, another option was to say the alphabet 5 times. Then, we opened our hands to see what had happened to the chocolate! When the experiment was finished, they had to write down what had happened and why. They both wrote that the chocolate had melted because it got warm. We spoke about how the heat energy that was transferred to the chocolate from their hands had caused the chocolate to change from a solid to a liquid (melting) and how this was, what is known as, a ‘reversible change of state’ - if we cooled it down again, it would change back into a solid again. 😃 https://www.instagram.com/p/CCR0Zv9HyWg/?igshid=1a34uy671y8dp
0 notes
Photo

DIY ✂️ Mini Dinosaur 🦖 Torch 🔦 Projectors! This week is ‘Dinosaur Week’ on our home-learning journey and, honestly, it’s a topic that requires little encouragement for the Three Beans. All three of them just LOVE all things dinosaur related already! So, as something a little bit different, we thought we’d give this cool dinosaur craft a try and make ourselves some mini dinosaur torch projectors. The idea was to use these as an alternative to story spoons/puppets and spark their imaginations to act out and tell their own dinosaur stories! All you need to make these is: ✂️ Some empty toilet roll holders ✂️ Cling film ✂️ Sticky tape or an elastic band ✂️ Small dinosaur 🦕 shapes or stickers (I literally googled ‘dinosaur silhouettes’ and picked some images to print and cut out from there and, actually, you don’t even have to use dinosaurs, any shape would work!) ✂️ Optional paint/felt tip pens if you also want to decorate your torches ✂️ Smart phone or a small torch We decided to make this more of a craft activity, rather than just an imaginative play/role playing exercise, by decorating our torches first. We used a 1:2 poster paint/PVA (white school) glue mixture to paint our toilet rolls. Adding the glue to the paint made the colours more vibrant and gave the paint a slight sheen. It also meant that it wasn’t absorbed straight into the cardboard and so the different colours merged together to create a marbled effect when they dried. Though this step is totally optional and doesn’t affect how the projectors work, the kids enjoyed doing it and we thought they looked pretty cool! Once your toilet roll holders are dry, all you need to do is stretch a piece of cling film over the top then pop your dinosaur shape or sticker on the top. Sandwich your shape between another piece of cling film and then secure everything with a piece of sticky tape or an elastic band (we used tape). The smoother you can get the cling film, the better. Then, you’re all set and ready to go! In a darkened room, shine the torch on your smart phone (or an actual torch) down the toilet roll and project your image! 😃 #threebeansplaytime #3beansplaytime #dinosaurprojector #funkidscraft https://www.instagram.com/p/CCLax48nPCa/?igshid=3oeja2h2abfe
0 notes
Photo

Dinosaur 🦕 🦖 Small World 🌍 Play The theme set by Holly’s nursery for her home learning this week is ‘Dinosaurs’! But, honestly, they’re all a bit Dino-crazy in our house anyway, so, this needed little encouragement! It was a damp and miserable afternoon, so, we headed into the garden for a bit of fresh air...close enough to home that it didn’t matter if the heavens opened and we got totally soaked! 🌧 ☔️ Some rain water had already gathered in our Tuff Tray and this was inspiration enough for Charlie...given that we’d already been talking about dinosaurs inside he declared, “I know! Let’s get our dinosaurs and make a dinosaur land for them!” Before I knew it, they’d gathered up their plastic dinosaur toys from inside, scooped some sand from the sandpit and liberated some stones from our boarders to form, “A rocky coastline along the beach!” And, their dinosaur land was ready! They loved making up stories and adventures for them and seeing the different footprints they made in the sand as they stomped around on their ‘beach’. Holly found it hilarious that she hid a plastic frog that she found in the sand on their beach too! 🤷🏻♀️ “It’s a dinosaur-frog!” She tells me!...Which actually prompted us to research whether frogs were, in fact, around when dinosaurs were? Turns out, they were! They’ve been around over 200 million years and most of the frogs that are around today (about 88% of all living species) actually began to thrive shortly after the extinction event that signalled the end of all, non-avian, dinosaurs at the end of the Cretaceous Period. So, you really do learn something new everyday! And, it truly is amazing how this type of activity can allow children to lead their own learning and take you in so many different directions. Child-led, open-ended and sensory play has such an important role in the early years environment! Plus, this took zero effort from me (save a few minutes on Google reading about frogs! 🐸🙈) and kept them busy for AGES! Win-Win! #threebeansplaytime #3beansplaytime #dinosaurs #smallworld #smallworldplay #eyfsideas #homelearningfun #homelearning #homelearningideas #eyfs #funlearning #funkearningathome https://www.instagram.com/p/CCJcyWRn-7m/?igshid=1d5twmog8jz7m
#threebeansplaytime#3beansplaytime#dinosaurs#smallworld#smallworldplay#eyfsideas#homelearningfun#homelearning#homelearningideas#eyfs#funlearning#funkearningathome
0 notes
Photo

Floating Lemons 🍋 and Sinking Limes?! We all know that scientists seem to be mildly infatuated with objects that float and sink. Well, the Three Beans are clearly going to be brilliant scientists one day because they just love chucking stuff in water and seeing what happens! 😂 We had some lemons and limes in the house and, after we did the density experiment with the orange last week and discovered that it floats with the skin on and sinks with the skin off, they saw the lemons and limes and ‘hypothesised’ that they looked similar and so would do the same...so, obviously, we had to try this out! Well, would you believe, that isn’t actually the case at all?! Actually, as it happens, lemons always float and limes always sink. Who knew?🤷🏻♀️ First, we put them in the water with their skins on. The lime, immediately sunk down to the bottom and the lemon bobbed around on the top. We weighed the lemon and lime to show that this is the case, even though our lime was smaller and weighed less than the lemon. We peeled them both. The kids examined the lemon and lime more closely...Since the lemon skin did seem to be thicker and coarser and a little more like the orange skin than the lime, they thought this might work in the same way and trap air to make the lemon float when it was on, but it would still sink when we peeled it? Maybe the skin just wasn’t thick enough on a lime? But, once peeled, the lemon STILL floated and the lime still sank? We also sliced them and, even then, the sliced lemon floated but the sliced lime sank?! Crazy! We tried different lemons and different limes...all of the limes sank. We found one lemon that sort of only half floated once it was peeled...it sat mid-way down in our beaker of water, but, it was still more buoyant than the limes and refused to drop to the bottom completely. Obviously, this experiment shows that an object’s ability to sink or float is all to do with density, rather than weight or size. A lime is denser than a lemon...no matter which way you slice it! 😂 And, it is also denser than water, even with its skin on! #threebeansplaytime #3beansplaytime #floatinglemons #sinkinglimes #densityexperiment #funlearningathome https://www.instagram.com/p/CCCRckUHvGx/?igshid=mpjjgaj1xrhd
0 notes
Photo

Butterfly 🦋 and Bee 🐝 Feeders! 💖 The weather has been glorious ☀️ where we are at the moment, so, it was time to take our home learning/crafts outdoors again! We decided to make these colourful butterfly and bee feeders to hang in the garden and around our bug hotel in the hope of attracting even more mini visitors. They were really simple to put together and a fantastic, combined; art, design and technology, maths, sensory and fine-motor skills activity for the kids. All you need is: 🦋 A plastic jar/coffee canister lid (ours were actually lids off some Betty Crocker cupcake frosting, I believe 🤔) - the brighter the colour, the better. 🦋 Some string or twine. (For an easier threading option than string, you could try substituting pipe cleaners/chenille stems instead and just twist them together, instead in tying at the top) 🦋 Pony beads (as little as 15/20 to as many as 100 per feeder...it’s up to you) 🦋 A Phillips Head screwdriver and a ball of Blu Tac or plasticine. (Or something similar, to make holes in the plastic lids!) They’re really simple and you can probably work out what to do just from the pictures but, if not, the full method is available in the original post on our Facebook page 💖 #threebeansplaytime #3beansplaytime #butterflyfeeder #beefeeder #butterfliesandbees #savethebees #kidscrafts #homelearning #homelearningfun #homelearningideas #eyfsideas #funkidscrafts #easycrafts #easycraftsforkids https://www.instagram.com/p/CB6u2Eqnz1w/?igshid=1serummltz44m
#threebeansplaytime#3beansplaytime#butterflyfeeder#beefeeder#butterfliesandbees#savethebees#kidscrafts#homelearning#homelearningfun#homelearningideas#eyfsideas#funkidscrafts#easycrafts#easycraftsforkids
0 notes
Photo

Does An Orange 🍊 Sink Or Float? A Fun and Easy Density Experiment For Kids! Does an orange float or sink when placed in water? Seems like a fairly straight forward question! ...But, is it? 🤔 We decided to give this fun density science experiment a try and answer the question of whether or not an Orange does, in fact, float or sink, whilst learning a unique characteristic of oranges. What you'll need: • An orange 🍊 • A deep bowl or container 🍲 • Water 💦 Instructions: Before you start, ask the children to give their hypothesis. What do they think is going to happen and why? 1. Fill the bowl with water. 2. Put the orange in the water and watch what happens. 3. Peel the rind from the orange and try the experiment again, what happens this time? What's The Science? The first time you put the orange in the bowl of water it probably floated on the surface, after you removed the rind however, it probably sank to the bottom. An orange with a peel is heavier than an orange without a peel. So why does the orange with the peel (the heavier one) float and the orange without the peel (the lighter one) sink? The secret to this experiment is DENSITY! The orange with the peel floats because the peel is porous - has lots of tiny empty spaces in it. These ‘empty spaces’ within the peel are filled with air, making tiny little air pockets within the orange’s skin. These pockets of air help increase the buoyancy of the orange (it’s ability to float). On the other hand, when you remove the peel from the orange, you are in fact making it lighter, but you are also removing those tiny air pockets. Therefore, the orange without the peel is denser than the water and so it sinks to the bottom. #threebeansplaytime #3beansplaytime #homescience #funscienceforkids #stem #stemeducation #stemforkids #stemeducationforkids #homelearning #homelearningfun #eyfsideas #density #floatorsink #sinkorfloat https://www.instagram.com/p/CB1amw5nJzH/?igshid=v6cyvjwdsxyr
#threebeansplaytime#3beansplaytime#homescience#funscienceforkids#stem#stemeducation#stemforkids#stemeducationforkids#homelearning#homelearningfun#eyfsideas#density#floatorsink#sinkorfloat
0 notes
Photo

Looking for a slightly different craft activity to do with the kids? Why not give making these night-time lanterns a go? It’s super easy to do; all you need is some coloured tissue paper, PVA/School glue, an empty jam jar and some string and you’re away! The end result is pretty eye-catching and the kids absolutely love them! Perfect for sparking an interest in night-time walks to track down some nocturnal wildlife, inspiring adventures, camping or just as a fun, self-made, night-light in their bedroom! What Do You Need To Do? - Take an empty glass jam/sauce jar and remove the label - Tear some coloured tissue into pieces. You can use whatever colour(s) you like and create patterns with it on your jar, or just stick the pieces on randomly, the choice is yours! - Using the PVA/school glue and a paintbrush, stick the tissue to the sides of the jar. You can put the glue both under and over the tissue, since it dries clear. It doesn’t matter if you leave a few gaps in your tissue as this can look quite effective too. Apply in whatever pattern you like! Be as creative as you want to be and experiment with different colours/multiple layers etc. - Tie some string/twine or ribbon around the neck of the jar to make a handle. - Leave your creation to dry. - Once it’s ready, you can use a tea light to light your lantern (a battery operated one is fine, to avoid any risk of burns!) or, we actually used some fun, self-adhesive LED bar coasters and just stuck them to the bottom of the jars! They’re perfect because they’re really bright, completely safe and have an on/off switch too. They can even be set to flash! But, we liked the solid light effect best. Now, you’re ready for a little night-time adventure, with your new lantern to light the way! #threebeansplaytime #3beanplaytime #nighttimelantern #kidscrafts #kidscraftactivities #kidslearnthroughplay #playeveryday #homelearning #homelearningfun #eyfsideas #eyfs #earlyyearsideas #earlyyearsmamma #earlyyearseducation #easycraftsforkids https://www.instagram.com/p/CBwlUj2HKl7/?igshid=4e8bs7m7min4
#threebeansplaytime#3beanplaytime#nighttimelantern#kidscrafts#kidscraftactivities#kidslearnthroughplay#playeveryday#homelearning#homelearningfun#eyfsideas#eyfs#earlyyearsideas#earlyyearsmamma#earlyyearseducation#easycraftsforkids
0 notes
Photo

We made Sugar Crystals (Rock Candy)! 🍭 😃 Such a cool, EDIBLE 😋 science project! ⚠️ Advance Warning: This experiment does require patience! ⚠️ A few weeks ago, we decided to have a go at another ‘quick and easy’ science experiment! Spoiler alert: whilst this is very definitely easy and the set up is, relatively, ‘quick,’ there’s nothing all that ‘quick’ about the results! 🙈 But, that doesn’t mean that it isn’t worth doing! (There is also a way to speed up the process, which I will include too...it means that results will take a few DAYS rather than the 4 WEEKS ours took 🙈) This experiment can be adapted to suit a really wide range of age groups from EYFS, to include Scientific concepts covered in KS2 and even KS3! It’s is a fun way to, potentially, teach kids about: - States of matter - Properties of liquids, solids and gases - Changing states - Reversible and irreversible changes - Dissolving - Solutions - Saturation - Evaporation - Precipitation - Patterns - Energy All from 2 ingredients; sugar and water! So, sure, it takes a little while to complete...but, the result is well worth it! And, there are lots of observations to be made during the process too. Checking in on it every day for a month was actually a pretty fun focus point. Plus, this experiment is also edible! So, what’s not to love?! How much of the science 🧪 behind everything you choose to delve into and divulge will very much depend upon how old your children are. But, there really is something for everyone to enjoy about this. My two year just old loved checking on his crystals every day and thought it looked really cool once it was finished! Then he asked if he could eat it? I think that was his favourite part!🤷🏻♀️😂 What you will need: - A clear cup or glass - A pencil - A pipe cleaner or piece of string - 1 cup warm water - 1.5 cups of granulated sugar - Some food colouring (optional) - Flavouring (if you’re planning on eating your sugar crystals as ‘rock candy’ a flavour, such as peppermint, may be added if you like) For the full ‘How To’ and the Science behind it all, find us on Facebook @ThreeBeansPlaytime #threebeansplaytime #3beansplaytime #ediblescience https://www.instagram.com/p/CBt4DEknA1S/?igshid=ga9m5wubqmng
0 notes
Photo

We did the Mouldy Bread Science Experiment! ⚠️ ADVANCE WARNING ⚠️ It's really gross!! This experiment serves as a powerful reminder to ALWAYS WASH YOUR HANDS! Now, this may not be something we need a lot of reminding about at the moment! I think it's ingrained in our minds by now?! But, as time goes on and, kids especially, may begin to become more complacent, it's always a good idea to remind them about the germs that they can't see! For the full ‘How To’ and the Science behind this experiment, check out our latest video on YouTube (link in bio) and see full details in the video description. You can also follow us on Facebook @threebeansplaytime #threebeansplaytime #3beansplaytime #scienceforkids #grossscience #mouldybreadexperiment #moldybread #moldybreadexperiment #learningathome #learning #eyfsideas #homelearning #homelearningfun #stemforkids #youtubers #youtuberkids https://www.instagram.com/p/CBrm7zQnmHS/?igshid=8n691lkr99xi
#threebeansplaytime#3beansplaytime#scienceforkids#grossscience#mouldybreadexperiment#moldybread#moldybreadexperiment#learningathome#learning#eyfsideas#homelearning#homelearningfun#stemforkids#youtubers#youtuberkids
0 notes
Photo

We made a Snailery! 🐌🐌🐌 Check out our new pet Snails! Despite anything you may believe, snails can actually make fantastic pets! After all... - They’re quiet - They don’t take much work - A simple home set-up for them is cheap and easy to make - Children can handle snails (It is fine to hold a snail but ensure you use proper health practices and wash your and your child’s hands straight after holding a snail. Also, I’d suggest that children be fully supervised as people can get sick if they eat snails) - They may be slow but they can be incredibly interesting/mesmerising to watch! - They are a unique pet - They require no special, expensive food and their diet can be mostly left-overs from your fridge The Three Beans have been having a great time learning all about Snails and setting up a home for them,to keep a few as pets! Last week, as part of their home learning, they were reading the story of ‘Jasper’s Beanstalk’. In the story, one night, Jasper heads out into his garden to collect all the slugs and snails in his garden to stop them eating his bean plant! Well, this sparked a bit of interest in them (or, in the snails at least...not so much the slugs!) and we just ran with it from there...”we have snails in our garden, don’t we, Mummy? Do they eat all your plants?” (I’ve recently taken up a bit of gardening myself and yes, yes they do, as it turns out! 😂) So, we decided to head out into the garden and take a look! There are some great Snail related fact sheets and activities available on @twinklparents @twinklresources , so I printed some off for us to look at, including a sheet all about how to make your very own snailery! For full instructions, check out the Twinkl website or follow us on Facebook @threebeanplaytime to see our original post in full. #threebeansplaytime #3beansplaytime #snails #snailery #petsnails #coolprojectsforkids #twinklparents #twinklresources #learning #learningathome #funlearning #funlearningathome #homelearning #homelearningfun https://www.instagram.com/p/CBVw0-3H9Ix/?igshid=l8jeosovju0u
#threebeansplaytime#3beansplaytime#snails#snailery#petsnails#coolprojectsforkids#twinklparents#twinklresources#learning#learningathome#funlearning#funlearningathome#homelearning#homelearningfun
0 notes
Photo

Super-simple Cheerio Bird-Feeders! Having made a (rather enormous!) Bug Hotel, we decided to continue our quest to attract more wildlife into our surroundings, by making some bird feeders to hang on/near to the bug hotel and around our garden too. These bird-feeders were incredibly easy to make (literally, all you need is a few pipe cleaners and a box of whole-grain Cheerios! - we used the Gluten Free kind) but they’re really effective and the threading is fantastic for improving the children’s fine motor-skills, necessary for other tasks, such as writing. Aside from just a little help with securely twisting the ends of the pipe cleaners, the kids were able to make these all by themselves, which they loved! And, in case you were wondering, Veterinarians have approved whole-grain cereals such as Cheerios for birds, as long as you feed the cereal in moderation. Because Cheerios is a cereal which is low in sugar, made of whole grains and contains no artificial colours or sweeteners, it is an acceptable bird treat. So, you can make them safe in the knowledge that you will not be doing the birds any harm at all too! (Though, be warned, there WILL be human snacking during this activity, so, make sure you stock-up well! 😂) You can twist the pipe cleaners into whatever shape you like or even try joining several together! Have fun! 💖 #threebeansplaytime #3beansplaytime #eyfsideas #cheeriobirdfeeder #cheeriosbirdfeeder #craftsforkids #funcraftskids #youtuberkids #kidyoutubers #homelearningfun #learningoutdoors #learningathome https://www.instagram.com/p/CBNbvuonoJw/?igshid=zae8fpzrsefn
#threebeansplaytime#3beansplaytime#eyfsideas#cheeriobirdfeeder#cheeriosbirdfeeder#craftsforkids#funcraftskids#youtuberkids#kidyoutubers#homelearningfun#learningoutdoors#learningathome
0 notes