
thrifty-magic-and-paganism
For the Frugal, the Thrifty, and the Rest!
This is a blog is for people who want/need cheap alternatives/ideas for things when working in in witchcraft and paganism or for those that are in the infamous "broom closet" and need some advice or ideas!
Please keep in mind that some traditions/spells should not or cannot be substituted...
PLEASE! FEEL FREE TO SUBMIT or ASK anything that has to do with saving money or anything else related to this blog!
327 posts
Don't wanna be here? Send us removal request.
Last Seen Blogs

diminutivedeity
Shorter and more Boisterous!!!

ofpolyhex
YO BATTLE BIRD!

mrappy
🤪DjArE🤪

a-nyellowheart
dark&twisted

largando
Untitled
Text
Hey Goblins, uh
Did you know, that you can make an AWESOME journal for your adventures ALL ON YOUR OWN from a cereal box and paper/scraps that you likely have at home/can get from friends or family/you may find around your environment?
They’re called Junk Journals and they’re my entire life.
Im gonna do my best to walk you through how to make one! First, get you a mini cereal box! I use boxes from those cool multipacks of cereal that you can find at Walmart!
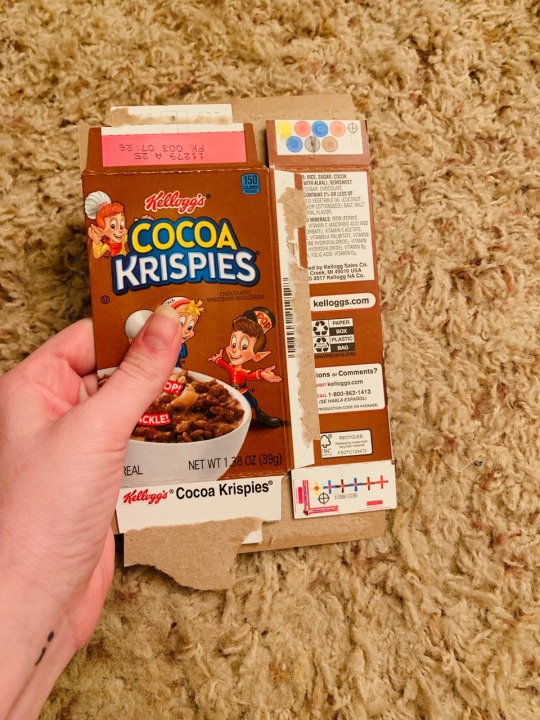
And then cut it out so it looks like this! (I already had one cut, so I’m gonna use that)

That “nutrition facts” side is gone become your spine!
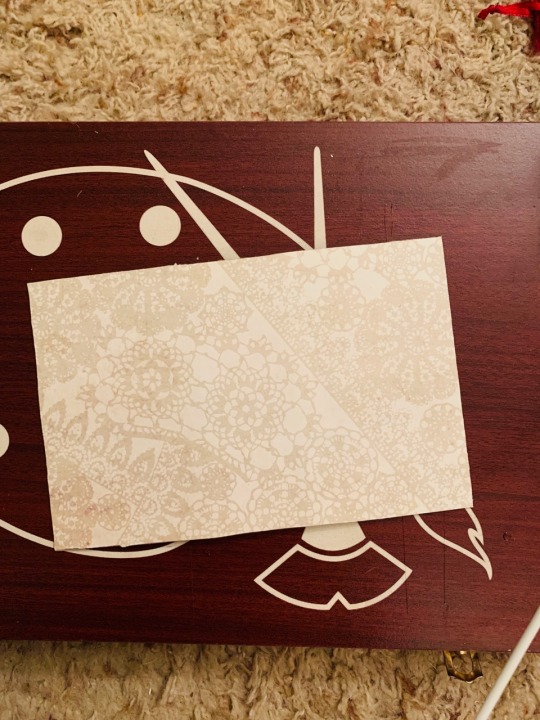
Next, find some paper to use to decorate your cover! I was lucky enough to be gifted a bunch of scrapbooking paper, so I’m gonna use that, but you can also use newspaper, paper from books/magazines, junk mail, napkins, paper towels (excellent texture), etc!
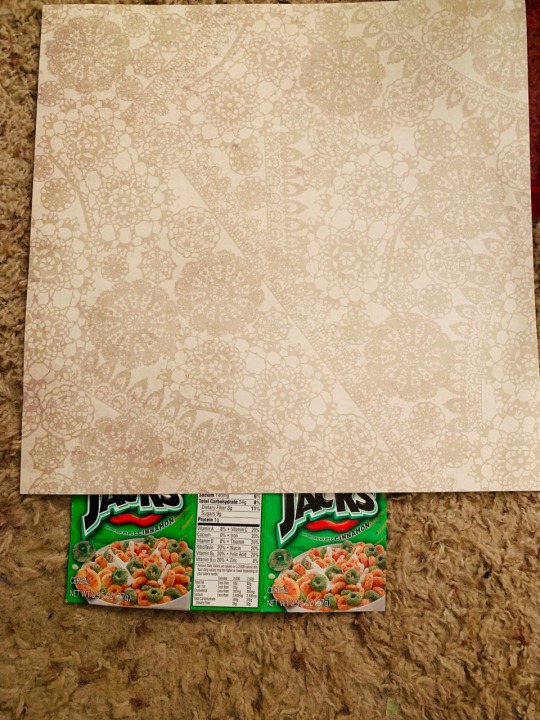
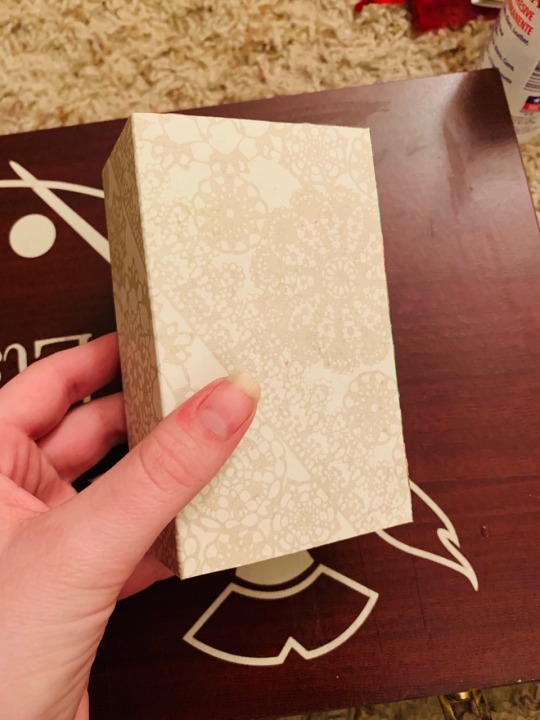
Go ahead and glue that paper to your box (to cover the cereal logo) and cut it out! It’ll look like this;
Next you need to find your pages! Again these can be anything! Junk mail, envelopes, receipts, food wrappers, magazine/book pages, scrapbook paper, computer paper, construction paper, ANYTHING. Just grab a whole bunch!
You’re gonna want to fold them in half and cut them to the size of one of the covers of your box, and layer other pages inside of it to make your signatures, like this!

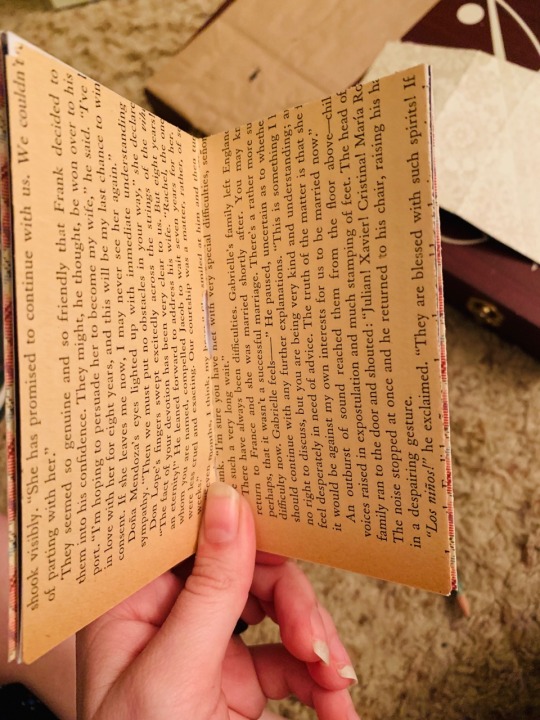
Each signature should be about 7-10 pages. You don’t want them too thick, otherwise the inner pages start sticking out when folded in half. You’re gonna have a LOT of these signatures, as you wanna fill the area in the spine as best as possible. For this one I’m using 7 page signatures. Here’s a pic to show just how much paper you’ll need
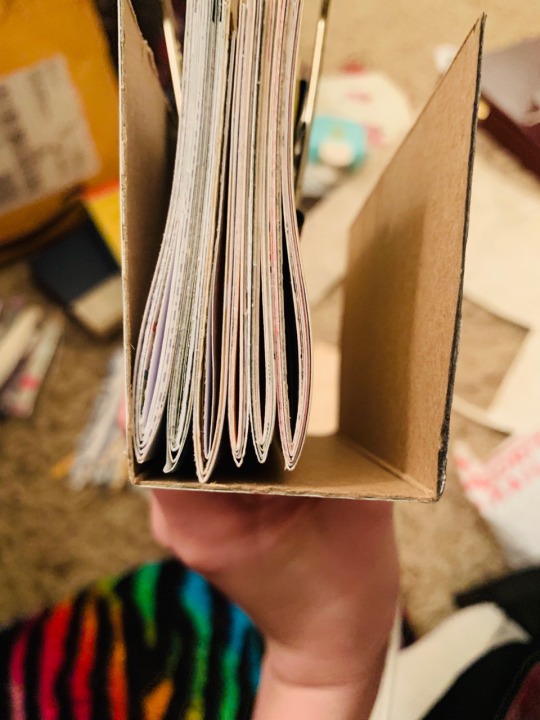
Each of these signatures are 7 pages, 6 signatures have only filled about half of the spine, so I’ll need probably 6 more.
Next you gotta figure out how you want them in your journal. Personally, I like to sew them into the spine, but you can also keep them in the spine with rubber bands, so you can have removable pages! (Be weary that rubber bands may break over time! So you may want to always keep extra bands near it to replace in case one snaps. This is why I prefer sewing them in) I find it best to look up on YouTube how to sew in signatures, just because having someone walk you through it where you can see what they’re doing is easiest. If you can’t access YouTube, there’s plenty of text tutorials on how to sew in signatures online, or you can message me! I’m not gonna go too into detail, but here’s the jist;
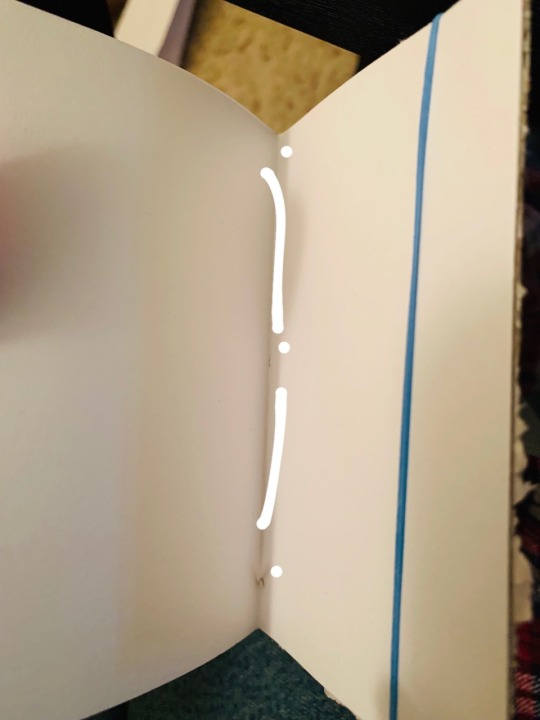

Okay so I’m a forgetful gob and I hecken forgot to take pictures as I was going along kahshshshsh
But essentially, I sewed in the pattern similar to the one I drew. The dots are where the needle goes all the way through to the back. I also like to use rubber band as an extra mode of support but you can do one or the other. I also like both cuz I can tuck stuff in em between the pages. Since I didn’t take more pictures; I’d really recommend looking up a how-to on YouTube or w/e if my badly drawn diagram isn’t clear enough (heh sorry about that)
Next, I glue fabric to the spine. It spruces it up quite a lot and holds the rubber bands in place, plus it give more support to the spine since there’s gonna be a lot of strain on it.
Only 10 photos per post, so I gotta post this and reblog it with the rest.
66K notes
·
View notes
Text
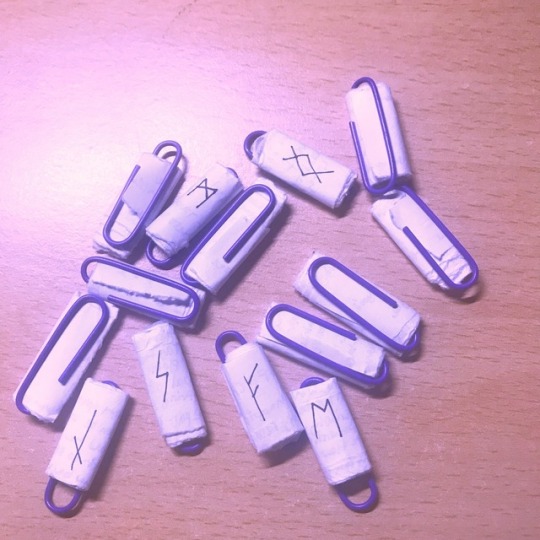
My DIY rune set for learning basic runes (charged and cleansed with selenite, amethyst and citrine)
I basically rolled up paper with runic meanings and slid on some paper clips, hey use what resources you have right ¯\_(ツ)_/¯
2K notes
·
View notes
Text
how I practice semi-openly while still being a secret witch
As of right now, I currently live with others, and I prefer to keep the fact that I’m a witch on the downlow. However, this is less about hiding what I do and more about modifying and finding different ways to refer to it.
If you live in a household that isn’t openly hostile to alternative spiritual practices, and your privacy is generally respected, but you’re still not quite ready to openly admit you’re a witch, here’s a few ways I go about explaining my practice when asked wtf I’m doing.
If you have or want a permanent altar in your room, you can refer to this as your meditation/prayer space. I keep anything too obviously witchy off mine, so no pentacles or other symbols or items that might raise questions, but candles and incense slide under the radar with this approach for me.
If you have deities or ancestors that you’d like to represent or dedicate space to, you can use abstract representations such as images/figures of animals, flowers and plants or simply a candle, crystal, or other inconspicuous item that correspond to them. Whatever your family or household’s religion is, you can also use associated imagery or symbolism in your craft as well, where appropriate. For example, to honor my great-grandmother, I keep a few of her old rosaries and a pocket bible on my altar.
Tying in with the meditation space idea, if you have that set up and want to practice but people are home and you’re worried about being barged in on, just explain to them that you’re going to take your meditation/prayer time and would prefer not to be disturbed. Since my family knows I’m in therapy and receiving mental health treatment, I’ve explained to them that regular meditation is a part of that recovery process and something I need the time and space to do uninterrupted and now I don’t have to wait to have the place to myself to perform work or worry about someone coming home unexpectedly early.
Generally just refer to your practice as meditation or prayer and most people won’t bat an eye, since these terms are usually easier to hear than witchcraft. In my personal experience, being more open about the fact I am doing spiritual work, without going into details, I’ve raised less suspicion than when I was creeping around, clearly hiding something.
With spellwork and prayer, you do not have to say chants or incantations out loud if you are worried about being overheard. You can mouth the words, or simply think them with intent. Anyone that tells you that you must be verbal or need elaborate aesthetic rituals that are very obviously witchy to perform magick is on their high horse.
Arts and crafts can also be a form of spellwork, but to anyone looking from the outside it just looks like you’re really crafty or into DIY. This is also a great way to personalize your altar/meditation space.
If your divination method of choice is tarot, there is loads of information out there about the psychological approach to tarot which can make it seem less like mystical fortune-telling and more like therapeutic introspection through pictorial prompts. I definitely practice reading with those I live with using this approach, and at the very least it doesn’t raise any alarm bells to have my decks out in plain view anymore. Prior to this though, I practiced reading with standard playing cards, which just looks like a game of solitaire.
Most witchy interests can be passed off as non-magickal hobbies. Honoring and working with nature can be environmentalism or gardening, working with crystals can just be a rock collection. Kitchen witchcraft is just an interest in cooking. An interest in space, the ocean, mythology, etc. doesn’t necessarily mean you’re a witch and most people won’t assume it does unless you give them a reason to tie it to witchcraft.
Of course, your living situation might be different than mine. If you live in a stricter household or if your boundaries and privacy are often violated, some of these methods might still not fly with those you live with. If you need more secrecy to keep yourself safe, then that’s 110% okay and doesn’t make you any less of a witch! Use your best judgement about what works best for you and your circumstances. Do not put yourself in danger or at risk for the sake of what you think your craft is supposed to look like. I just see a lot of posts geared towards those either working in deep secret or those working completely openly, and I wanted to throw out some tips for anyone else living between those two extremes.
And of course, feel free to add on to this if you have any other tips for those of us in the middle.
2K notes
·
View notes
Text
$10-ish (and under) Decks
So I’ve put together a list of tarot and oracle decks that are – mostly – $10 and under on Amazon. A few are over $10, but only by some cents, and nothing is $11 or over. All prices are accurate as of the time I grabbed them, and I’m going off of the main prices listed on the page, so you can probably find some cheaper decks in the used section as well!
I included a few offbeat choices, like a set of blank tarot cards and the Tiny Universal Waite – which is honestly too small to use as a deck, but is great for magic. Be sure to check out each listing for yourself if you’re interested!
Also, the prices are definitely going to change – the English Magic Tarot in particular has fluctuated wildly, as you all may remember. And decks that were priced too high at the time of making this list may go down in price, so it’s always worth checking Amazon just in case! Plus there are definitely a few decks that got left off this list.
TAROT
Harmonious Tarot Mini ($8.91)
Tiny Universal Waite Tarot ($8.95)
The English Magic Tarot ($9.34)
The Golden Tarot – Liz Dean ($9.86)
Ceccoli Tarot Mini ($9.87)
Blank Tarot Cards ($9.95)
Manga Tarot Mini – Lo Scarabeo ($10.05)
Smith-Waite Centennial Tarot, Tin Edition ($10.20)
Celtic Mini Tarot ($10.29)
The Wildwood Tarot ($10.39)
Quick & Easy Tarot ($10.71)
Tarot of Marseille Mini ($10.75)
Tarot of Pagan Cats Mini ($10.75)
Tarot Art Nouveau Mini ($10.75)
The Fairy Tarot Mini ($10.75)
Pagan Tarot Mini ($10.75)
ORACLES
Life Purpose Oracle ($8.39)
The Druid Animal Oracle Deck ($8.68)
Creative Whack Pack ($9.60)
Butterfly Oracle Cards for Life Changes ($9.82)
Angels of Atlantis Oracle Cards ($10.15)
Earth Magic Oracle ($10.52)
The Illuminated Tarot ($10.53)
The Psychic Tarot for the Heart Oracle ($10.62)
Goddess Guidance Oracle ($10.87)
8K notes
·
View notes
Text
actually important witch tips
nothing mystical or fancy here. just some serious tips.
- water can’t dilute essential oils. use coconut or almond oil and mix THAT with water.
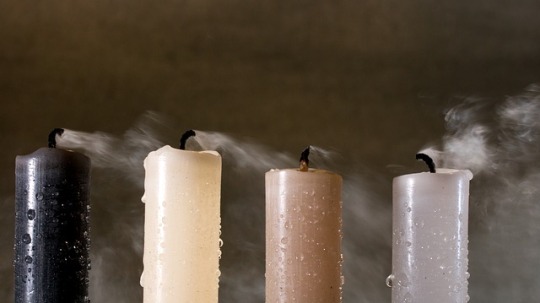
-put something under your coloured candles because they leave stains.
- don’t start fires indoors. candles are ok but keep an eye on them please.
- lavender incense/essential oils are dangerous for cats.
- check thrift stores THEN dollar stores before spending lots of of money online or in a metaphysical shop. save your pennies.
- the worst that’s gonna happen if you tell people you’re a witch is they tell you you aren’t and look at you weird. you aren’t going to be beaten up. that being SAID, it’s perfect okay to not tell people because you’re scared because they’re Christan or you’re worried it might damage the relationship or whatever. YOU as a person comes before the craft.
- that being said, making witch friends irl is AMAZING. PLEASE compare crafts and tips as a way to learn and grow.
- check for chemical reactions or skin reactions or poisons in ingredients before mixing.
- don’t DIY witchy sunscreens with coconut oil unless you want skin cancer. it has an SPF of one and is responsible for a lot of skin cancer in the 80s. this is a FACT.
- yes, while going eco is good, TRUST PROFESSIONALS OVER PINTEREST BLOGGERS. Herbal remedies are not cures or replacements for vaccines.
- fuckin refashion and recycle. saves money and saves garbage. make a tomato can into a succulent pot or use a cola bottle to store herbs.
- check for gas leaks before you go thinking there’s ghosts. Weird smells, lapses in thoughts, hallucinations are all signs of a gas leaks. Also maybe talk to professionals about psychosis if you have access to them? This isn’t saying there aren’t visible spirits out there! But it’s important to note ignore bad things in the hopes that they’ll be witchy, because that’s extremely dangerous
- if some 30 year old starts to call you trash and harass you on your blog because you think pop culture spells are cool, and you like to have fun with your craft, they’re a very sad person. don’t let them drain you, don’t argue. block and report if necessary. You don’t owe anyone your time and it won’t be good for you.
5K notes
·
View notes
Text
Witchy tip:
Washi tape!
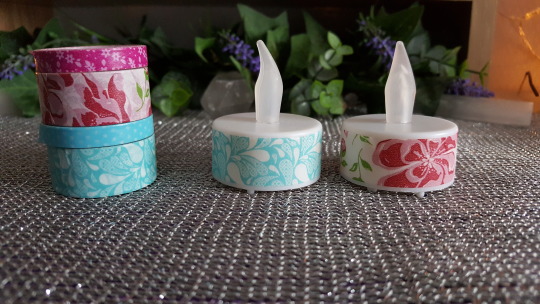
Are you in a dorm or other place where you can’t burn candles, but the healing spell asks for a blue candle? Use washi tape to turn your electric candle into a blue one! Do you want to burn a rose candle on your Aphrodite altar but you’re not allowed an open flame? Well, it doesn’t smell like roses but it’s pretty and has pink flowers!
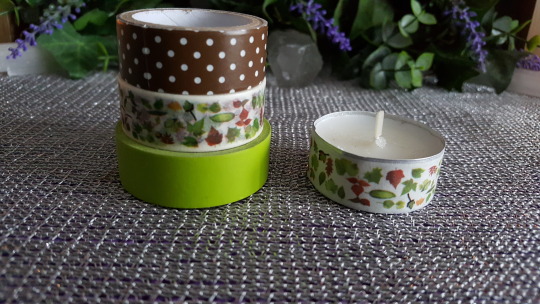
Do you want the tealight in forest-themed travel altar to match the rest of the aesthetic? Washi tape!
Washi tape is removable, so you can keep changing the colour to whatever you need. And you can write on it, so instead of carving candles, you can draw your sigils or runes on the tape!
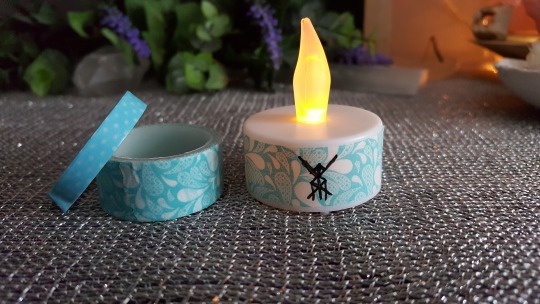
Happy Crafting!
8K notes
·
View notes
Link
I guess I never posted the in browser version of this. I haven’t worked on it since I posted it, but I did run across it again in working on some other projects, so I thought I’d put up the link for this on game jolt. You can easily use it in your browser.
It’s a very simple little digital shrine to Aphrodite where you can make offering and prayers.
13 notes
·
View notes
Text
little witch tip for ya!! if u dont wanna buy lots of different coloured candles all the time u can just buy a bunch of cheap white tea lights and some 1 dollar waxes off ebay, drip a few drops of the wax onto the candle and burn it and the wax will mix in and dye a fair amount of the candle as it burns!! :^) it means u can mix the colours up too for cool unique looks!
46 notes
·
View notes
Text
the best makeshift incense that’ll blow ur fucking mind.
alright sisters, lets get straight into it. to make this, roll up a small piece of paper into a tube. fold one end shut, and fill it up with any non poisonous herb (like lavender or frankincense). lodge that bitch in a pair of tweezers (use skewers and rubber bands if u donthave tweezers), with the folded end pointed down, then balance it over a fireproof bowl like so:
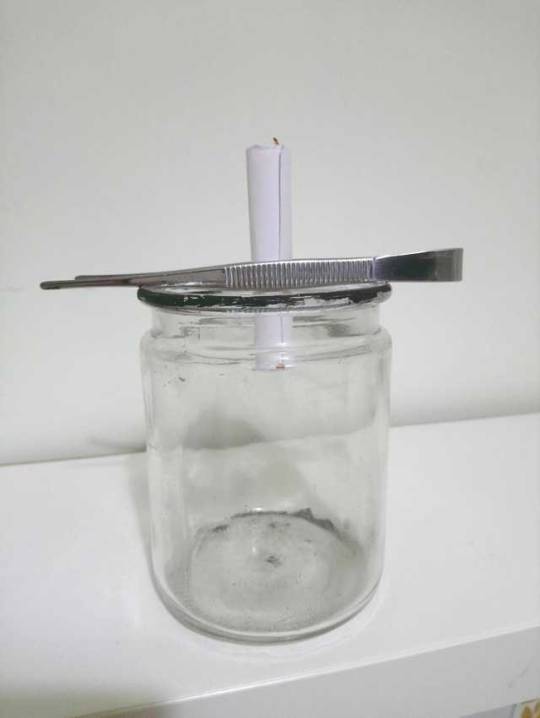
now light the end of the stick thats pointed down. blow it out after five seconds. the smoldering paper and herbs will release a sweet smoke, and any ashes will drop straight into the fireproof jar. congratu-fucking-lations, you made incense.
some witchy tips for this:
- burn secific herbs for different intentions, like chamomile for peace, jasmine for dreams, sage for cleansing etc.
- mark the paper with sigils
- use the ashes to make black salt, or for spell powders
have fun and dont burn ur house down!
3K notes
·
View notes
Photo

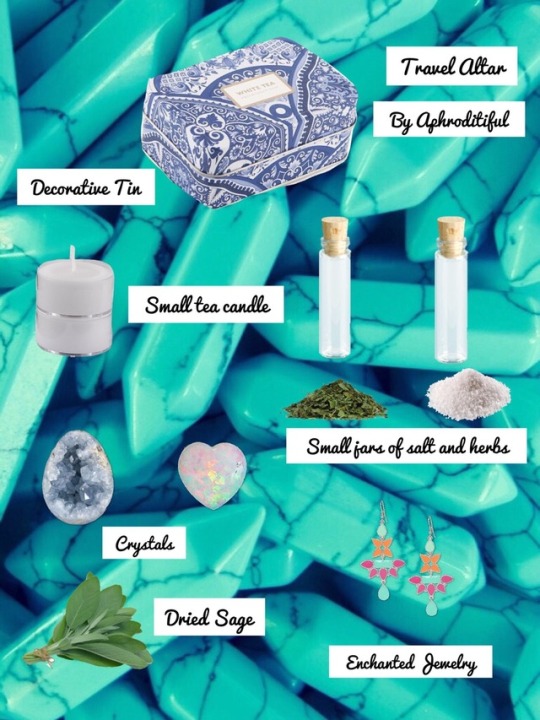
How to make a T R A V E L A L T A R
it’s often difficult to keep practicing your craft when away from home, and when you can’t lug all your items with you.
The perfect solution for this is creating a TRAVEL ALTAR.
Find a small tin, (tin is great, as you can use the lid as a tray to burn your sage in)
And fill it with the following:
✨ small tea candles, colored tea candles are great as well
✨a small pinkie sized bundle of wrapped and dried sage for Cleansing
✨small jars or phial’s of salt and herbs, rosemary or basil are good choices
✨crystals you like working with
✨enchanted jewelry
Wherever you go, you can do a little bit of bath magick, Cleansing or enchanting with the items in your tin. And it’s small enough to keep in a backpack or handbag.
💧🦋Aphroditiful🦋💧
1K notes
·
View notes
Text
Fast Witchcraft
Sometimes you need some magic, and you need to perform it in a hurry.
~ Into candle magic, but don’t have time to let an entire one burn down? Light a match. Birthday candles are pretty quick, too.
~ Pick out an appropriate stone to carry with you. Need some luck? Grab a piece of agate or citrine. Protection? Hematite, tiger’s eye, tourmaline, and onyx, baby.
~ Improv a quick chant. I’m quite fond of variations on ‘work, you fucking fuckfuck, work.’
~ Energy work, if you have the extra concentration to spare. This can go very quickly and is so versatile.
~ If you’ve got enough time for a shower, pick out a shower gel/soap/oil/aromatherapy disc to help give you a boost.
~ Salt forever. Powders if you have ‘em all ready to go. (Try cocoa powder for a love boost, cinnamon for a punch of protection, sugar to sweeten someone’s disposition, cayenne for something with bite.)
~ Pick out your makeup for its purpose and color. (Everybody says draw sigils in concealer, but that’s predicated on having one already made and ready to go.) Try weaving glamours into your foundation, clarity and true-seeing in your mascara, authority in your lipstick. Red lends power to your words. Pink offers charm.
~ Slip a charm in your shoe. Write your wishes on bay leaves.
~ Tie charms and chants (as simple as an incantation, as fancy as intricate beadwork) into pieces of colored string and tie them around your ankles.
~ Slap an appropriate tarot card in your book/planner/bag/whatever to give you a burst of energy for whatever you picked it for.
~ A note on sigils: sometimes these are quick to whip out, sometimes they can take ages to refine. If you have one ready to go, or are able to make one really quickly, try plugging in your phone and leaving the sigil on it while it’s charging to lend that charge to your spellwork.
~ When you have time/energy/resources next, do prep work in advance that can be quickly activated. House wards, money spell packets, don’t-notice-me charms, whatever you need.
6K notes
·
View notes
Text
🥄Spoonie Magick Tips🥄
★ Crystals are your lil batteries and energy emitters
Rose Quartz → Love
Lapis Lazuli → Communication
Amethyst → Individuality/psychic
Carnelian → Confidence
Clear Quartz → Energy amplifier/all-purpose
No Crystals? Rock work too!
★ White Candles, All-purpose Candle magick, simple and cheap too!
★ McDonald’s Salt/Pepper packets work
★ Jar Spells/Charms are simple
★ Keep your altar clean & organized if you have one, your Altar is a reflection of your energy and can emit such.
★Clean Magick area/bedroom → Less stressful & overwhelming
Tip: pick 5 items to pick up everyday if you can’t clean the whole room!
★ Overwhelmed? Make an energizing bubble shield!
424 notes
·
View notes
Text
Things for the Student Witch 🔑

+ Clean (physically and digitally) and cleanse your laptop or phone of any negative energy that can distract you
+ Place a crystal for focus and motivation (agate, amethyst, etc.) into the pencil case you’re going to take into an exam
+ Draw sigils for focus and attention on your hand and charge it before lessons
+ Charm your watch to keep you on time for school
+ Charm the pen you write with to produce amazing work
+ Draw sigils for memory and understanding on the corner of your notes
+ Charm ear studs or glasses to promote clarity when listening to your teacher talk or looking at the board
+ Cleanse and charm your planner at the start of a new school year
+ Keep sun water in your bottle for a boost of energy
+ Coloured pens are your best friend when it comes to colour correspondences
+ School supplies are useful! (correction tape/fluid for banishing and invisibility spells, glue or tape for binding or sealing spells)
+ Keep your grimoire in a binder so you can take it anywhere
1K notes
·
View notes
Text
DIY Lunar Calendar
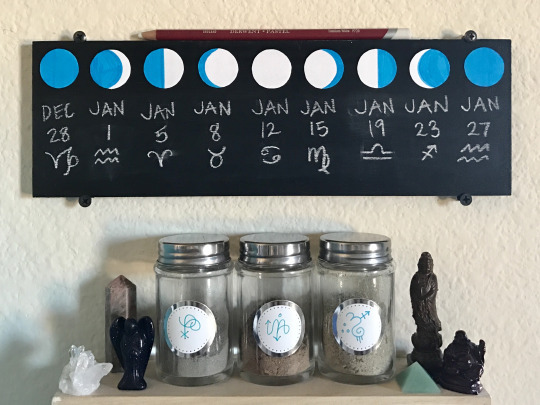
A few months ago, the most beautiful lunar calendar showed up on my dash, thanks to @etsycult! I immediately added this beautiful work of art by ABJglassworks to my wish-list. Alas, I am broke witch, so I came up with an immediate solution until I can afford to splurge :)
You will need:
piece of hobby board
chalkboard paint
white paper
marker
bottle cap
scissors
glue
chalk pencil
Step One
Paint your hobby board with the chalkboard paint. I used three coats of paint and sanded in-between so that it would be nice and smooth to write on. This is probably overkill and not necessary. Just paint until you’re satisfied.
Step Two
Use your bottle cap to trace 9 moons. Cut out your moons. Use your marker to denote the phases.
Step Three
Glue on your moons and then add the dates and astrological signs with your chalk pencil. To find the current lunar phase and astrological sign, The Moon app is perfect!
That’s it! Thank you to Etsy Cult and ABJglasworks for the inspiration! Please consider supporting the artist if it’s in your budget :)
8K notes
·
View notes
Text
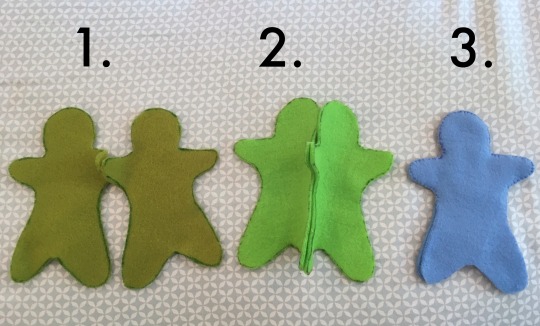
Making Fabric Poppets
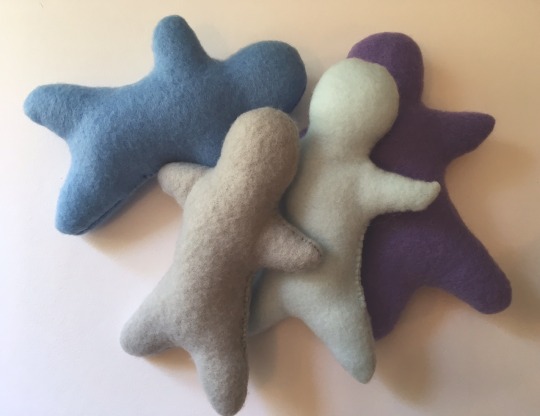
I want to teach you all how I make my fabric poppets, and how you can make your own too. Here is my post detailing all of what I do to make my adorable plush fabric poppets.
I also sell them if making them yourself is too much fuss for any reason. Here are details.
——Supplies——
- Fabric of your choice- My fabric of choice is fleece. The fabric should be a color you can match with your intent, personality, etc.
- Person-shaped pattern to trace- You can use a gingerbread man cookie cutter to make your paper pattern, free hand, or if you like you can use mine which I will gladly sell you a copy of- message me for details.
- Needle and thread- You can use different thread colors for different intentions.
- Stuffing and any extras- herbs, objects, etc.
- A marker of a similar but darker color than the fabric
- Scissors
-Step 1-
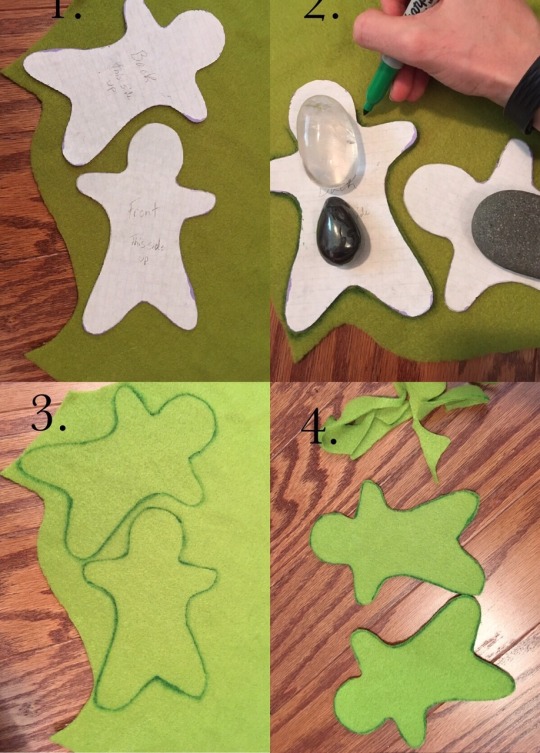
Lay out your fabric. Lay down the poppet pattern on the fabric. I prefer to weight them down with rocks so they don’t shift. (You can of course choose rocks that match your intent.)
-Step 1.5-
I then trace the patter with a maker that is of a similar color to the fabric, but off enough that I can see it. Don’t worry about being super clean with your lines because they will be hidden in the inside seams.
-Step 2-
Next, to sew the pieces together. Place them together so that the side with the marker line faces out.
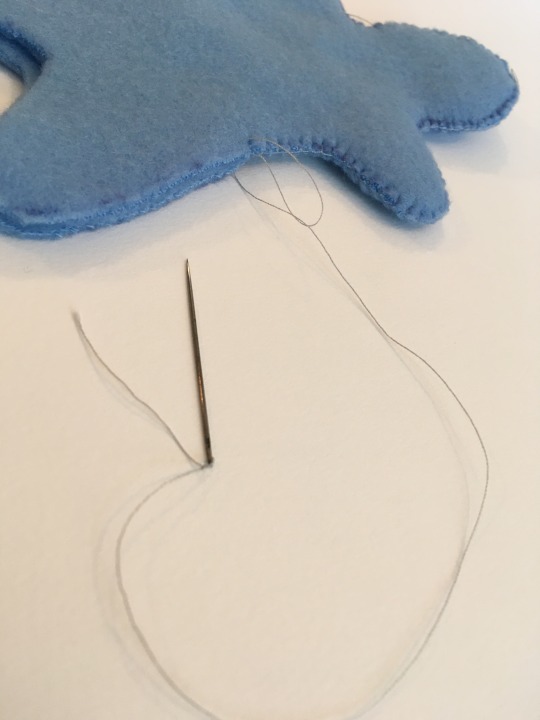
Then, grab your needle and thread. Thread your needle.
Be sure to have a piece of thread to work with that is about as long as your arm. This should be enough for the whole poppet, but make sure to have more on hand just in case.
-Step 3-
Start your sewing in the place where the opening will end later. I typically choose the “armpit” of the poppet because then the opening gives me great access to all of its insides for later.
I use a kind of slip stitch for sewing. Really any stitch will do, but I will show you mine. I put the needle all the way through both pieces of fabric to make a loop, and before tightening I stick the needle through the loop, then tighten. This makes a kind of knot that is durable and nice looking. Here’s a picture:
Aside- Why I hand sew- I find the process of hand sewing to be not only relaxing but also more magical. I can focus on my intentions while I sew, and with each stitch I’m fastening my energy into it. This is by no means the only way you can sew them together, but it is my personal preferred way.
Continue sewing around to join the two pieces of fabric. **Remember to leave a 1.5in opening! Also leave your thread attached!** This is the only way to turn it inside out and hide the seams.
- Step 4-
Turn it inside-out. Reach inside and grab the top of the poppet’s head and pull it through the hole like shown. You may need to poke around a bit to make sure everything is fully turned right-side-out.
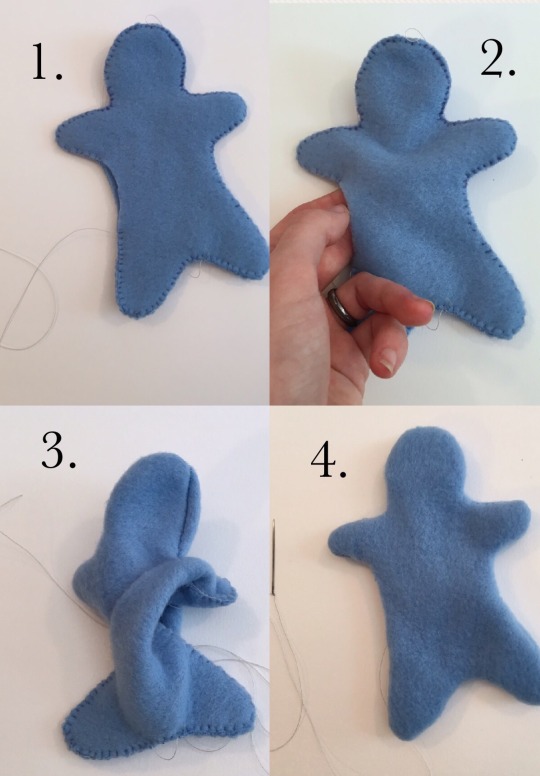
-Step 5- Once right-side-out, your poppet is ready for stuffing. Start with the appendages first, that way you can make sure they are well-fluffed. After that, if you want add in balls of stuffing in the places of major organs to make it more human. (A ball for a brain, a ball for a stomach, that kind of thing)
If you like, add in herbs or objects for your intent, or keys to link the poppet with the person that you’re targeting. Consider positions of the objects and herbs inside the poppet and the significance. I added rose petals in the head and heart of this one, and mint and rosemary in the stomach. That gives it some symbolism, and what witch doesn’t enjoy symbolism?

-Step 6- When it is stuffed to satisfaction, sew up the opening with the same stitch we sewed with before flipping it. This leaves a rough edge, and I actually like it that way. It makes it easier to cut open the stitching if you ever wanted to for any reason. I can’t be the only person that’s wanted to rip someone’s stuffing out (there’s a curse idea) so I hope you find it useful too.
Do a couple more stitches to assure your thread isn’t going anywhere and then cut it off.
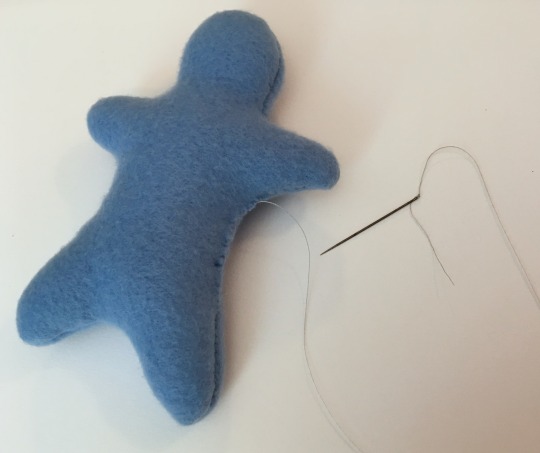
Ta-da! A perfect poppet for all of your witchcraft needs.
Happy crafting!
- Max the Death Witch
7K notes
·
View notes
Text
Room Cleansing for Closet Witches
Being a closet witch is hard, but it has definitely helped me become more creative with my magick. Here are a few tips for witches who want a quick and inconspicuous room cleansing!
Use candles. If you’re in a place where it’s okay to have a small flame, light a few candles around the room to help move the energy. I like putting a few drops of essential oil on mine for an extra kick.
Open the windows. Sometimes just a fresh breeze and some sunlight can help clear out the negative energy.
Play music. Make a playlist of songs that help you get rid of bad vibes.
Adopt some plants! Indoor plants can help purify the air and keep the energy in the room from going stale.
Actually clean the room. I am a messy witch and I live in organized chaos, but straightening your room really does help with making the energy flow better and shaking off negative vibes.
Use crystals. Setting crystals in key places of a room can help cleanse a room and get rid of negative energy.
Make some tea! I am a HUGE fan of tea and I use it for pretty much anything magickal. Brew yourself a cup and let it cleanse you and the room.
Use your own energy. Sweep the room with your own energy to get rid of the bad vibes. Just be careful that none of the negative energy sticks to you!
If anyone has any other suggestions, feel free to add them!
293 notes
·
View notes
Photo
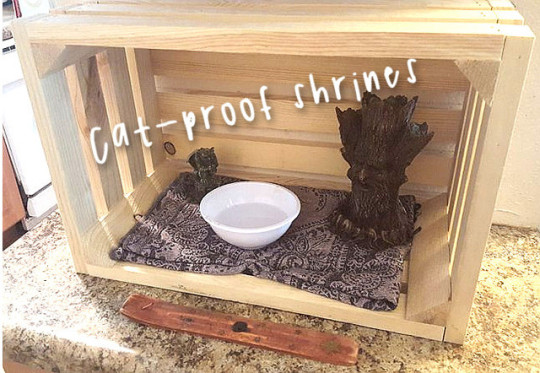
Cat-Proof Shrines
So, fellow cat owners, you have a problem. And that problem is that your cats won’t stop utterly destroying your carefully-curated shrines. Well, I can’t offer a magical cure-all, but here’s a little tip my boyfriend @foxesandflames figured out for his Loki shrine, and I’ve since adopted for the house spirits:
Get a crate. I got mine for $10 at Walmart, but you can check out your local craft store, or probably even the local dollar store if you’re not opposed to plastic crates. Heck, you could probably use a cardboard box. We use wooden crates because they’re a little heavier, reducing the risk that our cats will just push the entire thing over.
Ever since we set our house spirit shrine up in a crate, the most the cats do is sit next to it and poke their little heads in to drink out of the offering water (protip: if you have pets, DO NOT leave out offerings that are unsafe for said pets to consume–just don’t). They’ve yet to knock anything over. They’ve left my boyfriend’s Loki shrine alone entirely.
I also recommend using plastic or otherwise hard-to-break dishes for offerings, and using statues or other entity representations that you wouldn’t be devastated to lose. I also don’t recommend burning candles or incense inside one of these–candle flames especially need a few feet of clearance so you don’t scorch whatever’s above them.
But if you need a simple fix to help discourage cats from climbing all over your shrines, get yourself a crate. Works wonders. You can even decorate the crate.
818 notes
·
View notes