
Don't wanna be here? Send us removal request.
Statistics
We looked inside some of the posts by tilecleaningtoday and here's what we found interesting.
Average Info
Notes Per Post
0
Likes Per Post
0
Reblog Per Post
0
Reply Per Post
0
Time Between Posts
7 days
Number of Posts By Type
Text
17
Last Seen Tumblr Blogs


Fun Fact
Tumblr is used by 21% of adults online aged 18-29 years.
Text
How to Apply Ceramic Tile Grout (DIY)
How to Fill Gaps Between Tiles
Ceramic tile grout mix is a kind of filling material that is used in the construction industry, mainly for masonry works involving the application of tiles. It is used to seal ceramic tile joints after tile installations, and to fill voids and cracks in between the ceramic floor and wall tiles.
The materials used for grouting depend on what material is being joined together. It can be composed of a cement and sand mix if it is required for filling cement block joints, or a cement-based epoxy if it is for filling joints of ceramic wall and floor tiling.
When you have coloured tiles but no matching epoxy filler, a colour tint of any shade can be added to the mix. With that, the tile grout will be a close colour match to the already laid tiles. Grouting material can also be made a contrasting colour that highlights or complements the tiles. If this is the case, the colour tint and epoxy mix will contrast with the tiles.
Grouting is a simple task and can be done by most DIY enthusiasts. As long as you have the essential tools and grouting materials, the application is not a job that requires the services of professionals.
However, if you are not a hands-on person, you can always call in professional tilers from home improvement stores who will carry out your grouting works to your satisfaction.
Tools Required to Apply Ceramic Tile Grout
Before you commence the application, you will need to prepare adequately. Grouting can be a mess if you don’t use the right applicators and tools. To ensure a job well done, you'll need these simple things to perform your grouting task- whether you are installing new tiles, or re-grouting discoloured, broken, or chipped old grout works:
Grout Saw/Remover (an electric grout saw ensures a faster job)
Scraper
Float
Sealer
Attachment
Grout Saw: A grout saw is composed of tungsten carbide blades and is used to cut and remove old tile grout. This is required if renovation works are being carried out on existing laid tiles.
Scraper: A scraper is a simple hand tool that is required to remove old grouting that has been discoloured with age.
Grout Float: A grout float is similar to a trowel used by masons but it has a sponge rubber pad at the bottom. It is used to smoothen the surface when it's just been freshly applied to the tile works.
Sealer: The sealer is water-based and is applied over dried grout. They must possess qualities that resist water, oil or acid-based contaminants.
Guide (Attachment): A grout attachment acts as a guide. It is placed over a rotary implement and it helps in the quick removal of old ceramic tile grout. It can be used in place of the saw for faster and better grouting works.
Preparations Required Before Grouting
Preparing for grouting works actually commences before laying the tiles. You want to determine how wide or narrow your spacing (gap between tiles) will be. To do this, you will need plastic spacers.
Plastic spacers help to space tiles evenly and squarely to ensure that the tiles are laid perfectly straight and squared and the gaps are the widths of your choice. After tile application and before grouting, the X-shaped flexible plastic spacers should be removed.
Now that you are ready to commence your grout works,
Mix the grout material with water. Note that the quantities required will depend on how much tiling needs to be done. Follow the instructions on the package carefully and ensure you use the right ratios of tile grout to water (or the acrylic latex liquid) mix.
Buy grout material that has an acrylic latex additive in its components. This will ensure good flexibility and eliminate the chances of having fine line cracks a few weeks after it has hardened.
If the tile grout you have purchased comes without the additive, you can get some acrylic latex liquid admixture which can be used in place of water.
Instructions on How to Grout
These simple 10 step instructions apply to both wall and floor tiles grout works.
Spray the already tiled surface with a light mist of water. You can do this in sections so the water doesn't dry faster than you can work. The moisture will give the mix some moisture that without it, would affect its setting.
Scoop some amount of grout onto the surface starting from the inner corner of the room. Spread the paste with a grout float held about 30 degrees horizontally from the surface and move in a wiping motion at an angle to the gaps.
Work in a consistent pattern and avoid haphazard smearing.
Carefully and evenly spread the mix while compacting it into the gaps. Add more grout and spread until the spaces are well compacted.
Use the edge of the float to scrape off the excess grout from the floor or walls and wait for 20 minutes (or whatever time is stipulated on the package). During this waiting period, clean all messy grout from the edges of the walls or floor in case there has been a bit of smearing whilst grouting.
Sponge-clean the tiles. Cleaning with a sponge removes the thin film of grout from the tiles without affecting the grout within the gaps. It is important to keep to the stipulated waiting time or it will become difficult to remove the tile grout film.
Rinse the sponge often while cleaning, ensuring the water is wrung out well. Always wipe gently but firmly.
After about 40 to 45minutes, again depending on the stipulated drying period on the package, clean the faint residue of grout off the tiles using a simple paper towel. At this time the grouting has hardened, though not thoroughly, but enough to give a good clean a chance.
After the application, give your finished work a spray of misty water twice a day for three days after grouting.
After curing, apply the grout sealer to prevent the growth of mould and mildew, and prevent staining, yellowing, or darkening.
Ceramic tile grout mix comes in a variety of colours so there is something in the market that will suit each individual need. There are also the un-sanded and the sanded variety which contains some sand, great for those who want a special effect grout finish. The sanded type can be used for wider gaps because the sand serves as a filler, while 'un-sanded' grout is used to fill very thin gaps of mosaic tiles, marble tiles and granite tiles.
How to Maintain Ceramic Tile Grout
Occasionally, clean your tile grout by applying a baking soda paste on the grout, leave it on for some time, and then wash it off. Alternatively, you can use a solution of water and hydrogen peroxide to clean grout, especially if it is stained, or yellowing. You can also use a commercial grout cleaner and let it sit for about 15 minutes before scrubbing the dirt away with a sponge and rinsing it with clean water.
Another way to clean and maintain grout lines is by adding oxygen bleach powder to your mop water (for floors) or your cleaning water (for walls). Apply the solution liberally and on the grout joints. Leave it on for about 15 minutes, then clean thoroughly with clean water.
For a homemade cleaning solution, mix together a half-cup of baking soda, a quarter-cup of hydrogen peroxide, and one teaspoon of dishwashing liquid and apply onto grout/ after about 10 minutes, scrub off the mixture from the ceramic tiles grout lines and rinse well.
Source: www.Discover.HubPages.com
#Ceramic Tile Grout#DIY Grouting#Tile Installation#Grout Application#Grout Maintenance#Grout Tools#Tile Repair#Home Improvement
0 notes
Text
How to Replace Cracked or Broken Floor Tiles
Why Tiles Crack and Break
Tile floors can be beautiful, care-free and long lasting. There is huge variety of tile sizes and designs to choose from, so you can select floor tile that can suit almost any décor. Because it is easy to keep clean, and does not hold on to dirt and dust, tile floors are a boon to those that have trouble with dust, or who have asthma.
Tile rarely scratches or breaks if laid on the right foundation. However, even a little movement in the sub-flooring can cause problems. Because the grout is stronger than the tiles, the tiles will crack first if there is movement or stress. If you're considering tile flooring, then it is a smart move to keep several extra tiles stashed away -- just in case!
Step One: Remove the Broken Tile
How do you go about replacing a cracked, chipped or broken tile?
The first step, once you have checked to see if you've kept replacement tiles stored away, is to remove the damaged tile.
Start by carefully removing the grout surrounding the tile. Why start here? Grout is stronger than the tile, so if you try removing the tile first, you will likely crack the adjoining tiles as well.
I have found that a laminate knife with a carbide tip is the best tool to use for grout removing. Its hard tip doesn't wear out, and you can clear away the grout from between the tiles quite quickly. Once all the grout has been removed, carefully pry away the offending tile. It will come out in pieces that can have sharp edges, so wear a pair of leather gloves for this part.
Once the tile bits are all removed, the next step is to clean away all the original cement or thin-set that held the tile in place. An old chisel works quite well for this, but again, be careful you don't damage the adjoining tiles. If you have a lot of tiles to remove, a local tile shop may be able to loan you a tool for this.
Step Two: Replacing the Tile
Once the tile, grout and old cement are removed and you're down to clean sub-flooring, it's time to get ready to replace the tile. Hopefully you have a record of the grout color. but if you don't, take a sample to your tile shop and compare it to the available colors.
When you have the replacement tile, the grout, and thin-set mortar, you are ready to work.
First of all, clean the area by vacuuming up any loose bits. Mix the cement or thin-set as directed and apply it to the floor with a notched trowel. Flooring trowels should have a 1/4 or 3/8 inch notch.
Lay the new tile in place, taking care to align it with the surrounding tiles. Tap it in place with a rubber mallet (or something similar), and make sure it's the same level as the ones around it. Always use a level for this.
Alternatively, if your tiles are small, apply the thin-set to the back of a new tile. Carefully lay in place, ensuring the spacing around it is even with the surrounding tiles. Gently tap it in place.
Clean any cement from the space around it so there is sufficient room for the grout. Allow the cement to set for 24 to 48 hours.
Step Three: Finishing the Job
Once the cement has cured, the next step is to grout around it. Hopefully, you've been able to match the original grout perfectly. Mix up enough grout for the job as directed on the packaging. Allow it to sit for 10 to 20 minutes, and you're ready to begin.
Scoop some of it out, and using a grout float, press the grout into the spaces. Use the float on a 45-degree angle, and clear away any excess. Once the space between the tiles is filled, scrape away as much excess grout as you can, using the float.
Wait 30 minutes for the grout to settle in place. Next, using a large just-damp sponge, wash away as much of the grout from the tile faces as possible, taking care not to disturb the grout between the tiles. Remember - it has not set yet.
Once the grout has hardened somewhat, polish the tile with a soft cloth. Allow it to harden over the next 36 hours, before thoroughly washing down the area.
Source: www.Discover.Hubpages.com
0 notes
Text
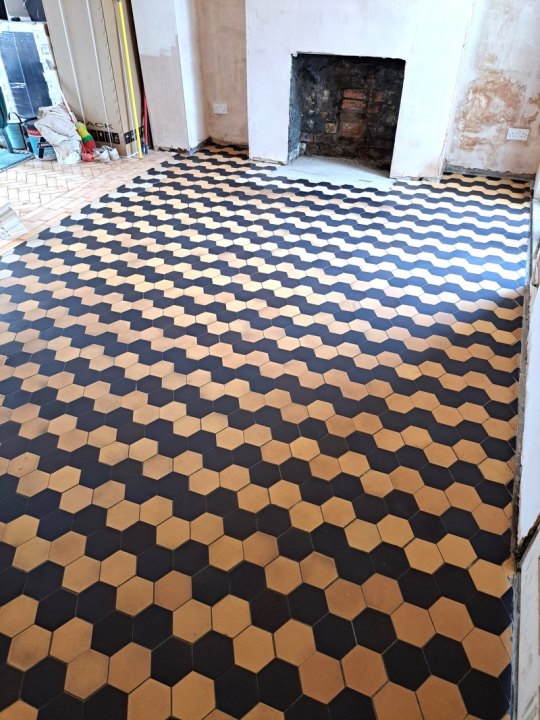
Amazing Restoration of an Original Victorian Tiled Floor in Penarth South Wales
Following a recommendation, this client from Penarth contacted Tile Doctor to carry out a survey on their Victorian tiled kitchen floor and come up with a plan for its restoration. Always happy to provide advice and guidance I arranged a date to pop over and take a look.
As you can see from the photographs on this page the floor was in very poor condition with many tiles needing replacing and a section missing adjacent to the wooden floor. Many stains were visible due to years of neglect as previous builders used it to mix cement and plaster.


Undeterred I advised that the floor could be restored using replacement tiles to match the existing and then with deep cleaning and sealing it should be transformed. I worked out a quote for the restoration which they were happy with.
Cleaning and Repairing a Victorian Tiled Kitchen
After sourcing suitable replacement tiles the first job was to remove the broken and damaged areas of tiling and clean up the base ready for tiling. This is slow and careful work as the replacements had to be cut to match the existing pattern. Once the tiles were ready, they were dry fitted into place to ensure the pattern was correct before being fixed in place with a flexible adhesive and fresh grouting.

The floor was left to set overnight, and I came back the next day to start the cleaning. As this floor was heavily soiled with a variety of different substances, I mixed a variety of Tile Doctor products to achieve the most effective way to lift the stains. The mixture contained a litre of Tile Doctor Pro-Clean, Tile Doctor Remove and Go together with Tile Doctor HBU Nanotech, all of which provide different capabilities and were combined in a container which was then shaken to mix the contents.
The cleaning progressed at 1m2 at a time scrubbing the surface with a handheld pad cut from a 17″ Tile Doctor Burnishing Pad, scrubbing the pitted areas with a scrubbing brush, rinsing with clean water and vacuuming up as I worked.
Once the floor was clean it was then given an acid rinse using Tile Doctor Grout Clean-up to help neutralise efflorescent salts and remove cement smears. Being acidic it also neutralises the floor after cleaning with the alkaline products used earlier.
Sealing a Victorian Tiled Kitchen
The floor was left to dry for 2 days as it had a considerable amount of liquids applied during the cleaning process.
The chosen sealer was Tile Doctor Colour Grow which is a durable tile impregnator. It also acts as a base coat for the next sealer applied which was Tile Doctor Seal & Go which provides a satin shine finish and enhances the rich colours. Both sealers allow for vapour transmission (aka breathable) which is important feature for floors laid without a damp proof membrane.

The floor looked stunning once complete and my clients was delighted with the service and finish of the floor. They have also passed on Tile Doctors contact details to family and friends.

For aftercare I recommended the use of Tile Doctor Neutral Tile Cleaner which is a mild yet effective tile cleaning product that safe to use on sealed surfaces.
Source: Victorian Floor Renovation and Restoration Services near Penarth South Wales
#Victorian Tiles#Tile Restoration#Tile Replacement#Victorian Tile Cleaning#Sealing Victorian Tiles#Kitchen Floor Restoration#Tile Repair#Penarth#South Wales#Pro-Clean#Remove and Go#HBU Nanotech#Burnishing Pad#Grout Clean-Up#Colour Grow#Seal & Go#Neutral Tile Cleaner
0 notes
Text
How to Replace Cracked or Damaged Floor Tile
Cracked and Damaged Tiles
The eyes of a home inspector or prospective buyer often gravitate right to cracks in the floors and walls. A long crack across several tiles indicates a settlement crack in a subfloor. Faulty installation, on the other hand, often causes a single randomly broken tile in the middle of a floor. These small eyesores become bargaining chips later on.
Tile setters usually use a notch trowel to apply a layer of thinset, a mortar-like tile adhesive, to the subfloor. The size of the notch depends on the size of the tile. Larger notches give more flexibility when working on bigger tiles. The notches give the thinset space to compress as the installer levels the tile. When the thinset dries, it adheres to both the subfloor and the tile. After the mortar dries, the installers fill the gap between each set of tiles with grout, a colored cement-like material.
How to Remove the Damaged Tile
Protect carpet: Sometimes the damaged tile butts up against a carpet edge. If so, cover the carpet edge with duct tape. This water-resistant type of tape protects the carpet from grout-colorant and mortar stains.
Cut the grout: When the grout dries, it adheres to the tile's surface. Trying to remove a tile without cutting the grout often leaves the adjacent tile chipped or with its corner broken off. Run a carbide-tipped grout saw around the perimeter of the broken tile. A handheld saw works well for small jobs, such as three or four broken tiles. However, professionals normally use an angle grinder equipped with a tile blade for larger jobs; holding a wet sponge against the blade helps keep the dust to a minimum.
Break the tile: Place a chisel blade approximately 1 inch away from the corner of the tile. A handheld chisel and hammer work fine for smaller projects but consider using an electric chipping hammer when the task exceeds a few tiles. Hold the blade at a 90-degree angle. Strike the chisel with a hammer or depress the electric chipping hammer's trigger, breaking the corner of the tile. Remove the broken corner.
Displace tile: Wedge the chisel blade against the thinset seam, hold the chisel blade at a 45-degree angle, and apply pressure. Use the hammer and chisel, or chipping hammer, to break the tile free from the subfloor.
Remove the remaining tile in the work area: Repeat this process for each additional tile. Discard all trash and debris.
Remove the thinset: Use a hammer and chisel, electric chipping hammer, or floor scraper to dislodge all of the remaining thinset in the repair area. Small pieces of leftover thinset create high spots in the new mortar bed, preventing the new tile from sitting flush with its neighbors.
Prep the Subfloor
Clean the repair area: Discard all of the demolition debris. A vacuum helps collect the dust in the corners and across the exposed subfloor.
Cover slab cracks: Apply an underlayment material over the cracked section of the subfloor. This barrier reduces the effects of any future slab movement.
Install the New Tile
Dampen the subfloor: Dampen a sponge and squeeze its continents onto a concrete subfloor. Do not flood the area, but apply just enough water to make the surface wet to the touch. The pours in the concrete pull in the water, which helps the thinset bond to the concrete. Simply wipe any dust from all other subfloor types with a damp sponge.
Mix the thinset: Pour the proper amount of dry mortar powder and water into a bucket, using the manufacturer's instructions as a guide. Thoroughly mix the contents until it reaches a toothpaste-like consistency with either a margin trowel or drill motor equipped with a mixing paddle.
Apply the thinset: Scoop a small amount of thinset out of the bucket and plop it down on the subfloor. Spread the thinset over the entire space with a notched trowel.
Set the tile: Place the tile on the thinset. Feel the difference in height between the new tile and its neighbors. If the tile sits too low, remove the tile and add more thinset. Push down on the highest corner with the palm of a hand. Move to the next highest corner and repeat. Continue to work the tile down into the thinset until its surface matches the neighbors'. Adjust the tile's position in the hole until its edges align with the neighboring tiles' edges.
Clean the tile: Remove any wet excess thinset from the grout joints with the corner of a margin trowel, or another thin blade tool. Remove any wet mortar from the tile's surface with a wet sponge. Let the tile dry before moving to the next step.
Apply Grout
Clean grout joints: Remove any excess thinset mortar from the joints. A thin Flathead-screwdriver works well for this. Excessive mortar buildup often gives the finished grout a stained or dirty appearance.
Mix grout: Pour one to two cups of grout powder per tile into a bucket. Create a bowl shape in the center of the grout powder with a margin trowel. Add a small amount of water to the bowl and mix the moisture into the powder. Continue this process until the grout can hold the margin trowel upright and it has a creamy consistency without any lumps.
Press grout in joint: Scoop a small amount of grout from the bucket with one end of a grout float. Place the grout on a joint and press it into the joint while holding the float at a 45-degree angle. Fill the joint until the grout crests the gap. Repeat this process around the entire perimeter.
Clean the tile: Fill a bucket halfway with water. Wet a sponge and ring it out. Gently rub the repair area with the sponge, using circular motions to feather the wet grout onto the tile's surface. Clean the sponge. Wipe the sponge across the tile's surface, using a 45-degree angle to the grout joint swipe. Clean the sponge after each pass. Remove all grout residue with the sponge.
Clean Finished Floor
Grout haze forms when evaporating water deposits small particles of grout on the tile's surface. This common problem gives the tile a rough feel and a dull look.
Apply cleaning solution: Pour a small amount of cleaning solution onto the floor and spread it across the entire dirty area. White vinegar often works well on floors with a light haze. However, excessive deposits often require a product designed specifically as a grout haze remover.
Remove the haze: Scrub the floor with a stiff-bristle brush. At first, the grout haze creates a noticeable friction. Each brush stroke becomes easier as the brush removes the haze. Add more cleaning solution, as needed.
Polish the floor: Clean up the dirty cleaning solution and dry the floor. Polish the tile's surface with a dry rag.
Source: www.Discover.HubPages.com
0 notes
Text
Update Your Kitchen Economically with Aspect Peel and Stick Backsplash Tile
An Economical and Beautiful Kitchen Update
The last time we updated our kitchen was when our home was first built back in 2004, so after 15 years, it was time for a change. We like our blue stone counter tops with hints of gray and white in them, and wanted to keep those, but we were tired of the basic yellow wall color.
The perfect solution we found was do-it-yourself peel and stick wall backsplash tiles. They're easy to work with, simple to cut using tin snips, or you can use a shear, and they're applied easily to the wall surface. Once the tiles were applied, we changed the kitchen paint color to a gray hue called tin foil, and we had the update we had been looking for!
Aspect brand peel and stick stone overlay backsplash tiles were what we chose. The design we chose is called Medley Slate. We love the realistic stone vibe from these tiles and the brand new updated look they bring to our kitchen.
Adding backsplash tiles was something we had wanted to do for a long time, and finally we found a way to add them without having to individually apply tiles. We didn't have to deal with grout either, so it was a win-win.
These tile strips can be applied in one afternoon, or you can take your time like we did and do it over a couple days. It takes careful measuring to make sure the tiles fit exactly where you want them to go. You also need to be careful measuring wherever you need to have notches for wall outlets. As the saying goes, measure twice, cut once for best results.
Made from Real Stone
These Aspect peel and stick stone overlay backsplash tiles look like authentic stone because they're made from real stone! The layers consist of the top real stone surface, a layer underneath of bonding resin, underneath that is fiberglass, and on the back of the tiles is a super strong adhesive. These layers provide strength and flexibility, with a strong and beautiful looking stone layer displayed prominently on top.
They give you the option of a real stone look without the hassle of hiring a contractor and having them put real stone on your wall, using mortar and grout. They're made by stone craftsmen in India who quarry and thinly slice stone to give you the look you want without the extra weight.
You'll find that due to the authentic stone, the colors will vary, especially when you choose the Medley Slate style that we chose. Panels are affordable, and when you buy them through Amazon, you get 16 panels that measure 5.9 x 23.6 inches.
For our kitchen, we used 18 panels. You can find individual panels through places that sell Aspect brand peel and stick tiles like Home Depot, which is where we found the extra tiles we needed, so you can get exactly the amount you need with no wasted tiles.
Simple Steps for Effective Installation
Here are a few simple steps for a flawless and easy installation. I have read that some people had trouble cutting these tiles using a tin snips. For the most part, we were able to get by with a tin snips, although my husband does have a band saw too that he was able to use on any pieces that were thicker and harder to cut. Here are some smart steps for a good installation experience:
Lay Your Tiles Out - lay the tiles out in the pattern you hope to use on your specific wall area. This gives you a good idea of what your finished results will be and how everything will look once it's done
Arrange Tiles - Move around and arrange your tiles however you'd like them to look. This will save you from looking back on your results and wishing a certain stone style or color was in another spot
Clean and Prime Your Walls - You want to be sure you walls are clean, using mild soap and water and that if you need a primer you've used one. In our case, we only needed to be sure the walls were clean. Tiles can be applied on traditional sheetrock walls, or over other tile surfaces
Snip, Peel and Stick - You'll probably find spots where you only need to peel and stick your tiles, and other spots where you'll need to notch out areas so the tile can go around wall sockets. When notching tiles, be sure to measure twice so you get it exactly right
We found that these tiles were extremely easy to work with and that the fact that they are lightweight and very flexible, they gave us exactly the results we wanted.
Tiles Can Be Used in Other Rooms
These Aspect peel and stick stone tiles an also be used in a living room around a fireplace. However, the manufacturer does recommend that you stay six inches away from the heat of the fireplace so the adhesive will continue to hold correctly for you.
It's not recommended to use these tiles in an outdoor space because extremes in temperature, humidity, rain or snow would not be well tolerated by these tiles. So basically, stick to indoor use where elements like humidity are well regulated, and you'll be fine.
An entire wall can be done using these tiles, or areas that are underneath cabinets or between a microwave and a stove like we did in our kitchen give your kitchen the update you want, in a fairly inexpensive way. I've even seen where people use these Aspect peel and stick tiles in a bathroom around a mirror, but you need to keep them from being exposed to wetness and extreme humidity for the best results.
Trims are Available for Extra Style
You can also find trims that measure 24 inches in assorted colors to give your Aspect peel and stick kitchen tiles a more finished look. We happened to like the look of these tiles as they were without the trim, but that is always an option if you'd like to use it.
Another word of advice is that if you do a lot of splashing as you cook or if there are other ways that your tiles could become stained, it's advised to use some type of professional stone sealer on the tiles to keep them from getting stained. They can be cleaned using a mild soap and water solution. But, if you feel that your tile may become stained due to heavy cooking oils or other splatters, it may be smart to seal the stone tiles first for your peace of mind.
Source: www.Discover.HubPages.com
0 notes
Text
How to Lay Tile Over an Existing Shower Floor
Can You Tile Over Tile in a Shower Floor?
As a tile shower floor ages, its imperfections can quickly turn into an eyesore.
Each settlement crack in the grout creates a pathway for water to seep into the concrete subfloor. A low spot lets water puddle. Both of these issues promote mold and mildew growth in the grout and subfloor, which darkens the grout in the problem area.
Many shower floors have cut tile with sharp or rough-looking edges. The bad cuts can turn an otherwise good-looking tile floor into an amateurish-looking maintenance nightmare.
Laying a new layer of tile over the existing shower floor can solve these issues without removing the old tile and grout. Below, you'll find instructions for prepping the old floor tile, installing new tiles over it, and finishing the job.
Step 1: Prepare the Existing Shower Floor
Most good tile setters will tell you that a high-quality tile project always starts with subsurface preparation. A tile shower floor uses a mortar and sand mixture as a subfloor. The tile setter dry packs the mortar mixture in the shower pan. He then cuts in the floor's slope with a straightedge.
Once dry, the mortar gives the tile a solid surface to rest on. An improperly created subsurface causes high and low spots in the finished floor. Sometimes it takes as long to prepare the subsurface as it does to lay the tile.
How to Prep the Floor
Remove the shower drain cover and set it aside.
Stuff a rag into the top of the drain hole. The rag prevents debris from falling down into the drainpipe.
Hold one end of a bubble level on the drain opening and slide the other end of the level across the existing tile's surface to check the floor's slope. When measured from the drain opening to the furthest wall, the level should show about 1/4-inch of slope per foot. Slide the level across the floor and mark all high and low areas with a wax pencil or permanent marker.
Put on all safety equipment, including safety glasses and leather work gloves.
Remove any raised tile using a hammer and chisel. Do not worry about damaging the neighboring floor tile. A single raised tile can hold enough water to create a puddle.
Remove all of the old caulking material from the perimeter of the shower floor, including the caulking covering the bottom six inches of each of the wall's corners.
Thoroughly clean the entire shower stall, using any household cleaner that removes soap scum and hard-water deposits.
How to Fix the Slope
Mix a white-colored thinset in a bucket using the thinset manufacturer's instructions. White-colored thinset will not bleed through the new shower tile's grout.
Dampen the floor with water.
Fill any dips or missing tile in the existing tile floor with the thinset, using a flat trowel to feather the thinset into the surrounding tile.
If the existing shower floor does not have the proper slope, build up the low area with thinset.
Run a straightedge across the floor's surface and shave off any high areas of thinset.
Let the thinset dry before continuing.
Double-check the floor for slope and dips with the level. Continue to add thinset to the problem areas, as needed. If the added thinset creates a high spot, rub the high spot with a sanding stone or cinder block.
Clean up all of the debris.
Step 2: Prepare the Drain
Mount a shower drain extension ring, a 1/4-inch-thick plastic ring, on top of the existing shower drain. The extension ring's mounting screws secure the ring against the top of the existing shower drain opening. Use a ring of the same diameter as the existing shower floor drain opening. Most extension rings bolt directly to a four-inch diameter round drain opening.
After the new tile floor dries, the ring will hold the drain cover flush with the new shower floor tile's finished surface.
An adapter can convert a round drain cover into a square cover. The square cover makes cutting the tile around the opening easier. If using a square cover, mount the adapter to the extension ring now.
Step 3: Install the New Shower Floor Tile
Make a bucket of white-colored thinset, using the manufacturer's wet-mix ratio, if applicable. Most shower floors require about one gallon of thinset.
Spread the thinset on the shower floor with a notched trowel, starting at the far corner and working toward the shower curb. Only cover as much of the floor as you can reach with a sheet of tile. When working on a larger shower floor, consider laying about half of the tile at a time, completing the far half first. If the thinset rolls with the trowel, add a little more water to the mixture.
Position the first full sheet of shower floor tile against the most visible corner. If you are working in a larger shower, start at a far corner and work back toward the door. The shower floor sheet tile has several rows of small tiles that are held together with a mesh backing. The small pieces let the tile follow the slope of the floor. The backing keeps the grout joints between each small piece even. Lay each full sheet of uncut tile on the shower floor.
Do not install the tile surrounding the drain opening or any cut pieces of tile near the shower walls yet. Adjust each full sheet of tile until the grout joints between the sheets match the joints between the individual pieces of tile. Lightly tamp the tile into the wet thinset with a grout float.
Measure the space between the full sheets of tile and the adjacent wall. Transfer the measurement to a sheet of tile. Layout the cuts surrounding the drain opening using the drain cover as a template. Make the cuts with an electric tile cutter or a set of tile nippers. Set the cut tile in their respective spots on the shower floor. Lightly press the shower floor tile into the wet thinset with a clean grout float. Wipe any excess thinset from the grout joints with a wet sponge.
Check the floor for high and low spots with the bubble level. Tamp high spots down with the grout float. Add more thinset to any low tile. Wash the floor with a damp sponge. Wait about one hour before continuing.
Inspect each grout joint for thinset. Often while tamping the floor, excess thinset will fill the grout joints. This thinset will bleed through the grout covering it. Once the floor has dried, any excess white thinset will stand out against the grout; white grout makes white thinset look grey. Carefully run a handheld grout saw across any thinset. The saw's carbide blade will cut a groove in the thinset. Vacuum any debris from the grout joints.
Step 4: Finish the New Shower Floor
Mix sanded tile grout, using the grout manufacturer's directions, in a bucket with water. Always follow the manufacturer's powder grout-to-water ratio.
Continue to stir the grout until all of the dry powder has mixed and the wet grout has a uniform color.
Dump the grout on the tile floor and press the grout into the joints with a rubber grout float. The grout must completely fill the cavity between each set of tiles.
Cut in the corners with the edge of a margin trowel. The margin trowel will give the corners a 90-degree cut.
Clean the floor with a damp sponge, using circular wiping motions. Wait 24 hours before continuing.
After the grout has dried, polish the tile's surface with a clean, dry rag. Clean any leftover grout on the tile that the rag will not remove with white vinegar and a stiff-bristled nylon brush.
Let the floor dry completely.
Run a bead of tile caulking around the perimeter of the shower floor, covering the floor-to-wall grout joint.
Let the caulking dry completely before using the shower.
Is Tiling Over Tile a Good Idea?
Although it's certainly possible to tile over existing tile, and in many cases it can be an easy and cost-efficient approach, you may wonder if it's a good idea.
The answer, as with most things in life, is that it depends. In some cases it's a perfectly fine idea, and in other cases it's not necessarily the best strategy. One of the main considerations is whether or not the existing floor is in good condition.
When to Avoid Laying New Tile Over Old Tile
It might not be a good idea to place new tile over existing tile if the old tile is cracked, badly damaged, loose, or uneven. If there are any leaks or moisture issues, this is also a red flag. It may be a good idea to consult with a professional to help you assess the condition of the existing floor before proceeding with the project.
Other Considerations: Height and Weight
Laying new tile on top of old tile will raise the height of the shower floor. Consider to what extent this will affect the distance between the new floor and the shower curb. You don't want to create a situation where water starts spraying or splashing over onto the bathroom floor.
A new layer of tile will also increase the weight that's sitting on top of the floor. In the case of a shower floor on its own, the increased weight shouldn't be too great, but it's just something to keep in mind. Typically, this would be a more significant issue if you were not only re-doing the shower floor, but the entire bathroom floor and/or the shower walls, as well.
Source: www.Discover.HubPages.com
0 notes
Text
Marble Floor Restoration in 3 Steps
Marble floor restoration may be required if the floor in your home is stained, dull, and unsealed. Despite its hardness, marble is a porous stone and can be stained easily by colored liquids or acids. Since the floor also receives a lot of foot traffic, it can lose its shine in time. The constant traffic will also cause the previously used sealer or impregnators to lose effect. For a quick guide to marble floor restoration, read the steps below.
What You'll Need:
Marble cleaner
Warm water
Mop
Vacuum cleaner
Baking soda
Marble polishers
Marble sealers
Step 1 – Clean the Stains
Clean dirt, grime, and stains using a mop soaked in warm water. Simply mop the floor to remove the dirt and grime and allow it to dry. However, this may not be sufficient when you are dealing with old stains that have never been cleaned. Stains from coffee, wine, and acids are also a lot harder to remove. In order to clean these, make a mixture of water and baking soda that you can apply on top of the marble floor and allow it to sit for about one night. The mixture will suck the stains out of the pores and allow them to be removed. In the morning, mop the affected area, let the floor dry, and clean with a vacuum cleaner.
Step 2 – Polish the Marble
Polishing the stones to produce a new look is the next step in the restoration process. Marble polishes come in many forms. Some are mixtures you can apply on top of the floor surface. However, if the marble needs to be polished heavily, consider using a diamond marble polisher. This abrasive tool can be rented from an equipment rental store. Keep in mind that the polisher will remove a thin layer of the marble to deal with scratches and irregularities. Diamond marble polishers work like fine-grit sandpaper and can make the marble look shiny and new.
Step 3 – Seal
Apply a marble sealer or impregnator (this step is optional and up to the homeowner). Just remember that sealing will protect the floor from contaminants that cause stains. The sealer will last for about two years or so depending on the amount of traffic the marble floor gets. Carefully choose the type of sealer you will use because some sealers can cause discoloration. Talk to an expert on this matter to get the best advice and never use an ineffective sealer on the floor. Choose only from the recommended products on the market.
More Tips for Marble Floor Restoration:
Although marble floor restoration is an important aspect of marble maintenance, remember that regular cleaning is also essential. Always make sure you clean the floor immediately after a contaminant falls on the floor. Never allow acids to touch the floor as well. You should not use cleaning products such as salt, vinegar, and lemon juice for cleaning because they can damage the stone.
Source: www.DoItYourself.com
0 notes
Text
How to Keep Your Tile Floors Sparkling Clean
Before You Start
Now that you’ve taken up all that old, worn carpet and replaced it with beautiful tile, you’re probably curious about its care and maintenance. If you want to extend the life of your tile floors and keep them looking like new, you need to know the basics of tile cleaning.
While cleaning tile isn’t necessarily rocket science, there are a few tricks to ensure your floors stay sparkling clean for years to come. These simple tips apply to most types of tile, including ceramic, porcelain, vinyl, linoleum, natural stone, or cork.
Sweeping
Believe it or not, some people don’t bother to sweep their tile floors. The results in granules of dirt sticking to the tiles like a magnet—especially textured tile like tumbled marble or slate. That layer of grit eventually etches into the tile, dulling the surface and making it difficult to keep clean.
Routine sweeping loosens and removes most of the dirt. An upright vacuum cleaner with a bare floor setting will also work, but over time it can scratch the tiles. If you must, use a canister vacuum with a brush floor attachment to avoid surface damage.
Damp Mopping
Tile floors should be regularly damp mopped using a mild cleaner, preferably one recommended by the manufacturer. If you’re not certain which cleaner to use, stick with water and a squirt of dishwashing liquid or a cup of white vinegar per gallon of water. Both are safe for use in homes with children or pets.
Preventing Soap Residue
Sometimes your tiles end up looking cloudy if you clean with dish detergent soap. Remove the haze with a liquid non-abrasive cleanser. If the film remains, try using a mild DIY cleaner made from diluted lemon juice. It will work on porcelain or ceramic tiles. Avoid using it on natural tiles that can damage the stone.
Deep Cleaning
If your tile floors are heavily soiled, mopping probably won’t help much. For extremely dirty tile, use an oxygen bleach solution and apply with a scrub brush to remove embedded dirt and grease. After applying a cleaning solution, rinse thoroughly with clean water to prevent breaking down the tile's protective surface.
Tackle years of ground-in dirt and gunk by purchasing or renting a steam cleaner. If your floor is beyond DIY help, leave it to the professionals to get out stubborn stains and grime.
Dry the Tiles
Once you’ve mopped the tiles, it’s best not to let them air dry. It will likely create water spots, especially if your local water contains heavy mineral deposits. Immediately dry the tile floor with a clean, lint-free cloth or a cotton or microfiber mop.
Grout Cleaning
Don’t forget about the grout. Clean tiles are just no good unless the grout is also sparkling clean. When tile is originally installed, a protective grout sealer is applied. The sealer should be reapplied each year to prevent stains, dirt, and moisture from penetrating the grout’s porous surface.
To clean dirty grout lines, mix up a batch of hydrogen peroxide and baking soda or oxygen bleach and water in equal parts. Scrub stains and discoloration with a toothbrush and rinse. Allow the grout to dry completely and then apply a sealer.
Guide for Cleaning Different Types of Tiles
Granite tiles: Just like granite, marble, and other natural stone tiles, it should be mopped with a pH-neutral cleanser. Harsh cleaners can discolor, cause streaking, and seep into the stone. Make sure granite tiles are sealed to prevent stains.
Marble tiles: Polished marble requires routine maintenance to enhance its sheen. Avoid cleaners with a high pH level. Stay away from stiff bristles and scouring powder that will scratch the surface. Routinely buff polished marble to keep it shiny. Tumbled marble has a natural appearance that doesn't require polishing.
Slate tiles: Use a mild detergent or stone cleaner. Acidic or alkaline ingredients will definitely etch into the slate. Rinse with clean water and wipe with a soft cloth to prevent spotting. If you find scratches in high-traffic areas, use a clean cloth and rub mineral oil into the abrasions to conceal abrasions.
Linoleum tiles: Linoleum is still available and gives kitchens and bathrooms a retro look. Linoleum is quite different than vinyl tiles. Begin sweeping or using a vacuum cleaner to remove dust and dirt. Mop with a special linoleum cleaner or homemade mixtures of water and borax or vinegar, baking soda and water to remove stubborn grime. Every few months apply wax and buff to a shine.
Cork tiles: Sweep and dust the floors and damp mop at least once a week. Wipe up spills immediately. Add a few drops of dish detergent or oil soap. Acid and base ingredients can damage its protective sealer. Excess water will saturate the cork causing the tiles to swell and warp. Use a damp sponge mop to clean the tiles.
Vinyl tiles: Vinyl is easy to clean and lasts over time. Sweep up the dirt, use a damp microfiber mop with warm water, or a vinyl cleanser. Avoid vinegar, abrasives or scrub brushes that can mar the vinyl surface.
Source: www.Discover.HubPages.com
0 notes
Text
Welsh Tile Wizard Restores Ruined 1920's Tiled Floor in Cardiff
Tile Doctor was contacted by a client who had recently purchased a 1920’s property in Cardiff with a Encaustic Tiled floor that was in a bad state. The property was having major building works carried out to bring it back to its original condition and this included the tiled floor.

The floor in general was in a very bad condition with builders’ plaster and cement staining in many areas, and to make things worse a lot of tiles were missing and damaged. Normally replacing tiles isn’t a problem but these particular tiles were very uncommon in colour shape and size and the pattern was very reminiscent of the Art Deco designs that were fashionable when the house was built.


Having surveyed the floor I came up with a restoration plan and explained that it should be possible cut the shape out of a larger tile and try to match the colour as best as possible. Once the clients and I decided on the closest colour I was then able to plan the restoration project in detail and provide an accurate quote.
Cleaning and Repairing an Art Deco Encaustic Tiled Floor
Before we could even contemplate cleaning the floor it had to be whole so the 1st job was to prepare the damaged areas for tile replacements. This involves carefully removing the damaged tile and cleaning up the foundation beneath ready to accept a replacement.
Next step was to cut all the replacement tiles to replicate the octagonal shape and size then dry fit them to check if any adjustments were needed. Once all the replacement tiles had been cut, they were fixed in place with flexible adhesive and then grouted. The floor then needed time to set before cleaning so that was it for the first day.
On day two work stated to deep clean the encaustic tiled floor of previous sealers and paint. To do this it was covered in a strong dilution of Tile Doctor Pro-Clean combined with Tile Doctor Nanotech HBU Remover for extra power. This was left to soak into the floor for a good fifteen minutes before scrubbing it by hand with a black scrubbing pad cut to size. Working it into the floor like this is less aggressive than with a machine and ensures 100% coverage with no gaps in the cleaning. Once done the floor was rinsed and the soiling extracted with a wet vacuum.
The next stage was to clean the floor working at 1 m2 at a time, again with a coarse black pad cut from a 17″ Tile Doctor pad. This time the pad was used to work in Tile Doctor Grout Clean-up into the surface to remove the cement smears. As work progressed the floor was rinsed with fresh water and all the residues vacuumed away. Working this way allowed me to keep progressing until I was satisfied the whole floor was clear and as clean as it ever could be.
The floor was then left for two days so it would be completely dry for the next step of applying a protective sealer.
Sealing an Art Deco Encaustic Tiled Floor
The client wanted a natural matt finish to the floor, so I had recommended sealing it with Tile Doctor Colour Grow which is a colour enhancing impregnating sealer that leaves a very durable matt finish.
Colour Glow allows for vapour transmission which is essential on old floors like this one that don’t have a damp proof membrane. The sealer soaks into the pores of the cement tile protecting it from within and ensure dirt remains on the surface where it can be easily cleaned away.
The clients were delighted with the results and relieved I was able to restore the floor as an original feature. They were told by other contractors that the floor would have to be removed and replaced at a substantial cost.
For aftercare cleaning I advised the use of Tile Doctor Neutral Tile Cleaner which is a mild yet effective tile cleaner that won’t impact the sealer.
Source: Encaustic Cement Tile Restoration Service near Cardiff South Wales
#Art Deco Tiles#Encaustic Cement Tiles#Encaustic Tile Cleaning#Floor Tile Restoration#Tile Repair#Tile Replacement#Cardiff#Southeast Wales#Pro-Clean#Nanotech HBU#Grout Clean-Up#Colour Grow#Neutral Tile Cleaner
0 notes
Text
Wood tile: a hardwood substitute
The hardwood downside
Hardwood flooring is beautiful and elegant but putting it in your bathroom is like flushing money down the toilet. No, seriously, it really is. Hardwood was never meant for humid temperatures, in fact that’s how wood rots. Moist wood is the perfect breeding ground for decomposing fungi that LOVE to eat your wood. Sounds pretty gruesome right?
So what do you do?
Well, you could (A) not install hardwood in your bathroom or (B) you could substitute wood tile instead.
Wood tile -the bathroom hardwood substitute Wood tile is just what you’re thinking, it’s ceramic or porcelain tile that’s fully colored, weathered and textured to look like real hardwood planks.
Ceramic vs. Porcelaine Tile
You can find wood tile in both ceramic and porcelain. One of the big differences between the two is that ceramic absorbs water and porcelain doesn’t. According to Bryan Blair, with Valley Tile, even ceramic does absorb water, it's still a good option for the average household bathroom. The absorbed water won’t destroy your wood tile like it destroys hardwood. You will have to clean your ceramic wood tile more than porcelain because of its coarse, dirt attracting surface. Also, because ceramic is softer than porcelain, it's best installed indoors.
Works great with pets
The benefits of wood tile don’t stop at the bathroom, they’re also a great option If you have pets. Hardwood is easily scratched and destroyed by dog or cat claws, accidents, and spillable water dishes. Wood tile is resistant to all of these. If your pet does have an accident when you’re away from home, you can clean it up easy with a sanitized rag. If your tile is porcelain, there's no need to worry about it staining or absorbing the mess either.
Easy to install
Installing hardwood flooring is a much longer process than wood tile. You have to nail each plank in place, which can take a long time if you don’t have the right tools. Wood tile is easily installed by simply placing your tile, adding grout and cleaning up. You want to pick a grout color that’s going to blend in with the tile so as to create a realistic hardwood effect. The nice thing about wood tile is that it comes in a wide range of plank sizes at more affordable prices than hardwood. Watch this clip for a more detailed explanation of wood tile installation.
Cleaning wood tile
Cleaning wood tile is simple and easier than cleaning hardwood. If you get in the habit of sweeping regularly and going over sticky spots with a damp rag, you’ll do great.
-Never use highly abrasive tools, like steel wool to clean your tile. This will destroy it.
Something different
Wood tile is not only a great hardwood substitute but it’s also just plain something different. As a new product on the market, wood tile can be both a rare and unique addition to your home. Install it in your bathroom or throughout your home. It’s an affordable wood substitute that will stand the test of pets, water, and time.
Source: www.Discover.HubPages.com
0 notes
Text
Tile Spacing, Grout Cleaning, Tile Options, and More
Tile and Grout: A Lifelong Relationship
Tiling accrues multiple benefits in the long run: style, durability, and cleanliness, to name a few. That said, there is another factor that has made a significant contribution to the growing popularity of tiles—versatility.
Gone are the days when tiles were limited to kitchens and bathrooms. Nowadays, it is a fad to have tiles in living rooms, foyers, hallways, and even countertops, thanks to their durability, ease of maintenance, and style, not to mention their high aesthetic appeal. With tiles, you can exercise your creativity and choose material, colours and designs as per the décor and purpose of the room.
However, you should take note of the fact that tiling also involves the formation of grout, and both have an important role to play in creating the overall impression of your space. Therefore, as a homeowner, you must pay equal attention to the cleaning of tile and grout.
Tile Spacers
Like tiles, spacers are also available in a variety of options ranging from a traditional plastic cross, to a spacer with a knob on top to facilitate the ease of placement and removal. Because spacers can be washed, it is possible to reuse them over and over again for every tiling project.
Facts About Tile Spacers
The purpose of spacers is to ensure that tiles appear proportionate.
Traditional sizes for tile spacers range between 1/4-inch and 1/16-inch.
Commonly chosen spacers measure 1/4-inch or 3/8-inch.
1/2, 3/4 and 1/8 are some of the other sizes that are used.
There is no golden rule in regards to the size of spacers that should be used during tiling. It depends on multiple factors.
Spacing Between Tiles
No matter which type of tile you choose, it's essential to ensure that the tiles are laid evenly in a straight line with uniform spacing between them. To this effect, the importance of spacing cannot be stressed enough because it has a direct bearing on the final outcome. Not only should you determine the amount of space between your tiles, but also the grid along which the tiles should be laid.
There are several factors that need to be taken into account while determining the space between tiles and primary among them is the size of the individual tile. Once you have ascertained the dimensions of the tiles, the next step is to gauge the spacing between them so that the need to cut or resize is minimal. It will be easier to lay down tiles without requiring too many small pieces or fillers along the edges and across the layout.
Likewise, in the case of an uneven floor, space between tiles should be reduced as much as possible so that the grout remains in its place and you do not have to re-grout within short intervals. Tile spacers are tools that enable you to adjust the space between tiles and ensure that they are aligned correctly as per the pattern or design. Spacers also come in a variety of sizes and it is imperative on your part to identify one that would be best suited for your project.
Why Is Tile Spacing Important?
If you have opted for tiling with the intention of acquiring trendy interiors, then it is all the more important that the task should be handled with care and proficiency. Paying attention to the spacing between the tiles is one way of accomplishing this objective. The spacing has a significant fall-out on related aspects like the size of tiles to be used, number of tiles required and their alignment.
While spacing between tiles might seem insignificant at first, no homeowner should make the mistake of ignoring it. Here's why:
It is only after having ascertained the space between tiles that you must start cutting as per specific dimensions. This would serve to avoid excessive cutting and enable you to curb wastage.
Spacing would enable you to ensure that your tiles follow a certain grid and this, in turn, would automatically lead to a symmetrical outcome.
Courtesy of using spacers throughout the area, the resulting grout will also be consistent in terms of width, thus imparting a neat look even in the corners.
Application of spacers would ensure that your tiles would fall in a straight line and there would be no requirement of fillers even along the edges of the room.
Tools for Cleaning Grout
No matter which type of tile you use, the inclusion of grout is a must. What might vary is the way in which it is applied.
Grout is obtained by adding cement to a mixture of water and sand and it is regarded as being the perfect material to hold tiles together and fill the void between them. Usually, the level of grout is slightly lower than that of tiles and this explains why it is prone to collect dirt and grime. While it is possible to add a layer of protection to the grout by incorporating a sealer, the shield is effective only for a short duration.
Over a period of time, grout appears as a crisscross of dark lines; courtesy of stains, spills and dust having gathered in the crevices and this, in turn, shrouds the tile floor in dullness. Noting how imperative it is to clean tile and grout regularly, you would do well to be aware of appropriate tools for the exercise so your results are truly effective and long-lasting.
Small Grout Brush
Designed to be larger and wider than a normal toothbrush, it is particularly useful in scrubbing out dirt from narrow lines and corners that may otherwise seem inaccessible. Unlike a toothbrush, the small grout brush comes with stiff bristles that may be curved or U-shaped, and hence are well-suited to remove not just dirt, but grime and stubborn oil stains too.
Triangle-Shaped Grout Brush
Slightly bigger than the small grout brush, there are three faces to this brush. Two serve as grips for holding, and the third features stiff bristles. What renders them truly convenient is the provision for attaching handles to grips, which means that you can use them to scrub grout without going down on your hands and feet. This would also serve to enhance their reach although some far-flung corners might still be inaccessible.
Power Brush
This grout-cleaning brush is not just the most flexible but is also regarded as being the most efficient. The flexibility of this brush is attributed to the provision of attachments, like a sponge, scouring pad, roller brush and so on, and to the adjustment mechanism of its handles- thanks to the pole can be lengthened or shortened as per the requirement. The source of power in this grout-cleaning brush is a battery that lasts for about 30 minutes per stretch. After this, it would need to be recharged or replaced.
Professional Grout-Cleaning Brush
At first glance, these might resemble mops and brooms but closer examination would reveal thinner and narrower heads which render this brush perfect for cleaning grout under tables and chairs not to mention behind fixtures like a toilet seat or a cabinet.
Some of the options offered under this category include a brush with V-shaped bristles for extracting stubborn grime and grease and a two-sided brush wherein one side is designed to clean grout and the other side is meant for cleaning tiles.
Types of Tiles
As one of the oldest forms of flooring in the world, tiling has evolved over the decades with the result that today there are several different types to choose from, like ceramic, porcelain, limestone and so on. With so many options, it is natural for a homeowner to feel overwhelmed and confused while picking tiles for his home.
Below, you will find a brief overview of some of the common types of tile, compiled with the intention of rendering the decision-making process easier for you.
Ceramic Tiles
Regarded as being the softest material, ceramic is a popular choice among homeowners courtesy of its versatility. Because it is made by baking a mixture of clay and water, it is particularly prone to cracks, chips and scratches. Also, it is more likely to get stained than other types, due to its high absorbency of components.
On the flip side, ceramic tiles come in a wide array of colours and patterns so there is something for everyone in this segment.
Porcelain Tiles
Although this type of tile is also based on clay, it is comparatively much denser and more durable than ceramic tile. Porcelain tiles are also resistant to stains, scratches and chips, so it is regarded as being most well-suited for high-traffic areas. Owing to their inherent characteristics, porcelain tiles need less maintenance compared to their ceramic counterparts. This rule is just as applicable to their grout.
Porcelain tiles could be thorough-bodied or glazed and while the former is an ideal option for a commercial location, the latter is often the first choice of residential dwellers.
Vinyl Tiles
Economical and convenient, vinyl tiles are the easiest to install and can even be stuck and peeled if the surface permits. For homeowners who are short on budget, these are perfect as long as they are not applied to areas that require hard tiling.
Glass Tiles
These are most effective on floors and walls wherein reflection forms an important part of the ambiance. Courtesy of their glossy finish and flat surface, they can add glamour to an otherwise normal countertop and provide a distinct outline to mosaic patterns. However, glass tiles require high maintenance since even a tiny smear or a single chip can spoil the entire back-splash effect that they are meant to provide.
Natural Stone Tiles
Granite, marble, limestone and slate are some of the common varieties of natural stone that are used for tiling floors, walls and counter-tops.
Travertine is an exotic type of natural stone tile that is characterized by consistent patterns and does not demand much maintenance. Homeowners prefer this type of tile since it has been known to have a positive impact on the resale value of a property owing to its durability and aesthetic appeal.
Metal Tiles
Latest in this category are metal tiles that lend a contemporary touch to any décor and require minimal maintenance. While these are a good match for stainless steel utensils, they come in copper and bronze finishes too, thus enabling the user to add a touch of color to an otherwise sterile décor.
Don't Overlook the Importance of Tiling and Grout Styles
Any decision that you take pertaining to the interior of your home should conform to contemporary benchmarks, and tile and grout are no exception to this rule. Knowledge regarding the types of tiles and how to clean grout would go a long way in ensuring that your investment yields long-term returns.
Spacing is an aspect of tiling that many homeowners make the mistake of overlooking often to regret later when the tiles have been wrongly laid or appear clumsy due to many fillers. Learning about spacing and the difference that it can make should be a priority for every homeowner since it can accrue multiple benefits in terms of time, material and expenses.
These are aspects of tile and grout which may not be apparent immediately but their cognizance could prove to be instrumental in defining the success of the project.
Source: www.Discover.HubPages.com
0 notes
Text
How to Clean Shiny, High-Gloss Kitchen Tiles Without Streaks
How to Clean Shiny Black Tiles in the Kitchen
I have had these black glossy tiles for a few years now—long enough to know that, after installing trendy glossy tiles into a kitchen, you need to clean them often to keep them looking their best. They are really nice to look at, but only if they are spotless. They show grease splatters, finger smudges and water marks quite easily, so you need to know how to clean them to a streak-free finish if you're not going to hate your new tiles.
Step-by-Step Guide to Cleaning High-Gloss Tiles
Here are step-by-step instructions for cleaning shiny tiles without expensive gadgets or chemicals.
Materials Needed
Liquid soap (washing-up liquid)
3 lint-free cloths
Hot water
Instructions
Gather the three supplies listed above—that's all you need!
Mix the soap with hot water just as if you were going to do the dishes. Soak the first cloth in this and wash the wall tiles to remove the grime. Do a whole wall or the backsplash at the same time, if you just do part of the wall you will see where you stopped cleaning. If it is a greasy area, you might need to wash the area twice.
Take the second cloth—a completely clean cloth—and wet it in clean water with nothing added to it. Now wash the whole area of tiles again, but this time, you are rinsing off the detergent.
Finally, take the third clean cloth and use it to dry the tiles. Polish the whole area quite rapidly. You don't need to work too hard; just dry the tiles off quickly.
Complete This Process in One Go
The trick to a good finish is completing all of these steps in one go. Choose one wall at a time and don't pause between the four steps, then move on to the next wall. If you try to do too much and the tiles dry before you buff them, you will get water marks and streaks. If this happens, simply start the process again. Once you get the hang of it, it is quick to do.
Which Cloths to Use to Clean Glossy Tiles
I have found that the best cloths to use to stop streaks on high-gloss tiles are the microfibre ones. The great thing about these is that you can stick them in the washing machine and use them over and over again. In fact, in my opinion, they work better after they've had a couple of washes and have really softened up. They can also be used on glass with streak-free results.
Another thing you can use is old cotton tee shirts if you like to recycle and reuse. If you cut them up, however, the fraying ends will often leave a trail of cotton behind.
What Is the Best Way to Clean Shiny Floor Tiles?
The same principles apply to cleaning glossy floor tiles. I do mine very quickly in the same way each night after the dinner things have been cleaned away.
I quickly mop the floor with hot water and a little liquid soap. I don't dip the mop in and out; I just soak the mop once and run it all over the floor in one hit.
I then repeat with a clean mop head just dipped into clean water only.
I follow with a quick—and I mean very quick—polish with a dry cloth on my hands and knees.
Are Shiny Floor Tiles Hard to Keep Clean?
The glossy floor tiles are, in my opinion, not worth installing if you are thinking about it. Wall tiles are worth the work and will stay clean most of the day until dinner time, but the floor tiles show marks the moment someone walks on them, and it just gets worse during the day.
Unless you clean the floor every hour, they look mucky to some degree most of the time. So if you're thinking about them, my suggestion is to avoid them!
Source: www.Discover.HubPages.com
0 notes
Text
Maintaining Stone Tiling in a Welsh Bathroom in Cowbridge Vale of Glamorgan
Last year we were approached by a customer in the market town of Cowbridge looking for a professional bathroom restorer to renovate their stone tiled bathroom. Apparently, their cleaner had etched the tiles using neat bleach unaware of the damage a strong product like that could have on natural stone.

I arranged to call in on the customer the next time I was in the area to discuss the work and take a close look at the tiling. Three different types of stone had been used in the bathroom with Limestone wall tiles in the shower, Black Marble mosaics formed the shower tray and bath panelling, and the floor had been laid with Black Slate.
Having discussed the bathroom at length with the customer it was clear that their main concerns were that the stone had lost its shine, the grout had discoloured, and a lot of the silicone was stained and needed replacing. I worked out a comprehensive plan to revive the bathroom and created a detailed quotation to do the work that listed all the necessary work. My customer was happy with the quote, and I got the go ahead to book the work in.


Renovating a Stone Bathroom Tiles
Before starting the cleaning, I spent some time protecting the fragile surfaces that didn’t need attention with protective sheeting.

Next the shower Tile and grout was scrubbed with a strong dilution of Tile Doctor Pro-Clean and a Black pad that I had cut down so it could be used by hand. The shower walls were then rinsed with water using the shower head which is one of the convenient advantages of working in a shower.
Focus then shifted to the Black Mosaic tiles on the floor of the shower using more Pro-Clean this time mixed with Nanotech HBU for extra cleaning power. This was scrubbed into the grout joints with a brush and a Black pad for the tile surface. I used the same process on the Marble mosaic bath panel. Once done the tiles were rinsed with water.
The next step was to cut out the silicone sealant around the permitter of the shower tiling and spray the area with Tile Doctor Duo Clean which kills mould. Once dry the silicone was replaced with a new anti-mould silicone.

The shower enclosure tiles were then sealed with Tile Doctor Pro-Seal a durable sealer that doesn’t alter the appearance of the stone. The customer liked the light appearance of the Limestone and wanted to keep it that way.

Refreshing Black Slate Bathroom Flooring
The last area to focus on were the Black Slate tiles on the bathroom floor which were also in a similar worn condition. The old sealer had clearly broken down on these and was now letting dirt become ingrained in the stone reducing the vibrant appearance of the Black Slate. I tread this by removing what was left of the original sealer with an application of Remove and Go mixed with Nanotech HBU and Pro-Clean. I left this cleaning cocktail to dwell for about half an hour before scrubbing with a coarse black pad and scrubbing brush.
The floor was then rinsed with water to remove the soiling and now looked much improved. Once dry it was sealed with Tile Doctor Colour Grow which is an impregnating sealer that contains a colour enhancer and provides a durable finish especially in bathrooms. This worked out very well on the Slate helped to add depth to the stone as well as bringing out more of the features in the stone.

The customers were delighted with the result and I’m please to say the service, in fact they have since recommended Tile Doctor to their friends, colleagues and family.
Source: Bathroom Tile Cleaning and Restoration Service near Vale of Glamorgan Wales
#Marble Mosaic#Limestone Tiles#Black Slate#Bathroom Restoration#Stone Cleaning#Stone Sealing#Bathroom Refresh#Cowbridge#Vale of Glamorgan#Pro-Clean#Nanotech HBU#Remove and Go#Pro-Seal#Colour Grow
0 notes
Text
Choosing The Right Tile For Your Kitchen
The tile you use in your kitchen goes a long ways in determining the entire room setting. Since the kitchen is such an important component in your overall home, it needs to offer comfort, function, and decor. This room is the central area of food provision and preparation, so it is essential that it offer the right environment for the one who is cooking. The kitchen is the room in the house that probably uses more tile than any other place in the house. There are kitchen wall tiles, countertop tiles, and floor tiles commonly installed in the kitchen. Many homeowners eventually use tile to complete their backsplash ideas to accent the stove and sink area.
Ceramic Tiles
Ceramic tiles: It would be near impossible to beat the functionality and beauty of ceramic kitchen tiles. Homeowners prefer it for the sake of the resale value of their home; Tiles offer such durability, design potential, and accent possibilities that it is easy to understand its popularity. It is also very reasonably priced and cost effective.
Porcelain Tiles
Porcelain tiles: These tiles are probably the most traditional type of tile around. It is the favorite of many folks because it looks a lot like natural stone tiles. Tiles made from porcelain create a texture and appearance that blends well with stone tiles. The other great advantage these tiles have over others is their scratch and chip resistance. They are also uniform in size and shape, so installation is predictable and simple to do.
Glass Tiles
Glass tiles: If you desire a very sophisticated and classic appearance, you might consider glass tiles. These unique tiles are durable, strong, scratch and stain resistant, and come in various shades and sizes. The upkeep and cleaning is easy and glass tiles can be used on countertops, backsplashes, and walls.
Stone Tiles
Stone tiles: A rich and elegant addition to any kitchen can be achieved with stone tiles. These tiles have a wide price range depending on the quality of the tile and the material. Unlike many other tiles, stone tiles must be maintained often in order to keep them looking great.
Vinyl Tiles
Vinyl tiles: These tiles are inexpensive, and one of the easiest types of tiles to install. They make a solid choice for kitchens, due to the high traffic volume and the presence of kids. Unfortunately, vinyl tiles will scratch easily, so great care must be used when sliding tables and chairs around on this surface.
Kitchen Floor Tiles
Kitchen floor tiles: The kitchen floor probably gets noticed by a person entering the room before anything else. The quality and appearance of the floor, consequently, determines the appeal you kitchen will have. Choose your floor tiles very carefully, making certain that the color will blend nicely with the rest of the tile and accents in the room. Avoid using tiles that are non-laminated or tiles that are porous as they both are prone to stain.
Backsplash Tiles
Backsplash tiles: The backsplash in your kitchen can sometimes be considered the main attraction of the room. Choose the materials and color very carefully and make certain that changes to your backsplash appearance are thought out and planned. Some great choices for backsplash tile might be glass tiles, natural tiles of stone, metal tiles, or ceramic tiles.
Wallpaper for Backsplash
Wallpaper for backsplash: In an attempt to cut corners, wallpaper is occasionally used as an easy option for quickly decorating the kitchen. The problem with wallpaper is the difficulty in cleaning it properly and the peeling that often occurs in humid climates and conditions.
Other Choices
Other Choices: In order to create an original style, some people have tried to use mirrored tiles in the kitchen. Though they match any type of kitchen decor, they can look rather tacky and also reveal dirt and grease.
Whatever type of kitchen tiles are used, make certain that you purchase strong and durable tile that improves the overall appearance of your room. You now can see that each type of tile choice has its benefits and sometimes has limitations. Make certain the tile you use fits your budget and the home decor you desire.
Source: www.Discover.HubPages.com
0 notes
Text
How to Keep Your Kitchen Clean, Kitchen Deep Cleaning Ideas
Kitchen is the very busiest place in every home. With all the daily meal prep, dirty dishes and spills and splatters, maintaining a sparkling kitchen often feels impossible. kitchen cleaning can seem never-ending, especially with us all spending more time at home at the moment. Here some ideas how to keep your kitchen clean.
1. Kitchen Walls Corners And Ceiling With Microfiber Duster
Let's get started first spread a newspaper or old bedsheet on the counter top to protect items kept on it from falling dust start
with a dusting of walls and ceiling first clean the kitchen walls corners and ceiling with microfiber duster also dust and clean the top of the cupboards if the area is really dirty then just spray the all-purpose cleaner and leave it for five to ten minutes and then drop the area with scrubber and wipe it off with a cleaning towel.
2. Clean The Grills And Glass Window
I would suggest you to always place dining mats or newspaper here to protect it from the dust first does the window grill with a microfiber duster now take a dishwashing liquid in a bowl and with the help of old scrubber clean the grills and wipe it with the clock all the grease will come out easily now spray the all-purpose cleaner on the window glass and with the help of this kind of microfiber duster clean it properly this duster is very helpful especially if you have grills installed inside this is also useful to clean the glass window from outside if you have blinds installed on your window then first dust them properly then spray the all-purpose cleaner and wipe.
3. Keep Your Cupboard Neat And Clean
Now let's start cleaning the cupboards if you have been following an organizing system then just start cleaning the cupboards one by one remove all the items first clean the surface and then place a dining mat to protect the surface from dust grease and spills it will always keep your cupboard neat and clean now wash and dry the organizers if you use clean the containers with damp cloth and place them back nicely clean and wipe the cupboard.
Doors and handles also don't forget to disinfect the handles with disinfectant wipes or liquid to kill all the germs which may have occurred with a frequent touch now cleaner and damp towel or with this kind of cleaning brush which makes your cleaning easy by reaching into deep corners.
4. Purge All The Expired Items
While cleaning do not forget to purge all the expired items and food packets which have been open for long and are not fresh anymore after emptying and cleaning the cupboards now it's time to organize them so that life becomes easy in the kitchen segregate the items ask for the meat like regular occasionally used never used and broken remove the broken items first check never used items one by one and see if they are of any use or not now make the system and designate the place for specific type of items like food separately regular needed utensils and occasionally used utensils separately this way you will have things segregated and finding in accessing things will be easy also use different organizers and baskets to organize your kitchen which will make your kitchen beautiful.
5. How To Clean A Microwave
Now let's start cleaning the appliances
microwave is one kitchen equipment that split cross-contamination if not cleaned frequently so please do not wait for the volley to clean it most of you already know.
How to clean a microwave just take half a bowl of vinegar and heat it for 2 minutes or until the solution boils and the window is steamy let it cool for few minutes and then remove the pole and the glass plate start wiping inside with a clean cloth you may require a snubber to remove stubborn and dry spills wash and place back the glass plate also clean the exterior nicely for deepening of hot chimney freight an exhaust clean backsplash the best and easy way is to clean it with this liquid and green scuff pad it will remove all the food stains and grease without much effort after scrubbing wipe it with a damp towel to clean switchboards effortlessly use nail paint remover all the black marks and stains will come out easily a word of caution nail paint removal liquids are highly ammable so always switch off the switches before cleaning remove everything from here and then spray a cleaner disinfectant to kill germs nicely give it a good wipe especially the corners.
6. Clean All The Brushes Sponges And Cleaning Cloths
After cleaning it is very important to clean and disinfect all the brushes sponges and cleaning cloths fill up the sink or bucket with the hot water pour some cleaner come listen fake taint and soak all cleaning tools for 15-20 minutes after 20 minutes rub them nicely and leave them to dry to clean dirty.
7. Clean The Rugs
Rugs just put them in the washing machine pour a cup of detergent in detergent container and set the water temperature on 60 degrees in regular washing cycle they will come out clean also hot water will kill the germs and disinfect them do not forget to clean all your dust beans and leave them to dry under the Sun sunlight is a natural disinfectant and we kill.
8. Clean The Sink
All the germs present in the dustbin to clean and disinfect this thing spread the baking powder on the sink nicely and leave it for 10 minutes after 10 minutes cup the sink with the wet scrub and then wash it with the clean water.
Lastly spray of vinegar and water mix all over the sink and tap and leave it for a minute then wipe with the dry cloth vinegar will bring back their shine and sing in tap will look sparkling clean at last clean the floor with the disinfectant and please do not switch on the fam disinfectant must get dry by itself for better results.
Source: www.Discover.HubPages.com
0 notes
Text
How to Choose the Best Flooring Colour for Your Home
No matter where you are installing a floor, the colour of the floor is an important consideration. A beautiful floor colour is important when you want to achieve the desired effect. The wrong choice can create disastrous results making the room look unsightly.
If you are confused about choosing the right floor colour, here are some tips to help you navigate through the decision smoothly.
Want to Open Up Space? Go for Lighter Shades
The right floor shade can help make small rooms look bigger. That’s exactly what lighter shades and natural colours can do. When you want to make a small space appear larger, go for lighter shades like light oak and beige. This way, your space will not look cramped and crowded.
On the other hand, if you want to make a larger space appear smaller and cosy, do the opposite - go for darker shades like walnut.
Have a Lighter Décor? Choose Darker Tones
If the wall and the furniture in the room are of lighter shades, choose a floor in darker tones. This will brighten up the entire room beautifully.
Darker floors come alive amidst lighter surroundings. Without the lighter shade to complement the darker floor, you’ll have a room that’s completely dark and unwelcoming.
Have Tons of Sunlight Pouring In? Try Lighter Floors
Lighter floors do not enliven rooms on their own. Left on their own without matching decor, these floors can turn the room dull and boring. But, in the presence of plenty of sunlight, they can turn a room bright, lively and stunning.
If your space does not receive enough sunlight, you can still choose a darker shade with the help of several light fixtures. Use several bright bulbs all around the room to set off your floor colour beautifully.
Got Heavy Traffic or Very Active Kids? Choose Lighter Floors
Lighter floors serve as a great cover for stains, scratches and dents. Such imperfections show more readily on darker floors. So, if the floor is going to see heavy traffic or is going to be used in households with active pets and kids, opt for a lighter floor colour. We have more information on the best type of flooring for pet owners here.
However, if you want darker shades and are worried about marks showing up, go for dark floors with great texture and detailing, or hand-scraping and grain effects. Such effects hide imperfections beautifully while allowing you to enjoy your favourite shade.
Conclusion
When it comes to choosing a floor colour, compromise is the key. Balance your love for a specific shade of floor with the right decor, lighting and floor texture.
Try out samples of flooring before purchasing. Light changes throughout the day, so can the way your floor looks. So, try the sample out at different times of the day to know if you will get the desired effect with the floor shade.
Source: www.StoriesFlooring.co.uk
0 notes
Text
What are the Best Budget Engineered Wood Floors?
Engineered wood floors are an excellent alternative to solid wood floors for people who have a tight budget. Thanks to a real wood surface layer, they look just like the real thing, yet they are much more practical for family homes.
Easy to install and maintain, engineered wood floors offer superb value for money. If you are looking for the best quality floor at the lowest possible price, check out our picks for the top three low cost engineered wood floors below.
Lusso Engineered Wood Floors
The Lusso collection is exclusive to Stories Flooring, offering a range of high-quality, hardwearing floors. Suitable for use in high-traffic areas, you can choose from an exceptional selection of wood designs.
Each floor is coated with a protective layer, with a choice of oiled or lacquered designs available. They are designed to be easy to maintain and you should find them easy to install thanks to their tongue and groove system.
Guaranteed to add character and elegance into the home, these striking floors are perfect for the lounge, bedroom, or hallway.
Atkinson & Kirby Engineered Wood Floors
With over 100 years of experience in the sector, Atkinson & Kirby are a leading manufacturer of engineered wood floors. They offer a huge range of floors, guaranteeing something to suit every interior.
Choose from a diverse range of measurements, shades, and finishes. Whether you are looking for something rustic, or a little more traditional, this range has something to suit all tastes and budgets. Each of the floors available can be installed with compatible underfloor heating. This helps to keep them warm and comfortable in colder weather. You can browse the full collection available at up to 65% off RRP at Stories Flooring now.
Nature’s Own Engineered Wood Floors
Sophisticated and traditional, the Nature’s Own Collection offers a beautiful choice of engineered wood floors. Built to last, each floor is offered with a generous manufacturer warranty. With 12 stunning designs to choose from, you are sure to find one to complement your interior.
Choose from oiled, lacquered, Handscraped, brushed, and stained finishes. The floors come with a wear layer for added durability, ranging from 3mm-6mm in depth. Like the other collections featured above, these floors can also be installed with suitable underfloor heating systems.
Source: www.StoriesFlooring.co.uk
0 notes