
Don't wanna be here? Send us removal request.
Statistics
We looked inside some of the posts by tmmfmp and here's what we found interesting.
Average Info
Notes Per Post
6
Likes Per Post
6
Reblog Per Post
0
Reply Per Post
0
Time Between Posts
19 hours
Number of Posts By Type
Text
17
Last Seen Tumblr Blogs


Fun Fact
Tumblr Inc. is funded by 13 investors.
Text
Final Outcome Video:
This is the final outcome for my game.
0 notes
Text
Pixel Artist: Thomas Feichtmeir (Cyangmou)

Thomas Feichtmeir, also known as Cyangmou, is a well-known pixel artist from Austria. He creates detailed and colourful digital art using pixels, often focusing on fantasy and medieval themes. His art is full of rich colours and intricate details, making each piece stand out. Cyangmou has worked on several video games, helping to create their unique looks with his pixel art. Some of his notable projects include "Tower 57" and "Shakedown: Hawaii." His ability to create complex scenes and emotions with tiny pixels has made him popular in the pixel art community. Cyangmou's work shows how powerful and beautiful pixel art can be.
0 notes
Text
Pixel Artist: @Genuine Human Art

Genuine Human, also known as Genuine Human Art, is a skilled pixel artist famous for their detailed and colourful digital art. Their work often features themes like fantasy, sci-fi, and everyday life, creating interesting and immersive scenes. They have worked on video games, helping to design their unique looks with their pixel art. Genuine Human also shares tutorials and tips online, making it easier for others to learn pixel art. Their art is known for its vibrant colours and the ability to tell stories, drawing people into the worlds they create. Genuine Human's work inspires many and is loved by fans all over.
0 notes
Text
Pixel Artist: Paul Robertson
youtube
Paul Robertson is a famous pixel artist who worked on "Rick and Morty". His pieces often feature fun and quirky characters in action-packed scenes. He is best known for his work on "Scott Pilgrim vs. The World: The Game," where his pixel art brought the comic book to life. He has also worked on other projects like "Mercenary Kings". Paul's art is full of energy and movement, making it exciting and fun to look at. He shares his work online, where many people enjoy his playful and intricate creations. His unique style has made him a popular and inspiring figure in the pixel art world.
0 notes
Text
Pixel artist research: Pedro Medeiros

Pedro Medeiros is a well-known pixel artist famous for his colorful and lively digital art. He creates vibrant characters and scenes that stand out in the world of pixel art. He has worked on popular indie games like "Celeste" and "TowerFall," both known for their beautiful and detailed pixel graphics. His work helps make these games visually appealing and fun to play. Pedro also shares his knowledge through easy-to-follow tutorials, helping others learn how to create pixel art. His ability to make complex art simple and accessible has inspired many aspiring artists.
0 notes
Text
Extra platformer research
Doodle Jump
youtube
Doodle Jump is a fun and simple mobile game where you help a cute character named Doodle jump as high as possible. The game came out in 2009 and quickly became very popular. In the game, you tilt your phone to move Doodle left or right and tap the screen to shoot at obstacles. Doodle jumps on different types of platforms, and you need to avoid falling or hitting enemies. There are special items like jetpacks and trampolines that help Doodle jump higher. The game has different themes like space and underwater, each with its own look and challenges. With its easy controls and endless jumping, Doodle Jump is a favourite for many players.
Old Castle of Illusion Starring Mickey Mouse
youtube
Castle of Illusion Starring Mickey Mouse is a fun video game from 1990 where you play as Mickey Mouse. Mickey's on a mission to rescue Minnie Mouse from a mean witch named Mizrabel. The game takes you through different magical worlds like toy land and forests. Along the way, you'll jump, bounce on enemies' heads, and collect gems. Mickey also meets friends like Goofy and Donald Duck who help him out. Each level ends with a tough boss fight against one of Mizrabel's henchmen. It's a classic game loved by fans of Disney and old-school gaming.
Celeste
youtube
Celeste is a cool game released in 2018 where you play as a girl named Madeline climbing a mountain called Celeste. It's a platformer game, so you jump and dash through levels full of obstacles. What makes Celeste special is its story about overcoming personal struggles, like anxiety and self-doubt. As you play, you learn more about Madeline and her journey toward self-acceptance. The game has beautiful pixel graphics, great music, and challenging gameplay. It's been praised for its story, gameplay, and how it tackles important themes like mental health.
0 notes
Text
Door unlock code.
Similar to the key code there was also an Enumerator created for the doors.

When the player overlaps with the door it will then cast to the third person character and check each of the key boolean variables against the E-num created for the door. If the player had the right key for the door then it will enter a do once where it will set the relevant door opening animation based off of the preset E-Num.

It will also destroy the preset cubes in the level which block off the players access to certain areas of the level until they get the unlock the door.

0 notes
Text
Key pick up code
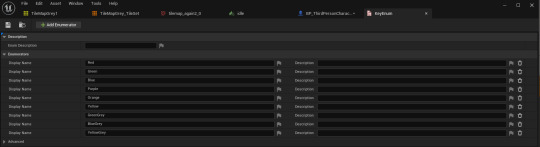
Firstly an Enumerator was created which contained a list of display names for the keys .When the player overlaps with the key depending on which e-num value is selected within the game via a drop down menu it will set a variable which is a boolean stored in the player to true for the specific key you have picked up.

Here is a screenshot of being able to edit the E-num in the world editor. This allowed for one piece of code to be used for multiple different key assets.

0 notes
Text
How to make the level switching code.

The first think that was created was an actor blueprint which was going to determine what the shift distance between the 2 levels was going to be. To do this at the beginning of the game it will check whether second marker is valid (it exists), if it does then it will get actor of class ' ThirdPersonCharacter' and set the shift distance to be the difference between the character location and the second marker location.
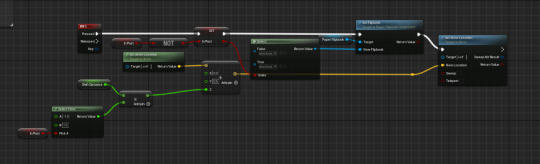
The next bit of code is the switching code which when the player presses Q it will set 'in past' to not be true, when this happens it will change the character flipbook to be the other character as well as shift the player into the other level. For all of this to work there needs to be 2 levels in one world.

0 notes
Text
How to make an animation state machine

This is the animation state machine used for the character animations, on tick it will check whether the character is falling which is used to check if they are either falling or jumping. If they are then it will play the jump flipbook, if false it will move onto the next branch. The next branch checks to see whether the players velocity is NOT 0. If it is not 0 then it will play the walking flipbook and if it is 0 then it will play the idle flipbook.
0 notes
Text
How to add animation in unreal
To add animations in unreal first we need to make a character animation set in photoshop which can then be put into unreal and made into sprites by using the create sprites option in the sprite action menu.

These sprites can then be put into a flipbook to create an animation. In the flipbook elements such as the flipbook play rate and length of frames can be altered to help customize these animation.

0 notes
Text
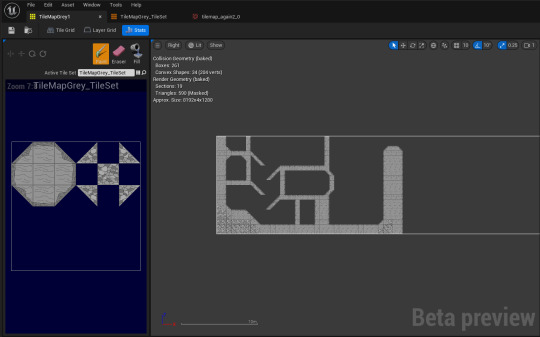
How to create a tile set and add a tile map into unreal

To create a tile set in unreal firstly you need to have a tile map created in photoshop and brought into unreal as a png. By using the apply paper 2d texture setting onto the image it will remove the background.
Then with the image a tile set can be made which will separate each section of the texture into separate tiles which can then be used in a tile map later to create a level. We can also add in the collision to these tiles which will allow the player to stand on the tiles later on.

The tile set is then used as a palette to then create the level. The level is drawn out in the space next to it and then can be put inside of the world.
0 notes
Text
Time Switching Games
Dishonored 2
youtube
A Crack In The Slab is a level in Dishonored 2 which requires the character to switch between two timelines of the same place which is exactly like my game. You also collect things in this level that contribute to both the past and the future. I feel like if I would have known about this before I made my game I would have used this as a massive inspiration for my puzzles and level design. The way they switch between levels code wise is by having two separate levels offset from each other, which is exactly what I did.
Life Is Strange
youtube
In Life Is Strange has an interesting time switching mechanic which involves using photographs to go back in time and change events to save the future from being horrible. This mechanic is incredible and I would love to have added something like that in my game but it seems that it would be difficult to code as I'd have to find a way to interact with things and then create a little animation.
Assassin's Creed II
youtube
In Assassin's Creed II, the time switching function works story wise by using Desmond's DNA to push him into the memories of his distant ancestors in order to gain information for a company called Abstergo. The way this mechanic works in the game actually amazing. When you use the animus (memory viewing device) you basically teleport into the mind of the ancestor that you intend to live the memories of. You can then be fed information from the outside that will help you progress through the game.
1 note
·
View note
Text
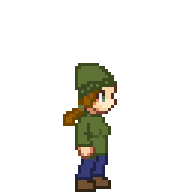
Verdandi Final Product

This is the final product of Verdandi. The colours are simply just me finding greys and picking which ones fit best with each other. The actual shape of the character is made with the base used for Destiny but missing the details and adding a cloak. The cloak is both me trying to make it hug the body at the same time as it flowing like a cloak does.
1 note
·
View note
Text
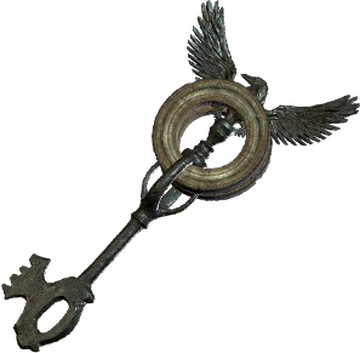
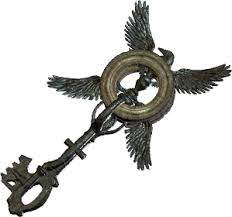
Keys Inspiration

The keys from Resident Evil 2: Remake are a great inspiration for my keys and doors in Fate And Destiny. This is because not only are they shapes but they also have different colours like mine do.
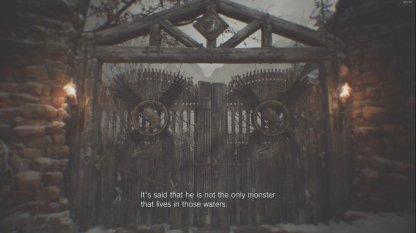
The doors are also an inspiration as each door has the symbol of the key they need on it.


The doors do have their full images for the last 2 but google doesn't want to show me it.
Resident Evil Village is also a good example but more with the shapes rather than the colours. Here are a few examples:


2 notes
·
View notes
Text
Grayscale Tile Map

I used my previous tile map and desaturated it in Unreal Engine itself as I would have had to spend hours manually redoing the tile map in black and white as I wanted them both to be the same but with different colour palletes.
In order to make sure that both of my tile maps match I copy and pasted the first tile map, only changing a few things to make sure it wasn't possible to cheat and finish the game faster than intended by switching to the past to skip areas. (I thank a friend of mine for showing me how easy it was and he just let me know you can cheat to get the orange key so I had to fix that.) It also makes the time travel function actually make some form of sense.
1 note
·
View note
Text
Tile Map and Colour Palletes

This is the finished tile map for my game. I didn't really need much in order to create the feel as I had to focus on what would be necessary against things that were just for background purposes.

This is my final colour pallet decision. The greens are much more foresty than my original choice and my second choice had some weird combos which are present in the next photo.

Potential Destiny was my second option for colours. I don't like the lightest and the darkest of those as they seem very out of place compared to my final choice. They is also too similar to the colour pallet of the past section and Verdandi.

This is the original colour design for Destiny. This does not fit with how I wanted my game to look as the greens are too bright and seem more like a grassy meadow than a dense forest.
This is the updated and complete version of Destiny. I feel like this one fits the most with my forest theme with the cooler tone and darker greens.
I am very pleased with how my tile map turned out. The grass lines up almost perfectly and the dirt is facing the same direction for every block. I used the same colour pallet as the final Destiny sprite as I wanted the grass to match the greens so it did not look out of place.
If I could change anything with my final design I would have added a bit more detail in the cobblestone, making sure they actually look like stones rather than random blobs of colour that do not line up as seamlessly as the grass does. However doing repeatable stone/brick textures is a lot harder than doing grass so may require extra care and a longer time to create them.
1 note
·
View note