
universalthings
Universal Things
As a college student, this blog will be used to help me in my learning, and furthering my academic experiences.
10 posts
Don't wanna be here? Send us removal request.
Last Seen Blogs
marianodeasis
Canal de YouTube: Mariano de Asís

yoanaconye
YOANA CON YÉ

5alsheikh
mohammad

nishapatel123-blog
Nurturing Technologies

hobbitart
butterfly theme wedding
Text

Saturn
This is an image of Saturn I edited in class using GIMP. This was my third and final image edit for the class and was one of the three images I presented at StARS on April 24th. When I was choosing my third image to edit, I wanted to do something completely different from what I had done before. Having done the Crab and Flame Nebulas, I thought a planet would be the perfect thing to edit. When I needed to choose which planet to edit, I had originally chosen Jupiter, but when I went into the data base for images, there was a problem with some of them. This led me to check my second choice, Saturn. When I checked, there had been over 200 different images for each of the luminance, red, green, and blue layers, as well as an already calibrated image for each. With each having the calibrated image already, I was able to skip the MaximDL process and start directly with GIMP. When I got to GIMP and began to brighten the images using the levels and curves tools, I realized that each layer was unaligned by a very large amount, which led me to realign all the layers next. After that was done, I went on to colorize the red, green, and blue layers, as well as set the three to screen mode while setting the luminance layer to luminance mode. After, I began to mess with the curves and levels tools again to adjust the brightness of each layer. In the end, I was able to pull out a yellowish color, with a red ring on the outside. The end product was exactly what I was looking for, as I wanted to be able to make Saturn a yellowish color, as that's how it is in real life.
Saturn is the sixth planet in our solar system and is also the second largest behind only Jupiter. Being sixth from the sun, it takes 29 Earth years for Saturn to orbit the sun. The planet is surrounded by icy rings and is also the only planet to have rings in the entire solar system. Saturn has an atmosphere, which is made up of hydrogen and helium. Saturn has been known for centuries, dating back to ancient times, and is the farthest planet from Earth discovered by the naked eye. Saturn has had a huge showing in pop culture, being viewed as the most iconic planet in our solar system. The planet has been featured in several different shows, movies, and video games, including "WALL-E," "2001: A Space Odyssey," and "Star Trek."
Saturn - NASA Science
0 notes
Text

The Flame Nebula
This is an image of the Flame Nebula that I edited in class, as well as presented on my poster at the StARS presentation on April 24th. I edited the picture using MaximDL, and GIMP. On MaximDL, I used darks and flats to calibrate several images, before then layering them into one. This process allowed me to remove a lot of unnecessary background noise from the images. I would create four single layered image to bring over to GIMP, including a luminance, red, green, and blue layer. This would be the hardest part of the process, as I needed to find flats and darks that matched one another in length, as well as needed to create a set of flats and darks to calibrate against one another. After finishing on MaximDL, I then moved on to GIMP. On GIMP, I would colorize, brighten, and align the four layers I created on MaximDL. I started by brightening each layer individually, aiming to bring out the nebula, as well as any surrounding stars. After doing so, I would then colorize the red, green, and blue layers as their respective colors. Once the three layers were colored, I changed the mode of each layer, putting the luminance layer on luminance mode, and the red, green, and blue layers on screen mode. After doing this, I had to then adjust each layer to align with the luminance layer, which required me to toggle the layers on and off and individually align each one. Once everything was all aligned, I was able to begin to use the levels and curves tool to brighten and darken the image, allowing me to pull out more details. While I was using the curves tool to adjust the layers, I found I was traveling in circles, struggling with having too much red and too much green in the image rather than a combo of the two. This led me to experiment with the curves tool. Instead of using a traditional curve with only one point on the curve, I added a second curve, making the curve turn into a wave. I did this on the red and green layers, which in turn allowed me to pull out the different colors in different areas of the image. This gave the inner part of the Flame Nebula a greenish color to it, while surrounding the outer part of the layer with more of a reddish color. In the end, despite taking a long time to edit the image, with most of the time being dedicated to editing the image on MaximDL, I was extremely happy with the result. Creating this image of the Flame Nebula allowed me to learn a lot about editing astrophotography and allowed me to experiment beyond my comfort zone to create this edited image of the Flame Nebula.
The Flame Nebula is located on the eastern hip of Orion the Hunter. It is located over 1400 light years away from Earth. NASA has worked to study the Flame Nebula using their Hubble Space Telescope, looking to find protoplanetary disks, which are circumstellar disks of gas and dust that rotate around young stars. So far, NASA has found four protoplanetary disks in the Flame Nebula and have also found three globulettes as well. According to NASA, Globulettes are "small, dark dust clouds that can be seen against the background of bright nebulae." Such dust clouds form brown dwarfs, which are warm objects that don't have enough mass to be a star but are also too big to be a planet. The Flame Nebula appears bright due to a large star over 20 times the mass of the sun lit in the center of the nebula. This would make the flame nebula as bright to the human eye as any other star, but due to the surrounding dust, the star appears over four billion times dimmer than it truly is.
Sources: The Flame Nebula - NASA
Hubble Finds Flame Nebula's Searing Stars May Halt Planet Formation - NASA Science
0 notes
Text
Solar Eclipse!
On Monday April 8th, America experienced an event that will not be seen again anywhere in the country for another 20 years, and for the Northeast, not for more than another 50 years. For us in Bridgewater, MA, we experienced over 90% totality. The closest point of full totality to Bridgewater was in Northern New Hampshire, roughly a three to four hour drive north. The path of totality entered the US in Texas, and continued Northeast, leaving the US in Maine. The eclipse shed total darkness on many major US cities, such as Dallas, TX, Little Rock, AR, Indianapolis, IN, and Cleveland, OH. Personally, I saw the eclipse on the South Shore of Massachusetts, at my house as well as at a Walmart I pulled into as the eclipse reached its peak. Despite not seeing complete the eclipse in totality, it was still one of the coolest astronomical events I have witnessed. Spanning for over an hour in the midafternoon, I watched as the moon slowly continued to overtake the sun and revealing more and more of the sun again after the peak of the eclipse. I was fascinated with how quickly the moon had seemed to overtake the sun, as well as how dark it had gotten outside when the eclipse reached its peak. Compared to the last solar eclipse experienced in the US back in 2017, this solar eclipse had much more of an effect on the Northeast, which also made it seem like there was more interest than the previous eclipse. Overall, the eclipse was an extremely cool experience, and opened my eyes to how complex and fascinating our solar system truly is. While I didn't get the chance to see the eclipse in totality this time around, I hope that one day in the future I will be able to experience the rare and eye opening event in totality.
0 notes
Text
StARS Presentation
On Wednesday, April 24th, I presented at the Student Arts and Research Symphosium, or StARS for short, alongside my classmate, Cameron Williams. At the event, we presented our pictures of the Crab Nebula, comparing our edits against one another's. Alongside our Crab Nebula, we had pictures of the Flame Nebula, and Saturn, which I had edited, as well as Cameron's image of the Iris Nebula. Throughout our time presenting, we had multiple people approach our poster, asking questions about how we edited our images, as well as why we chose to colorize the images that we did. We received numerous questions regarding our class, as well as how long we worked on each image. We explained to people how long the images took to create and dove into the details of the steps we took, highlighting our use of the curves tool, and the levels tool. Cameron and I also explained how we aligned the several layers of each image, as well as explained the difference between each layer to the people who approached our poster. We touched on the three screen layers, and how each were either green, red, or blue, as well as the top layer, or the luminance layer. Presenting at StARS was a fun experience, allowing us to showcase our newly learned knowledge in image editing. It also allowed for us to see the differences in each other's posters, as well as other posters from presenters outside of our class. The presentation was a good and fun experience and allowed me to really discover how much I learned over the course of the semester.
2 notes
·
View notes
Text

This photograph is of my final product of the crab nebula I have been editing using GIMP. The process took about a month of classes, which consisted of meeting twice a week for an hour and fifteen minutes. I used many tools within the app to create this image, including the level tool, as well as the move tool to align all layers involved. Unlike the work in progress post, the photograph of the crab nebula appears less red in color. Instead, my final product has more green color to it, but also pops with red stars and blue stars as well. To change the photograph from being mostly red in color, I created several different layers colored blue, red, and green. I proceeded to change the brightness and darkness of each layer and compared the look of each layer, attempting to find a good point where colors from all three layers became visible in the stars surrounding the crab nebula. After finding the combination I liked, I ensured all images were aligned. In the end, I created more than ten total layers, but only used four for the final product. Throughout the process, I also created and deleted more layers in order to produce a level of brightness each layer presented. In the end, I ended up finding it best to move on from the photograph and begin working on a new project in class. In my opinion, the best part of the image would be the ability to see red, green, and blue stars. However, I feel as if the crab nebula itself is presented too dim in color. Overall, I am happy with how it came out, and believe the process taught me valuable lessons in photo editing as a whole.
0 notes
Text
Calibrating Images Using Maxim DL
In class, we have been working on calibrating images using a program called Maxim DL. This program allows us to calibrate flats with darks in order to adjust and combine images for further editing in GIMP. To do this we first need to find sets of flat and dark images to go with our chosen image. For me, this would be a flame nebula. After finding all required images, I went to Maxim DL to begin calibrating. First, I started off by setting each set of darks to use for calibration against the flats, making sure each image's range is set between 22000 and 38000. This will be done for the flats as well. The images that are found usable will be used for the dark calibration against the flats. A dark calibration is an image taken without light hitting the sensor and can be used to extract pixels from the flats when calibrated against one another. On the contra, a flat calibration image is an image which is blank and evenly illuminated throughout. Using flats allows you to calculate correction factors for each pixel. It is important to use the median when combining darks and flats for calibration as it will give you an image based around the medium values of all images. Taking the median will give a centered balance of each pixel, removing the artifact of the image, whereas the average will noticeably affect the result of the image. Doing these things in order to develop your images will give you images to use in GIMP for coloring.
0 notes
Text

This is a photograph of the Crab Nebula, this is a work in progress photo from February 12, 2024, created using the photo editing program GIMP. I have been working on adding color and details to the photo in class for a little over a month now, and currently I am working to make the photograph appear less red, making the blue and green layers of the photograph pop more, having more of a presence than in the photo above. The photo was created from four copies of a picture of the Crab Nebula, each given a different color designation of clear, blue, red, or green. To begin with creating the photograph, I first had to brighten each layer in order to see the Crab Nebula, as well as other stars surrounding. After brightening all four layers, I added color to the blue, red, and green layers depending on the color the picture was labeled. Next, I went on to set the clear layer to luminance and set the remaining three layers to screen. This allows for all color throughout all layers to appear as one image. Since then, I have worked to try to adjust the colors to make each color appear more or less, as well as have worked to make sure all stars, as well as the Crab Nebula are aligned throughout all layers. I plan to continue to work on the photograph, aiming to make the image have less of a red appearance, and add more blue and green to the photograph.
1 note
·
View note
Text

This week in class, we toured the BSU Observatory, which is located in the DMF Math and Science center on campus. The observatory is a great way for students involved in astronomy to continue their studies, allowing for many astronomy students to experience the night sky through any of their several telescopes. The BSU Observatory is accessible for all students, which allows many students not involved with the observatory the chance to look up into the night sky, which is something that could be intriguing to many students, such as myself. In addition to exploring the observatory, we learned about different light waves, and how different cameras are used to capture different types of waves. In turn, learning about the different light waves showed us what types of cameras were better for astronomy, compared to those in which are better for everyday use. In class on Wednesday, we looked at photographs taken from the 19th and 20th centuries. We looked into how many of the photographs had marks on them, questioning what they may have come from, and figuring out that they may have been damage to the photos over the time since they had been taken. We learned of the backgrounds of the photographs, and about how they were used to count the number of stars in the sky, as well as measure how far away a star, galaxy, or any other object in the night sky is away from Earth. During class we also started to edit pictures of the crab nebula. In order to do this, we used a photo editing program called GIMP. Using the program allows us to brighten, color, and layer photographs together in order to create a colored photograph. At first, the process was pretty difficult to figure out, as I had never used, or even heard of GIMP before, but I was able to quickly figure out how to use the program and resolve minor issues I had within it.
source: Observatory | Bridgewater State University
1 note
·
View note
Photo
This image shows an interesting perspective of what Earth looks like from beyond the surface of the moon. While we all see the moon in our lifetime, as all we need to do is look into the sky on a clear night, many do not see the moon through an image that displays our planet beyond the moon's surface. This image does just that, giving many a perspective not often seen. Our moon, which was formed billions of years ago, was likely formed from the collision of a Mars-sized body and Earth. Being the Earth's only natural satellite, the moon's is less than one third of Earth's width, and is 238,855 miles from earth, but this unique image gives viewers the alternative perspective. The size difference mentioned above is figured out by measuring the volume, surface area, and radius of the planets due to them being spheroid. The moon, which orbits around Earth, has a complete orbit of 27 days, but appears to us on Earth as a 29-day rotation. Similarly to Earth, the moon also has water on the surface. The water on the moon, in the form of ice, is concentrated at the lunar poles, on the side which appears permanently dark, and is not seem by us here on Earth. Despite having water like Earth, the moon does not have a strong atmosphere, but instead has a weak exosphere, which creates a lack of protection from space debris, meteoroids, and the radiation from the Sun, which would make the moon inhabitable to life forms.
source: Moon Facts (nasa.gov)
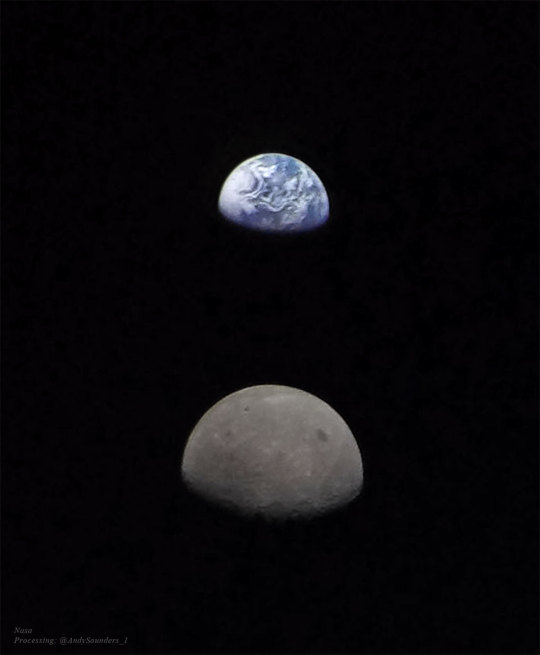
2024 January 24
Earth and Moon from Beyond
Image Credit: NASA, Artemis I; Processing: Andy Saunders
Explanation: What do the Earth and Moon look like from beyond the Moon? Although frequently photographed together, the familiar duo was captured with this unusual perspective in late 2022 by the robotic Orion spacecraft of NASA’s Artemis I mission as it looped around Earth’s most massive satellite and looked back toward its home world. Since our Earth is about four times the diameter of the Moon, the satellite’s seemingly large size was caused by the capsule being closer to the smaller body. Artemis II, the next launch in NASA’s Artemis series, is currently scheduled to take people around the Moon in 2025, while Artemis III is planned to return humans to lunar surface in late 2026. Last week, JAXA’s robotic SLIM spacecraft, launched from Japan, landed on the Moon and released two hopping rovers.
∞ Source: apod.nasa.gov/apod/ap240124.html
190 notes
·
View notes