
Statistics
We looked inside some of the posts by unrulysynergy and here's what we found interesting.
Average Info
Notes Per Post
118
Likes Per Post
80
Reblog Per Post
32
Reply Per Post
6
Time Between Posts
2 months
Number of Posts By Type
Text
17
Last Seen Tumblr Blogs


Fun Fact
12.7% of mobile users access Tumblr.
Text
I don't seem to have done a lot in the last 6 months ...
But I made this tissue pouch from a kit I bought. I never really saw the point of things to put tissues in, since they already come in something in the first place, but I guess it slightly increases the attractiveness factor of your surroundings.
Anyway it turned out well.

It's almost exactly as long as a standard Bic pen.
18 notes
·
View notes
Text
I'm getting a reputation at the model and game store...
My first completed model. Would you like to approach the pool for a cool drink of water in the desert?

Two photos of my latest lot of completed models


Ok these are just phone photos in poor light at a bad angle, but I think they look pretty cool.
17 notes
·
View notes
Text
Book Bag
I needed a small bag to carry a book in. I wanted it to be as simple as possible, without extra weight or bulk. But I also didn't want it to look boring.
The lightest, simplest, tidiest idea (that didn't require learning a new skill i.e. fabric painting) was sewing on organza ribbons.

2 notes
·
View notes
Text
Leaf Dice Pouch
Inspired by something for sale, so not my original idea. The pattern and method is mine however.
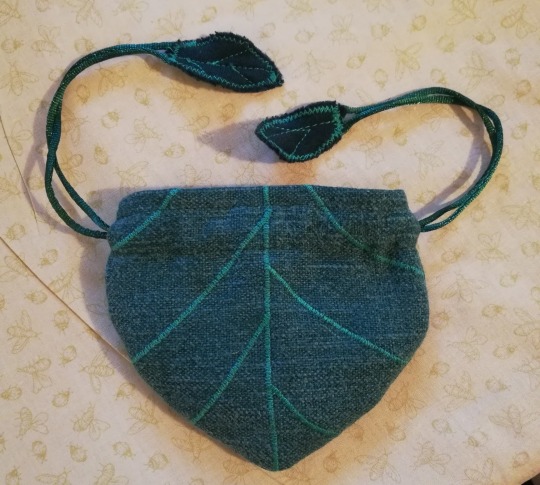

This pouch easily fits a standard set of 7 RPG dice and was made for my husband to use with his druid character.
It came out surprisingly well and opens and closes beautifully.
I started out very methodically, testing the stitch lengths and interfacing options, but got impatient at the end and rushed the little leaf-shaped toggles so they're not as perfect - although the way they curl up is actually quite cool for a 3D look and I probably couldn't have done that deliberately.
9 notes
·
View notes
Text
Knitting Project Bag
Over the Christmas holidays I wanted to continue a knitting project I abandoned some time ago. I found everything I needed except for the piece of paper where I'd written out the instructions in a nice me-friendly way.
I thought this wouldn't have happened if I had a bag to keep that project, and only that project, in. So I decided to make a bag.
The pattern is and construction is largely as written from a book about how to make bags, and the fabric is what I could find lying around without having to actually move anything to access the main stash.


I eventually found the instructions I was looking for, but have yet to resume the knitting.
6 notes
·
View notes
Text
Sculpture inspired by maned wolf (Chrysocyon brachyurus aka "wolf with the Chanel boots"). Foraged tree branch, acrylic paint, corn silk.


Its kind of better if you can move around it, because it's three dimensional and kind of had these cool different perspectives. The branch is responsible for that though, not me.
11 notes
·
View notes
Text
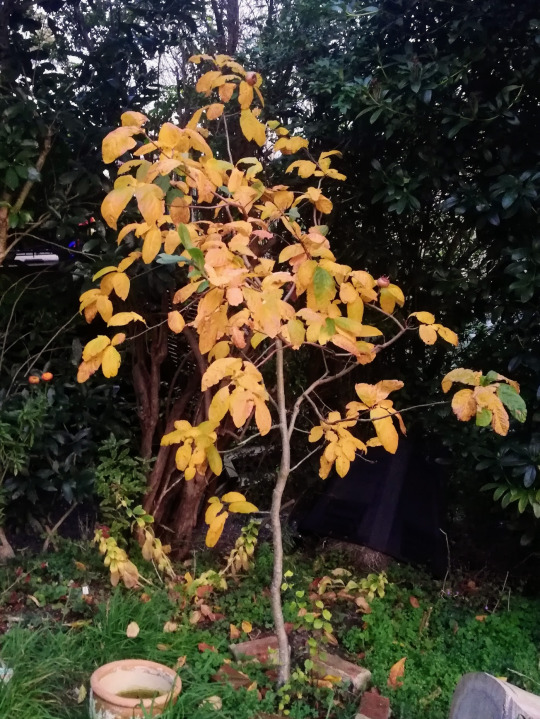
Useful post on HOW to eat medlar - they're tricky because you want to peel the skin, but they're squishy, and then have big seeds. The trick is to peel the skin off in a spiral from the bottom.
The medlar was probably the last deciduous tree to still have its leaves. It was kind of glowing against the backdrop of evergreen trees. Now a week later its completely bare. Once again, many of the medlar fruit vanished along the way.
10 notes
·
View notes
Text
Surprisingly but happily, the varnish has not been damaged by having multiple hot pans placed on them.
I gotta say that they do actually look better in real life than in these pictures.
Scavenged Wood Trivets
For my Mum's birthday, I made her these trivets/pot stands.

They're made from wood scavenged from skips - the darker wood is decking off-cuts and the lighter is probably just pine? I tried to use the wood in the shapes I found them as much as I could*.
They're glued with PVA, stained/varnished with some left-over from when our window was replaced, and have felt (synthetic craft felt) on the under-side.
I realised after making them that I didn't consider or test whether the varnish was heat-proof (for hot pots) but hopefully they'll be ok.
*I like the concept of making as few changes as possible to scavenged materials, but also its less work.
6 notes
·
View notes
Text
The medlar was probably the last deciduous tree to still have its leaves. It was kind of glowing against the backdrop of evergreen trees. Now a week later its completely bare. Once again, many of the medlar fruit vanished along the way.
10 notes
·
View notes
Text
I'm starting a shawl using the "ball band" pattern.

The yarn came from the opshop and unfotunately I forgot to check the fibre content before buying and its Acrylic. Oh well.
6 notes
·
View notes
Text
Scavenged Wood Trivets
For my Mum's birthday, I made her these trivets/pot stands.
They're made from wood scavenged from skips - the darker wood is decking off-cuts and the lighter is probably just pine? I tried to use the wood in the shapes I found them as much as I could*.
They're glued with PVA, stained/varnished with some left-over from when our window was replaced, and have felt (synthetic craft felt) on the under-side.
I realised after making them that I didn't consider or test whether the varnish was heat-proof (for hot pots) but hopefully they'll be ok.
*I like the concept of making as few changes as possible to scavenged materials, but also its less work.
6 notes
·
View notes
Text
I got these for my water lily and lotus pots. Definitely recommend something like this - quite cheap and especially so when you are just treating a couple of pots of water. I just dropped 3 grains in each pot and the next day all the baby mosquitoes had died.
It doesn't say on them what it is, but I believe it is some kind of soil bacteria that only kills mosquito larvae and fungus gnats.

Tip if you are searching for these online - search for "mozzie" specifically. I tried searching some online stores for "mosquito" and nothing came up because the product name and description didn't use the full word.
2 notes
·
View notes
Text
Some ideas for crafts using oyster shells.


I think maybe they decoupage them but I'm using this as painting inspiration. etsy tideandjoydesigns
decoupage. etsy nakedoysterdesign
decoupage instructions. blog 2beesinapod
painted or just painting inspriation. blog abruxinhacoisasgirasdacarmita
small bowl. Source unknown, found it for sale on various websites from different countries...
0 notes
Text
Holiday Cactus Rescue
I'm going to try and rehabilitate this cactus I got in the weekend. The previous owner did not want it anymore so it hadn't been looked after. It probably hadn't had any water for a while, and was getting too much sun.
I removed all the dirt from the roots, allowed it to soak for a bit to give it a chance to absorb some water, trimmed off the sections with no leaves, and repotted it. Hopefully it will start looking better when it has had time to absorb some nutrients, but I'm not sure how long that takes.


2 notes
·
View notes
Text
I guess wreaths can have a purpose as a place to put seasonal decorations... Trying out some curry flowers. They're very yellow when fresh, but are they the kind of flower that lasts out of water?

Hop Weaving - Attempt 1
I recently realised you could probably weave with hop vines (or bines) and since the hops are taking over the garden this seemed like a good idea.
Sorry for this bad photo of the hops but I can't be bothered taking another one. Suffice it to say they are all through the grass there and up the tree and of course there are others not in the photo. The leaves in the top right there are enormous.

Although I looked up how to make some cool and easy baskets, common sense set in and I decided to start with something easier rather than learning a new skill (basket) whilst working for the first time with a less than ideal material that can cause rashes on skin contact.
So, wearing gloves, I cut a few lengths that were most likely to be a tripping hazard and stripped the leaves off (they come off easy just by running your hand down the vine). The vines break kind of easily so I started by twining two together, thick end next to thin, so they could reinforce each others deficiencies, then made a rough circle and just wound them together where they overlapped. Then wound another round and so on until I ran out. It made a relatively circular wreath very easily.

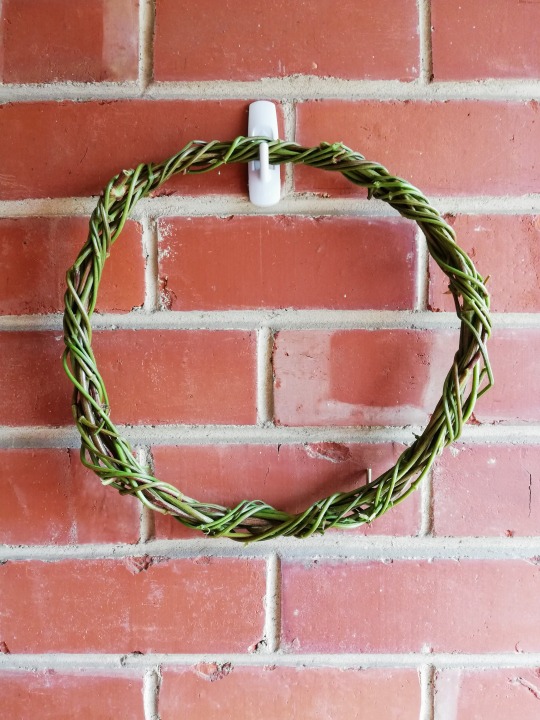
Once done you can handle it easily without the gloves. I think the hairs get damaged or come off in the process, and normally they only irritate when you move against them not simply touch them.
Usually when you look up hop wreaths they have all the leaves and hops on them, but I want to see how the vines handle and how they age and so on.
6 notes
·
View notes
Text
Hop Weaving - Attempt 1
I recently realised you could probably weave with hop vines (or bines) and since the hops are taking over the garden this seemed like a good idea.
Sorry for this bad photo of the hops but I can't be bothered taking another one. Suffice it to say they are all through the grass there and up the tree and of course there are others not in the photo. The leaves in the top right there are enormous.
Although I looked up how to make some cool and easy baskets, common sense set in and I decided to start with something easier rather than learning a new skill (basket) whilst working for the first time with a less than ideal material that can cause rashes on skin contact.
So, wearing gloves, I cut a few lengths that were most likely to be a tripping hazard and stripped the leaves off (they come off easy just by running your hand down the vine). The vines break kind of easily so I started by twining two together, thick end next to thin, so they could reinforce each others deficiencies, then made a rough circle and just wound them together where they overlapped. Then wound another round and so on until I ran out. It made a relatively circular wreath very easily.
Once done you can handle it easily without the gloves. I think the hairs get damaged or come off in the process, and normally they only irritate when you move against them not simply touch them.
Usually when you look up hop wreaths they have all the leaves and hops on them, but I want to see how the vines handle and how they age and so on.
6 notes
·
View notes
Text
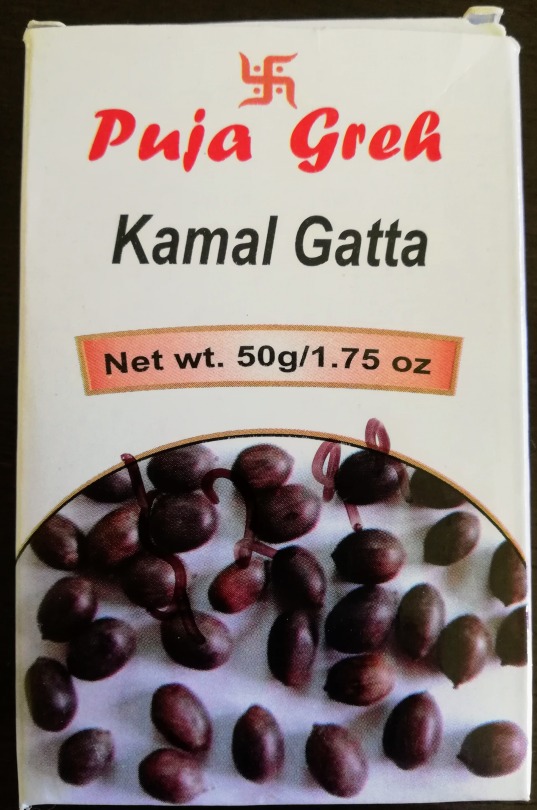
Grow Lotus Seeds - How To
First of all, go to your local Indian supermarket and buy a box of lotus seeds for $3. They will be near the incense and other non-food items used for ritual purposes (lotus seeds are used as offerings). Have an awkward conversation with the cashier if you don't look Indian, because wtf are you buying lotus seeds for.
Below is the box I bought. Kamal Gatta appears to mean lotus seed so look for that when you're shopping. Also, the shop I went to, the cashier did not seem to know the English word lotus, or that these seeds grew into an aquatic flower, so... your milage may vary if asking for assistance.
Second, open the pack and pick up the lotus seeds that roll away from you. Pick up the next one that escapes. Then the next couple. They are very rolly. It took me forever to take this photo as they kept getting away. They are dark brown, very light, and very hard which bodes badly for the next step.

Next we have to somehow get through the outer shell of the seed so that the water can enter and start the growth. This is called seed scarification. Maybe you don't have to do this, maybe you can just put it in water and wait a year, I don't know but I want it to happen faster. If you're wondering how this happens in the wild, most seeds that require this kind of step DON'T need it when the seeds are fresh.
The shell is SO HARD so you need to pick the option easiest for you. You can crack it with a hammer but this often damages it too badly to grow. However, it is very easy and the seeds cost $3 for a pack so maybe you can experiment. You can also use a file, or try to shave bits off with a knife. The pliers were to hold it.
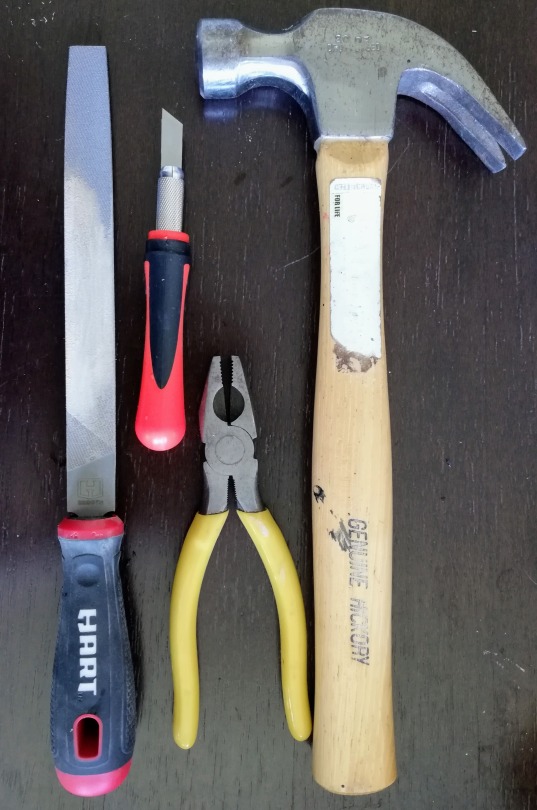
I tried them all. When using the knife I chipped quite a hole in it, down to the inner brown layer of the shell. Theoretically you are supposed to go until you see white. I think they mean the very inner section, however there's also a faint white layer in the shell somewhere, with slightly softer, slightly different shade of brown below it. I think that's as far as I went with the last two I germinated, so stopped there.
Below you can see the seeds after I attacked them with the tools, and the inside of one that cracked right in half with the hammer. You can see the layers of the shell and the green shoot already inside ready to grow. There is a slight dip in one end of the shell, and slight point at the other, and all these are arranged dip to the top of the photo, if that matters to you for some reason.

Now I put them in slightly warmish water and leave them to grow. Last time I put them on a heat pad but I think maybe the weather is warm enough without that now. I'll grow the two I hit with the hammer in separate container so I can see if they were too damaged to germinate or not.
I used glass jars and put them in my kitchen which is well-lit but they do not get direct sunlight. Currently the indoor temperature during the day is 18-23C. Hopefully it stays warm enough overnight without the heat pad.
1 note
·
View note