
Tales Ferreira aka untilde (aka un~)Brazilian artist creating music and other crafts since 2017.A blog for sound trackers, mastering and other audio shit. May contain small doses of shitposting.
Don't wanna be here? Send us removal request.
Statistics
We looked inside some of the posts by untilde and here's what we found interesting.
Average Info
Notes Per Post
1
Likes Per Post
1
Reblog Per Post
0
Reply Per Post
0
Time Between Posts
1 month
Number of Posts By Type
Text
4
Last Seen Tumblr Blogs


Fun Fact
There were a total of 171.5 billion posts on Tumblr in 2019.
Text
New Release: Indek - Yope+

Super happy to announce the release of Yope+, the expanded edition of Indek's EP.
The original 5 track EP was updated with +14 remixes made by different artists, including me, and is available in limited edition cassettes, mastered by yours truly.


The key differences between the digital and cassette versions:
It features new masters for the original tracks, alongside the remixes.
Delicious tape hiss and saturation
Considerably darker and warmer masters
Needless to say it, but all masters done in Reaper. This is what the chain looks like:
Arturia Dist Tube Culture
Pulsar Poseidon
Fab Filter Pro-Q 3
Cytomic The Glue
DMG Audio Limitless
Grab your copy HERE!
0 notes
Text
New Release: Eve Nacari - Impulsos/Intrínsecos
Made this collab with Eve Nacari for her latest full length album, Impulsos/Intrínsecos.
The track started with a demo made in Renoise. The stems were then rendered and we built everything else in Ableton Live 11. A great way to concillate completely different workflows :)
Very happy with the final result. The whole record is worth listening.
You can grab the full album at BandCamp or listen on any streaming platform.
1 note
·
View note
Text
Breakbeat layering and hardclipping: a dream couple.
(This started as Renoise Forum discussion)
When it comes to breakbeats, I usually work in layers of 2 loops, no less, but more depending on track complexity. I group them all into the same bus, then put a parallel compressor to glue everything together.
The basic setup would be:
Top layer = The breakbeat containing the main kick and snares, the one that will drive the groove. Triggers the bus compressor (usually kick and snare only, the peaks).
Bottom layer = Hi-hats, cymbals, rides, rimshots, etc… The more metallic and high frequency stuff. Usually for fills, rolls, etc. I don’t let these trigger the bus compressor, so I clip the signal 1 at the end of the chain to get rid of some peaks (right before the bus).
Please note that I usually filter some of the low frequencies in the breakbeat channel, because I like to use my own synthesized kicks in a separate channel/track.
Structure looks like this:
breakbeat 1 + breakbeat 2 + breakbeat etc => breakbeat bus kick (short) + kick (sub/long) => kick bus
kick bus + breakbeat bus => drum bus
In short, it’s a “main” break, with more low and mid content (kick and snare), and a “secondary” break with more high frequencies, like hi-hats and cymbals.


A: Usually by clipping the track or group where the hihats are located.
Hihats tend to have inaudible clicks in the transient phase that can clutter the mix and make compressors go crazy. These can usually be clipped out without any audible distortion.
You lose a bit of dynamics by doing this (crest factor is reduced), but at least there’s more room for the snare and kick work the compressor’s rhythm, for instance.
I highly recommend trying Peakeater for this. It’s free and open source!
The way to go is linking the input and output levels (the chain button) and start increasing the input until you hear distortion, then back off a few dB. This way you get almost the same loudness as before, except with more “consistent” peaks.
Example: the SM101_brk_back II soul_102bpm break from the Renoise factory samples. Imagine you’re trying to layer it with another heavier break (let’s call it main break).
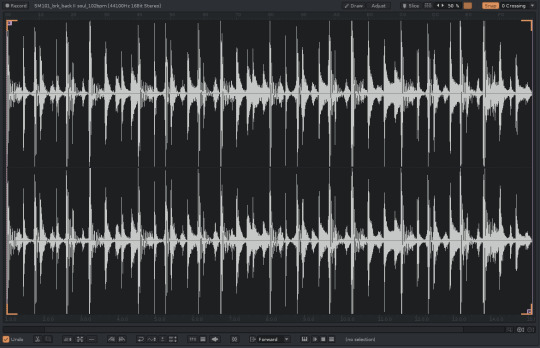
You put a high pass filter to take out the lows and leave mostly the high end.

The resulting waveform:

You can see some of the peaks are louder than others. These peaks can be clipped to reduce dynamics and make it easier to blend with the main, heavier breakbeat.

The resulting waveform:

If you wanna hear how these sound, you can download the project here.
C4 - original break C#4 - hipassed D4 - hipassed and clipped
0 notes
Text
Parallel processing in Renoise: a short illustrated review
As you probably know, native parallel processing is somewhat limited in Renoise. Some DAWs implement it with “racks” (such as Ableton Live and Bitwig) or even containers (Reaper). In Renoise, however, a few tricks must be used in order to achieve such thing, the first and most obvious one being the Sampler FX tab - now hang in there.
After a short discussion with some folks in the Facebook group chat (yes, some people still use Facebook), I decided to build a couple example projects to explain how parallel processing can be achieved natively.
My goal here is to sum up that discussion, serving as a reference for the future - at least until proper “effect racks” are (hopefuly) implemented in Renoise.
All example projects can be downloaded here.
Open discussion at the Renoise Forums.
--
Method #1 - Sends and Returns

Limitation 1: Cannot send signal to previous groups/tracks, only from left to right.
Limitation 2: Requires an extra Return channel for summing/bussing.
Explanation:
1. Create a Return channel (I’ll call it Wet). 2. Place your desired effect with 100% wet (if possible). 3. Place a send in Dry track. Keep the source. 4. (Optional) Create another Return track (I’ll call it Sum) to process the Dry+Wet signal together. Place a send on the Return #1 (Wet) AND another on the source track (dry). Mute source on both. Continue processing in Return #2 (Sum).
--
Method #2 - Sampler

Limitation 1: Not compatible with VST plugins, only instruments/samples. You can also render your VST to samples to bypass this limitation.
Explanation:
1. Create a new instrument 2. Create a FX Chain in the Sampler window (F6) 3. Create one “lane” for your dry signal, one lane for your effect (wet), and one for summing. That’s a total of 3 FX chains. 4. Place two sends in lane #1 (dry): the first send with “Keep Source” enabled (goes to lane #2) and the second one with “Mute Source” (goes to lane #3). 5. Insert the desired effect in lane #2. In this example, we are using a compressor. Insert a send after the effect with “Mute Source”. Route it to lane #3. Lane #3 is going to be the sum of dry + wet signals (lanes 1+2), and your main output. Adjust sends in lane #1.
--
Method #3 - Sampler + Groups [my favorite]

Limitations: Same as Method #2.
Explanation:
This is a variation of Method #2.
1. Insert two tracks in the mixer. Name them “Dry” and “Wet”. Group these. 2. Create a new instrument. 3. Create a FX Chain in the Sampler window (F6). 4. Create one “lane” for your dry signal and one lane for your effect (wet). That’s a total of 2 FX chains. 5. Place a send with “Keep Source” in lane #1 and send it to lane #2. Keep the second lane empty. 6. Route each lane to a separate track (the ones you created in step 1, Dry and Wet). 7. Place the desired FX on the “Wet” track that is receiving from Lane #2. If it has a dry/wet control, set it to 100%. 8. Adjust the faders to determine the balance between Dry and Wet. In this example, I reduced the Wet track -10db to match the volume with the dry uncompressed signal. Mute the Wet track to bypass the FX. Peak volume stays almost the same, but more ‘body’ is added to the signal. 9. Profit.
--
0 notes