
He/Him I like to make games, but this blog is to talk about dev stuff and code, not to talk about my projects
Don't wanna be here? Send us removal request.
Statistics
We looked inside some of the posts by vaadazen-codes and here's what we found interesting.
Average Info
Notes Per Post
7K
Likes Per Post
6K
Reblog Per Post
1K
Reply Per Post
11
Time Between Posts
2 months
Number of Posts By Type
Text
4
Last Seen Tumblr Blogs


Fun Fact
The average Tumblr user visits about 67 pages every month.
Text
(semi) Emergency Commissions open!


I'll spare the whole story for time, but I'm currently switching from my old program to a new one at work, but unfortunately we have a month between the end and start dates, so I'll be without income for the next month. So I'm reopening my commissions on ALL platforms that I have! I typically do a lot of portrait work, but I've done all sorts of styles and types of work, including memorial portraits (pets and humans), fantasy and DND OCs, works inspired by other artists, realism, my style, etc. I really enjoy playing with lighting and shadows. What about pricing?
I gotta be real, I normally never charge above $20 USD for my pieces because they never take me more than a day to complete unless it's a physical canvas. For the pop art pet example, I think I asked $15 for it, versus $20 for the Portrait of the black haired girl If you can't comm, please reblog <3 I normally wouldn't ask but it's a semi urgent issue.
9 notes
·
View notes
Text
Instead of "Looked", consider
glanced
peered
gazed
stared
watched
observed
examined
scrutinized
surveyed
glimpsed
eyed
beheld
inspected
checked
viewed
glanced at
regarded
noticed
gawked
spied
6K notes
·
View notes
Text
How To Get Started Making Visual Novels
Wanna make a visual novel? Or maybe you've seen games like Our Life, Blooming Panic, Doki Doki Literature Club, etc. and wanna make something like that? Good news, here's a very basic beginners guide on how to get started in renpy and what you need to know going in! Before you start, I highly recommend looking at my last post about writing a script for renpy just to make it easier on you!
LONG POST AHEAD
Obviously, our first step is downloading it from their website

thankfully, its right on the home page of their site. Follow basica program installation steps and run the program. I highly recommend pinning it to your task bar to make it easier to access.
From there, you're met with the renpy app, it's a little daunting at first but let's talk about what all these buttons are for.

Projects
This part is simple, it just lists the current projects in the chosen directory. You probably won't have any in there of your own. You should still see Tutorial and The Question!
Both of those default projects are super helpful in their own ways, i highly recommend testing out the tutorial and playing around with it just to get comfortable with some of the basics.
Create New Project
The first step to actually making your game into a game!
You'll be met with a prompt letting you know that the project is being made in English and that you can change it. You can click Continue.
From here, you'll be asked to input a project name! Put in your games title, or even a placeholder title since this Information can be changed later! (this is also the title the folder will be in your file browser, be sure to name it something you won't overlook)

Now we get to choose our resolution!
If you have no idea what to choose, go for 1920x1080! This is the standard size for most computer monitors and laptops, but it will still display with moderately decent quality on 4k monitors too!
You can choose 3840x2160 as well. This is 2x the measurements of the default, with the same ration. These dimensions are considered 4k. Keep in mind, your image files will be bigger and can cause the game to have a larger size to download.

Now we get to choose our color scheme!
Renpy has some simple default options with the 'light mode' colors being the bottom two rows, and the 'dark mode' colors being the toop two rows.
You can pick anything here, but I like to choose something that matches my projects vibes/colors better. Mostly because depending on how in depth you go with the ui, it minimizes the amount of changes I need to make later.

Click continue and give it a minute. Note: If it says "not responding" wait a moment without clicking anything. It can sometimes freeze briefly during the process.
Now we should be back at our home screen, with our new project showing. Let's talk about allll that stuff on the right now.
Open Directory
This just opens that particular folder in your local file explorer!
game - is all the game files, so your folders for images, audio, saves, and your game files like your script, screens, and more.
base - this is the folder that the game folder is inside of. You can also find the errors and log txt files in here.
images - takes you to your main images folder. This is where you wanna put all of your NON gui images, like your sprites, backgrounds, and CGs. You can create folders inside of this and still call them in the script later. EX: a folder for backgrounds , a folder for sprites for character a, a seperate folder for spirtes for character b, etc.
audio - Takes you to the default audio folder. This is empty, but you can put all your music and sound effects here!
gui - brings up the folder containing all of the default renpy gui. It's a good place to start/ reference for sizes if you want to hand draw your UI pieces like your text box!
Edit File
Simple enough, this is just where you can open your code files in whatever text/code editor you have installed.
Script.rpy - where all of your story and characters live. This is the file you'll spend most of your time in at first
Options.rpy - Contains mostly simple information, like project name and version. There aren't a ton of things in here you need to look at. There is also some lines of code that help 'archive' certain files by file type so that they can't be seen by players digging in code however. Fun if you want to hide some images in there for later or if you just dont want someone seeing how messy your files are. We've all been there
Gui.rpy - where all of the easy customization happens. Here you can change font colors, hover colors, fonts, font sizes, and then the alignment and placement of all of your text! Like your dialogue and names, the height of text buttons, etc. It more or less sets the defaults for a lot of these unless you choose to change them later.
Screens.rpy - undeniably my favorite, this is where all of the UI is laid out for the different screens in your game, like the main menu, game menu, quick menu, choice menu, etc. You can add custom screens too if you want, but I always make my own seperate file for these.
Open Project - this just opens all of those files at once in the code editor. Super handy if you make extra files like I do for certain things.
Actions
last but not least, our actions.
Navigate Script - This feature is underrated in my honest opinion, it's super handy for help debugging! In renpy you can comment with # before a line. However, if you do #TODO and type something after it, it saves it as a note! You can view these TODO's here as well as easily navigate to when certain screens are called, where different labels are (super great if your game is long, and more. It saves some scrolling.
Check Script (Lint) - also super duper handy for debugging some basic things. It also tells you your word count! But its handy for letting you know about some errors that might throw up. I like using it to look for sprites I may or may not have mispelled, because they show up in there too.

Change/Update GUI - Nifty, though once you start customizing GUI on your own, it isn't as useful. You can reset the project at any point and regenerate the image files here. This updates all those defaults we talked about earlier.
Delete Persistent - this just helps you delete any persistent data between play throughs on your end. I like to use it when making a lot of changes while testing the game, so that I can reboot the game fresh.
Force Recompile - Full disclosure, as many games as I've made and as long as I've been using Renpy, i have never used this feature. I searched to see what it does and this is the general consesus: Normally renpy tries to be smart about compiling code (creating .rpyc files) and only compiles .rpy files with changes. This is to speed up the process since compiling takes time. Sometimes you can make changes that renpy don't pick up on and therefore won't recompile. In these cases you can run force recompile to force it. Another solution (if you know what file is affected) is to delete that specific. rpyc file.
The rest of your options on this right hand side are how you make executable builds for your game that people can download to extract and play later!

Sorry gang! that was a whole lot of text obviously the last button "Launch Project" launches an uncompiled version of the project for you to play and test as you go! Hang in tight because my next post is about how to utilize github for renpy, so you can collaborate easier!
587 notes
·
View notes
Text
2 BIG Tips for formatting your VN script
Are you a Visual Novel writer? Or at least are you writing a visual novel? Don't know how to format it? good news, I'm here to give you some tips for formatting your script to make it 10x easier on the programmer to implement into RenPy!
All of these tips apply to Google Docs, since that's the most commonly used script writing platform for VNs, especially given the collaboration that goes on for them and for game jams!
Page Set Up
These tips are the most important of this whole doc, because it prevents everyong (writer or programmer) from having to find and replace later!
Turn off Smart Quotes
Turn off replacements for ... and -
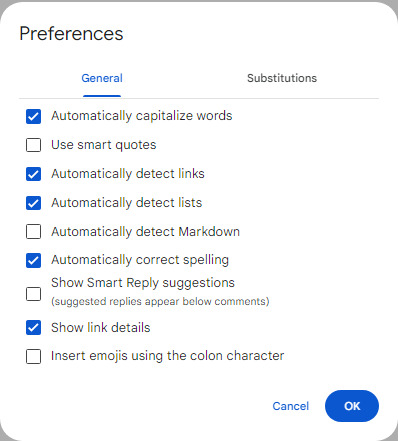
To do that, go to your tool bar at the top and go to tools > preferences
see it down there at the bottom?
then just uncheck tthe smart quotes box.
Here's an example of what mine looks like to make things easier, though the others don't matter as much.
To turn off substitutions, you have two options.
Manually uncheck the boxes
Turn it off altogether.
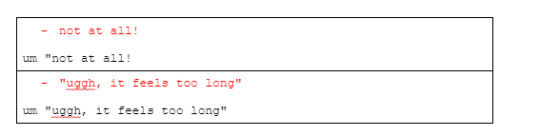
I personally chose to turn it off all together, most of what it is is just things like 1/2 becoming a visual fraction, or < - - turning into <-.
If you chose to manually uncheck them, there's only really two that'll need to be checked off!
The one for ... and the one for -- or --- Why do you need to do this? Well unfortunately, renpy and most code editors don't recognize them as characters, and it can cause some issues with the dialogue text being displayed.
Choice Dialogue
This one isn't a huge deal, but after working on quite a few jam projects and personal VN projects, I've found a way that seems to work best for allowing your programmer to efficiently implement them! (Or yourself if you write and code for your projects like I do) use tables in google docs! Here are some examples from some of my projects:
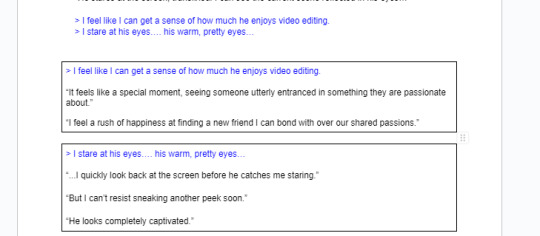
It's pretty c lear what the options are for each menu choice this way, since they're color coded and have some sort of indicator before them to seperate them.
This also makes it easier to know where the choice menu dialogue ends.
The colored parts are the menu label itself, so what shows up on the screen
and then the rest is the dialogue branch for that choice!
between these two, the biggest majority of your programmers job will now be making sure things don't break, instead of spending hours finding and replacing certain things, or having to pause to wait for an answer if your team is in all sorts of time zones!
#renpy#renpy visual novel#renpy game#vn#elvn#vn dev#visual novel#otome dev#visual novel dev#indie otome
54 notes
·
View notes