vaimetanyx
Infrequent nonsense
Vai's art blog. I draw a lot and post it rarely. I want to disappear into the forest and become a horrifying cryptid
276 posts
Don't wanna be here? Send us removal request.
Last Seen Blogs

filmworm
The Film Worm

amythe-livie0
amy🦋

karura
☽ with teeth clenched ☾
transprideworldwide
hi im fifi

tocomputers-blog
Untitled
Text

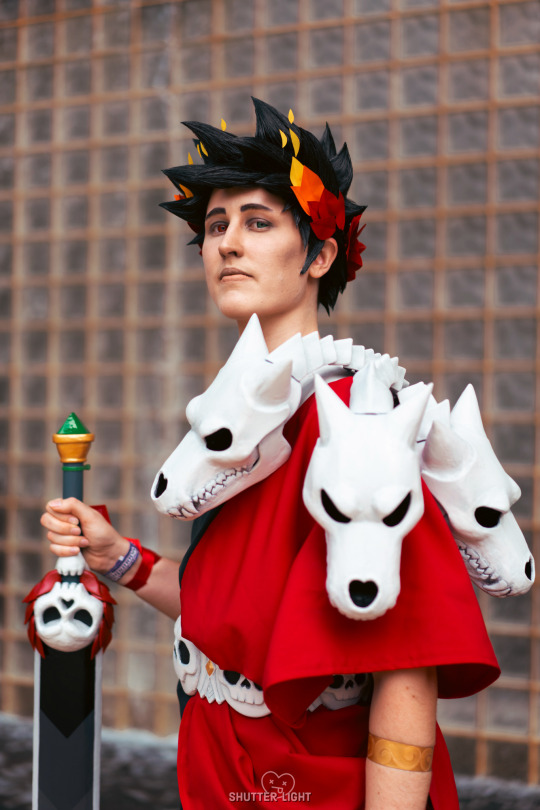
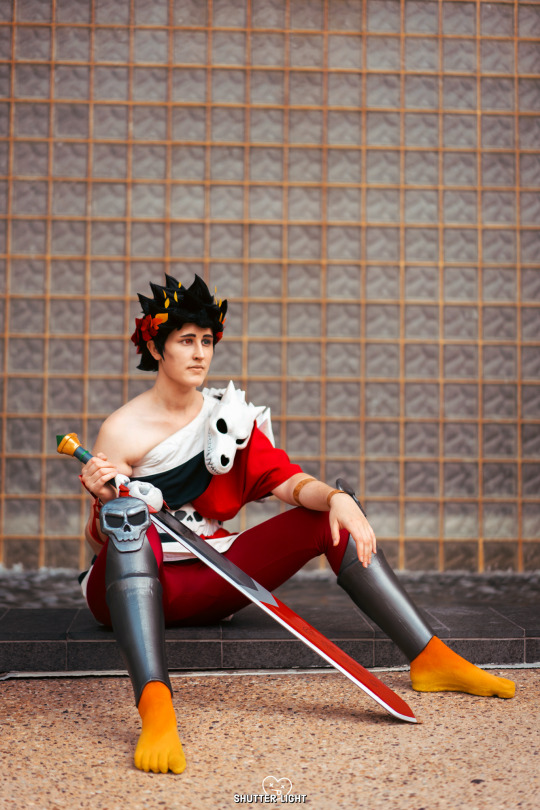
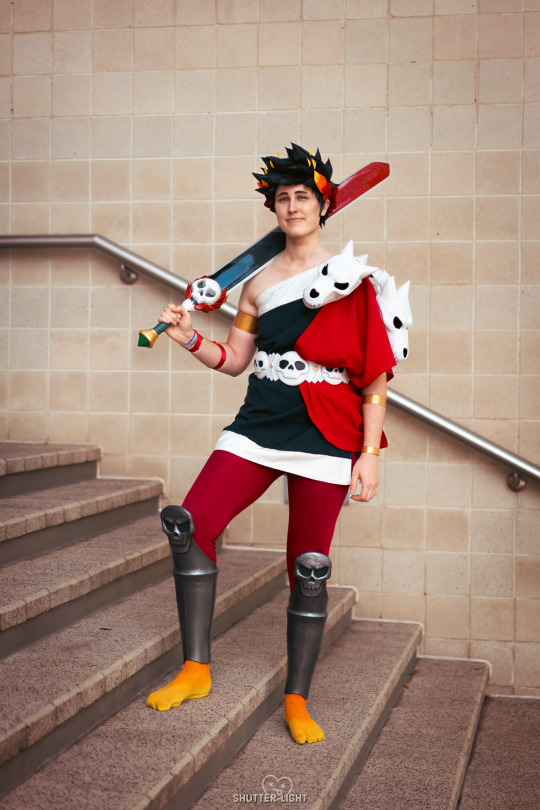

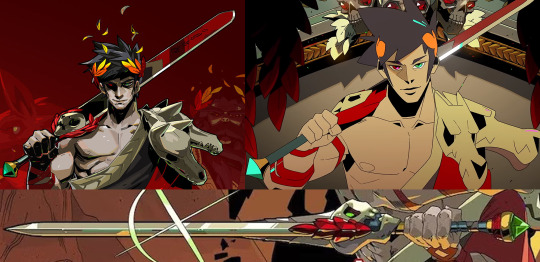
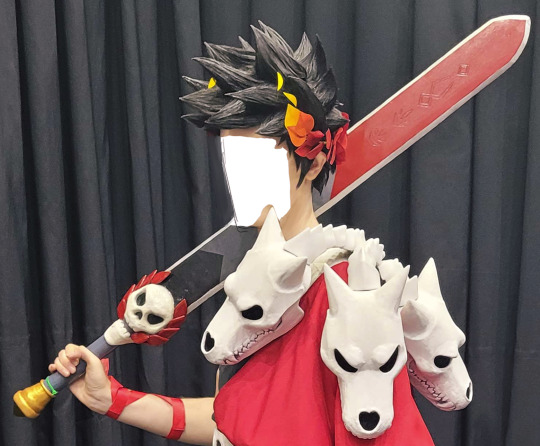
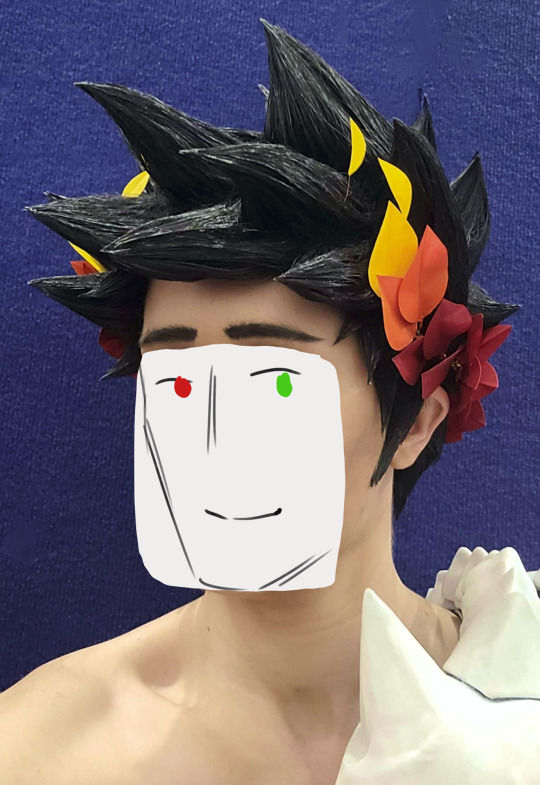
Enjoying a few short moments in the sunlight before returning to the House of Hades
Photos by the amazing Shutter_light_photography (on Instagram) who did an absolutely incredible job and was great to work with!
Cosplay breakdown posts can be found here:
[Skull pauldron] [Belt] [Greaves] [Toga + sash] [Wig + Laurels] [Armbands] [Flaming feet] [Satyr Sack] [Stygius v1] [Stygius v2] [Nectar]
#my cosplay#zagreus#hades game#zagreus cosplay#did I totally forget to make this post for over a month? maybe#shout out to shutter light for being so lovely and dealing with my complete inability to pose for photos
65 notes
·
View notes
Text
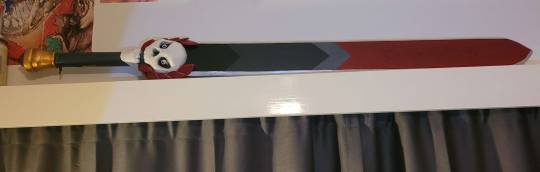
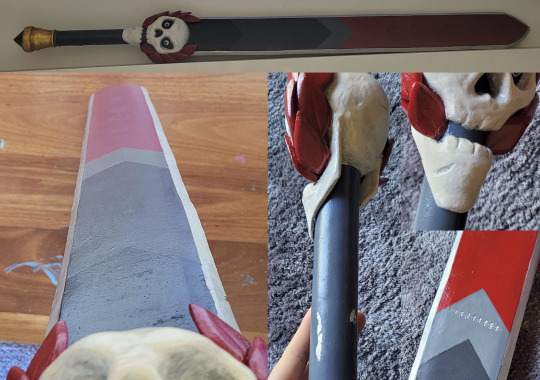
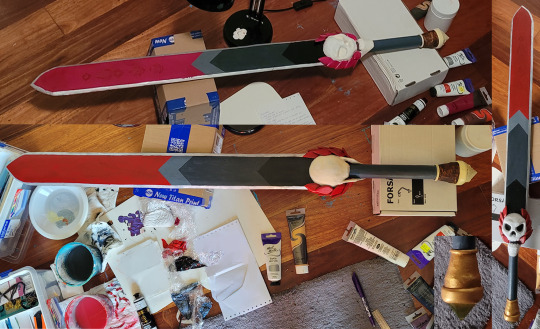
Much later than I thought it'd be done, it's Stygius v2! Not absolutely perfect, but much better than my first attempt

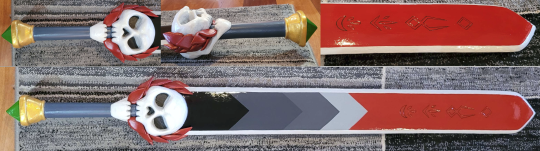
(Full process under the cut)
[Skull pauldron] [Belt] [Greaves] [Toga + sash] [Wig + Laurels] [Armbands] [Flaming feet] [Satyr Sack] [Stygius v1] [Stygius v2] [Nectar]
For Stygius v2 I kept the blade the same, and used the same base pattern as v1 - the main change was the hilt, which I made shorter and adjusted the skull and pommel accordingly. To reduce the hilt diameter I also used some sort of shrink rubber (that I believe is meant to be used for electrical work) instead of covering the PVC pipe with foam like I did with v1
From there the process was much the same - cut away most of the bevel for the edges, then sand down to a smooth finish. I used a hand sander immediately instead of trying to get an even edge with a dremel, but even then I had some issues and decided to do the whole edge with foam clay for the smoothest finish

Before that though, I got to work on the pommel and skull! I used the same process for the resin gem at the end, but hated the colour so decided I would paint over it this time. I also made sure to pack the aluminum foil extra tightly when crafting the skull so it wouldn't have the slight give that Stygius v1 has, and caused a few minor cracks in the finish. The actual pommel was designed to be much shorter and with a smoother curve, though I was kinda making it up as I went to once again it became an area I had to fill with foam clay


Foam clay my beloved <3
After cleaning up the blade edges with foam clay and letting it set I could get started on the leaves. I used the same process as v1, though I changed the placement slightly and added a few on the sides. I also wasn't super happy with how easily the runes got lost on v1, so I cut the patterns into the foam instead of pressing them in for v2.


I used flexbond to prime the foam this time since plastidip is expensive and I have terrible luck with aerosols, especially since I don't have a dedicated spraying area and Australian spring and summer weather is all over the place which makes for a terrible outdoor spraying experience. That being said, I did use a base spray paint coat of ivory to get the sword a uniform colour before painting the colours and details

...by hand. all of it. Each colour needed a minimum of 3 coats
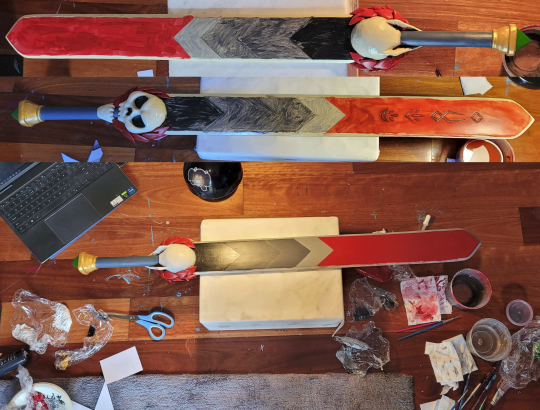
Then the only thing left was to spray the clear protective coats! Matte for the hilt and skull, gloss for the blade and pommel
While the edge isn't perfect and I would have liked the gem to be more glossy, I'm incredibly happy with how v2 turned out, and v1 now gets to live out its retirement sitting over my window watching over my room
#my cosplay#cosplay process#hades game#zagreus cosplay#cosplay props#stygius#NEW AND IMPROVED#I had a year to remake this but still only got it done the week before the con why am I like this
14 notes
·
View notes
Text
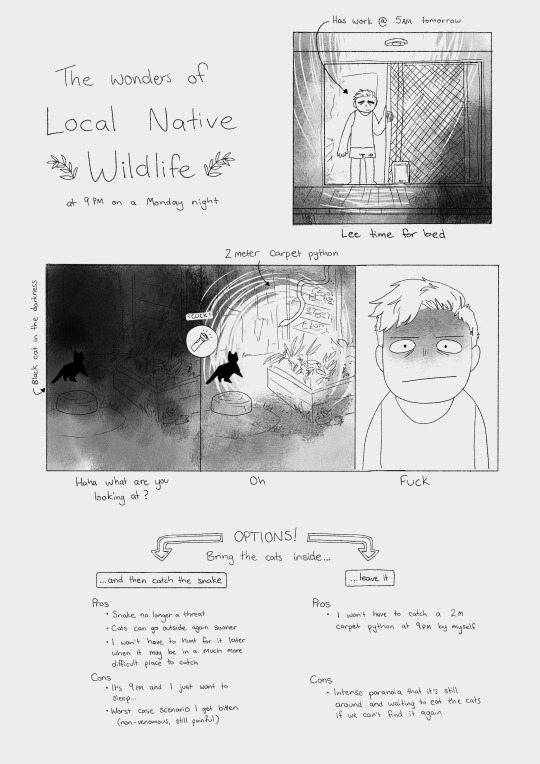
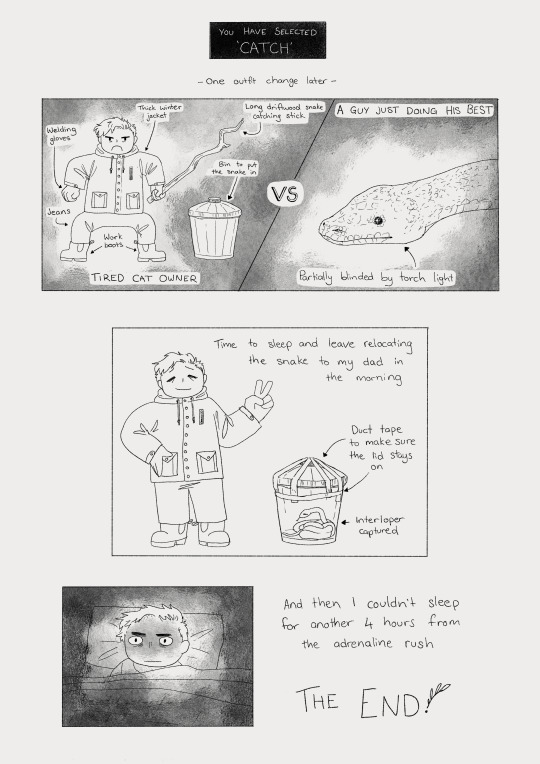
Decided to practice a simpler comic style with something that happened last week
Remember: don't mess with snakes if you don't know what kind they are, and even then you should only interact with them if you have experience and are unable to get professional assistance!
#my art#original comic#i do actually have experience catching snakes because this exact thing has happened a dozen times#it's just that I usually don't have to do it alone#venomous snakes should always be left alone unless your stupid cat has brought small ones into the house and you have to catch them#because he put them in front of your bedroom door#sometimes I forget other people don't live near national park and constantly dealing with local wildlife is not standard#anyway: keep your cats indoors bc all this shit has happened within a fenced in 10 square meter ish yard so they would absolutely devastate#the local wildlife population if they weren't kept in a restricted area
5 notes
·
View notes
Text
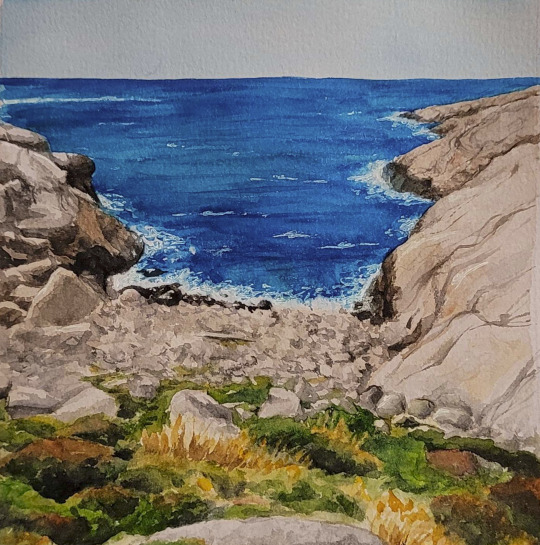


I recently had time to practice using water colours using photos I'd taken while traveling
#my art#watercolour#traditional painting#don't get me wrong watercolours are still of the devil and finicky as hell#but I've started to understand them#also using reference images helps SO much#I wish everyone a very get a chance to scamper across rocky coast land like a mountain goat. it's good for the soul
4 notes
·
View notes
Text
I usually hate the phrase "the ol' ball and chains" but being used in this context got me with a strong enough death grip that I tried to figure out 3 point perspective
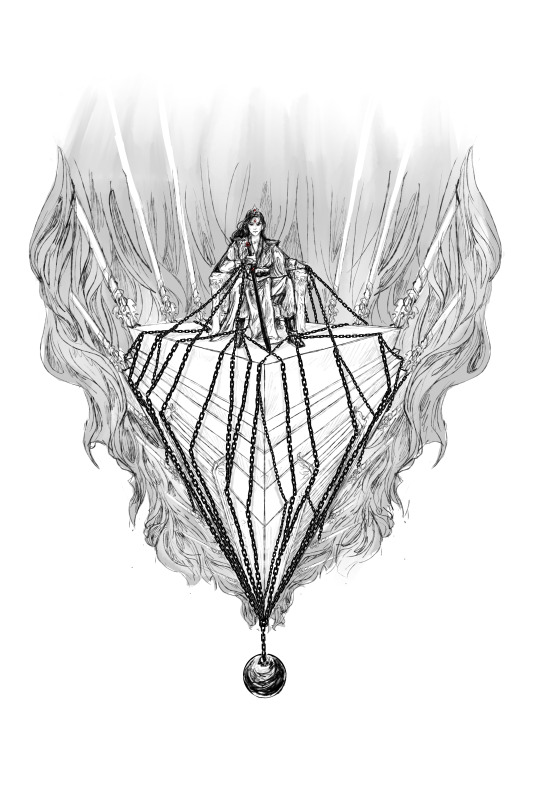
Sorry to laugh at my own joke but imagining bingge referring to all of his 100+ wives as "the ol' balls and chains" is making me hysterical
#lots of chains one ball (where the ball is expectations or toxic masculinity or something idk)#I once saw a customer with a tattoo of a ball and chain on the back of his hand#leading to a tattooed ring around his finger. insane.#anyway xin mo is the only thing close to him bc despite constantly searching for love and genuine care#he can only keep forging more of the same bond of power and lust which is why none of his wives are present#unable to climb up the pedestal he has trapped himself on in the search for love and safety#and in turn has been stuck only with admiration fear lust and power that can't fill the same void#hi sorry to hijack your joke post im mentally ill about him and everything pidw represents and svsss subverts#my art#svsss#luo bingge
2K notes
·
View notes
Text
Ah nectar, the drink of the Gods
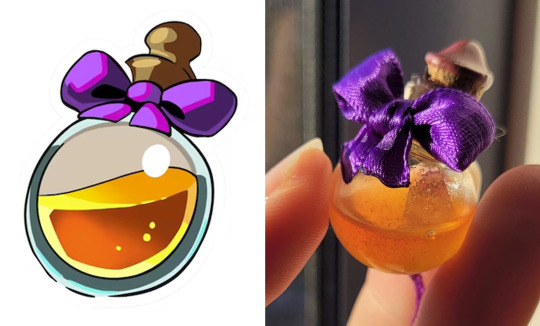
Also known as potion of burn your fingers because you're bad at using lighters and refuse to turn your ceiling fan off
(Full process under the cut)
[Skull pauldron] [Belt] [Greaves] [Toga + sash] [Wig + Laurels] [Armbands] [Flaming feet] [Satyr Sack] [Stygius v1] [Stygius v2] [Nectar]
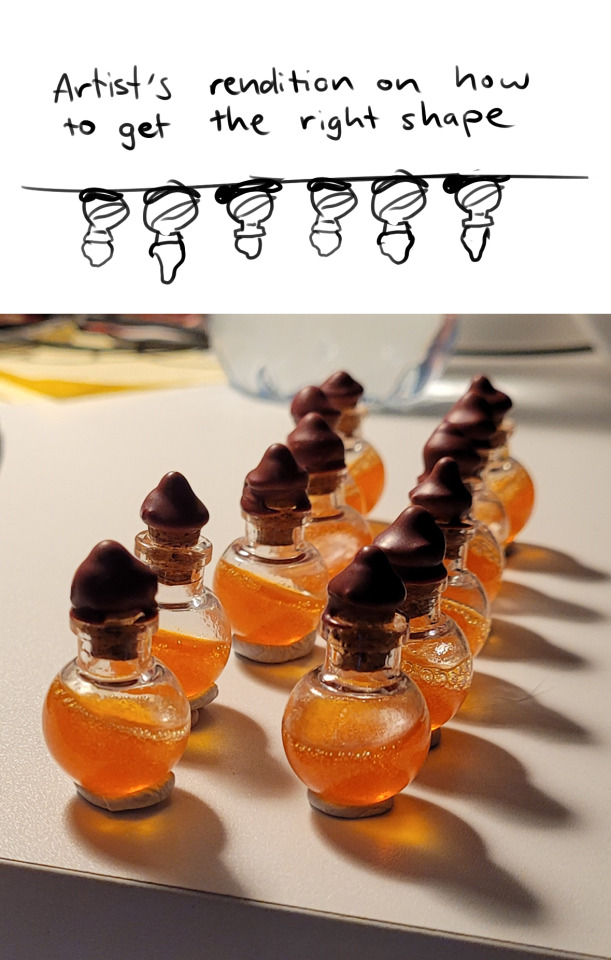
I really love being able to give out in-character items while in cosplay, and I figured nectar, as a semi-common friendship leveling item, would be perfect. Originally I was going to try sculpting them out of sculpy or something and then I realised I would be unsatisfied with the end result so I bought bought 50 tiny glass bottles off aliexpress
To get the golden-orange filling I experimented with a few things - while the one I was happiest with was a clear PVA glue mixed with watercolour paint pigment for colour and gold pearlescent pigment for shine, it wouldn't set, and I didn't want to deal with a liquid considering I have a long history of just bashing the shit out of things if I'm not very careful, and I don't want to spend my whole con day taking special care of tiny glass bottles. So, I ended up using resin! Coloured the same way as the glue, this was my first time using resin and while I would have liked less bubbles it turned out well

To get the weird blobby looking cork the ends were dipped in wax by my sister, who mixed a few colours together and let the bottles dry upside down to get the right shape
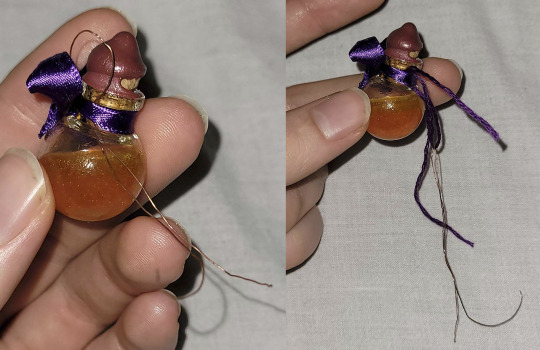
I used two types of ribbon for my two lots of bottles (nearly 100 bottles have been made up to this point), but both were a purple satin. After trying the bow in a way that would let it sit in the right direction and burning the ends with a lighter to seal them and prevent them from fraying, I used clear PVA glue to stiffen the ribbon and secure it. While drying I used a bit of blutack to get the ends to dry straight down rather than to the sides

Then, because small trinkets are nice but can be difficult to carry around all day at a con, I attached some string which is just purple embroidery thread I had lying around. Unfortunately I did too much of a good job tying the ribbon tightly for some of them since I had to use wire and pliers to actually get it under the ribbon to tie it on
But all the finicky work is worth it, they're very cute when complete
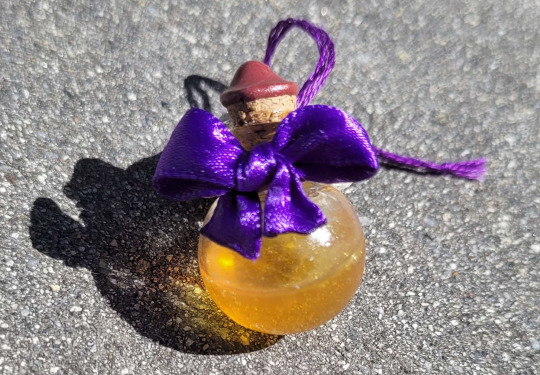
(Psst - if you're an Australian con-goer (specifically Supanova) keep an eye out for me on the floor - I give these out to the hades fans I meet!)
#my cosplay#cosplay process#hades game#zagreus cosplay#cosplay props#nectar#a few people have asked me why I don't sell these and why I go to so much effort and spend money on something I'm giving out for free#and the answer is because its fun it makes me happy and it makes the recipients happy#who cares if I'm 'losing money' when I can make someone's day#and still be in character to make my cosplay even better#I don't roleplay and I'm a shit actor but it's about having fun and making connections and keeping up that sense of community#bc we're choosing to be at the convention and be enthusiastic about the things we love#and that is so unbelievably special to me#anyway that's it for the tag rant and these damn process posts thanks to anyone that actually reads all this word vomit
132 notes
·
View notes
Text
"...Stygius, the Blade of the Underworld, must have been amongst the finest weapons ever wielded..." - Stygian Blade entry, Codex of the Underworld.
Unfortunately this one isn't so fine and needs a remake, but here's how it was made while I work on Stygius 2
(Full process under the cut)
[Skull pauldron] [Belt] [Greaves] [Toga + sash] [Wig + Laurels] [Armbands] [Flaming feet] [Satyr Sack] [Stygius v1] [Stygius v2] [Nectar]
Unfortunately Stygius was the victim of con time crunch, and I wasn't even sure I'd be able to make the rest of my outfit in time for the con so Stygius, as a prop, had the lowest priority. But hey for a sword done from scratch in a week, not too bad.
I guessed all the measurements (which ended up making Styg 1 a hand and a half sword instead of the one handed sword it should be) and made a pattern. From there I was able to cut out a base, attach a handle, and then cover it in EVA foam. I then proceeded to so a VERY wonky job on the blade bevels, and even took a few chunks out, which meant I had to use foam clay on some parts of the edges which ended up leaving an inconsistent finish once it was painted.
For the skull I used spare EVA foam for the base, built up the bulk with aluminum foil and hot glue, then used more foam clay to sculpt the features and create depth (and ideally for that thickness it should have had several more days to set). The leaves were just some cut and dremelled EVA foam, and the pommel base was, you guessed it, more EVA foam and foam clay.
The gem was made from epoxy resin, and poured into a mould I made out of cardboard, sticky tape and some plastic lining, and coloured with some watercolour pigment. Somehow that actually worked.
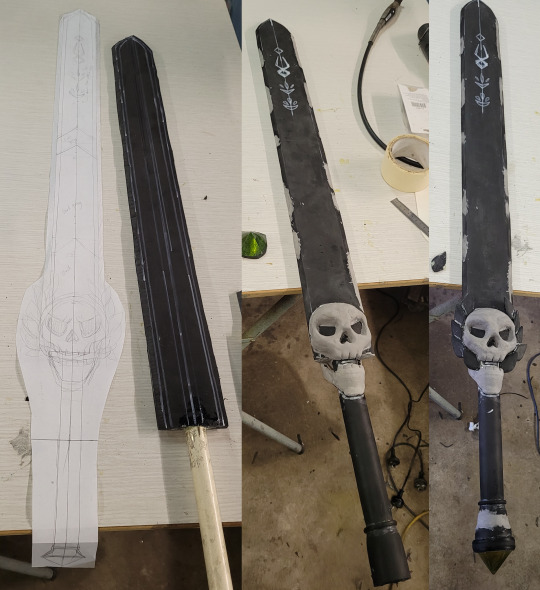
I primed the whole thing with plastidip, and next was Spray Paint Hell. I had to do it all in one day, and the masking tape I was using to protect the parts I'd already done started pulling off the actual paint and sometimes the plastidip when I tried to remove it. I don't have a lot of experience with spray paints so my coats also weren't to the standard I wanted, and there was overspray despite my best efforts.
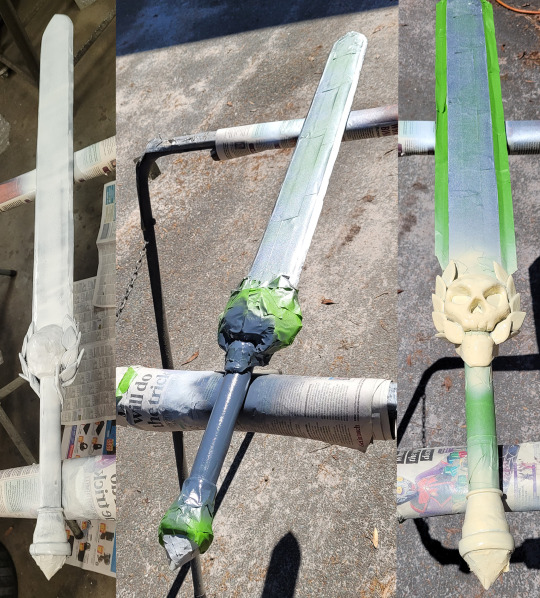
The spray paints I used were cheap and it showed. So I decided that they would be a base coat, and that the whole thing should be hand painted over most of the sections in order to achieve the correct colours, and in the case of the skull, match the other bone accessories. My sister helped do a lot of the base coats while I was at work so I could focus on detail work when I got home, and even there I was still painting the night before.
To tie everything together I did a few coats of gloss spray the morning of the con. Unfortunately, it didn't quite dry so it stuck to the surface it was resting on when I did the other side, which caused most of the paint defects. However, it was finished in time for the con and luckily the worst of the marks were on the back.
The main issue to address with Stygius 2, besides not doing an absolute catastrophe of a paint job last minute, is to fix up the hilt. It's too long and thick, the pommel is too chunky and badly shaped, and the gem is the wrong colour. The skull could also use more sculpted depth and a bit more shading to make it really stand out.
#my cosplay#cosplay process#hades game#zagreus cosplay#cosplay prop#stygius#first time making a sword not too shabby but I am unfortunately a perfectionist#shout out to my sister for helping with both the painting of stygius and the wax seals on the bottles of nectar#also to my dad for the base of styg and allowing me to steal a bunch of his tools and miscellaneous shed stuff for my EVA foam accessories
16 notes
·
View notes
Text
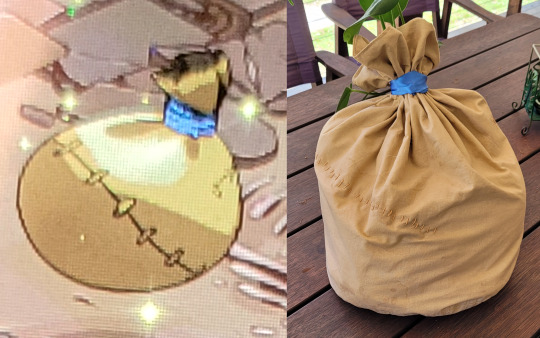
There are two bags that appear in Hades (to my memory), and because I'm pedantic I had to choose one of the canon bags to carry my stuff around while at the con. I could have gone with Hermes' bag, but it has too many little details and not enough room.
So I went with the sack of disgusting meat
(Full process under the cut)
[Skull pauldron] [Belt] [Greaves] [Toga + sash] [Wig + Laurels] [Armbands] [Flaming feet] [Satyr Sack] [Stygius v1] [Stygius v2] [Nectar]
Making this bag actually went really well despite almost fucking up my math and not having enough material in the first part. I have not had to find the circumference of a circle for years, and almost got the wrong measurement for the sides of the sack. I could have gone with the classic 'fold in half' bag making approach, but I wanted this one to have a rounder look about it and be able to sit upright when placed on the floor. My plans are always super professional, and were so perfect that I maybe forgot to take photos of rest if the making process.
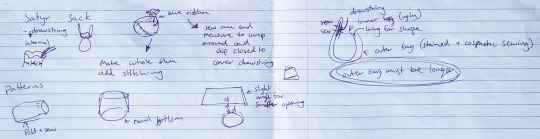
Once the outer bag was done, I could create the inner lining using the same measurements. I also roughly attached some interfacing to shape the sack a bit more.
Then after remembering to create some holes for the drawstring (long so I could use it to carry the bag over my shoulder if needed) and lining everything up it was time to sew the two pieces together!
All that's left is detail work - marking out the 'seam', staining the material with coffee grounds to get that nice dirty look, and then hand sewing the visible stitches with some embroidery thread.
Finally, I attached the blue ribbon but hand sewing one end - since it's just there for accuracy sake rather than to keep the bag closed, I just let the rest of it hang loose so it can be wrapped around when the bag is closed and tuck the end in.

I love this bag
#my cosplay#cosplay process#hades game#zagreus cosplay#had to play until I reached the satyr sack to actually get a reference image since even the wiki doesn't have a picture of it#which was fine bc I then got to see my good boy cerberus and get my ass kicked by hades bc I'm not very good at video games lmao
79 notes
·
View notes
Text
I wanted rain so I decided to make god cry

Either you love or hate these things, I have had no other reaction
(Full process under the cut)
[Skull pauldron] [Belt] [Greaves] [Toga + sash] [Wig + Laurels] [Armbands] [Flaming feet] [Satyr Sack] [Stygius v1] [Stygius v2] [Nectar]
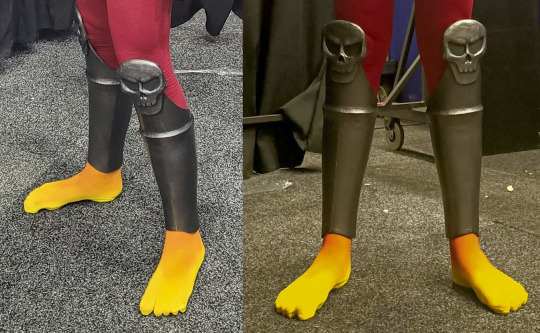
These things are terrible and were terrible to make but are actually quite comfy to wear!
I started off with some yellow toe socks, and some cheap insoles. The black ones were used as a draft, before I cut out a white pair and painted them yellow. Then I sewed the insoles into position, trying to stick to areas that would later be covered by the actual show sole so they wouldn't be noticed. There was no way to do with without wearing the socks, which turned out to be the case with several stops of this process.

Next was cutting and shaping the show soles! These were from $4 slip on flats, since I wanted a sturdy sole without being too thick. To get the rough size and shape of my feet on the sole I did paint my foot and just stick it on there, before realising I'd made a mistake and having to hop one legged through my house to wash my foot off in the laundry sink. But! It did give me a good base to work off, so I was able to cut out the right shape and then bevel the edges for a more natural look.

I should have bought white shoes. Or done more research about how paints react to whatever rubber mix these shoe soles are made of. Because painting these yellow was so incredibly painful because they kept getting slightly sticky even if the coats dried properly. It was also quite difficult to get them to stick to the material of the socks since hot glue doesn't like a lot of rubber/plastics if it's sticking to something else, and contact adhesive doesn't like most materials. So I had to use epoxy resin to try and connect these two together since it was the strongest thing I had, and boy was it painful trying to figure out the right amount so it wouldn't all squeeze out the sides and ruin the whole shoesock. Overall terrible experience, -1/10, but they ended up on the feet and painted yellow which was the goal.

Then I got to paint my legs orange along with the socks in order to get that on-fire look. it wasn't the most even gradient due to some of the angles I had to work at while wearing them, but thankfully not too noticeable.

And with that, they were done, and ready to horrify everyone I come across! The greaves have worn some of the orange paint off the socks after my first con, but thankfully that's not noticeable if I place the socks and greaves in the same position each time I wear the outfit.

Terrible
#my cosplay#cosplay process#hades game#zagreus cosplay#con rules say you have to wear shoes. I could have gone the easy way and bought yellow thongs and painted my feet#but I refuse to do that I ain't having my toes out at a con#I AM AUSTRALIAN BY THONGS I MEAN FLIP FLOPS OR WHATEVER YOU CALL THEM IN YOUR REGION#but yeah I like to cause psychological damage to my friends with my toe socks#by making toe shoes I can afflict that same damage onto everyone at the con#and still follow con rules
174 notes
·
View notes
Text
Finally shorter process post! To think I almost considered applying glue directly to my arms for this part

(Full process under the cut)
[Skull pauldron] [Belt] [Greaves] [Toga + sash] [Wig + Laurels] [Armbands] [Flaming feet] [Satyr Sack] [Stygius v1] [Stygius v2] [Nectar]
Part 1 - Throwing hands with the Supergiant artists
I would never actually do that, but the armbands are by far one of the least consistent things across official art, so I had to compile my references and make some very professional notes about it.

Part 2 - Arm ribbon
I almost fully considered just gluing ribbon to my arm for the day, but decided to leave that as a last resort option. To start off with I tried to make some sort of pattern with just masking tape, pulling out my arm hair after I took it off because I didn't plan ahead at all. Unfortunately I couldn't use it to get the right pattern so I made a ribbon, cling wrap and hot glue monstrosity to figure out how the whole thing was going to work.
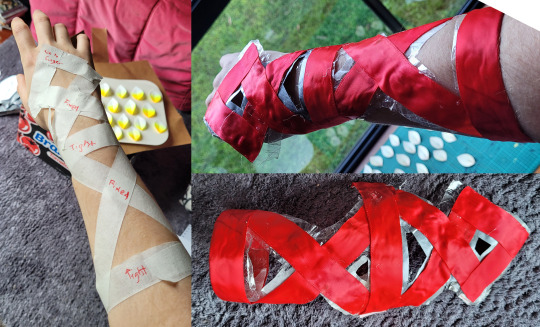
Since the hot glue was way too lumpy I trialed contact cement, but that doesn't work well on most fabrics. So I used PVA glue on my ribbon segments to make them a bit more rigid, and allow the contact cement to bond better, and then had to try and connect that all while it was on my dominant arm.
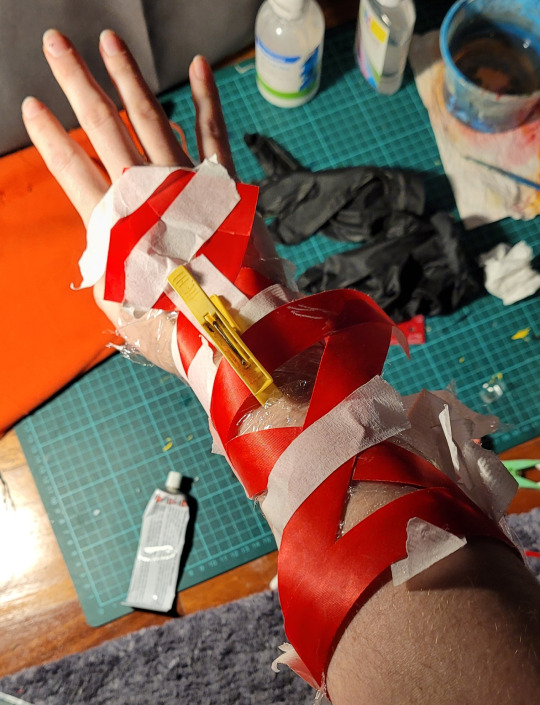
I then used a bit of clear sticky tape to make an 'invisible' ring to connect and secure the tip to my middle finger, and added snap button closures with a mix of hot glue, contact cement and tears to try and get the metal to stick. In hindsight I should have gotten thin plastic ones since they don't need to hold my tension, but the metal ones were the only ones I had on hand.
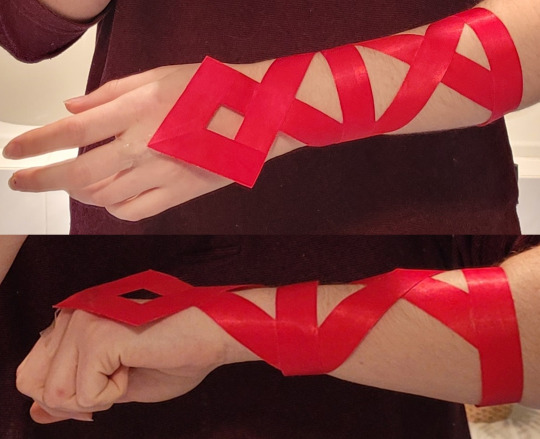
They turned out well, though I needed to use double sided tape on the hand diamond to get it to sit right, and by the end of the day the tape adhesion wears off.
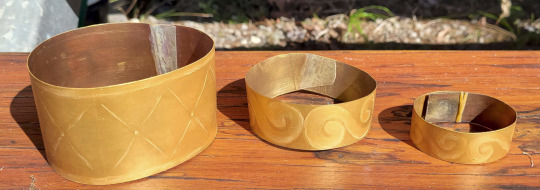
Part 3 - Gold bands
Now I didn't actually get any progress pictures for these because I was running out of time and they were pretty straight forward. They were all made from a plastic bottle, cut and sized, surface sanded, and ends held together with contact cement. The smaller wrist band has a velcro closure otherwise it would never get over my hand, while the large ones just slide up my arm.
Once they were put together they were hand painted gold. I tried to use an airbrush but my airbrush is old and tiny and has so little paint capacity that I gave up after a rough base coat. I just went with some simple designs since they're mostly implied with the shading in my references, though if I could have forged these from actual metal I would have done it in a heartbeat.
In the end, I actually have to remake the red armband since the snap buttons started detaching before I even got to my second con, but that's alright since I've never been super satisfied with how it sits on my arm.
#my cosplay#cosplay process#hades game#zagreus cosplay#my apologies to anyone following the hades game tag and the zagreus cosplay tag and just getting these massive posts of mine#they're not even good tutorials they're more like warnings of what not to do lmao
11 notes
·
View notes
Text
Every time I put this thing on I'm scared I'm going to take someone's eye out with these spikes. However with this much glue in a wig it means I have to do very little upkeep between cons!
(Full process under the cut)
[Skull pauldron] [Belt] [Greaves] [Toga + sash] [Wig + Laurels] [Armbands] [Flaming feet] [Satyr Sack] [Stygius v1] [Stygius v2] [Nectar]
This was my first time ever styling a wig beyond some brushing and hairspray as I did for my Snufkin cosplay. The base wig I used was Apollo in black from Epic Cosplay Wigs, and it was really good to work with! I probably should have shaken it out and used the hair dryer to make it more fluffy before I started, but I made it work in the end
To start off - gather reference images, and section out all the main points!
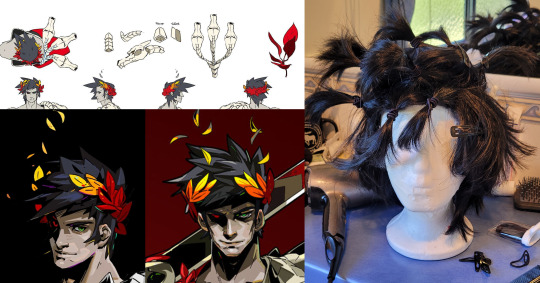
Then get your sister to teach you how to shape a spike. Don't fuck it up. Repeat this for all the other major spikes using the hairspray you bought 3 years ago, your mum's hairdryer because you don't own one, and PVA glue to keep those spikes sharp and everything together because you still don't know exactly what you're doing.

Then it's time to make a bunch of little spikes for the back, most of this will be covered up by the laurels. But damn, there's gaps, because a bunch of these spikes go up when the wefts go down! A smarter and/or more experienced cosplayer would have bought more wefts to sew in to thicken the hair and cover gaps. But who needs that when you've kept all the hair you cut off when making the spikes and you can hairspray and glue that into place to hide your mistakes!
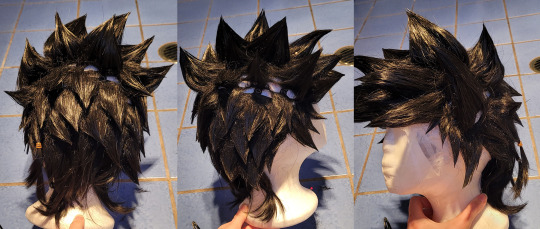
While praying that no one notices the half kilo of glue that is now your wig, time for the laurels! I actually went through three versions - the first version I discarded straight away because my wig wasn't done when I started, and as a result of not being able to compare it was WAY too bulky, heavy, and didn't cover the right area. It did look pretty though. The second was what I wore to my first con - wire and some mesh material with the 'leaves' glued directly on. The leaves for both these versions were made of 3 layers of cheap fake material petals glued together, folded and painted - honestly too much work for the end result but it is what it is.
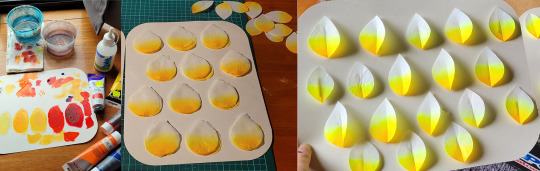


The third laurel's leaves are made of a thin wire covered in plastic laminate, left over from years ago when we used to cover our school books in it. Cut into the right shape, I then painted them, making sure to paint in the direction of the leaves 'veins' so when held up to the light they'd look more realistic. After that they were wrapped around a single thick bit of wire and a few sections hot glued for security.
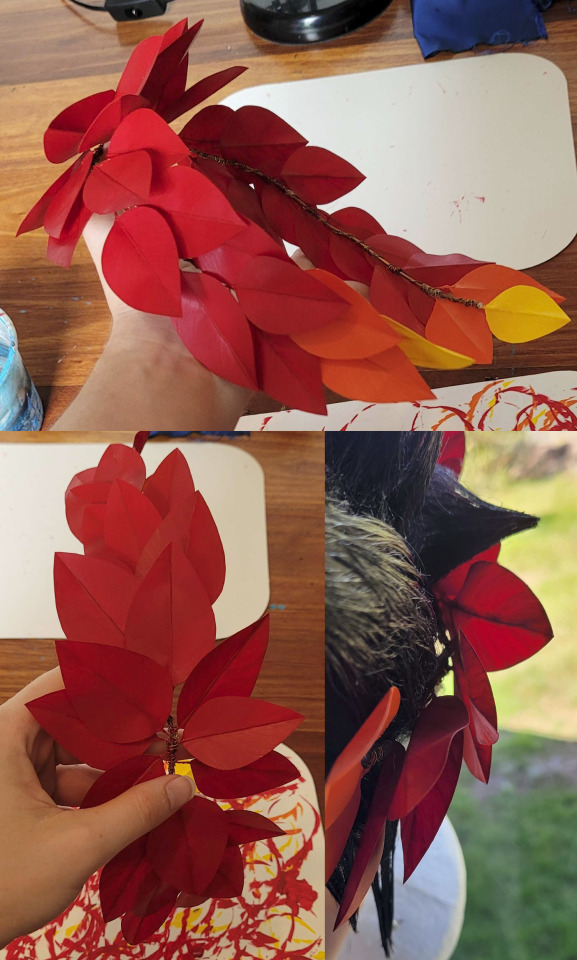
Finally it could be attached to the wig! I just used a bit of thread and sewed them on in a few places, then adjusted the leaves to sit right. For an extra touch - some of the official art has embers tailing up off the laurels, so I added a few of my own. These are just some spare painted laminate glued to wire, the wire twisted and inserted into the hair.
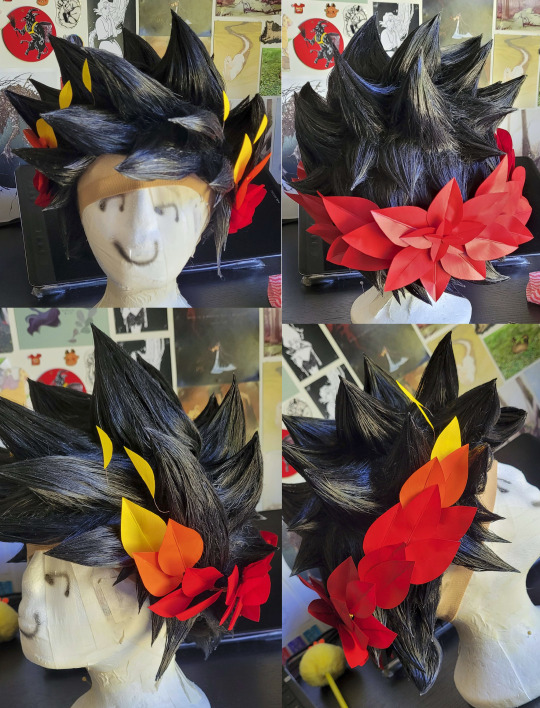
Part of me wants to try and remake the wig from scratch so it's not such a glue soaked mess, or to go for a more natural look that I could actually brush my hand through like the Studio Grackle trailer, but I wanted a stylised look and I sure ended up with one!
#my cosplay#cosplay process#hades game#zagreus cosplay#yall my hands were so covered in glue working with that wig#like i actually couldn't fully wash it off at some points it was that bad#fusing with my skin. becoming one with the glue. they always warn your about hot glue guns but the hairspray was much more persistent#also art credits for the prints in the bg of the last photo is hawberries/sid stone/iguanamouth/artepaca and my friends vi and ravel
39 notes
·
View notes
Text
"I know how to sew!" I said.
"I've made my own patterns before, this doesn't even have sleeves so it'll be easy, right?" I thought.
It turned out great in the end but I definitely underestimated how much trouble I'd have with it
(Full process under the cut)
[Skull pauldron] [Belt] [Greaves] [Toga + sash] [Wig + Laurels] [Armbands] [Flaming feet] [Satyr Sack] [Stygius v1] [Stygius v2] [Nectar]
Part 1 - The toga
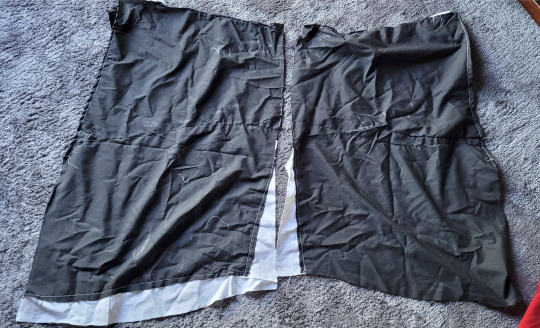
The first thing I had to do was decide on the cut of the toga - I opted to move the trim to armpit level because I would definitely get in trouble at con if I went for the full tits out look. If you're going to use a binder like I did, it's best to wear that while making your patterns and making adjustments, as your bust can effect how the fabric sits, and with such a draped piece (especially if you're using a thinner material) it's important to account for that. I don't have binder recommendations, as I made my own sleeveless binder for this cosplay.
What materials did I use? The ones that were the right colour and not too expensive. I barely look at fabric types when I'm buying them for costumes, yes I am ashamed, yes I know it matters, no I will not change my ways. To make the pattern for the toga I used some black poplin I had on hand, and used the professional method of guessing what the pattern should be like and then spending a whole day yelling as I tried to pin and adjust the fabric to sit right. Making the belt before the toga really worked in my favour for this part.
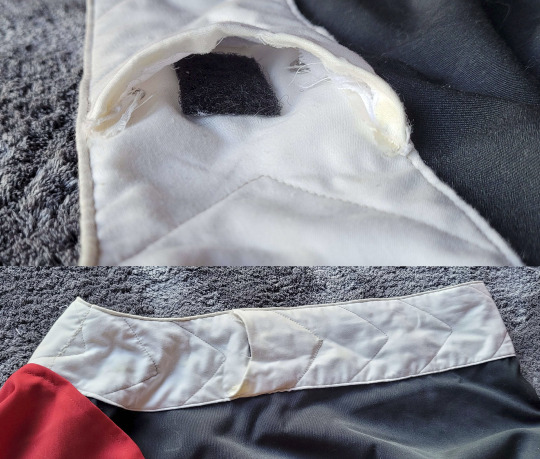
Part 1.5 - The trim and the pauldron attachment
I should have bought a thicker fabric so you can't see the black underneath - as it is, this is 2 layers, one white scrap material I had lying around, and the nice off-white I originally bought for the trim. The top edge was sewn directly onto the edge of the black toga since I measured where it was meant to sit. The bottom was sewn along the edge to get the right length. To get semi-consistent lengths for the spine pattern I cut out a paper pattern, traced it onto the trim, then used my cream thread to sew the pattern on.

The attachment point on the skull pauldron isn't quite at the right angle, but it has yet to fail as I made the attachment point on the toga very secure. It's mainly held on with a section of velcro, secured in position by two snap buttons in the side corners, and had a material covering to hide any flaws and keep it secured. The covering was attached with a mixture of hand sewing and hot glue.
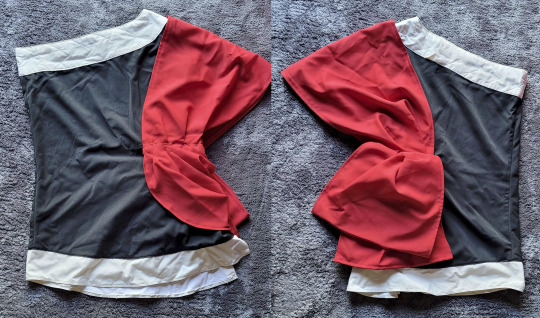
Part 2 - The sash
I originally wanted to do the sash in one continuous piece. However, official art lied to me, and fabric doesn't drape like that. My main measurement was from the shoulder to where it sits on my arm, and then the length was guessed based on mockups. I also included a tiny pouch at sits at the waistline that I could use to store a few bottles of nectar to hand out during the con. From there, I then had to do the most painful section of the whole toga - hand sewing tiny sections of the side material to get it to have a draping look and not leave any spaces. It took forever and needed some wire to stop the front edge from flapping around, but I didn't want to chance cutting it off and making the section from a separate piece of material so close to the con. However, that didn't stop me once the con was done and I had a few months to the next one.

Part 2.5 - side section v2 and hidden phone pocket
Using the correct amount of material ended up with a much nicer drape! It was a painful, painful day as I don't actually know how drapery works and this was all guesswork and trial and error (if that's not obvious by the amount of pins present).
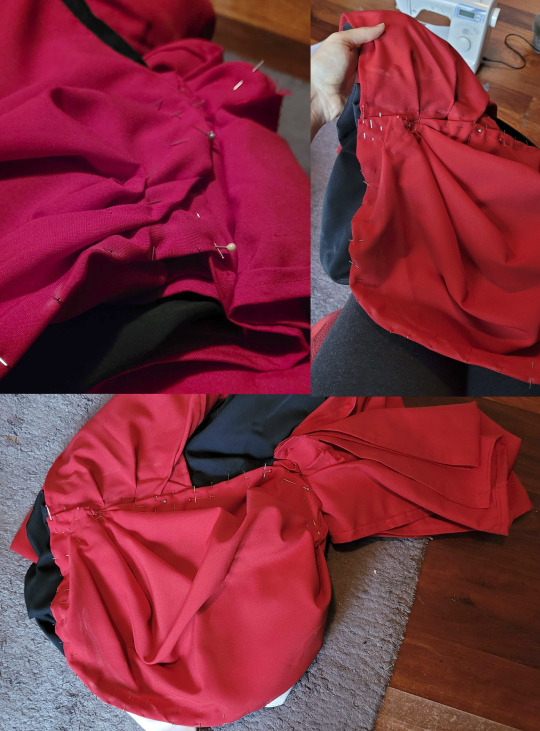
The phone pocket was roughly measured, and made from a few layers of the same red I used for the sash to blend in. I also used a bit of stiff felt to give it more shape to bulk out that back loop section. A bit of velcro to keep the phone in and it's done!

#my cosplay#cosplay process#hades game#zagreus cosplay#look I made this mostly through trial and error and trying it on repeatedly while making adjustments#so there's no easy measurements I can share#but if you want exact size details I can give them to you
5 notes
·
View notes
Text
Part three - refusal of the call

Because, and I can't stress this enough, there is no way these greaves can be worn without stabbing your own feet when you move, let alone dash. So here's my non-foot destroying version!
(Full process under the cut)
[Skull pauldron] [Belt] [Greaves] [Toga + sash] [Wig + Laurels] [Armbands] [Flaming feet] [Satyr Sack] [Stygius v1] [Stygius v2] [Nectar]
To start off with, more pattern making!
(And remember, if you don't want to suffer needlessly, make your back closure straight. Don't be like me)
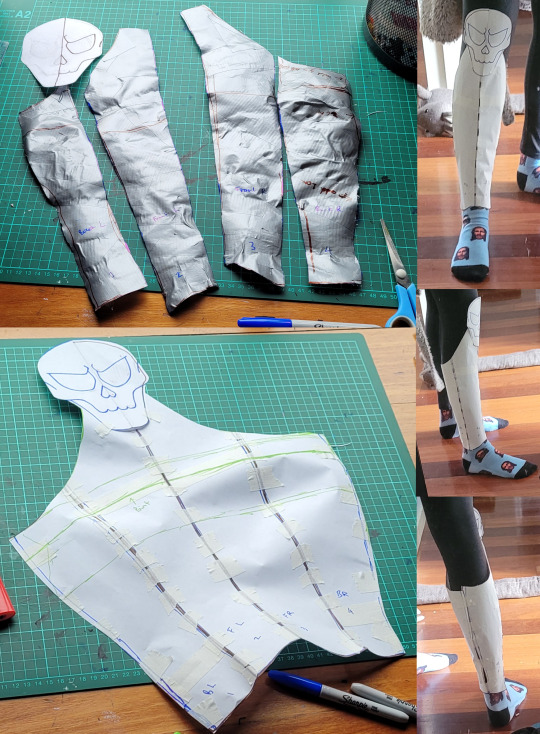
Once you have you have your pattern (WITH A STRAIGHT BACK SEAM) then it's time to cut it out of foam, contact cement it together, and heat shape. This was my first time making any sort of fitted armour so I tried them on and held them closed with masking tape. Terrible Hozier socks are courtesy of @afternoon-softea

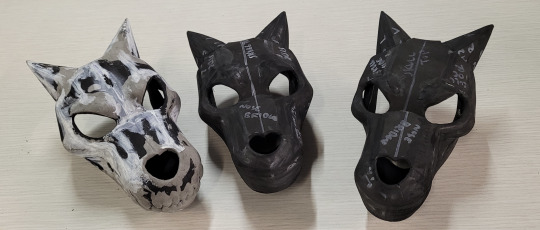
Next up, skulls! As per my previous posts, I cut out the pattern, contact cemented the pieces together, dremelled the edges and added depth + tidied things up with foam clay.

Now I made a hero's journey joke about refusal of the call at the start of this post but genuinely I had so much trouble with these bevels/ridges/whatever, and even the finished product still looks super rough if you focus. I was so mad and focused while doing them I don't even have progress pictures, but here's the end look with an unflattering closeup on the bevels.

But they ended up getting done, which meant time to heat seal and plastidip! The original paint I was going to use for them turned out to look absolutely terrible, so I had to do a late night Bunnings trip to get an actual nice metallic grey. I then did some shadows around the skull and painted the eyes black, and proceeded to forget to take photos of any of that.

Painting! late night bunnings trip to get a decent one bc the spray paint you originally picked was terrible! Black in the eyes, a little bit of dry brushed highlights and shading and that part's done! Forget to take photos again!
For the closure, I knew I didn't want to have an obvious zip so I could match the art more accurately, so I thought 'hey, I'll just super strong velcro!'
...
If your closure. Isn't even. You will have so much trouble keeping it closed properly. No matter what you use. Version 1, which I wore to my first convention in this cosplay, had an internal velcro closure and some on the edges to try and get it to sit evenly at the seam. it sort of worked. I also did this before painting and then had to redo the edge velcro since the velcro got clogged up with plastidip and paint.

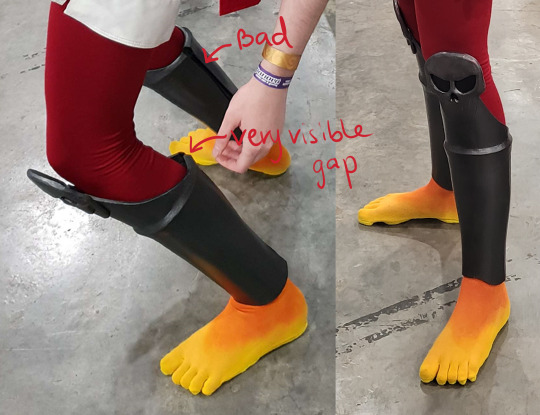
I later went to modify this and still use velcro! It didn't work! so I decided fuck this all, and made it lace up using spare hook and eye closures I had lying around, held together and shaped with a LOT of hot glue.
I was originally going to use some black string I had, but it couldn't handle the tension needed to keep it closed flush, so I changed to fishing line. I also added some more highlighting and shadows on the skull part

The tension did rip off a few of my tiny hook and eye closures during the con, and I had to cut myself out of them at the end of the day, but they did end up sitting much better (and no annoying velcro sounds if I moved too much and put pressure on the closure). I kinda want to remake them now knowing what I do about making cosplay armor, but who knows when I'll have time to do that. They're good enough for now, especially considering the amount I walk into things on a daily basis.

#my cosplay#cosplay process#hades game#zagreus cosplay#and this folks is why we make sure out closures are straight so we don't watch full seasons of dropout's game changer#just trying to get the seams to sit flat
27 notes
·
View notes
Text

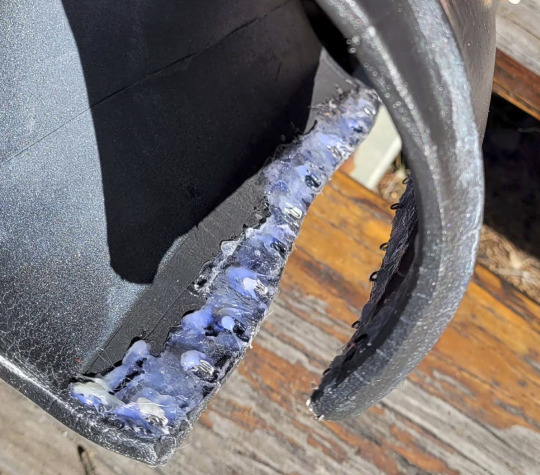
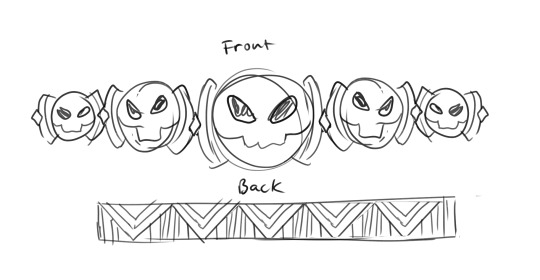
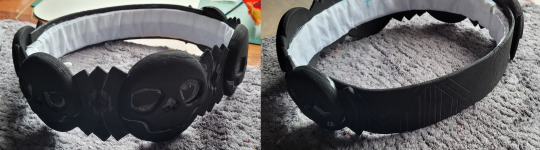
Part 2 of my cosplay breakdown - Zagreus' skull belt
(Full process under read more)
[Skull pauldron] [Belt] [Greaves] [Toga + sash] [Wig + Laurels] [Armbands] [Flaming feet] [Satyr Sack] [Stygius v1] [Stygius v2] [Nectar]
Thankfully this one was a lot simpler than the skulls. My main issue was once again comparing inconsistent official art and trying to figure out what approach I wanted to take. I ended up with this pattern, with skulls at the front and a flat back.
I also had to consider how I was going to put it on and take if off, and went for a hidden buckle clip to make things easy. The strap was threaded through a white loop of material that I would later hot glue to the belt so it would be able to be adjusted if needed in the future, and to have a more uniform appearance. Unfortunately it turns out I didn't take any photos of this process but you can see how it looks attached here.
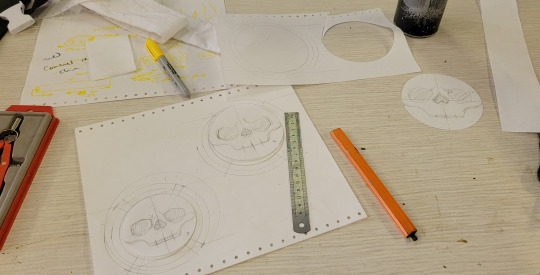
Back to foam work! After cutting out the base pattern and heat shaping it to have a slight curve, I cut out the circles for the skull bases, and and additional top half for depth. I should have dremelled these sections separately but instead contact cemented them together after heat shaping and had to be very careful with those teeth and eye sockets so I didn't dig into the base.
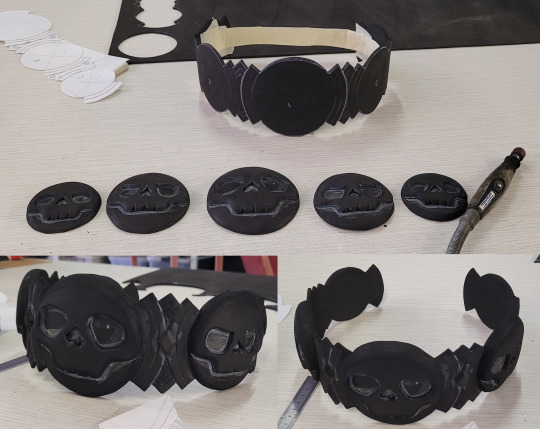
After attaching the flat backing piece and the skulls, using a bit of foam clay to fix up mistakes and add some detail/depth, and hot gluing the actual belt section, it was time to plastidip the whole thing. You can also see where I added some velcro to the opening side to better hide the opening and make the belt look like one solid piece. I over-sprayed way too much when using the plastidip, but it ended up with a lovely smooth finish.
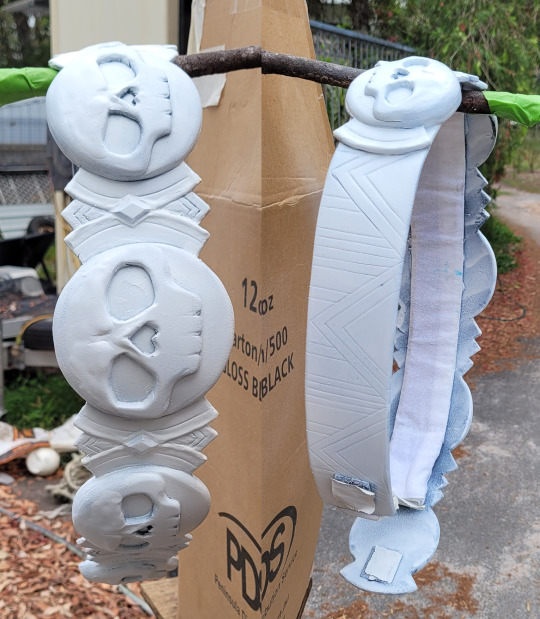
Then time to paint. I added some very dramatic shadows before bringing it all back with several layers of off-white blending into the darker colours. Once all the 'bone' sections were done I gave it a coat of the same matte spray that I used for my skull pauldrons, and then finished it off with another layer on the gold details so they'd stay nice and shiny.

The belt may actually be my favourite part of this cosplay, not because it's impressive, but becuase i turned out exactly how I wanted! It wasn't super tricky to make, and it's so easy to take on and off (and with the nightmare that was getting that toga sitting right I had to do that many times)

#my cosplay#cosplay process#hades game#zagreus cosplay#if I were braver I could wear this out and about in my daily life but alas I don't have that confidence nor style to pull that off#also sorry for the lack of photos in this one and the shittier quality of the ones I do have#I take most of my photos when complaining so since this one went really smoothly I don't have a lot of documentation of the process
21 notes
·
View notes
Text
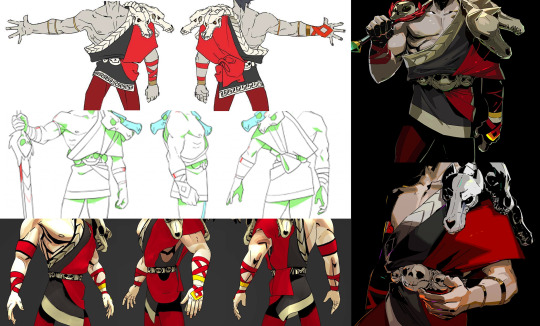
Alright I've been sitting on some of this stuff for over a year, but here's the first part in a series of cosplay breakdowns! Starting with my most ambitious part of my Zagreus cosplay - the skull pauldron

(Full process under read more)
[Skull pauldron] [Belt] [Greaves] [Toga + sash] [Wig + Laurels] [Armbands] [Flaming feet] [Satyr Sack] [Stygius v1] [Stygius v2] [Nectar]
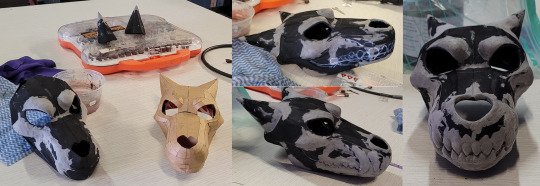
Now while maybe not the most complex bit of cosplay armor, nor the most detailed skull around, this was my first time working with foam and 3D pattern making in general. So I started off with a rough design mock up with paper, make a pattern with cardboard, then tested to see if the pattern worked with more cardboard (making slight adjustments as I went)
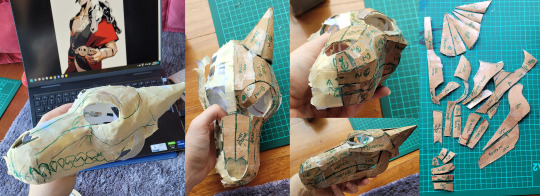
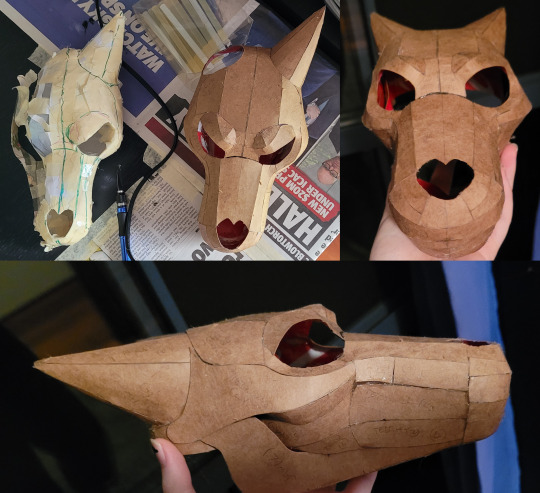
Next was breaking out the foam and starting to make the skulls for real. I had some trouble figuring out angles at first, and a few pieces didn't fit together perfectly, but it still came together in the end. The next skulls went a bit more smooth as I now knew what I was doing

Then some bulking out and detailing with foam clay! I used Lumin's Studio's grey foam clay, and would highly recommend it. I had some trouble deciding on how detailed/realistic to make the teeth and ended up using real dog skulls as reference and simplifying them
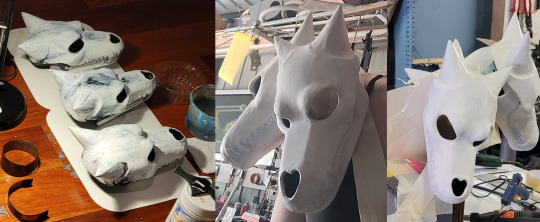
I had to prime them to paint - unfortunately plastidip is expensive and I had trouble using it on my other foam pieces, and the pauldron have a very complex shape, so I ended up sealing them with PVA glue. Not the best option but the only one I had at the time. But with that done, I could begin painting. Now, I should have done this after I'd attached the spine section, but I wasn't sure how to tackle that so I distracted myself from spine logistics by priming and painting (I just used acrylic paints)
Then the most difficult part - the spines and attaching them to the toga. My first idea was to make hollow 'bones' that would slot into each other and have internal wire so they're repositionable, but this ended up being far too bulky

In the end I scrapped these pieces and cut them up to make a more flat spine (hot glued onto a wire frame - I used copper wire that has been in my cupboard for 3 years). I had to build a mock shoulder to rest the pauldron on, and did my best to position the base in line with where the toga trim would sit

To make it stick to the toga I used a bit of velcro and two snap buttons in the side corners - the connecting point is also hidden by a material 'sleeve' to help keep it all in place, but I'll have more on that in my toga post. I needed to make sure it was detachable for transport and to be able to wash the toga after wearing it

Then another round of PVA glue and acrylic paint, a few coats of a matte sealer to get that good uniform bone texture over the whole thing, and some black poplin to cover the open base of the skulls, and they're done!
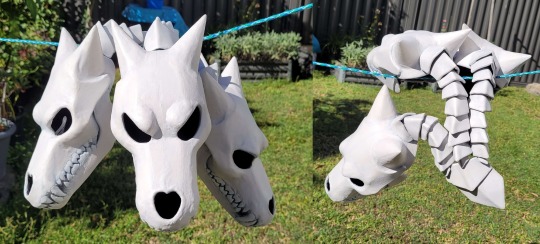
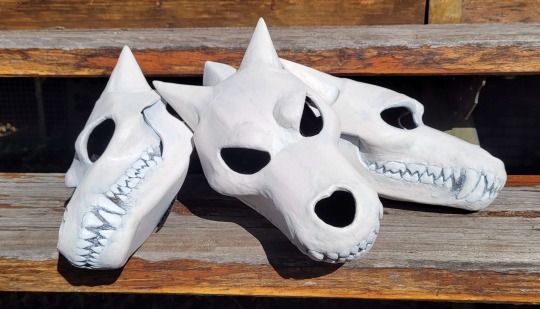
In the end, they're a bit more chunky than I would have liked, and the paint job could use a bit more shading to bring out the shape of the skulls a bit more, but overall I'm quite happy with them!
#my cosplay#cosplay process#hades game#zagreus cosplay#all the official art isn't consistent and that gives me both creative liberty and a headache trying to decide which direction to go in#god this may be my longest post in the 7 years I've been posting on this site#anyway if anyone wants the pattern for the skulls let me know!
57 notes
·
View notes
Text
I'm about to fill up the zagreus cosplay tag with 9 posts of cosplay breakdown so blacklist that if you're not interested!
#rip to everyone who's followed me recently for the mdzs brothers comic or the dumb cumplane sketch#i am not consistent with anything on this blog#sometimes its radio silence for 7 months and then 9 posts of something that isn't even art over a few days#so many wips but no finished art and who knows when I'll have more fanart ready to share. certainly not me
3 notes
·
View notes
Text
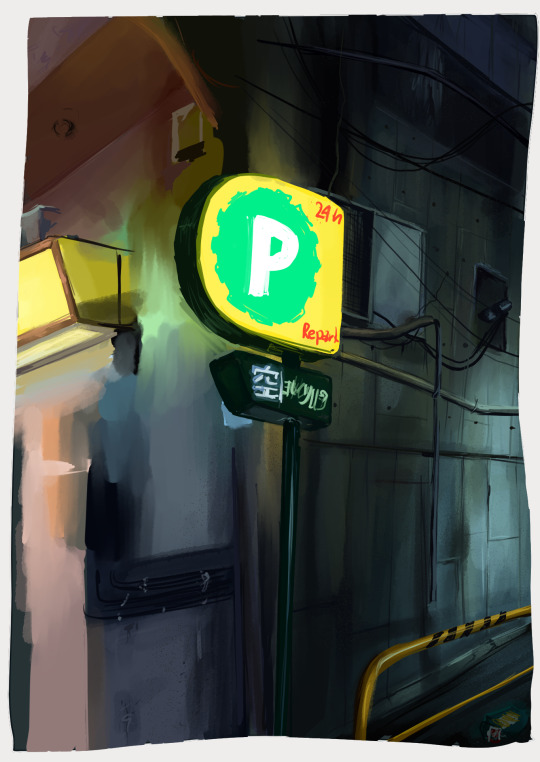
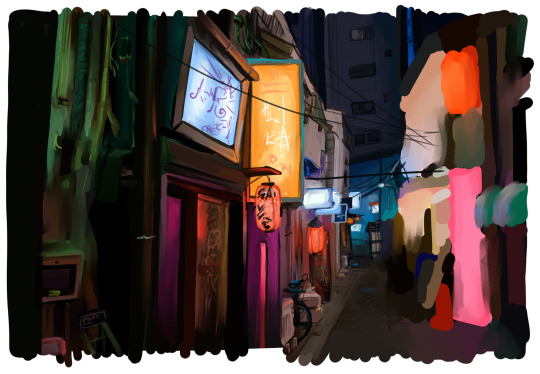

More painting practice! I've been trying to limit these paintings to an hour, only to immediately break my own rules and work on them for about 2 hours instead
All photos used for these studies by Lukasz Palka @tokyostreetphoto
(1 2 3), please check out the originals!
#my art#painting#photo studies#unfinished since I'm using these to improve my technical knowledge rather than produce something polished#thank you to tokyostreetphoto for letting me post these studies based on his photos!
9 notes
·
View notes