
Statistics
We looked inside some of the posts by veganmoji-blog and here's what we found interesting.
Average Info
Notes Per Post
2
Likes Per Post
2
Reblog Per Post
0
Reply Per Post
0
Time Between Posts
2 minutes
Number of Posts By Type
Text
17
Last Seen Tumblr Blogs


Fun Fact
Tumblr has 4 main sources of revenue.
Text
🍳🍳🍳🍳🍳🍳🍳🍳🍳🍳🍳🍳🍳

Sunny Side Up Fried ‘Egg’ [Vegan]
Ingredients
FOR THE ‘EGG YOLK’:
2 heaped Tbsp vegan dried instant mashed potatoes, dehydrated flakes or powder. The ratio of water/liquid versus the potato flakes or powder that you find may differ depending on the brands and textures differ in the dried potatoes, some need less water, so you may need to slightly adjust this.
7 Tbsp (105 mL) hot water (may need a tiny bit more)
1 tsp nutritional yeast
¼ tsp turmeric
¼ tsp kala namak salt, otherwise known as black salt – it has a sulphuric “egg” flavor, so is essential for this recipe
¾ tsp egg replacer
1 tsp vegan margarine
1 tsp sunflower or canola oil (not olive oil, as that would alter the taste)
FOR THE ‘EGG WHITE’:
12.3 oz pack of firm silken tofu
2 Tbsp vegan mayonnaise
FOR GARNISH:
A sprinkle of fresh chopped chives (optional)
Freshly ground pepper (optional)
Instructions
No secret or frills, it’s firm silken tofu. Using a round cutter (mine 2¾”), cut through the center of the tofu block, so you should be left with a cylinder around 2” thick – this will yield around 4 egg whites. All you have to do is cut this into 4 equal slices with a very sharp knife (don’t use a serrated one).
Next, with a smaller round cutter (1¼”), press out the centre of the first ‘egg white’, which will leave space for your ‘yolk’. Do this carefully, as the tofu will be very fragile, and repeat the same with each ‘egg white’.
In the meantime, you will have extra tofu left – place this in a covered container and refrigerate. I use this to make the egg mayonnaise/salad the next day – I just put together some more yolk (it only takes a couple of minutes), and then just add the mayo, as per the recipe (see link above).
Now heat up some oil in a non-stick pan. Meanwhile, take 1 teaspoon of the egg yolk (make sure it has cooled down), roll it in your palms, then flatten it slightly. Then, using the smaller cutter, cut out the ‘yolk’ circle, which will fit inside the centre of the ‘egg white’ perfectly. But don’t place it in there yet at this stage.
Gently place your egg white in the hot oil, one at a time, in and shallow fry it until golden around the edges on both sides. Now flip it, and place your egg yolk in the middle to fit the puzzle so to speak, and press down a little with a teaspoon.
Meanwhile add some hot water to the mix in your 2nd ‘egg yolk’ bowl, and stir all the time until you reach a smooth egg yolk consistency. Using a small teaspoon, pour a tiny amount of this in the center of the egg yolk, but don’t agitate it. Then spoon some of the oil it is frying in over the top of the yolk, to seal the top, and sprinkle on some salt and pepper.
Gently bring it out from the pan onto your toast, or your plate, and enjoy alone, or with your favorite sauce.
That’s it, you’ve homemade delicious vegan eggs FOR LIFE.
More about
Sunny Side Up Fried ‘Egg’ Vegan
1 note
·
View note
Text
🥚🥚🥚🥚🥚🥚🥚🥚🥚🥚🥚🥚🥚

Proper Vegan Hard-Boiled Eggs
Ingredients
EGG YOLK
2 Tbsp vegan instant mashed potatoes
7 Tbsp hot water
1 tsp nutritional yeast
¼ tsp turmeric
¼ tsp kala namak or black salt – essential
¾ tsp egg replacer
1 tsp vegan margarine
EGG WHITE
1 x 349 g/12.3 oz pack of firm silken tofu
Instructions
EGG YOLK Make up your mashed potato mix, add margarine and other ingredients, and mash until the consistency is thick and resembles real hen’s hard-boiled egg yolk. Mix ‘egg yolk’ really well before placing it in the freezer for 15-20 minutes.
CREATING YOUR EGGS Using hen egg molds, cut a piece of tofu to fit a half-egg mould. Press it down firmly and level it with a knife. Using a soup spoon, carefully scoop out a smooth oval shape, slightly off-centre, lengthwise for your ‘egg yolk’. Check Miriam’s photo above to see the correct shape.
Fill this indentation with your ‘egg yolk’ mix.
Place in the fridge for a few hours to set.
Add these beautiful eggs to your picnic basket or lunch box. Alternatively you could slice them using a very sharp knife and serve on freshly toasted wholewheat bread.
And there you have it — a miraculous step forward towards our compassionate Vegan World!
Thank you to Miriam Sorrell Mouthwatering Vegan Recipes.
More about
Proper Vegan Hard-Boiled Eggs
1 note
·
View note
Text
🧀🧀🧀🧀🧀🧀🧀🧀🧀🧀🧀🧀🧀
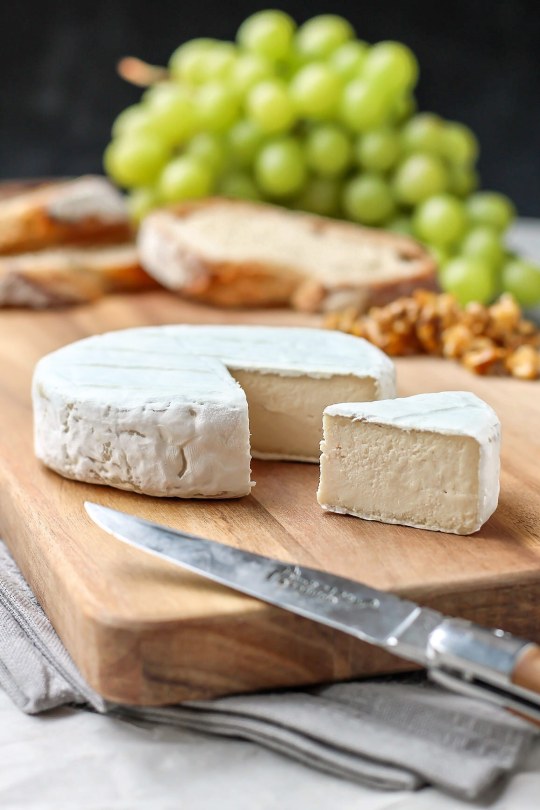
Vegan Cheese
Ingredients
4 cups raw cashews
8 capsules vegan probiotic (Acidophilus) or ⅛ tsp mesophilic
8-10 tbsp filtered water
4 drops of penicillium candidum
2 tsp sea salt
Instructions
The day before
Soak the cashews in filtered water for at least 5 hours or overnight.
Forming the cheese
Drain the cashews, rinse them under cold water and place in the bowl of the blender.
Add 8 tablespoons of filtered water to the bowl of the blender.
Open the probiotic capsules and add the powder to the bowl.
Add the penicillium candidum, just 4 drops is enough (about ⅛ tsp). If your penicillium candidum is in powdered form, please check the notes.
Blend on high speed, scraping down the sides from time to time, this step might take about 10 minutes depending on your blender. You can also use a food processor if you don't have a powerful blender.
The cashew cream should be smooth but thick. If needed, add 1 tablespoon of water at a time until smooth. Do not add too much water, you want to use as least as possible.
Transfer the mixture into a cheesecloth and pull it tight. Add a weight above it and let drain at room temperature for at least 10 hours. I placed the cheesecloth in a colander on top of a bowl. Note: you can skip this step if you cashew cream is very thick.
Transfer the cashew cream to a clean bowl, cover with plastic film and let sit at room temperature for one day, this step is important to let the cheese ferment.
The following day, place the bowl in the refrigerator for about 4 hours to make the cashew cream easier to work with.
After that, line a clean baking sheet with parchment paper.
Cut strips of parchment paper and lay them in 3 small springform pans (I used 4-inches pans). You want to cover the sides and bottom of the springform pans, you can also use plastic film if you prefer. The goal is to prevent the cheese to touch the metal. Fill each pan with the mixture and press it down using plastic film so it doesn't stick to your hands.
Place each cheese on the baking sheet.
Aging
Cover the cheeses with a large plastic box to keep some humidity. Let sit in a room at a temperature of about 52-56 degrees Fahrenheit (11-13°C). You can also age them in a refrigerator, it might justt take a little longer to age. You will age the cheeses at this temperature for the next two weeks.
Every day for the next 3 days, carefully flip the cheeses using a small plate. The cheeses will still be very soft, like cream cheese. Don't worry they will be easier to work with after four days.
On day 4, carefully remove the springform pans and sprinkle the salt over the top of the cheeses, turn them over and sprinkle the bottom and sides with more salt.
Continue to flip the cheeses everyday, always use clean hands or work with a plastic film to be sure you are not touching the cheese.
After 7 days, they should be a little bit harder and you should be able to place them on a bamboo mat.
Flip them everyday for the next week. The mold will appear after 5-7 days and continue to grow until they are fully covered with a white rind.
After 2 weeks, wrap the cheeses in parchment paper or cheese paper and place them in the refrigerator for at least 2 days. The longer you let them age in the refrigerator, the stronger the taste.
Enjoy with french bread, fresh figs or walnuts!
The cheese will keep for at least 1 month in the refrigerator.
More about
Cheese
0 notes
Text
🥖🥖🥖🥖🥖🥖🥖🥖🥖🥖🥖🥖🥖
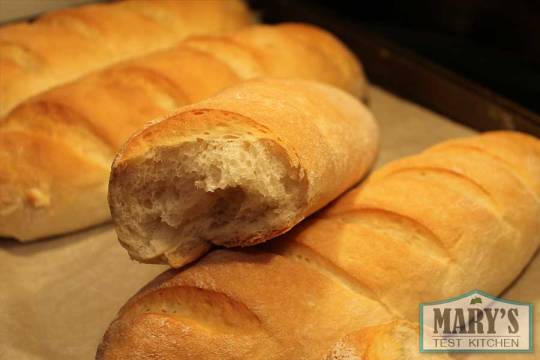
Vegan Baguette
Ingredients
1 cup of warm water
2 ¼ teaspoons yeast (traditional or instant)
2 tablespoons sugar
2 tablespoons melted butter alternative (I used Earth Balance)
1 teaspoon salt
3 cups of all-purpose flour
Instructions
In a large mixing bowl, combine the water, yeast, sugar, and a half cup of flour. Mix well and let rest for 10 minutes.
Stir in the melted Earth Balance and salt.
Add 2 cups of flour and mix with a spoon until it all comes together into a dough. You can also use your hands.
Prepare a large surface for kneading the dough by dusting it liberally with flour. Flour your hands too while you’re at it.
Turn the dough out on to the floured surface and knead for about 10 minutes. You may need to add a little flour to keep the dough from sticking but try not to add too much. Otherwise, the dough will become too tough.
Place the dough in a large oiled bowl and cover with a wet cloth or partially with a lid. You want to keep the dough from drying out, but still allow for some air circulation.
Let rest in a warm place for an hour or until the dough is doubled in size. I find that the warmer my kitchen is, the faster the dough rises.
Once the dough is doubled in size, turn it out on to a flour surface once more. Divide the dough into 2 or 4 equal portions.
To shape the dough into baguette shapes, roll the dough into a ball first. Then flatten it with the heel of your hands. Roll it up, then tuck in the ends, pinching them to seal. Repeat with the remaining loaf or loaves.
Prepare a baking sheet by lining it with parchment paper.
Lay the loaves onto the parchment paper with pinched ends down. Give enough room between the loaves for them to double in size.
Using a sharp serrated knife, cut diagonal slits across the tops of the loaves, about 1 ½ inches apart.
Spray the tops of the loaves with a fine mist of water. Then let rest for 30 – 45 minutes.
Preheat oven to 400F.
Spray the loaves one more time with water, the bake for a total of 20 minutes (give or take according to your oven temp). After 10 minutes, give it a few more spritzes of water.
When done, the loaves should be nicely golden on top and if you tap the bottom, they should sound hollow.
Let cool before serving.
More about
Baguette
0 notes
Text
🍞🍞🍞🍞🍞🍞🍞🍞🍞🍞🍞🍞🍞
Bread
4 cups unbleached flour
1 1⁄2teaspoons salt
1(2 1/4 teaspoon) packet active dry yeast
2 tablespoons extra virgin olive oil
1 3⁄4cups hot water (about 105 degrees)
Instructions
in a large bowl mix together flour, salt, and yeast, and form a well in the bottom.
pour in water and add the oil.
with a wooden spoon slowly pull the flour into the liquid until it's fully adsorbed.
work it into a ball with your hands and place on a floured work surface.
the dough should be tacky but not hopelessly sticky. sprinkle flour on the work surface and hands if needed; continue to knead the dough for 5-10 minutes or until the dough becomes elastic.
rinse and grease the large bowl, then place the dough back in it. cover lightly with damp cloth or plastic wrap. let rise in warm place (i usually turn on my oven and place the dough on the stove above it) until double in size (about 1 to 1-1/2 hours).
turn dough back out onto floured surface. punch down and kneed slightly to work out air bubbles.
divide the dough in half, form round loaves and place on lightly oiled pans. preheat oven to 375F and let dough rise 20 more minutes.
bake 30-40 min until crusts golden. you can also throw 1/2 C of water on the bottom coils 10 minutes in for "crustier" bread.
More about
Bread
0 notes
Text
🥐🥐🥐🥐🥐🥐🥐🥐🥐🥐🥐🥐🥐
Croissant
Ingredients
Dough - 2 tsp instant yeast - 3 tbsp sugar - 3 tbsp warm water - 1 cup cold plain soy milk - 1 tsp salt - 2 tbsp melted margarine - 13 to 14 oz all purpose flour
Margarine Block - 1 cup Earth Balance margarine (not the whipped kind) - 2 tbsp flour
Instructions
Whisk the yeast and sugar into the water. When yeast is hydrated, whisk in soy milk and salt. Add in melted margarine and flour and bring into a very soft dough. Do not overknead.
Transfer dough to a lightly floured surface and roll/shape into a 9 x 13 inch rectangle. Cover with plastic wrap and refrigerate for 30 mins, or until well-chilled.
While dough is chilling, make the margarine block. Use the method described here, but shape it into a 6 x 8 inch rectangle.
Laminate the dough: place the margarine block in the bottom half of the dough, making sure there is a about a 1/2 inch border.Fold the top half down and seal the edges. Take your time to make sure everything is sealed properly.
Making sure your surface is properly floured, place the folded side on our left and roll the dough into a 10 x 24 inch rectangle. Take your time, rolling from the centre to the edges first. Try to square everything up as best you can. With the short side towards you, fold the bottom third up, then the top third down, like a letter. Cover with plastic wrap and refrigerate for 30 mins.
Repeat step five 3 more times, always placing the folded side on your left. After the final turn, refrigerate for a few hours to chill all the way through.
To make the croissants, roll the dough into a 9 x 32 inch rectangle. Starting in the bottom left corner, make a notch every four inches along the length of the dough. Then, from the top left corner, make a notch 2 inches in, then every four inches thereafter. With a pizza cutter, cut from the bottom notches to the top to make triangles. (You can make mini pastries with the leftover edges)
Gently pull the bottom of the triangle wider then, with the point pointing at you, begin to roll up the pastry. Hold the tip/point with your finger so you can pull the pastry as you roll it up. Place on a baking sheet lined with parchment paper, making sure the tip is on the bottom. You can curve the ends inwards to get the crescent shape if you like. (You can freeze them at this point, then thaw, let rise, and bake later)
Cover with plastic wrap and let rise for about 1.5 to 2 hours, until nicely swelled. Preheat oven to 450 degrees. Brush the croissants with soy milk, if you want.
Place the croissants in the oven and reduce the heat to 375 degrees. Bake for 15 mins, then rotate the pan and reduce the heat to 350 degrees. Bake for another 15 mins, until a golden brown. Let completely cool in the pan before serving.
More about
Croissant
0 notes