
Statistics
We looked inside some of the posts by vickypritchardblog and here's what we found interesting.
Average Info
Notes Per Post
0
Likes Per Post
0
Reblog Per Post
0
Reply Per Post
0
Time Between Posts
3 days
Number of Posts By Type
Text
17
Last Seen Tumblr Blogs


Fun Fact
If you dial 1-866-584-6757, you can leave an audio post for your followers.
Text
Final Interactive Displays - I made (ECtIP)
These are the final seven Interactive Displays that I have made for this project!
Birds:

Fish:

Invertebrates:

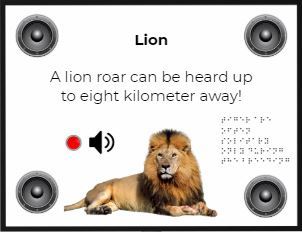
Lion:

Monkeys:

Small Mammals:

Reptiles:

0 notes
Text
Extra Display - ‘Reptiles’ Interactive Display (ECtIP)
Due to technical issues, the other designer (Christian), is unable to make his sixth Interactive Display, which is based on Reptiles at the Isle of Wight Zoo, so has asked me to create this Interactive Display. Resulting in me making seven in total and him making five. I agreed, and so have made this post to show the process I took to make the Interactive Display.
Making of the Madagascar Day Gecko:

The first step was to pick the animal I was going to create my illustration about, for the display. I picked the Madagascar Day Gecko, found at the Isle of Wight Zoo.
Complete Madagascar Day Gecko:

Once I had finished the illustration, which I made using Photoshop, I then had to make the game for the Interactive Display. As I had previously made the games, luckily I had all the templates available.
Making the Game:

I decided to use the ‘Maze’ game for this display, which I had also used for the ‘Small Mammals’ Interactive Display. To make this display, I changed the text and removed the two animals previously used. So replaced the African Hedgehog with the Madagascar Day Gecko.

I also changed the Worm illustration and replaced it with a Cricket illustration I made on Photoshop. Once I had completed the ‘Maze’ game, I then had to combine the projects into one Interactive Display.
Making the Interactive Display:

The first step I took to make this Interactive Display, was adding the illustration and game into one document. I then added a brown background, and added buttons into the game, as well as the logo to brand our work.

The next step I took was to add the fact, title and braille into the display in white text, so that all elements were now available.

Finally, I added the wooden textured background into the document to complete the Interactive Display.
Finished Reptiles Interactive Display:

This is the complete ‘Reptiles’ Interactive Display.
Extra Presentation Slides: Once I had competed the Interactive Display, I needed to add it into our group presentation as part of our project.


Now I have finished the final Interactive Display, I am going to make a final post showing the final products, of the Interactive Displays I have made.
0 notes
Text
What would we do differently? / Alternative styles (ECtIP)
Now that we have made the complete Interactive Displays. We were asked to think about what we would do differently if we were to do this project again. Would we change the styles of the digital drawings? The layout? The typography? Backgrounds? We came up with the following ideas as a group and then Abdulrahman made mock-ups of the alternative pieces.
Idea 1 - “Keep it Visible”:

This mock up template shows what the display would look like with less on it - no game, and only one animal on it. Whilst I think this display is more visually pleasing, I don’t think it would be as eye-catching to children, who like things that are bold, bright and have lots of different activities on them to interact with. This display also shows a different background, a block, pale green colour. For our final displays we chose brown, wooden textured backgrounds to fit with the atmosphere of the zoo. However, we wanted to make a mock-up display of a different background and coloured text, to see what it would look like. I personally prefer our original, textured backgrounds.
Idea 2 - “Typography and fonts”:

In our final Interactive Displays we used the font “Tempus Sans ITC”, whilst this font is legible, we wanted to see what the displays would look like if we were to use a more ‘crisp’, ‘clean’, font. Fonts used by professionals, also have varied weights, using bold, or heightened font to make key words stand out. If we were to use this typography layout, we could change it to help our displays by making key information stand out. This could also make it more memorable.
Idea 3 - “Sound in the signs”:
The sound buttons we have included in our Interactive Displays - which will be of the noises each animal makes, could be slightly altered and improved by using 3D Audio Effects (which is a collection of surround-sound speakers placed in a wide range in a small space), making the sound more realistic and life-like.
Idea 4 - “Digital Signage”:

The final alteration/change we thought of for our Interactive Displays, was to make them into digital signs, instead of printed, traditional displays. The main advantage of having digital displays, instead of printed is that they are easier to change, to fit into the zoos programme - if there are special events on, etc. However on the Interactive Displays we have made, it would cost more to change and update them with this information.
0 notes
Text
The making of the Presentation (ECTIP)
These are the slides that I was responsible for, as part of our group presentation.


Once our presentation was complete, everyone made voice over notes about each of the slides they made for the presentation. Katie then recorded all the voice overs to put into the presentation.
0 notes
Text
The making of the Interactive Displays (ECTIP)
Now that I have all my illustrations and games complete, it is time to combine all elements of the Interactive Displays - including the facts and braille other team members have done, to make the final project outcome. I also need to add other elements such as buttons and textures to the animals.
Making the Interactive Displays: To make the Interactive Displays, I began by adding each categories illustrations into one Photoshop document - so in the end I had six documents to work from.

This is an example of what all six of the documents looked like.
Once I had done this, I added the background - which was sent to me by Christian, which he made for his Interactive Displays. I also added the titles, all text on the displays was completed in the font ‘Tempus Sans ITC‘. However, for the Fish Interactive Display, I gave it an underwater background.

Next, I added the title of each animal in the display, a fact about them and the two buttons that were needed for each animal. The pink button represents the noise the animal makes. The blue button represents the spoken fact.

Afterwards, I added the games I had previously made.

Now was time to add the texture to each animal, to do this I cut out a section of each animal from a google image, using the ‘Quick Selection Tool’, and overlayed it onto the animal, to show which area would be textured if these displays were to be made. I also outlined the texture in yellow to allow it to stand out more. However, it was by this point I realised some of my Interactive Displays were too overcrowded, and I still had the braille to add for the facts.
So, I decided to get rid of some of the animals in three of my displays - the Monkeys, the Small Mammals and the Invertebrates - to allow the Interactive Displays to look visually pleasing and less overcrowded.
For the Monkeys display, I removed the Capuchin Monkey.
For the Invertebrates display, I removed the Stick Insect.
For the Small Mammals display, I removed the Raccoon, the Coati, the European Hedgehog and the Lesser Hedgehog Tenrec.
BEFORE:

AFTER:

Finally, to finish these Interactive Displays, I added the braille for the visually-impaired to use.

What next? Next, I need to start adding my work to the group presentation which is to be presented as part of our coursework. I am also going to make a post showing the final six Interactive Displays I made.
0 notes
Text
Games Feedback - Market Research (ECTIP)
Before putting the games onto the Interactive Displays, I think it is important to get market research, and have the games tested by a young child of the target audience/age category we are aiming the Displays at. Luckily, my neighbour has a 4 year old boy, so I printed off the games and asked them to complete the games, and to note any difficulties he had, or if there were any improvements the parents felt could be changed to make the games more engaging to children.
I copy and pasted my designs from the Photoshop document into the word document, I also made the background white to save on ink.

This is a screenshot of the word document I printed out.

I printed the orange squares for the ‘Lift the Flap’ game, cut them out and stuck them over each paw print with some blu-tack to represent the hinges of the game.

This is what the final games looked like when I printed them out, before I sent them to my neighbour.
Feedback:


These are the returned printed games, with feedback on them. I said that they were welcome to draw and write on them to see how the child solved the problems.
Game improvements: Based off the feedback I have received, I will be making changes to two of the six displays. According to the feedback, and based off my own opinion, the Bird, Fish, Invertebrates and Small Mammals games that have been made are fine and work well for the age category we are aiming the Interactive Displays at - the feedback said they are engaging and the games were solved - so not difficult for a 4 year old. However, the Lion game and the Monkey game, could have a couple of improvements added to them. The Lion game should have the paw print on the orange square, so when the flap is lifted, it reveals the fact - not the other way round which is what we originally have. The Monkey game, whilst fun and intriguing (as well as solvable), was slightly too easy and instead of have to match the shape and the colour, having the outline of the shape on the map alone would be a lot more engaging for the children.
Lion game improvement; The first game I have decided to edit/improve is the Lion ‘Lift the Flap’ game.

The edit for this game was quite simple, all I had to do was swap the paw prints with the hints around.

This is the complete, new edited Lion Interactive game.
Monkey game improvements; Once I had edited the Lion game, it was time to edit the Monkey game.


These are two screenshots I took whilst editing the Monkey’s game, I took the old block colour shape and changed them into having ‘no fill’ (so the shape is see through), but still has a coloured outline.

This is the complete, new updated version of the Monkeys Interactive Display game.
What next? Now that I have all six games complete and tested by a young child - who succeeded in solving the games. It is time to make the Interactive Displays, by adding the illustrations, text, buttons, games, braille and texture to the animals.
I also need to send the six games to Christian to edit for his Interactive Displays.
0 notes
Text
Making of Games for Interactive Displays (ECTIP)
For the six displays, I have made six games, - one game per display. I have made a ‘Follow the Line’ game, a ‘Spot the Difference’ game, a ‘Word-search’, a ‘Lift the Flap’ game, a ‘Where in the World?’ game and a ‘Maze’.
Birds - Follow the Line: For the Birds Interactive Display, I made a ‘Follow the Line’ game where the player must match the bird to their prey. I used three bright colours to match the bird with the food as the game needs to be easy.

I made each game on a separate Photoshop document, the background for the final display will not be black, nor will it be of a block colour. We think the display background will be wooden, however, as the writing on the display is going to be white, it is important I match the writing on the display with the writing on the game.

This is the complete ‘Follow the Line’ game. I drew the ‘prey’ on Photoshop so that the illustration styles all match.
Fish - Spot the Difference: For the Fish Interactive Display, I created a ‘Spot the Difference’ game. There are five differences in total to spot - which should be fun for a 2-6 year old.
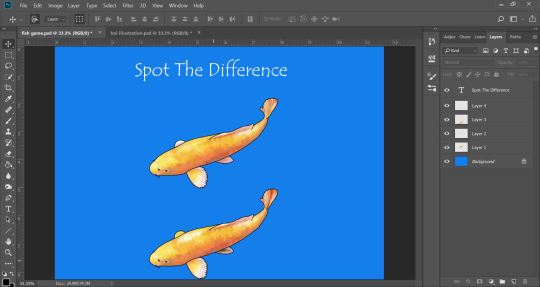
For this Interactive Display, the background will be of the sea, so I have chosen to use a bright blue, block-colour background to create my game on.
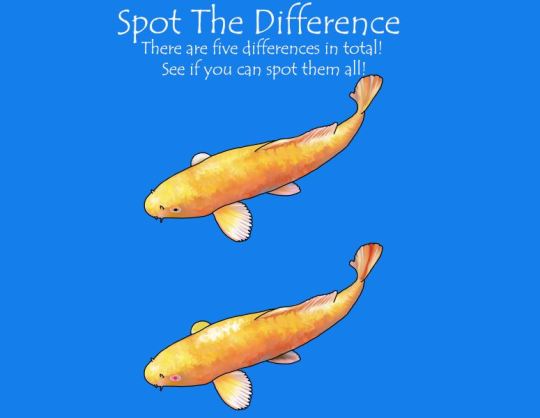
This is the complete ‘Spot the Difference’ game for the Fish Interactive Display. I edited the fish by duplicating the original and on a different layer, adding five edits/differences for the player to try and spot.
Invertebrates - Word-search: For the Invertebrates Interactive Display, I created a Word-search. I did have to simplify the names of the invertebrates, Giant African Land Snail became Snail Giant Millipede became Millipede Malagasy Hissing Cockroach became Cockroach Or else the word search would have been too difficult for the age category we were aiming for.

This is the process of making the Word-search, it was quite difficult to make but in the end I managed to make an effective, working Word-search.

This is the complete Word-search for the Invertebrates Interactive Display.
Lion - Lift the Flap: For the Lion Interactive Display, I created a ‘Lift the Flap’ style game, where the player must use hints on orange boxes to guess what animals paw print is being hidden. The choices of big cats paw prints are; Lions, Tigers, Leopards and Jaguars.

This is a screenshot of the process of making the game.
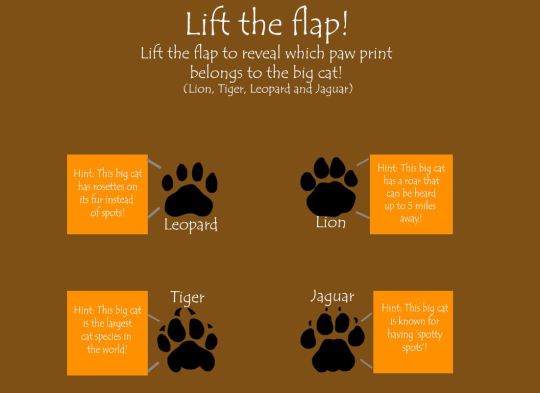
This is the complete Interactive Display game, it is quite difficult to show the game working using a drawing/diagram, but imagine the thin grey lines are the hinges that would be on the display to lift the flap to reveal the paw print and animal name.
Monkeys - Where in the World?: For the Monkeys Interactive Display, I made a ‘Where in the World?’ style game, where the player must use the shapes of the animals and match them to the shapes on the world map. This then tells the player where originally this animal is from/where its natural habitat is.

This is a screenshot of the making of the ‘Where in the World?’ game.

This is the complete ‘Where in the World?’ Interactive game, I am very proud of this game as this was not only my most time consuming game to make - with research having to be done about where each animal is from. But it also is my favourite and most visually pleasing game to look at.
Small Mammals - Maze: The final Interactive game I made was for the Small Mammals Display, for this display I made a ‘Maze’, where the player must help the African Hedgehog get to the worm - its food.
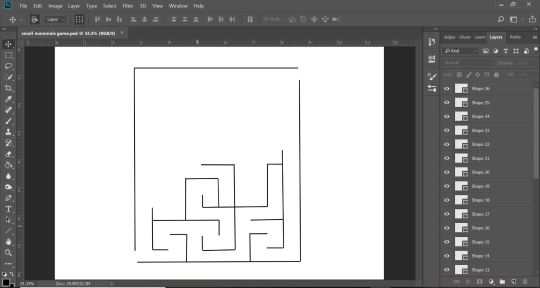
This is a screenshot of the making of the Maze, this game also took a very long time to create.

This is the complete Maze game for the Interactive Display, I used the same Hedgehog as the one that can be found illustrated on the display, and used the same worm I previously drew for the Birds Interactive Display game.
What next? Next I am going to print out these six games and give them to my neighbour, who has a 4 year old son. I feel doing this is great market research for the games - it will let me know how well they are to follow, what games were easy and what games were more difficult, as well as any improvements that could be made.
I also need to send the six games I have created to Christian to use and slightly edit to match his six Interactive Displays he has made. As he is running out of time and could use the help.
0 notes
Text
Interactive Games for Children Research /Mind Map (ECTIP)
Based on our survey, our group decided that we wanted to add one interactive game per Interactive Display, to make them more fun and engaging to young children; our target audience is aged 2-6 years old. We decided to brainstorm some game ideas that would be suitable for that age range, and then pick the best 6 games for us to use.

Once this mind-map had been made, we decided to create 6 games for our 12 signs, each game will be used for 2 signs, there will be; 2 mazes, 2 word searches, 2 matching games, 2 follow the line games, 2 ‘lift the flap’ games and 2 spot the difference games.
What next? Now that we know what games we are to use for our Interactive Displays, I will begin designing my 6 games needed.
0 notes
Text
Future Think Logo (ECTIP)
For part of this unit, we had to think of a name for our group. It took our group a couple of weeks to think of a name that could effectively describe our group and our aim for the project. In the end, after careful consideration, we decided on the name ‘Future Think’.
Once we had decided on a group name, we needed a logo as part of our branding that can go on each Interactive Display we create for the Isle of Wight Zoo. Abdulrahman created the logo for our group, I really like the outcome and feel it is simplistic yet effective and looks very professional. I particularly like the use of bright colours to help make it stand out.

0 notes
Text
Illustrations for ‘Small Mammals’ Interactive Display - The Process (ECTIP)
My final Interactive Display that I needed to draw illustrations for is about the ‘Small Mammals’, found at the Isle of Wight Zoo. This consists of; a Meerkat, a Coati, a Wallaby, a Porcupine, a Raccoon and three different types of hedgehogs - the European Hedgehog, the African Hedgehog and the Lesser Hedgehog Tenrec.
Meerkat:

This is the half way process of my Meerkat illustration, I made this illustration in Photoshop, just like all my other illustrations I previously made.

This is the complete Meerkat illustration needed for the Interactive Display.
Wallaby:

The next animal I drew was a Wallaby, this is a screenshot of the half way process of my Wallaby illustration.

This is the complete illustration of the Wallaby.
Coati:

This is my halfway progress screenshot of the Coati illustration.

This is the complete Coati illustration needed for the Interactive Display.
Raccoon:

This is the halfway screenshot of my Raccoon illustration.

This is the complete illustration of my Raccoon needed for the Interactive Display. In my opinion this is my least favourite illustration I have made.
Porcupine:

This is the halfway screenshot of my Porcupine illustration.

This is the complete illustration of the Porcupine, it is on a brown background to show all the details on the spines in its back - which are white.
Lesser Hedgehog Tenrec:

This is the halfway screenshot of the Lesser Hedgehog Tenrec.

This is the complete screenshot of the Lesser Hedgehog Tenrec illustration.
African Hedgehog:

This is the halfway screenshot of my African Hedgehog illustration.

This is the complete illustration of my African Hedgehog.
European Hedgehog:

This illustration of a European Hedgehog, is the eighth and final illustration needed for the display.

This is the complete illustration of the European Hedgehog needed for the Interactive Display.
What next? Next, it is time to create the Interactive Displays games, by researching various children games we can create and make our own versions of. Before that though, I am going to create a post about out group logo that has been made.
0 notes
Text
Illustrations for ‘Monkeys’ Interactive Display - The Process (ECTIP)
The fifth Interactive Display illustrations I have made is based on the ‘Monkeys’ at the Isle of Wight Zoo. There are four types of monkeys at the zoo, they include; the Vervet Monkey, the Spider Monkey, the Capuchin Monkey and the Common Marmoset.
Vervet Monkey:

The first monkey I drew was the Vervet Monkey, this is a screenshot of half of the illustration I created.

This is the complete Vervet Monkey illustration for the Interactive Display. I didn’t add a black outline to the fur on its head, as I wanted to show texture and how fluffy the tops of their heads are.
Spider Monkey:

The second illustration I made for the display was of the Spider Monkey, this is a screenshot of the process of the Spider Monkey illustration which I made using Photoshop.

This is the complete Spider Monkey illustration that will be used in the Interactive Display.
Capuchin Monkey:

This is a screenshot of the process of making the Capuchin Monkey illustration.

This is the complete illustration of the Capuchin Monkey.
Common Marmoset:

This is a screenshot of the Common Marmoset illustration that is needed for the display.

This is the fourth and final complete illustration of the Common Marmoset needed for the ‘Monkey’ Interactive Display. Again, I didn’t put a black outline around its head as I wanted the texture of its fur to be shown.
What next? Next, I will focus on the final illustrations needed for the last Interactive Display I am designing, which is ‘Small Mammals’.
0 notes
Text
Illustrations for ‘Lion’ Interactive Display - The Process (ECTIP)
The fourth Interactive Display I needed to design illustrations for was on the Lions at the Isle of Wight Zoo. There is only one breed of Lion at the zoo - the African Lion.
African Lion:

This is a screenshot I took whilst making the illustration of the African Lion.

This is the complete illustration of the African Lion, this display will have one illustration on it, so this drawing will appear quite large in the final display.
What next? Next I will be focusing on the illustrations needed for the fifth Interactive Display, which is ‘Monkeys’.
0 notes
Text
Google Slides (ECTIP)
As well as the Google Docs, I also decided to start drafting out our group presentation, and layout all the necessary information we needed to include.


Once I had drafted the presentation, I sent out a group link using Gmail to each member, so they could start adding their work/research to it.
0 notes
Text
Illustrations for ‘Invertebrates’ Interactive Display - The Process (ECTIP)
The following are illustrations for the ‘Invertebrates’ Interactive Display I have drawn, I used Photoshop to create all four of these illustrations. Giant African Land Snail:

This is the half way screenshot of my Giant African Land Snail illustration I have made.

This is the completed Giant African Land Snail illustration for the Interactive Display. I am really pleased with this illustration - particularly the texture and highlights/shadows of the snail shell.
Giant Millipede:

This is the half way screenshot of my Giant Millipede illustration for my Interactive Display. So far I have drawn the legs, antennas and a small part of the body.

This is my completed Giant Millipede illustration for my Interactive ‘Invertebrates’ Display.
Malagasy Hissing Cockroach:

This is a screenshot I took of the Malagasy Hissing Cockroach illustration I drew, this illustration is just under half way to being complete.

This is the complete Malagasy Hissing Cockroach illustration which I will later put into the Invertebrates Interactive Display.
Stick Insect:

This is a screenshot of the half way point of the Stick Insect illustration, the fourth and final illustration needed for the Invertebrates Interactive Display.

This is the completed Stick Insect illustration.
What next? Whilst I keep working on creating more Interactive Display illustrations (next will be Lions), I will also be creating a post about the template for our group presentation in Google Slides.
0 notes
Text
Illustration for ‘Fish’ Interactive Display - The Process (ECTIP)
The second Interactive Display I am going to make the illustrations for is ‘Fish’. On the Isle of Wight website, the only species of Fish they have available at the zoo is Koi. I have made this illustration in Photoshop.
Koi:

This is a screenshot of the progress of drawing the Koi that will be on the display.

This is the finished Koi illustration for the Interactive Display. The Koi is the only Fish on the display so will be quite large. There are currently no interactive elements in any of my illustrations, this is because I will add textures to them afterwards when I am creating the Display so I know what proportion of the animal should be textured to stand out.
What next? Next, I will make the illustrations for the Invertebrates Interactive Display.
0 notes
Text
Google Doc (ECTIP)
I decided to make a Google Doc for my group, I felt this was important because it is an efficient way for our group to communicate without meeting up. It is also a good way for everyone to access the research that has been made.


Once I had made the Google Doc I also set up this template for the group members to put their research into each section. When the template was made I then sent the link of the Google Doc to everyone in the group.
0 notes
Text
Illustrations for ‘Birds’ Interactive Display - The Process (ECTIP)
The first Interactive Display I am going to make the illustrations for is ‘Birds’. On the Isle of Wight Zoo website, the three species of birds they have are; Ducks, Tawny Owls and a Cockatoo. I have made these illustrations in Photoshop.
Duck:

This is a screenshot of the process of drawing the Duck that will be on the display.

This is the completed Duck illustration for the display, I have decided to put a black outline around all my illustrations to make them stand out from the background of the display board, as the colour of this is yet to be decided.
Tawny Owl:

The next animal I drew in Photoshop was the Tawny Owl, this illustration took a very long time to create but I think it is my personal favourite.

This is the completed illustration for the Tawny Owl to go onto the Interactive Display.
Cockatoo:

The final bird to draw was the Cockatoo. I decided not to do a full body illustration as I wanted different sizes/styles of illustrations to make the Interactive Display appear more professional.

This is the finished drawing of the Cockatoo.
It is important to note that these illustrations do not show the areas that will be textured, I will add a ‘textured’ element to each of them when I put them onto the display.
What next? Whilst I keep working on creating more Interactive Display illustrations (next will be Fish), I will also be making a Google Doc for our group, this will be beneficial to our group as it will allow us to communicate without having to meet up. I will also put a list of all the information that is needed for our group to find.
0 notes