
Don't wanna be here? Send us removal request.
Statistics
We looked inside some of the posts by viktoriiab and here's what we found interesting.
Average Info
Notes Per Post
1
Likes Per Post
1
Reblog Per Post
0
Reply Per Post
0
Time Between Posts
3 months
Number of Posts By Type
Text
6
Last Seen Tumblr Blogs


Fun Fact
The most popular pages on Tumblr are about Minecraft, GIFs, and David J. Peterson.
Text
My acquaintance with React. Part 3 - Redux + Redux Thunk
This is the last part of three articles
Oftentimes, when building a web application, we will need to call on APIs which means some asynchronous action is going on. Redux Thunk is a middleware that to do these asynchronous actions with Redux. Redux, by itself, does not allow asynchronous actions and this is troublesome if we want to dispatch an action that fetches data from an API for example. The thunk can be used to delay the dispatch of an action, or to dispatch only if a certain condition is met.
Without redux-thunk, we are only allow to dispatch objects with a type property. With this middleware, we can return functions. Within the functions, we can do async calls (i.e. API calls) before or after we dispatch actions.
A quick run through of how Redux works:
Create the store
Passing in a reducer as an argument
Reducer update states accordingly based on the type of actions that are dispatched
In order to start you need to install a redux-thunk package and import thunk from it.

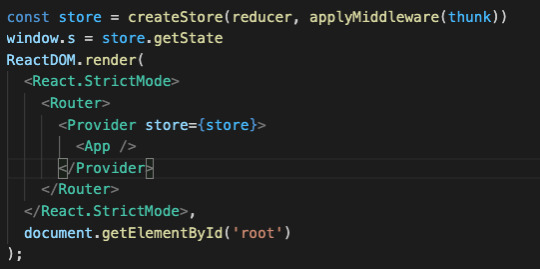
Now you got the redux thunk. Now you have to import applyMiddlware, and compose from redux package.

To use redux-thunk, we can modify our code as follows when creating our store:

Next, we’ll need to wrap our main App component in a component called Provider, which the react-redux library provides. It enables the Redux store to be available in our React App. It takes in a prop called store, which would be the store we just created.
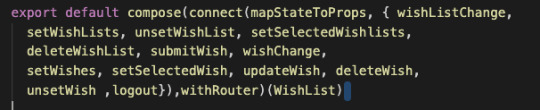
To make our Redux store available to our components, we will need to call on the connect function provided by the react-redux library like this:

The connect function takes into argument as mapStateToProps
As the name of the function suggests, mapStateToProps enables us to easily map our central state (i.e., our store) to the props of our react component. The result of this means we can access our states through props without needing to pass states between components as we had to do when without Redux.
For example, we want to be able to grab our state ‘wishList’/ ‘user’/etc that we have in our store so that we can access it in our component. Then our mapStateToProps function in our component will look like:

Which will be passed to the connect function of our component:
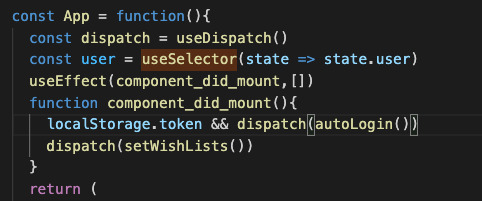
Also, were important place takes - useSelector() which allows us to extract data from the Redux store state, using a selector function.
The selector is approximately equivalent to the mapStateToProps argument to connect conceptually.
useSelector() will also subscribe to the Redux store, and run your selector whenever an action is dispatched.
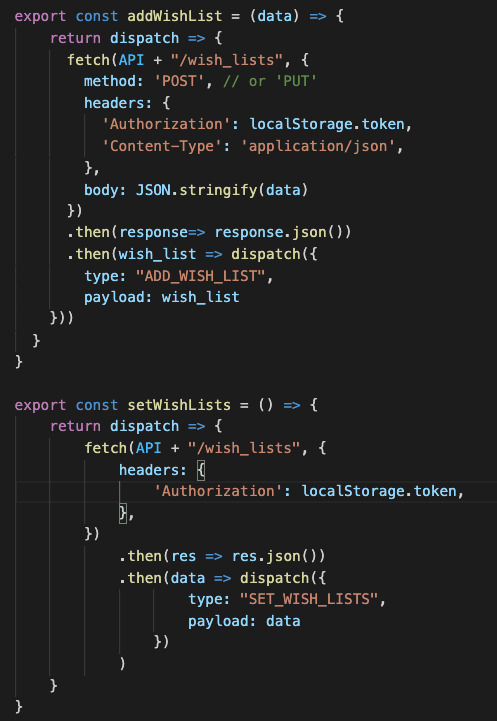
Creating our actions
Action creators are functions that return an action. We export each one so we can use them elsewhere in our codebase.
By default, Redux action creators don’t support asynchronous actions like fetching data, so here’s where we utilise Redux Thunk. Thunk allows you to write action creators that return a function instead of an action. The inner function can receive the store methods dispatch and getState as parameters, but we'll just use dispatch.
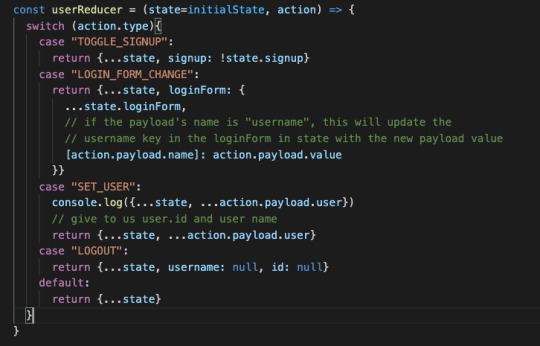
Creating our reducers.
With our action creators defined, we now write reducers that take these actions and return a new state of our application.
Note: In Redux, all reducers get called regardless of the action, so inside each one you have to return the original state if the action is not applicable.
Each reducer takes 2 parameters: the previous state (state) and an action object. We can also use an ES6 feature called default parameters to set the default initial state.
Inside each reducer, we use a switch statement to determine when an action.type matches.
The type and action is what was defined in your action creators.
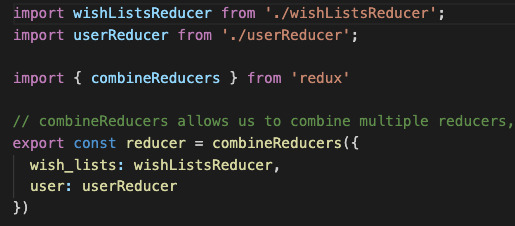
With the individual reducers created, we need to combine them into a rootReducer to create a single object.
And that’s it! The application now uses Redux and Redux Thunk to fetch and display the data!
0 notes
Text
My acquaintance with React. Part 2 - Build a React Wish List App with React Hooks
This is the second and part one of three articles.
React is a front-end JavaScript library that can be used to create interactive user interfaces for your application.
This type of project can be accomplished with Class components, but this application will instead integrate React Hooks. React Hooks allow for functional components to have a state and use lifecycle methods, allowing you to avoid using Class components and have more modular and readable code.
As soon as my application has been set-up I continue on to building the rest of the app.
I started with creating a first Wish component. The component is a functional component. In past versions of React, functional components were unable to handle state, but now, by using Hooks, they can.
The first parameter I had is where I named my state.
The second parameter, - is what I used to set the state.
The hook of useState is what React uses to hook into the state or lifecycle of the component.
Then I created an array of objects and had the beginnings of my state.
All created components I used later on in the return of the main App component.
Below is partial an example of my 1st component:
By using the JavaScript method, map(), I was able to create a new array of items by mapping over the Wish items from state and displaying them by index.
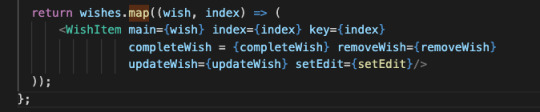
This adds a <div> for app, a <div> for wish-list, and a map of the wishes to Wish components.
Another step that I did was creating second component for WishForm which included form for creating and updating the Wish List.
These were my goal:
Start with an empty state for an input field.
Be able to update the form by setting the state.
Handle the submit
The state starts off empty, and as you add things to your state, it will add it to your list of to-do items.
Below you can see details.
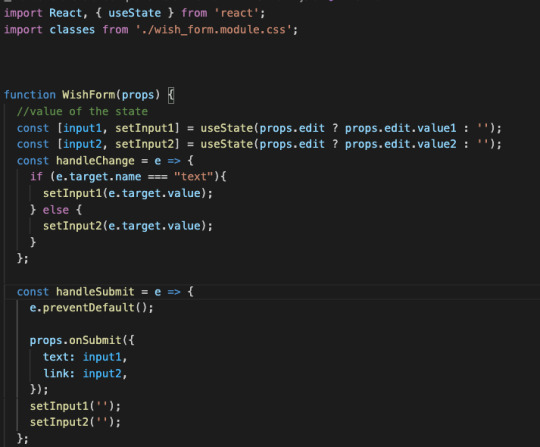
The WishForm function are returning the following form
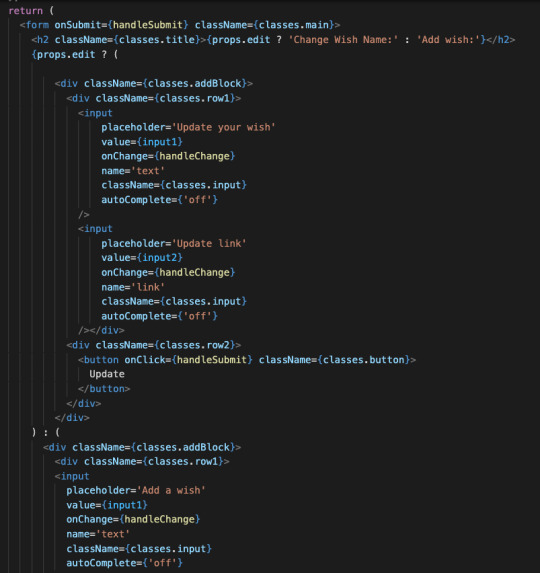
With learning React Hooks I notice that there is no this.state. You will have no use for this.state since the new Hooks understand that it is going to be implied in certain places.
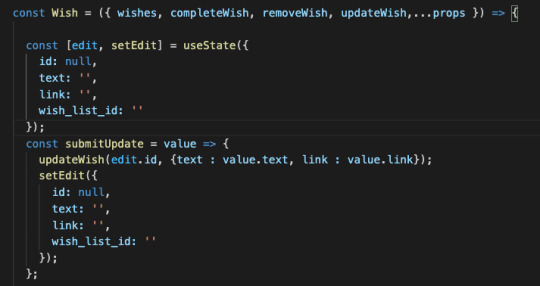
I also added functionality to add, update and remove my wish.

A Wish-List app can be a great reminder or starting point when it comes to CRUD in web development. Being able to read information, create new information, update existing information, and delete information can be powerful in any application.
To finalize my project I added Redux Thunk middlaware that has a functionality of pausing and resuming the dispatch action.
Go to the Third Part of this article to continue.
0 notes
Text
My acquaintance with React. Part 1 - Ready to start.
This is the introduction and part one of three articles. React is a wonderful front-end development framework with a user-friendly interface and great features that are best used when creating single page applications. Today I will tell you how I created a small Single Page Application and in parallel we will understand some of the principles of React.
DOM. When loaded onto the page, the script takes control of the DOM element that you provided to it. At this point React now reigns supreme within this element. It can track user actions and change the tree of elements at any level. A fast virtual DOM is used for this. Any component (or component tree) can be displayed in this element, depending on the current state of the application. Some little things may change, or even the entire content as a whole.
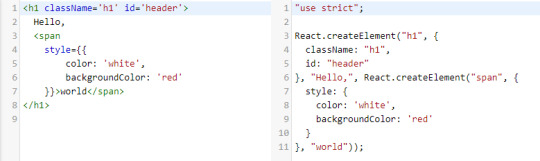
JSX. There is no familiar MVC model in React, since the component combines both presentation (render) and logic. This means that in a component, for example, a selector, you define both its appearance and behavior. For convenience, specific JSX syntax (JavaScript XML) is used. It looks like HTML, but it's actually pure JavaScript.
Launch of the project
Setting up webpack. Setting up an entire development environment from scratch would be long and boring. I used a ready-made solution - the create-react-app utility. It prepared the initial project structure, downloaded the required dependencies, and configured webpack.
Install the utility:

create a project:

folder react-wish-list has appeared in the directory. We go into the folder, run the command:

The server for local development will start, and a new tab with the current project will open in the browser.
Source codes. All sources of interest are in the src folder:
src / index.js is the build entry point. This specifies the root DOM element that will hold the main App component, which is our React application.
src / App.js is the actual code for the App component.
In addition to these files, the src folder contains styles, tests, several service scripts and a svg logo file. The main fighting will take place inside App.js.
The React documentation have all details about component and how to work with it. For now, it is enough for us to understand that a component is just a function that takes some properties (props) from the outside, and returns markup for rendering in JSX format.
What are the main points I paid attention to:
The className is used instead of the class attribute;
All tags, including img, must be closed;
The map method is used to display an array of elements;
Each element of the array created by the map method must have a unique key, key.
Go to the Second Part of this article to continue.
0 notes
Text
A Single Page App with Javascript/ Rails API
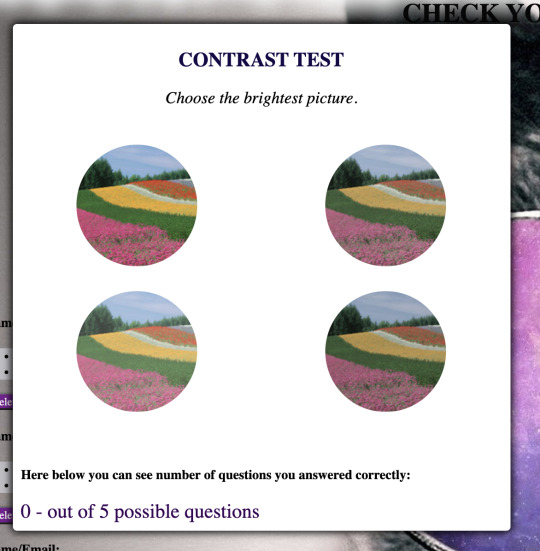
Rails is a cool framework for building web tools in Ruby. I started out by using the Rails gem to create the basic template for my app-api. This gem creates the basic file structure for the app and permits for additional useful gems. Rails also allows you to use generators to create basic necessary folders for models, controllers, views etc. The app is composed of backend Rails API and front-end modular JS clients, which use asynchronous Javascript to make HTTP requests to the API to get/ post data and render them to the user interface. Having chosen the tools, I considered possible project ideas. And my choice landed on an application for checking eyesight. With this application users will be able to check their vision online.
Data
I use Object Oriented JavaScript (classes) to encapsulate related data and behavior.

Client-Server Communication All the interactions between the client and the server are handled asynchronously with the fetch() method provided by Fetch API.
Results
Iterations in JavaScript There are a lot of ways to traverse a collection in Javascript. However, it can get quite confusing especially when you want to iterate through Array-like DOM objects. There are .map, for..in, for...of and .forEach but they are all slightly different.
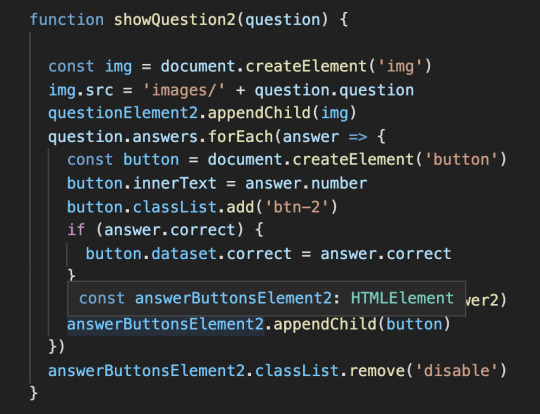
I was was need randomly show the questions to User, therefore for me forEach way worked perfectly.
Learning JavaScript is a breath of fresh air, and I am looking forward to learning more and more to improve my skills.
0 notes
Text
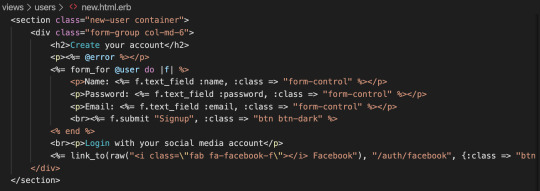
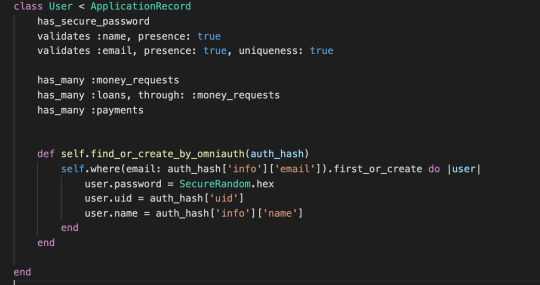
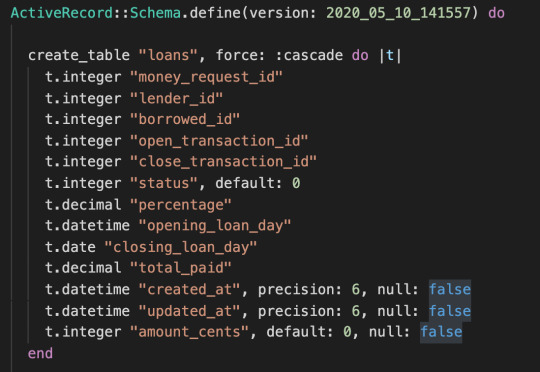
How I built my first Rails application.
Rails is a cool framework for building web tools in Ruby.
I started out by using the Rails gem to create the basic template
for my app. This gem creates the basic file structure for the app and
permits for additional useful gems. Rails also allows you to use
generators to create basic necessary folders for models, controllers, views
etc.
Having chosen the tools, I considered possible project ideas. And my
choice landed on an application for loaning. Users will
be able to borrow or lend money to another users and make some interest on it.
Here I would like to analyze the structure of the project. With Rails
gem you will have very simple and useful structure, which you can modify
according to your needs.
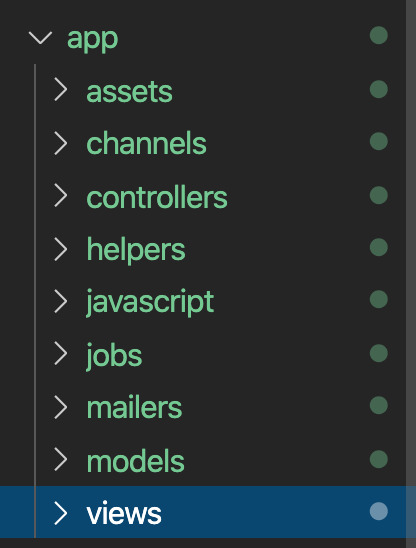
App directory holds our MVC directories, such as models, views, and
controllers. Where:
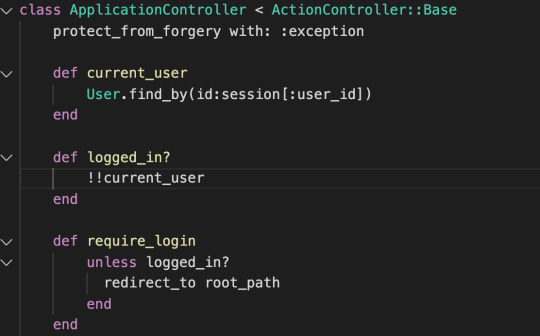
- Controller handles the user request and responsible for implementing the
user login/logout, for the sessions/cookies, etc.
- View is a user interface. View display data using model to the user and
also enables them to modify the data.
- Model represents the logic. It maintains the data of the application. Model
objects retrieve and store model state in a database.
- The database (DB) directory contains my database migrations and seeds. Schema migration allows us to fix mistakes and update with new requirements.
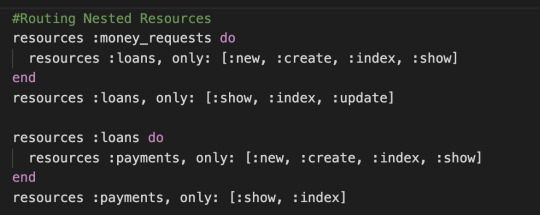
The routes.rb file defines the actions available in the applications and the type of action such as get, post, and patch.
For my application I was need also used nested resources which is a powerful tool that helped me represent parent/child relationships in my system.
The above structure is all you need to create a simple web application with Rails.
Overall this project was a fabulous learning experience for me. I became more confident with creating a Rails App from the ground up.
0 notes
Text
Building my first CLI scraping gem with Ruby
In this post I’ll talk about my experience building a gem with Ruby.
To start, I searched the web for any sites with posts on how to build a Ruby Gem. I watched Flatiron’s post and read several others, and was able to piece together enough to build one.
The first steps were pretty simple. I created a repository and initialized a simple gem in it. I created a new gem using the command bundle gem name_of_the_gem, and create a repository on Github.
One of the first challenges I encountered was the different patterns for requiring libraries, and after trying out several ones I came down with the following:
For my bin file:

For my environment file:
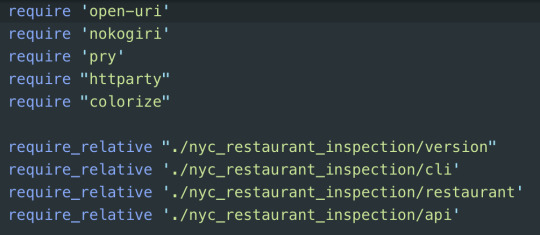
For my gemspec and dependencies:

After setting up my environment, and managing to have all my dependencies working, I went onto my next task - Scraping.
I decided to go with HTTParty, because I was need to parse information from json file and HTTParty looked like the easiest way to do that.
Parsing the data is a breeze with HTTPParty — all that you need to do is run the HTTParty get method on the API endpoint url we pulled above to get the page contents and store that into a variable. From here running the “getting_response” method on the page contents parses the contents into an array of Ruby hashes representing the records in the data file. I stored the array in a variable called responses.
Then I created new class inside the loop, so I can initialize my Restaurant class with hashes I need. See below the code I used:

Then I built my restaurant class, where I initialized my restaurant with hashes you see on the above picture. In the same class, I created methods, which gave me ability to search inside of my array of hashes “by zip code” or “by name”.
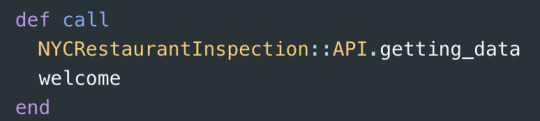
The last final step was building the logic, therefore I started my CLI class. Despite the fact that the organization of this class seemed rather easy, I ran into some difficulties.
For example, I missed the point that in order to get data from json file, you first need to call your data, otherwise you will get an empty results.
When everything was ready and work perfectly I installed colorize gem to make my CLI gem prettier and to give some color. In the end was very satisfying to see it working. Mission accomplished!
1 note
·
View note