
The tumblr version of my sewing blog! Find more photos on Instagram @whennnow
Don't wanna be here? Send us removal request.
Statistics
We looked inside some of the posts by whennnow and here's what we found interesting.
Average Info
Notes Per Post
315K
Likes Per Post
168K
Reblog Per Post
147K
Reply Per Post
611
Time Between Posts
2 days
Number of Posts By Type
Text
17
Last Seen Tumblr Blogs


Fun Fact
28.6 is the average number of monthly visits per US mobile user.
Text
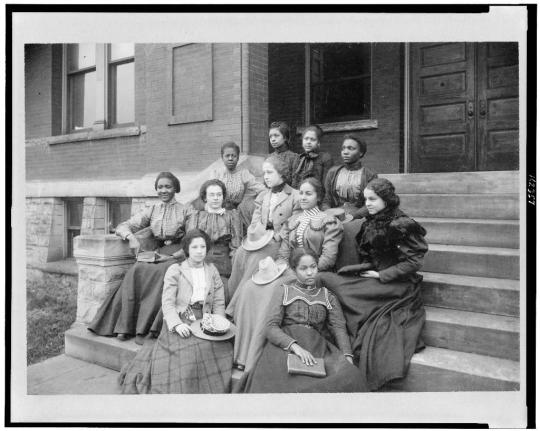
[junior normal class of fisk university, nashville, TN]. ca. 1890-1906.
91 notes
·
View notes
Text
Medieval Linen Headwear
July 15, 2025

[Image ID: a photo of Alex from the waist up wearing a blue tunic, a barbette, and a pie crust fillet with her hair loose. /end ID]
Previously in my medieval sewing journey, I sewed a simple rectangular linen veil and wimple, and started a medieval coif. But I wasn't done with the linen (or the coif).
Also, please note that this post has been in the works since... February, I think. I've been working on these almost exclusively at SCA meetings and events.
Finishing the Coif
My coif was drafted based on my own head measurements according to Katafalk's St Birgitta's Cap pattern and instructions. All I had left to do was whip the open sides of the ties closed, and attach the ends!
Only I never got around to that - until now! I actually didn't attach the ends because that takes a level of commitment I just don't have right now, so I just finished off the ends so they don't fray. Tying them and tucking in the ends works fine to wear all day.
Having worn the coif (both incomplete and complete) to a few events now, I have some adjustments I would make if I made another one.
Currently, the coif is a bit tight to get over my hair if I put the front on first. It's less of a squeeze if I put the back on first, but then I have to shove all the loose little strands at the front under the band at the front. I also feel like the gathers at the bottom of the cap start very far forward.
To fix both of those, I would use the same base pattern and measurements, but start the gathering an inch further back. That would give me more room in the band to get the coif over my hair AND keep the majority of the fabric volume further back on my head.
But with the coif finally done, I could move on to other linen projects. I had three pieces of linen left after the coif, and from those pieces I wanted to get a semicircular veil, a barbette, and a fillet with a ruffle along the top.
A Semicircular Veil
The largest piece of linen was 35"x36". I did some digging through The Medieval Tailor's Assistant and various blogs and tutorials to see if that would be large enough for the semicircular veil.
I was pretty lucky. Many sources I found recommended that the straight edge of the veil be about 100cm, or 39.37in. Personally, I found that the 36in I had to work with would be enough. For the widest part of the curve (or the diameter, I guess), I was seeing anything from 23-28in. I decided that I would rather my veil be too long than to short, so I went with 28in.
I did a simple double-turned hem along the edges. It took awhile, but the curved edge didn't give me as much trouble as I expected. I did most of the work on this during an SCA meeting and subsequent event in January. It's always nice to have something period to work on at these events!
I could (and maybe should) have done a finer hem along the edges, but as this isn't a particularly fine linen, it doesn't bother me too much. I like the look of the semicircle veil better than my rectangular one!

[Image ID: a photo of Alex from the waist up wearing a blue tunic and a semicircular linen veil and wimple. /end ID]
A Barbette
I knew that the barbette would need to long enough to wrap around my head and overlap so I could pin it, which gave me a length of 27in. But how wide should it be?
I saw suggestions ranging from a uniform 1in width to 1in under the chin but widening to 4in for the part on top of the head, and contemporary depictions certainly support both versions.
I decided to go with a uniform 3in wide strip that I could pleat under my chin, and I was able to do this by using slightly more than half the scrap from the semicircle veil cutoffs!
I took two 14in long strips of linen 3.5in wide and seamed them together along one short edge. To ensure no raw edges would show, I folded the short edge of each in by a quarter of an inch. Then, I slotted the two folds together so that the raw edge of each was encased in the valley of the other side's fold. Both sides got whip-stitched down to give me a strong, clean seam.
Then all the edges got a rolled hem, and I tacked a pleat into the center of the strip (the part that will be under my chin) with fairly large stitches, since I want to be able to remove them if I change my mind.
And that was it! The barbette gets wrapped under my chin to overlap at the top/back of my head, where it is secured with 1-3 pins.
It's kind of funny how much the barbette changes my face shape - it "hides" the corners of my jaw and makes my cheekbones much more prominent.
A Fillet (Pie Crust Edition)
Because a fillet could be many different things depending on when and where you are discussing, many people call this version of the fillet the "pie crust hat," thanks to the ruffle on top that looks like a fluted pie crust edge.
For the main band of the fillet, I opted for a height of slightly less than 2in, so I cut a strip 4in wide to fold in half and tuck in narrow seams at the top.
Speaking of the ruffle, I knew I wanted to do box pleats instead of gathers, so I knew that my ruffle strip would have to be three times the length of the main piece. I wanted the ruffle to be a little over 1in tall, so I made the strip 3in wide and folded it in half. This way, the raw edges went inside the seam at the top of the fillet and I didn't have to hem the looooong edge of the ruffle.
Construction started with a lot of ironing - ironing the main band in half long ways, ironing in the seam allowances, ironing the ruffle in half long-ways, and ironing the short ends on the ruffle inside to hide the raw edges. It was at this point that I also double-checked the length of the main band, to ensure it would ft on my head.
Then I pleated the ruffle into simple box pleats, ironed them, and basted them with a long running stitch to hold them in place as I sewed.
The ruffle was sewn to one side of the main band first, then I folded the other side of the band over it and whip stitched that to the ruffle. That just left the ends to attach, but I needed some sort of stiffener to give the main band some body.
I opted to use plastic aida mesh (like people cross stitch on) as that stiffener. I figured that the lines of the mesh would help me keep the edges straight. Plus, it's flexible enough to curve around my head easily, but stiff enough to keep the band upright.
Before inserting the plastic aida, I seamed up the side of the band that would face out once the hat was complete, leaving the inside seam open. I also whip stitched the edges of the ruffle together. Then I inserted the plastic aida, and whip stitched the open seam closed with big stitches, to make it easy to remove if the fillet needed to be washed or ironed later.
I took inspiration from Medieval Threads' Manesse Codex Hat post and folded and tacked down the outer bits of the pleated ruffle. I love the look it gives, and someone really cool in my barony has also done it. I tacked the ruffles AFTER inserting the stiffener so that I wouldn't accidentally catch the other side of the band (which would make it impossible to put the stiffener in).
And that was it!
It fits perfectly over my hair when it's down, but still fits over my hair when it's in the hairnet/snood I made. The ruffle gives it a super fun textured look, but I wish I had made the main band of the body a bit shorter - maybe 1.5in instead of a full 2in. It's not a huge deal, though.
Final Thoughts
For starters, these projects checked off two things from my 2025 goals - stashbusting (the linen was already in my stash, and I'm left with no project-sized scraps) and SCA stuff (I finished my coif and made the veil, barbette, and fillet).
The coif and semicircular veil have both already been and will continue to be very helpful and versatile pieces in my medieval wardrobe, as they are suitable for at least the 13th and 14th centuries. The barbette and pie crust fillet really sell the look of my 13th century garb, and I can wear them with or without the hairnet/snood I crocheted at a workshop a few years ago.
I've already worn the semicircular veil to a few events, and I love the look of it!
I've only just finished the pie crust fillet, but I'm looking forward to wearing that to my next SCA event (whenever that is).
My next priority for my medieval wardrobe is to make a fitted kirtle pattern. Using that, I can make a supportive smock/shift (I just acquired 4yds of an appropriate linen for cheap), remake a secondhand kirtle to fit me, and start on more 14th century garb!
Stay cool. Stay safe. Stay healthy.

[Image ID: a photo of Alex from the waist up wearing a blue tunic and a white pie crust fillet with a hair net. /end ID]
0 notes
Text
i got almost 3yds of light blue cotton velveteen (2nd hand and for free) and it very nearly matches the linen-look tablecloth I thrifted for my ren faire petticoat
do I set them both aside to become an elizabethan ensemble?
#wnn rambles#i would need many new pieces to go with it since i really only have the fabric for the outer#it would need a shift and bodies not to mention a coif and i'd still need to make the jacket#or maybe i make stiffened bodices and attach the petticoat to that instead of separate bodies
1 note
·
View note
Text
i got almost 3yds of light blue cotton velveteen (2nd hand and for free) and it very nearly matches the linen-look tablecloth I thrifted for my ren faire petticoat
do I set them both aside to become an elizabethan ensemble?
#keep the tablecloth as a petticoat and make the velveteen into a doublet/jacket#I'd need to make a chemise and a bum roll to match#and either attach the petticoat to a bodice or make stays to wear#not to mention headwear! and accessories!#wnn rambles#it would be a whole new era for me and would just squeak by as sca-period#but do i really want a new era project lurking in my stash? hmmm#my sca eras so far are ancient greco/roman and 13th cent. plus i have 14th cent and early italian ren planned
1 note
·
View note
Text
what you learn from hobbies:
consistent practice opens up whole worlds of skill that you couldn't imagine
making mistakes in the process of learning is not only natural, it is also essential
activities that you enjoy can give you more energy back than you spent on them
wow everything is so expensive
49K notes
·
View notes
Text
Pink Moth Underwear
July 8th, 2025

[Image ID: a brallette and two pairs of underwear made out of the same fabric and the same colored elastics, laid flat. /end ID]
I recently posted about the pink moth pajama set I made, and here's a Part 2 of sorts since I had extra fabric left over!
Since the original project and its inspiration are a sort of lounge-wear underwear set (or lounge-erie, as I like to call it), I opted to make more underwear and a bralette to match.
The Plan
The fabric, of course, is the leftovers of an interlock cotton knit with a small amount of spandex or elastane in it (I can't remember).
For the patterns, I chose the Hyacinth Bralette and the Acacia Undies, like I had used for my second Periwinkle velvet set. I was able to squeeze another set of underwear out of the fabric so I chose Blank Slate Pattern's Panties Pattern.
I liked the periwinkle velvet Acacia underwear I made, but I wanted to try them in more of a "daily wear" type of fabric and different elastic to see if I still liked the cheek coverage.
I went to Bias Bespoke for my elastics, as usual, choosing the "Passion Flower Purple" color to coordinate with the purple in the moth print and contrast with the copper knit bands on the previous tank and undies.
The Execution of the Underwear
The two underwear patterns are very similar - a front piece, a back piece, and a two-layer gusset between them. I enclosed the raw edges of the seams between the layers of the gusset, and zig-zagged over the bulk of the seam allowances in an attempt to flatten them.
The next step was to attach the elastics to what will become the leg holes.
Since I had used fold-over-elastic on the Acacia Undies before, I decided to use Luna Thin Picot Elastic for them this time, and use the Cara Fold Over Elastic for the Blank Slate Panties.
The picot elastic on the Acacia is attached right sides together, then the raw edge is turned in, top stitched with a zig-zag to keep it in place, and the raw edges are trimmed back. The decorative picot edge of the elastic just peeks up over the edge of the underwear and gives it a super cute, delicate look.
The fold-over elastic on the Blank Slate Undies was also a two step process, but it works more like bias binding. The wrong edge of the fabric is stitched to the wrong edge of the elastic so that the edge of the fabric just barely meets the center fold line in the elastic. The exposed edge of the elastic is folded down over the right side of the fabric, covering the first round of stitching, and stitched into place. This leaves one round of stitching visible on the outside, and two rounds visible inside.
With the leg holes finished, I sewed up one of the side seams on each pair of underwear. Just one side though, because the next step is to attach the waist elastic, just like the leg elastics were attached.
Then you can stitch up the second side seam, tacking down the raw ends of the elastics to help secure and flatten them, and the underwear is done!
The Execution of the Bralette
I won't go into as much detail on the construction of the bralette, since bralette patterns aren't as standard as underwear.
However, I can say that the Hyacinth is a simple (and free!) two-piece pattern - just a front and a back.
I used a double layer of the moth fabric for both pieces. I was afraid one layer wouldn't be supportive enough, but the powernet I used on the velvet version of the Hyacinth had proven to be too supportive for my tastes.
I also took care to stretch the band elastic (Bias Bespoke's Lyra Picot Band Elastic) more as I attached it to the bottom of the "cup" parts of the front piece. I thought that might make it more supportive, while also allowing more of a hollow in that area. It worked to a certain extent, but it wasn't the drastic change I had hoped for.
I had enough of the thinner picot elastic left over from the underwear to go around the upper edge of the bralette. I sewed from one strap attachment point, around the back, and up to the other strap attachment point, leaving a two inch-ish tail at each end. Then I sewed the elastic to the front neckline, leaving a similar tail at each end.
The tails at each attachment point were made to overlap, and I threaded a silver ring at each one, folded the elastic over, and stitched the tails down. This ring serves to - you guessed it - attach the straps.
At this point I could try the bralette on to check the fit...
And discovered that the band was too loose.
Referring back to the instructions included with the pattern (which I had disregarded immediately after checking the seam allowances), I discovered that I should have measured the band elastic to my underbust first, and then stretched it to fit the lower edge of the fabric. Soooo, that's on me. But how to fix it?
I considered adding darts to the cups or something, but after unpicking two rounds of zig-zag stitching from the front of the bralette, I got lazy and decided to just reattach the elastic while stretching it as much as I could across the whole front. That only managed to reduce the band length by about an inch, but it deemed it good enough.
With the band issue fixed, I could move on to the straps (the Leda Strap Elastic).
I cut my length of strap elastic in half, attached silver sliders to one end of each, and threaded the loose ends through the rings that were already attached to the bralette and then back through the sliders. Finally the loose ends of the straps were attached to the back of the bralette, anchoring them to both the upper picot and lower band elastic for strength and a bit of extra support.
Conclusion
Despite the band issues, the bralette turned out comfy and serviceable. I'll be giving the pattern one more chance (eventually) to redeem itself (by actually reading and following the instructions), but I want to try other patterns with shaped/seamed cups.
The Acacia Undies with the thin picot elastic fit perfectly again! I wore them all day (work and a yoga class) and they were comfy and the back didn't ride up at all. I'll definitely be using this pattern more in the future.
The Blank Slate panties, when I first tried them on immediately after I finished them, seemed slightly too big. A week or two later, when I tried them on again they fit better, and they were comfortable to wear all day. I wonder if letting the fabric and elastic "rest" after going through the machine helped or if I exaggerated the poor fit the first time. They weren't as "secure"-feeling as I'd like, though, so I would probably use wider seam allowances in the future.
I had a bit of the fold-over elastic left over, and it ended up being enough to make two little hair ties out of (after saving a bit for my swatch book). An indie lingerie maker I can no longer recall used to do something similar, and for some reason the fold-over elastic just works so well for hair ties!
Anyway, I think this might be the end of the moth fabric - unless I can piece another bralette out of the scraps...
But for now, I've put my stretch needle away and returned to my standard needle. I've started work on my ren faire outfit, and I just joined a local historical sewing circle, so I'm hoping that will kick-start my motivation to continue my 1890s underwear!
I still have most of a yard of the copper jersey I used as the accent for the pajama set which I intend to make underwear of eventually as well, and I have a bunch of stash fabric set aside for lingerie and a kit on the way, so you will absolutely be seeing more of my underwear in the future.
Until then
Stay cool. Stay safe. Stay healthy.
0 notes
Text
Pink Moth Pajama Set
July 1, 2025

[Image ID: A matching three-piece set consisting of a tank top, a pair of shorts, and a pair of high-waisted underwear. /end ID]
The Inspiration
I fell in love with lingerie-making a few years ago when I made a bralette and underwear set from a periwinkle-colored stretch velvet. I recently made a second set from the same velvet, and would like to try sewing more practical, non-velvet lingerie.
A few months ago, I fell in love with the style of loungewear/underwear made by Studio Ten Fifteen. They make matching tank top/underwear sets in the most gorgeous prints with contrast binding! While I'm sure that each set is more than worth every penny (they're all made by the owner!), my budget doesn't leave me enough pennies to justify such a purchase.
An impulse purchase of a fun cotton/spandex knit print during Joann's meager first closing sales kick started my desire to make my own knit loungerwear/lingerie set (or lounge-erie, as I like to call it). The print is a variety of stylized moths in cream/orange/brown/purple on a light pink background.
Because the inspirational sets are all bound with contrasting knit bands, I ordered a few swatches and settled on a bamboo/spandex jersey in "dark copper" from The Fabric Fairy. It goes well with the orange and brown in the moth print. Plus, I don't wear a lot of pink and purple, so the brown-ish orange color suits my wardrobe better. I figured one yard would be more than enough for the binding on this set!
The Plan
My original plan was to make a cropped tank top and matching shorts that could be worn as pajamas (because I have a roommate now and can't just laze about in my undies). If I had any fabric left, I'd make high-waisted undies like my original inspiration have.
I sourced a few free patterns for the tank, but ultimately decided to use Burda 6820, which is a basic fitted knit t-shirt pattern (and I snagged it during a really good sale). I used View A for the cropped length, but omitted the sleeves. I planned to bind the neckline and arm holes in the copper-colored jersey.
I chose a free pattern for the shorts - the Rosery Shorts from Rosery Apparel - but shortened the waist in order to add a waistband from the copper-colored jersey instead of doing the grown-on waistband the pattern calls for.
Lucky for me, I had enough fabric left over to make the matching underwear! I used the free Noelle Underwear pattern from Madalynne Intimates. They have the high-waisted cut I was looking for, and they seemed to have good coverage in the back. I planned to use bands of the copper knit for the waist and leg bindings instead of elastic, like my inspiration does.
The Execution - Top and Shorts
As for actually making these things, I threw the instructions out the window (metaphorically) and just winged it.
For the top and shorts I did most of the construction seams first - using a regular straight stitch on most of the seams since they were on the vertical, and the fabric doesn't stretch in that direction. Where possible, the seams were finished by ironing the seam allowance to one side, zig-zagging over the seam allowance close to the seam, and trimming off the excess.
The pockets of the shorts were the exception. I just left the full seam allowances as they were and zig-zagged over the edges as if I was serging them.
To hem the shirt and shorts - since those stitching lines were along the stretch direction of the fabric - I turned the seam allowance up once on the wrong side and zig-zagged over the edge to both hold the fabric in place and finish the raw edge.
Then I attempted the knit bands on the top. Because I had already sewed the arm and neck holes closed, I had to sew up the ends of the bands as well. The seam allowances were ironed flat, then I folded and ironed the bands in half long-ways.
Both the bands and the edges they were binding were marked into quarters, then I pinned in between to distribute the fullness and stretch.
Because the band needs to lie flat, but still go around the curve, the length of the band needs to be shorter than the length of the opening it's going around. The edge that gets sewn on will stretch, allowing the free edge to relax and the whole thing will be flat. Make sense [[Add link to article explaining knit band lengths]]
Anyway, the band got placed on the right side of the fabric, and I sewed (with a zig-zag stitch) through both layers of the band and the raw edge of the shirt openings. Then the band was flipped up, the seam allowances ironed toward the body of the shirt, and those ironed seam allowances zig-zagged over like top stitching to finish the raw edges and flatten them a bit.
Then the shirt was finished!
The shorts waistband was attached as sort of a wider version of the knit bands on the tank top, only I cut it the same size as the top edge of the shorts, instead of cutting it shorter and stretching it to fit. I also didn't sew the short ends of the bands together - I folded the raw edges in and left them open so that I could feed the waistband elastic through after the waistband was attached.
Once the elastic was inside the waistband, I zig-zag stitched over the opening in the waistband, and top stitched over the center front and side seams as well to keep the elastic from twisting inside the casing.
The Execution - Underwear
I chose to take a different approach to attaching the knit bands to the underwear.
Instead of finishing the seams, attaching the ends of the knit bands, and then attaching the two to each other, I left one seam of each banded edge unattached, so that the short edges of the band would be sewn at the same time as that seam.
Make sense?
My order of operations was this:
Sew the front, gusset, and back of the underwear together so that they are one flat piece, open at the sides.
Sew the knit bands to the legs. (Same process as the bands - right sides together, zig-zagged, band flipped out and seam allowances zig-zagged down.)
Sew ONE side seam of the underwear, including the knit band, and finish the raw edge. (I just zig-zagged over the edge to keep it flat.)
Attach the knit band to the waist edge BEFORE sewing up the second side seam.
Sew the second side seam, including both the leg band and the waist band, and finish the raw edges.
I was a bit concerned about how bulky the band attachment would be on underwear, but it's actually not bad! The main moth fabric is on the thicker side, like a t-shirt, but the band fabric is a thin jersey.
Conclusion
I organized this blog post to help things make sense and flow better, but I actually had the tank and shorts mostly done (sans the shorts waistband and the bands on the tank) and then I started and finished the underwear before finishing the other two pieces. Which is to say that I saw the knit bands on the underwear first and absolutely loved the way they turned out!
The solid coppery-orange of the bands looks soooo good against the busy print of the moth fabric. They also make for surprisingly good "elastic" - like the copper jersey itself is thin and stretchier than the moth fabric, but doubled up and attached with two rounds of zig-zag stitching (one to attach it, and once as top stitching) it works really well. Like, it's not too loose, but it's still nice and stretchy.
I really like the cut of the Noelle Underwear, but I should have gone down a size. I'll still wear them, but they don't feel very secure when I wear them.
I'm really happy with the top, too! I graded the original shirt pattern to be a larger size in the waist, but I don't think that was necessary. I don't mind the looseness in the waist, though. Also, if I ever make a set like this again (who knows...), I'll make the shoulder straps thinner - maybe take an inch off each side of the neck and shoulders, and maybe an inch off the rest of the neckline too.
The shorts are very comfy, but the waistband isn't super pretty. I think a grown-on self waistband would have been neater, but I'm also glad that I had a way to incorporate the copper knit into this piece. Also, I think this might be the last time I use this shorts pattern - the waist is very high, the crotch seam sits very low, the inseam is very short, and the legs are very wide. Comfy, like I said, but not the vibe I'm going for.
Surprisingly, I still had fabric left over from making this set, so stay tuned for more knit adventures! I have a bralette and two more pairs of underwear already in the works using what's left of the moth fabric, and I intend to make a bralette and a few pairs of underwear from what's left of the copper jersey as well.
Until then
Stay cool. Stay safe. Stay healthy.
0 notes
Text
What Makes a Lady Hobbit Costume?
June 24, 2025
If this post ever sees the light of day, it will be a miracle. I'm mostly writing this to organize my own thoughts as I make my own Hobbit-y costume for the ren faire.
My "research" (aka Pinterest pinning), is based on the Peter Jackson LotR and Hobbit movie series.
Historical Basis
While the Hobbits' costumes do involve a lot of fantasy fashion elements and modern creative liberties, they are, at their heart, a mishmash of historical pieces.
The formula of the costumes follows the standard for European fashions for the 1600s and 1700s (and beyond, but mostly those two hundred years, I think).
The basic formula seems to be a shirt or shift of some kind, a petticoat, a skirt, and a bodice. Typical accessories include aprons and neckerchiefs.
The Hobbits, with their propensity for bare-footed-ness, usually skip on stockings and shoes.
On some of the more "upper-class" Hobbits, you sometimes see nicer mid- to late-18th century gowns, but that's not the idea of "hobbit-core" you usually see on social media and at ren faires, so I'm disregarding those for the sake of this post.
Hems and Sleeves
What makes a Hobbit costume stand out from a historical ensemble?
Well the lack of stockings and shoes, obviously.
But one of the first things that stood out to me was skirt length. You rarely (if ever) see Hobbits in full length skirts.
Hobbit hems (and this is true of the masc Hobbits' pants, too) tend to fall between the upper calf and mid-shin - all the better to show off their distinctive hairy feet!
The sleeves of the females Hobbits also tend to be shorter than would be seen historically, often (though not always) hitting at or above the elbow. The also sometimes feature a large ruffle at the "cuff" of the sleeve.
Interestingly enough, there are a few sightings of pinned- or tied-on sleeves worn over longer shift sleeves, like those common in medieval Europe.
Color and Pattern Usage
Fabric is another way they add a bit of fantasy into the historically-based ensembles.
For starters, in one of the books, JRRTolkein references the Hobbits preferring greens and yellows. In the movies, there is some suggestion (though I'm too lazy to confirm my theory, and I haven't seen the movies recently) that they tried to distinguish the different Hobbit clans by color, as you see a fair amount of blue and purple as well.
"Hobbit-core" fashion tends to favor browns and greens, plus with white and cream, with accents of yellow or orange. Blues, pinks, and purples aren't unheard of though!
A prime example is the shifts/shirts the female Hobbits wear. Historically, these would almost always be white, with the exception of embroidery. However, in the movies, many female Hobbits wear shifts made with a variety of solid colors, but also occasionally gingham or small, low-contrast floral prints.
The florals tend to be of the sort that reinds me of Victorian floral prints, or the 1990s-does-Victorian type. No large "grandma florals," though.
Bodices tend to be solid colors and small florals as well, plus sightings of what might be corduroy or velveteen.
Skirts and petticoats run a fuller range - solids, small florals, medium florals, stripes, gingham, and even some neutral plaids.
Both bodices and skirts are seen trimmed in contrasting or coordinating solid-colored trim or embellished with (usually floral) embroidery.
Bodices specifically sometimes have elaborately embroidered stomachers, or stomachers cris-crossed with decorative ribbon.
Accessories and Layers
Most costumers would agree that accessories and layering is what makes a costume come life. They convey a lot about their character and lifestyle.
Neckerchiefs, worn draped around the shoulders and tucked into the bodice front are seen several times.
Half-aprons are common as well, in a variety of colors, shapes, and levels of wear.
Jewelry seems to be limited to necklaces - almost exclusively ribbons worn choker-style or otherwise close to the base of the neck. It seems to be fairly narrow ribbon, ranging from maybe a quarter inch at the thinnest to less than an inch at the widest.
Straw hats are an option seen occasionally in the movies, but I'll tell you from experience that they can be difficult to wear with fake ears.
Small cross-body bags are seen a few times as well. They seem to be simple rectangles, sewn together on three sides to make a pocket.
While certain significant male Hobbits spend much of the movies wearing cloaks, the female inhabitants of the Shire are more often seen in triangular shawls (or square shawls folded into triangles). Perhaps cloaks are more of a traveling garment?
Hobbits value their gardens, so naturally fresh flowers show up in Hobbit costumes! Now, flower crowns are not seen (as far as I've seen) in the movies, but they are popular in "hobbit-core." In the movies you do, however, see flowers tucked into bodices and apron pockets.
Hair
The iconic Hobbit hair is, of course, just past shoulder-length, worn loose and very curly. Half-up is another common style.
They're not the only options, though!
Some Hobbit ladies wear their hair up in a bun, with just a dense mass of curly bangs. Others go for more of a loose late 18th-century style updo, or even a look similar to those long, early 18th-century (I think) wigs that men in some parts of Europe wore.
Short hair on ladies seems a solid option as well - the messier the better.
"Hobbit-core" looks seem to prefer curls as well, but they aren't a necessity. I've seen many people with their natural hair either loose or half-up.
Miscellany
Fake pointed ears are common in Hobbit costumes, since the ears are one on the Hobbits' distinctive features.
The hairy feet are another feature. Unfortunately, many ren faires and other places where people commonly dress as Hobbits don't allow people to walk around barefoot. Some more hardcore costumers get barefoot shoes or "shoes" that look like oversized Hobbit feet. Most people just wear neutral brown leather-like boots or sandals.
And for one more "bonus" garment - bloomers, or pettipants. We don't see any on the lady Hobbits, but I think it's not much of a stretch to think that some Hobbit ladies might like them. They might even be a fun layer if you make them long enough to peek out under your skirt!
Personally, if I was going to go the bloomer route, I'd make them split crotch (Victorian-style) to make navigating porta-poties at events easier.
Conclusion
I don't really have a conclusion, except to say that how movie-accurate you want your Hobbit look to be is totally a matter of preference. Do what you want (as long as it's appropriate for the situation and not culturally offensive) and if some rando tries to get on your case about it, remember that they're not your mom or your boss or whatever and they have no say over what you wear.
1 note
·
View note
Text
“Bamboo is antifungal”
Because it’s rayon
“Eucalyptus fabric is cooling!”
Yeah, because it’s rayon
“We make clothing called seacell out of seaweed!”
Yeah I looked on your website it’s made by the lyocell process, which means-
-wait for it-
It’s fucking rayon!!
Listen. There is a list of actual plant fibers that are directly made into fabric: cotton, linen, ramie, some hemp. I’m sure I’m missing a couple.
But if you’re wondering “huh how did they turn that plant material into fabric,” 99% of the time? It’s RAYON.
All rayon is made by putting plant material in chemical soup, dissolving out everything but the cellulose, and turning the cellulose into filaments/fibers.
The source of the cellulose has zero effect on the eventual fabric.
Rayon made from bamboo or eucalyptus or seaweed is not any better than rayon from any other sources.
Don’t let companies mislead you!
20K notes
·
View notes
Text
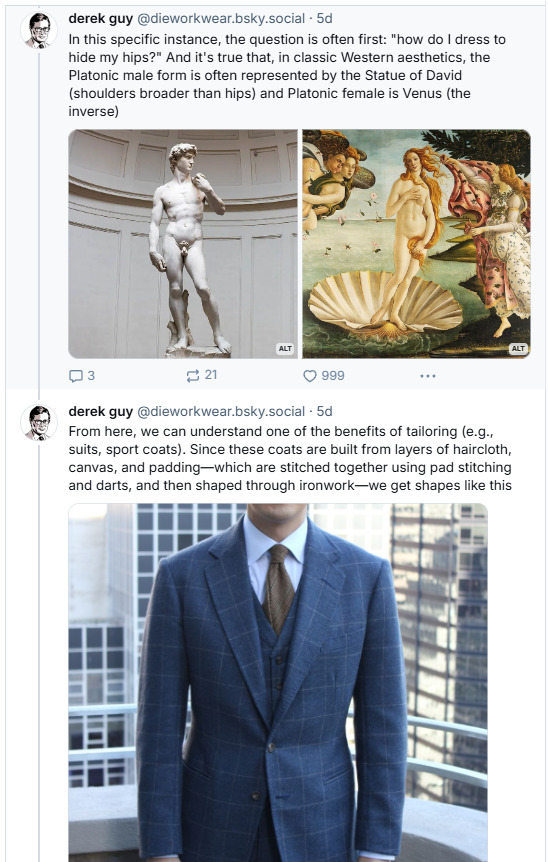
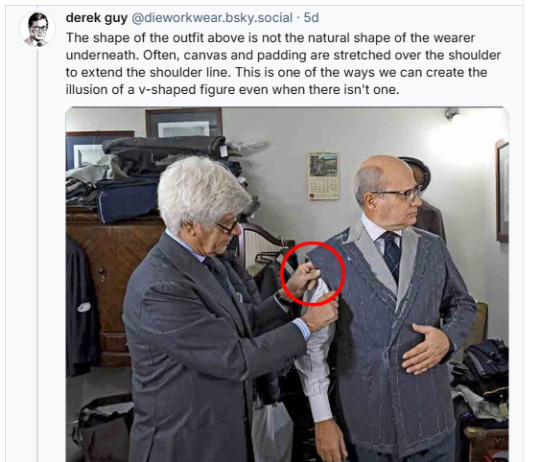
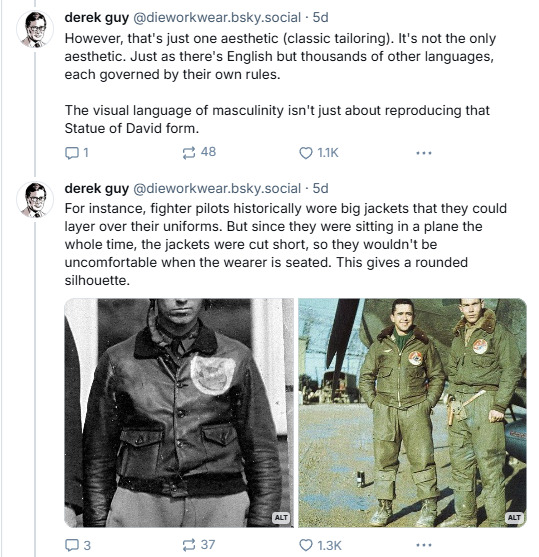
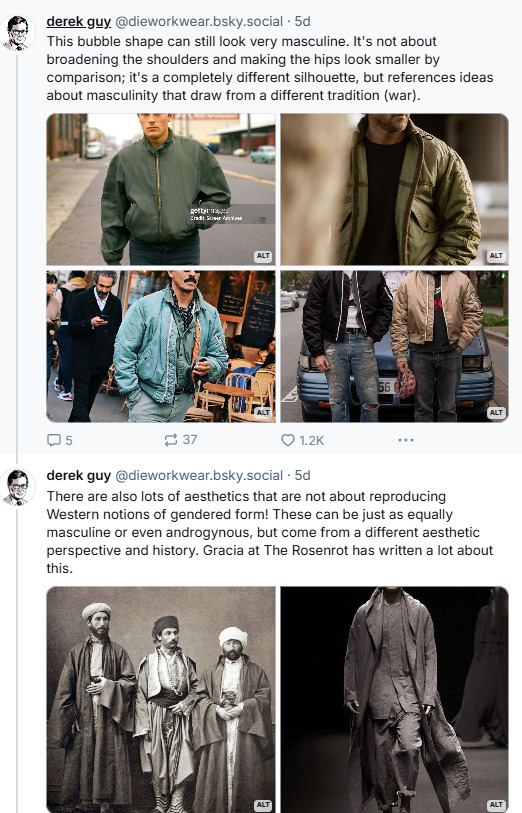
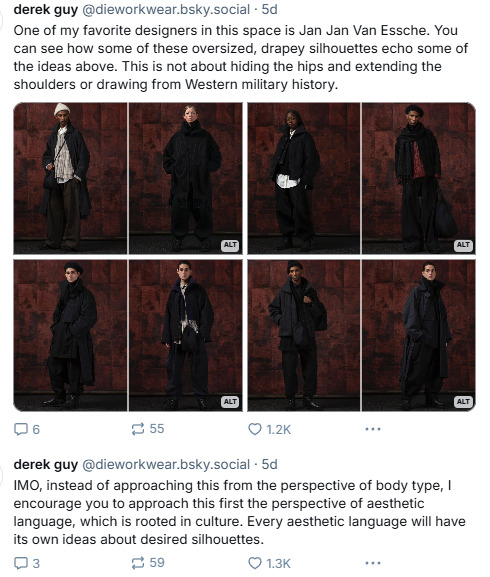
https://dieworkwear.com/2022/08/26/how-to-develop-good-taste-pt-1/
From the comments "In my experience clothing on anyone looks best when it is done with confidence. We are all different shapes and sizes. I was really struck by your post on dressing well that included John Goodman in a faded t-shirt and jeans. He rocks it!"
Excellent advice, whatever gender or style one is looking for. Thank you
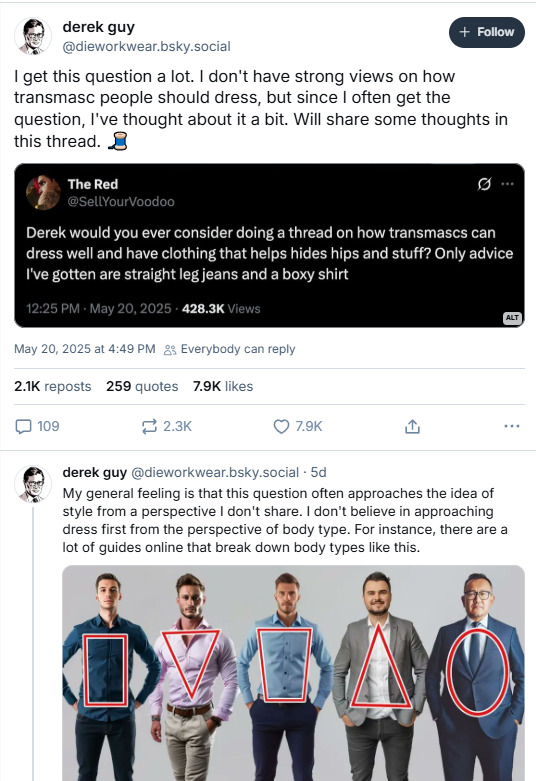
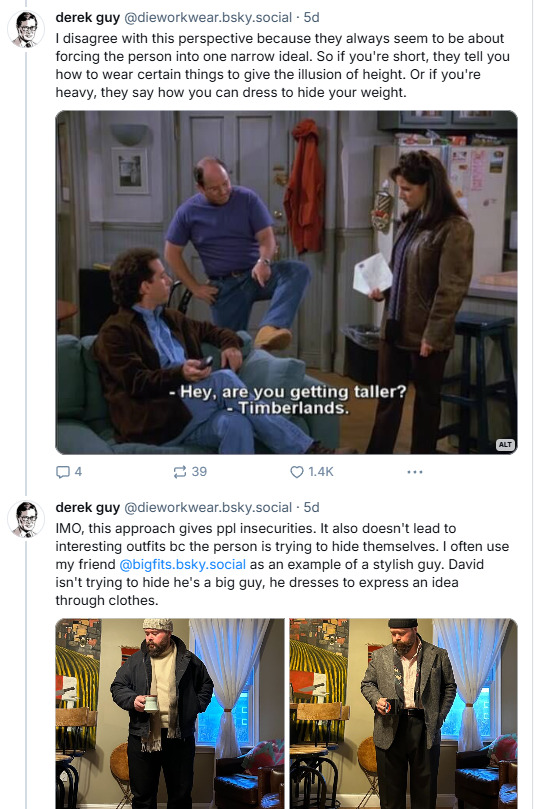
I'm a trans guy and Derek, I can tell you my wardrobe has improved a huge amount simply by reading your threads. The "dress for your body type" stuff never worked well for me; your threads about putting together an intentional look and for getting a good fit - that's 99% of the game.
27K notes
·
View notes
Text
With JoAnne Fabrics going out of business I feel it is my duty as a cosplayer, historical costumer, and general sewing gremlin to help teach y'all how not to be reliant on evil overpriced mediocre big box stores for fabric and cosplay supply, cause if I catch y'all going into Homophobia Lobby to get cosplay fabrics imma have to start throwing hands. And frankly you guys all deserve better.
- Find a neighborhood full of brown people. Probably a slightly poorer neighborhod. I know, I know, but they will have small independent fabric stores. Selection in each may vary. Hispanic and Caribbean areas will give you prints that EAT. Muslim areas will give you fabrics with amazing drapery. Indian and Southeast Asian areas will give you beading that would make the House of Worth wet with envy. (Try to avoid oldwhitelady quilting stores unless you are a knitter or are specifically trying to cosplay Kirsten Larson.) (Also ask while you're there for lunch/dinner spot recommendations. Your fabric store guy usually has a buddy with a joint nextdoor with the best *insert relevant ethnic food here* you'll ever put in your mouth.)
- DEVELOP A RELATIONSHIP WITH THE OWNER OF SAID STORE. This I cannot stress enough. Abdul, my fabric guy, can and will get me whatever I want cause he knows me, knows I bring in other young people, and knows I will be back every month for more. Indie fabric stores tend to have older clients. They are anxious to see faces under 60. Just chat with whoever is in there about the kind of stuff you want and need and they will help you. This also frequently leads to discounts. I have not paid listed price for fabric in years and just walked out of Abdul's with 7~ yards of gorgeous teal satin for 10 bucks. Not a yard. Total.
- Do not be afraid of mess. The best shit comes from stores that look like a hurricane went through them. Don't try to understand the organization. (One day, 4 years into your relationship with the store, suddenly the fabric gods will reveal the knowledge to you.) Again, talk to whoever is in there about your project. They'll help.
- Give up on one stop shopping. Get your crafting supplies elsewhere. Like a small independent hardware store. There's usually an old guy in there that reminds you of an uncle who will also help you.
-Worbla and whatever other Cosplay Specific Material you're using is a fatphobic material straight from Satan's hot taint, you do not need it, and any old hardware/tractor supply dad will help you find better, more durable armor/weapon/detailing material. Don't snub your nose at paper mache and plaster of paris. Venetian Mask makers have been using it for years. Balsa wood is also your friend. Hardware store Uncles will teach you to work with both.
- Elderly people are your bffs. If you see an old person TALK TO THEM. They know how to do all kinds of shit. I know there's a hesitation around old people because of the political climate and a fear that they may be homo/trans/whatever-phobic, but hey....minds are changed by making friends. My elderly Muslim fabric supplier is an Our Flag Means Death fan because of me gushing about the teal I needed for Stede Bonnet. He wishes me happy pride now. He put bolt of rainbow in the window in June and kept it up all summer. And he'd never had a thought about queers before me.
- Don't feel limited to Craft and Fabric stores. Hardware stores are cool. They stock outdoor fabrics and umbrella and furniture covers that are very durable....my first cosplay was made out of patio furniture covers. Also upholstery stores and upholsterers have velvets and damasks and faux leather and real leather and all sorts of rich textures. Most of them will part with a few yards pretty cheap. Second hand sheets and bedspreads and curtains also make some really cool garments. A significant amount of my ren fair garb started as household goods.
- If you are forced to order fabric online, please for the love of all that is holy DO NOT BUY FROM MOOD or any other famous store. You're paying for their branding and their place on certain reality shows I will not mention. Indie is always cheaper for the quality and usually not abusing their workers.
- If the fabric/hobby/hardware/upholstery/etc store you develop a relationship with is inconveniently far from you, see if said owner is willing to take your order via phone and send it to you. You'd be surprised how accommodating people in the crafting and sewing world can be.
It all really comes down to having to form a community. I know finding multiple small stores is a lot less convenient than Joannes. But forming a relationship with a local supplier will, in the long run, yield you much better results AND put money and good back into a community near you.
(And if you're in the NYC area DM me and I'll put you in contact with Abdul. He's the absolute best and I'd do anything to help him and his business grow!!!)
24K notes
·
View notes
Text
sewing underwear and lingerie is kind of addicting ngl
#wnn rambles#and since i'm small i can make a yard of fabric go a looooooong way#like my current project - two yards of the main fabric gave me a tank top shorts a bralette and three pairs of underwear#can't wait to see what one yard of the copper gets me since that will be undies only
0 notes
Text
Half Year-ish Update!
June 17th, 2025
I haven't had much time to sew this month and it's driving me up the wall, so here's an update on my projects and goals so far this year!
Goals
Stashbusting: So far, I've destashed three small pieces of cotton from my existing stash. I have acquired nine lengths of fabric. Of those nine, two have already been destashed, one will be destashed once I finish the projects I've cut out from it, four more have been partially used, and one I have ideas for but haven't started.
Dyeing: The two tunics have been dyed, but my first attempt at dyeing the corduroy pants didn't take. Maybe later this summer I'll try dye remover and starting from scratch with the color. I probably won't get to the Regency dress this year.
SCA stuff: I've sewn or started a bunch of linen headwear (more on that soon, I hope). I've picked out a name but haven't registered it (yet).
Ren faire stuff: I sewed a petticoat from a thrifted tablecloth and I've started on a bodice. More on that later!
Something 1890s: :/
One big project: I made a modern dress using McCalls 8507! I've already worn it to one wedding, and will be wearing it to another wedding later this summer.
Finished Projects
Since you can find basically all of my projects here on my blog, I won't go into detail about what I've already made this year, except to say that they have been almost exclusively modern. I haven't really done any historical sewing this year. Mixed feelings about that.
Works In Progress
I have a few (but not too many) projects currently in the works. My current hand sewing project is a medieval pie crust-style fillet. That will mark the end of my linen scraps and the last of the medieval headwear I want to make (for now).
I'm also working my way through two yards of cotton interlock knit which I impulse bought at Joann's (rip). I'm making a summer pajama set, along with a matching bralette and a few pairs of underwear.
Upcoming Plans
Where to begin... I have a whole list of projects that I can make from my stash fabrics, and I'm trying to prioritize ones that will both destash a cut of fabric and that actually interest me.
My first new project priority is the bodice for my ren fair outfit, using that one Butterick pattern everyone uses and a golden yellow upholstery cotton from my stash. I already bought the bias tape and boning I'll need.
I bought a solid colored cotton jersey to make knit bands for the cotton knit pajama set. I'll have enough of that left over to make a bralette and a few pairs of underwear, though I'll need to buy elastics. I'm going to put that off until I can procure a walking foot, though, because this fabric doesn't get along with my normal presser foot.
Also in the knit department, I impulse purchased a cream rib knit that has a small red/orange/green floral print on it. I have three yards of the rib knit (go big or go home), from which I hope to make a long-sleeved t-shirt, a cami, and at least one bralette and pair of underwear. I bought some stretch lace that I think will look cute on the cami, bralette, and underwear, though it's a darker cream than I expected, so I'll have to whiten it a bit. If there's big enough scraps of the fabric left over, a sleep mask and some scrunchies may be in order.
I have just enough linen/rayon fabric left over from my dress to make a pair of shorts. I should also be able to squeeze out a bralette, if I'm lucky. They should coordinate nicely with the cream knit tank and undies...
I also want to make a kimono-style wrap top out of what's left of the blue cotton gauze I just made a summer pajama set from. Probably also a scrunchie, if there are large enough scraps left (I'll be cutting it close).
A few small accessories are on the docket too - I have enough of the dark blue floral and it's contrasting solid teal (which I made a toiletry bag and matching shoe bag from) to make a pair of luggage tags, I think, and probably a scrunchie or two. I have fabric to make a sleep mask and scrunchie to match the berry pajamas I made as well.
(Why am I making so many scrunchies, my hair is soooo thin.)
Getting away from pajamas, I've had a black polyester poplin or lawn in my stash with a tan and red floral print, which will be just enough to make a short-sleeved blouse from. I have a similar shirt in navy blue already and I like wearing it, so I know it will be a useful piece in my wardrobe.
As for historical stuff, I really need to make the 1890s bustle pad. I have the fabric and cotton batting for it, plus enough fabric scraps to cut up to stuff it. With that done, I can start on petticoats and some bust padding!
Hopefully I'll be back with more completed projects soon or else my head will explode!
0 notes
Text
I don't know who needs to hear this, but
YOU DO NOT NEED TO START A NEW HOBBY!
STEP AWAY FROM THE TEXTILES!
YOU DON'T NEED MORE YARN!
THAT FABRIC IS NOT CALLING TO YOU! LEAVE IT ALONE!
163K notes
·
View notes
Text

due to factors such as "time pressure" and "tulle is of the devil" my expectations for this shirt are not high. but i spent a lot of time imagining these button bands and they turned out pretty nice
31K notes
·
View notes
Text
I was angsting because due to the way Etsy weights/only counts recent reviews, my seller rating has dipped and as a result, I'm not making any sales. In order to perk things up (and hopefully get a few more, newer good reviews), I decided to run a promotion for the rest of the month!
See my shop here
Just use the link, or you can manually put in the discount code: JUNE2025
221 notes
·
View notes