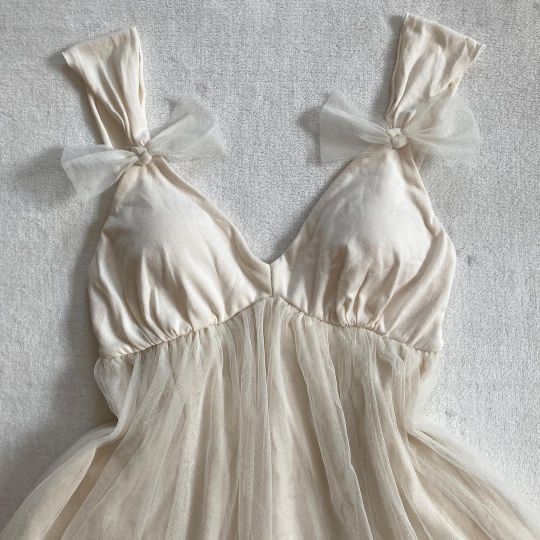
#lingerie sewing
Photo
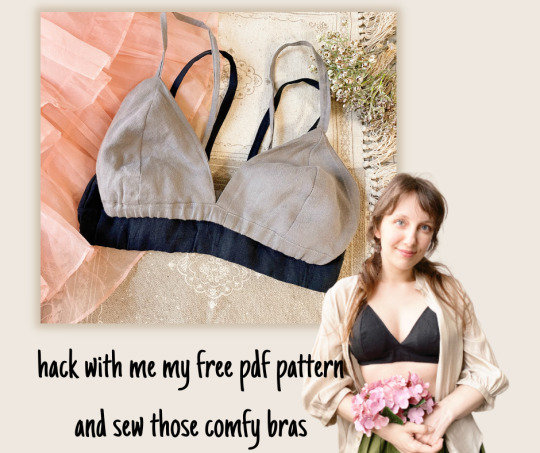
Hey there! I'm excited to share my latest YouTube video on how to hack my free bralette pattern and sew two different types of bras using a recycled linen skirt. It's a beginner-friendly tutorial with detailed step-by-step instructions, and I can't wait for you to watch the whole video. out! Don't forget to share your thoughts on these unique bras in the comments. Happy sewing!
youtube
#sew with me#sparrow refashion#sew#sewing#diysewing#diy projects#sewing community#lingerie sewing#creative sewing#diy fashion#modern sewing#recycled sewing#upcycled sewing#sustainable fashion#sewcialists#handmade#diy sewing
168 notes
·
View notes
Text
I took a break from bra studying because I was losing my mind. The past week I went back to it, and am happy to say suddenly it all makes sense to me now. I drafted cups for myself finally, the one thing that just eluded me for so long.
This bra will be a nice corset bra hybrid, made without boning or wires (making it more washable). It follows a more 40s - 50s aesthetic so when all things are complete, I'd like to make some garterbelts to transition from stockings to thigh highs instead. It gets sorta hot in summer and I think it would be better.
6 notes
·
View notes
Text
A Purple Bralette
June 16, 2022
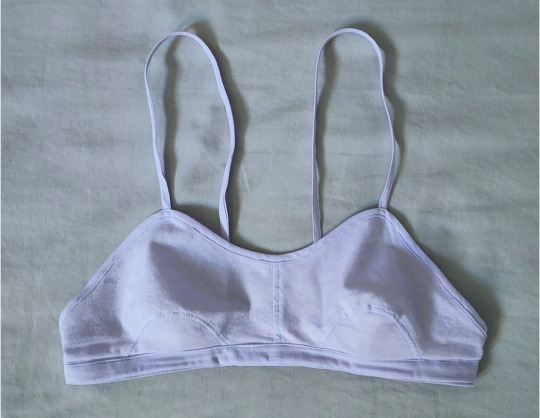
[Image ID: a soft-cup bralette made of light purple cotton, laid flat on a grey background.]
To go with my pale purple shorts - and still riding the high of making a nice bralette - I decided to make a bandeau/bralette out of the same purple cotton.
Some time ago, I bought this 1920s bandeau bra pattern from The Underpinnings Museum. Because they take their patterns from original garments, it's a one-size pattern. The band size of the original fit me, but the cup size was too big so I knew I would have some fitting and adjusting to do before I could actually make the thing.
I transferred the digital pattern to paper in a roundabout way - the pattern files are on A4 (I think) paper so I couldn't print it, and the scale square was in centimeters but my paper was gridded in inches. So... yeah. I opened the pattern pdf in a design program and put a 1" grid on it, making sure that each square was a bit bigger than the 2.5cm scale on the page, then used it like any other gridded pattern.
Fitting & Adjustments
With the pattern sized up, I cut out the pieces from my purple cotton. Obviously I wouldn't normally use the fashion fabric for a mockup, but I have at least two yards of this stuff still, so I didn't really care.
I pinned it together to try it on, which was dangerous, but I survived. Then I pinched, pinned, and marked the excess fabric to make it fit me in the way I wanted it to.
Once that was done I was able to take it apart, even up my alterations, and trace a new pattern. It already looked a lot different than my starting pattern, and not in the ways I was expecting.
I had expected the cutout for the insets to get smaller and the upper part of the 'cup' to also get... smaller, somehow. The upper part did get smaller, but the cutout got wider!
I suppose that makes sense if you think of it like swinging darts around - taking space out of one area and putting it in another. The lower bust inset also got smaller, which keeps it from being too big in the area where the excess went.
The bust got a bit more pointy because I made the inset narrower, but not much shallower. It's not overly pointy, though, and I was already getting a bit frustrated so I didn't try to fix it.
I gave my new pattern half-inch seam allowances at the back, center front, and inset seams. The bralette would have the upper and lower edges bound, so no seam allowances were necessary.
Now I had to wrestle with grainlines. The original pattern had the grainline running parallel to the center front seam, so I did the same with my new pattern.
Unfortunately, that was the wrong choice, as I discovered when I made my next mockup. The shape of the bandeau had changed so drastically from the original pattern that putting the center front on the grain put the top of the bra 'cup' almost directly on the cross-grain, giving it no stretch or ease. I know the 20's had a flat-chested look, but this just did NOT fit.
On sewing that mockup, I also realized that a half-inch seam allowance on such an intensely curved seam was too much to sew smoothly - I ended up with a lot of wrinkling and catching between the main piece and the insets. Those seams were cut down to a quarter-inch. I also narrowed the inset slightly again and moved the part of the body where the strap attached a bit.
So I made those minor alterations to my new pattern and cut it out again, this time making sure the top of the 'cup' was cut on the bias. Then I sewed it up again and it fit great!
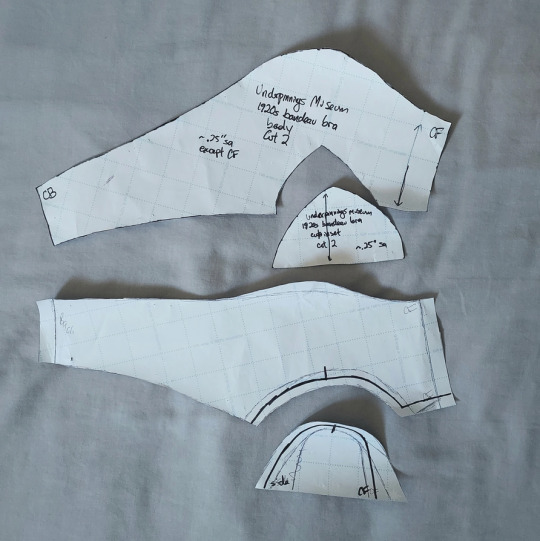
[Image ID: the original two-piece sewing pattern at the top of the photo, compared to my version of the two-piece pattern with marks for the final pattern on the bottom of the photo.]
Finishing
Feeling terribly pleased with myself, I started finishing the seams. The center front was flat felled to one side, in the hopes of fortifying the front seam. I top-stitched the other side of the seam to match. I flat felled the bust seams, too, folding the seams up toward the main piece of the bandeau and carefully stitching them down.
Then I figured I'd better think about elastics and closures. I was intending to attach a V-shape of 1" elastic on each end, with a G-hook as a closure, as you see in this 40s bra. Unfortunately, I only had one G-hook and it was already designated for another project (a modern version of this bralette).
Rather than order another one and wait for it to ship, I decided to alter the bandeau dramatically into more of a bralette. I pinned one end of the elastic to where I wanted it to attach on one side and marked that same point on the other side. Then I put the bra 'on' and wrapped the elastic around to see how much elastic I would need for it to fit snugly. I pinned that end to where I had marked on the bra band and made sure I could (every so carefully, with the pins still in) get it on and off okay.
Once I was sure I could get the bra on and off, I sloped the 'top' of the bra down to where the elastic would be attached. I then folded the elastic and fabric in on each other to hide the raw ends of both and did three lines of vertical stitching to hold the elastic in place.
Finally, I could bind the edges. I cut a strip on the straight grain to serve as the bra band, folded the long edges in, sandwiched it around the lower edge of the bra, and sewed it on in one fell swoop. I folded it over the edges of the elastic, so I made sure to give it a good backstitch on each end. I top-stitched the lower edge of the band too because I thought it would look nice.
The upper edge got a simple quarter-inch bias binding which was also attached in the lazy/all-at-once way. I made sure to sew slowly so my stitching was mostly even and there were barely any ripples.
I didn't have enough elastic for the straps, so I just took more of the bias tape I used for the top edge and top stitched it on each long side. I attached one end of the strap to the front, then pulled it around to the back and pinned the strap to the elastic band. I made sure that the length of the straps and the point where I was attaching them were even, and then I sewed them on.
Final Thoughts
The bra was done! It's obviously very different from the original, but I like it just the same! I'm proud of how well I got it to fit, it's very comfortable, and I can't wait to make a nicer version out of some burnout velvet I picked up a month or two ago.
There was one small issue I didn't discover until I was done. Because I removed so much of the bra band, there is no... containment in the armpit area, so it ends up not being quite so secure or supportive. It's not a huge issue, though. It still fits and it's still comfy, so I'll take what I can get.
My next sewing project is one of my two "big" goals for this year - Edwardian combinations!
Until then
Stay warm. Stay safe. Stay healthy.
1 note
·
View note
Text

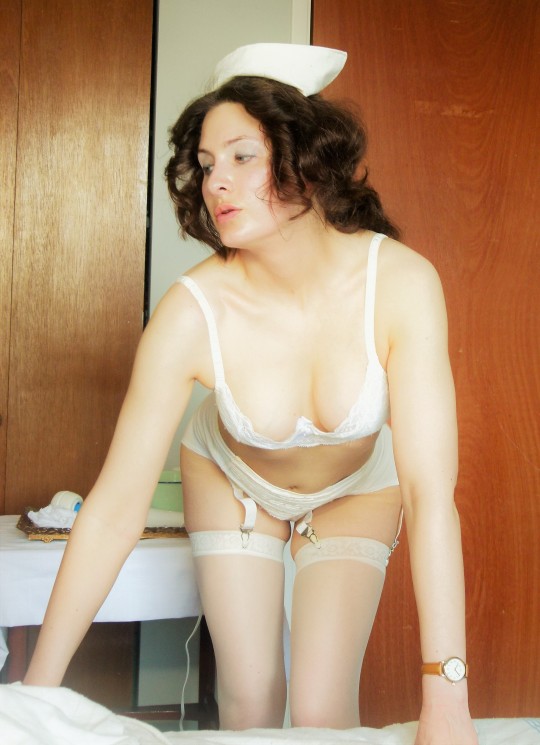


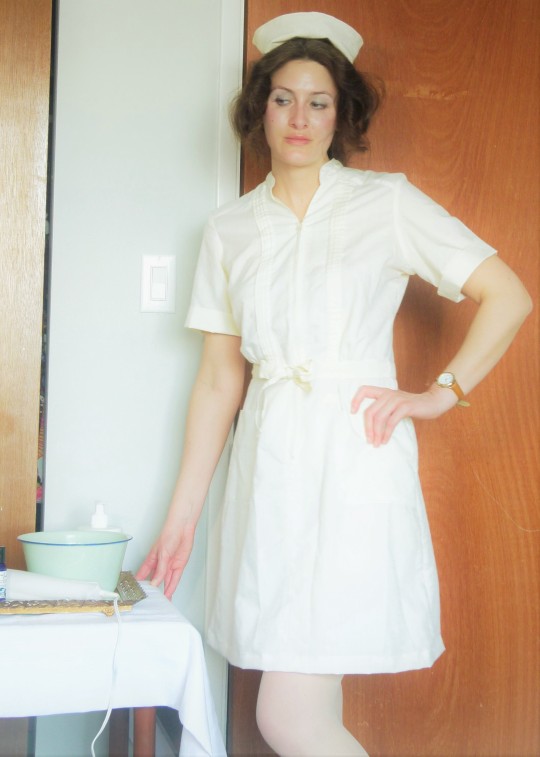

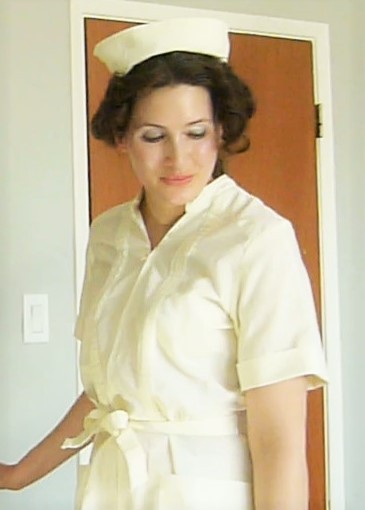
Me, in costume as 'Nurse Sally'. You can see the trailer and full video on my site: fansly.com/SallyFranklin
78 notes
·
View notes
Text


It got hot real quick and I just really want a long lace skirt to parade around in, so I'm gonna see what I can do with a lacy tablecloth an aunt gave me ages ago
I'm changing the butterick B6018 to match this 1908 Corselet skirt shared by marquise.de
Very experimental, so I guess we will see
#this is just to tide me over until i can sew the well thought out and properly planned Edwardian lingerie dress of my dreams#a talia original#talia's adventures in dressmaking#quick lacy corselet skirt#excerpts from my life#sewing#historical costuming
26 notes
·
View notes
Text

Vogue 7876, 1980.
68 notes
·
View notes
Text

New lingerie colection www.divaurae.com
pls subscribe!
#luxurylingerie#lingerie#vintage#divaurae lace fullback panty#handmadelingerie handmade sewing lingeriedesign lingerieaddict lingerielife instalingerie independentbusiness smallbusiness shopify retrolin#silk#divaurae
10 notes
·
View notes
Photo
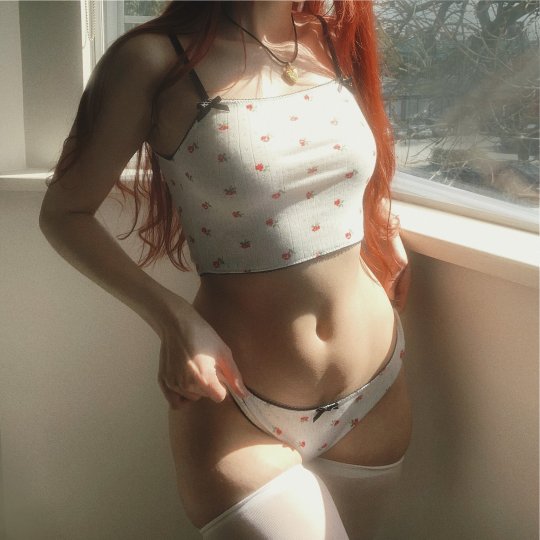
handmade rose print cami set available in 3 sizes here :)
#me#sewing#depop#lingerie#handmade#handmade lingerie#cami#cami top#coquette#aesthetic#dollette#fashion#red hair#long hair#brandy melville#urban outfitters
39 notes
·
View notes
Text

Sapphic Sarcastic Spidery Swamp Sorceresses shoots...for my self indulgent niche and I can't even post the rest anywhere else🌈🔮👩🏾🤝👩🏻🐍🔮🥰
Women do not frighten like little boys....🕸
#Gonna be the Morrigan we deserve....donate to my wishtender so I can go study toxicology and sew creepy little dolls and potions~#Wish I could share my lingerie pictures with like only wlw or there were actual lesbian clients at the club lol...#I need to make my feather pauldrons again...they fell apart...I want an actual Morrigan cosplay for cons but this is just my casual look#“Necklaces bones and knives are an appropriate courtship gifts...wlw can rb”#guys what mods do I need for Orgins on my pc...I want restored content and full BI overhaul#Morrigans friendship with a female warden is more powerful than any and all her het romance conversations...... Morrigan vs Comphet essay#siren face tag
11 notes
·
View notes
Text
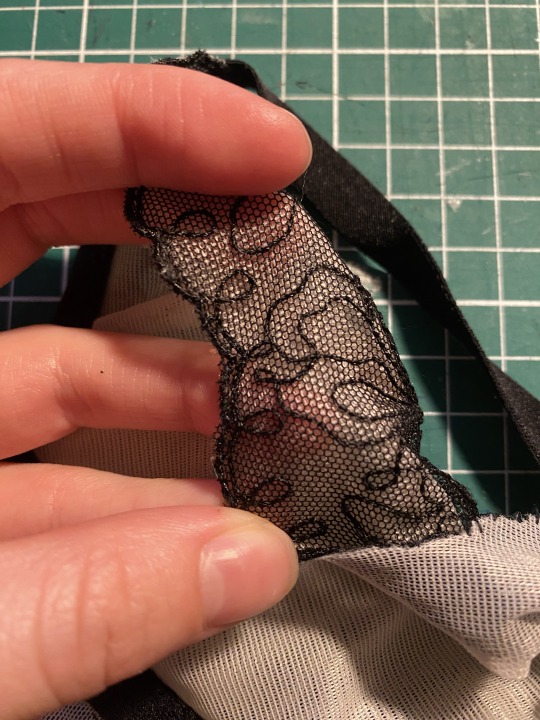
<3
#instagram#pinterest#dress#lingerie#clothing#resell#teddy#tulle#vintage#depop#small business#lace#ruffle#sewing
9 notes
·
View notes
Text


Bridal corset
10 notes
·
View notes
Text
Purple Pajama Shorts
June 2, 2022

[Image ID: a pair of plain purple shorts laid flat on a fuzzy white background.]
With my desire for cute lingerie and sleepwear still going strong, I went looking for more cute patterns. I had bought a non-stretch burnout velvet when I bought the fabric for my periwinkle bralette, so I needed patterns for woven fabrics. I thought knickers might make a nice lower half and decided to try my hand at drafting a pair from Vera Venus' French Knicker Tutorial.
The drafting went pretty smoothly, even though this was my first pattern drafting attempt besides my corset. Surprisingly beginner-friendly! There is one point where you put in darts, then close the dart to flare out the base of the leg, but I didn't want the shorts to be too loose in the leg so I didn't do that.
Once my pattern was drafted I figured I'd better do a mockup in something simple before cutting into my expensive velvet. So I pulled out some of the pale purple cotton broadcloth that I can't seem to get rid of.
That's when I realized that a pair of simple cotton shorts would make great summer pajamas and waste not want not... I decided to make them as a test run more than a simple mockup.
So I cut out my pattern with a half-inch seam allowance all around to give me room to do french seams. The hems got a full inch, though.
I pinned it all together to test the fit, and I'm glad I did. The fit was a bit too tight in the waist. I simply decided not to sew up the front darts the pattern calls for (I'm not shaped that way anyway lol). Satisfied with the fit, I got to sewing.
The back darts went first, then I french seamed the short inseams. The crotch seam went next and was also given a french seam.
Then I pinned up the sides to double-check the fit and was very happy with the result, except I felt like the waist sat a bit too high in the front. I experimented with folding the center front down a bit and settled on leaving the side front seams at the height they were but dipping in an inch at the center front.
With that settled, I french seamed the full right side seam and the left side seam below the opening. If memory serves, the pattern drafting instructions call for an opening on both sides, but my hip-to-waist ratio is small so I can get away with one opening.
Next it was time to finish the opening. I opted to bind the opening in one long piece of bias tape. The tape was a quarter-inch wide when folded but attached to a half-inch seam allowance. The binding on the front side of the opening gets folded under and still overlaps with the binding on the back edge to form a sort of placket.
Then I could attach the waistband. I wanted something thin since the shorts are already pretty high-waisted. I cut a piece of fabric two inches wide so that once it was folded in on itself it would be a half-inch wide to match my seam allowance. I was too lazy to attach it properly, so I just encased the raw edges of the waist inside the waistband and topstitched it all together.
I finished the waistband end on the front half of the opening to line up with the edge of the opening (mostly), but the end on the back half extends a bit. A buttonhole went on the front end, with a button on the extended back edge.
For the hem, I folded the edges under twice and machine-stitched a bit over a quarter-inch from the edge. My folds weren't super consistent on the inside but no one will see that so it doesn't really matter to me.
To finish I spaced three snaps evenly down the side opening. My side opening is about 7" long, so the snaps are about 1.75" apart. The opening was pulling in an odd way because of how the front placket was folded under but not secured, so I quickly topstitched short lines between each snap on the front.
From drafting to done, I think these shorts took about three or four short evenings of work. They're almost entirely machine stitched except for the button and snaps. All the raw edges are encased to ensure that these survive the heavy wear they're bound to get.
The shorts are just slightly loose in the waist, but they definitely would have been too tight with the front darts. The bottom of the crotch seam could be an inch higher and still fit well. When I make these shorts out of that next burnout velvet, I'll take the front side seams in by about a quarter-inch on each side and try raising the crotch seam a half-inch (just in case).
I'm super happy with how these turned out and they're definitely going to be my go-to pajama/lounge shorts this summer!
Until next time
Stay warm. Stay safe. Stay healthy.
0 notes
Text


I made this set out of an old shirt I thrifted 💛🕊️
10 notes
·
View notes
Text
hairy legs, black lace, and chains (also you can kinda see my walker in the background ☺️)

#sometimes i feel hot what can i say#my art#queer artist#disabled artist#sewing#non binary#lgbtq#collar#lingerie#slightly not safe for work#cripplepunk#babe with a mobility aid
50 notes
·
View notes
Text


I have a dance evening this Friday, so I'm working on a quick red dress with twirly skirt suitable for athletic pursuits. Best of all, there's exactly enough fabric to make a pair of matching shorts for under the dress so I can twirl to my heart's content 💫
#i started this dress like a month ago#worked on it a day#and then i really really had to finish the ballgown#the fabric is stretchy whatsisname#the thing you make athletic wear and bathing suits from#it was a leftover from my lingerie teacher#a talia original#talia's adventures in dressmaking#excerpts from my life#sewing#sewing progress#quick red dance dress
20 notes
·
View notes
Text
Adventures in... lingerie making?
Yeah so at some point I thought, you know what I'm going to do instead of studying for my finals? Bra sewing. So I took a deep dive into bra patterns, underwires, lace and elastic.
There are a few patterns so many people rave about online, the Harriet bra, the Black Beauty bra, the Marlborough bra etc. There are so many small pattern companies specialised in lingerie patterns and it was a little intimidating when choosing one. They're also not cheap. A bra pattern is easily 15-20$ and I get why, but I'm a little cheap when it comes to patterns. This is however not a project I wanted to draft my own cups for. The Maya bra is a free pattern, but it's not a style of bra I wear often.
I don't have big boobs (I wear a 65D/30D) and like, a lot of the home-sewing bra patterns offer a lot of coverage and support. Which is great! But it's not what I wanted. So when I saw this nice plunging/push-up bra pattern, and people online were like "it's not a beginner friendly, buy when you have some bra-making experience" I went like "that sounds like a perfect pattern for me, a beginner". Of course I bought the paper pattern of the Merckwaerdigh PBH30. And the Cambia bra pattern because it intrigued me.


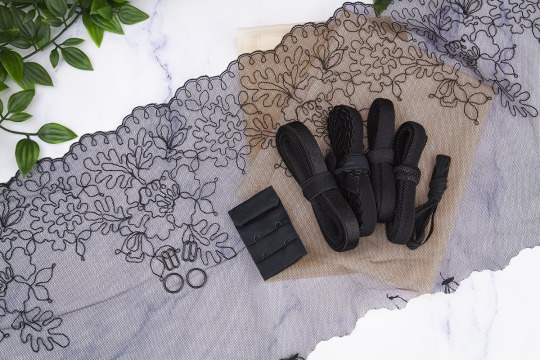
Then it was time to get lost in all the kinds of elastics and fabrics I would need. I caved and just bought a bra kit; shipping prices can variable and I didn't like the kits the Dutch sites offered. I did however like this black lace set by smallbobbins.be.
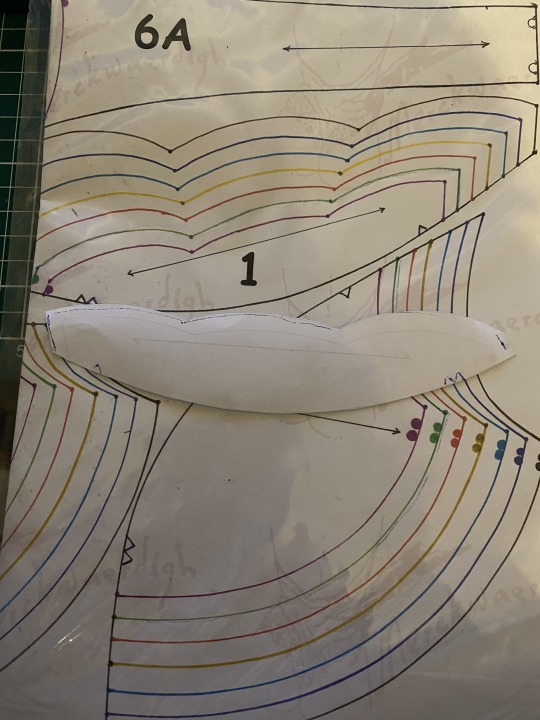
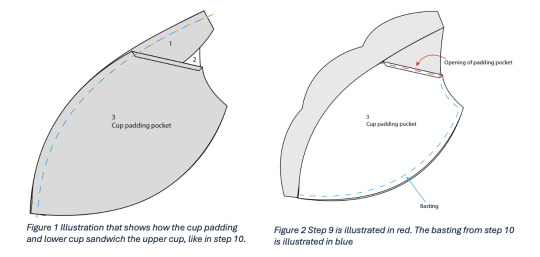
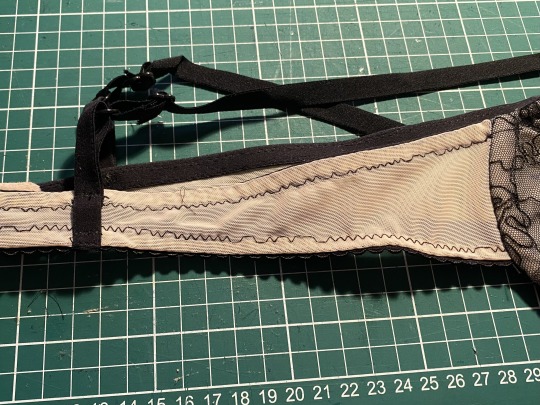
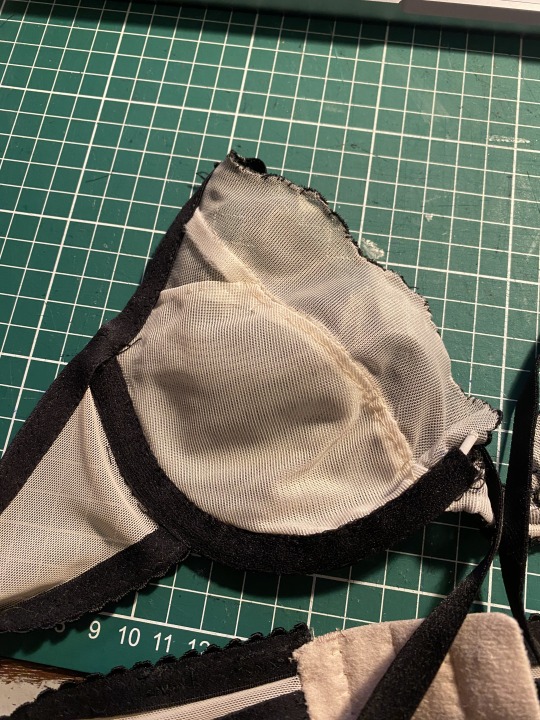
And then I started on a test bra, made out of some cotton voile and purple lace and lycra I had in my fabric stash. I had such a hard time with the instructions; even though they're available in mine and Merckweardigh's native language, this pattern is very... ehm brief in the instructions. Thank the gods for the wayback machine and clothing engineer's tutorial on how to insert the removable padding pocket. After that things made way more sense, but I still wrote my own instructions + illustrations (message me if you're interested). I decided halfway through my mock up, that I felt confident enough and that I would make a 'mock up' out of the bra set. I used a different piece of bra tule that was included (it was a shade lighter). The cup pieces were so small that I suspected I could make at least 2 bra's out of it if I threw some strap elastic, rings and sliders in that I already had in my stash. I ripped the hook and eye closure of a too small bra and reused it.
I made the B70, like the measurements table told me to do. I allowed myself some experimenting with a one-piece lace cup fabric (not my fave look). It went pretty well! Until I used a zigzag stitch to topstitch the power mesh to the picot elastic and the black thread on the beige power mesh showed all the missed stitches of my machine. It's not pretty at all. I hate ripping out seams that are positioned well, but I do want to redo this after I do some much needed maintenance and timing management on my machine, before I start zigzagging my 'official' version of the bra.

The wires, even though they're push up wires, are a little too big, but I've ordered shorter ones.
To mine and everybody's surprise, (no really, I was really surprised), the cups are... too small? Yeah not sure how that happened. I might be on my period, but even those measurements fall neatly in the "84-86 cm" measurement for the B70 cup. I'm not totally spilling over, but it's noticeable enough that some of my breast tissue is not in the cup before I did the swoop. Adding the little padding 'cookies' for some volume is making the problem a little worse. So I guess that means I'm making a C70 for my 'official' bra.
3 notes
·
View notes
Last Seen Blogs

sapphicmeltdown
☆brooke☆

delhifastfood
Untitled

huntingblossoms
Tetchō Suehiro

askjdjalijdaoihdqoibiosdboca56
18181818818181818181818181818

newyorkgas-blog
New York Gives A Sh*t