
Statistics
We looked inside some of the posts by whiskmobile-blog and here's what we found interesting.
Average Info
Notes Per Post
5
Likes Per Post
5
Reblog Per Post
0
Reply Per Post
0
Time Between Posts
1 month
Number of Posts By Type
Text
5
Photo
3
Last Seen Tumblr Blogs


Fun Fact
Tumblr was acquired by Yahoo for $1.1B in 2013.
Text
SBBAnimatedTweetActivity
Whilst developing the new GIF preview functionality in CLIP+, I discovered that the built-in Twitter UIActivity would not post animated GIFs. It accepts the GIF's NSData perfectly happily, but then posts a static image - whereas posting the same NSData via the Messages UIActivity results in an animated GIF as expected.
Ease of sharing animated GIFs was a major reason to implement this new functionality in the first place, so I needed to come up with another option - that's where SBBAnimatedTweetActivity comes in.

SBBAnimatedTweetActivity is open-source, and has been released as a Cocoapod.
0 notes
Photo

CLIP+ Copy & Paste Clipboard Manager v2.0 is out today!
It's been a long time coming, but CLIP+ v2.0 live on the App Store today! Inspired by great user suggestions and the recent launch of iOS9, we've added the following features:
• NEW: Preview images and animated GIFs - any URLs that point to images will be previewed in your list. Share the image directly rather than just the URL. • NEW: Edit items - swipe left for an "Edit" button. • NEW: Reorder items - simply drag items to reorder them. • NEW: Spotlight Search integration - your clipped items are available in your iOS9 search results. • NEW: Safari Shared Links extension - your clipped URLs are available in Safari's "Shared Links" tab.
I'll write about the technical implementation of some of these new features over the coming days, but I hope that you enjoy using them.
Anyway, CLIP+ is live on ProductHunt.com today and we are very much looking forward to hearing your questions & feedback.
0 notes
Photo

With all this talk about ASO, don't forget about your apps' SEO
We'll put this one down under "seemed like a good idea at the time" - I was trying to come up with a name for my new iOS clipboard manager app that was clean, simple & modern (just like the app). CLP+ was the result - certainly simple, and has that oh-so trendy missing character!
During the first year of the app's life, what became obvious (arguably should've been obvious the whole time) was that it was not obvious how to even say the name. This made it slightly painful to tell people about it, and probably slightly painful for other people to tell their friends about it. This is not a good thing!
The nail in the coffin of CLP+ was when I was trying to grab the URL for the US App Store by typing the full name of the app into Google.
The first page of search results listed the competitors, but not CLP+!
People typing in the actual name of the app were being sent to competitor apps because of the stupid trendy spelling I'd chosen because I'd thought it looked nice! Google was correcting the search text entered because CLP was incorrectly spelt.
So, CLP+ is now CLIP+ ...and I hope the SEO damage is not permanent.
CLIP+ Copy & Paste Clipboard Manager v2.0 is hitting the App Store on Wednesday 14th October 2015
0 notes
Text
UIScrollView with Auto Layout
I've seen a number of posts recently on blogs and SO, that either don't quite go all the way to a full explanation of how to (easily) achieve this, or make it much more difficult than it needs to be.
Our layouts need to be more flexible than ever to cope with size classes and iOS9 split-screen (& slide-over) on the iPad, so Auto Layout is an essential part of iOS development - I dread to think of the man hours lost in frustration trying to get the *#!@ing UIScrollView to scroll!
It's certainly a subject that bothered me when I first made the switch from "springs & struts", so here's a foolproof method of getting a UIScrollView to place nice with Auto Layout.
1. Add your UIScrollView to the Storyboard scene - in this example, it is directly placed inside the main view.
2. Pin the UIScrollView to the parent UIView on all sides (untick "Constrain to margins"):
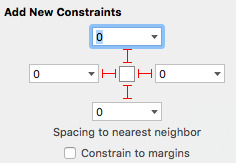
3. Add exactly ONE UIView to the UIScrollView, and again pin that on all sides to its parent. Your hierarchy should look like this:

4. If you're trying to achieve a vertical (up/down) only scroll, select both the UIScrollView, and the "Content View" in the hierarchy, then set them to have "Equal Widths". If you're trying to achieve a sideways (left/right) scroll, then set "Equal Heights".
5. The critical final step is that the "Content View" must now have an "Intrinsic Content Size" (it needs to "know" how tall it should be) for the direction that you want it to scroll e.g. the direction that you didn't fix as equal to the parent in the previous step.
Therefore, in this example, we want the screen to scroll vertically - there must be a "chain" of subviews from top to bottom, they must all have top & bottom constraints, and they must all in turn have an "Intrinsic Content Size".
Labels are easy therefore, because their "Intrinsic Content Size" is set directly by the text shown in the label.
In this example therefore, the three labels each have top & bottom constraints to either the "Content View", or to each other. The chain is complete, and the Auto Layout warnings disappear - on small screens, the UIScrollView will scroll, or on screens where we can see everything without scrolling, then the scrollView won't move at all.

It's these basic principles that make it easy to get your UIScrollView to scroll (avoid the classic "scrollView won't scroll" issues), and to get rid of those nasty "Need constraints for: Y position or height" warnings in IB.
0 notes
Text
Using "special" characters in your app name - or how I named my app CLP+
This one goes under "simple when you know how"! One of the most painful parts of the process of releasing my new app CLP+, was building it for submission to the App Store. This is something that I've done literally hundreds of times before, but it seems I've never previously tried to have a plus sign in my app's name. This issue only reared its ugly head when I was actually trying to submit to Apple. The app builds perfectly up through development, it archives without any problems, but when you actually try to upload it you see this:
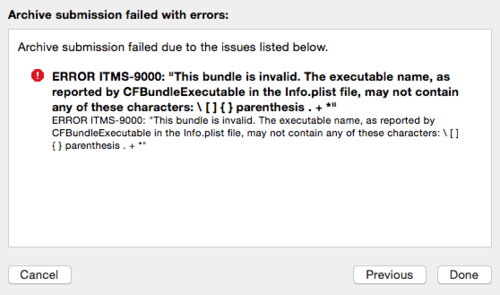
Ok, so I remove the "+" from "Product Name" in Build Settings because that is where CFBundleExecutable gets its value from.
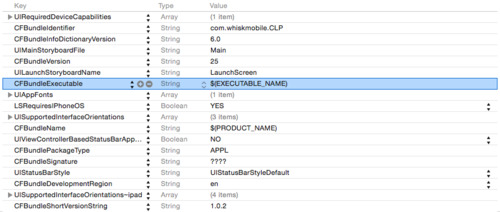
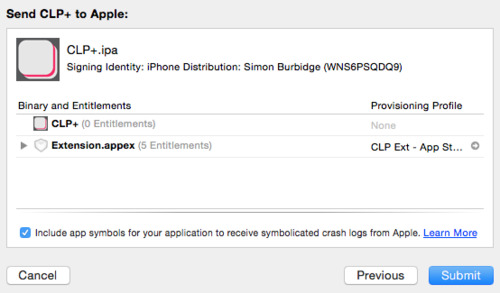
However, removing the "+" from "Product Name" results in the app being displayed as "CLP" on the device. How about explicitly setting CFBundleExecutable to "CLP" in the info.plist file, and keeping the Product Name as "CLP+"? Well, things get really messed up if you do that - when you hit the submit button you'll see "0 Entitlements" on the signing screen, and you won't be able to submit it.
The answer is far easier than all that: 1. Leave CFBundleExecutable alone, so it gets its value from Product Name. 2. Remove the "+" from Product Name in Build Settings, 3. Add a new row to Info.plist for "Bundle display name", and give it the name that you want e.g. "CLP+". Your app now appears correctly on the device, and it can also be submitted to Apple without any problems (at least without any problems caused by the plus sign in the name). PS: The really stupid thing is that I've used "Bundle display name" previously, but went down the rabbit hole of trying to fix the issue in CFBundleExecutable (and then in the provisioning profiles etc) that I didn't see the obvious answer!
0 notes
Photo
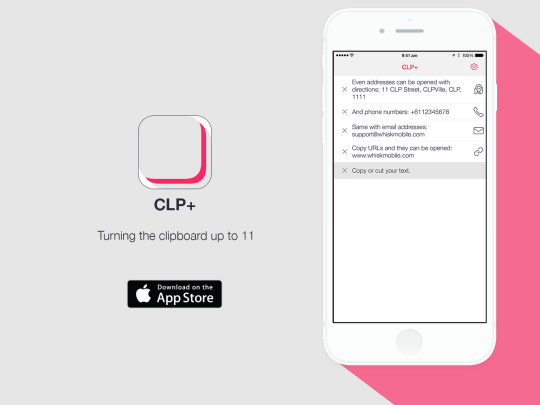
CLP+ Copy & Paste Clipboard Manager
Very excited to announce my latest project. CLP+ is a simple, but extremely useful little app.
Install the "Today Widget" in Notification Center, then when you copy text from any app, it will appear in the list.
Just tap any item in the list to copy it back to the clipboard.
Automatically recognizes different types of content. If you copy a phone number, then it can be called directly from the app. If you copy a URL, then just tap the icon to go to the site. If you copy an email address, then just tap the email icon to compose a new email.
Very simple to use, but powerful and customizable too.
I'll write more about the technical aspects of the project - a few interesting techniques were used - but for now, please give it a try!
1 note
·
View note
Text
Validating a UITextField
Looking today at some sample code for validating an email address in a UITextField, I came across a lot of people recommending that you should validate by regex in the textField:shouldChangeCharactersInRange:replacementString: delegate method.
Initially, this seemed like a great way to do it, but when testing, something became clear - that because the text in the UITextField hasn't actually changed at the point the method is called, you're not validating the new text in the box, you've validating what WAS there previously.
This means that although it will seem to work whilst you're typing in your email address, when you get to the end, it will allow you to put an invalid character on the end - and when you then delete that character (to leave a valid email address), you'll be told that it is invalid.
The solution to this - like so much else in Objective-C - is NSNotification. The UITextField posts the "UITextFieldTextDidChangeNotification" notification when the textField HAS changed. You can therefore observe for these notifications and validate away, safe in the knowledge that your text is in the same state that the user is seeing it.
So, a complete solution - assuming you've got a method for validation somewhere - is:
0 notes
Text
Respect the "Limit Ad Tracking" switch
We went through a phase of Apple rejecting apps due to them requesting the IDFA (ID for Advertising) when they don't do any advertising. Often this was due to no direct fault of the app developers themselves - certain popular 3rd party SDKs have code that captures the IDFA without the developers knowing about it.
This move seemed to put a stop to people using the IDFA for install attribution, however Apple now allows it to be used for that purpose.
It is still important however, that if you're not using advertising or attribution in your app, you remove the AdSupport.framework from the build, remove all references to the IDFA from your code, and also check that you're on the latest versions of 3rd party libraries (and that they've updated them to remove their own references to the IDFA).
One thing that hasn't been mentioned very much is that even if you are advertising or using attribution SDKs in your app, you still shouldn't be using the IDFA if the user has set the "Limit Advertising" switch in their settings.
One would be perfectly within their rights to assume that a user setting this switch to limit advertising tracking, would remove access to the IDFA within the app, however it has no such effect. App developers can still access this value even if the user has limited advertising tracking, and it is a logical next step in Apple's crackdown for them to reject apps that continue to use the IDFA after the user has "limited" access to it.
The setting in iOS6 is in General -> About -> Advertising. In iOS7 & iOS8, it has been moved to the more logical location of Privacy -> Advertising.

The 'Limit Ad Tracking' switch in iOS7 & iOS8.
Therefore, if you are serving ads in your app, check if advertising is enabled with the following method:
If it is not enabled, then make sure you don't send the IDFA to your servers, or you could (and probably should?) be rejected by Apple.
4 notes
·
View notes