#xcode6
Explore tagged Tumblr posts
Visit Tumblr Blog
Explore Tumblr blogs with no restrictions, modern design and the best experience.
Last Seen Tumblr Blogs


Fun Fact
In February 2021, Tumblr had 518.6 million blog accounts.
Text
Gem インストールでエラー : "DESTDIR=" No rule to make target ~/config.h, needed by hitimes.o. Stop.
Mac OS X 10.9.5-x86_64 で Xcode 6.1 な環境で、とある Gemfile を bundler でアップデートしたところ、以下のようなエラーが発生しました。
$ bundle update Updating https://github.com/mitchellh/vagrant.git Fetching gem metadata from https://rubygems.org/.......... Resolving dependencies... Using builder 3.2.2 Using gyoku 1.2.2 (was 1.1.1) Using mini_portile 0.6.0 Using nokogiri 1.6.3.1 Using akami 1.2.2 Using ansible 0.2.0 Using bundler 1.6.5 Gem::Ext::BuildError: ERROR: Failed to build gem native extension. /System/Library/Frameworks/Ruby.framework/Versions/2.0/usr/bin/ruby -r ./siteconf20141126-17776-19kblu0.rb extconf.rb creating Makefile make "DESTDIR=" clean make "DESTDIR=" make: *** No rule to make target `/Applications/Xcode.app/Contents/Developer/Platforms/MacOSX.platform/Developer/SDKs/MacOSX10.10.sdk/System/Library/Frameworks/Ruby.framework/Versions/2.0/usr/include/ruby-2.0.0/universal-darwin13/ruby/config.h', needed by `hitimes.o'. Stop. make failed, exit code 2 Gem files will remain installed in /path/to/vendor/bundle/ruby/2.0.0/gems/hitimes-1.2.2 for inspection. Results logged to /path/to/vendor/bundle/ruby/2.0.0/extensions/universal-darwin-13/2.0.0/hitimes-1.2.2/gem_make.out An error occurred while installing hitimes (1.2.2), and Bundler cannot continue. Make sure that `gem install hitimes -v '1.2.2'` succeeds before bundling.
このエラーが出て、そういえば Xcode を 6.1 にアップグレードしてから Xcode の Command Line Tools(CLT)をインストールしていないことに気付きました。 そして、brew --config で CLT を探したところ案の定見つかりませんでした。
ということで、CLT をインストールする。
$ xcode-select --install xcode-select: note: install requested for command line developer tools
上記実行後、インストールダイアログが起動するので「インストール」する。
インストール後、brew で設定を確認してみる。
$ brew --config HOMEBREW_VERSION: 0.9.5 ORIGIN: https://github.com/Homebrew/homebrew.git HEAD: cd8a322fceda57ff8788e350416fdf6b48b3d426 HOMEBREW_PREFIX: /usr/local HOMEBREW_CELLAR: /usr/local/Cellar CPU: quad-core 64-bit ivybridge OS X: 10.9.5-x86_64 Xcode: 6.1 CLT: 6.1.0.0.1.1413057044
CLT が入った。
ふたたび bundle update を実行。
$ bundle update Updating https://github.com/mitchellh/vagrant.git Fetching gem metadata from https://rubygems.org/.......... Resolving dependencies... Using builder 3.2.2 Using gyoku 1.2.2 (was 1.1.1) Using mini_portile 0.6.0 Using nokogiri 1.6.3.1 Using akami 1.2.2 Using ansible 0.2.0 Using bundler 1.6.5 Installing hitimes 1.2.2 . . . Your bundle is updated!
Yes!!
参考 URL
yajl-ruby doesn't build on OS X Yosemite with Xcode 6.0.1 · Issue #148 · brianmario/yajl-ruby
3 notes
·
View notes
Video
tumblr
So, today's topic will be touching about something new in iOS8. But before that, I am very excited about today's post, I finally posted a video!! I know it can be easily done in Tumblr, but, it's my first ever video on Tumblr. Cheers to that!
Not sure if you notice this, but if you try scrolling in your Safari mobile app, you'll notice that the navigation bar gets "compressed". We aren't exactly going to do that, but something close enough. Ever wished to make your app to have the fullscreen experience? Now in iOS8, you can easily do that with a bunch of properties.
TODAY's TOPIC : HIDING NAVIGATION BAR IN IOS8
In the video, I've shown you two ways to hide the navigation bar. First was hiding it by just a tap on the screen. The second way, which would probably be more useful, was hiding the navigation bar when keyboard appears.
How to do it??
In iOS8, there's a couple of properties that allows us to hide the navigation bar. Here is the super simple and short code that I've used to demonstrate both the effects as seen in the video:
override func viewDidAppear(animated: Bool) {
super.viewDidAppear(animated)
navigationController?.hidesBarsOnTap = true
navigationController?.hidesBarsWhenKeyboardAppears = true
}
That's it. The. End.
What other ways to hide the navigation bar?
- hidesBarsOnTap
- hidesBarsOnSwipe
- hidesBarsWhenVerticallyCompact
- hidesBarsWhenKeyboardAppears
- navigationBarHidden
- barHideOnTapGestureRecognizer
- barHideOnSwipeGestureRecognizer
All the properties listed above can be found in the Apple documentation of UINavigationController Class. Link is below:
Apple Documentation
Well, that's it for today. Have fun 'magically' hiding your navigation bar!
#ios#ios8#navigationcontroller#navigationbar#Xcode6#tips#iOS Tips#apple#development#programming#mobile#apps#tricks#new#hide#Swift
2 notes
·
View notes
Text
Using Objective-C libraries in Swift with CocoaPods
Hi there!
I have been developing iOS apps for some time now and I would like to say that CocoaPods has been a good friend to handle library dependencies in Xcode projects. However, since Swift came out some developers have had some doubts about how to make use of Objective-C libraries in Swift, since the majority on the market are still in Objective-C.
This tutorial will assume that you are already familiar with CocoaPods. If this is not the case please click here to find more information.
So lets start!
First, lets open Xcode and create an empty application called Example, making sure that language is Swift. Once created, the Project Navigator inside Xcode should look like this:

Second, lets create an empty file that it is going to be called Podfile.


Third, inside the recently created Podfile lets go and list the project libraries dependencies. As an example we are going to be using the MBProgressHUD library, which is simple and very handy when we need to let users know that some work is being done in the background.
platform :ios, '8.0'
pod 'MBProgressHUD' , '~> 0.8'
Fourth, lets open terminal and run the following command in the Podfile path:
$ pod install
Once everything is installed, there should be a new file in your Xcode project path with the same name of the project but with the extension .xcworkspace. So lets go and open this file running the following command.
$ open Example.xcworkspace
Now the Project Navigator should look like this:

This is great! We have the Xcode project with a Swift class and an Objective-C library. However, there are still some missing steps. In order to use the MBProgressHUD library we would need to create a header file that will be used as a bridge between Objective-C and Swift. So lets create the header file following this format <#PROJECT_NAME>-Bridging-Header.h.


Perfect. We are almost done! Now we need to tell Xcode that Example-Bridging-Header.h is going to be the bridge file. In order to do so, lets go to the Build Settings section of our Target and lets click the options all located at the top left corner of the Build Settings view.

Then lets look for the section Swift Compiler – Code Generation and add the recently created bridging header in the option that says Objective-C Bridging Header, using the following format <#PROJECT_NAME>/<#PROJECT_NAME>-Bridging-Header.h, always making sure that the option Install Objective-C Compatibility Header above it is set to Yes.

Excellent, we have set everything that is needed to start using the Objective-C library in a Swift class.
The last step will be to include the MBProgressHUD header in our Example-Bridging-Header.h.
#import "MBProgressHUD.h"
Congratulations! Now we can use MBProgressHUD in any class that needs it!
var hud: MBProgressHUD = MBProgressHUD( )
Hope you find this as useful as I did.
Have a good one!
2 notes
·
View notes
Text
How to split UIView into equal parts using autolayout
Split a UIView into equal parts is made setting the constraints correctly to ensure that the views are divided in equal parts.
To split UIView into two subviews, using autolayout, you can follow the steps below:
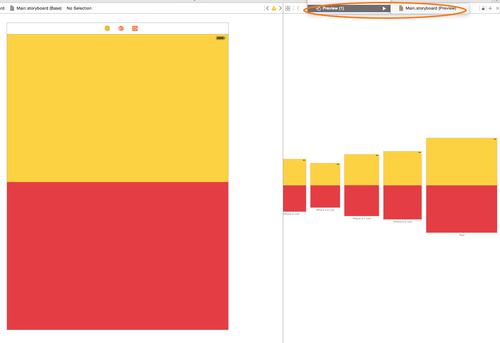
0) Set your storyboard to use autolayout (size classes is optional)
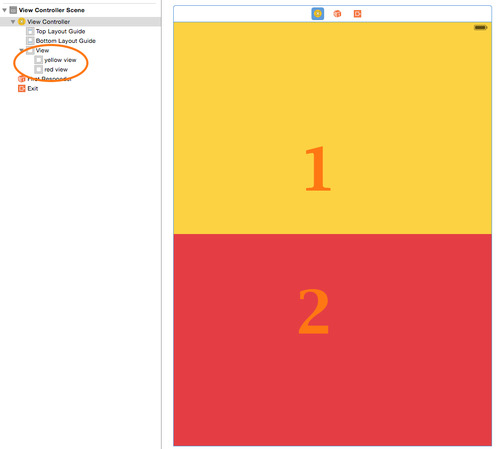
1) create two subviews like in the picture. The views size is 600x400, the top view is at position (0,0), the bottom view is at the position (0,400)
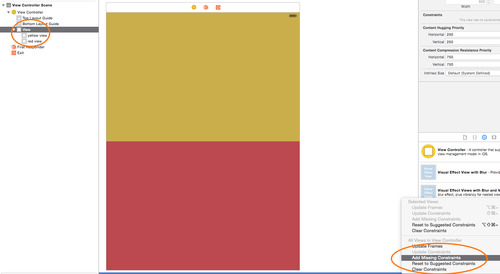
2) select the main view container, open the “Resolve Auto Layout Issues” menu and select “Add Missing Constraints”. If “Add Missing Constraints” is not available, remove the viewcontroller and restart XCode.
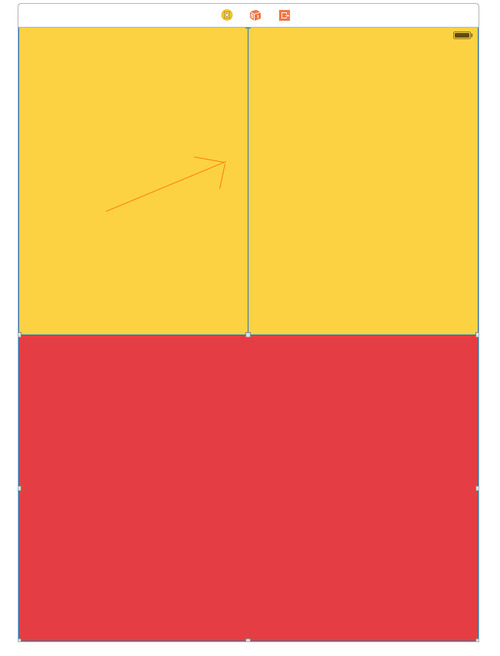
3) select the bottom view and remove the vertical space constraint (a costraints error will be appear)
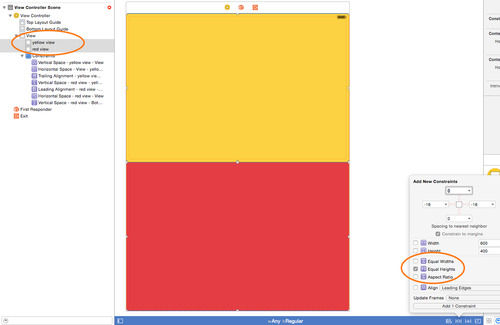
4) select top and bottom view simultaneously using the cmd button, open the “Pin” menu and create the “Equal Heights” constraints (the constraints error will disappear).
5) open the “Assistant Editor” and choice “Preview” for the storyboard. Add preview devices with the “+” button in the assistant editor and look at the views size for all devices.
Enjoy!
1 note
·
View note
Text
NSHTTPCookie.cookieWithProperties Return nil
If you are trying to create a NSHTTPCookie using the cookieWithProperties function and getting back nil instead of a NSHTTPCookie instance, the dictionary that you are passing to the function must be wrong or incomplete.
// Wrong properties dictionary var properties = [NSHTTPCookieName: "YOUR-COOKIE-NAME", NSHTTPCookieValue: "Cookie Value"] // nil cookie var cookie = NSHTTPCookie.cookieWithProperties(wrongProperties)
After executing this code, the cookie will be nil. This occurs because the properties dictionary does not contain the right keys and values. The documentation of the function cookieWithProperties says: "To successfully create a cookie, you must provide values for (at least) the NSHTTPCookiePath, NSHTTPCookieName, and NSHTTPCookieValue keys, and either the NSHTTPCookieOriginURL key or the NSHTTPCookieDomain key.".
Following exactly what I just quoted, our code will look like this:
var properties = [ NSHTTPCookieOriginURL: "http://example.com", NSHTTPCookiePath: "/", NSHTTPCookieName: "foo", NSHTTPCookieValue: "bar" ] var cookie = NSHTTPCookie.cookieWithProperties(properties)
The execution of the code above will end up with the cookie being an instance of NSHTTPCookie.
Cheers.
1 note
·
View note
Link
The above link has the answer! Well, it has a workaround, anyway.
This problem seems to be caused, although I couldn’t say if it was directly or indirectly, by the Storyboard "Use Size Classes” option being checked (visible in the File Inspector right side bar of the Storyboard file. No idea exactly why, but I bet it has something to do with the way that the Size Classes set up uses unique seeming views when looking between classes. Just a hunch with no substantiation, but it kind of makes sense in a terrible, why-oh-why kind of way.
The Size Classes are the ‘fun’ new thing whereby you capture several form factors at once using the Storyboard. They are apparently still full of growing pains or else require alternate approaches, as given in this example. (Actually, they seem pretty neat. Well, potentially neat.)
Threw me for a loop – I was working through something to POC some stuff for a project I’m working on and thought I had somehow completely forgotten how UITableViews work. Very frustrating feeling!
Turns out, it’s not the old stuff but the new stuff that I need to keep more on top of. Hazard of only doing iOS coding part time for fun, I guess.
0 notes

Photo

Finished chapter 8 of https://www.packtpub.com/game-development/learning-ios-8-game-development … … for making 3D game using #Scenekit #screenshotsaturday
0 notes
Text
How to resolve pod error in Yosemite OS X 10.10
With the new OS X 10.10, aka Yosemite, rubygems works differently. So, if you try the command "pod init" you will obtain a error like this below:
/System/Library/Frameworks/Ruby.framework/Versions/2.0/usr/lib/ruby/2.0.0/rubygems/core_ext/kernel_require.rb:126:in `require': cannot load such file -- xcodeproj/prebuilt/universal.x86_64-darwin14-2.0.0/xcodeproj_ext...
Just resolve the error following those steps:
Open Xcode 6
Open Preferences
Click the Locations tab
Change the Command Line Tools version to last Xcode 6.x
Uninstall all Cocoapods (you can not remove executables)
$ sudo gem uninstall cocoapods
Install xcodeproj
$ sudo gem install xcodeproj
Install Cocoapods
$ sudo gem install cocoapods
Run pod --version to verify that it worked
That's all!
1 note
·
View note
Text
Xcode6でのクラッシュログの読み方
TestFlightの外部テスター用に申請したらクラッシュすると怒られ
0 notes
Video
tumblr
So, you have an app that is heavy with texts. What do you do to "solve" it? You've selected beautiful fonts, text color and etc, but something still doesn't seem right. It still feels heavy. There isn't a breathing space.
Firstly, what does it mean to have an app that is heavy with text? The best example would be like news apps. Surely, there are images and appropriate style of text to ease with the readability. But it's still too cluttered. What's the one way to help with the user experience reading through the app? Provide space between texts. Best example? Facebook app. It has lots of text, but there is something light about the app. If you actually see it, there is spaces between each posts. And that's what we're gonna take a look at.
Is it difficult to create this effect?
NO! (pheeww...you can read on)
How do I create this cardlike-tableview effect????
1. Having the regular tableview all set up.
2. Create a custom uitableviewcell. And subclass the tableviewcell to the custom uitableviewcell you just created.
3. Drag in a UIView on to the custom uitableviewcell. (This is the part "secret" ingredient)
4. Place what ui elements (uilabels presumably) that you wish on to the uiview.
5. Hook them up as a property to the uitableviewcell.
6. Populate whatever you want in tableview's delegate method cellForRowAtIndexPath
7. Set the tableview's separator style to UITableViewCellSeparatorStyleNone
8. Set the the custom uitableviewcell's color to something other than white (maybe a light gray)
9. RUN THE APP!!
10. Watch the Cardlike-table effect take place! =]
Sample code is as below
-(NSInteger)tableView:(UITableView *)tableView numberOfRowsInSection:(NSInteger)section
{
return 5;
}
-(UITableViewCell*)tableView:(UITableView *)tableView cellForRowAtIndexPath:(NSIndexPath *)indexPath
{
CardTableViewCell *cell = [tableView dequeueReusableCellWithIdentifier:@"CellID"];
cell.name.text = @"Clark Kent";
cell.age.text = @"20";
cell.gender.text = @"Male";
cell.occupation.text = @"Superhero";
cell.selectionStyle = UITableViewCellSeparatorStyleNone;
return cell;
}
If you would like to checkout the full code, head over to the Github project.
#Xcode6#xcode#ios#iOS 8.1#iOS Tips#tips#new#card#clean#facebook#twitter#uitableview#custom#ux#light#heavy#apple#mobile#programming#development#developer#ios7#uitableviewcell#github
0 notes
Text
Xcode 6 - Empty Application
With the release of Xcode 6, a curious omission has forced some iOS developers into a mad Google scramble. This option is not used by all, or even many, but it is a rather helpful educational choice and the perfect state for those who seek total control of the project. There is no more Empty Application option when starting a new project in Xcode 6.
Getting the old familiar Empty Application is, however, not to difficult. The following steps will prepare a blank slate for a new project in Xcode 6.
Create a New Project, and choose the Single View Application option.
In the Project Manager, delete Main.Storyboard and LaunchScreen.xib.
In the Supporting Files folder, select Info.plist. Remove "Main storyboard file base name" and "Launch screen interface file base name”.
Open AppDelegate.m, and edit application:DidFinishLaunchingWithOptions: so that it matches the following:
- (BOOL)application:(UIApplication *)application didFinishLaunchingWithOptions:(NSDictionary *)launchOptions {
self.window = [[UIWindow alloc] initWithFrame:[[UIScreen mainScreen] bounds]];
// Override point for customization after application launch.
self.window.backgroundColor = [UIColor whiteColor]; [self.window makeKeyAndVisible];
return YES;
}
0 notes
Text
Fix: Python in Xcode 6 #it #development #dev
Fix: Python in Xcode 6 #it #development #dev
Python in Xcode 6
How does one create a Python friendly environment in Xcode 6?
Answer [by Edvinauskas]: Python in Xcode 6
You should try PyDev plug in for Eclipse. I tried alot of editors/IDE’s to use with python, but the only one i liked the most is the PyDev plugin for Eclipse. It has code completion, debugger and many other nice features. Plus both are free.
Answer [by Jerzyk]: Python in…
View On WordPress
0 notes
Text
How to: How do I create a category in Xcode 6?
How to: How do I create a category in Xcode 6?
How do I create a category in Xcode 6?
I want to create a category on UIColor in my app using Xcode 6. But the thing is that in Xcode 6 there is no Objective-C category file template.
Is there any option to create a category in Xcode 6?
Answer: How do I create a category in Xcode 6?
While all of the answers above are good, I’ve taken it a step further and filed a radar.
https://bugreport.apple.…
View On WordPress
0 notes
Text
Swift Has Reached 1.0
On June 2, 2014 at WWDC, the Swift team finally showed you what we had been working on for years. That was a big day with lots of excitement, for us and for developers around the world. Today, we’ve reached the second giant milestone:
Swift version 1.0 is now GM.
You can now submit your apps that use Swift to the App Store. Whether your app uses Swift for a small feature or a complete application, now is the time to share your app with the world. It’s your turn to excite everyone with your new creations.
Swift for OS X
Today is the GM date for Swift on iOS. We have one more GM date to go for Mac. Swift for OS X currently requires the SDK for OS X Yosemite, and when Yosemite ships later this fall, Swift will also be GM on the Mac. In the meantime, you can keep developing your Mac apps with Swift by downloading the beta of Xcode 6.1.
The Road Ahead
You’ll notice we’re using the word “GM”, not “final”. That’s because Swift will continue to advance with new features, improved performance, and refined syntax. In fact, you can expect a few improvements to come in Xcode 6.1 in time for the Yosemite launch. Because your apps today embed a version of the Swift GM runtime, they will continue to run well into the future.
0 notes
Text
Using "special" characters in your app name - or how I named my app CLP+
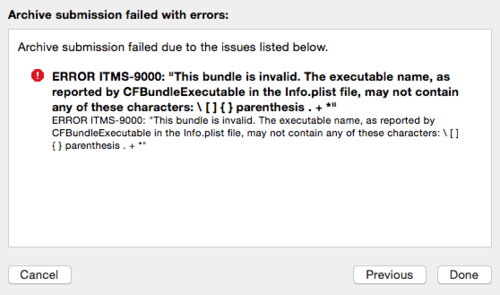
This one goes under "simple when you know how"! One of the most painful parts of the process of releasing my new app CLP+, was building it for submission to the App Store. This is something that I've done literally hundreds of times before, but it seems I've never previously tried to have a plus sign in my app's name. This issue only reared its ugly head when I was actually trying to submit to Apple. The app builds perfectly up through development, it archives without any problems, but when you actually try to upload it you see this:
Ok, so I remove the "+" from "Product Name" in Build Settings because that is where CFBundleExecutable gets its value from.
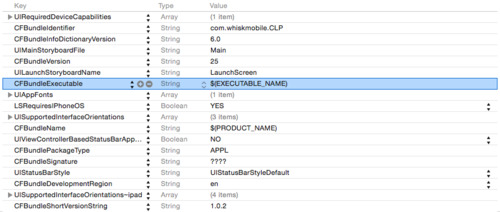
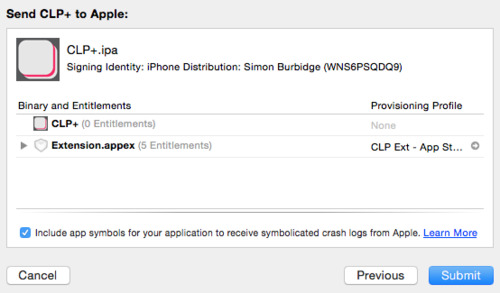
However, removing the "+" from "Product Name" results in the app being displayed as "CLP" on the device. How about explicitly setting CFBundleExecutable to "CLP" in the info.plist file, and keeping the Product Name as "CLP+"? Well, things get really messed up if you do that - when you hit the submit button you'll see "0 Entitlements" on the signing screen, and you won't be able to submit it.
The answer is far easier than all that: 1. Leave CFBundleExecutable alone, so it gets its value from Product Name. 2. Remove the "+" from Product Name in Build Settings, 3. Add a new row to Info.plist for "Bundle display name", and give it the name that you want e.g. "CLP+". Your app now appears correctly on the device, and it can also be submitted to Apple without any problems (at least without any problems caused by the plus sign in the name). PS: The really stupid thing is that I've used "Bundle display name" previously, but went down the rabbit hole of trying to fix the issue in CFBundleExecutable (and then in the provisioning profiles etc) that I didn't see the obvious answer!
0 notes