
Don't wanna be here? Send us removal request.
Statistics
We looked inside some of the posts by willil and here's what we found interesting.
Average Info
Notes Per Post
2
Likes Per Post
2
Reblog Per Post
0
Reply Per Post
0
Time Between Posts
2 months
Number of Posts By Type
Text
4
Last Seen Tumblr Blogs


Fun Fact
Tumblr was acquired by Yahoo for $1.1B in 2013.
Text
MUSC 3603 Assignment 2(Medium)
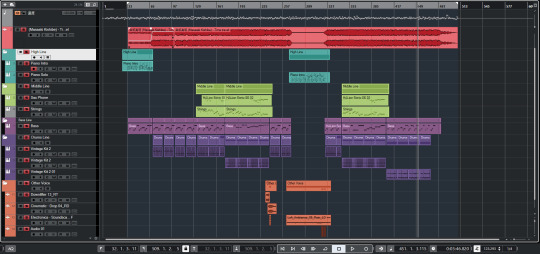
In the beginning, The goal this time is to mix a finished recording with my own unique ideas. Before I start mixing, I mix all the tracks together and listen a few times, presumably determining the structure of the song as Verse1-Prechorus-Chorus-Verse2-Prechorus-Chorus-Bridge-Prechorus 2-Chorus. After determining the structure of the song, I've probably assigned a look at how each instrument should evolve and how the entire piece of music evolves. Throughout the project I used mixing knowledge, sound physics knowledge, and artistic vision to assist me with mixing. When I've worked out how to keep my work flowing, the mixing process is divided into three steps.
Part I :
I listen individually for each track, understand the changes in each track, and fix some of the impurities that appear in the recording. Add different colors to different sounds and add appropriate instrument pictures to each track, making it easier for me to find tracks. I use yellow and brown instead of the vocal part. For example, high-frequency tones like Marimba I use green instead. I use blue instead of blue on the piano. Drum set and bass I used orange instead. Some effects sound I used purple instead.
I trimmed the vocals, removed all breathing murmurs from the singer, and used the gradient tool to make the connection between each part more natural. At the same time, I took the vocal track apart and added the first vocal part to a new track, planning to make the song a little more unique at first. I spend most of my time here, because I'm not familiar with each track and I need to listen to each instrument and make changes.

Part II:
The second part I will add an effector to each soundtrack of the vocals and make adjustments for each track automation.
(Note that the automated adjustment here is for the initial volume adjustment)
Firstly, I set up 4 Bus to add effects to each track later.
Bus 1 uses Space Design for Instrument (Short)
Bus 10 uses Space Design for Vocal
Bus 11: stereo delay, St-Delay
Bus 12: Limiter

(To give you a clear picture of what I've done in automation, I'll put the picture to the maximum.)
Next, start adding effects to each track and adjusting the EQ balance.

Marimba:
Effector: Compressor, Limiter, Enveloper Channel EQ and Space Design.
EQ: Use low-cut to cut out parts below 145 frequencies and slightly reduce 3Db in the 350Hz section. As I listened to this tone, I found that there was a particularly harsh marimba playing in Verse 1, and a few sounds that sounded very uncomfortable at 200Hz and 245Hz, making my ears very uncomfortable like singing, so I lowered the part of 200Hz and 245Hz by 10Db using Q-2.9, and after adjusting it didn't sound so harsh.
Mellotron Flute:
Effector: Channel EQ, Compressor and Limiter, sent to Bus 1. EQ: Flute frequency between 250Hz-1KHz affects the plumpness of the tone, 5-6KHz hero tone brightness. By listening I found this tone of high frequency very much I speak of 90Hz below the partial cut.
Piano section: Piano 1(Clean Piano) and Piano 2(Vintage Piano)
Effector:
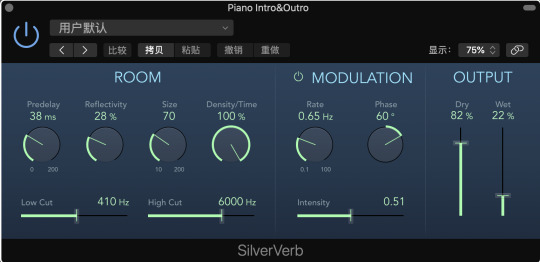
Piano 1&2: Compressor, Channel EQ and Echo, sent to Bus1, Bus11 and Bus12.
EQ:
Piano 1: Filter out less than 140Hz and lift 2Db at Q-1 at 140Hz. Since Piano 1 is used in most parts of the music and plays some solos, I increased it by 6Db at 150Hz to make it sound warmer. 3.5KHz reduces 3Db at around 3Db, 8Khz increases 3Db by Q=3, and increases 5Db near 8K5Hz.
Piano 2: Since Piano 2 is mainly assisted playing and the tone is very thin, I lowered 3Db at 1KHz on the basis of Piano 1 at Q-0.2, making it less obvious. Added some of its low frequencies.
Vibraphone:
Effector: Channel EQ, Compressor and Echo.
EQ: Filtered out parts below 126Hz, increased 5.5Db at 250Hz, and finally reduced 4.5Db by 4.5Db to 1200Hz with Q-0.30.
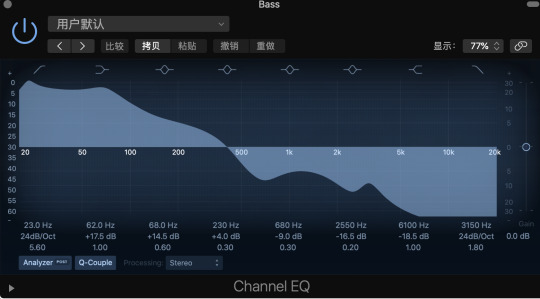
Bass:
Effector:
Noise Gate: Effectively blocks some of the noise generated by the instrument.
Bass Amp Designer: Help bass sounds become thicker and thicker, I had to use this plugin. But I don't like this effector, he has a switch Bright, if you turn on the sound will become very thin. But if you don't turn on the sound will become thick, but this thickness makes the instrument more distorted, losing the original sound of the instrument.
EQ: I filtered out sounds below 60Hz, which is not bass and therefore useless, and continuing to retain may conflict with other instruments. I've raised 3Db around 90Hz, and I've also raised 3Db at 800Hz with Q=1, which increases the intensity of the tone. At 2.5KHz, 2Db is increased by Q=0.2, which makes a slightly distorted tone a little more realistic.
Strings:
To be honest, this strings group is only visible at the end of the song and the bridge before the last chorus, so I think it's a heavier instrument, and I'm still adjusting it with the EQ adjustment method of normal strings. Filter out parts below 90Hz, increase approximately 3Db in the 2KHz range with Q=3, and increase 4Db near 7KHz and 3Db at 10KHz. Strings I use plug-ins like Compressor, Space Design and Delay.
Synthesizer:
For this group: I mix these synthesizer (or ambient sounds) together. I found that they felt very noisy when they played together, so first of all I had to make some changes to the frequency of each tone.
Reverse Piano: Reduce the portion below 245 by 24db by Q=1.1 and by 5.5db at 400Hz. Reduce 7db at 3500Hz by Q=0.7. I added Space Design, Channel EQ, Limiter and Compressor to it.
Synth1: I cut out the section below 890Hz and add 5.5db to 1020Hz, 3500Hz, and 5300Hz with Q-6.0. Synth1 adds some effectors, including Compressor, AutoFilter, Channel EQ and Gain.
Synth2: By enhancing this tone with EQ, I cut out the part below 100Hz, enhanced the part 4db at Q-0.4, and made some minor adjustments at 3600Hz. Synth2 uses SpaceDesign, EQ, Compressor Limiter and Enveloper.
Synth Bass: I cut out more than 500Hz. Since it conflicts with Guitar Bass around 200Hz, I made some minor adjustments to the 200Hz section to reduce its frequency. I added Compressor, DelayD, SilverVerb and Channel EQ to it.
Drum set:
Effector:
Kick: Compressor Digital, SubBass, Channel EQ and AutoFilter, and sent to Bus1 to enhance its sense of space.
Crash: Compressor Digital, Enveloper and Channel EQ and sent to Bus1.
Tom: Compressor (Vintage FET) and Channel EQ, sent to Bus1.
Ride: Compressor (Platinum Digital) and Channel EQ, sent to Bus1.
EQ:
Kick: I cut the place at 60hz and raised it by about 3Db, and by 4.5Db at Q1 near 85Hz, which makes Kick sound like it's hitting the chest. Then, increase the 5KHz by Q=2.8 to enhance the impact of kick.
Ride: Because there are fewer Snare parts of the song, I try to make it clear so that the audience can hear a noticeable rhythmic change. I filtered out parts below 150Hz and increased 3Db around 175Hz to increase fullness. Increases 3Db at 225Hz with Q=1.4 and 4Db near 3KHz to increase impact. Increase at 5KHz for crispness and 3Db near 7KHz for increased sharpness.
Crash: Filter out the sub-1KHz section and raise the 3Db for the 7.5KHz and 10KHz sections.
Tom: Lift 5Db at 5KHz to increase tom's impact. And increase 4Db around 120HZ to increase fullness.
Part III: Mix the already made parts with the vocal tracks and make some subtle adjustments to the balance of the entire music.
Step1: Trim the breath-in part off with the scissors tool first.
Step2: Add some effects to the vocal track
DeEsser 2: Eliminates murmurs in the mouth, which I say is set to 7KHz, which effectively reduces the lip-tooth sound from the singer's mouth.
Pitch correction: To modify the pitch, test and find that nothing has changed much.
EQ: The low cut (100Hz) of the vocals gradually decays from 100-500Hz, which makes the sound brighter.
Compressor: To get a more natural volume for vocals. Here I'll talk about Thereshold set to -15Db, Ratio (4:1), Attack (5ms), Release (50ms), and Makeup (3Db).
Bitcrusher: I use it to help add color to the vocals, setting clip mode, Drive (16.5), Resolution (24Bit), Down Sampling (1x), Mix (60.80%) here.
Multiprssor: This is the way I learned to adjust from the web, which makes the sound crisper, and this effect device I also use in harmony track. The spatial feel of the entire acoustic audio I do by sending tracks to Bus10, Bus11 and Bus12 (Limiter is mainly for making people sound more focused), the advantage of using bus is that you can simply go to bus.

Step3: I put the first lyric on a separate track, making it feel like a phone call, which makes the prelude to the song more storyful. Here it uses DeEsser, Amp, Limiter, Compressor and Channel EQ (LowCut355Hz and Highcut 7700Hz, enhanced 640-1160Hz).
Step4: I used automation to dynamically adjust the frequency of the Vocal Bridge and the Chorus section, including adjusting its High Cut frequency, Slope, and its ambient and reverb. In the PreChorus stage, where there is only vocals and pianos, the vocals become thicker and more atmospheric. In the last Chorus, the singer's extended tone also creates a sense of spatial transformation with dynamic EQ.
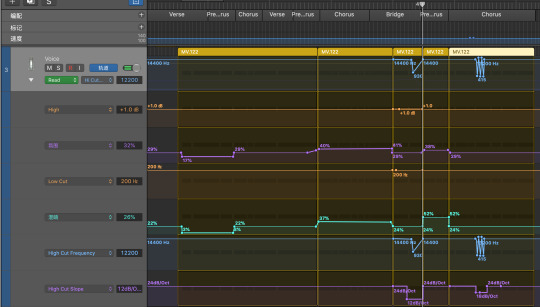
(Here's a comparison of automation and vocals of some of the plug-ins in the instrument)

In the last prechorus only vocal and piano sound played at the same time, when the piano's low frequency obviously appeared powerless, in order to solve this problem, I used dynamic EQ to adjust the piano here Low Shelf Frequency, Low Cut Frequency and Low Gain Shelf Shelf should be able to see his direction.
At the end
When I finished the whole mix, I was happy and satisfied. This is the first time I've remixed a complete work, and after eight weeks of learning, I think the mixing process is very important to me, and in addition to learning some basic effects and mixing techniques, I've found that different EQ adjustment methods can give a drum set a completely different effect, and a completely different mixing technique can even change the style of a song. And the production of vocals is so much in need of excellence, which made me have a great interest. At the same time, I also have a lot of regrets, some of the waves I want to use because the price is too expensive, so I have no way to buy and use in this job, and some logic pro comes with plug-in effect is not particularly ideal. In short, thank you very much for providing this work so that we can experience, can complete this work I am very happy, I hope you can feel in my mix I want to express.
0 notes
Text
3603 Assignment 1 Remix
I chose a pure guitar music to rearrange and mix. First of all, I allocate the music and reassign the intro and bridge, so that the structure of the whole music becomes "Intro-A1-A2-bridge-A2-outro". The orchestration is based on the original, adding synthesizers, piano, strings, bass and drums, each timbre has been changed using the effects, so it may not look like its original timbre, but everything sounds very harmonious.
In the overall production, my initial mood was to produce this music with a sense of picture. The specific picture is that on New Year’s Day, I was walking on the streets of Italy while wearing headphones and listening to'Time travel' (that is, I chose remix music). I was very happy that day (I believe you can feel this work brings Happy atmosphere), I met different performances and all kinds of shops on the street, there are candy shops, popcorn shops, ice cream bus, coffee shops, etc., they let me smell different tastes, and after every When I was in a shop, my inner feelings were different. Suddenly I passed a fountain at the intersection. There was a piano beside the fountain. A grandpa played very nice piano music on it. I took off my headphones and listened to the music he played. (Here, the music he played is also The music I played in the bridge, the name of the music is called'Fountain'), until the end of his performance, I continued to put on the headphones and left the intersection with the fountain. The structure of the entire arrangement is arranged according to the story in my heart. I hope you can feel the pleasant atmosphere of that day after listening to my music.
Mix: Due to the importance of the lead guitar, it was not changed too much. 'DeEsser' tool was used to remove part of its recorded noise and increase its reverb to ensure its spatial sense. EQ tool was used to use low cut for its part below 100Hz and increase its frequency between 300-5khz. Because the tonic source refers to play the guitar, speed is not stable, I use the speed detector, and to the entire audio track speed is analyzed, and the application of the speed change of the tonic to the whole project, made some slight adjustment, will be adjusted individual extremely irregular speed change, make whole music become more stable, It is also convenient for me to arrange and mix the following music. I used some digital tools and Filters to change the timbre of the whole tonic to look more like 'electric current' and StepFilter to make it sound more wobbly. By the end, I think of it more as a variable 'electric guitar' than a classical guitar.
Bass and piano play together at the beginning of the music. In the process of arranging music, I effectively controlled the frequency of the piano to be between 300 and 3K, while the bass was below 300 Hz, which greatly simplified the mixing process for me. Therefore, in the intro part, I did not need to worry about the frequency conflict between the two instruments, they were very harmonious. I added reverb and Delay to the piano to make it more realistic and to increase the appeal here. There is also the part where the Piano appears in the Bridge part, where I create a new track (Piano Solo) for it. Since it appears at the same time with the ambient sound, I set it the same as the intro. However, the effect is not as good as expected due to the part I play and the music I haven't practiced for many years.
In terms of rhythm, three kinds of rhythms are used in this piece of music. In Drum Rhythm1, I use an EQ to bring the 1.2KHZ area down because it sounds like a clear conflict with strings and synthesizers. At the same time, in the part where I increased 300Hz, the middle and low frequency of the rhythm became fuller due to the joint effect.
Drum Rhythm 2 is matched with the second main melody and has an upward climb, so the Drum does not need to be so rhythmic, but the bottom Drum must be obvious, thus highlighting the upward movement of the melody. Revelation was added here, using the internal functions of the plugin to improve the sense of space and effectively increase the low frequency part.
Drum Rhythm 3 is only used at the end of the music. In addition to influencing the effects added before, the frequency in the range of 4K-6khz is also increased. Since there are no other instruments here, the drums are set more complex and HITHAT is added.
This was the first time I tried Cubase to make music and mix it. I like cubase's MixConsole interface very much. It makes the whole music very clear. In MixConsole, there are five sections: ROUTING, INSERTS, EQ, STRIP, and SENDS. INSERTS shows the effector I used, along with some Digital Tools. EQ you can see my EQ change at each track and it is very easy to adjust. STRIP can check my Noice Gate, Compressor, DeEsser, etc. SENDS let me write plug-ins and make other changes to different tracks at the same time. But since this track doesn't have a lot of 'stuff', there's no need for the 'send' function. I applied NoiceGate on most of the tracks. As there are few Musical Instruments, DeEsser can help me control each frequency with high efficiency and remove unnecessary noises, so that I and the audience can clearly hear the part controlled by each musical instrument.
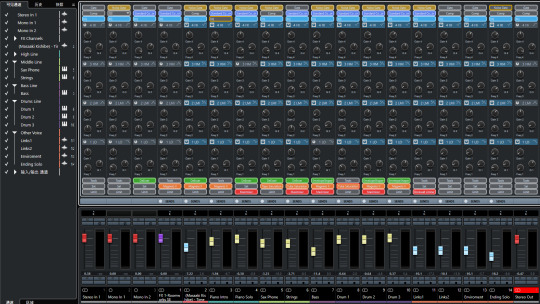
From the MixConsole diagram, you can clearly see what digital tools I used for each instrument track. The only thing that bothers me is that Cubase tools doesn't seem to work as well as Logic, at least in my opinion. For example, its reverberation requires manual adjustment of many parameters, unlike logic, which allows us to set up various scenarios and requires only subtle adjustments. And this is very time consuming for people who are not familiar with it.


At the end of the song, I adjusted the balance of the whole song through Stereo Mastering, and finally exported it as a finished product.

0 notes
Text
Final Assignment 480070717
This is a work that focuses on electronic sounds. Through the entire semester of study, I also learned how to make similar electronic music, and learned how to mix and master. I remember in the first blog I wrote that at that time I still felt very tired of the music software (logic pro), unfamiliar with the sound, unfamiliar with the plug-ins, and did not know how to mix, but after the final project I ended. I feel that music production is really a very interesting thing.
The inspiration for this work came from a party. Before I started writing this song, I used to have a drink and chat with my friends in a bar. Everyone was thinking about what kind of profession we will be in in the future, which city we will go to, who we will be with, and such questions. Let me be full of expectations for the future. Although we have not graduated yet and may need keep finishing master degree, the time flies quickly, and soon we will all need to go to different cities. There are not many opportunities for everyone to get together in the future, so everyone cherishes the present time. Therefore, I hope to interpret the kind of ‘movement’ that I can hear and cherish each other. The beginning and the end of the song are mainly quiet, in order to echo the thinking of everyone who just started chatting and ending the chat, it is very quiet, and the climax in the song represents everyone's enthusiasm.
The whole song is completed with electronic sounds. The logos of the piano and other traditional instruments you can see in the picture are because the arrangement of a small part of the sounds was originally completed by the piano, and finally modified to other sounds, but for the purpose of arrangement It is convenient for me to use the'piano' instead. The drum set includes a total of 3 rhythms. Due to the use of effects and electronic music, the rhythm pattern of the entire music is more than 3 rhythms. However, the drum is the backbone of the entire music, so there is no too complicated rhythm pattern. Music can be roughly divided into intro, A1, A2, B1, Bridge, A3, B2 and Outro.


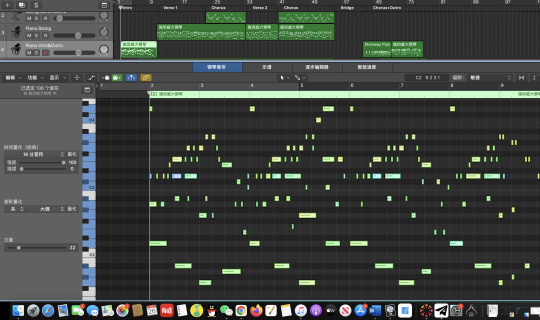
Intro: Intro is made of an electronic musical instrument. The main body is a main melody plus harmony. It is played by piano skills. Due to a bug in my logic at the time, the sound could not be loaded, so I created a new logic File, after recording the music, import the audio file into the track, so you can find that there is an audio file in the lower left corner of the picture.
The A1 section is connected by intro with some FX impact, Noise and Reverse, which will make people sound more layered, as if they have entered the topic, followed by the chord progression of the electronic synthesizer sound, or we can say It is a kind of ostinato, it has the same rhythm pattern, number of notes and interval, but the chord of each bar is not the same. Section A1 follows the chord progression of IV-V-vi-vi. The rhythm that appears at this time is the first rhythm of the whole music, and it only appears in the A1 section and bridge. The main melody first appeared in the 33rd bar, using an electronically synthesized sound similar to the flute, and its sound was really nice. As the main melody began to play, Synthesizer changed the rhythm pattern and began to accompany the main melody.
A2: The main melody of the A2 section is played by another synthesizer tone. It is biased towards the timbre of an electric guitar, and it sounds a bit distorted, but as the middle of the A1 and B1 sections, it mainly plays a transitional role. At the beginning of the A2 section, the drum rhythm changed from the original 8th note to 16th note, the rhythm became faster, and Hihat and Snar were added. At the same time, in order to make the low frequency more sufficient, Bass is added to the A2 section. You can see the darkest color on the picture, which is the bass line. The A2 section is a transition section, its melody is developing, and it is relatively smooth in the first half. In the second half of the A2 section, I adjusted the tone of the main melody to make its frequency wider, which also made the audience feel that the work is developing and the melody fluctuates greatly, not as flat as the first half. It began to drive towards a higher pitch.
B1: The B1 section is the climax part of the first half of the whole song. The synthesizer responsible for the accompaniment is played with a scale from low to high. In order to make the melody sound fuller, the range of the main melody has been significantly improved compared with the previous part. , The rhythm pattern of the drum has also changed, and the drum also added Snar and claps in the orchestration. Because the B1 segment is the climax part, the melody is easier to remember and the memory points are stronger. His harmony changed from IV-V-vi-vi to VI-V-vi-V
Bridge: Bridge played the role of linking the entire music. The overall chord progression of bridge is different from the previous ones, becoming IV-V-vi-V. It started with the bass, and slowly brought in the melody of the bridge through the rhythm, and then the synthesizer played a melody. Its sound was ethereal, matched with the sound of the effector and the connection of the drums, and the melody was overdone in the 113th bar. In the second time, the melody of the second time is played by another tone, which will not make the listeners feel tired, and they are more willing to accept this change. The second time the melody is played by adding the drum rhythm, Synthesizer and Background sound.
A3: The overall A3 is similar to the A2 section, but the background sound is added to pave the way. As it is close to the end of the entire music, I emphasized the heavy bass area in the mix to make it more obvious, and the background sound was also added. Make this piece of music richer than A2. If you listen carefully, you will find that the playing method of the background tone is somewhat similar to the string music in classical music. It makes the harmony of this piece of music richer and sounds higher. In the second half of the A3 section, the tone of the main melody also changed, and the frequency became wider. At the end of section A3, I changed the tempo. It quickly slowed down and then speeded up suddenly. Due to the electronic tone, the whole bar was stretched very long. This is a very obvious change in rhythm, which is the best for the music. Pave the climax part.
B2: The B2 section is the climax part of the whole piece of music. Its frequency is undoubtedly the highest. All the instruments are displayed in this section. In terms of background, the synthetic sound like an electric guitar becomes the background sound here, it will occasionally make a sound and is responsible for the stability of the melody. The main melody is replaced by a flute-like tone and synthesizer, and the sound becomes fuller, where every tone plays its function. When mixing, I used low cut and high cut to distribute their frequencies because I was afraid of the frequency conflicts of the various timbres, which avoided the appearance of noise. At the same time, in terms of melody, the use of simultaneous arrangement allows me to clearly see which notes are being played in each bar, so as to avoid the occurrence of interlacing and the appearance of dissonance.


Outro: After the climax of the song, it suddenly quieted down. The whole piece of music entered the outro section, which was connected by the effector, and it didn't appear so abrupt. At this time, the simple drum beats were still playing, and we heard that the melody that resembled the A1 section was looming. As the music was about to end, the instrument gradually disappeared. In terms of music automation, I gradually reduce the volume here to achieve the feeling of slow ending.
In terms of mastering, I exported the finished music and added it to a new mastering project file to monitor the overall music effect. I found that the low frequency was weak, and the mid and high frequencies were high, so I made the final modification.

For this work, although it is part of the homework, for me, this is one of the few songs I have completed. I am very happy that I can complete this work. In the course of this semester, I learned about arranging, mixing, mastering, etc. It is a great help to making music. Even though the current work may not be perfect, I hope that the audience can understand what I want to express from my music.
0 notes
Text
Assignment 1
This is a piece of pop rock, because I am familiar with this style, so using this style to create can better help me interpret what I want to express in this work. Every instrument in the whole piece of music was done by me alone, and I didn't use the recorded sections, so that I could better control it. To be honest, I felt fatigued during the production process, and I am not particularly good at music software. From arranging to mixing, I am actually a novice at the beginning, but I try my best to do my best.
Under the influence of covid-19 in the past two years, the virus has also shown us the fragility of life. During the epidemic, in order not to be infected, we had to stay at home and study online. There are many people in the world whose lives have been affected by the epidemic. They cannot go out, without food, entertainment, and friends. We are all here. Try another way to adapt ourselves. Although we are not as freely as before, we still live very hard. This may be the human instinct for survival. This is my inspiration for writing this song.
The structure of the music is Intro-Verse-Chorus-Verse-Chorus-Bridge-Chorus, you can also think of it as a piece of A-B-A-B-C-B. The A section is mainly used to interpret the progress of the melody, and the B section is the part that pushes the entire music.


Intro: At the very beginning, I played the A-segment melody twice using piano and bass. In the second time, an electric guitar was added instead of the piano to play the main melody. Because of the higher frequency of the electric guitar, it played more alternately with the piano. Can highlight the level of music. But here I am very puzzled how to make the connection between the intro and the a-segment more natural. I thought of using staccato methods to change the rhythm, and use bass to play the descending scale to transition to the A-segment. From the results, this method is effective, but here I need to strictly control the changes in the volume of each instrument. Fortunately, these instruments are played through the midi keyboard. Just pay attention when playing. No Too many adjustments need to be made. However, due to the input delay of midi, after recording, in order to make each note more accurate, I still used the automatic adsorption function "select all and press Q".
In this way, you can simply adjust the notes with inaccurate rhythms, and then adjust each note. In the intro paragraph, since the piano was in the solo state at the beginning, I improved his compression and reverberation, and added it to increase his echo and sense of space. Bass I use the finger bass that comes with logic pro. Due to the quality of the built-in sound, it always feels very blunt, so I have to add some plugins, such as Pedals, Echo, etc., and I adjusted the bass. EQ, Boosting its low frequency and cutting off its high frequency part at the same time, after making these adjustments, at least the effect I made feels much better than before.

Part A: The Chord progression of Part A is vi-IV-ii-III. In Part A, I used vocals (because no one sang and no words were written, so I used bass fingerstyle instead of vocals to play the main melody in the submission file), PianoBackground, E-Guitar, Bass and Drum, if you wear it Listen with headphones or use monitor speakers. You can find that the sound of PianoBack is on the right ear, the sound of E-Guitar is on the left, and the sound of Drum is on the upper side of the space. I think the positioning of this song is pop rock, so I need to present a sense of spatial performance in the music, that is, the human voice is in the middle, all the two sides are instruments, and the back is the feeling of drums. Since I am not good at playing E-Guitar, I use midi sound instead, but I have used some techniques of portamento and vibrato, I believe you can hear it in my file. In terms of midi sound, I used the hard rock electric guitar sound, which is also one of the sounds that comes with logic pro. When monitoring, I found that the high frequency of the electric guitar often exceeded the upper limit, which made me have to cut it out in the EQ. The high frequency of an electric guitar,


At the same time, the sound feels weak to me, so I increased its distortion, and added Space Design and Silver Verb to it to increase its spatial performance. Since the drums are actually recorded with Roland Drum, the sound will be more realistic, but since they are not midi drums, there are not many things that can be modified. However, I found the same problem as the electric guitar when I was monitoring, but I There is no way to cut its low frequency, otherwise it will cause the kick drum sound to be too low, so I used Limit to control all the frequencies that it exceeded, so the effect seems to be good. PinaoBackground uses the same tone as intro's pinao. They are both Steinway Grand pianos and logic pro's own tone. As a person who has played the piano for many years, I have to say that midi's tone is still very unpleasant, at least for me. I don't think it sounds good. I used two different tracks for PianoBackground and PianoIntro. The reason is that in Part A&B, the piano is only used as an accompaniment and does not need to highlight the main melody. Since I did not set a second guitar, all chord decomposition tasks will be performed. Give the piano to finish. Similarly, since there is no need to play the main melody, I cut off the low frequency and part of the high frequency of the piano, This makes it almost difficult to hear the sound of the piano while monitoring, but if I mute the piano, I feel that something is missing. At the same time, I didn't use too much vigor to play this section of the piano, because it is mainly for the chords, but when the rhythm changes, it will be more obvious with the drum beats.
Part B: The overall Chord Progression has changed, from VI-IV-ii-III to IV-V-II-IV-III-vi. In terms of orchestration, on the basis of PartA, only a background sound is added to make the whole level fuller. The sound I use comes with stereo surround, so I don't need to use some plugins to assist it. Since the B section is the part that pushes the music to the climax, the electric guitar is played more full, and the pitch of the performance is also higher than that of the A section. For Drum, I made his tone to be progressive, making the sound fuller and louder while entering Part B.
The next thing I want to talk about is Bridge. According to the habit of rock and roll, 8bar bridge or 16bar bridge is usually played by musicians freely. This song also follows the rules, with drums and bass as the base, electric guitar solo, I The electric guitar alone is used as a track. Since it is a solo, I added some kits to make its sense of space and atmosphere more full. At the same time, the change of drum rhythm also makes this bridge more prominent. At the end of the bridge, there is a sudden silence, the echo after the electric guitar solo, plus the rhythm of the bass, no drums, only vocals, and then the piano, drums and electric guitar return to play in turn. This sense of hierarchy will be the main theme for the last time. To the climax of the whole song.

my thoughts
For my work, I hope he can express my thoughts, at least what I expect from this work. I try to interpret this work in a proficient way, and at the same time have some innovations. I learned some plugin usage and EQ adjustments in the class of the previous few weeks, which helped me a lot. Even though the work I am producing is not perfect, I hope you can feel what I want to express from the music
2 notes
·
View notes