
Statistics
We looked inside some of the posts by woofinstepper and here's what we found interesting.
Average Info
Notes Per Post
37
Likes Per Post
30
Reblog Per Post
2
Reply Per Post
5
Time Between Posts
3 months
Number of Posts By Type
Text
16
Photo
1
Last Seen Tumblr Blogs


Fun Fact
Tumblr Inc. is funded by 13 investors.
Text
My latest Raspberry Pi efforts have been with the Raspberry Pi pico W. I was interested in this microcontroller because it has Wifi support, so I can use it to make things to attach to my home network. I found a set of lessons called Raspberry Pi W for the absolute beginner. I started with lesson 28, I think. I have to restrain myself from yelling “get on with it!”, on the other hand, I can often type in the code from the lesson while watching the video without having to pause and rewind. The lessons are sponsored by Sunfounder and of course they get a plug for their kit.
The other Raspberry Pi effort has been to purchase the Raspberry Pi 5 and add a PCIe attached M.2 SSD and set it up to boot from that. The Pi 5 is much more powerful than the 4. It needs a more powerful power supply than the 4 to run it. You can use the power supply for the 4 with it, but it will warn you that it can’t power all its ports to their rated current.
One of these days, I will do something useful or at least fun with these toys.
There is a new hat for the Raspberry Pi 5 that supports AI, but I have not found it to be available from Digit-key yet. I know nothing about AI, but it will be a bright shiny thing to chase.
1 note
·
View note
Text


I had been wanting to get a Raspberry pi 4B 4GB or 8GB card, but the markup on those parts is unreasonable. I went to
Digi-key because they charge the retail price for the Pi units that they cell. Unfortunately they don’t have any in stock. But they did have some Raspberry Pi 400s, though not the US version. I was able to get the keyboard only one for UK. I already had the other need parts, mouse, US power adapter and microSD card. The 400 has specs similar to the 4B except it only has 3 USB ports (Two 3.0 and one 2.0). Considering I didn’t need to plug in a keyboard, there was no loss there. It has 4 GB of RAM and it runs at 1.8 GHz instead of 1.5 GHz like the 4B. The standard IO ports are covered by a rubber plug, but thy are there. Seems like a good deal.
1 note
·
View note
Text
0 notes
Text
I recently acquired this little single board computer. It is a BBC Microbit which is designed to help teach computing. The website supports both block programming and Javascript. I did the first block programming heart lesson. It was extremely easy. There is an online emulator so you can go through the steps to build your program and when you are done, download it to your PC. It shows up as a .hex file which you then can copy to your microbit through the USB cable which is also what powers the card. The card has a 5 x 5 matrix display as you can see in the picture. The oval with the two dots is a touch sensor. It has a compass, an accelerometer, 19 GPIO pins, Bluetooth and a microphone. So lots of things to play with. I got this as a starter kit, so it had an adapter so it could be plugged into a breadboard along with wires, resistors and LEDs. So this could be a lot of fun.
0 notes
Text
I finally got brave enough to make something with my Creality Ender 2 Pro. I wanted to make something simple so that I might learn how to to this. I think if I was purchasing a printer again, I would look for automatic bed leveling. I had a lot of difficulty deciding if I had the bed level or if it was something else that was causing the plastic not to stick down. The first thing I had to do is make a model in an acceptable file format. I set up the Creality slicer program to accept stl, obj and dae files as input. I used Blender to make my models, not because it is a great CAD program, but because I had used it a lot in Second Life to make mesh objects and felt the time to make my model would be quicker than getting up to speed with a new CAD program. Blender is really a program for making animated movies, but it is very powerful and can put out the required file formats. I made my model and exported it, sliced it and put it on a microSD card that the Ender 2 could use. My first attempt taught me three things: 1) The Z axis on the Ender is not up. Y is UP. 2) Be more careful on my measurements (It didn’t fit), and 3) Leveling the bed is a pain. I am not positive that leveling was the problem, it could be nozzle clogging, but I think it was leveling. If the nozzle is too high, the print won’t stick dow to the bed and the plastic will just get dragged around instead of staying down in the shape intended.


5 notes
·
View notes
Text
I never thought I would be playing with laser beams, but technology has advanced. From spots for cats to chase, distances to be measured and now burning wood with a laser engraver. The world has changed a lot since LEDs were a new neat replacement for nixie tubes and four function calculators were much better for adding and multiplying than my POST decitrig sliderule.


2 notes
·
View notes
Text
A few other things I have been playing with.


This add on card provides a real-time clock, charging contol and battery backup for a Raspberrypi. I like how after installation I can have the Pi turn off using the shutdown command on the screen. Don’t over tighten the screws
1 note
·
View note
Text
It has been a long time since I have posted anything, but that doesn’t mean I haven’t been playing with electronic toys. I have had quite a supply of them from a certain unnamed online source.


21 notes
·
View notes
Text


While digging around looking for some letter sized file folders, I came across this ancient gem. An HP 11C scientific calculator. I remember getting this and thinking I finally had a calculator that could help me do engineering calculations. Look at all the multifunction buttons. What more could anyone want? RPN (Reverse Polish Notation). That means to add say the numbers 3 and 5, you didn’t key in the 3, hit the plus sign and enter the 5 followed by an equils sign. You entered the 3 entered the 5 and then pushed the + key. I know it seems silly, but you didn’t need parentheses this way. This was hot stuff at the time. It used an LCD display. No power hungry LEDs requiews. I was really surprised that after all these years, it still had power to work. You will notice that at some time I had lost the little door that covered the batteries and used my engineering skills to design a masking tape replacement. You know what was really special about this calculator, it was programable!d Wow... something that would fit in your pocket that was programmable. Imagine that. It was almost like a computer.
0 notes
Text
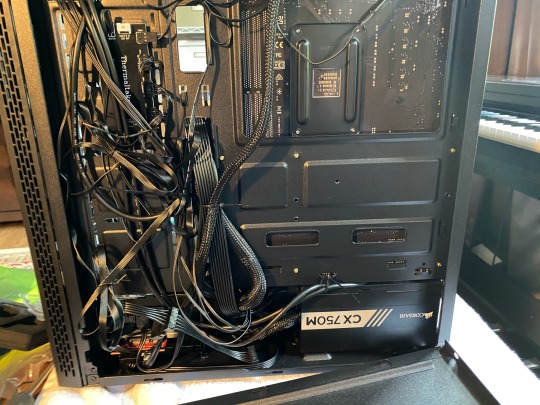
So case issues aside, I am fairly pleased with the performance of the machne. I found that the ASUS 5700X graphics card with the ASUS 570X Prime motherboard performed well. I used it in Second Life and the Blender 2.83 graphics program. I found its rendering peformance was substantially quicker than on my current computer with has a GTX 980 and an intel i7-6700K processor. I guess you get something for having twice the memory in the graphics card and 3 times as many cores in the CPU.
If I were choosing again, I would pick a case that you could put in a DVD drive. Preferably one that is MDISK compatable. I would look for the cable routing features that this case has. It seemed with so many of the previous cases I have used, there was a big knot of extra cable out of the power supply that got in the way of things such as long thick graphics cards and 3.5” harddrives bays. Snce the 3.5” harddrives were relagated to a space below the motherboard near at the front, none of that was an issue.
The otherboard that I used was a relatively inexpensive version and had no wifi. Fortunately I had an Wifi 5 level card to add Wifi and bluetooth to add that function.
1 note
·
View note
Text


You can see the colored lights on the case fans that change colors with time. That goes well with the cooling fan for the RYZEN 9 processor which does the same sort of thing. If only it hadn’t given me a fan error. One thing I do like about the case was that in order to keep the view of the pretty interior lights unobstructed by unsightly cables, it made routing them under the motherboard relatively easy. Some parts of hookin up the colored light controls were a bit of a puzzle. I just made sure that the pin out on the motherboard matched the connector from a small controller board that came with the case and hoped for the best. There were all sorts of words about this generationn or that generation connector. I could see that one version had +12V, R,G,B signals and I used those. Seems to work, though I haven’t pressed the lighting mode button on the front panel yet. Aren’t those fans prettty? Notice there is no place to put a DVD drive? But lets have pretty fans. Who needs a DVD drive anyway ... well unless you need to install Windows for a disk. Fortunately, I had an external DVD drive that plugged into the USB connector and was able to start the install process. During the Windows install, I hit another problem. You know how the install says .... this machine will restart several times? That is when the ‘CPU fan’ error happened. Which wants you to go into BIOS and make some magic correction. I did play with the fan profile and save that, but from what I could tell, the system did recognize that the fan was connected. I could see that the fan was spinning with all its pretty lights and I checked the connector to make sure it was plugged into the CPU fan jack. I couldn’t complete the windows install unless I could get past the error. The internet suggested that I check the connector and if all else fails, I could change the setting for monitoring the CPU fan from auto to ignore. One might do this if they had a liquid cooling system. So that is what I did. And Windows 10 installed with no more surprises.
Back to those pretty case fans. One of the things I noticed was that besides not leaving any room for a DVD drive, the front of the case is clear, unperferated plastic. So those fans aren’t sucking in air from the front face of the case, they are actually getting the air from vents along the 1st inch of the side. So I can imagine the efficiency is not as high as they could be. But who could have a gaming computer without pretty lights on their fans. The CPU temperature seems to be just fine though.
2 notes
·
View notes
Text


There were a couple of problems with the case. The insert for the back panel was difficult to install. It didn’t want to go all the way in. Another thing about it was after I installed it, I was looking at the springy contacts around the HDMI output and noticed that they were inside the connector, which would have been a problem if I was using a CPU that had built in graphics. I checked to make sure that it wasn’t shorting to any of the contacts on the jack and when I found it wasn’t, I left it that way rather than remove and reinstall the motherboard.
In this case, there are several positions available for 2.5” harddrives and as you can see, I used a colorful bit of duct tape to hold the drive in place with the screw holes lined up until I could get the screws started. I thought I was so clever, until I went to plug in the SATA and SATA power connections and found that the SSD was too close to the case to allow the connectors to go on. There didn’t seem to be any standoffs or anything that came with the case that could fix this problem. So I moved the SSD and installed it in one of the 3 bays that were designed for 3.5” drives. The instructions that came with the case were light on details. On of the most imformative things in the instructions was a picture of the various screws included and words to the side of them that said what they were for. I also installed a 1 TB 3.5” drive in the case and you can see the odd screw that was made to slide in a slot on one side of the dive. This was necessary since you can’t get to that side of the drive in the case. The other side can be accessed and regular screws work fine. The case used was a Thermatake V200.
1 note
·
View note
Photo


The basic parts and the hope that they will actually work together.
Most of the problems I encountered with this build were case related, with exception of the “CPU fan error”. lI find it interesting that the name ‘gaming computer” seems to be associated with flashing colored lights, which I would think would be a distraction during actual gaming.
1 note
·
View note
Text
Building a New PC
In the middle of a pandemic what other geeky thing should I be doing. Don’t run out of somedays!
0 notes
Text
AncientElectronics - More Model IBM Model 30 286
Since the old computer doesn't seem to support very big hard disks, I did some playing around today. I had ordered an adapter which would allow me to connect a SD card on the hard drive cable. I disconnected the HD and connected the adapter with a 4 GB flash card that was already formatted FAT32. It worked sort of. By the time I got it working it was formatted FAT16 and could only access something like 37 MB. I had a lot of trouble getting things going. It seems that almost all the copies of DOS I have are upgrade copies, so they always seemed to be saying that they couldn't install because I didn't have a valid version of DOS on the machine. I ended up installing DRDOS 7 and then replacing it with Microsoft DOS 6.0. I was going to upgrade to IBM PCDOS 6.1 or 7.0, but as fate would have it, the floppy disk drive on the machine decided it was going to quit reading disks. Not all that surprising after reading all those dusty DOS install disks. I may open it up and have a look. I seem to recall there was a problem with some floppy drives where a wad of lint would build up on the head shaft that drove the head positioning and mess up the head positioning home. I could be thinking of another drive.
The hard disk drive adapter that I have in the computer is an 8 bit card. Since I am probably going to have to replace the floppy drive, I am going to attempt to put in a 16 bit ISA card that has both a 34 pin floppy and a 40 pin PATA connector on it. So I may be able to use a standard pin out floppy drive with a 4 pin power cable instead of the IBM version that has the power in the ribbon cable and I think there was some difference in the pin that indicates the size of the drive that is connected. I think I even have the manual for the adapter card, so maybe all those jumper settings won't be a mystery.
#IBM Model 30 286 #SD Adapter #AncientElectronics
0 notes
Text
And what crazy things have I been up to now? Well, I have had the opportunity to do some things with LED lighting. I had been looking for something to replace the various fluorescent lights in my basement. Some of which are T12 replacements and some of which are drop in 4 x 2 foot fixtures for a suspended ceiling. It was supposed to be that all I had to do was take out the old T12 tubes and put in the new LED T8 sized ones. My first try at this killed the electronic ballast in a suspended shop light. However, these same bulbs worked fine in an older shoplight that had a magnetic ballast. I had one shoplight that wasn’t working at all and I had the opportunity to try the same process with a different brand of replacement tubes. They flickered, but didn’t stay light after installation. The instructions for that brand said remove them if they flickered, but had alternate instructions in which the ballast was cut out of the fixture and the power wired directly to pins. This variation worked and had the feature of not humming. So I could rewire all these fixtures and use those tubes. Something about balancing on a ladder while doing this makes me reluctant to take that path.
The replacement of the 4’ x 2’ fixtures bring up another topic. The ones I obtained are a very bright white light (4000K). But they have a feature. There are a purple wire and a gray wire that are described as 0-10V dimmer control wires. But no other description of how to use them. Reading a bit on the internet, 0-10V dimming controls can refer to various things. One is theatrical lighting controls, another refers to LED strip lights and the last and probably most likely one that I found was commercial lighting. The commercial lighting type seem to be controlled by lowering the voltage across the purple (+) wire and the gray (-) wire. Measuring the open circuit voltage on these wires I found them to be almost 12 VDC. So if you left the wires open, the light would be at full brighness. I found that dragging the voltage down with a resistor dimmed the light. So the brighness should be able to be controlled with a simple pot. Since the lights are so bright, I will want to take advantage of this dimming control.
1 note
·
View note
Text
Second Life on a Raspberry Pi?
I had been wondering if one could run Second Life on a Raspberry Pi 4B since it is a much more poweful computer and is available with 4 GB of memory. So I thought that I might be able to download the Linux version of Firestorm and use it. One thing I learned is that the current version of Firestorm requires a 64 bit processor and I would assume that means that it needs a 64 bit version of Linux. While the Raspberry Pi 4B has 64 bits available, Raspbian Linux does not. Ubuntu Mate has both 32 bit and 64 bit versions of Linux, but the 64 bit versions are for the Raspberry Pi 3B and 3B+. So until some 64 bit version of Linux is available for the Raspberry Pi 4B, my efforts to try to run Second Life on a Raspberry Pi are on hold.
0 notes