#Raspberry pi 4B
Explore tagged Tumblr posts
Visit Tumblr Blog
Explore Tumblr blogs with no restrictions, modern design and the best experience.
Last Seen Tumblr Blogs


Fun Fact
US Tumblr user growth rate is estimated to slow down to 4.1%.
Text
Today I made a case for my raspberry pi with lego:

(Ignore the ugly chunky hdmi cable and micro-hdmi adapter. these are some rigid chonkers.)
It even has a lid for the display:


The air can circulate thru the literal "windows". i might add some more cooling bodies inside.
#raspberry pi 4B#raspberry pi#raspberry pi build#raspi#lego#bricks#brick#building bricks#raspi case#raspberry pi case#custom build#microcontroller#tinkering#technology#tech
32 notes
·
View notes
Text
Linux Life Episode 82

Hello ladies and gentlemen. Yes the return of the Linux blog written by me. don’t know whether that’s a good thing but here we are.
I admit its been a long time since my last episode that’s because I went an absolute age without Linux in any machines for quite a while. In the last episode I admitted I had just installed EndeavourOS Cassini Nova R2 (Arch-based) in my Dell i7 laptop (Mangelwurzel)
Now I have been running it for several months and I admit continues to work well. I admit i am not trying to play Windows games on it as the Quadro K3100 is not supported buy the current Nvidia drivers. However running just the nouveau drivers allows me to do anything else providing you don’t need Vulkan.
Which I only use Vulkan when I was using Lutris to play games such as Path of Exile. That can’t be done with the nouveau driver. Apparently there is a version of the Nouveau setup called NVK coming which will allow Vulkan to work but as of yet its in very early beta stages and my card is not even on the list for support just yet.
Mind you considering the guy who maintained Nouveau for the last 10 years has just left the Linux industry I don’t know when any new updates to the nouveau project will even be. I assume its a team of people I doubt one man alone is writing such.
However I have been using EndeavourOS as my daily driver and it has been no problems whatsoever. Even the internet which used to keep dropping out they seem to be using a broadcom wl driver that works fine and is updated and moved every time the kernel gets updated.
So to be honest it can web browse, I can do email, word process, emulate stuff, even video edit and more if I felt like it so to be honest at the moment I can’t complain regarding how well it is working.
As for playing modern Windows games well I don’t really do that any more so not going to lose much sleep there. To be honest when I had my i7 desktop with the Nvidia 1030 I only did it to prove it worked. Sadly that machine is long gone.
So as Mangelwurzel is working well and I have no major complaints what else have I be doing in the meantime.
Well I had been using an Apple iBook G4 to start writing a book as it was a lot less distracting of a machine. However the guy who attempted repair it before I rescued it made a right hash and removed most of the screws in the machine.
So the hard drive would move on a regular basis if you moved it across the desk. Sometimes it wouldn’t start until you reconnected the pins which had moved a fraction of a millimetre.
So I had to lift the keyboard panel regularly. All was fine until one day the keyboard came undone then I had to put it back in. It was a fiddle. Then the power connector on the board came out of its socket.
I managed to get everything back in or so I thought. But moving the keyboard had now unseated the wireless card. I struggled to get that back in but when I put it back together the power connector came out but this time it took the actual socket connector with it from the board.
Guess what now the machine won’t power up. So I took out the hard drive and the iBook G4 is now dead as the connector is tiny and will require soldering I know I am not capable of.
Obviously I was not amused by this but I did happen to have a USB 2.0 to IDE adaptor which has a side for 2.5” drives.
So I connected the drive up to Mangelwurzel and using qemu-img which is one of the tools of QEMU. I set about copying the image to my i7 hard drive. I had enough space as it was only an 80Gb HDD (Yes my Hard drive was called Braeburn it’s an Apple) and I had 150GB space on the SSD.
When I did it I really didn’t think it would work. It sat there doing nothing at the command line. No percentage meter no nothing but when I looked at the file in caja it was going up slowly so I left it to get on with it.
Four and a half hours later the files had copied to the hard drive and it was done.
OK so now I had this copy of this hard drive but no Mac OS X to run it on. So using QEMU (a Level 1 VM hypervisor) basically it can create a virtual G4 machine and run Mac OS X 10.4.11 which was on the old hard drive.
It took a few attempts at getting the right QEMU commands but sure enough I managed to get QEMU running Mac OS X using the image of the hard drive i had made. It can connect to the internet and run everything i had installed including the Mac OS 9 Classic stuff on there.
I was impressed and because it was a direct conversion I didn’t have to change passwords or anything as it was the ones from the hard drive.
Amazing stuff I had saved the drive and its contents and it was usable. However QEMU unless you use it a certain way doesn’t supply sound for G4 emulation in the basic version.
Nope for that you need the Screamer version luckily there is a QEMU Screamer build in the AUR but it’s not as recent as QEMU standard.
So after a bit of fighting with QEMU commands as sound is a bit odd the way they do it. So I now have two boot scripts one without sound and one with.
Sound sort of works it crackles and slows things down a little but it does work. Its not perfect but considering its an i7 on Linux running Mac OS X 10.4.11 as a G4 using my hard drive image.
That in itself is quite amazing I can’t complain.
Having just completed that I was given a Raspberry Pi 4B (2 GB model) to play with. Now I have played with Pi machines before.
Last time I was messing around with a Pi 3B and a Pi 4B (4GB Model) and I remember playing with thongs like Twister OS, RiscOS, and having to build a micro SD a certain way to get EndeavourOS to work.
However I had to give them back to their owner so it has been a while since I have played with a Raspberry Pi.
So now I have the current 2GB model which obviously is a not got as much memory since the last Pi 4B I used.
Well I knew who owned it last so I had to set up a new download of the OS. If anyone is aware that the Raspberry Pi Foundation has announced to new Pi 5 which is twice as fast as the 4B apparently.
As I don’t have one for testing I can’t say and the likelihood of me getting one any time soon is probably none existent.
However they have updated the Raspbian OS to the latest Debian (Bookworm) which does work with the Pi 4B
I got it down and wrote it to the Micro SD all nice and ready.
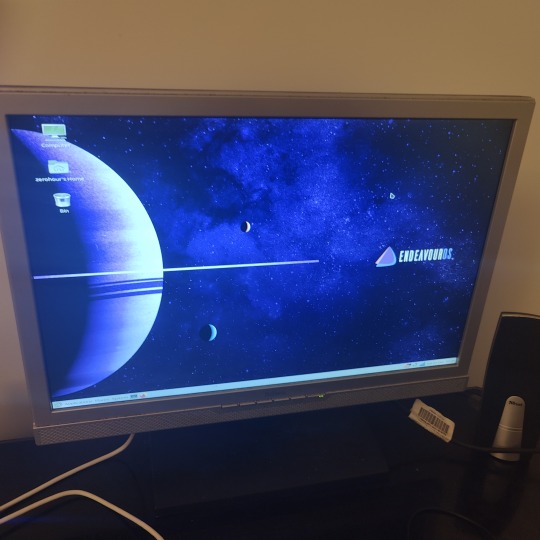
Now comes the fun bit. i don’t own a monitor or TV with a HDMI port so now i had to figure how to connect it to the only monitor I still have which an old Belinea 22” monitor (which works fine considering its age).
The previous time i was using a Dell 19” monitor but it had a DVI connection so I had this HDMI to DVI lead which I knew worked as I had used it when I last used the Pi I used previously. Unfortunately the Belinea is VGA connection only… problem.
Also the connection lead I used last time to link the two HDMI leads I had to return so I had to buy a coupling link to connect the two leads together. So as I was buying leads I decided to buy a connector lead which now had a Female DVI to Male VGA creating on hell of a stupid Frankenstein type lead
So the lead is now Micro HDMI to HDMI - Coupling link - HDMI to DVI Male - DVI Female to Male VGA. Strangely enough this stupid lead didn’t work.
After a lot of failing I ordered a Female HDMI to Male VGA adapter making the cable be much shorter and it actually works. Tada… however don’t ask me to remove the adapter from the monitor as it was a bitch to screw in and I am not taking it off in any hurry.
OK now I have a working screen connection lets test some software.
New RaspianOS being a recent version of Debian (Bookworm) it is using Wayland as a compositor rather than the old X11 setup. which I am sure on the Pi 5 works wonderfully or an 8GB Pi 4B. On the 2Gb model it works but runs like treacle.
So slow it was painful to watch. After about a hour of faffing I gave up and reinserted the MicroSD to my i7 and installed EndeavourOS which strangely enough is based on the same Cassini Nova R2 build as the i7 but ARM.
I set it to run and it kept dropping out due to not being able to find a mirror. Quick edit to use the London mirror which was hashed out once put back in the installer worked.
Now lets be straight here it was not fast and jumped in stages so many a time I thought it had given up for it to suddenly jump to the next stage. It took about 3 attempts but now I have a working edition of EndeavourOS working on the Pi4.
It still uses X11 instead of Wayland but it seems to work fine. It is never going to win Olympic medals as the 2GB model is the inferior one. However I was able to watch YouTube admittedly at 360p and 480p respectively but it works fine.
The ironic factor is the Micro SD is 16Gb then i found an unused 32Gb one but I am damned if I am going through that again in a hurry. Basically when it installs it extends to ensure the full space is used meaning I would have more space for installing programs etc.. Oh well I may get around to it but not for a little while.
So far I have installed Libre Office and Focuswriter. I installed a few emulators after all isn’t that what the Pi is famous for…
Well lets say Dosbox I ran MAME 0.37b5 with full romset as I have them and running Mr Do. not an immensely taxing ROM it achieved 3.57 frames per second and was rather choppy
At that point I tried installing a few things only to discover they were not available for the aarch64 version such as Hedgewars or TuxRacer.
I didn’t try TwisterOS as it looks like it hasn’t updated since I last looked at it neither has RiscOS.
So EndeavourOS is now working on both my i7 and the Pi 4B. It seems Debian just doesn’t like me.
Off to find an arcade image to stick on that 32GB Micro SD but I will report on that next time as I think this has gone on long enough.
Until next time when ever that may be… Take care.
1 note
·
View note
Text
Dear Linux tumblristas, @xorg-official @kde-plasma-official @arch-user @arch-official @endeavouros-official and friends,
Sorry to be serious for a second but why does my panel (with all its widgets) and wallpaper just randomly disappear sometimes when I'm browsing firefox on fullscreen?
(I'm running EndeavourOS with KDE Plasma on an 8gb Raspberry Pi 4B)
As remunerate you for your help here is a sketch I did of my dog (I'm simultaneously trying to teach myself to draw and to use a wacom graphics tablet and to use Krita!)

4 notes
·
View notes
Text


"Heron" hardware MIDI sequencer (work in progress) - 2023 Built with: - Raspberry Pi 4B - 4.3" DSI Touch Display - Midiface 4x4 USB MIDI interface - Custom PCB and various switches/encoders/GPIO expanders/LEDs/... - Shell, Python and Node.js The UI is built with Electron and React. The previous version of the UI used node-raylib - which has less overhead and is more performant, but developing in a browser window is much faster. The quad-core RPi seems to be able to handle it without too much latency. The Electron app communicates with the Python processes for IO access and shared state is stored in memory using Redis.
2 notes
·
View notes
Text
Good news: My raspberry pi 4b came
Bad news: I forgot to get a case + I don't have a sufficient power supply and I also don't have a micro-HDMI adapter
Good news: I have just ordered a case, power supply, and micro-HDMI to HDMI adapter
Bad news: I just spent money on a case, power supply, and micro-HDMI to HDMI adapter
1 note
·
View note
Text
Raspberry Pi per VNC fernsteuern: Desktopzugriff unter Windows leicht gemacht

Wenn du deinen Raspberry Pi komfortabel mit Maus und Tastatur bedienen möchtest, brauchst du mehr als nur den Zugriff über das Terminal. Zwar ist das Tool PuTTY ideal, um per SSH auf die Kommandozeile des Raspberry Pi zuzugreifen – doch wer grafische Anwendungen oder die Desktopoberfläche nutzen will, stößt hier schnell an Grenzen. Terminal-Tools erlauben nämlich keinen Zugriff auf Fenstertools oder grafische Benutzeroberflächen. https://youtu.be/mc8qa8dutNk In diesem Beitrag zeige ich dir Schritt für Schritt, wie du VNC auf deinem Raspberry Pi einrichtest und von einem Windows-PC aus eine Verbindung zur grafischen Oberfläche herstellst. Damit kannst du den Pi ganz bequem fernsteuern, als säßest du direkt davor – inklusive Desktop, Maus und Tastatur. Besonders ab dem Raspberry Pi 4B, auf dem sich die Desktop-Version von Raspberry Pi OS flüssig nutzen lässt, wird diese Methode richtig komfortabel.
Was heißt VNC?
VNC steht für Virtual Network Computing und ermöglicht die Fernsteuerung eines Computers über ein Netzwerk – inklusive grafischer Benutzeroberfläche. Anders als bei einem reinen SSH-Zugriff (z. B. über PuTTY), bei dem man nur die Kommandozeile sieht, kannst du mit VNC den kompletten Desktop deines Raspberry Pi auf einem anderen Gerät anzeigen lassen. Maus- und Tastatureingaben werden dabei in Echtzeit übertragen. VNC ist ideal, wenn du Anwendungen mit Fenstern und grafischen Elementen nutzen möchtest – etwa einen Webbrowser, ein Konfigurationstool oder die grafische Entwicklungsumgebung auf dem Raspberry Pi.
VNC auf dem Raspberry Pi aktivieren
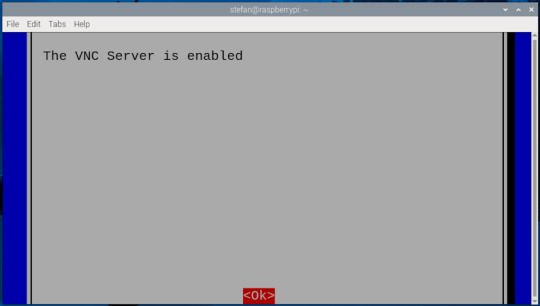
Bevor du dich per VNC mit dem Raspberry Pi verbinden kannst, muss die Funktion zunächst aktiviert werden. Das lässt sich auf zwei Arten erledigen – je nachdem, ob du bereits Zugriff auf die grafische Oberfläche des Pi hast oder lieber über die Kommandozeile arbeitest: Methode 1: Aktivierung über die grafische Oberfläche Wenn du einen Monitor, Maus und Tastatur direkt am Raspberry Pi angeschlossen hast, kannst du VNC ganz bequem über das Tool "Raspberry Pi Configuration" aktivieren. Dort findest du die Option unter dem Reiter "Interfaces", wo du den VNC-Server mit einem Klick einschalten kannst.

öffnen der Konfiguration über das Startmenü - Step1

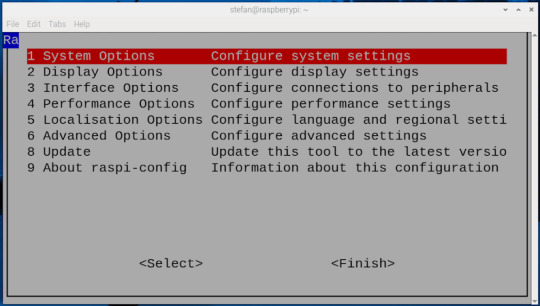
aktivieren des Schalters VNC in der Konfiguration - Step 2 Methode 2: Aktivierung über die Kommandozeile Alternativ lässt sich VNC auch per Terminal aktivieren – z. B. über eine SSH-Verbindung mit PuTTY. Gib dazu einfach folgenden Befehl ein: sudo raspi-config


Die IP-Adresse des Raspberry Pi herausfinden
Damit du dich per VNC mit deinem Raspberry Pi verbinden kannst, musst du seine IP-Adresse im Heimnetzwerk kennen. Es gibt mehrere Möglichkeiten, diese zu ermitteln: - Über den Router: In der Geräte- oder Netzwerkübersicht deines Routers (z. B. Fritz!Box) findest du alle verbundenen Geräte samt IP-Adressen.

- Über die grafische Oberfläche: Bewege deine Maus über das Netzwerksymbol oben rechts neben der Uhr auf dem Desktop.
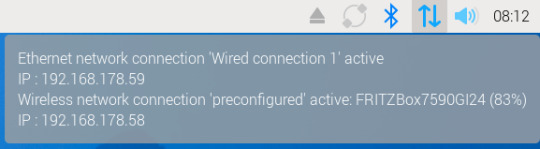
- Über das Terminal: Der schnellste Weg – besonders, wenn du direkt am Pi arbeitest oder per SSH verbunden bist – ist der Befehl: bashKopierenBearbeitenifconfig In der Ausgabe findest du unter dem Abschnitt wlan0 (WLAN) oder eth0 (LAN) die Zeile inet, z. B.: inet 192.168.178.59 – das ist deine IP-Adresse im Heimnetz.

Ich persönlich finde den Weg über ifconfig am einfachsten und zuverlässigsten.
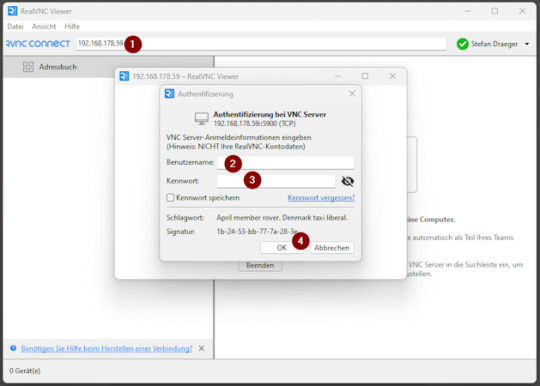
VNC-Verbindung unter Windows 11 mit RealVNC Viewer herstellen
Um vom Windows-PC aus auf die grafische Oberfläche deines Raspberry Pi zuzugreifen, benötigst du einen VNC-Client. Eine der bekanntesten Lösungen ist der RealVNC Viewer, der einfach zu bedienen ist und gut mit Raspberry Pi OS harmoniert. Schritt 1: RealVNC Viewer herunterladen Lade dir den RealVNC Viewer über die offizielle Webseite herunter: 👉 https://www.realvnc.com/de/viewer/ ⚠️ Wichtig: Der RealVNC Viewer ist in der aktuellen Version nur als 14-tägige Testversion verfügbar. Danach ist eine kostenpflichtige Lizenz erforderlich, um alle Funktionen weiterhin nutzen zu können. Schritt 2: RealVNC Viewer installieren Nach dem Download führst du die Installationsdatei aus und folgst den Anweisungen. Die Installation dauert nur wenige Sekunden. Schritt 3: Verbindung zum Raspberry Pi herstellen - Öffne den RealVNC Viewer. - Gib in das Eingabefeld (1) oben die IP-Adresse deines Raspberry Pi ein (z. B. 192.168.178.59) und bestätige mit Enter. - Beim ersten Verbindungsaufbau erscheint ein Sicherheitsdialog – diesen kannst du bestätigen. - Melde dich mit den Zugangsdaten deines Raspberry Pi an (Standard: Benutzername (2) pi, Passwort (3) raspberry, sofern nicht geändert). - Nach dem Login (4) erscheint die Desktopoberfläche des Raspberry Pi in einem Fenster – fertig!
Verbindung erfolgreich hergestellt
Sobald die Verbindung steht, öffnet sich die Desktopoberfläche deines Raspberry Pi in einem neuen Fenster auf deinem Windows-PC. Du kannst dich nun ganz normal mit der Maus und Tastatur bewegen und den Pi bedienen, als würdest du direkt davor sitzen – inklusive aller grafischen Anwendungen und Tools.
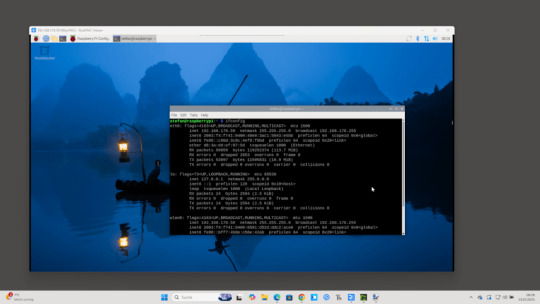
In meinem Fall habe ich den Raspberry Pi über ein LAN-Kabel direkt mit dem Router verbunden, was eine deutlich stabilere und schnellere Verbindung ermöglicht als über WLAN. Gerade bei der Fernsteuerung mit VNC sorgt das für ein flüssigeres Nutzererlebnis ohne Verzögerungen oder Verbindungsabbrüche. Read the full article
0 notes
Photo

https://www.youtube.com/watch?v=iL833P0Vino&t=1s
とてつもない運動神経。岩山もぐいぐい登山する犬型ロボット
岡本玄介
山の中でパルクールしてるみたい。
ここ数年、四足歩行をする犬型ロボの進化が止まりません。
以前には車輪を履いてスイーっと走って直立する「ANYmal」に驚かされ、人間さながらにハシゴを全力で駆け登ったり、GPTで会話して逆立ちやダンスもできるタイプも登場しました。
スタントマンさながら
中国のDEEP Roboticsが作る「Lynx」は、整地もされていない山の斜面を二足歩行で滑り降り、ガタガタ道も車輪でスイスイ走るだけでなく、高さ80cmの巨石もよじ登る運動性能です。
下り坂を前に逆立ちを始めたり、50度の急勾配も難なく下りますね。
ソニーの新型完全ワイヤレス、柔軟なツノと低いイヤーピースで着け心地がとにかくラクSponsored by ソニーマーケティング株式会社
生身の犬ですらここまでできなさそうです。
Advertisement
これに各種センサー類を装着すれば、遭難者の発見などで活躍することと思います。
ヒト型のほうが劣っている?
DEEP Roboticsは二足歩行のヒューマノイドも作っていますが、犬型より俊敏性が格段に落ちます。
バランス感覚は良さそうですが、上半身が重いぶん慎重に動かないといけないんでしょうね。「Lynx」を見た後だと、性能的に劣っているように感じてしまいます。
AmazonでPC買うためのハウツーをライブ配信でお届けSponsored by インテル株式会社、日本マイクロソフト株式会社、日本エイサー株式会社、ASUS JAPAN株式会社、LGエレクトロニクスジャパン
同じ犬型でも方向性が違う
近年の犬型ロボの流れは、Boston Dynamics(ボストン・ダイナミクス)の「Spot」からですが、アチラは危険区域の検査などが得意。コチラは運動性能がズバ抜けすぎて、インパクトがすごいと感じました。
将来の犬型ロボはどんなものに?
この先、世界中の開発者はどんな犬型ロボを作るのでしょうか? 考え出したら大喜利が始まってしまいそうです。
Yahboom Raspberry Pi 4B スマートロボット
97,670円
Amazonで見る
PR
(とてつもない運動神経。岩山もぐいぐい登山する犬型ロボット | ギズモード・ジャパンから)
1 note
·
View note
Text
Navigating the World of Best Price Robotic Kits
Navigating the World of Best Price Robotic Kits
In the realm of technology and innovation, robotic kits have emerged as a popular tool for learning and exploration. This article delves into the best price robotic kits available in the market today.Get more news about Best Price Robotic Kit,you can vist our website!
One of the top contenders in the market is the Makeblock Ultimate .0. This advanced robotics kit offers ten different structures, ranging from a robotic arm tank to a self-balancing robot. You can program it using a graphical editor, or delve deeper with Arduino or Python. The Makeblock Ultimate .0 caters to individuals of various skill levels.
Another noteworthy product is the Lego Boost Robotic Kits. The Lego Boost is arguably the best STEM robot accessible for children and youths. It features an impressive number of Lego bricks, a single motor, one light/IR sensor, and the Lego move hub with two inbuilt motors. You can build robots using five different methods.
For Raspberry Pi enthusiasts, the SunFounder PiCar-X is a must-try. This robot kit is powered by a Raspberry Pi and loaded with various sensors. It can be controlled from your phone or your computer and programmed via Python or EZBlock. The PiCar-X is compatible with a Raspberry Pi B, B, B+, and 4B.
The Makeblock mBot series also offers a range of beginner-friendly coding robot kits. The mBot, mBot Neo, mBot Mega, and mBot Ranger kits provide a variety of options for different skill levels.
Choosing the right robotic kit depends on several factors. Do you want to improve your knowledge of electronics? Are you experienced in Arduino, C++, Raspberry Pi, or Python programming? What is your experience level? What is your budget? These are some of the questions you need to ask yourself before making a decision.
In conclusion, the world of robotic kits is vast and diverse. Whether you’re a beginner or an experienced programmer, there’s a kit out there that’s perfect for you. Remember, the best price robotic kit is not just about cost, but also about value, quality, and suitability for your specific needs.
0 notes

Photo

Raspberry Pi 4B Case Rig TFT #3DThursday #3DPrinting « Adafruit Industries – Makers, hackers, artists, designers and engineers!
0 notes
Text
How to Migrate UniFi Controller from a Debian 11 on a Raspberry Pi 3B+ to Debian 12 on a 4B
Glossary: 4B = 4 Model B 3B+ = 3 Model B+ Step 1: Set up the Raspberry Pi 4B Follow these instructions. I highly recommend doing as much preconfiguration in the Raspberry Pi Imager as you can. Step 2: Install UniFi Controller Follow these instructions. Step 3: Export your UniFi Controller settings on the Raspberry Pi 3B+ Step 4: (If you have a Site set up) Export your Site(s) from UniFi…
View On WordPress
0 notes
Text

Cici Wu, Foreign Object #2 Umbra And Penumbra (Dolphin), 2023. Bamboo wire, paper, Raspberry Pi 4b, USB webcam, neopixel ring LED, cable, memory card, 73 x 29 x 99 cm
1 note
·
View note
Text
PiArm kit de robot multifuncional de 4 DOF para Raspberry Pi 4B, 3B +, 3B.
SunFounder PiArm es un kit de robot multifuncional de 4 DOF para Raspberry Pi 4B, 3B +, 3B. PiArm Tiene dos métodos de control que son Joystick dual incorporado y control remoto (PC, teléfono y Tab). El Kit de robot admite la programación visual de Python y EzBlock Blockly. La aplicación EzBlock Studio es compatible con IOS, Android, teléfono y tableta. Deja que todos aprendan a programar en…

View On WordPress
0 notes
Text
Raspberry Pi 4B Supply Found in Spin Scooters in Seattle. Spin No Longer Operates in Seattle BTW
https://www.reddit.com/r/SeattleWA/comments/15k0p0v/raspberry_pi_4b_supply_found_in_spin_scooters_in/?utm_source=dlvr.it&utm_medium=tumblr
0 notes
Text
change of plans- getting raspberry pi 4b now
getting a raspberry pi pico for a project 💪🏼 it's gonna be fun
2 notes
·
View notes
Text
Einstieg ins Chia-Mining: Testbericht zum Bitcoin Merch Chia Miner 9TB Kit

Kryptowährungen werden immer vielseitiger, und der Einstieg ins Mining wird dank neuer Lösungen einfacher. Mit dem "Bitcoin Merch Chia Miner 9TB Kit" gibt es eine einfache Möglichkeit, in das Chia-Mining einzusteigen. In diesem Beitrag stelle ich das System vor, erkläre, was die Währung Chia (XCH) ausmacht, und wie sie sich vom bekannten Bitcoin unterscheidet. https://youtu.be/YBOQzr8eOzM Hinweis: Ich habe dieses Kit von BitcoinMerch.com kostenfrei erhalten, um es zu testen und darüber zu berichten. Die hier geäußerten Meinungen basieren auf meinen eigenen Erfahrungen.
Was ist Chia (XCH) und wie unterscheidet es sich von Bitcoin?
Chia ist eine Kryptowährung, die auf einen umweltfreundlicheren Ansatz setzt. Statt auf energieintensives Mining wie bei Bitcoin (Proof-of-Work) siehe Bitaxe Gamma, basiert Chia auf dem sogenannten Proof-of-Space-and-Time-Verfahren. Dabei wird Speicherplatz anstelle von Rechenleistung genutzt. Das macht Chia deutlich stromsparender und nachhaltiger. Gleichzeitig bleibt die Sicherheit des Netzwerks gewährleistet.
Das Chia Miner 9TB Kit im Überblick
Das "Bitcoin Merch Chia Miner 9TB Kit" richtet sich sowohl an Anfänger als auch an erfahrene Miner. Es enthält folgende Komponenten: - Hauptmodul (Evergreen Hub): Die zentrale Einheit für den Betrieb des Systems. - Erweiterungspaket: Ermöglicht eine einfache Erweiterung des Systems bei steigenden Anforderungen. - Netzteil (10A) mit Verteiler: Sorgt für eine stabile Stromversorgung. - Netzwerkkabel: Ermöglicht eine schnelle Verbindung zum Internet. - USB-Kabel: Verbindet die einzelnen Komponenten miteinander. - 90 Tage Garantie: Schutz bei technischen Problemen.

XCH Chia Miner von Bitcoin Merch

RJ45 Netzwerkkabel

10A Stromadapter

Stromkabel für US Markt

Stromverteilerkabel für mehrere Chia Miner Geräte

USB3 Datenkabel Ein Blick auf die verbauten Komponenten Nach genauerer Prüfung der Hardware fielen einige interessante Details auf: - Raspberry Pi 4 mit 32GB SD-Karte: Dieser Mini-Computer ist das Herzstück des Systems. Er ist leistungsfähig genug, um das Chia-Mining zu steuern. - 10 TB Festplatte mit Lüfter: Der Speicherplatz ist entscheidend für das Chia-Mining. Hier wird auf eine klassische Festplatte gesetzt, die zwar preiswerter als eine SSD ist, jedoch langsamer arbeitet. - Einfache RGB-LED: Dieses Modul stammt aus der Mikrocontroller-Programmierung und dient zur Visualisierung des aktuellen Status des Systems. So kann man den Status schnell erkennen, ohne sich am Frontend anzumelden. Insgesamt setzt das Kit auf günstige, aber bewährte Hardware. Dies macht den Einstieg ins Chia-Mining erschwinglich, auch wenn keine High-End-Komponenten verwendet werden.

Chia Miner mit Raspberry Pi + RGB LED + Spannungskonverter

Spannungskonverter von 12V auf 5V

40 mm Lüfter zum kühlen des Raspberry Pi im Chia Miner von Bitcoin Merch


Raspberry Pi 4B mit passiven Kühlkörper

günstiges RGB LED Modul Interessanterweise handelt es sich bei der HDD um eine No-Name-Version ohne ersichtliche Markenbezeichnung. Eine Google-Suche nach weiteren Informationen zur genauen Modellbezeichnung oder technischen Details ergab keine Ergebnisse. Daher lässt sich die Qualität und Langlebigkeit der Festplatte nur schwer einschätzen.

10 TB HDD aus dem Chia Miner von Bitcoin Merch

40 mm Lüfter zum kühlen der HDD

Stromversorgungsmodul für die HDD
Herausforderungen bei der Einrichtung
Für die Einrichtung des Kits wird eine spezielle App benötigt, die jedoch nicht mehr im offiziellen Google Play Store verfügbar ist. Stattdessen muss man eine nicht zertifizierte APK-Datei herunterladen und installieren. Dies birgt ein potenzielles Sicherheitsrisiko, da der Entwickler der App nicht bekannt ist. Um meine privaten Daten zu schützen, habe ich testweise ein altes Handy verwendet. Dazu habe ich ein neues Google-Konto erstellt, das kostenfrei ist, und die App darauf installiert. Dieser Ansatz bietet eine gewisse Sicherheit, ist jedoch keine Lösung für jeden Nutzer. Dennoch ist dies ein praktikabler Weg, um das Kit risikofrei einzurichten.
Besondere Merkmale des Kits
Das Kit bietet einige interessante Vorteile: - Einfache Einrichtung: Auch Einsteiger können das System schnell in Betrieb nehmen. - Erweiterbarkeit: Das System kann bei Bedarf problemlos erweitert werden. - Bonus-NFT: Mit dem Kauf des Kits erhält man ein exklusives digitales Sammlerstück.
Mein Fazit zum Bitcoin Merch Chia Miner
Das "Bitcoin Merch Chia Miner 9TB Kit" ist ideal für alle, die ohne großen Aufwand in das Chia-Mining einsteigen möchten. Die verwendeten Komponenten sind solide und funktional, auch wenn sie eher einfach gehalten sind. Besonders für Einsteiger ist dieses Kit eine gute Wahl, da es alles bietet, was für den Start notwendig ist. Im nächsten Beitrag werde ich zeigen, wie die Einrichtung funktioniert und wie sich das System im Alltag bewährt. Read the full article
0 notes