
Don't wanna be here? Send us removal request.
Statistics
We looked inside some of the posts by wuroodshaher and here's what we found interesting.
Average Info
Notes Per Post
1
Likes Per Post
1
Reblog Per Post
0
Reply Per Post
0
Time Between Posts
5 days
Number of Posts By Type
Text
15
Last Seen Tumblr Blogs


Fun Fact
Tumblr.com rank in the US is 25.
Text
Final Project
It is so hard to travel to a different place and this place is completely different in culture, lifestyle, and language. I have been traveled from middle east to the USA and it wasn’t easy to participate in a new community and there are many different things in this new life.
I am working as a volunteer in some places in Syracuse to translate from The Arabic language to English and from English to Arabic. I went before a month to translate and help a family that came from Syria to the USA and they arrived at that week. I gave them a help with everything as much as I can because I feel what they feel at this time.
They have three children, one of them was just smiling with me, he is four years old. I asked him if he needs anything and he told me that he needs a car because he hadn’t had one for more than 3 years.
I told him that I will give him two cars, one of them I will buy for him and the other I will make it. he was surprised that I can make one and he told me that he will be so happy if I taught him how to make it and all the connections inside it.
I decided to work with Arduino, I got all the items that I am going to use and I got ready and interested to start to build my robot.This is the tools and parts that I used in my project:


I will explain in this part how to start put the pieces together. This is how I start designing my car, the first pics is the diagram of the work. the first part is how to Install UNO R3 Board and Motors on Chassis:
1- I Connected the 4 motors on lower chassis:


In this part,I did these steps:
-I Installed Arduino on upper chassis.
-I Installed Battery Box on upper chassis.
- I Installed Voltage meter on upper chassis.


In this part, I Connect Voltage Meter to the motor driver moudle :
GND----GND VCC-----12V Vt-----V0

And then,I Connected Arduino to model x motor driver module:
D2----IN1 D4----IN2 D5---ENA D6---ENB D7---IN3 D8---IN4

And the final part is to connect the upper and the lower part together:


The software part is easier than the hardware part. I used this two codes in this project.
I uploaded these codes to Arduino through the IDE Arduino software.
This is the first code:
#include "configuration.h"
/*motor control*/ void go_Advance(void) //Forward { digitalWrite(dir1PinL, HIGH); digitalWrite(dir2PinL,LOW); digitalWrite(dir1PinR,HIGH); digitalWrite(dir2PinR,LOW); } void go_Left(void) //Turn left { digitalWrite(dir1PinL, HIGH); digitalWrite(dir2PinL,LOW); digitalWrite(dir1PinR,LOW); digitalWrite(dir2PinR,HIGH); } void go_Right(void) //Turn right { digitalWrite(dir1PinL, LOW); digitalWrite(dir2PinL,HIGH); digitalWrite(dir1PinR,HIGH); digitalWrite(dir2PinR,LOW); } void go_Back(void) //Reverse { digitalWrite(dir1PinL, LOW); digitalWrite(dir2PinL,HIGH); digitalWrite(dir1PinR,LOW); digitalWrite(dir2PinR,HIGH); } void stop_Stop() //Stop { digitalWrite(dir1PinL, LOW); digitalWrite(dir2PinL,LOW); digitalWrite(dir1PinR,LOW); digitalWrite(dir2PinR,LOW); }
/*set motor speed */ void set_Motorspeed(int speed_L,int speed_R) { analogWrite(speedPinL,speed_L); analogWrite(speedPinR,speed_R); }
//Pins initialize void init_GPIO() { pinMode(dir1PinL, OUTPUT); pinMode(dir2PinL, OUTPUT); pinMode(speedPinL, OUTPUT);
pinMode(dir1PinR, OUTPUT); pinMode(dir2PinR, OUTPUT); pinMode(speedPinR, OUTPUT); stop_Stop(); }
void setup() { init_GPIO(); go_Advance();//Forward set_Motorspeed(255,255); delay(5000);
go_Back();//Reverse set_Motorspeed(255,255); delay(5000);
go_Left();//Turn left set_Motorspeed(255,255); delay(5000);
go_Right();//Turn right set_Motorspeed(255,255); delay(5000);
stop_Stop();//Stop
}
void loop(){ }
The second code is the code for the remote control and I installed IRremote library into Arduino IDE and this is the code:
#include <IRremote.h> #include "configuration.h"
IRrecv IR(IR_PIN); // IRrecv object IR get code from IR remoter decode_results IRresults;
/***************motor control***************/ void go_Advance(void) //Forward { digitalWrite(dir1PinL, HIGH); digitalWrite(dir2PinL,LOW); digitalWrite(dir1PinR,HIGH); digitalWrite(dir2PinR,LOW); analogWrite(speedPinL,255); analogWrite(speedPinR,255); } void go_Left(int t=0) //Turn left { digitalWrite(dir1PinL, HIGH); digitalWrite(dir2PinL,LOW); digitalWrite(dir1PinR,LOW); digitalWrite(dir2PinR,HIGH); analogWrite(speedPinL,200); analogWrite(speedPinR,200); delay(t); } void go_Right(int t=0) //Turn right { digitalWrite(dir1PinL, LOW); digitalWrite(dir2PinL,HIGH); digitalWrite(dir1PinR,HIGH); digitalWrite(dir2PinR,LOW); analogWrite(speedPinL,200); analogWrite(speedPinR,200); delay(t); } void go_Back(int t=0) //Reverse { digitalWrite(dir1PinL, LOW); digitalWrite(dir2PinL,HIGH); digitalWrite(dir1PinR,LOW); digitalWrite(dir2PinR,HIGH); analogWrite(speedPinL,255); analogWrite(speedPinR,255); delay(t); } void stop_Stop() //Stop { digitalWrite(dir1PinL, LOW); digitalWrite(dir2PinL,LOW); digitalWrite(dir1PinR,LOW); digitalWrite(dir2PinR,LOW); }
/**************detect IR code***************/ void do_IR_Tick() { if(IR.decode(&IRresults)) { if(IRresults.value==IR_ADVANCE) { Drive_Num=GO_ADVANCE; } else if(IRresults.value==IR_RIGHT) { Drive_Num=GO_RIGHT; } else if(IRresults.value==IR_LEFT) { Drive_Num=GO_LEFT; } else if(IRresults.value==IR_BACK) { Drive_Num=GO_BACK; } else if(IRresults.value==IR_STOP) { Drive_Num=STOP_STOP; } IRresults.value = 0; IR.resume(); } }
/**************car control**************/ void do_Drive_Tick() { switch (Drive_Num) { case GO_ADVANCE:go_Advance();JogFlag = true;JogTimeCnt = 1;JogTime=millis();break;//if GO_ADVANCE code is detected, then go advance case GO_LEFT: go_Left();JogFlag = true;JogTimeCnt = 1;JogTime=millis();break;//if GO_LEFT code is detected, then turn left case GO_RIGHT: go_Right();JogFlag = true;JogTimeCnt = 1;JogTime=millis();break;//if GO_RIGHT code is detected, then turn right case GO_BACK: go_Back();JogFlag = true;JogTimeCnt = 1;JogTime=millis();break;//if GO_BACK code is detected, then backward case STOP_STOP: stop_Stop();JogTime = 0;break;//stop default:break; } Drive_Num=DEF; //keep current moving mode for 200 millis seconds if(millis()-JogTime>=200) { JogTime=millis(); if(JogFlag == true) { stopFlag = false; if(JogTimeCnt <= 0) { JogFlag = false; stopFlag = true; } JogTimeCnt--; } if(stopFlag == true) { JogTimeCnt=0; stop_Stop(); } } }
void setup() { pinMode(dir1PinL, OUTPUT); pinMode(dir2PinL, OUTPUT); pinMode(speedPinL, OUTPUT); pinMode(dir1PinR, OUTPUT); pinMode(dir2PinR, OUTPUT); pinMode(speedPinR, OUTPUT); stop_Stop();
pinMode(IR_PIN, INPUT); digitalWrite(IR_PIN, HIGH); IR.enableIRIn(); }
void loop() { do_IR_Tick(); do_Drive_Tick(); }
Right now, I have a car that can go forward and back and turn around to both side. I will submit a video when I got the battery.
Right now, we are going to the art part of the car. I choose the car to be white because the white refers to peace and that child need to see something like that in this hard part of his life.
I used the foam papers in my design and just a little sparkling pieces to make it more beautiful.
This is my car looks like:


Right now, we are going to see how it is working in these videos:
youtube
youtube
### FINAL PRESENTATION ###
The presentation day was the most important day in this semester or any other day in my college life. It is the first project that reflects important events in my life, it is the first project that I can talk about my feelings and thoughts with my friends and my professor in the class.
I felt that everyone in the class was interested in my story and they feel what I feel when I said my story. I saw the tears in everyone eyes and I am happy that I did the best that I can to let everybody feel and like my story.
The feedback was great, my professor, the visitor, and my friends liked my project.
The most important part of my project was to go to Zaid’s house and give him the car. he was happy, and surprised that I can build a car for real. He asked me to explain everything to him and show him how to build a car. he told me that he will do as much as he can to be a robot designer.


Finally, I am happy that I got the point that I worked for. I made Zaid happy and I made his sad face shiny. I got also the idea of making a robot and this is just my start, I will go forward in that way and I will build something that no one thought about it before.
0 notes
Text
Interactive Paper Play
My choice was to do something that is different from my game, I got an idea to make flowers working with lights because I like to do arts with flower, it is my favorite thing ever.
These are the tools that I used in my project:


I started but my tools together, I put the slag tape in two lines and then connected the positive legs of the led lights to one of the lines and the negative sides to the other line.
I the lowest line, I used makey makey and I connected the ground to the negative line and the key out to the positive. I connected also one alligator to the space in makey makey and the other to the earth so when you touch them together the lights will turn on because you closed the circuit by your body.

And then I put them inside the frame to hide them all.

The other two lines of flowers I used the batteries in them, I used the critique that we did in class by connect the negative face of the battery to the negative leg of the led and the positive to the positive. I pit a bird on the positive side and when you click it you will close the circuit and the led will turn on.

This is my final shape and we gonna try it in class tomorrow.

0 notes
Text
Artist Research, Annelie Koller, DC Motor Control Using an H-Bridge Project.
The artist has a lot of works that using electronics to present art. She also has many architecture and other kinds of work. I will present the electronics art.
http://www.anneliekoller.com/
https://vimeo.com/89340367
https://vimeo.com/87538042
In this project, they designed a little remote control car and they used a DC motor with an H-bridge. They programmed it with arduino. The vehicle working by two wheel drive to drive, reverse, and turn.
In Koller’s project, we are going to learn how to control a DC motor’s direction using an H-bridge.


Things that you need in this project:
1- Solderless Breadboard

2- 22-AWG hookup wire

3- Arduino

3- Light emitting diodes – LED
4- LED10Kohm resistors

5- Switch

6- L293NE or SN754410 H-bridge

7- 12V DC power supply
8- DC motor

Start to Prepare the breadboard
They Connected ground and power on the breadboard to power and ground from the microcontroller. And on Arduino they used the 5V and one of the ground connections.

they connected the switch to digital input 2 on the Arduino amd the other side to the ground.

They used a DC motor in this project that runs on low DC voltage within the range of 5-15 V.
note\ when you run a motor at a voltage much higher or much lower than what it’s designed for will possibility or permanently damage your motor.
Set up the H-bridge
They used the L293NE/SN754410 and it is a very basic H-bridge. there are two bridges, one on the right side of the chip and the other one on the left side and this bridge can control two motors.
This is the way that show us how to setup the H-bridge:
Pin 1 (1,2EN) enables and disables our motor ( high or low)
Pin 2 (1A) a logic pin for our motor
Pin 3 (1Y) one of the motor terminals
Pin 4-5 for ground
Pin 6 (2Y) other motor terminal
Pin 7 (2A)a logic pin for our motor
Pin 8 (VCC2) is the power supply for our motor.
Pin 9-11 unconnected.
Pin 12-13 for ground.
Pin 14-15 unconnected
Pin 16 (VCC1) connected to 5V

Connect the motor to the H-bridge
Right now, we need to connect the motor to the H- bridge in this way

Program the micro-controller
We need right now to do program the micro-controller to run the motor through the H-bridge.
This is the code that they use in this case:
- First set up constants for the switch pin,
- Setup the two H-bridge pins, and the enable pin of the H-bridge.
- Use one of the analogWrite pins (3,5,6,9,10, or 11) for the enable pin.
const int switchPin = 2; // switch input
const int motor1Pin = 3; // H-bridge leg 1 (pin 2, 1A)
const int motor2Pin = 4; // H-bridge leg 2 (pin 7, 2A)
const int enablePin = 9; // H-bridge enable pin
In the setup part, set all the pins for the H-bridge as outputs, and the pin for the switch as an input and we do that because when we set the enable pin high then the H-bridge can turn the motor on.
In the void setup part , we have to do:
- set the switch as an input
- set all the other pins you're using as outputs
- set enable Pin high so that motor can turn on
void setup() {
pinMode(switchPin, INPUT);
pinMode(motor1Pin, OUTPUT);
pinMode(motor2Pin, OUTPUT);
pinMode(enablePin, OUTPUT);
pinMode(ledPin, OUTPUT);
digitalWrite(enablePin, HIGH); }
In the main loop part we have to:
- read the switch
- If it’s high then we have to turn the motor one way and that happen by taking one H-bridge pin high and the other one low.
- If the switch is low, change the direction by reversing the states of the two H-bridge pins.
void loop() {
if (digitalRead(switchPin) == HIGH) {
digitalWrite(motor1Pin, LOW);
digitalWrite(motor2Pin, HIGH); }
else {
digitalWrite(motor1Pin, HIGH);
digitalWrite(motor2Pin, LOW);
}
Finally and by using this project we can be a creative artist by using this motor to design something can move, run, fall or whatever they way that we can use it to make something different and new.
.
0 notes
Text
Arduino & Fritzing
Arduino is an open origin or source computer software & hardware. It is a single-board used for constructing the digital devices and interactive objects that can control objects in our physical world.

The board uses many types of controllers and microprocessors. The boards has also sets of digital and analog input and output pins that may be linked to different extension boards and many other circuits.
Frizing is a software that is using to design the electronics hardware to help the designer and the artist to draw our ideas and support them to put their circuit in a prototype shape.

A- Blink LED
The first and the most easy way to start with the Arduino & Fritzing is the blink led. The idea is to make a close circle by connect the long side of the led to the number 13 or any other number on the board and the negative side to the ground

And also we can connect it like the down image by adding a resistor to the circle and then we gonna connect the circle again the positive side to like number 8 and the negative side to the ground.

And then we gonna add the code in the code part to start run the circle and get the led work.

I designed that and print it out.
B- Press Button to make LED Blink
We are going to design a different kind of electronic circle, we have to learn and try how to use a button in this case to make the led blink.
I draw a circle with some changes, we need to use arduino, buttom or switch, resistor, wires, and headboard.

We gonna put the led on the board and the resistor then we gonna to run a wire from the arduino to the positive side of the led, so I connected 13 and the other side of the led to the resistor and both of them going back to the ground in the arduino so we have a close circle for the led.
This is exactly how do I connects the parts together:

And this is the code that I used in this case:

c- Use photo-sensor to change the rate of blinking of LED
And this is the code for this diagram:

And this is the code that we used in this case:
Connect one end of the photocell to 5V, the other end to Analog 0. connect one end of a resistor from Analog 0 to ground Connect LED from pin 13 through a resistor to ground
int photocellPin = 0; // the cell and 10K pulldown are connected to a0 int photocellReading; // the analog reading from the sensor divider int LEDpin = 11; // connect Red LED to pin 11 (PWM pin) int LEDbrightness; // void setup(void) { // We'll send debugging information via the Serial monitor Serial.begin(9600); }
void loop(void) { photocellReading = analogRead(photocellPin);
Serial.print("Analog reading = "); Serial.println(photocellReading); // the raw analog reading
// LED gets brighter the darker it is at the sensor // that means we have to -invert- the reading from 0-1023 back to 1023-0 photocellReading = 1023 - photocellReading; //now we have to map 0-1023 to 0-255 since thats the range analogWrite uses LEDbrightness = map(photocellReading, 0, 1023, 0, 255); analogWrite(LEDpin, LEDbrightness);
delay(100); }
Two sketches
1-
The first sketch That I draw is represent two led working together, when one of them turn on the other turn off.

And this is the code that I used:

void setup() { pinMode(Red,OUTPUT); pinMode(Green,OUTPUT); } void loop() { //Blinking digitalWrite(Red,HIGH); digitalWrite(Green,LOW); delay(500); digitalWrite(Red,LOW); digitalWrite(Green,HIGH); delay(500); }
2-
I got an idea to make three led working sequentially by changing the code by define 3 led and make them working one after the other.

And this is the code that I used in this case.

int LED1 = 13; int LED2 = 12; int LED3 = 11; void setup() { pinMode(LED1, OUTPUT); pinMode(LED2, OUTPUT); pinMode(LED3, OUTPUT); } void loop() { digitalWrite(LED1, HIGH); delay(200); digitalWrite(LED2, HIGH); delay(200); digitalWrite(LED3, HIGH); delay(200); digitalWrite(LED1, LOW); delay(300); digitalWrite(LED2, LOW); delay(300); digitalWrite(LED3, LOW); delay(300); }
1 note
·
View note
Text
Bubble Shooter Game Observation.
youtube
The famous game Bubble Shooter is very nice and easy to learn and so easy to get into the game. These words showing the rules of the game and how to play it.
The goal of Bubble Shooter is to get as many points as you can. To get these points you need to break the colored bubbles, to do that, you need to link at least three bubbles from the same color.
In the bottom and exactly in the center of the game's window, you will find an arrow or any other shape like a cannon, and you can change the way of this arrow points by the computer mouse. when you clicking the left mouse button, you will shoot a bubble to the current direction of the arrow.
This is some notes and hints of this nice game:
-when you shot 6 bubbles, you will get a new row of bubbles will appear on the top of the game and the game will end when the bubbles rows touch the border of the game. -Any bubbles which get isolated from the others will explode. -In the lower left side of the game, you can see the new bubble's color. -There is no end in this game, the goal of it is to collect as many points as you can.
I tried to turn this digital game to non-digital game and I want to follow as much as I can from the information that I got it from my observation.
I followed the instruction and then I get a small idea and it is close to the game with just a small difference because it is not easy to turn from digital to non-digital form.
These are the simple tools that I used to do my game.

This is the game that I did. It has the same idea of the original one.


They will be two players in this game. They have to turn around the arrow to see who will start first. The player who has the lowest number will start the game.
youtube
The next step will shoot the ball towards the items and there are some rules for that:
-The player has to choose the first ball in the bottom and he\she has to shoot it towards the items, the most of the items that fall should be the same color of the ball, any other color will not be count.
-The player will take the same color of the ball and put it in his\ her account.
-The black precise will not be count.
- After taking all the items, the player who has more Items in his\ her account will be the winner.
In this case, the player used the yellow ball and he didn’t get a yellow item so he has nothing in this turn.
youtube
In this turn, the player got just one item has the same color of the ball “blue”, so he got 1 in his account.
youtube
In conclusion, it is a good idea that we have like this thinking assignment because I learned how to understand the digital things and get a way to work with it as a non-digital. Right now, When I look at any game I think about it if it is non-digital how it will look like. This will add more experience how to turn the something into its opposite.
0 notes
Text
In-Class Game Assignment
Our games name was “Hate”. We tried to find something to support the point. We found a new way to play the game. It was that the last person being on the board will be the winner. And you were able to eliminate other players by making them fall off the edge of the board or by having the red chip which will give you the privilege to eliminate other players on the same side of the board as you by attacking them.


This is our game guide that we wrote it in class:
Objective:
Last one standing on the board wins
Order of players:
Roll the dice by chance. Whoever has the highest number becomes Player one, then the reset in respective order.
- Up to four players only. Each player may place their character in any space at the edge of the board that isn’t occupied by color of chips
Color- used for teleporting
- Yellow with yellow
- Blue with blue
Dice- use to move spaces
- Roll the dice
- The face that touches the bottom will be choices of a number of spaces you can move
- Must pick only one of the options
- Must land on-chip to pick it up
Chips: Player can hold on to the chip when collected until they want to use it however once used player must put back the chip onto the board where they last were placed. When starting the game, the chips can be placed anywhere at the discretion of the last player.
- Can only move left and right unless you have a green chip
- Green: can move diagonally only (for a number of spaces you rolled)
- Red: can move the length of the board, must have in order to eliminate opponent unless opponent is the space closest to the edge of the board
- Without the green chip, each player can only move up and down, left or right
- Can use chips after you move
Roll the dice to move
Must move the amount rolled
Can only move left and right unless you have a green chip
Must land on a chip to collect it
Can use chips after you move
Red chips are used to eliminate the opponents in the same row as you
If on the edge can be pushed off
0 notes
Text
6 Curved wall Final part
Our project was to observe the “Six Curved Walls” outside Crouse College and see how the people interact with it. Sol LeWitt is the artist who made this sculpture. It was built on November 16th, 2004 in 38 days below Crouse College. The sculpture was designed to mark the opening of “Nancy Cantor” as the eleventh Chancellor of Syracuse University in the year 2004. It came to the SU because LeWitt donated it to the university for a permanent installation.

In the last week, we decided to add the last part to our project and it was the sounds. We had before a string of lights to get the people interesting to the wall. After that, we hide the lights and wires between the cracks in the wall and the pathway of arrows to get the people to the walls.
These are the arrows for just a reminder how we did it before.


These are pictures of our installation and it shows that we hide the laptop behind the wall and we put three bottoms and two sticks on the side to let the people think about it and used it to see what it leads to.
We took the pieces of advice that we got it from you and it was very helpful and more beautiful in our simple insulation.
Things we changed that we got it from the evaluation day:
- We put the laptops in the back of the wall.
-We hide the whole wires from our insulation.
-We put the wires and the lights in the cracks
- We changed the bottom from the big circles' shapes to a small square shape.
Things we added after the evaluation day that we thought it will be more beautiful and it will add something more interesting:
- We added more lights.
- We added two sticks and it was a new way of how to get lights and sounds.
- We put it in a different way and we put the lights on by default to get people interaction and when someone uses the stick it will be off.
-


Then, we thought about an interactive part of our installation, we used a simple processing code and three handmade buttons one for the light and two for the sounds, so we got sounds beside the lights.
We used two Makey Makey one of them to control the light and the other one to control the sounds. and three bottoms two for sounds and one for lights. after that, we put two sticks also to control both of them. when you take the stick and put it on the bottom you will get sounds and you will also turn on and off the light.
In conclusion, finally, we got what we want for this project, it was a nice work and doesn't need any other thing because we got the goal that we drew before.
the first part of our goal was how to get people there.in this place and every one know that it is so high and far place and no one will go there and we saw that in our observations days. we got the idea of put a pathway the will be more interactive and we used arrows for that and then we got many peoples who follow our new way to the top.
After that, we figured out how can we make this walls more interactive and then we used lights on that wall.
The last part was how to let people doing more than the lights to stay in that place for a while and we got the idea of adding sounds to our installation.
youtube
youtube
0 notes
Text
Parable Of The Polygons

The goal of this game is to move the sad triangles and squares to another place until they have the happy faces, but when I make all of them happy, I got that I divided the space to two different spaces. By playing more with the squares and triangles, I discovered that even a small bias towards similarly can change neighbors and head up to discrimination.
It shows us that how a small bias can have divided the world around us. It is helping us to understand and recognize how is choices that are not harmful choices can make a harmful world and society. The individual life is affecting the community in many ways.
A parable of the polygons shows us in an uncomplicated way the connection between shapes and bias to let the people understand it in a nice and effortless way. It told us that it is not right to choose the people around you just because they have the same shape, colors, and cultures.
Also, it shows us that the different people or things make the world around us strong and beautiful. Every difference is more powerful and useful because we need a different people to build our society and it will be more successful.
0 notes
Text
6 Curved Walls Part 4

Going back to our project, after we got the way to make people interested to follow our path, we think about something to make them happy when they go up towards the wall. we got an idea of putting a small system there to let the people do something interesting when they arrive at the wall.
we set up our project together on Friday morning and we finally got the last set that we were looking for.


The idea was to put two systems, the first one is a vision system, we set up the Makey Makey in this way.


and this is the video that explains how it is working.
https://youtu.be/xMTUEiCxEQs
then we set up another system and it was a sound system and that done by using another Makey Makey and another laptop, this is the video of how it is working.
https://youtu.be/UMVQmjmTtwQ
the final show is working perfectly and the most important point that we got our goal, we put a path for people to walk in that area and we put something different up on the wall to get the people interact with that space.
0 notes
Text
6 Curved Walls Part 3
We tried to get a way that will be more successful than the way that we used before. We thought of something that had gotten the attention of people near the walls which was arrows leading from the bottom of the hill to the walls. We started out by putting the arrows behind the walls and attracting students from Crouse college to go down to the walls but there weren’t many people coming out. There was only one student who came out at the time and then she looked at the arrows which got her interest to go follow them and look at the 6 curved walls.

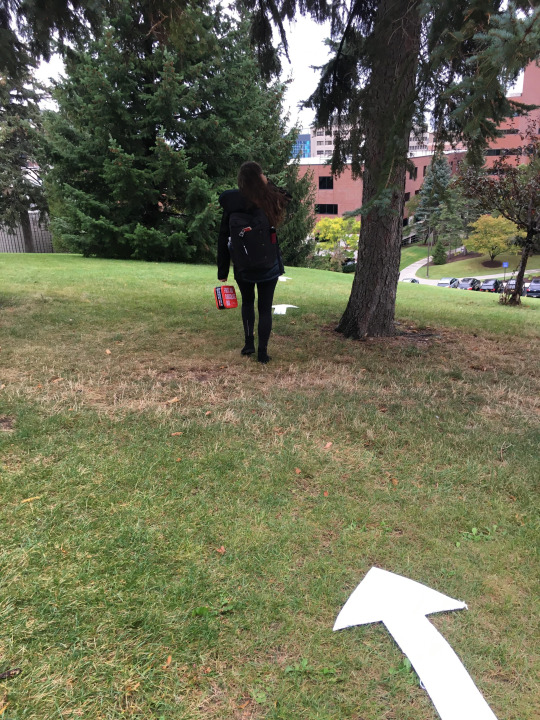
That idea wasn’t very successful so we got another idea which was to put the arrows on an easy and less-steep way going up the hill to the walls near the sidewalk.
We changed the positions of the arrows near the side walk and close to the stairs going from the sidewalk up to the walls. And the people who were going to the Crouse college used the path of the arrows to know where they went and why they were there. Anyone who was going to the stairs stopped and used the way of the arrows because it was something unusual to see everyday.
Then we got many people going up to the wall using the arrows pathway.


The student on the right in the bottom photo went up and went down using the same road that the arrows showed.

Here is some video footage of what happened today.
https://youtu.be/kuQHMPQqJy8
https://youtu.be/4dIi8f192u8
Finally, after putting the arrows from the sidewalk was more successful than putting arrows from Crouse college to the wall that was because there were more people at that area and then we got more people using the arrows to go up to Crouse college. We plan to use the lights with the arrows to make the people more interested to see what’s going on at that space.
0 notes
Text
Six Curved Wall, part 2
Makey Makey is a great tool, we can control everything by using it. it works with everything like a circle so it can give a power for any electrical or electronic circle.
we got an idea to use it in our project, we notice the last week that there are no one look at the walls or even turn their heads towards it. and I feel there are little ideas about it between the students.
We decided to put lights on the wall to bring people’s attention to it to let the people know what is mean and who the artist that establish it, and why, because it is a nice space to see. We found that it is so hard to get power in that space but by using Makey Makey we will have no problems.
We turn on the string light with Makey Makey and we were very happy when we got the result.
This was the first picture in my home when we turn it on at the first time.

This was our plan to connect our string light to Makey Makey.

We connected two of the white wire, one of them to V5 and light and the other to key out and the other wire of the light. We put also one alligator on click and the other connected to the earth on the bottom.

When we touch the other face of the alligators we got the control in this light and we can turn it on and off. Also, we can turn it on and off by connecting the alligator clips together and separating them. so we have the light setup and we have the idea to start doing it.

on Sunday night, we put the lights on the wall and but the computer connected to it and then we got our light on in that nice space.


We connected the USB wire to the computer and put it beside the wall. and this is the video of how it looks nice and shiny at that time.
https://youtu.be/ur76pDpnDmQ
Our build was nice and successful and we got everything worked like it should. There were no problems when we were trying to get the installation to be in the shape that we decided to get before, everything was great.
It was just one piece of string light so it covered just one wall. We need to figure out a way that we can connect more than string light and put them together to cover the six walls.
The most important part that we got the result that we plan to get it before. On Sunday night, there were no many people at that space or outside to see how is our build works, but there were some people walked and turn their heads and looked at the lights. we got the people attention towards the wall and this is the second part of our assignment and it works perfectly.
0 notes
Text
Six Curved Walls
Sol LeWitt is the artist who made this sculpture. It was built on November 16th, 2004 in 38 days below Crouse College.

The sculpture is very nice six wavy walls, each one high is 12 feet, built of concrete blocks.

LeWitt used this kind of material because it is easy to get and it is easy to convert to different shapes and ways. The sculpture was designed to mark the opening of "Nancy Cantor" as the eleventh Chancellor of Syracuse University in the year 2004. It came to the SU because LeWitt donated it to the university for a permanent installation.
I observed this place for 3 hours and my partner did the other 3 hours. I went on Friday, Saturday, and Sunday. I didn’t see anyone look at it or cares about it. It is so wonderful place and it gives to the area that is around it a nice look. I got many pictures and these are some of them.


In these two videos, I am going to show everybody how the people behave towards this place and how they walk in that place and around it.
https://youtu.be/-PHn6bOA15I
https://youtu.be/45YyifqSNFk
I saw just two people sit beside the walls and I felt happy that there are people that feel it is an interesting place and they decided to sit there. This is the picture that I got for them at that time.

I didn’t see anything different or any idea when I was observing this place, and I am sure that very little people know about it and why it had been built. I liked the place too much and I think it is an interesting point to stop by and look at this sculpture. I like the idea that the artist got, and it is so nice to go between them.
On Sunday, I decided to look at the place to see if there are anything different. I went there but I got the same thing that there are no people at that place, I just got two people sit in front of it. This is the pic that I got for people.

In conclusion, I think it wasn’t supposed to be in this place because the students always have classes and all of them don’t have an extra time to stop and look at the sculpture. Everyone, there was walking so fast and everyone there came to do a project or have classes. I think also if we put it in a lower place to give the people a chance to look at it and think about what is mean and who did it. It is located on the hill and it is so far from the people, all of them walk on the street beside the walls and there are no people walk or go close to that place.
These are the sources that I got an information from it.
https://jewishphilosophyplace.com/2012/04/18/the-great-wall-of-syracuse/
http://dailyorange.com/2016/04/explore-the-su-campus-through-these-6-historic-statues/
http://artoncampus.syr.edu/sixwalls.html
http://forward.com/culture/3976/at-syracuse-university-undulating-walls-commemora/
https://news.syr.edu/2005/05/su-devotes-new-web-site-to-artist-sol-lewitt-six-curved-walls-syracuse/
0 notes
Text
Project 1, part 2
Returning back to our space, Everson Museum and the issue that we got before, just a reminder that we didn’t see any people in our observation day and we said maybe the reason behind that is the museum fees, time, season, and location. As a team, we decided to put what we learned before from our observation before and develop an idea that makes the space more active and to gain interaction to space.
We learned that not all presumptions will be propped by the information collected so we decided after the class to get an idea and figure out a few things that could bring people to the place to make it more active and then we can get a real observation about how the people react and behave towards a places like an art museum.
we got many thoughts and ideas, after that, we decided to put all those under “Art Festival”.
This is the most important part, how to make our “Art Festival” to be a space that people can come to look at it and follow the art in different cultures to learn about them.
We tried to keep our way in a real way and we started to put a sequence to our festival and the first step is to design flayer to get people attention.

it is a simple flayer to get the people attentions to the museum and there are many other ways we can use it to get the people attractions to the museum.
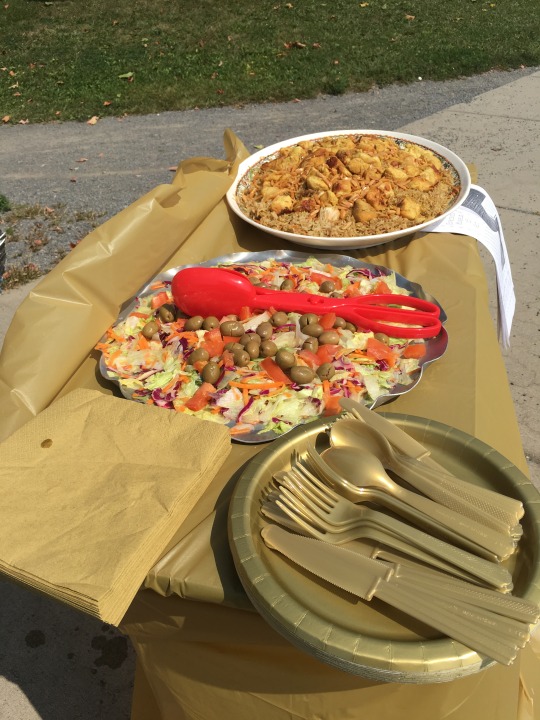
This was the first step, the second step was what do we have to put to get people attention to the museum. We decided to put a food from other culture to make the festival different and I believe the cooking is another kind of art.
We put our tables and then we put our food, flyers, and a piece of art to make the festival colorful and then we got a visitors one by one but we waited until get five visitors together to start taking our pictures. We were so happy that we gain what we want and we believe that we can do it and nothing is impossible in front us.
These are some pictures from our small festival.

This is my cooking, it is Beriani with chicken and almond, and a vegetable salad.
in this picture, we were talking to them and let them know more information about the museum and how nice is to visit it to get an idea about many kinds of arts.

they liked the idea and they said it is nice to figure out how to bring people attentions to this place.

My partner and I were happy at that time because we got the point of bringing five people to our festival.

We talked a lot about cultures, art, and our class, we told them about the first observation and how was difficult to us to observe an empty space.

Finally, we learned that our work is useful to bring people attention to the museum and that leads to improving it as a public space. we can get an attention by put flayers in many places, make a commercial on TV, establish many kinds of a festival like cultures, arts, movies and others. The people appreciated what we did and why we did it and they liked the way of how we work together as a team. We gain more than what we expected and there are many people interested in what we are doing.
0 notes
Text
reading 1 & 2
Observation is a qualitative method used to watch people in natural spaces and get an information that will be useful for researchers in their studies. Observing people in spaces is the best idea to learn how space looks like. People and their behaviors always give the observer the real image about spaces and then get what they need for the social studies. I asked myself many times why do we have to learn and study spaces but then I understood how important is that for many kinds of studies like sociology, psychology, and others, so we can’t understand spaces without understanding how the people react to these places. The best way to make space better is to watch how people interact with` it.
The researchers don’t tell the people that they are observing them because any person in the life when he heard that will react in a unique way than the normal way and that leads to an incorrect information through the studying.
The writer started the studying in plazas and recorded information every day and they watched people see how they are using the plazas and how they are behaving to them. They got that most people who are coming to these places are office workers from the area around them. And, women are the most people who are using plazas.
The writer got that there are many similarities between the people who are using a space in the large cities and they behave the same in many things there like they walk faster and they self-congest. The writer went to Tokyo after New York city study and got a comparison between these studies and got the same behaviors as busy corners and talk in the middle of store doorways. For all the differences between the two cultures, the writer got the same information about how people react towards spaces in the big cities.
Also, the video has the same ideas that the observation method will help us to understand spaces and how people use it to improve the spaces around us.
In (Another Pavement, Another Beach: Skateboarding and the Performative critique of Architecture, Ian Borden) the writer gave us a picture of another shape of spaces. occasionally that the most active assign spaces are those working by symbols like parks and religious buildings. Also, this book argued that the appropriation giving the chance to reverse social relations and significance and then get a kind of different space around the world.
In (Cultural Probes, Bill Gaver, Anthony Dunn, Elena Pacenti) the author talked about the understanding the spaces and how the cultures play a wide role in it and make it different from country to others.
All the readings are talking about how observation method is used to understand spaces and how people are using them to get the better way to improve them.

0 notes
Text
project one
For this project, we decided to go to Everson museum to do our observational study for 12 hours to see people and how they behave towards this space during the visit.
This is our schedule for a person who likes to visit this place.

This is our timeline for the observation day.

And here are our photos during the visit and it shows the 12 hours observation study.


These pictures should’ve been taken on the 2nd of September but we find that there is nobody to observe and then we decided to go the other weekend the 9th of September to the museum to find more people to observe but we got the same. We didn’t see anyone just two peoples and after minutes, they were gone. It was a big issue for us and we felt we maybe fail this project but then we decided to get an information and get pictures for the observer itself. We thought that the first week of the school and classes in colleges could be the reason behind that.
We followed the map that we draw before for this visit and this is the most important part of this project and we said we will get information about everything or everyone we will see but we got no one in any place inside the museum. That was a big problem because we will not have a story without people.
There are various kinds of art in totally empty rooms and there are many rooms without art and this may be the second reason that makes people not interested to visit the museum.
Finally, our thoughts were so different than what we got, we thought we will have too many people there and then we will get a good observation and knowledge, but we followed the most crucial point of the project to observe spaces and how people interact or behave in that space.
We got a good and a real understanding of spaces and we got a real understanding for the observations method that we studied it before in Psychology and Sociology classes. We gain also how to work as a team and share our thoughts and ideas together and how is that easier than when you do something alone. Maybe the time was not perfect and maybe the school season was not perfect but I like to see another observation in another time and season for this place to compare it with what we got and see if we were right or not.
0 notes