
Statistics
We looked inside some of the posts by xpetrichorum and here's what we found interesting.
Average Info
Notes Per Post
4
Likes Per Post
4
Reblog Per Post
0
Reply Per Post
0
Time Between Posts
13 days
Number of Posts By Type
Text
17
Last Seen Tumblr Blogs


Fun Fact
Tumblr was attacked by a cross-site scripting worm deployed by the Internet troll group GNAA on Dec 3, 2012.
Text
Last post as a bfa student!!!
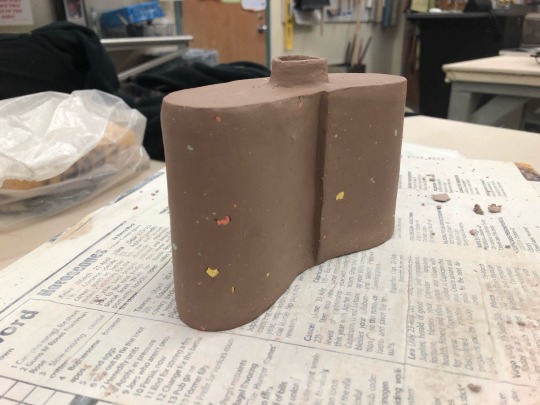
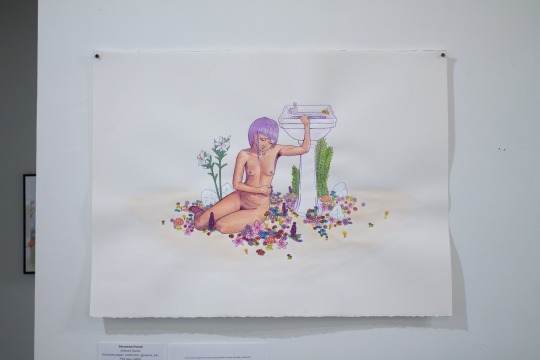
So, after I finished all that luster and all my prints were done, I came in for my final kiln Christmas as a bfa and my toilet tank top had exploded! The sink was fine, and all the epoxy fell off which was super nice because now it’s perfectly clean and smooth so it can be used again! But the toilet tank had a huge crater and a bunch of cracks coming off of it, and a bunch of broken stuff fell off under it. I think that since it was a fairly recently used toilet it had accumulated moisture in tiny pockets or pores and that’s what made it explode. Crazy!

So, I had to do some troubleshooting and decided to just take one from my house and figure out some decorations with gold paint. This was kind of sucky though because it was the day I was installing so I had to figure out a key part of my show in less than a day, which was stressful.


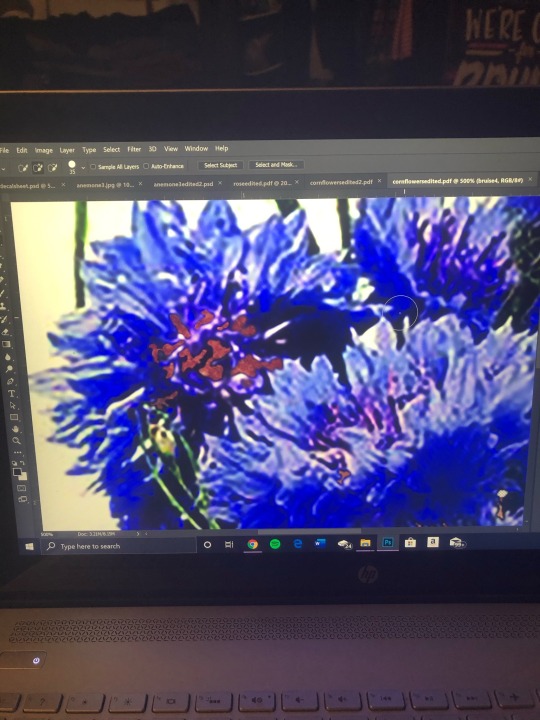
So one of the coolest parts of my thesis is the slime obviously, and let me tell you about it. It took like 5 gallons of glue and I think we ended up with about 15 gallons of slime in the end. It was SO much easier than I anticipated. I thought we were going to have to make it in small batches to ensure the connections between the pva and the borates were equally distributed but nope! I just mixed it by the gallon of glue right in the five gallon bucket. I made a purple, an orange, a green, a blue, and a pink. The purple and green were the most successful because they were so opaque and the other colors kind of got lost in the mix when I set them all out. So that’s something to remember for next time.
Also the menstrual blood I had saved smelled like a dead animal by the time I put it in that jar. Absolutely disgusting.


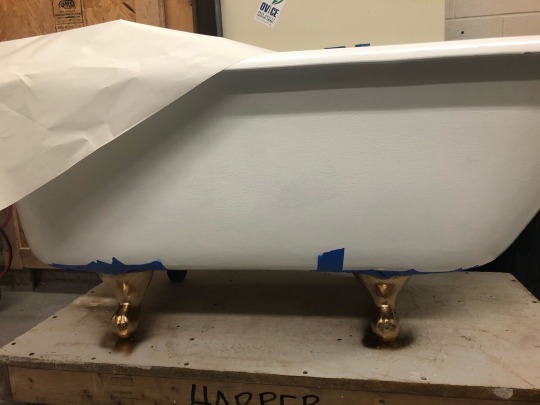
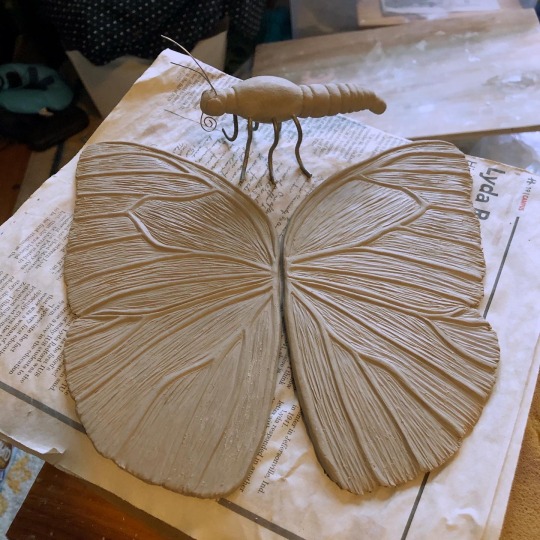
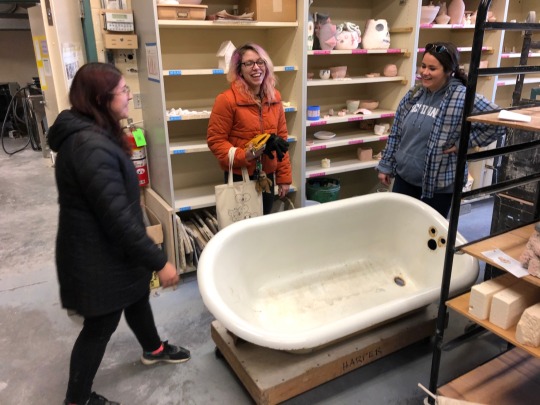
As for everything else, it all turned out so good!! The luster and mother of pearl worked like a charm! I loved how the period stuff came out. I painted the butterfly wires black, and also covered the part of my butterfly that stuck to the shelf with black so it was less noticeable. I’m thinking of covering it with some nail polish to make it match the iridescence if that works.. not sure. My mom is currently in possession of it as it’s her birthday in early May and she loved it so much. So next up was just to install... I just tried to make everything as close as possible to my original idea sketch. Shane was there to help me and after moving the tub and sink and toilet around and trying out shelf positions a few times we got it, really quickly. We got the bathroom stuff in position and installed the shelf!

We had to leave early though because no one could hang out with Kezia at home and my mom was working (she’s a pediatric er nurse!)
So we continued the next day, which was the day we had to submit everything so not gonna lie that morning we went in I was very nervous.

By the second day all we had left to do was replace that dang toilet tank top and set everything out, and figure out the toilet decoration situation. I decided to put some small things on the toilet seat cover so that I didn’t push my luck with the gold paint, which ended up being the same spray paint I used for the tub feet and the shell. I wanted to put slime in my little perfume bottles but we could get it to go in no matter what we tried so we just did veg oil and glitter instead. We filled the bathtub with a bunch of filler stuff and covered it with plastic, and then covered that with slime. We fixed the lights which took FOREVER. The slime didn’t quite behave how I expected, and because of this, I had to move really quickly to photograph everything and didn’t really get a chance to just look everything over and take it all in in person as it was together and installed. I didn’t realize this until I got home to edit photos. But it’s okay, it wasn’t really possible this time because I had a learning curve with the slime. When I install work like this again it will be different.

I took SO MANY pictures. And speaking of that, in the last days of working in the studios and installing, I took so many sad pictures of little odds and ends in the studios and hallways. I really missed everyone. But I took 235 photos in all of my show, including all the book pages. I stayed up literally all night from the time I got home editing, organizing, choosing photos, and I kind of regret that because I ended up making some last minute decisions I didn’t really want to make. I wanted to have a separate artist statement, the one I wrote earlier, and a project statement in my actual show. But in my craze of editing and organizing I thought it would be better to just integrate the two (especially since my thesis was so long) so that everyone didn’t have so much to read. Maybe that was a better idea anyway.

But, after turning everything in in the wee hours of the morning, I was finally done. And it really didn’t feel like it. It was really crazy to finish and be at home and that’s it. And there it is! I have reached my 10 image limit.
I think I’ll do another post in a few days talking about the whole post experience in detail, but this is it for grade-purpose blogs for this year. I’ll have a chance to post more photos ;) but also I feel like I could talk about this experience forever so I really want to come back and discuss more in detail after I have some time to consolidate my feelings and thoughts.
Thanks for reading if you are, and thanks to you Brian for everything! You are the greatest and most inspiring instructor ever! I’ll talk about you like you talk about Dr. Don when I’m your age. :) (also special shout out to Shane for taking so many great pictures of me installing :’) )
1 note
·
View note
Text
Next to last post? Ever?
Man, how crazy has this semester been? I think the state of my blog reflects it. It has been extra hard to keep up with this over the last few weeks. Working alone in the studio has been pretty hard on me, to say the least. It’s been really conflicting, because I am so excited to be done and do my thesis show but it doesn’t really feel like it should be over because half my last semester is gone. So it’s very bittersweet... and I felt that a lot in the studio for long hours with no one else around. Everyone has been so supportive though, I got to see Susanna on my last print session in the print studio, and she and Brian both have given me encouraging words to help me keep going.
So, before I start rambling, I’ll pick up with where my work last left off—I brought everything back to school and let it dry and poured my last pad molds, from the second mold I made. Nothing cracked too badly while drying, but I did lose a cast while trying to dry it. I set two of them on a wheel and when I turned the wheel on I hadn’t checked the pedal (who would have thought since I never use them) and one of them went flying. Somehow the other one was safe.. not really sure how. I wanted to have more than one big one in the pile of period stuff, but I think aesthetically and compositionally one will be better.
So next up was bisque obviously! Everything survived bisque, and I also refinished my bathtub with some nice white paint. I’ll have to spray paint the feet gold but that can wait until I am painting other things. Once everything was out of the bisque I realized I didn’t quite have the underglaze colors I needed and had to run to mudworks to get them, thank goodness for Brian helping me!
Another bump I ran into during the underglazing process was that the pink I got was labeled to “fade drastically” at mid-range, meaning I was going to have to fire these pieces lower than I planned. The blue I got also was labeled to fade, only slightly, but I decided to find a good 04 glaze I could use and fire them to that temp instead. I was super nervous about this because my clay bodies are both meant for mid-high range! I kept worrying the glaze would shiver off or craze, and honestly this didn’t help the underglazing process because it just sent my anxiety through the roof. Since I wasn’t using the blue and pink on every single piece, I decorated what I could fire at cone 6 first and fired it to get it out of the way.
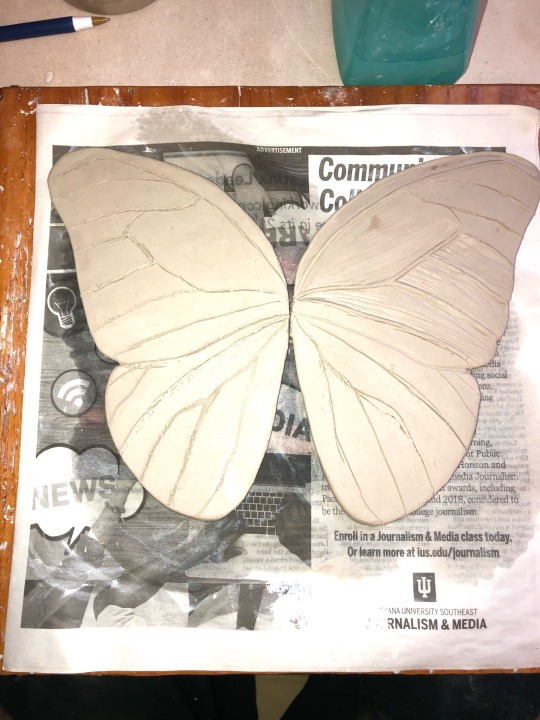
I spent quite a long time underglazing. It took a long time to finish the butterfly wings, but I think they turned out so beautifully. I got everything done, mixed up my 04 glaze, and got the next kiln rolling late that night.
Next up was painting my shell gold, and the tub feet, and painting on luster and mother of pearl. Not much to comment about this, except that I ended up using all the gold luster in the entire studio. I felt like underglazing patterns took a long time, and the luster was refreshingly quick and easy, even though I had comparable amounts of both.
I really started to get sad around this time, knowing that these would be the last times I would work in the studio as a student. I would have loved for my last times to be different, but at least I got a proper last time at all. I’m so grateful to this school and this studio for everything I’ve been given. I tried really hard to be conscious of my gratitude while I was sad and working. I also kept in contact with everyone else as much as I could, and I even got some really good feedback (from Sam of course, an angel) about some things—something I had been missing without others around.
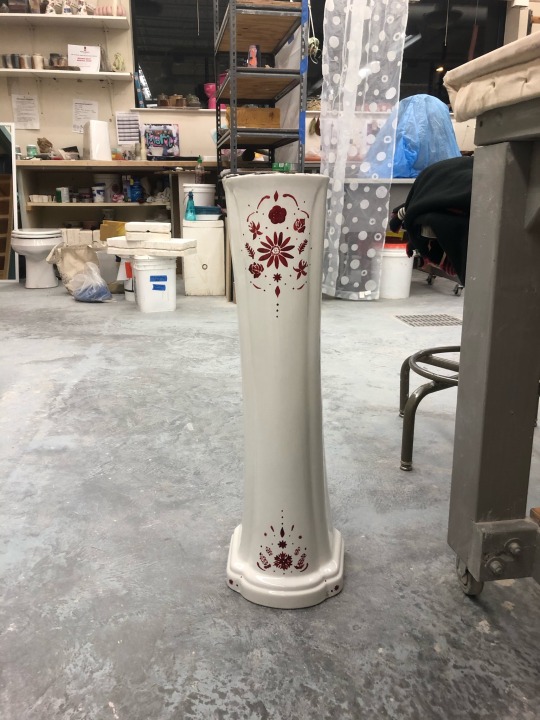
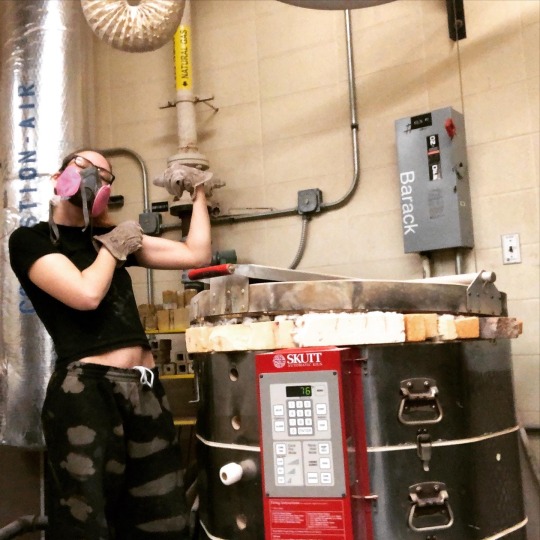
Anyway, my sink pedestal was just a hair—literally only 1.5 inches—too tall for the electric kilns, so I wondered if I had to use a gas kiln or what, and asked Brian what I needed to do. I was ready to just use gold paint instead, but Brian advised me on how to brick up the door to allow it to fit, and it worked like a charm! I felt really confident and motivated after that.
I’ll save the rest of what I have to say about the end of the semester for another post. ~~
1 note
·
View note
Text
Week 8-i don’t even know anymore
Sorry for doing these big conglomerate posts, I only planned on doing it to catch up when I missed some weeks but now I have no idea where we even are in the timeline and when my work happened so. Yeah.
...soooo... things have changed a lot since my last blog post. A lot.
There’s a global pandemic going on right now, school and most businesses are closed, and life has drastically changed for everyone in the WORLD as everyone practice social distancing and self isolation and staying home unless otherwise necessary. It’s pretty freaking crazy! It was like, things started to happen in the United States and then maybe a week or two later classes were suspended for two weeks, then businesses were closing, then classes were suspended even longer, and then indefinitely. We had to wait a couple of weeks to know if and how we would have studio access. States issued shelter in place orders and travel restrictions and people are being arrested! Indiana was one of those places, and we managed to still be able to come to the studio as the dean and president of the school said we are essential, since it’s only a handful of people with studio access. But still shit is crazy! Cops are being sent to infected peoples houses to supervise if they refuse to quarantine! Like shit has really hit the fan for the first time in my, and I think most of our, lifetime(s)!
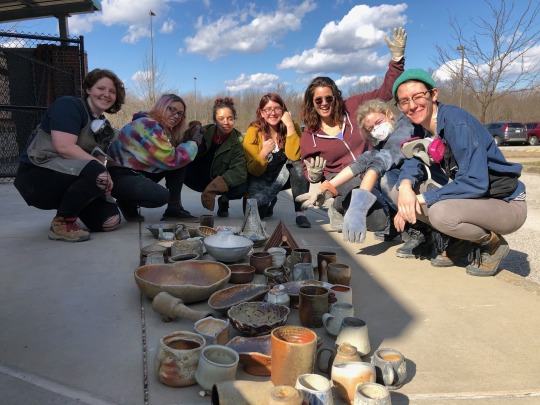
But, before all of that happened we unloaded the wood kiln. It was magical!
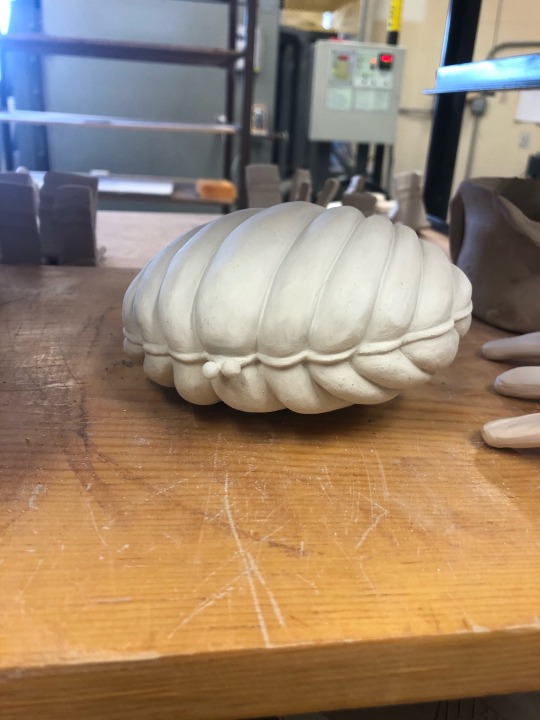
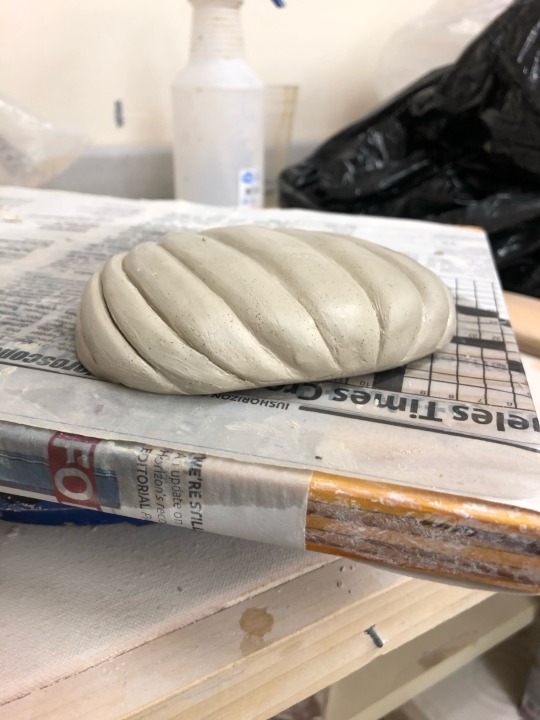
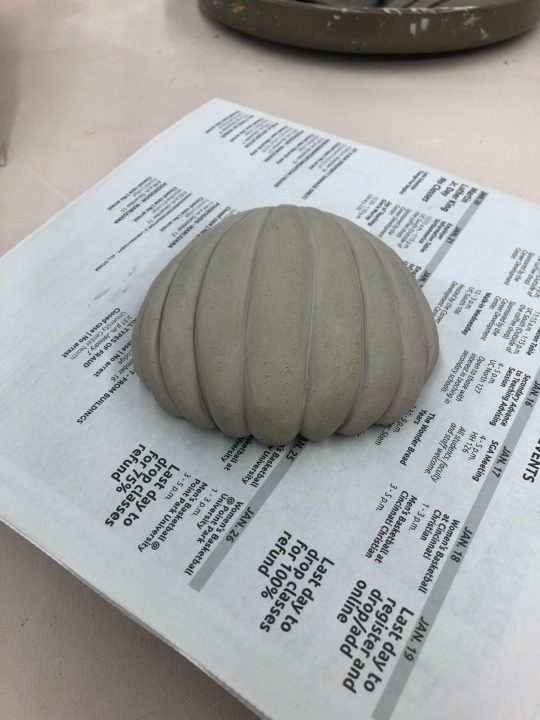
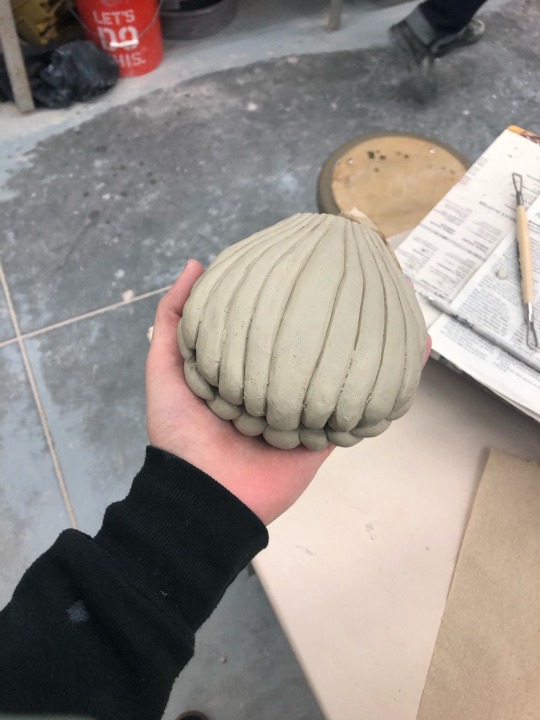
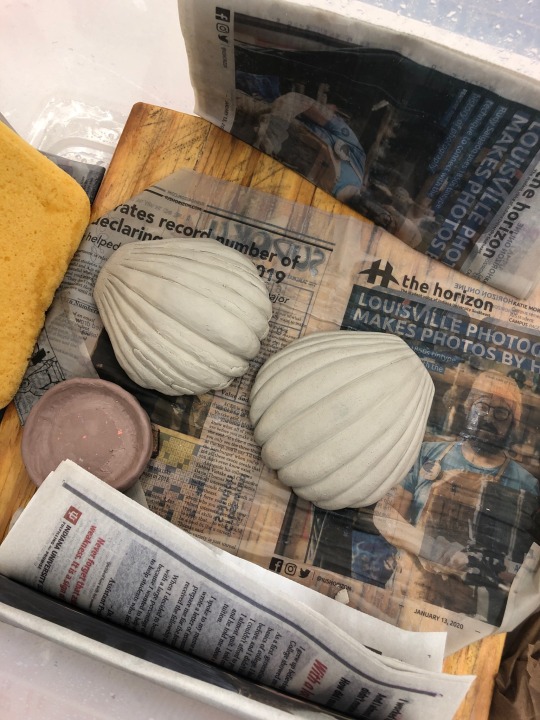
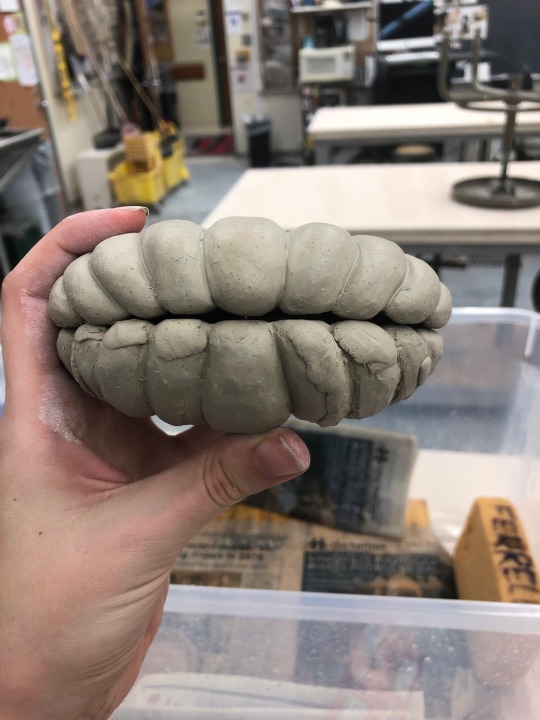
I did also finish my clam shell compact. It got fired and did not explode (yay, always an accomplishment) and I moved on to the next thing, being the butterfly.
At some point in there Ben Carter and Kate Johnston came to the studio and did demos and talks and they were both amazing and super fun, especially Kate, for me. She was so inspirational and so women-forward in her practice, I loved having her. And I helped lift her big pots which was super cool.
One of the last times I was in the studio before the world ended as we know it, I was working on building the platform for my two part mold of all my pads and tampons, and then later on pouring the plaster for the first half. We ran out of plaster and then shit hit the fan and school closed and brooklin dropped off some plaster from Mudworks at the studio for me to use. While I was using the studio during the shut down of everything, I finished printing the signatures in my book, poured the second half of that mold, and made another mold. When I was pouring the first half of my first mold one of the pads floated to the top, so I had to redo that one. (-_-)
I tried to prepare my bathtub and refinish it, but by the time I had all the materials Indiana issued the shelter-in-place and I took a bunch of stuff home to work on there in case anything else changed. I had plenty of stuff to finish at home before the shelter in place order was up and I figured it would be helpful. So I worked on my butterfly a bunch. I poured casts. I made my website. (Savannahferrellart.com)
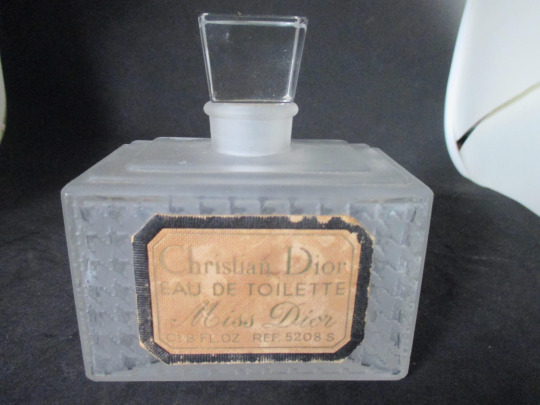
I have everything I need to refinish my bathtub and I plan on going to the studio to do that soon, I have just been kind of nervous recently to go because Kentucky just issued a travel restriction. There’s no enforcement language in the executive order so I think I’ll be fine. My mom is sewing us all face masks to use with air filters in them so they’re as much protection as we can get. This is really hard, I’m not going to lie. I miss school and my friends really bad. It’s hard for me to find the motivation to work on thesis stuff when the world seems to be falling apart and were all so unsure about the future. I have to go to target to buy frames and other equipment for my installation and I am kind of dreading it because I don’t want people to think I’m an idiot who’s just shopping for whatever during a pandemic when everyone’s supposed to stay home. I also may or may not be able to thrift for and antique for all the extra little things in my show that I don’t already have, like the antique perfume bottles I talked about in my last post. I might be able to borrow some from my grandmother but who knows. But I’m working on my thesis this weekend and going to the studio and firing, glazing, lustering, refinishing, and printing next week and beyond up until installation and orals. I’m so excited for all this to be over so I can finally, FINALLY breathe a sigh of relief amidst all this chaos. Senior year is tough enough. This is just insanity.
2 notes
·
View notes
Text
???-week 7?? (????)
In the meantime, I started making the golden shell compact for my thesis show. I sculpted the two halves separately and carved out the middle underneath so I can put them together and it be hollow and not so heavy.
I want it to have a distinct top and bottom, especially so it can sit pretty flat on its own, but I do want to finish it as if it was a real compact so it is glazed all the way around and can be viewed from any angle or picked up. I had a pretty easy time with the first half but the second half has been really trying.

I didn’t want to make a mold of the first one and replicate it because I was worried the sides wouldn’t match up correctly, so I tried to replicate it by sculpting, which was really hard.
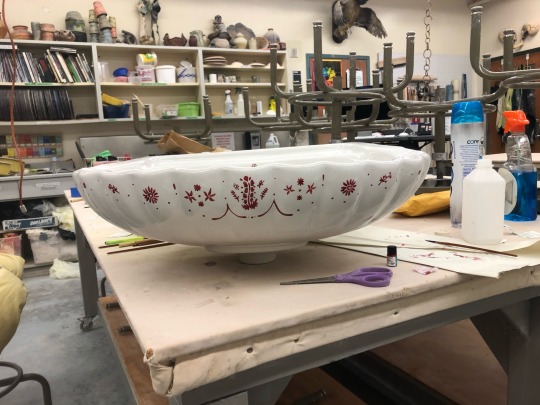
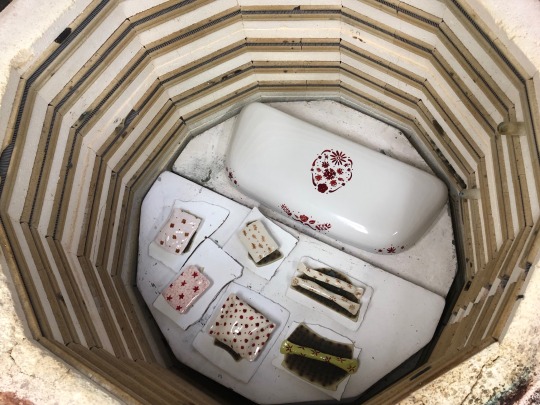
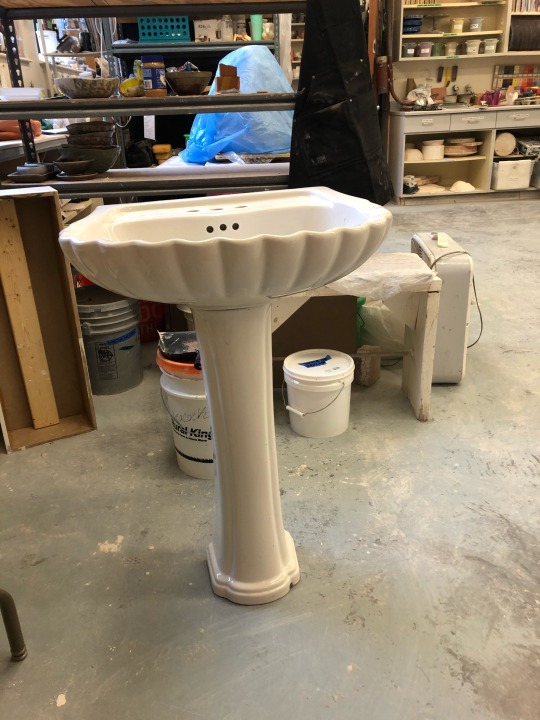
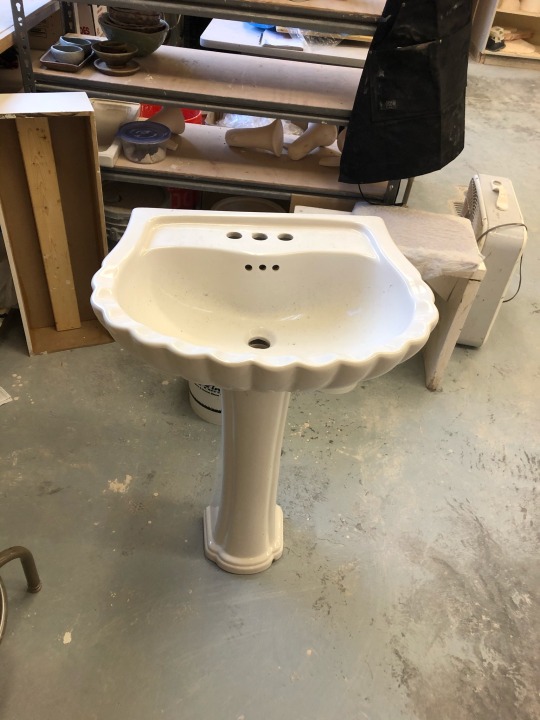
I also picked up my sink, bathtub, and toilet. I need to sand some parts of the toilet down and detail it with paint, but the sink and toilet are pretty good on their own. I’m going to luster some accents onto certain parts of the toilet and sink, take the handle off the toilet, and draw on the fixtures with posca markers.
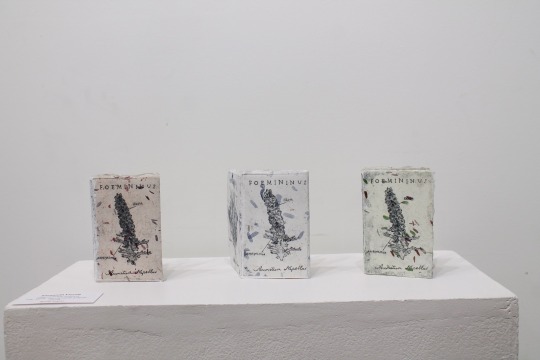
I’m also making molds of tampons and pads, and I have to cut tiny slits in the wrappers and put sand in the tampons to keep the packaging from slumping when I pour the plaster over them. I’m trying to put the gas on this shell compact and finish it (like today) so that I can focus on making those molds and casts and sculpting my butterfly and decorating my fixtures. I also decided to use real perfume bottles instead of making them for times sake, and also for aesthetics’ sake. I just love the way antique glass bottles look, and I think it would be a nice opportunity to put some mystery liquid inside them that you could actually see. My own “perfume.”
So basically, where I’m at now, week 7: I’m dangerously close to finishing my compact, I have all my furniture, I have a test piece to try luster on, I need to find some more objects to put in my show, I need to sculpt my butterfly, and work on my print stuff of course. Woo!
0 notes
Text
Week 2-???
So I have gotten a little behind on blogs this semester (obviously), so I’m going to make a couple of conglomerate posts to summarize what has happened.
Started off the semester with working on things for the sale and the wood kiln, and also writing artist statements and thesis outlines. I really benefited from the exercises we did as a group, revising our statements together with annotated hard copies to look over. I think my artist statement is very strong now. I really wanted to start this semester on a good foot, so I did a lot of planning in the beginning of this semester. I dialed in on the things I really wanted to have in my space, I sketched out the space, I started looking for bathroom fixtures, and I prioritized the work I was going to make. I also wanted to sell a lot of stuff at the valentine’s sale, so I decided to make earrings, since it’s jewelry and, ya know, valentine’s day. I made toilet earrings, since they’re like my trademark at this point and they’re silly, and silly earrings are trendy right now.
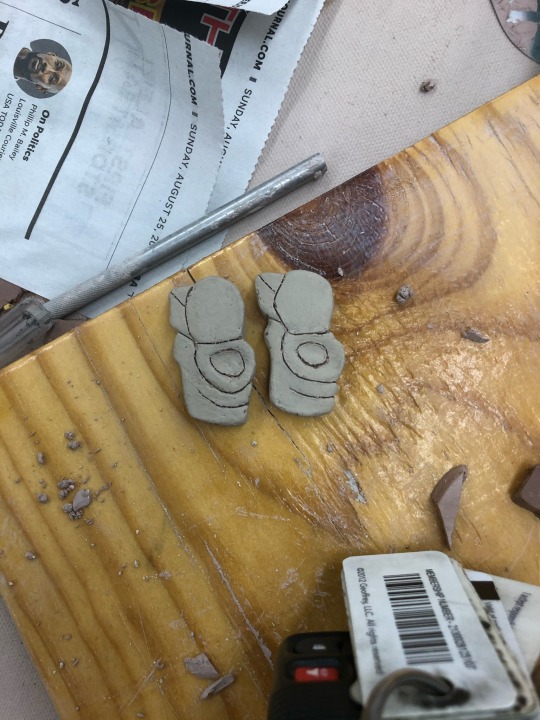
I spent a lot of time on these, they were super intricate and tedious. I glazed them clear and did some resourceful finagling to fire them hanging.
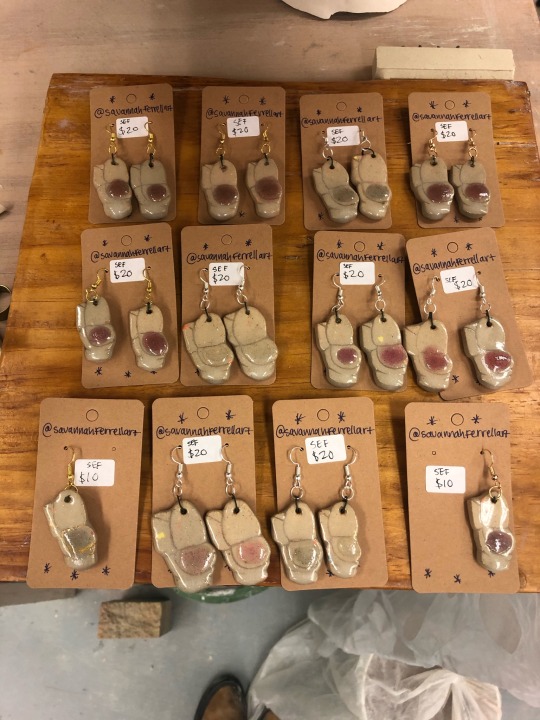
I am not too happy with the color of this clay body at cone 6 unfortunately. I’m going to get the recipe for the clay body Sam P uses that fluxes and is a nice velvety chocolate brown and use that for my confetti grog. I also put glittery resin in the toilet bowls to make them even more special~
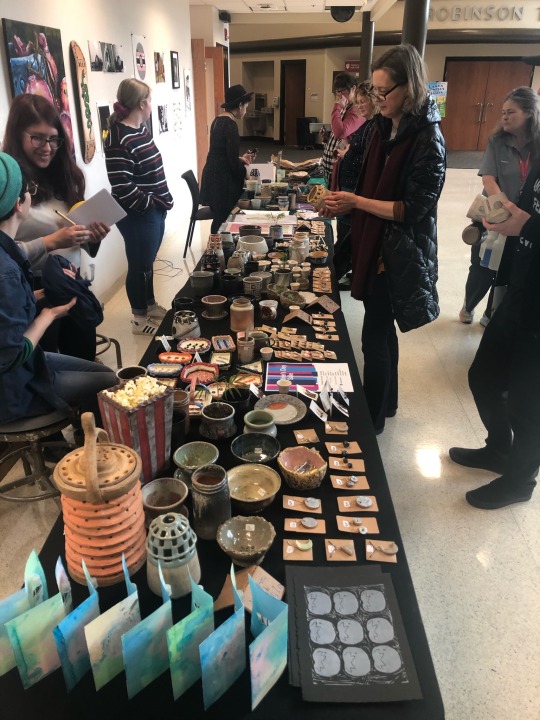
And the sale went so well! I put a lot of my digital prints in sleeves with cardboard backs and they sold like crazy. I think we all made a good chunk of change too ;)
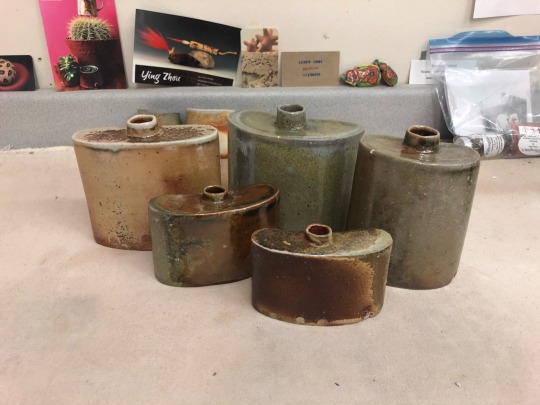
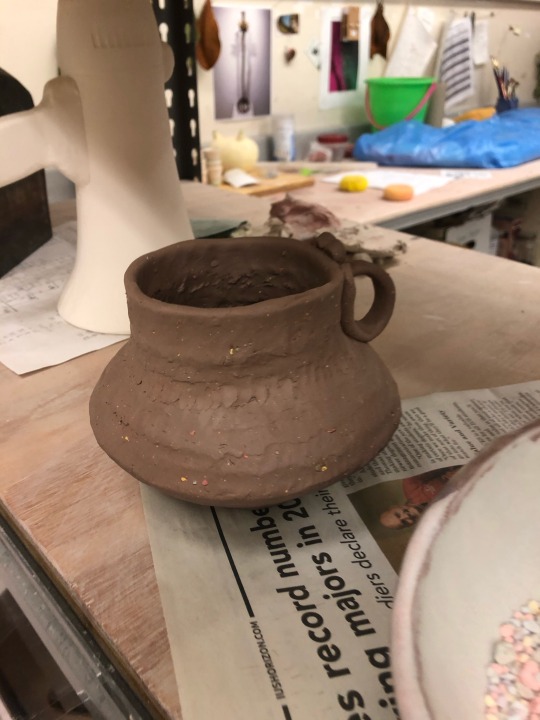
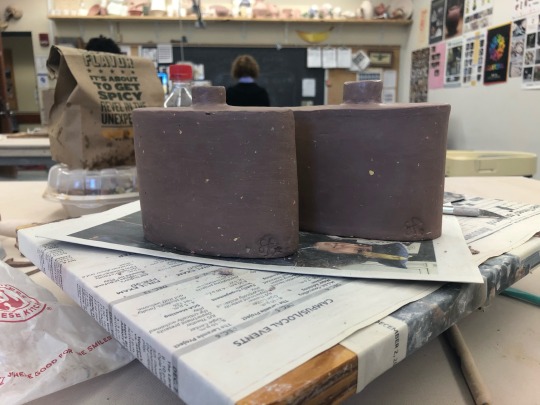
So after the sale, I focused on wood kiln stuff. I really want to make functional work as part of my practice, as a way to stay engaged with clay and make work even if I’m not making a larger, more planned and researched body of work like I am working on now. (Of course I would plan and research for functional work too, you know what I’m trying to say.) So I thought about what kind of functional stuff I’d like to make, and I have decided I want to make non-conventional pottery, like things people don’t necessarily usually make or things that are specialized and used often. I want to make mortar and pestles, bottles, flasks, fermentation and butter crocks, incense burners, finger bowls for bookbinding/crafting, and other tools for diy cooks, artists, or whoever. I just want to make things that people want to use and will use often, and not just cups and bowls. So I decided my ten objects would be flasks. (I also made a little cup)
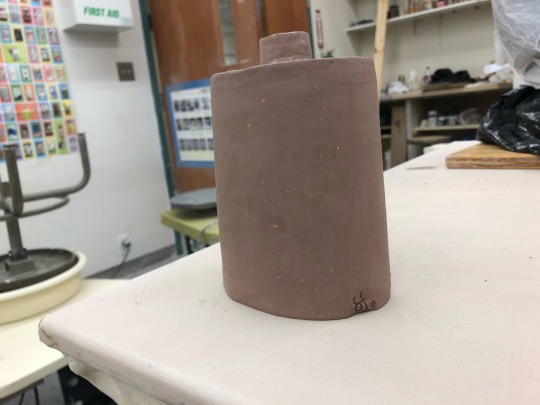
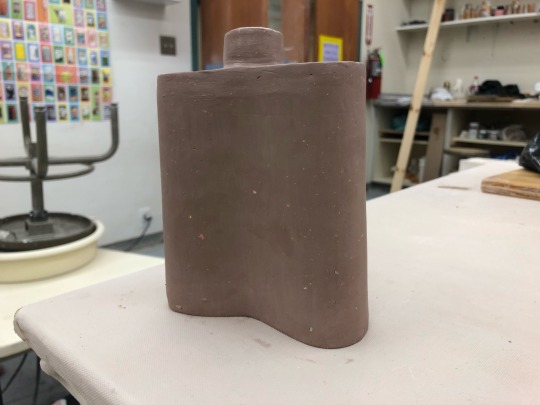
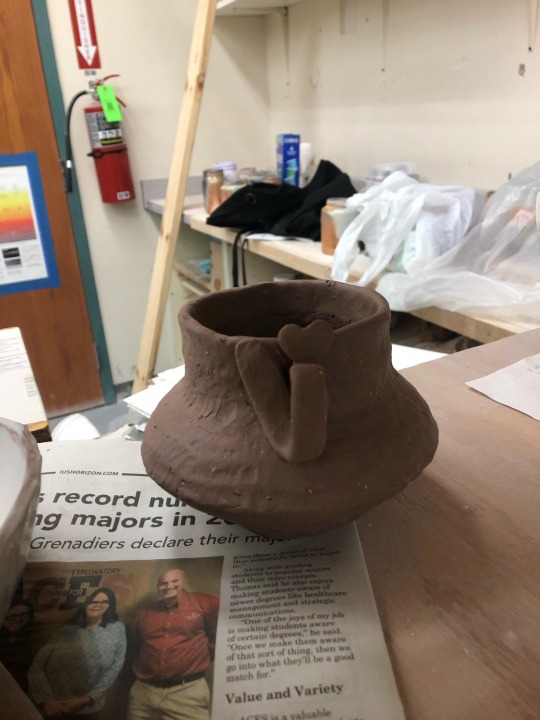
I wanted to make a bunch of different sizes, even if they weren’t necessarily practical. I ended up making a large range of them, with a couple of really big ones and a lot of small ones. I made some with the same clay as the earrings and some with sandy white stoneware.
0 notes
Text
Semester thesis plan??
This semester, for my thesis, I will need to do a lot of testing and a lot of finding and purchasing items. I’m going to create a bathroom space like the ones in my drawings and prints, complete with ceramic Knick-knacks and a bathtub overflowing with slime. I will need to figure out the best slime recipe, perhaps something without water so it won’t evaporate, or maybe a resin would be best, because I don’t want the slime to dry out. I want it to move out while the opening is happening and then stabilize at some point and stay in the same position until the show is taken down. I have been thinking about trying agar-agar, liquid starch, and sodium silicate as possible slime ingredients. I’m going to talk more in depth about this with Sydney and Emily since they both know some stuff about resin and polymers in general.
I am going to search through a warehouse that one of my printmaking classmates has access to for free bathroom stuff like the bathtub and sink and what not, and if I don’t like what i see there I will try looking at architectural salvage as well as Facebook marketplace and craigslist for the cheapest options. I will need to make a false bottom so I don’t have to fill the whole bathtub up.
In the meantime I will be working on my ceramic Knick knacks to get them out of the way. I’d like to make some gold stuff, I’d like to put some gold luster on some of the bathroom stuff I get, and I’d also like to try out pearlescence. I will need to find some sort of shelving or make it to display the ceramic pieces. I’ll also need a mirror, which I am thinking about drawing/painting on. I’d also like to arrange fake flowers around the bathtub on the floor. (I’ve also been planning on collecting my own menstrual blood in a jar and making synthetic tears to put in another jar—stay tuned)
So basically, right now I need to purchase my slime items and once I get my school refund I will go out and get the big stuff. I need to make my ceramic pieces. I also need to get pearlescence and look at shelving and mirrors and flowers. I will be going to lots of thrift stores.
0 notes
Text
14th week aka last blog post!!
This week we cleaned up and had a glaze day and then the next class session was thanksgiving break. It was pretty uneventful for me since all my work was finished and in a gallery, so I just hyper focused on cleaning and organizing the studio. I did a lot of work in the glaze room... trying to keep my original organization from the beginning of the year going.
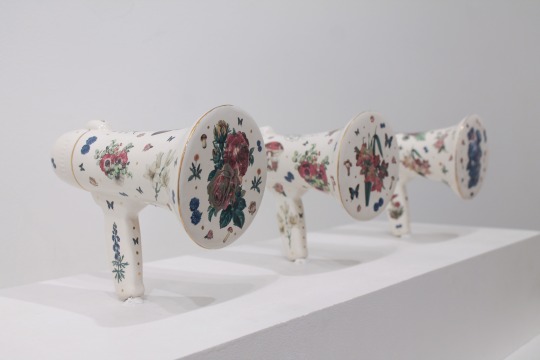
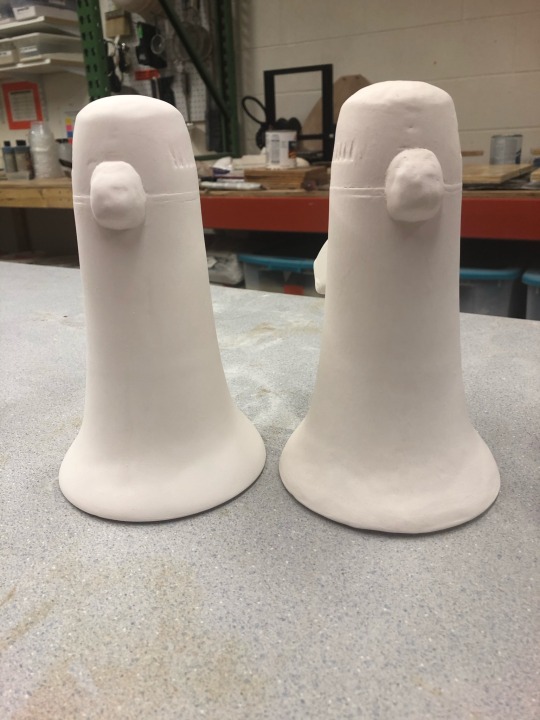
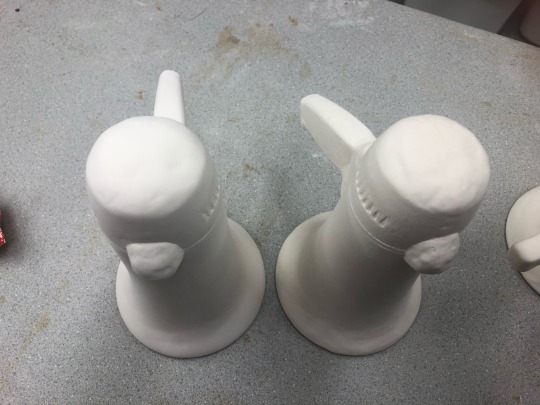
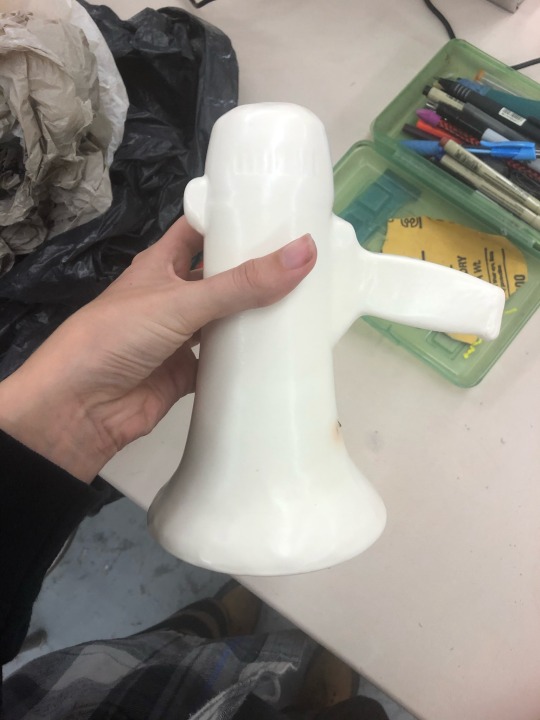
I would like to talk more about my final critique which happened the next week, and I also got to meet Miranda Becht’s husband Philip. I had a really great critique, I got some good feedback about how I could structure my sculptures so I can send them to other shows and sell them. I really need to figure that out soon so I can actually get them out before I start diving into my thesis because I would love for them to be seen elsewhere. Meeting Philip was really great, and I’d really like to spend some more time getting to know him as I work on his megaphone. I want to thank him for honoring me with such an award and with his interest in owning my work. I am super grateful to him, and to Brian, and ius in general for all my experiences here. It’s been a really great time and I’m sad to see next semester as my last.
0 notes
Text
13th week yo
This week I had to get ready for the undergrad research conference in Bloomington, but after that I ventured to the gallery to photograph my work for applications to the juried show. The gallery was closing early for some reason so Mel and I hurried over there, and since my camera didn’t have a battery in it, she even let me borrow hers. A true friend. I got some really good photos and we headed back to the studio. I edited them there, printed them out, and got everything ready to apply. I got some cardboard and cut it to the surface dimensions of my pedestals and my drawing. I’m so excited to say three of my five entries were accepted, including my phones!!!
0 notes
Text
12th week
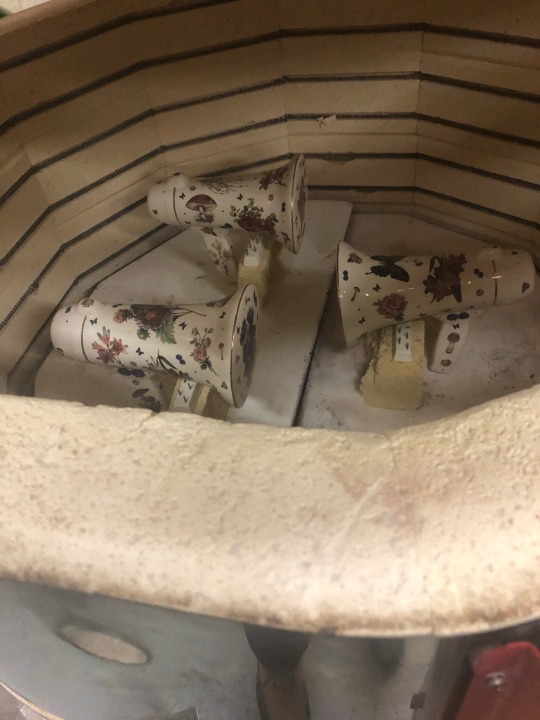
I honestly think I blacked out for part of this week. This week was probably the single most productive week of my life. I applied the decals, literally sat in the studio in the same spot for upwards of 12-13 hours, only leaving for subway and other treats, and fired them that night. (I taught Sydney Ewerth the magic of the delay function on the kiln for things that need extra time to dry 😉) The decals were super easy and fun to apply, its kind of like scrapbooking or collaging. Very relaxing.
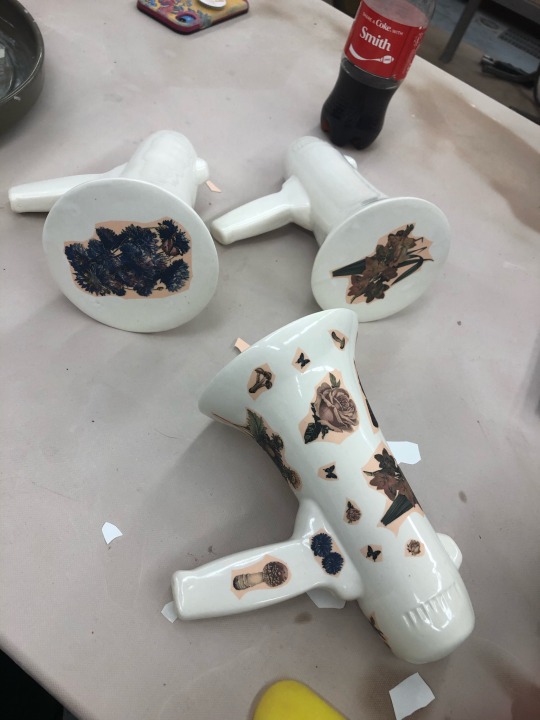
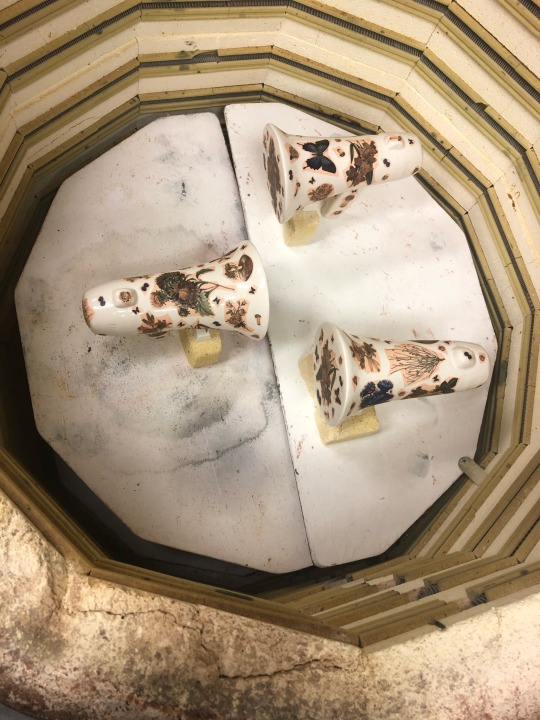
As they fired I was, again, paralyzed with fear that they might break on their precarious perch in the fire box, but they were fine!!! And when they came out, I was so happy I nearly cried and was so excited I was shaking so much that I couldn’t hold them. Then, I PROMPTLY applied the luster and put them back in AGAIN. I used tape to mask off my lines. It took FOREVER. Another day spent in the same spot in the studio doing the same thing. I painted pedestals in between the luster firing and making my zines for the show, and finally, the time came to drill through my beautiful pieces of hard, hard work. The luster was *beautiful*. I was again so excited when I opened the kiln I nearly cried. I cracked it at 300 something degrees to get a photo.
At some point in here I rewrote my artist statement and made a project statement for my phones. This whole week was such a blur. So, drilling was not fun this time around. I think the tips still need to be replaced pretty regularly even if they’re carbide tips, but I also could have just not been using pressure. Anyway, I was in the studio until like 2 am drilling and didn’t even break through the first one. This was the day before install, so I was freaking out to say the least. I knew I was going to have to have help, but I wasn’t sure how, and I figured getting brand new drill bits wouldn’t hurt either. I got up as early as I possibly could and dragged my boyfriend to Lowe’s and then to my school, and he helped me drill holes all day, bless him. We were still drilling the last one in the parking lot of the gallery, but we got it done.
Next was the fiasco of installing the phones... it took forEVER to screw the rods in the wood, and even longer to get them the right height. Then, I thought I could just use some museum putty to make them stay in place and not rock or swing, but the putty that we had (not museum putty) was not strong enough. I needed something sticky that would also hold its shape under weight/pressure. Sydney suggested hot glue, so my *ACTUAL* knight in shining armor went home to get our hot glue gun. On his return, I squeezed glue out onto the tops of the rods, lowered the phones onto them so they stuck to the top, and squeezed some out under the phones and let them dry to hold them in place. I painted these white to cover them up. Not sure how I feel about it. We had the opening, it was great. Next I had to prepare for a research conference. Again, the most productive week in my entire existence.
0 notes
Text
Eleventh week
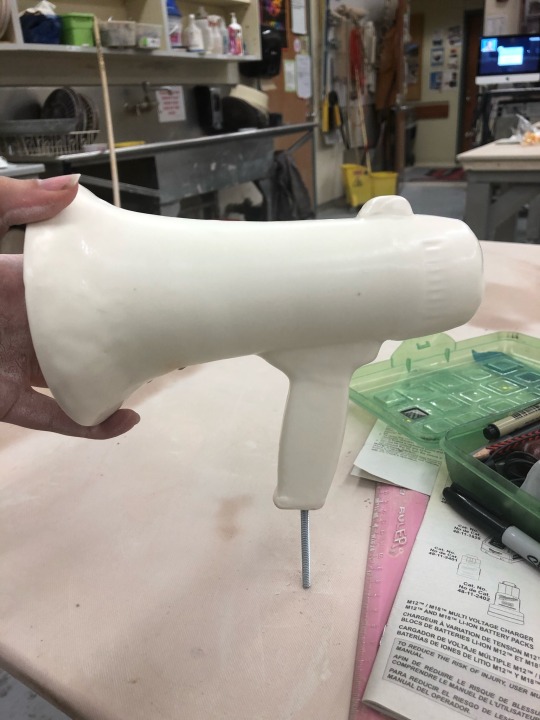
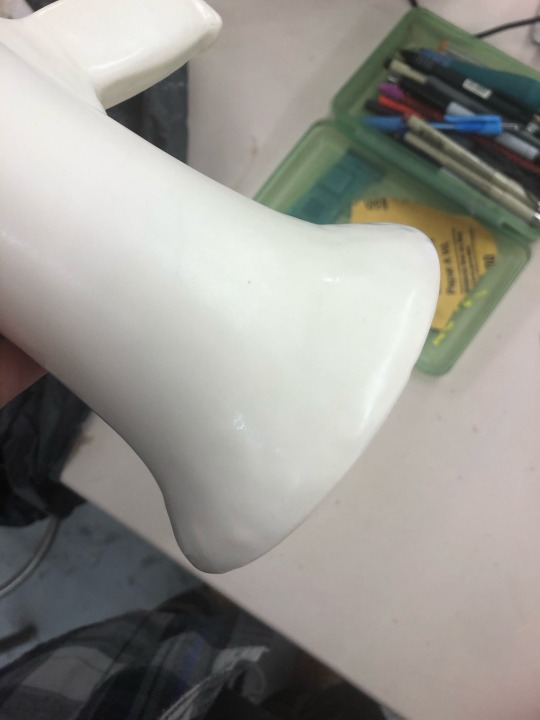
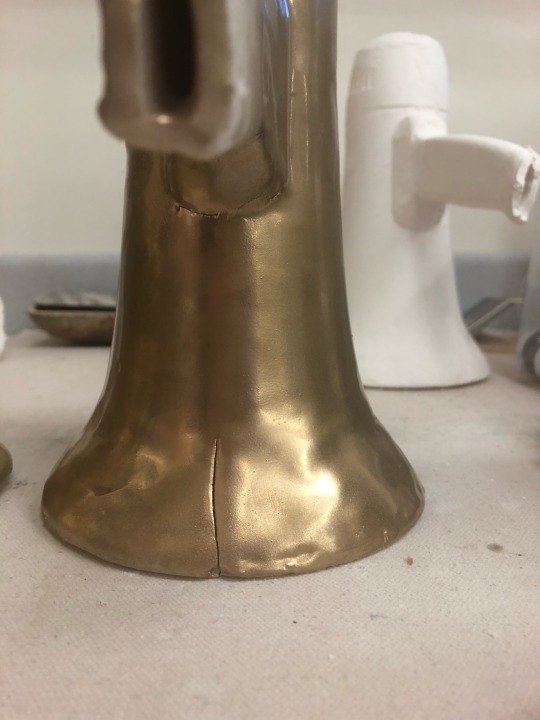
This week I practiced drilling through the handle of my practice megaphone. I was SO nervous at first because all the videos I watched online used a punch drill bit, which is not the kind I had, and they all nearly broke through their pieces at the end because of it. So I was worried about that the whole time and didn’t use any pressure because of it. Anyway, since my drill bit was more of a spade shape and it wasn’t a punch, there wasn’t any danger of me breaking my piece. The hole looked nice and clean and the rod that I have fits perfectly!
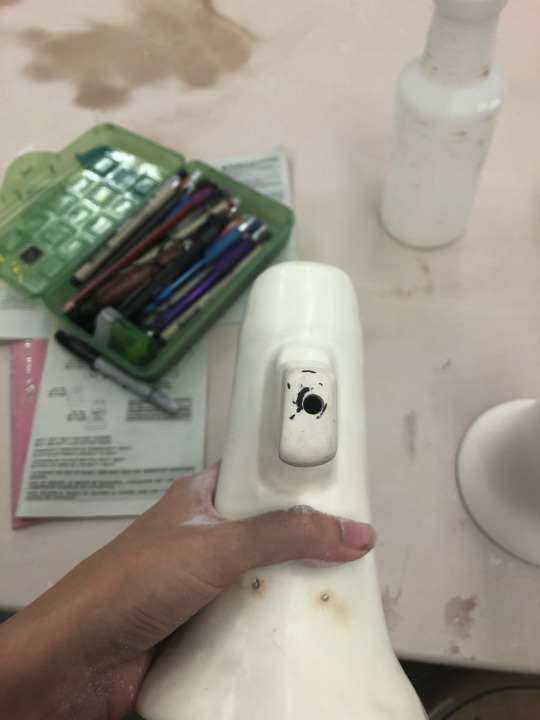
I went to the mudworks and bought bisque fix and started applying it to the craters and sanding, only to realize that my glaze requires epk and that id have to go back to the store the next day to get it before I could fire the phones!! So I did! And I got snow, a nice white celadon by amaco. I thought it would be nice so it would be uniform and there wouldn’t need to be testing or anything. So I returned to school, finished up my bisque fix and sanding, glazed them quickly, and fired them. The next day, my decals arrived!! Too bad I had to wait until my phones got out of the kiln. And then, when they came out, some of the bisque fix had slipped and there were bubbles and bare spots in my glaze. Meaning I had to wait even longer!! So I touched it up quickly and stuck them right back in for round two. All the while hoping and praying that the phones don’t slip and break for some reason in the kiln. While those were in the kiln, however, I bought my materials for the pedestal and built it with Sam! She was an amazing teacher, everything went very smoothly, and I learned a lot. It turned out great!
0 notes
Text
Tenth week!
This week I *surprise* kept sanding.. until my fingers fell off... although I think I’m finally getting to a point where I can stop. There are some craters in the surface, but I think I can just get some bisque fix and fix that before I glaze them. I wish I could do what Emily suggested in my critique and just sand one of them and make new molds from that one.. But the time I’d lose doing all that and then making new casts and fixing them and firing them... plus the considerable loss of size that would occur makes sanding the existing casts for so long a little more worth it.
I decided on the measurements for my pedestal-topper-pedestal-thing. I wanted the megaphones to be centered, by their actual center, not by their handle. I didn’t want there to be too much length on either end of the pedestal, but plenty of room between the pieces. I feel like this will put all the focus on the phones. So, I decided on about 6 inches on either end and 10 inches between each, making the pedestal around 2.5 feet long. It’s going to be just 6 inches tall since it will go on top of another pedestal. It will probably be about a foot wide.
Finally, I presented my studio potter article! I found one that went along with my current project with the phones and my body of work in general. It was called Rock Hard Feminism by Dani Sigler, an artist who works with imagery directly relating to women’s bodies, sexuality, and sexual empowerment. It had to do with women artists working only (or predominantly) in clay with feminist themes, particularly relating to sexuality and the body. Female sexuality is a recurring background theme in my work, and the megaphone project relates directly to the female body through its connection to intimate partner homicide. Murder is the ultimate assault upon one’s body, and intimate partner homicide is frighteningly common for women. It is a specific thing to women and their bodies because of the structures and standards of patriarchy.
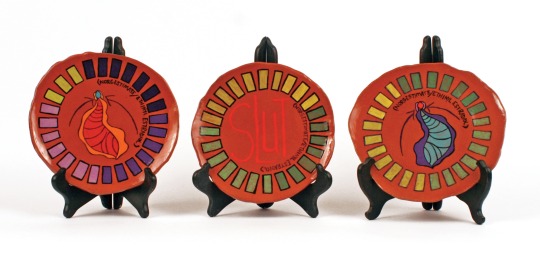
Dani Sigler. Birth Control Plates, 2013.
0 notes
Text
Ninth week!!!
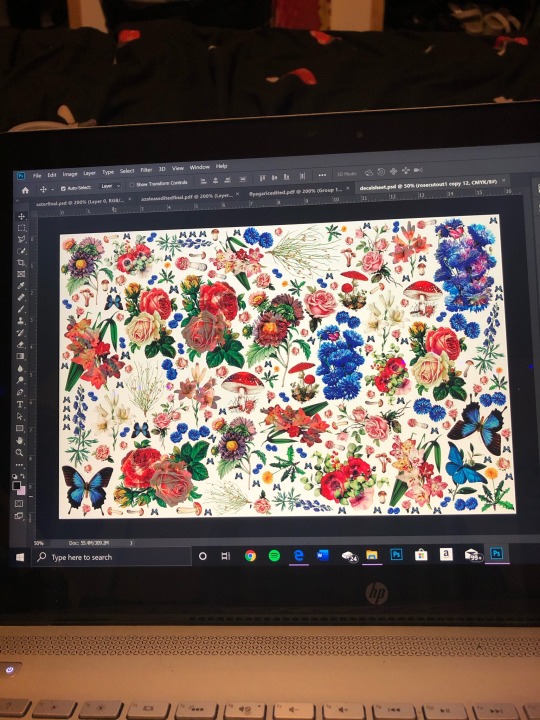
This week I got a lot done but not in many words. I finished my decals, fit as many as I could possibly fit into an 11x17 sheet, and sent it off to the printer! After all that’s said and done, I had over 110 files used in this project, and probably somewhere near that for actual decals printed.
I sanded my megaphones for what seemed to be a never ending period of time.. and that’s about it. I’m trying to put as much effort into these as possible and make the craft on them impeccable since that was a main point in my critique. This is a point where I’m going to do a whole lot of waiting. I’d like to get the phones all sanded and glazed and fired before the decals get here so that I can just work as soon as I get them.
Below, on the right is unsanded, on the left is sanded.

0 notes
Text
Eighth week~
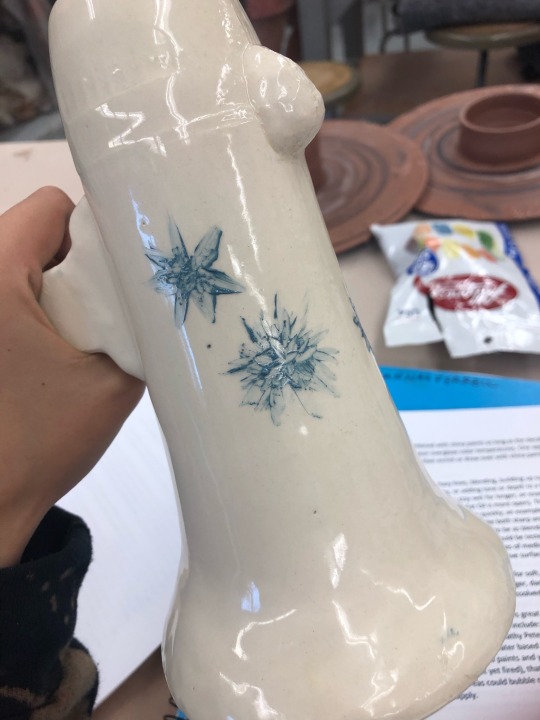
This week I took my firing test out of the kiln, and the glaze looked good, and the megaphone didn’t fall!! Huzzah! The wires made a really weird blushing effect that was not desirable, but I think I can search for some newer wires to use next time. I am just so excited and relieved that the stand idea worked.

I also sanded down one of my megaphones a little to see if it would help in the long run like the feedback I got suggested, and it seemed pretty successful! I measured different parts of my megaphones a second time to finalize the sizes for my decals so I could start arranging them in the sheet that I will send to the printer. Everything is starting to come together!
0 notes
Text
Seventh week
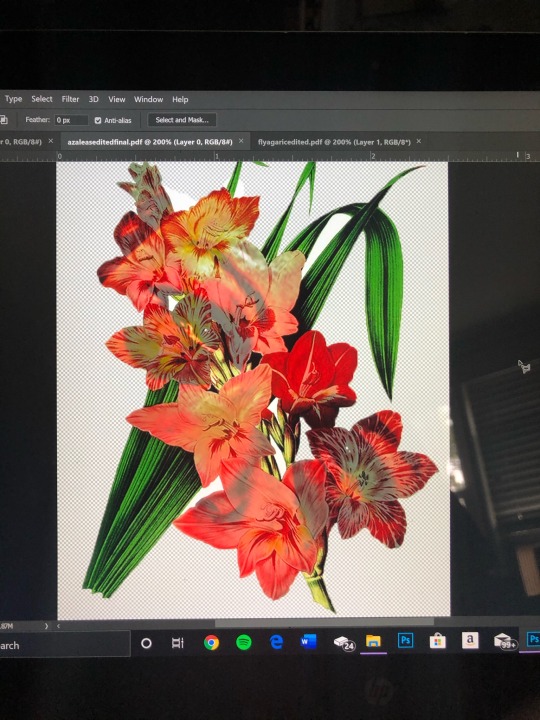
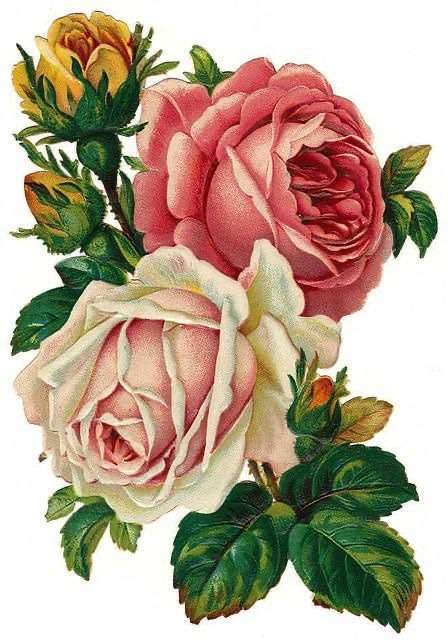
This week I had my BFA critique for the semester. I was nervous because it was so early in the semester and I wasn’t going to have much finished work (if any) to show, but also grateful because that meant I could apply my feedback before anything was finalized. The main response was there needed to be something to compare the edited flowers to so that you would notice the difference and the form of the megaphone needed to be sanded and honed in a little. I was planning on having some decals of the unedited versions of the flowers so I was very satisfied with the feedback I got, it seems I am on the right track I just need to keep going.

So, I kept editing decals.
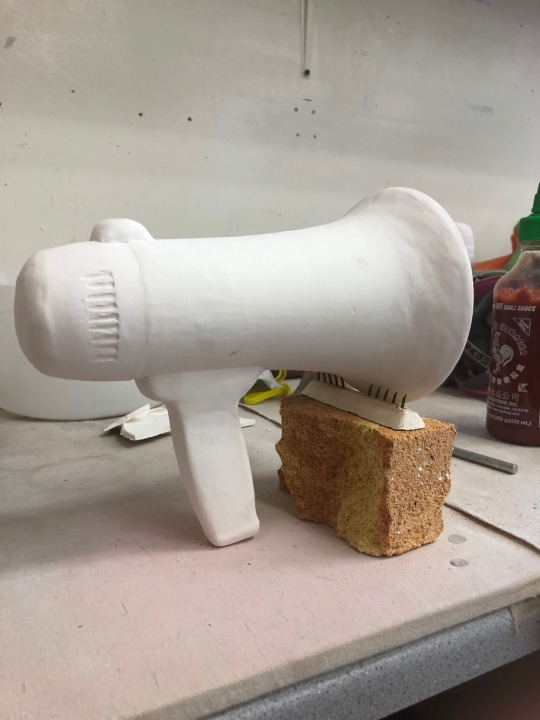
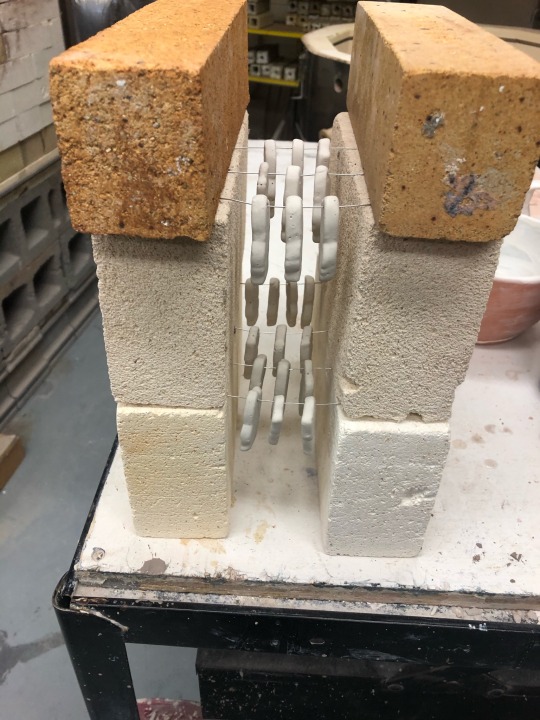
In class I tried to figure out the best way to make a stand that would allow me to glaze every part of my megaphone except the bottom of the handle. I was thinking about making it myself and putting wire in the top, like building a hollow triangle and sticking wire out to hold the megaphone just under the bell. But I tried doing that and it was just too hard to try and accommodate for shrinkage. I tried putting an existing wire stand on a brick and that worked perfectly. I quickly glazed a megaphone and put it in a kiln with Alma’s work to see how it turned out.
0 notes
Text
Sixth week


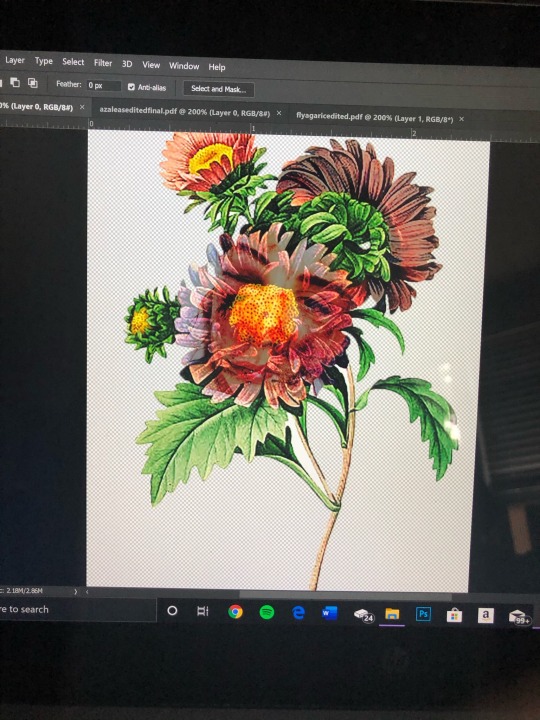
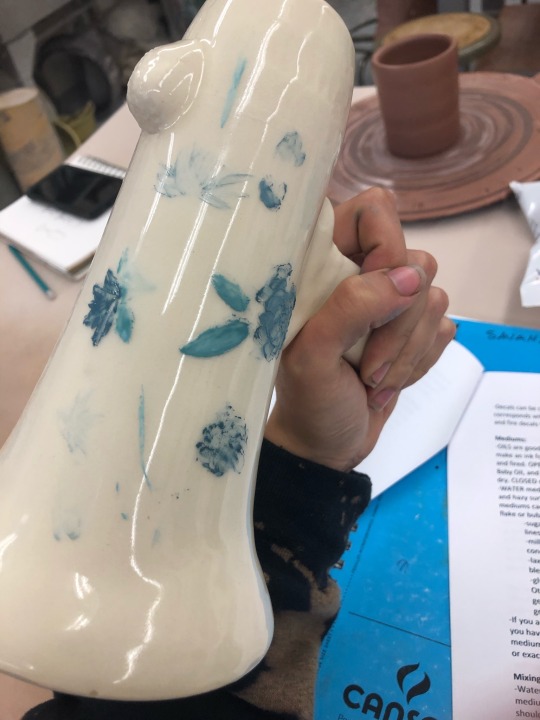
This week I just kept editing decals. I wasn’t really liking how putting the bruises and black eyes under the flowers was going so I tried something different. I didn’t like what I was doing so far because it was so hard to tell what was going on behind the small window that I was allowing. I thought if I could just make the flowers translucent and have a bigger picture in the background it would work better. So I looked for more easily recognizable things, and I figure the best thing is a face; humans are constantly looking for faces. So I found photos of battered faces and put them behind some slightly translucent flowers. I really like it. I’ve had to up the contrast and change the colors a lot, to both the flowers and the background images, but I really like this new direction.


0 notes
Text
Fifth week
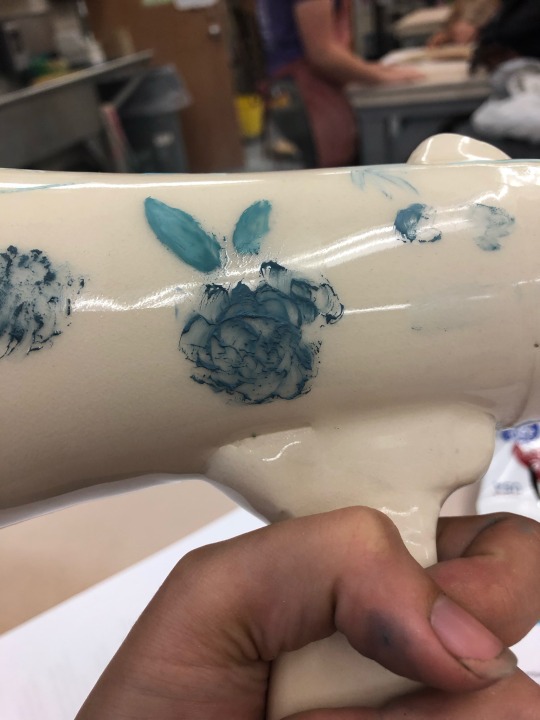
This week I had progress critique with the class. I unloaded the overglaze enamel megaphones and all the spots I thought would flatten did flatten, but the blue was very green and it did not look like what I was going for, not like antique porcelain. So this presented a very large learning curve for the overglaze enamel—I was going to really have to experiment a lot to get it right. I had been looking at overglaze enamel tutorials on YouTube and one of them mentioned vintage commercial decals, which looked exactly like the look I was going for, but I wondered if it would be inauthentic or kitsch to use them in this project. So, when decals were brought up in my critique I asked and everyone unanimously thought it would be fine, and we talked about altering them to make them a little subversive, like you had to take a double take to notice that it was altered. This made me consider what I could alter them with—I was thinking I could make the flowers look like bruises, possibly edit bruise colors into the shadows of the flowers. I looked into custom decal printing and decided it was much more efficient and on the nose than the overglaze enamel. (I thought I got pictures of my test after taking it out of the kiln but I’ll have to come back later and add some.)


So I immediately started looking for vintage flowers that I could photoshop as well as photos of bruises and black eyes and other injury. I started some casts with my new slip before my progress critique and when I took them out they were so thick it was unbelievable. I added a lot more water to my slip and put the casts in the reclaim.
I started cutting out the darkest parts of my flowers and placing photos of bruises and black eyes behind the cut outs and seeing how I liked the combination. It’s kind of hard to tell what’s going on when it’s just a bruise, and it’s so small that I’m worried the black eyes won’t be readable at the final size. Ultimately, I’m excited about this direction and I’ll keep going, get one finished so I can see the big picture to see if I need to change anything to make it more readable.
0 notes
Text
Fourth week~
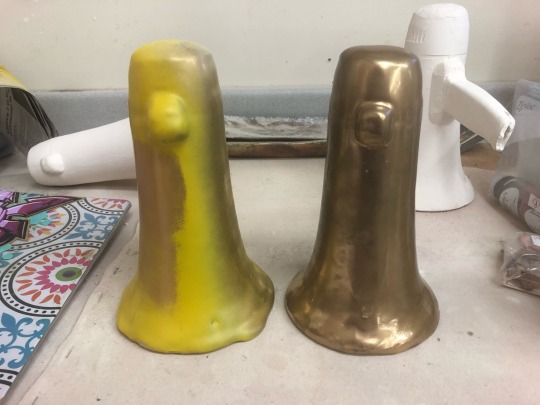
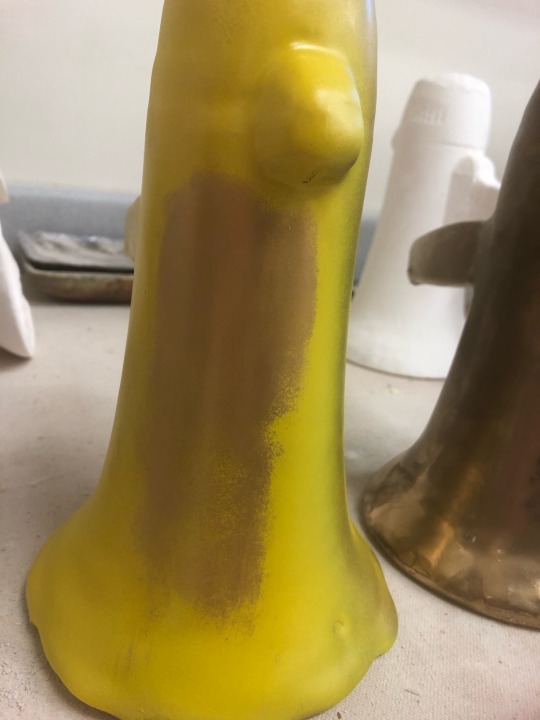
This week I started off with testing the spray paints and powders. Ultimately, I think the gold chrome spray paint is a little too bronze colored. It is reflective, but not quite enough. The glossy varnish shows up as black speckles and dulls the shine overall on top of the gold chrome as well. The nail powders worked like a charm however, and if you get the paint layer thick enough the finish is absolutely perfect and smooth. The glossy varnish over top gives it a little extra shine too. The yellow paint with gold powder worked the best.
After messing around with that, and while I was letting it dry, I organized and cleaned up the studio, specifically the glaze room sink and the peg boards in both rooms.
The next class I just messed around with china paint (overglaze enamel). I tried to see how it would behave in different thicknesses; if it would flatten in thick spots and how opaque the colors were. I had some trouble getting the pigment to mix in correctly with the medium. I did what the instructions were saying (I think) but it just didn’t seem like it was working correctly, especially when comparing it to videos on YouTube of artists using overglaze enamel. I got some good tests though, and I fired it at the end of class, which was the first firing I ever did completely by myself!
0 notes