
Don't wanna be here? Send us removal request.
Statistics
We looked inside some of the posts by yessssssstaceyyao and here's what we found interesting.
Average Info
Notes Per Post
0
Likes Per Post
0
Reblog Per Post
0
Reply Per Post
0
Time Between Posts
12 days
Number of Posts By Type
Text
16
Link
1
Last Seen Tumblr Blogs


Fun Fact
The average Tumblr user visits about 67 pages every month.
Text
Interface Design Final Project
youtube
First, here is the google slide I show today, plz feel free to check it: https://docs.google.com/presentation/d/16s30o8nSpXcVZtTtavIx0qUI6vB9QkL6AaY1ZJAU61I/edit?usp=sharing
Problem Statement:
How can we promote social interaction through interface design?
Goal:
Redesign name tag in order to encourage more human interactions and genuine conversations in both personal and professional setting.
Sketch:
process of digital interface & physical interface


Prototype:
process of p5.js & Arduino
link to p5.js code: https://editor.p5js.org/staceyao/full/zIYjE0ub3


Prototype (cardboard):

0 notes
Text
Final Project Process (Part 2)
In the past few weeks, I still focus on my final project. The goal of this project is to create an interface between p5.js and Arduino. Before this, I have shown the work of p5.js. Although the interface I made and the original idea were not completely the same, it also worked very well.
What I have updated:
In the sketch in p5.js, I added a photo to replace the original color option, and later I will add the same image to my TFT board.
Arduino wire setting
Find the graphic test in Manage Libraries
Add pic on the microSD card
Add “imageread” in Manage Libraries(make sure the size of pic)
pic of arduino:

link of new p5.js sketch:
https://editor.p5js.org/staceyao/full/zIYjE0ub3
Touch GUI Referenced:
https://github.com/L05/p5.touchgui
link of new interface video:
youtube
What I need to work on:
Solder all pins for reliable electrical contact (MarkerSpace)
Do the graphic test
File→examples→Adafruit ImageReader Library→BreakoutST7735→160x128 example.
Write code for loop pic (Code Referenced: Scott’s example)
Question:
Is there have any ways to contact the p5.js to the arduino? or maybe just create a video for this project?

code referenced:


Some tutorials I’ve watched for TFT set up:
youtube
youtube
youtube
0 notes
Text
Final Project Process
In the past two weeks, I have focused on how to find a solution for my final project. This is actually more of a wearable project, so I need to use both software and hardware to achieve this goal. First, I need to figure out what the application looks like on p5.js. For example, the buttons for "business model" and "social mode,” also include how the interface looks of users to choose their interests. In this process, I designed several different versions. But in the end, when I was operating on p5.js, I chose the simplest one as the final interface.

Then, I need to display the code on p5.js on the phone screen, so that it is more convenient for users to display their identity. Finally, the most important part is to establish a connection between p5.js and Arduino. The professor suggested that I prepare the things I need in advance, a micro SD card and a 1.8-inch color TFT LCD.

Until now, I’m still working on the interface of p5.js. I hope I can finish it soon. However, I will learn more about how to establish a connection between p5.js and Arduino after taking tomorrow’s class. In the next few weeks, I will establish a good connection between them.
Here is the link to my code:
https://editor.p5js.org/staceyao/sketches/zIYjE0ub3

P5.js on mobile phone:
youtube
Questions:
- show pic (pic replace the color)
0 notes
Text
Final Proposal: An interface that promotes social interaction between people

In the age of hyper-connectivity, people always focus on social media and the internet, thus lacking interaction with others. People find it difficult to introduce themselves to strangers comfortably and effectively, which makes it difficult to establish new relationships. Is there a way to promote social interaction between people through interface design?
Topic:
How to use the interface design to promote the relationship between people?
The current widespread popularity of social media has made people lack face-to-face communication. Most groups are more likely to interact with technologies than communicate with people. In "Alone Together," Turkle talks about mobile devices that increase the distance between people, also causes people to only get ‘sips’ of connection, but not real communication (Turkle 2011). In addition, Oduor notes that over-focusing on smartphones can affect intimacy between people (Oduor et al. 2016). Thus, people would choose to interact with technology more than talk with people. Even though smart devices help us interact effectively, they also affect the intimacy between us.
To solve this problem, I want to create an effective interface design to encourage more people to interact and have a genuine dialogue in a diverse environment. At the same time, it can also increase the convenience of interaction while keeping people closer to each other.
Ideations:
I want to make this product a digital and physical interface. The user can connect to the physical interface through the digital interface. My first idea is to build a digital interface — a mobile APP. “Successful interaction design employs simple, clearly defined goals, a strong purpose, and an intuitive UI” (Miklos, 2017). I’ll try to keep this APP simple. After users registered their accounts, they only need to choose different interests.

After the first step, I also want to create a physical interface for this project — a badge. Ruuska mentioned that a good interaction is allowed users to "select the most appropriate modality” (Ruuska,2001). So, to make users feel comfortable and get rid of the barriers to communicating with strangers, this badge is presented as a screen that shows the user's identity and interests. Moreover, the badge changes the picture depending on the environment. After users choose their hobbies on the APP, they can wear badges for social activities to find a friend in a short period. For example, if you attend a community job fair, the badge shows: Stacey, from NYU. It can help you find your alumni faster, and maybe you'll get a job opportunity. If you go to a pet event, a photo of your favorite "cat" will appear on this badge, which is easy to find friends who also like cats.

The reason why I want to create two different interfaces for this project is “the more human-like the interaction, the better are the attitudinal responses of the user” (Stefan, 2022). In addition to the design of the APP, I think the physical interface of the badge is very “human-like”. Users can find people with the same interests by wearing badges on their clothes, which is very simple and effective.

Further Plan:
In the next few weeks, I'll do more research, especially on how people want to promote relationships with others. If I use the solution mentioned above, I will be working on sketches, wireframes, and prototypes for the APP in the next few weeks. Then, I might use Arduino to create a small screen instead of a badge. If you guys have different ideas about my project, plz let me know :)

Resource:
Turkle, Sherry (2011). Alone Together: Why We Expect More from Technology and Less from Each Other. New York: Basic Books, Inc.
Oduor, Erick; Carman Neustaedter; William Odom; Anthony Tang; Niala Moallem; Melanie Tory; and Pourang Irani (2016). The Frustrations and Benefits of Mobile Device Usage in the Home when Co-Present with Family Members. DIS '16. Proceedings of the 2016 ACM Conference on Designing Interactive Systems, Brisbane, QLD, Australia, 04–08 June 2016. New York: ACM Press, pp. 1315–1327.
Ruuska-Kalliokulju, S., Schneider-Hufschmidt, M., Väänänen-Vainio-Mattila, K., Von Niman, B. (2001). Shaping the Future of Mobile Devices. Results of the Workshop on Future Mobile Device User Interfaces at CHI 2000. SIGCHI Bulletin January/February 2001.
Miklos Philips, Boost Your UX with These Successful Interaction Design Principles,2017.
https://www.toptal.com/designers/interactive/interaction-design-principles
Stefan Marti, How does the user interface design of mobile devices influence the social impact of mobile communication? February 2002.
http://alumni.media.mit.edu/~stefanm/generals/mainpaper_social_impact.2002.02.18.pdf
0 notes
Text
Interface Week 6 —UI Design
In this week’s homework, we need to find an example of a good and a bad user interface.
What we need to describe for each example:
the purpose of the interface
who is supposed to use it
what are its affordances
how usable is it
can someone learn
what it does through experimentations
Good Example of UI
WeChat
Social media platform, for people to chat & share the lifestyle
A wide range of age groups
It promotes a multi-mode environment, through text, audio, video conferencing, and various convenient functions for synchronized communication interaction.
Convenient
Easy to learn
It has changed from a simple mobile messaging app to a diversified information interaction platform, which has expanded many functions such as payment, games, and shopping. In the third quarter of 2020, WeChat had over 1.2 billion monthly active users
WeChat is a platform established by Tencent, it was marketed as Weixin and was rebranded as WeChat in 2012 for international users. WeChat is a very similarity to FB Messenger, but its functions are more diversified than it. I think a good user interface is clear and easy to use.
UI for WeChat:

Other features on WeChat:

Bad Example of UI
Instagram
A visual platform
A wide range of age groups
The use of imagery
Convenient, but there are many unnecessary functions
Easy to learn
It allows people from all over the world to share their pictures and videos at any time through the function of visualization.
The reason I chose Instagram as a bad UI design is that it has become more complicated and commercial than before. When I open Instagram, it feels like walking in a mall. And its design and functions are updated frequently, I think it has too many useless functions.
UI for Instagram:

0 notes
Text
Interface Week 5 – Physical Interface (Part 2)

This week we are continuing with last week’s assignment — create a physical mouse for our computer interface. I made a mouse using a 3D printer according to my last week’s ideas. The biggest challenge for me in this design is to build a complete 3D model, because I have no previous experience. I did a tutorial with student assistant Gabriella and she helped me a lot. Then my friend Mengmeng also gave me many suggestions. With their help, I used Rhino to complete my work.
Last week I divided the mouse into two parts, each part can be rotated by the user to input letters in the computer. After discussing with Gabriella, she suggested that I make the mouse into three parts to make it easier for the user to rotate the mouse. Then, I drew a sketch of the mouse again and divided it into three parts. The first part is the bottom of the mouse with letters from A to M on it, and the second part is the top of the mouse with letters from N to z. The last part of the model is very small and is the support part of the entire mouse in the button.
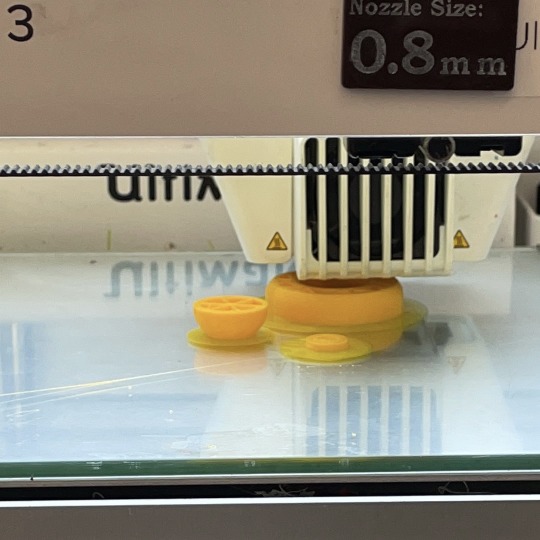
Finally, I rebuilt the 3D model in Rhino. I trained in 3D printing in the school's Markerspace and made this mouse. In the process of making 3D models, the tutor there also told me a lot of knowledges about 3D printing. The whole design process is very interesting to me, although my work does not look perfect. But since it was my first time to make 3D models and prints, I really enjoyed the whole design process.
Here is my sketch:

Different view of the 3d model:

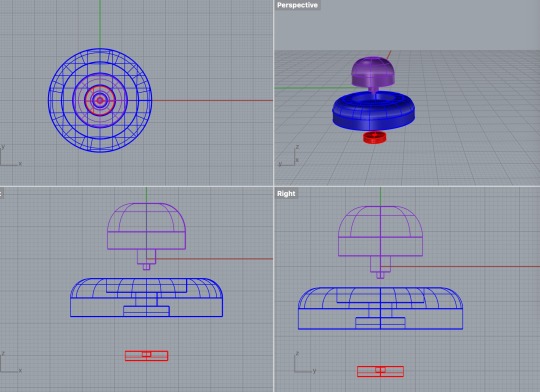
Final 3D Model:

3D Printing:

Final Prototype:

Video:
youtube
0 notes
Text
Interface Week 4 – Physical Interface (Part 1)

In this week's reading, we learned about the development history of the mouse, and various mouse models. Physical interfaces influence the digital world. Our current lives are unable to leave internet and computer. However, keyboards, mice and touch bar have become one of the ways we interact with the computer.
This week we need to make a product that interacts with the computer and draw a sketch.
have a means for entering text
a method for manipulating objects on screen
not a touch screen or a mouse/keyboard
I found a very interesting video on Youtube, it is an arcade joystick for a smartphone. I think it is very interesting that it turns the button function from the game into a physical interface. Maybe some people will find it boring or inconvenient, but I think I will try this product.
For my initial idea, I wanted to transform the keyboard and mouse into a physical interface like a gamepad, just like a switch. But then I thought it was still particularly inconvenient in operation, so I gave up. Then, I thought that the old phone used a rotating way to dial numbers, and I incorporated this idea into the design.

In my sketch, it can be seen from the figure that there are 26 letters in the first and second layers respectively. When the user wants to enter “Hi”in the computer, he needs to turn the letters of the first layer to H and then to I. The user can rotate the upper and lower parts to enter different letters. The characters will appear on the computer screen. Of course, it also contains a default option when the user does not use it.

3D model:


0 notes
Text
Interface Week 3 -- Map

This week, we need to build a map of our neighborhood. I just moved to Brooklyn last month, and I don’t know much about New York, so my first idea was to make a map of my hometown. Since I haven't been home for two years and I really miss it, I chose my hometown as the object of my design. My hometown is in the south of China. It is the capital of Jiangxi Province, called Nanchang.

Then, I want to make this map more creative and more story-conscious. I remember that when I was at home, I went to a stray cat organization as a volunteer. There were many unclaimed cats, and I’m a cat lover. Although there are many shelters for stray animals in my hometown, it is inevitable that there are still animals wandering outside. Therefore, I wanted to combine the map of my hometown with stray cats.
In the design process, I first drew the map of Nanchang into a very simple shape on my iPad. Secondly, I decided to draw six cats according to the different areas of each district. In addition, the space I want to express is to hope that every stray cat in this world can find a warm home. They’re all cute and need to be adopted.
Final sketch:


0 notes
Text
Interface Week 2 -- Time

Creative Clock:
Hi guys! This is Stacey Yao from the Integrated Digital Media Program at New York University. I’m taking an Interface course this semester, and this is my weekly homework blog. Hope I can explore more knowledge and different ways to combine ideas and interfaces through this course.
This week, our topic is to make a clock that can tell us the time. Time is important to everyone, so I want to combine the items people need every day with time to make a more creative clock. In addition to water, people need a certain amount of vitamin supplements every day, so my idea is to combine time and fruit.
I used p5.js to design the clock. As you can see from the picture above, each fruit represents a different time. For example, apples represent seconds, bananas represent minutes, and watermelons represent hours. I think the clock made in this way can not only represent time, but also remind people whether they have supplemented the vitamins they need today.
Here is the link for my cute clock:
https://editor.p5js.org/staceyao/present/htNU7gpSD
Reading Responses:
After reading Shannon Mattern’s “Time’s Interface,” I learned a lot about the different ways people record time from ancient times to the present. The most impressive thing is that the author mentioned that the phone is the interface between people sleeping and waking. In the past, it was the cock or whistle that helped people get up. But now technology products have become a direct bridge for people to sleeping and waking. It reminds me that when I watched the recording of the second course, "Interface as a form of relationship between entities” mentioned in the book "interface" from Branden Hookway. The clock in the mobile phone has become the connecting person and the world, and this interface has completely changed the way people live. When I was in elementary school, there was only one physical alarm clock at my home. My parents and I wake up at different times, so after the alarm clock rings for the first time, we need to set it a second time. Now the convenience of mobile phone alarm clocks perfectly replaces the alarm clock that needed to be set multiple times. The interface between the users and technology saves a lot of people's time and cost.
The second article is from Florian Cramer and Matthew Fuller, "Interface" in Software Studies. In the article, the authors discussed a lot about the connection between the user, software, and hardware. In the article, they talked about that "'user interface' and 'programming interface' are not always different" and I agree with that. Since my area of focus is UI/UX, a lot of the design concepts I've been exposed to are user-centric. In my opinion, as an interaction designer, we need to simplify the language of computer hardware to convey it to our users and improve user-friendliness. Make it easy for our users to understand computer language.
0 notes
Text
Final Project: Four Seasons in San Francisco
youtube
Final with Arduino
youtube
Final with p5.js
For my last project in the course, I decided to combine the p5.js and Arduino coding together to make an unique view for my favorite city San Francisco. Last week, I only draw the simple view for the city, and this week I draw the four different season of my sketch. Each season has some fun thing shows, and hope you guys will love it!
The beginning of my sketch:
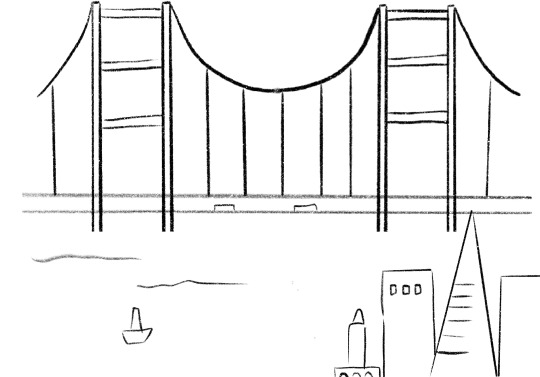
After draw the very first view of my sketch, I did a lot of change of it. And then I came up with the seasonal variations. It doesn't snow in San Francisco in winter, but in my imagination, it does snow in winter. So I let the last season of winter into snow.

For the p5.js psecode, I wrote on my sketch already:
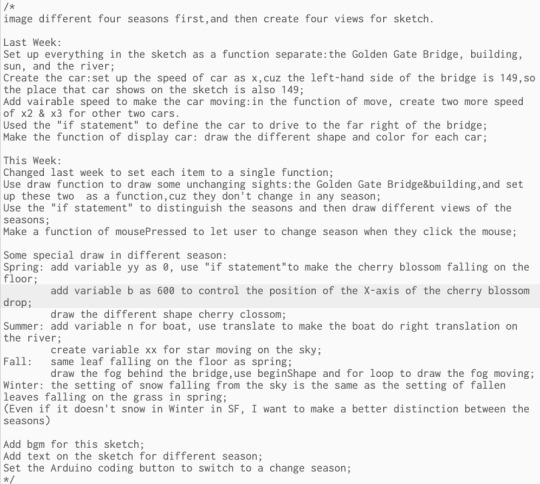
For Arduino set up, I only use one button on the breadboard:

User can clicked the button to see different season, and I also add background music on my sketch, because I want to make some people who have never been to San Francisco want to visit the city after seeing my works. BGM also wants to make people more relaxed.
For the processing, I spend a lot of time on my p5.js, because each season has different setting of views. For the Arduino coding, I only use simple code to complete it, because I only use one button to control my sketch chaning.
Finally, here is the link of my code on p5.js:
https://editor.p5js.org/staceyao/present/_iZxmErv5
and here is the link of my arduino coding:
https://editor.p5js.org/staceyao/present/EGtnwHGsb
Hope you will like San Francisco!!!!!!

Spring

Summer

Fall

0 notes
Text
Final Proposal: San Francisco City View

My idea about final project is combine the p5.js and Arduino together to make a city view for San Francisco. Just like what we did this week. The idea came from my mind, because I already living in San Francisco for many years, and then I will moving to New York in January. I will miss San Francisco so much! ❤️and just want to take what I learned from the course to my favorite city.
First I will make a view of SF on p5.js, and then using a button on the Arduino circuit board. The default setting is that San Francisco is daytime, and every time when the button is pressed, the city becomes night. In other words, the default is summer of SF, and when you press the button, it turns into winter.
Some illustration pictures I found online (hope I can make p5.js like this):


0 notes
Text
Build a Sketch with a Physical Interface

For this week’s assignment, we need to make a sketch with a physical interface, and I used one of the earliest homework from week 6.
First, I watched the video from Scott called “p5.js and Arduino serial communication - Send a digital sensor to a p5.js sketch” from the https://www.youtube.com/watch?v=feL_-clJQMs&list=PLnkvii1uWBvEprzkCJZbSAWsiqncWodoQ&index=2 And then, I referenced the Arduino code from https://gist.github.com/shfitz/7fd206b7db4e0e6416a443d61c8c988e


I used above code to test my circuit first, and after it working very well. I used my homework flower slider from week 6 to make an interface with circuit.

youtube
0 notes
Text
Love Compatibility Machine

For this week, we need to build & code a a love compatibility machine. My idea about this circuit was use the analog input and color mixing with an RGB LED. I used two potentiometers for user input, because it takes two hands to get this red light to go on, and this is made for a couple.
When the lights start flashing, the red, green and blue lights will flash for 1 second respectively, which represents the countdown. When the color stopped, the light didn’t turn off. Instead, it takes two people's hands to adjust the buttons so that it rotates in the same direction. When two buttons reach the same range, less than 50 (code I wrote is: (abs(analogA - analogB) < 50)), their love light will be red. If the two buttons do not turn to the same range or direction, their love light will not light up.
And here is my code:


When they're in a long-distance relationship:
(The distance between the two potentiometers is like that of a long-distance couple LOL)

When their mind in the same direction:

Here is my final video of love light ❤️:
youtube
0 notes
Text
Build a Meaningful Switch: Rear Camera Countdown Flashing Lights

For this week’s assignment, we need to use the Arduino to provide some meaningful feedback on what the action we engage in means.
I decided to use digital input and output to give people feedback on the countdown flash for the phone's rear camera. At parties, people like to take group photos with their phone's rear camera. However, since the countdown on the phone's rear camera is only prompted by the flash, there is no accurate action to let people know when the photo will be taken. So this time I'm going to use digital input and output to provide a countdown flash for people who likes to take pictures with a rear camera of their phone.

How it works?
Users can click the button when they want to take a picture with the phone’s rear camera. The device flashes green light 10 times to remind the user of the countdown. When the green light goes off, the device flashes a yellow light for a second to remind the user that the photo has been taken.
The process:
After watching the video “A momentary switch as a toggle” that Scott showed us, I started to write the code.
Write the variable that I need: two LEDPin for green & yellow lights, switchPin, the previous switch state, and the pressed button

Set up the input and output:

Write the loop for it:

Here is my final video of this cool rear camera countdown flashing lights:
youtube
0 notes
Text
Mickey Mouse Switch

Hi, this week we need to build a circuit with a switch. I used aluminum foil to make this cute Mickey switch.
Materials: aluminum foil, Arduino Uno, Breadboard, Jumper wires, Light Emitting Diodes, Resistor, USB Cable, Double Side Tape, Pen and Paper.


The processing: First, I squeezed the aluminum foil into a Mickey Mouse shape, and then used a pen to draw the Mickey Mouse pattern on the paper. Then I glued the painted Mickey Mouse to the tin foil with double-sided tape. This three-dimensional "Mickey Mouse" is my main conductor. Then I used two jumper wires to connect the positive and negative poles of the breadboard. Finally, plug two jumper wires on both sides of Mickey Mouse's ears, and the LED on the breadboard lights up.
The whole process is very simple, the aluminum foil Mickey Mouse is the conductor of the whole circuit, and the cartoon character wearing headphones "listening to music" is very interesting.
Here is my final prototype:
youtube
0 notes
Text
Midterm — Candy Shop Game
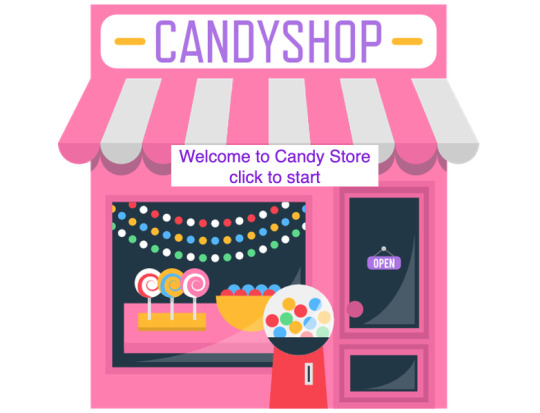
For the midterm of my Creative Coding course, I change my mind from the last idea “Donuts Dodge Game” to “Catcher Candy Game.”
Here is my code: https://editor.p5js.org/staceyao/sketches/70X4-VFDy
The processing: When I first started this project, I found some pictures for the background and candy, as well as may sound to test the game. I’m very familiar with the Preload() function because it is the simplest one. Then, I create three different screens for this game. The homepage is very easy to design and code, with only the background picture and text on it. I spent the longest time working with my game on the screen, especially about falling candy. Initially, I wanted to create an ellipse (face) for the main object that eats candy at the bottom. When it gets the candy, its face will be a smile, when it doesn't get any candy, its face will be sad. But in the end, I just substituted Pac-man for my original idea, because it would help me save more time. As the main character in the game, it looks very cute after I changed his mouth up to get candy. I’m very appreciated about how Scott told me to make the candy as a class to control the speed when it's falling. This advice helps me a lot to understand how coding works in a game. The function that I used in this game includes Preload(), “if..else” statement, and mousePressed. As someone with no background in programming, coding is really hard for me. During the two weeks that I was working on this project, I watched the video that Scott had sent us before many times. I hope I can really understand all the functions we’ve learned, but don't forget them at the end of the semester.

The challenges I faced: The most difficult part of the process for me was changing the image of the candy drop. I got the idea from Scott, he suggested that I make a class of these candies so that I could easily control their speed and shape. But I tried many times, and even Scott sent me a sketch of the candy, but I still didn't get it. I should review the function of the object and class to understand how it works.

How to solve the problem: I used the “if.. else” statement to solve the problem that I mentioned above. Even I didn’t change the speed of each candy, but I’d it with changing pictures. I used the relationship between numCandy and score to write the code for it. And it works.

How I might improve this game in the future: If I had more time to work on this midterm project, I would like to change the speed of each candy when it drops. At the same time, I also want to change the main character in the game, Pac-Man. I want his face to be a smiling face when he eats the candy, and his face to be a sad face when he misses the candy. If possible, I want Pac-Man's mouth to be closed while he waits for the candy to land and opens a mouse when he gets it.

0 notes
Link
Hi guys! This is Stacey again, I want to share my hw6 from Creative Coding Course. For this assignment, we need to create a small sketch that uses a library to enhance a sketch.
For my work this week, I chose to use DOM to create interactive interface sliders. My topic is flower. In addition to what the professor taught us about adding hue, saturation, and brightness. I also added the functions to move this lovely flower left and right, up and down. Lastly, you can change the weight and height of the flower's shape as what you want.
For this week, I will focus more on my midterm project. I've written some basic functionality and pseudocode for it. :)

0 notes