
Statistics
We looked inside some of the posts by yunzis-photoshop-classroom and here's what we found interesting.
Average Info
Notes Per Post
2
Likes Per Post
2
Reblog Per Post
0
Reply Per Post
0
Time Between Posts
5 days
Number of Posts By Type
Text
10
Last Seen Tumblr Blogs


Fun Fact
12.7% of mobile users access Tumblr.
Text
Additional thing you need to know
There are a lot of things to go over before taking the Adobe Certificate test.
Read the guideline carefully: Adobe Photoshop Certificate
Work in Design Industry
Purpose, audience, and requirements
Identify your audience - Key Terms: client goals, target audience, demographics, accessibility, etc.
Identify the required images - Print, video, web
Identify the project scope - Key Terms: project scope, scope creep, cloud utilization and file management
Understand design process - Key Terms: sketches, specifications, design process, wireframes, prototypes, iterations, change orders, drafts, feedback loop, etc.
Wireframe

Design Iteration

Copyright
Key Terms: Creative Commons, public domain, intellectual property, derivative work, commercial use, attribution, work for hire, fair use, fair dealing, stock images, etc.
Creative Commons
Creative Commons (CC) is an American non-profit organization and international network devoted to educational access and expanding the range of creative works available for others to build upon legally and to share.
Public Domain
creative materials that are not protected by intellectual property laws such as copyright, trademark, or patent laws.
Work for hire
A work for hire, or work made for hire, refers to works whose ownership belongs to a third party rather than the creator.
Fair Use
Fair use permits a party to use a copyrighted work without the copyright owner's permission for purposes such as criticism, comment, news reporting, teaching, scholarship, or research.
Fair Dealing
Fair dealing is an exemption in the Copyright Act which allows you to use other people's copyright material for the purpose of research, private study, education, parody, satire, criticism, review or news reporting, provided that what you do with the work is 'fair'.
Color Theory
The fundamentals of understanding color theory

1 note
·
View note

Text
Week 8 Thriller Poster
This week, we're going to do your own poster.
Do you have your story?

First, let look at some existing posters.

To make the above poster, you will need:
a girls face
a hand
a rain drop picture
a font of your choice
Some Photoshop Brushes
To unify the tone of the face and hand, we need to add a black & white adjustment layer with a tint blue. Then mask off the lip part on the layer mask of the adjustment layer.
To add raindrop, we can find a picture with a relatively unified background, and choose layer blend mode.
Then we need to add a mask of the raindrop layer, and draw with black brush to reveal the eye part.
We probably need another dripping brush to draw the drips on the mask layer as well.
By recreating others' work in mind, we'll learn how to plan for our own project, so that we won't feel at lost when see the blank canvas in front of us.
Downloading and Installing Brushes
You can find many free Photoshop brushes on Brusheezy
The brushes will be ".abr" files.

Open your brush panel, then go to the hamburger icon on the top right corner. You'll see Import Brushes. Then choose your brush files. Done!
How to install fonts
There are many website that you can download fonts.
You can also use Adobe Fonts is your subscription gives you access.
Here are some other websites I like
Let's do a study of this poster!

0 notes
Text
Week 7 Text Tool and Text Portrait
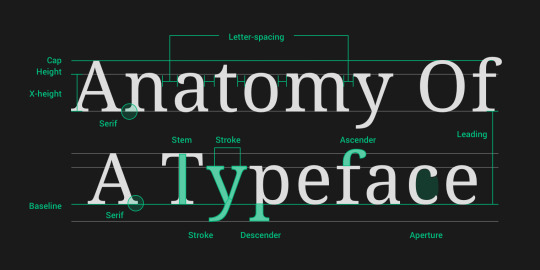
Keywords: font, typeface, kerning, tracking, leading, displace

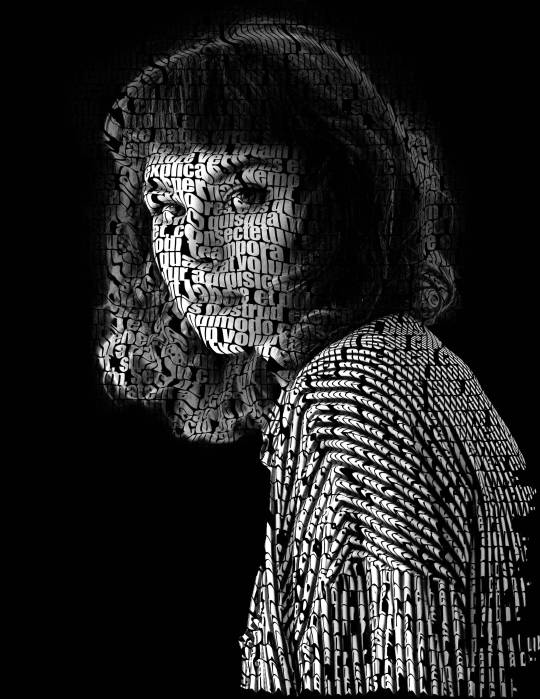
Today, let's learn something about "text", or to put it in a professional way, typography.
First, let's see some terms.
Font: font and typeface are not the same. However, we use both to represent a style of text most of the time.
(Want to know the difference? Check this article: Typeface)
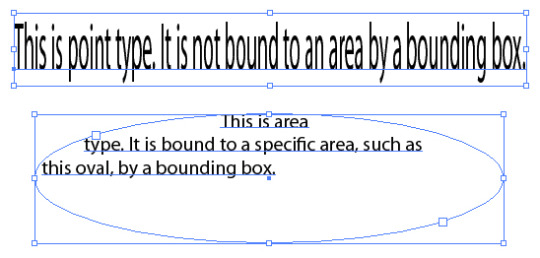
Point Type: create a point text by clicking with the Text tool.
Area Type: create an area type by dragging with the type tool.
------------- Point Type vs. Area Type? (Detailed reading: Photoshop Point vs. Area Type)
Point type will not automatically break lines.
Area type will break lines according to the size of the text box.
Point-type letters can be distorted when you scale it without locking the ratio.
Area Type will change line breaks instead of distorting the text when you scale the text box.
Kerning: Kerning is the spacing between individual letters or characters

Tracking: Letter space

Leading: Line space

Additional typography knowledge:
Okay, now we are ready to start our project!
Download the exercise file.
remove the background
create a new file with the ideal sizes
move the girl layer to the new file
add a gradient map to change her to black and white
add a level layer to add contrast
convert them to a smart object, then Gaussian Blur it
Save it as a new .psd file; name it "displace"
Ctrl Z to undo and get the clear image layer back
create an area type; change font, font size, leading, and tracking
Convert the text layer to a smart object
Filter->Distort->Displace->30, 30->choose the "displace.psd" file
move the image layer on top and clip it into the text smart object.
add a black background layer
remove the background


create a new file of letter size
then use the move tool to move the girl to the new file
add a gradient map adjustment layer and a level adjustment layer to achieve the below effect


convert all the layers to smart object, and apply gaussian blur to it.


save this as "displace.psd".
RMC->clear smart filters to remove the gaussian blur.
Add an area type to cover all the canvas.
Choose the "impact" font, and change the font size to 24pt, leading to 17pt.
Type->Paste Loren Ipsum

Convert to smart object.
Filter->distort->displace

change numbers to 20-30. The bigger your number is, the more distortion you'll get.

move the girl layer on top and clip into the text layer, then add a black background.

Adjust the level of the image layer to give more contrast.
Then we're done!

0 notes
Text
Week 6 Dancing Girl - 2
Keywords: Layer mask, type tool, shape tool, layer opacity vs. fill
Layer Mask
layer mask in a non-disruptive way to conceal some pixels on one layer/group.
You can create a layer mask by clicking the mask icon at the bottom of the layer panel -> a circle in a square
Add a mask that shows or hides the entire layer?
Click the New Layer Mask button in the Layers panel to create a mask that reveals the selection. Alt-click (Win) or Option-click (Mac) the Add Layer Mask button in the Layers panel to create a mask that hides the selection. Choose Layer > Layer Mask > Reveal Selection or Hide Selection.
Add a layer mask that hides part of a layer?
In the Layers panel, select the layer or group. Select the area in the image, and do one of the following: Click the New Layer Mask button in the Layers panel to create a mask that reveals the selection. Alt-click (Win) or Option-click (Mac) the Add Layer Mask button in the Layers panel to create a mask that hides the selection. Choose Layer > Layer Mask > Reveal Selection or Hide Selection.
To directly edit layer transparency, do the following and create a mask
In the Layers panel, select the layer. Choose Layer > Layer Mask > From Transparency.
Photoshop converts transparency into an opaque color, hidden by the newly created mask. The opaque color varies greatly, depending upon the filters and other processing previously applied to the layer. This technique is helpful for video and 3D workflows.
Apply a layer mask from another layer
To move the mask to another layer, drag the mask to the other layer. To duplicate the mask, Alt-drag (Win) or Option-drag (Mac) the mask to the other layer.
we'll use the second method to hide some parts of the color stripe. Lowering the transparency of the color stripe layer will help you identify the edges.
We need to hide the girl's right foot. Use the pen tool to select the right foot.
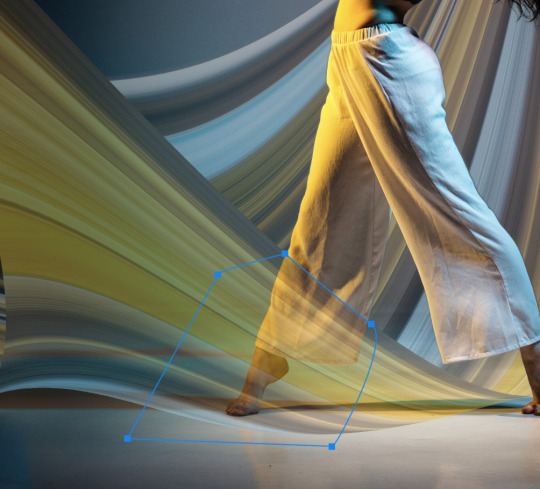
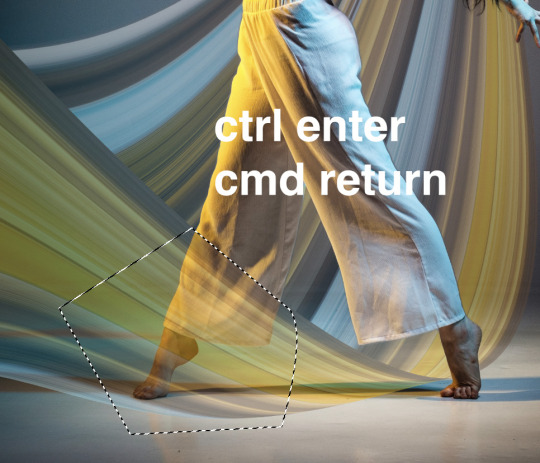
Pen tool
Ctrl + enter
Cmd + return
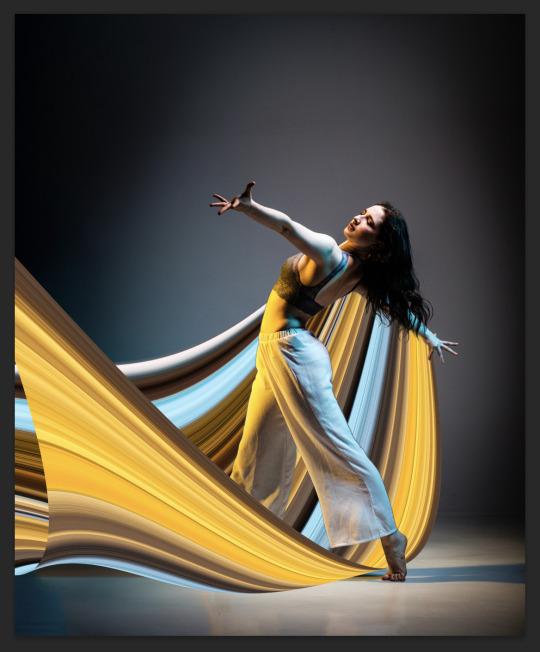
Now, we've done the swoosh thing. We can move on to add some text to our design.
Type Tool
Choose the Type Tool with a "T" icon. Click to create a point type
Type in "DANCE" in uppercase and choose a font
Edit the font size and weight.
Create another point type and type in "FOR THE NIGHT" in uppercase and a smaller font size.
Increase letter space for "for the night"
---------------How to increase letter space?
select all the text, hold Alt (Win) Opt (Mac) and hit -> arrow
Move them to the top left conner.
Shape Tool
Different from all the other layers we've dealt before, the Shape Tool creates vector Path instead of Raster elements composed of pixels.
Once we have a shape, or to put it in another way, a path, to edit like pixel layers, we need to right click on the path layer and rasterize it.
The shape tool is actually a tool group. By default, the icon is the rectangle.
You can change the fill and stroke styles from the control panel on top of your screen.
Now, you can add a box for your title "DANCE".
Layer Opacity vs. Fill?
When you look at your layer panel, you'll notice that you have two options to lower down the transparency of your layer: Opacity and Fill.
-----------------What is the difference?
Opacity will control the opacity of both the layer and layer effects.
Fill will control the opacity of the layer, but not layer effects.
Let's add a light strip to practice.
Create a long rectangle, double click on the layer tab area to add a outlow effect.
Change the perimeters to make the light strip look natural.
Lower down the fill to 0, and now you'll have something similar to my sample.
0 notes
Text
Week 5 Dancing girl - 1
Keywords:


Plan for this project
separate the girl from the background
extract color pixels from the girl
add more space to the left
stretch the color pixels into color stripes
distort color stripes
intertwine the color strips with the girl
add shadow
add text

Add more space to the left
click the Crop Tool
Check Content-Aware on the control bar
Extend the left side
Commit this change with the Enter key or the check mark on the control bar
Separate the girl from the background:
form a good habit -> duplicate the background layer
object selection tool -> select the girl
select -> select and mask to brush over the hair below her right arm
on the select and mask window, set the output to -> new layer
good habit -> name the new layer "girl"
New way to do this:
Active the layer
open the properties panel
click remove background
extract color pixels from the girl:

Active the girl layer
click the single-column marquee tool
Find a color you like and click with the single-column marquee tool
ctrl /cmd j to duplicate those pixels to a new layer.
----------why the single-column marquee tool?
With this tool, there will be only one color in one row. later on, when we stretch the pixel into stripes horizontally, there will be one color on one horizontal line.

stretch the color pixels to make color stripes
Here we need to use the free transform tool.
Free transform tool
The Free Transform command lets you apply transformations (rotate, scale, skew, distort, and perspective) in one continuous operation. You can also apply a warp transformation.
There are three ways to access the free transform tool:
Edit -> Free Transform Move Tool (the first tool on the tools bar) -> check "show transform controls" on the optional bar. ctrl / cmd + T
scale and keep the original ratio: by default, your image will keep the same ratio when you scale it.
scale your image without keeping the original ratio: hold Shift when you scale it.
We'll scale our single columns to make wide color stripes.
Repeat from column selection to free transform three or four times until you get all the colors you want.


Then we need to use the square marquee tool to select and delete some even colors.


Play with all the color stripes, and find the best combination. Then merge the layers

Distort color stripes

Then drag the mesh and corners to make the stripe as below

Intertwine the color stripes with the girl
Here we need to use the layer mask
Layer Mask
layer mask in a non-disruptive way to conceal some pixels on one layer/group.
You can create a layer mask by clicking the mask icon at the bottom of the layer panel -> a circle in a square
Add a mask that shows or hides the entire layer
Click the New Layer Mask button in the Layers panel to create a mask that reveals the selection. Alt-click (Win) or Option-click (Mac) the Add Layer Mask button in the Layers panel to create a mask that hides the selection. Choose Layer > Layer Mask > Reveal Selection or Hide Selection.
Add a layer mask that hides part of a layer
In the Layers panel, select the layer or group. Select the area in the image, and do one of the following: Click the New Layer Mask button in the Layers panel to create a mask that reveals the selection. Alt-click (Win) or Option-click (Mac) the Add Layer Mask button in the Layers panel to create a mask that hides the selection. Choose Layer > Layer Mask > Reveal Selection or Hide Selection.
To directly edit layer transparency, do the following and create a mask:
In the Layers panel, select the layer. Choose Layer > Layer Mask > From Transparency.
Photoshop converts transparency into an opaque color, hidden by the newly created mask. The opaque color varies greatly, depending upon the filters and other processing previously applied to the layer. This technique is helpful for video and 3D workflows.
Apply a layer mask from another layer
To move the mask to another layer, drag the mask to the other layer. To duplicate the mask, Alt-drag (Win) or Option-drag (Mac) the mask to the other layer.
we'll use the second method to hide some parts of the color stripe. Lowering the transparency of the color stripe layer will help you identify the edges.
We need to hide the girl's right foot. Use the pen tool to select the right foot.


Pen tool
Ctrl + enter
Cmd + return

0 notes
Text
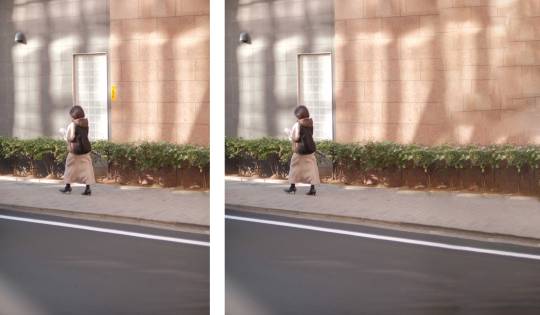
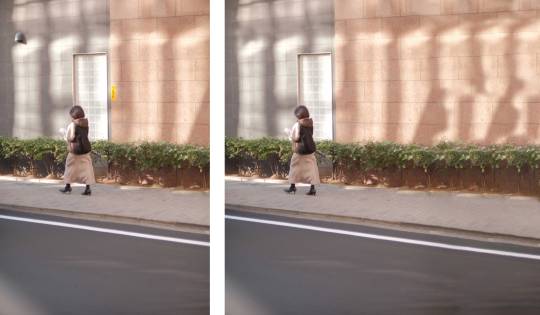
Week 3&4 Apply Makeup to a Girl
Keywords: liquify; make a selection; remove background (especially with hair); blending mode; Dodge and Burn tool
This week, we are going to learn how to do makeup in Photoshop.

Liquify - Make you slimmer
Exercise file download:
First, as usual, let's duplicate the background layer with Cmd/Ctrl+J.
Filter->Liquify

Once you open the liquify window, you'll see the interface like that.
Below are the names & functions of each tool:

Forward Warp tool: Pushes pixels forward as you drag.
Pushes pixels forward as you drag.
Reconstruct tool: Reverses the distortion you’ve already added, as you hold down the mouse button and drag.
Twirl Clockwise tool: Rotates pixels clockwise as you hold down the mouse button or drag. To twirl pixels counterclockwise, hold down Alt (Windows) or Option (Mac OS) as you hold down the mouse button or drag.
Pucker tool: Moves pixels toward the center of the brush area as you hold down the mouse button or drag.
Bloat tool: Moves pixels away from the center of the brush area as you hold down the mouse button or drag.
Push Left tool: Moves pixels to the left when you drag the tool straight up (pixels move to the right if you drag them down). You can also drag clockwise around an object to increase its size, or drag counterclockwise to decrease its size. To push pixels right when you drag straight up (or to move pixels left when you drag down), hold down Alt (Windows) or Option (Mac OS) as you drag.

Brush Size: Sets the width of the brush you’ll use to distort the image.
Brush Density: Controls how a brush feathers at the edge. An effect is strongest in the center of the brush and lighter at the edge.
Brush Pressure: Sets the speed at which distortions are made when you drag a tool in the preview image. Using a low brush pressure makes changes occur more slowly, so it’s easier to stop them at exactly the right moment.
Brush Rate: Sets the speed at which distortions are applied when you keep a tool (such as the Twirl tool) stationary in the preview image. The higher the setting, the greater the speed at which distortions are applied.
Stylus Pressure: Uses pressure readings from a stylus tablet. (This option is available only when you are working with a stylus tablet.) When selected, the brush pressure for the tools is the stylus pressure multiplied by the Brush Pressure value.
Face-Aware Liquify: This is the point!


---------------------------------------------------------------------
Make a selection
There are many tools to make a selection and more tools to modify a selection.
-------Why we need a selection?
Sometimes, you only want to edit or just keep a part of the image.
-------How to make a selection?
select the sky: select->sky
select a person: select->subject
Or by these tools:


------How to modify a selection?
All the selection tools will provide you below options to edit the selection


You can also modify your selection by select->modify
Let's practice

We can make our penguin a bit chubbier by:
magic wand -> click the dark brown color area to select
select-> modify -> expand -> type in a number
eyedropper -> click to pick a color
Alt/Opt + Delete/backspace to fill the color
Feather
-----------------------------------------------------
Remove Background
Removing the background is tricky, especially when your portrait has fuzzy hair.

Follow the below steps to avoid headaches
select the main body: Object selection tool / select->subject
modify the selection: select->select and mask
brush the edge: refine edge brush (second brush) -> choose a proper brush size -> Object aware
Check decontaminate colors -> 100%
Then we can add a solid color background to see the result!

Sample background download
------------------------------------------------------------
Blending Mode
See the below examples to get a better idea of blending modes


For today's exercise, we'll use blending mode to add lip color to that girl.


Add a new layer: (M)cmd+opt+shift+n / (W)Ctrl+alt+shift_n / clicking the "+" icon at the bottom of the layer panel
Brush (hotkey "b") some color in the lip area
Change the blending mode to multiply or darken or any other mode that can show the lip details with a reasonable color.
Change the color: Hue and Saturation dialog -> (M) cmd + U / (W) Ctrl + U
Change the opacity of the lip color layer
Add highlight by the eraser tool
-----------------------------------------------------------
Dodge and Burn
In the last step, let's add some highlights and bronzer.
Dodge tool will lighten up the brushed area
The burn tool will darken the brushed area

There are some options for these two tools.
Method 1:
duplicate the portrait layer
change range to Midtones
use the dodge tool and burn tool to draw on the face
Method 2 (non-disruptive)
Edit -> Fill -> 50% grey
change blending mode to overlay
use a darker grey to darken some areas.
use a lighter grey to lighten some areas.

One thing to remember: Don't edit too much!
0 notes
Text
Week 2 Edit your Second Photo
Keywords: Smart Object; Content-Aware Fill; Clone Stamp Tool
Smart Object

Smart Objects are a type of container that holds multiple layers within Photoshop. Apply properties and characteristics to multiple layers, combining different tools, filters, and features. Then undo and make changes as you need to — the original image is protected.
An easier way to put it: scaling up or down will not influence the clarity of the image.

-------- How to turn a layer or some layers into a smart object?
select the layers -> Filter -> Convert for Smart Filters
select the layer -> Right Click -> Convert to Smart Object
-------- How to turn a smart object back to layers
Select the smart object -> Right Click -> Convert to Layers
Select the smart object -> Layer -> Smart Object -> Convert to Layers
Select the smart object -> Properties Panel -> Convert to Layers
Select the smart object -> Layer Panel -> hamburger icon -> Convert to Layers
A complete passage about Smart Object: Using Adobe Photoshop
Content-Aware Fill / Scale

Content-aware fill is another way to remove unwanted elements in your image. You can select the unwanted area, and fill that space with the elements in the sampled area.
Content-aware scale is one way to extend your image without stretching the background.
Sample image download
-------- How to use Content-Aware Fill?
Use the Lasso tool to select the unwanted item. Make sure the selected area is a little bigger than the item -> Edit -> Fill -> Content Aware -> OK
Use the Lasso tool to select the unwanted item -> Edit -> Content-Aware Fill -> Brush off the sample area (green area) or add some sample area based on the preview -> OK
Scale box will fill the selected area with scaled sample area.
Mirror box will fill the selected area with a horizontally mirrored sample area.


-------- How to use Content-Aware Scale?
Crop Tool -> check the content-aware box -> scale up the cropped area horizontally or vertically -> Return or Enter


Then, use the Clone Stamp Tool to edit the imperfect details.

Clone Stamp Tool
The Clone Stamp uses a sample you define yourself, and then you can adjust the size of the brush you use to paint with that sample from the options bar. It's intuitive and gives you greater control over your work.

-------- How to use Clone Stamp Tool?
Select the Clone Stamp Tool -> Hold Alt (Win) or Option (Mac) -> Click on the image to pick the sample area -> release Alt/Opt -> Draw on the destination area
Complete Article: How to Use Clone Stamp Tool in Adobe Photoshop

Extra practice if we have time: download here
remove the freckles; add eye shadows; add lipsticks; make her thinner...
1 note
·
View note
Text
Week 1 Edit Your First Photo
download the exercise file here.
Enhance the Photo
Open a photo
File -> Open -> Locate your photo file
Mac: Cmd + O; Windows: Ctrl + O
Start Pane ->Open
Locate your photo file, and drag it onto the start pane
If you have some other open files, drag to the document tab
2. Crop a photo
C for crop
Ratio
Straighten
Uncheck delete cropped pixels
3. Improve your lighting and color by adjustment layers
Add additional layers to adjust the photo instead of just editing itself.
On the layer panel, click the adjustment layer. It is active when it is highlighted.
The adjustment layer will influence all the layers below it.
To apply the adjustment layer only on one layer instead of all the layers below it, Hold the Opt (M) or Alt (W) and move your cursor between those two layers to clip it in.
To reopen the property panel of the smart filter, double-click the thumbnail of the smart filter layer
To delete a smart filter layer
Activate the layer and hit backspace/delete
Drag it to the trash bin icon at the bottom right corner of the layer panel
Some commonly used adjustment layers:
Solid Color
Brightness / Contrast
Hue / Saturation
Levels
Gradient Map
Selective Color
4. Add a layer mask on an adjustment layer
Using a Layer mask is a non-disruptive way of concealing contents
White: 100% reveals the adjustment
Black: 0% conceal the adjustment
Select the layer mask
Select the Brush Tool
Pick black or gray depending on the percentage you’d like to remove
Brush on the area you’d like to remove
5. Color Picker
Foreground color
Background color
Set back to default: D
Swap foreground and background: X
Increase brush size: ]
Decrease brush size: [
6. Compare the before & after
Show and hide layers
Click the “eye” icon to show and hide layers
To only show one layer:
Hold (M) Opt
Hold (W) Alt
And click on the “eye” icon of the original layer
7. Save a file
File->Save, or Save as
Or Mac: cmd + S; Window: Ctrl + S
Save as a psd file
Choose a destination
Make sure “layer” is checked
---------------------------------------------------
Remove Unwanted Contents
Adding a new layer
Add a new layer with the new layer panel:
(M) Cmd Shift N -> Name it -> Ok
(W) Ctrl Shift N -> Name it -> Ok
Add a new layer and skip naming
(M) Cmd Opt Shift N
(W) Cmd Alt Shift N
Click the + icon at the bottom right corner
Layer - > New
2. Spot Healing Tool
Create a new layer to make sure the editing is nondisruptive
Select Content-aware
Content-aware will sense the content around the brushed area and autofill the brushed area with similar contents
Check “Sample all layers”
If unchecked, the spot healing tool will apply to the layer right beneath the new layer.
If checked, the spot healing tool will sense all layers beneath the new layer
3. Undo
(M) Cmd Z
(W) Ctrl Z
4. Patch Tool
Create a new layer
Select Content-aware in the patch menu
Check “sample all layers”
Click and drag to make a rough selection. Make sure the selected area is slightly larger than the unwanted item
Move your cursor inside the selection and drag the selection to somewhere that you want photoshop to patch.
Deselect the area
Select -> deselect
(M) Cmd D
(W) Ctrl D
Structure: how many details you want to preserve
Color: how much color blending you want
--------------------------------------------------------------
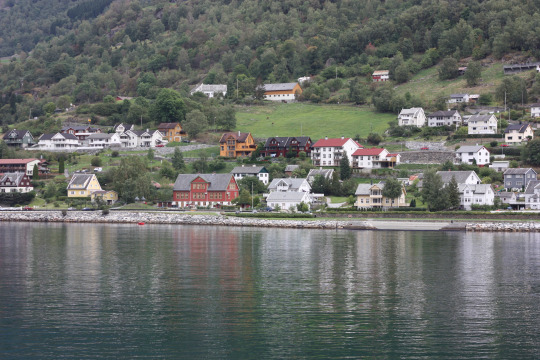
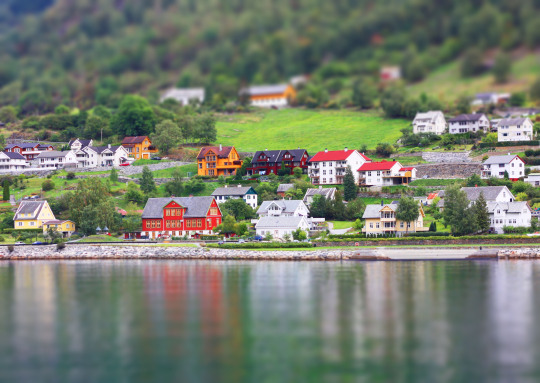
Miniature Effect - Tilt-Shift Blur
Tilt-Shift
Tilt-shift is a blur effect that gives your photo a miniature feeling by adding depth of field.
Activate the smart layer
Filter -> Blur Gallery -> Tilt-Shift
To reposition the filter: drag the black and white pin
To control the blur strength -> blur slider on the Tilt-Shift panel
To control the size of the focused area: drag one of the solid lines up and down
To control the size of the blurry areas: drag one of the dashed lines up and down
To rotate the focused area, drag one of the white circles
Once you finish, click OK on the control panel.
To edit again, double-click the filter name to reopen it.
To conceal some areas of this filter, paint black or gray on the smart filter layer mask
To delete the smart filter, drag it to the trash bin icon
-------------------------------------------------------------
Color Adjustment
Black and White
Activate your smart object
Click the half-black and half-white circle at the bottom of the layer panel -> choose black and white
To add more contrast to the image, drag the sliders. Drag left -> darker; drag right -> lighter
2. Add a tint
On the black and white property panel, check “tint”
Click the square next to “tint”, and pick a color you want
To reopen the property panel, double-click the thumbnail of the smart filter layer
0 notes
Text
Week 1 Welcome to Photoshop
Keywords: creating files; navigating files; photoshop interface; saving files; workspace; tools, find missing tools

Photoshop
Adobe Photoshop is a program for image creation, photo editing, and graphic design.
One thing you need to know before we dive into the Photoshop training.
--------------------------------------------
Raster files vs. Vector files
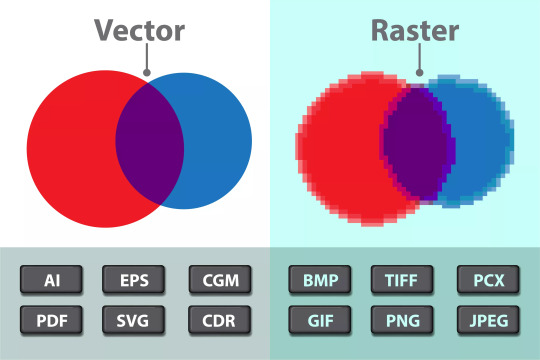
source of the image
Vector vs. Raster images Composition: Vector: Made of lines and shapes (math-based). Raster: Made of pixels (tiny color dots). Scalability: Vector: Resizes without losing quality. Raster: Becomes blurry or pixelated when enlarged. Best Use: Vector: Logos, icons, and illustrations. Raster: Photos and detailed images. File Size: Vector: Smaller file size. Raster: Larger, especially for high-resolution images.
Raster graphics are made up of orderly arranged colored pixels to display any image whereas, vector graphics are composed of paths using a mathematical formula that is a vector that directs the route and shape. (source)
The most common raster files are: jpg (jpeg); png; gif; tiff
The most common vector files are: ai; esp; pdf; svg
----------------------------------------------------------------
Creating a file
1. Four ways to create a new document
Use the following keyboard shortcut:
(Mac) Cmd+N
(Windows) Ctrl+N
Select File > New.
Click New or Start New in the Start workspace.
Right-click the tab for an open document and choose New Document from the in-context menu.

2. Start with Blank Document Presets
Blank Document Presets are blank documents with predefined dimensions and settings.
Presets make designing for specific device form factors or use cases easier. For example, you can use a preset to quickly start designing for the iPad Pro. Blank document presets have predefined size, color mode, unit, orientation, positioning, and resolution settings. You can modify these settings before creating a document using the preset.
Templates and presets are categorized into these sets:
Photo
Print
Art & Illustration
Web
Mobile
Film & Video
3. New Document dialog
The New Document window lets you:
Create documents using selected templates from Adobe Stock across several categories: Photo, Print, Art & Illustration, Web, Mobile, and Film & Video.
Find more templates and create documents using them.
Quickly access files, templates, and items that you have recently accessed (Recents tab).
Save your own custom presets for reuse and quickly access them later (Saved tab).
Create documents using Blank Document Presets for multiple categories and device form factors. Before opening the presets, you can modify their settings.
4. Modify Presets
Width and Height: Specify the size of the document. Select the unit from the pop-up menu.
Orientation: Specify a page orientation for the document: Landscape or Portrait.
Artboards: Select this option if you want your document to have artboards. Photoshop adds an artboard while creating the document.
Color Mode: Specify a color mode for the document. Typically, for screen-based design products, use RGB; for print outs, use CMYK. K stands for "Key", which is the main color to determine the outcome of the prints.


Resolution: Specify the fineness of detail in a bitmap image measured in pixels/inch or pixels/centimeter.
Background contents: Specify a background color for the document.

5. Advanced Options
Color Profile: Specify the color profile for your document from a wide range of options. It matches your design with a specific display screen. sRGB is a most commonly used choice.
Pixel Aspect Ratio: Specify the ratio of width to height of a single pixel in a frame.
6. Save your own presets
After you're done specifying the settings, click the “save” icon in the Preset Details pane.
Specify a name for the new preset.
Click Save Preset.
You can later access the new preset from the Saved tab of the New Document dialog.
----------------------------------------------------------------
Photoshop Interface
Photoshop Interface

(source)
----------------------------------------------------------------
Navigating a file
Hand Tool
Scroll all windows: With the Hand tool selected, checking Scroll All Windows (in the Option bar) will scroll (or pan) all open documents at the same time.
100%
Fit Screen
Fill Screen
2. Zoom in and out
Zoom in: (M) Cmd “+”, (W) Ctrl “-”
Zoom out: (M) Cmd “-”; (W) Crtl + “-”
Magnifier tool (z): click to zoom in, hold Option (M) or Alt (W) and click to zoom out
3. Fit to Screen
(M) Cmd “0”
(W) Crtl + “0”
4. 100%
(M) Cmd “1”
(W) Crtl + “1”
M: Mac W: Windows
----------------------------------------------------------------
Save a file
Save
Format: PSD, PSB(Large Photoshop File), PDF, TIFF
Shortcut: Cmd/Ctrl S
If click “as a copy”, then you’ll have the below format to choose from:
Jpg
Png
Gif
2. Save a Copy
Save a copy works the same as "save->as a copy"
3. Save As
File -> Save As
Shortcut: Cmd/Ctrl Shift S
4. Save for web
File -> Save for web
Shortcut: Cmd/Ctrl Opt/Alt Shift S
5. Save vs. Save for web
When using the “Save As” function in Photoshop, the user is given the option to choose the file format, quality, and destination of the saved file. The “Save for Web” function is designed specifically for saving images for web use and offers a number of settings to optimize the image for web delivery.
5. Export layers to files
You can export each layer as a single file if you export layers to files.
6. Save vs. Export
Save will save the file as it is or compresses it as a jpg. Export gives you more options and previews for the final images.
7. Jpg vs png
JPEGs contain fewer data than PNGs — and therefore, are usually smaller in size. Unlike JPEGs, PNGs support transparent backgrounds, making them preferred for graphic design.
7. PNG vs GIF
PNG is mostly superior to GIF, as it is newer, and supports more colors. PNG cannot be used for animation but offers highly sophisticated transparency and color support, among other features. In most cases where animation is not required, it is best to use PNG instead of GIF.
----------------------------------------------------------------
Workspace
A workspace is the entire working area of Photoshop. It's what encompasses all the menus, tools, and panels. Simply put, it's pretty much everything you can see and click within Photoshop. (source)
First, let's look at the panels.
There are three status of panels:
Iconic
Floating
Docked
You can drag the panel icons or panel tags to move and rearrange them. They will form the most important part of your workspace.
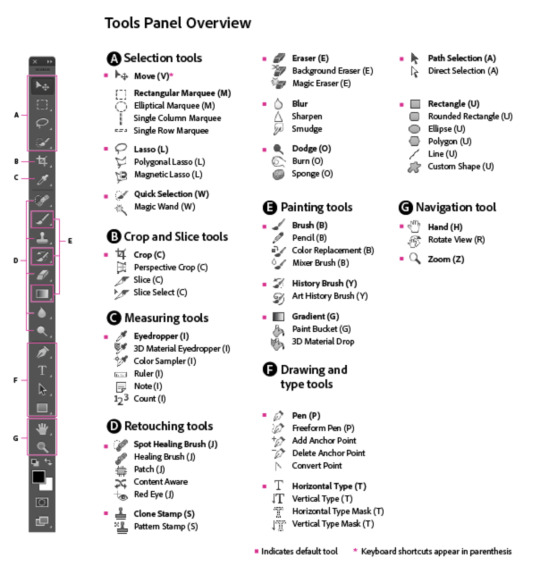
Then, let's look at the Tools bar:
The Tools bar can be shown in one-column or two-column
------------How to toggle between one-column and two-column?
By clicking the double-arrow on the top of the Tools bar.
------------Why I cannot see the tools I'm looking for?
Maybe you are using a workspace that does not include some tools in the tools bar.
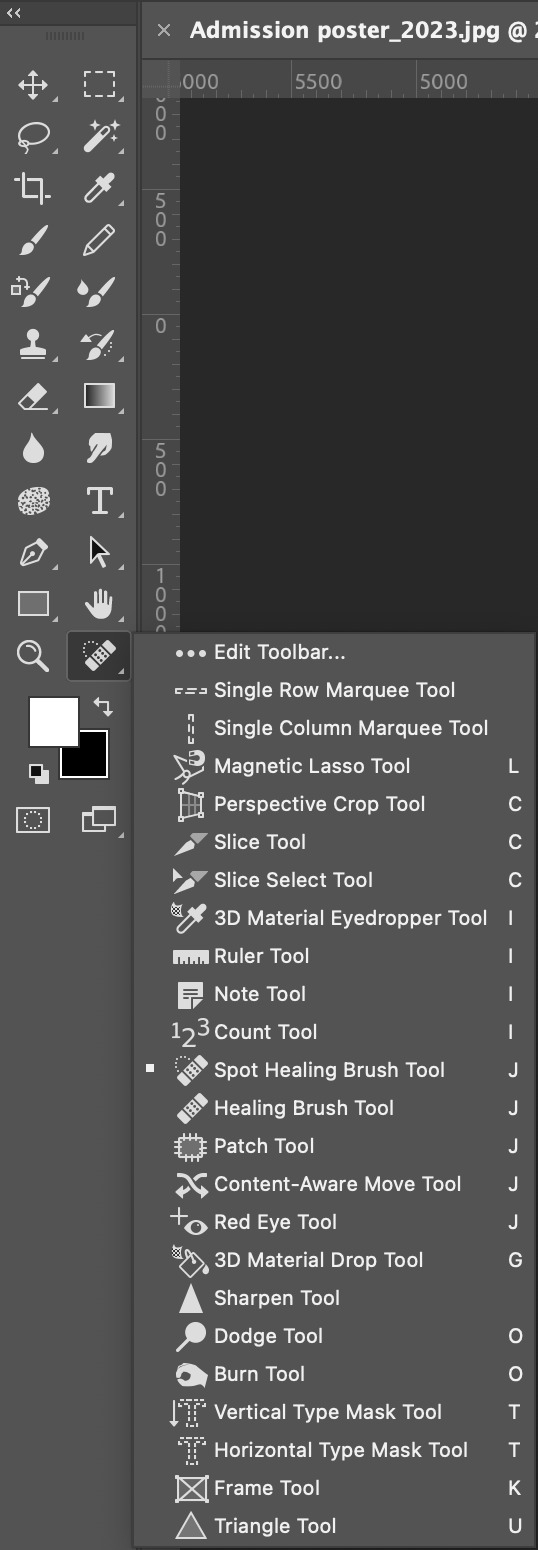
No worries. You can access more tools by right clicking the three dots icon at the bottom.
If the Tools are still not here. Then refer to the video below:
youtube
-----------Oh no! I don't have any tools bar!
It's okay, go to Window-> check the "tools" at the bottom. Voila!
-------What are the tools?
Now, you've known enough to set up a workspace.
You can access workspace by:
Window->Workspace
The icon below at the top right corner

The different workspaces will give you the most commonly used tools and panels for a certain purpose.
------------How to reset workspace?
window-> workspace -> reset "the workspace name"
the workspace icon -> reset "the workspace name"
------------How to save your own workspace?
Window -> workspace -> New Workspace -> Name it->Save
the workspace icon -> New Workspace -> Name it -> Save
Once you have a workspace that you feel most comfortable working with, just save it!

0 notes