
Don't wanna be here? Send us removal request.
Statistics
We looked inside some of the posts by zachmakesgames and here's what we found interesting.
Average Info
Notes Per Post
7
Likes Per Post
5
Reblog Per Post
2
Reply Per Post
0
Time Between Posts
15 days
Number of Posts By Type
Text
17
Last Seen Tumblr Blogs


Fun Fact
Tumblr.com is the 103rd most visited website in the world.
Text
Sunrise Shoals Update

It appears I haven’t shared anything about Sunrise Shoals here yet. Well...here’s an update:
I’ve blocked out the walls and door ways for the B&B.
The space is about 10-20% larger than it should be due to me not properly scaling my Player Avatar. Spaces were feeling smaller than they were. Post-correction, they’re feeling huge. I did reduce the left side by about 10%. The space is still probably too large…but it’s a game.
Next step is to add doors. I’ll be stealing a script from my other project, but may make a few changes.
LINK to Project P2
#Zach Makes Games#Sunrise Shoals#Dumb name?#Game Development#Level Design#Game Design#Unity3D#Unity Development#Made With Unity#P2#Video Games#Indie Games
0 notes
Text
0 notes
Text
CANDLES UPDATE 33: New Candle Model

As an experiment, I used ProBuilder to create an in-game candle stick. But this simple test made me learn things...
I ran into a few issues trying to model the object. While ProBuilder is amazingly useful, it's not a full-suite 3D modeling system. So it was not easy to build a complex, symmetrical object. Plus, working on a small object in Unity was challenging, because the camera swung about in large arches (I could probably adjust that somewhere), it was a little stressful. I'll probably just try using Blender in the future.
Once I made the model, I discovered a new issue. Because the light source is a point light, it was not able to light the sides of the candle. This made the candles hard to identify, since I use color to distinguish between them. I considered writing a script to set the point light off-center toward the player, so that it appeared to be lighting the object. Also, I considered using four point lights, structured in a square, to light on all sides of the object.
This all seemed a little overly complicated. So I decided to try using "Emission" to self-light the object. An answer that was offered by a few videos and resources online, as well.
It took some fiddling about to see how this would affect the object. But I ran into a roadblock. The candles use an Enumerator to tag the candle's ownership to a character. The candle script uses that enum-tag to set the color of the candle in real time. While I could set each candle's emission individually, I wanted to take advantage of the script's automation.
But I had no idea how to access some of a material's finer features. Turns out, you gotta get into the shader and use keywords. Learn something new everyday.
I mean, I did...you probably already knew...
It took me a few tries to find the right keyword (I was "mislead" by online resources). Once I figured it out, I was able to make the smallest of code changes--and now instead of changing the material's color, we change its Emission color. I added an emitIntensity float so I could easily adjust the intensity on the fly. I found yellow needed a .3 intensity, while the others could get away with a .2.
Voila: new candles!
#Candles Project#Zach Makes Games#Unity Development#Game Development#Indy Games#Indie Games#ProBuilder#Unity 3D#Shaders
0 notes
Text
CANDLES Update 32: Level Redesign
CANDLES Update 32: Level Redesign
I’ve been loving ProBuilder. Still kicking myself for not using it sooner. My focus for the past few weeks has been moving assets into ProBuilder. That included a massive out-door hiking area…which will be reimagined. But for now, I’m going to focus on the main level. As a starting point, I remade the old level with ProBuilder: Previously, the exterior walls were made of 8×3 meter sections:…

View On WordPress
0 notes
Text
Working in ProBuilder

I’ve been addicted to the ProBuilder Tool in Unity. I was trying to go for a blocky PlayStation 1 style, but probably used about a billion too many polygons… Continue reading
View On WordPress
#Candles Game Project#Indie Games#ProBuilder#Unity 3D#Unity Development#Video Games#Zach Makes Games
0 notes
Text

I downloaded ProBuilder some time ago. But being a bit intimidated by learning a new program on top of everything else I was trying to do, I didn't touch it. Now, after spending hours blocking out an outdoor scene with Unity primitives, I decided to re-do my work with ProBuilder. I'm so angry with myself for not trying ProBuilder sooner! I think this is the beginning of a beautiful friendship.
#Indie Games#Video Games#Unity 3D#ProBuilder#ProGrids#Level Design#What have I been doing with my life?
1 note
·
View note
Text
Candles Update 31: Growing Pains

With my ray of light working, time to grow something with that light! The idea being, when Margaret’s candle is held, a shaft of sunlight appears. Placing the correct pot (played here by a brown cube) underneath the light will allow a flower to grow. But if not given the full time, the flower disappears (fancier effects to come).
You got away with no code in the previous post, but no such luck today (you three or so readers, you)! Let’s start with the pot/plant:

I set a public enum to easily define which character the pot belongs to. There are a few bools here: growPlant (should the plant be growing?), growthComplete (is it done growing?), and delivered (has the grown plant been delivered to the right location?). The flower game object references the visual flower that is childed to the pot. I used private vectors cause I hate too much info in the editor. fullsize (how big the flower should be when fully grown), zero (all zeros), grownPos (the flowers final position when grown), seedPos (position the flower starts at before growing). Since objects expand from their center, I had to change the plant’s position as it grew so that it appears to spring from the pot and not mid-air. (Starting to wonder...could I change the object’s pivot point? Would that affect how it expands?) At the start, we grab the pot’s pick up info--we then call “assign()” (clearly). Next, I grab the flower child object, I set its “fullSize” to current size, that way I can resize in the editor without having to make code adjustments. Same for grownPos. Then I set the flower to “zero” so it disappears, and then lower it’s position to the surface of the pot. Next:

As can be seen, Assign() is a not-too-impressive switch statement. This allows me to use the enum in editor to define which character the pot belongs to and then the script assigns the correct ID without me having to think too hard.

In update, if growPlant is true we grow the plant. I think I’ve finally understood “lerp” and I love it. Since the plot needs time to grow, I set the growth time in editor. I can track how much time is left and then use that as a percentage of how fully grown the plant should be. Same for changing its position. If the pot is picked up before the process is complete, I tell it to shrink back down. This lerp doesn’t work quite as well, but I’m also not super concerned, as I’d rather it dissolve into dust or something. But there’s time to work on that.
Now, for the trigger:

We start with a trigger ID, which needs to match the pot. Then we have a bool if the correct pot enters the trigger. Then a game object reference for the pot and a script reference for the pot’s script. So when something enters the trigger, we check if it’s a pot, then we check if it’s the right pot. If so, we declare it as the right pot, take ownership over it, and then start activating growth in the pot’s script. If the player takes the pot out--well then we null everything. And viola, that’s how plants grow. Who needs a green thumb when you’ve got C#?
#Zach Makes Games#Candles Game Project#Game Development#Unity Development#Indie Games#Unity 3D#C-Sharp#that's a lot of pot
0 notes
Text
Candles Update 30: Light Finds a Way

With Kyle’s guitar completed, I’ve been working on Margaret’s puzzle. The writer and I discussed plants/flowers being her thing. So the puzzle will be using Margaret’s candle to reveal sunlight rays magically shining into the house. The player must place the correct pot within the light, which will cause the character-specific flower to grow. These flowers will need to be placed in the correct location of Margaret’s greenhouse/indoor garden to reveal her sigil.
Step One for me is a bit more about aesthetics. I needed a light ray. Apparently one needs Unity Pro to get things like “fog” on their lights. I’m too cheap and unsuccessful to pay for pro at the moment, so I had to find a solution. First, I turned to Google Search. I found some light rays, but they weren’t exactly what I needed. I then looked up how to make light rays in Photoshop. While there’s some cool tricks, the answer (for me) was drawing a white line then using the eraser tool to fade-out the edges. I think it actually looks pretty good (for proxy-art, of course). Creating a pool of light, thus marking where pots are meant to be placed, I simply used a spot light. But I couldn’t quite figure out how to get the light ray to “glow”. Not when I was using “fade” for the material so that transparency would work correctly. So I opted for a directional light that only shines on the light ray asset, and it points in the direction the player looks. It’s kinda silly, and I’m sure there’s better, more reasonable solutions. But the effect seems to be quite...effective.
#Zach Makes Games#Candles Game Project#Game Develpment#Indie Games#Unity Development#Unity 3D#Getting the (light) shaft from Unity free version
0 notes
Text
Candles Update 29: Playing Kyle’s Song

Well...Just the chord. I worked this out a little ways back, nearly a month--maybe. But I kinda forgot how it worked. So when I came to write about it and discovered I hadn’t actually figured it out, it took a little redoing. But as shown in the gif: it works now. For each Kyle Shade that is solidified, a Sigil will appear on the guitar note that needs to be played (represented here by the letter E). In the gif, we’re seeing that all shades were solidified and thus all sigil notes are revealed.
Now, the player can play the magic chord. But there is a time limit within which to achieve the chord. This is also expressed in the gif. When I play two notes and stop, the timer runs out and the notes are no longer checked. When I play all notes within the time limit, the sigil is revealed. Most the “magic” happens in this block:

Every time a “Sigil Note” is played, the function NotePlayed is called. First, it calls a function: AreSigilNotesRevealed(). (I’ve been trying to be more direct with my function names.) Here, we check if all sigil notes have been revealed. If not, than why bother moving forward? If so, then we can record that a sigil note has been played and the player has a brief window to play the next note. This might ultimately be the most challenging puzzle for the player. We’ll see.
#Candles Game Project#Zach Makes Games#Indie Games#Game Development#Unity 3D#Unity Development#C-Sharp#return goes outside the for-loop
0 notes
Text
Candles Update 28: Shade Solidification

So I have the shades which are revealed with Kyle's Candle. In order to reveal the note that needs to be played, I also require the player use a radio. If they have both objects in hand, then the shade solidifies.
To achieve this, I made a few adjustments to the Shade Activator Script:

I forgot that I had put the shades on an unlit layer, so I had to bring them back default. And then, well the color lerp is pretty straight forward.
1 note
·
View note
Text
Candles Update 27: Rock Band (not really)

I took some time this past week or so to enjoy playing video games. But now I'm back on the case.
Given that we can "pick up" the guitar, it’s time to play it. Using Garage Band on my MacBook, I was able to collect 25 (24) notes from a guitar instrument. These notes represent 5 frets across six strings on the guitar (frets 1-5), and excludes playing any string "open". I say 25(24) because of the way guitars are tuned, the fifth fret on the G string is the same as the first fret on the B string...so I got confused...and it may all be ruined. I'll check on that later.

Not the most exciting script--but it gets the job done. Using OnMouseOver and OnMouseExit, I was able to make "highlights" on the guitar appear. I thought about using rectangles on the fret board, but that didn't feel right. This doesn't look great either--but it's more of a proof of concept. And now each fret plays a note.
I was really excited by how easily this came together and how well it functioned.
youtube
2 notes
·
View notes
Text
Candles Update 26: Kyle’s Guitar
So I have the shade up and running. But for the shade to fulfill its purpose, I need notes: musical notes. So I hopped into Apple's Garage Band and I tried to grab some notes.
Shhh--this is a secret, but there's a chord we're focused on. The notes are F, C, C#, and G#. I used to play this chord in high school, having no idea that it was an actual "thing", or that I would reuse it for the basis of a puzzle 20 years later.
But for Kyle's Guitar, I need more than these four notes. For this to be a "puzzle", there must be "wrong answers". I've decided to include every guitar note for all six strings within the first 5 frets. Not including playing a string open, that's 30 notes...well, something like 12 notes in 3 different octaves...whatever.
I played every note in Garage Band and exported. As I was editing the audio to include one note per track, I remember that guitars break the tuning pattern between G and B strings--so there's some note sharing. I think I've set it correctly. We'll see...
Next step--make a playable guitar. My writer suggested using an interface. Since I had a guitar 3d model available, I opted to use that.
First, I duplicated the in-scene model and childed it to the player. I start the game with it deactivated so that it may be activated later. The model I downloaded had to be blown up to 1.5x size to be "realistic". But because the guitar cannot get too close to the camera without clipping, I had to blow it up to 4x to sufficiently fill the screen.
To “pick up” the guitar, I’ve set a new check for the tag “Guitar”, and I can make the call in PickThingsUp:
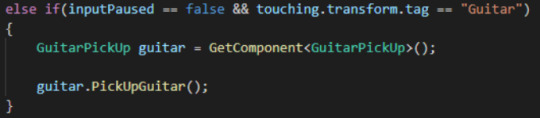
Then in my guitar script (which is actually on the player):
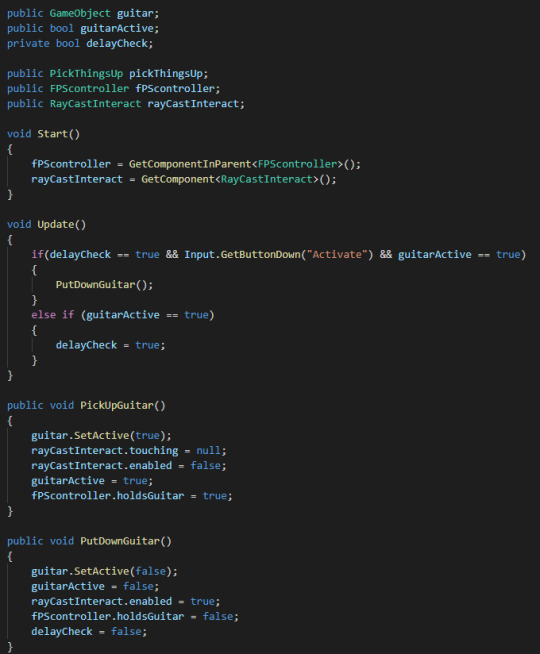
Looks like I need to delete that PickThingsUp reference...
Here, I grab the necessary scripts. You can see the two functions to “pick up” and “put down” the guitar. All pretty straight forward--but I ran into a weird bug. In the if statement, I found that when holding the guitar, if tried to put it down...it uh, didn’t work. I’m not sure why this is happening, but since I’m using the same button to pick up the guitar and put it down, I thought I’d make sure to never allow the two actions in a single frame. The script was working fine previously, but the next day not so much. This seems to fix it. Next, I’ll be trying to build a canvas-based UI that lets the player click on notes...and we’ll see how well I’ve picked out notes for the game.
#Zach Makes Games#Candles Game#Unity3D#Unity Development#Game Development#Indy Games#indie games#c-sharp
1 note
·
View note
Text
Candles Update 25: Kyle’s Shade Fade

I've really struggled with what to do for Kyle's Music Puzzle. I wanted Four collectibles (to match Maggie's painting) but I wanted to incorporate the musical element our writer pitched. To do the "musical" aspect, we will have a guitar that the player can pick up and play. They just need to play the correct four notes (to be made later). But the question is: how does the player learn these notes?
I went back and forth on a few ideas and what I've (mostly) settled on is Kyle shades that the player has to find (by using Kyle's candle). Once a shade is found, the player will need the radio to learn the particular note played by that shade. I would also like to have each shade holding down one of those notes, so the player can visually see.
Anyway...
Step One: Build a shade. Since I didn't want to re-learn Blender at 11:30 pm, I opted for building my proxy shade out of primatives and downloaded guitar.
Step Two: Rip off my strategy for disappearing images to make a disappearing shade.
The result of my efforts is presented at the top. But the story of how I got there is so much more interesting. Well...not really.
Firstly, I deviated slightly from the picture strategy. Instead of every picture checking whether or not the key candle is held, I created a parent object (Shade Activator). If the player picks up Kyle’s Camera, all shades become activated. If the camera is dropped, all shades are deactivated. The code is so simple it’s not worth showing.
Next...well here’s the story: I first tried to do a 1:1 copy of the Painting Script--but that meant the full specter lerp’d in when the player was close enough. But I thought, what if the shade appeared based on how close the player was? That actually led to a simplification of the script with fewer checks and function calls. Also meant a lot of re-writing and hard thinking--which was challenging while trying to watch the most recent episode of Lovecraft Country.

Grabbing Kyle’s Candle to be sure it’s being held. Since I’m lazy and made my shade out of a billion primitives, I had to store each object in a list, and then grab each material. Reading this...I probably need to clean this up a little. I set the max opacity of the object in the editor, then opaque picks that up at the start. I set opaqueMax to the current alpha, for reference later, and then I make the objects fully transparent.
Fun fact: Objects with Transparent materials will never be fully transparent. You need to set the material to fade. Supposedly they have different uses, and if I weren’t watching TV I would have known that sooner.

This probably isn’t super clean, but I was Frankensteining the Painting script. There’s probably smarter way to do percentages...but uh...I don’t know them. GetShadowParts goes through the children to grab all the materials...which will be changed when I get a real shade model. Then we have Fade Shade which probably doesn’t need to be its own function. Ah well...as you can see, it works.
0 notes
Text
Candles Update #24: Maggie's Fading Images

A puzzle I've wanted to do involved setting paintings in the correct order with the clue being secret images that appeared when holding Maggie's candle. There's also an opportunity to have different images appear based on what candle is being held. I think this could open some avenues for environmental storytelling. But getting this to work required me re-writing the pick up script.
The final step (fading images) has been a whole other headache. A headache that resolved itself when I realized how to switch Materials from "cutout" to "transparent". Once I did that, it was just figuring out how best to track everything. Here's where I landed:

Nothing too magical here. I felt it was best to put the scripts on the pictures. We only cheeck all the important stuff when the user is holding Maggie's Candle. So I think it works out.
While I took a shortcut for now by just having the numbers 1, 2, 3, and 4 appear on the paintings, hopefully we'll have more interesting art.
#Candles Game#Game Development#Indy Games#Unity3D#Unity Devlelopment#Video Games#C-sharp#Fade Materials
0 notes
Text
Candles Update #23: Maggie's Painting Board
I've had two minor setbacks. The first was when I had to completely re-write how the pick-up scripts work. Then my son's birthday led to me prepping for that and also making him a Garbage Truck game.
BACK ON TASK!
First step to completing Maggie's Painting Board was to track whether or not the player was delivering the correct picture to the correct placement. There are so many scripts for picking up objects, interacting with placements, and tracking this and that--I spent a lot of time deciding where I should put this. The easiest thing would be to setup a bool-check in the Painting Board's Update Function. But I didn't want to be checking every frame whether paintings were placed. I decided the best place was on the placement target themselves:

Now, when the player tried to interact with the board, if they're holding a picture--it will check if the IDs match, and then give it a check. Or, if the player is empty handed and is clicking on a placed picture, it will uncheck that placement.
Next, I allowed my Painting Board to activate Maggie's Sigil in the Magic circle through the Painting Board's script:

So here, when the PaintingIDCheck is called, we compare the provided painting ID and placement ID, and then we do a quick check to see if all the paintings have been delivered. The nifty return interupts things if all paintings have not been delivered. Once they have, I turn off the interactive placements elements, now the player cannot pickup the pictures, and then we reveal the Sigil on the Magic Circle: Yay!
Next, I want to reveal Sigil on the Painting Board itself. Probably a stand-in until there's a real artist on the project. Then, I want to work on the pictures.
My plan is to have many pictures in the game, and depending on what color candle your carry--the pictures "change". So I will need a way to fit multiple layers of images on a "picture object" and then fade-in images based on the candle in the players hand.
(I just got a headache thinking of that.)
Next, it will be time to work on the brother's music based puzzle. I've got a few ideas and have been brainstorming with the writer. I think what we're discussing could be quite interesting and creepy.
1 note
·
View note
Text
Garbage Truck Game: Finished-ish
So it's done!
And by done, I mean: I ran out of time!
But as my film professors were fond of saying, "You don't finish a project--you give up."
My son got to play the game and he said, "This is the BEST game!"
And then he made a list of complaints and suggested improvements.
Six year olds...
So here's a link to a windows download and a playthrough video:
youtube
#Garbage Trucks#Video Games#Indy Games#Unity Development#Video Game Development#unity3d#Game Download
0 notes
Text
Garbage Truck Game: Level Design
WELL, with the truck functioning and picking up trash, it was time to create the environment. Because of how fast the truck moves (around 45 km/h), I felt like I should go big. So I had road segments 100 meters long. After creating a few blocks, I started putting in buildings (upscaled primitives). When I started driving around, I realized this was WAY too huge. I wasn't really sure how best to move forward. So I went on the hunt for some more free assets.
I found this Simple City Pack, which seemed to to have the style I was going for...as much as I was going for anything. At first I was nervous, there were only three buildings--two of which were nearly identical. Also, there was a gas station, store, and two houses. This was barely enough to make a single city block. Luckily, the creator had included multiple colors, so I was able to copy-paste the structures and then use colors to change things up. I even merged a few models to change their "shape".
The level isn't quite "realistic", but it doesn't feel too repetitive, and reminds me of classic Twisted Metal on PS1. Not sure my 6 year old will pick up on that though.

1 note
·
View note