
Don't wanna be here? Send us removal request.
Statistics
We looked inside some of the posts by zitseng and here's what we found interesting.
Average Info
Notes Per Post
0
Likes Per Post
0
Reblog Per Post
0
Reply Per Post
0
Time Between Posts
2 days
Number of Posts By Type
Photo
17
Last Seen Tumblr Blogs


Fun Fact
12.7% of mobile users access Tumblr.
Photo
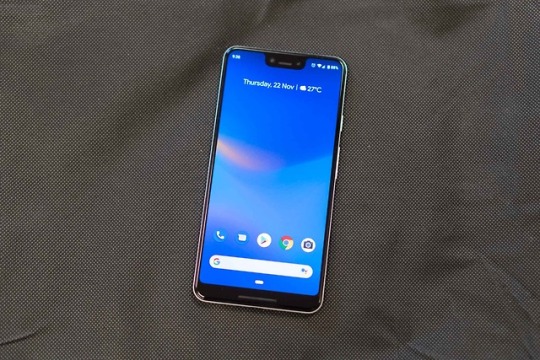
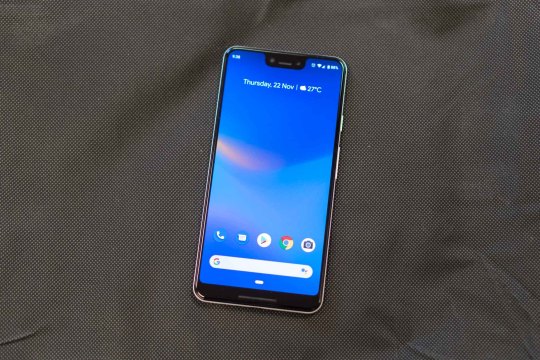
New Post has been published on https://zitseng.com/archives/17940
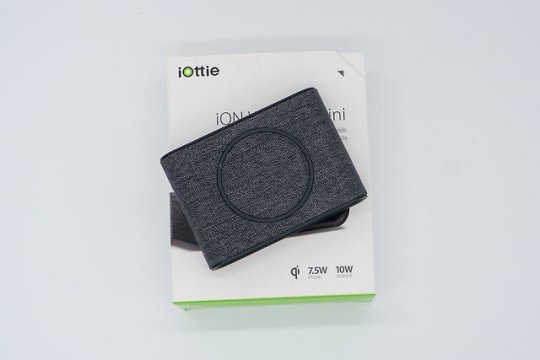
iOttie iON Wireless Mini Review


Qi wireless chargers are not new. There are enough of them around that we’re not just looking at function and convenience. We also want good form and design. In this regard, I like iOttie’s iON Wireless Mini charger, a sleek looking Qi-compatible charger for Android and iPhone devices.
The iOttie iON Wireless Mini is a small gadget that measures just 6 x 4.2 x 2 inches. It’s covered in a nice soft feathered fabric material, which I especially like, in part because it very nicely matches with Google’s fabric case for the Pixel 3 (and Pixel 2).
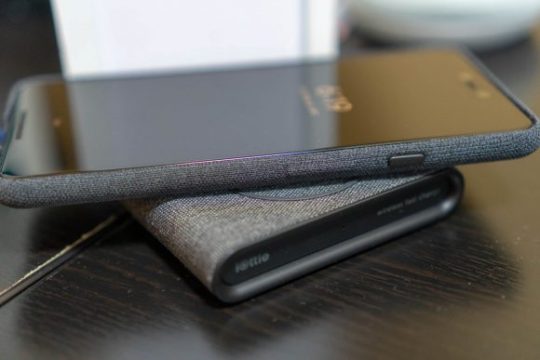
The fabric material itself makes it not easy for your smartphone to slip off the surface. Additionally, the rubbery ring helps to hold on to glossy surfaces, which is likely the case on the back of most smartphones, more securely.
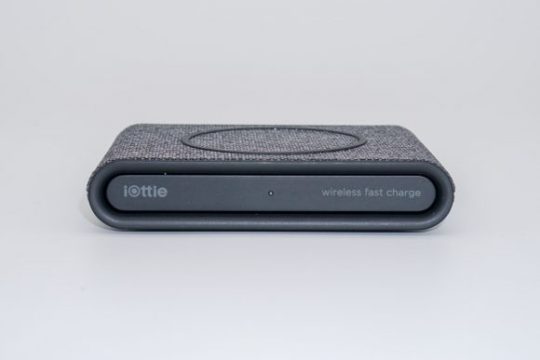
A charging status LED on the front will light up in white if Qi-compatible wireless charging has been activated. A red colour LED indicates there’s a problem, such as when it detects an incompatible smartphone.
The iON Wireless Mini charges iPhones at 7.5 Watts, and certain Android smartphones at up to 10 Watts. Specifically, smartphones like Samsung’s Galaxy S8, Galaxy S9, and Galaxy Note 9, will charge at 10 Watts. The charging power for other Android smartphones varies. The Google Pixel 3 smartphones charge at 5 Watts, the standard Qi-wireless
With a charging radius of 10 mm, the iON Wireless Mini charger can accommodate smartphones with thick cases on them.

I like that the iON Wireless Mini uses a USB Type-C port for receiving power. USB Type-C is ubiquitous enough that even Micro-USB is becoming a little inconvenient.
Unlike the bigger version of the iOttie iON Wireless Charger, this mini version doesn’t have a extra USB port for charging wired devices from itself.
iOttie includes a USB Type-C cable in the retail packaging.

The iOttie iON Wireless Mini is available in four colours: Charcoal (as reviewed here), Ruby, Ash, and Ivory.
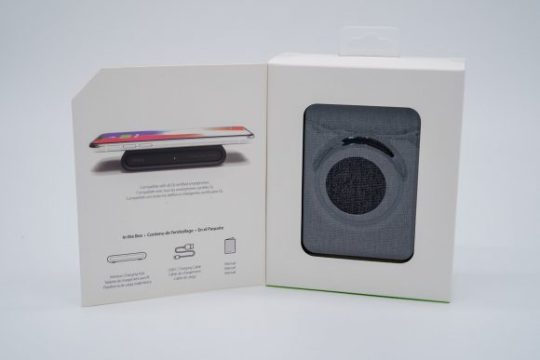
You can buy this iOttie iON Wireless Mini from Amazon (affiliate link) at US$25.95, with shipping to Singapore for a nominal fee. For some strange reason, only the Charcoal colour sells at this price. The other colours sell at US$39.95.
0 notes
Photo

New Post has been published on https://zitseng.com/archives/17930
Top Trending Google Search in 2018


Google recently presented their annual Year in Search 2018 with the top trending topics, people, events, and places that captured the attention of Singaporeans based on Google Search queries. This is an interesting peek into what our fellow countrymen are up to.
Sports ranked high, though not necessarily that we are more active or love engaging in sports. The 2018 FIFA World Cup, you see, took the #1 spot in the Top Trending Search this year, as well as #1 in Tending International News, and #1 in Trending Sports News.
For those interested in tech gadgets, particularly smartphones and tablets, here’s the list of top products searched by Singaporeans:
iPhone XS
Samsung Note 9
iPhone XR
Huawei Mate 20 Pro
Huawei Nova 3i
Google Pixel 3
Apple Watch 4
Oneplus 6
iPhone 9
iPad Pro
It’s quite awesome to see this year’s Google Pixel 3 smartphones have captivated the attention of many people here. This should be a good sign of encouragement for Google to continue bringing their latest hardware products in Singapore. This year has been good with all models of the Google Pixel 3 available for sale in Singapore on the global launch day, but we are still missing a few of other new Google hardware products. Check out my review of the Pixel 3 XL.
On travel, I visited Khao Yai last year, and I have noticed quite a bit of search interest on this topic. Hence, it’s perhaps not surprising to see Khao Yai making it into the top 10 list of travel itineraries. The list is here:
Taiwan
Osaka
Khao Yai
Hokkaido
Korea
Taipei
Hong Kong
Tokyo
Perth
Melbourne
In other categories, here are what Singaporeans are interested in:
Trending Singapore News: Trump-Kim Summit
Trending TV Shows: Story of Yanxi Palace (延 禧 攻略)
Trending Movies: Black Panther
Trending Events in Singapore: Comex 2018
Trending Korean TV Shows: What’s Wrong With Secretary Kim
Trending Farewells: Stan Lee
Trending Adulting Tips: How to file for income tax
Trending Viral News: Yanny Laurel
What about searches on my blog? Surprisingly, the top topics in the last 12 months are:
Sudio Niva Review
Bluedio T5 Review
Kindle Singapore
Khao Yai
Toyota Sienta Review
Scrap Value of Car Singapore
Lazada Surprise Box
Car Scrap Value
Scrap Value of Car
Timbuk2 Spire Review
For a blog which I had intended to be largely about consumer gadget tech, I get quite a lot of car-related search traffic. At times, I’ve wondered if perhaps I should write about cars a bit more. Motoring related tech, perhaps?
So this has been what Singaporeans search, and what sort of searches come to my blog. If you’re interested in finding out more about what’s trending in Google Search, check out Google Trends.
0 notes
Photo

New Post has been published on https://zitseng.com/archives/17906
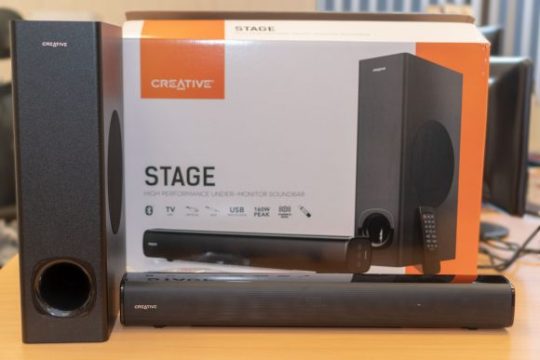
Creative Stage Sounbar Review
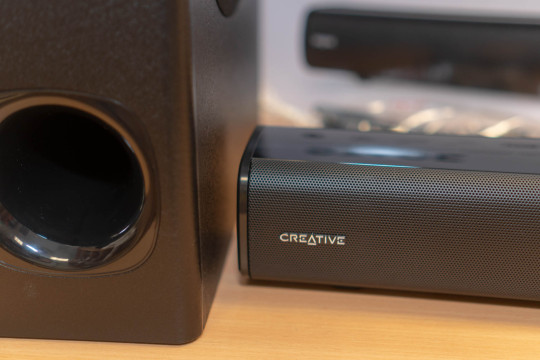
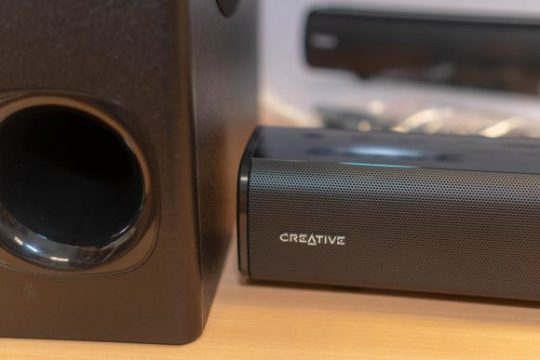
Creative recently launched a new Stage series of under-monitor soundbars are surprisingly affordable prices. There are two of them, Stage and Stage Air, and I have the Stage, the larger of the pair, for this review.
The Stage series soundbars are primarily intended to replace basic PC and TV speakers. They deliver superior audio performance in a small space-saving form factor that should fit under most monitors and TVs. The Stage soundbar includes a dedicated subwoofer, something that the more diminutive Stage Air lacks.

The Creative Stage soundbar isn’t very wide, measuring just 550 x 70 x 78 mm. This is probably not an issue for most monitors, but when used with large TV screens, the Creative Stage may look a little undersized.
The build quality of the Creative Stage is excellent. The soundbar itself weighs 1.2 kg, and features a cool segmented LED status display under its front metal grill.
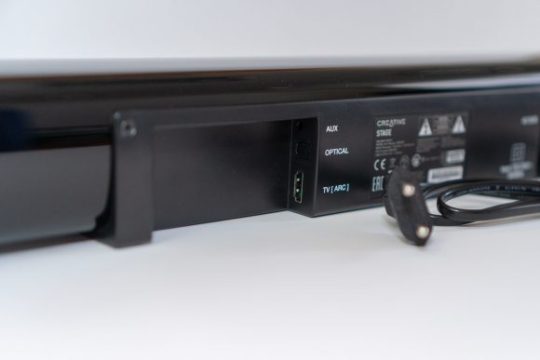
For audio inputs, the Creative Stage supports optical audio, HDMI (ARC), 3.5 mm aux-in, and Bluetooth with A2DP stereo. It also has a USB port for playing back MP3 audio formats on a FAT32-formatted mass storage device. The USB port is on the right side of the soundbar, so sticking a flash drive into it might not look so aesthetically pleasing.
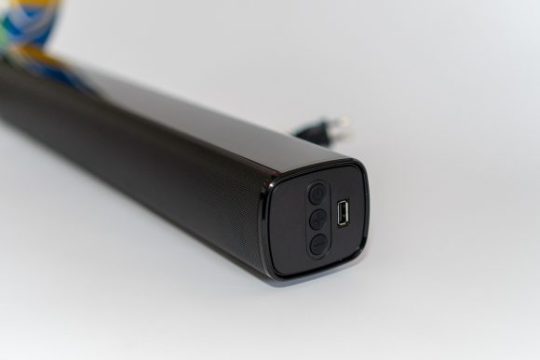
Also on the right side are some very basic physical controls. You will definitely need to use the included remote control to access most functions of the Creative Stage soundbar.
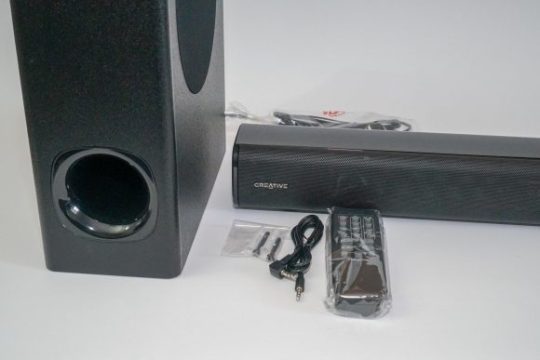
The subwoofer measures 420 x 115 x 250 mm, and weighs 3.07 kg. It doesn’t have a separate power supply, which is good, but it does need to be wired to the soundbar itself. The short 1 metre cable should work well to serve a computer on a work desk. However, you may find the cable length to be a constrain if you intend to hook the Creative Stage up to a larger TV in a bigger living area,
I found that the Creative Stage needs to be enjoyed at higher volume levels to appreciate the oomph that the speakers can deliver. At low volumes, the bass was simply unimpressive,. The mids were well-emphasised, and the highs were clear, but overall, the sound just lacked body.
However, once the volume levels are pushed up, the Creative Stage becomes a whole lot more enjoyable. The bass is projected more prominently, but it’s still tight and well-controlled, not at all overwhelming.
With 2x 20 Watt mid-range speakers in the soundbar, 40 Watt subwoofer, and a total of 160 Watt of peak system power, the Creative Stage can get quite loud. It will be able to deliver a rich and enjoyable movie experience in a typical living room or TV room.
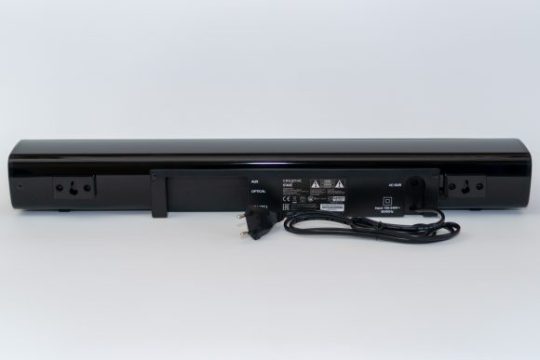
The soundbar can be wall-mounted if you so prefer. The retail box includes wall-plugs and screws, as well as the remote control and 3.5 mm aux cable.
The Creative Stage retails at S$129, but you can avail yourself to ongoing $20 discount promotion from the Creative Store.
Conclusion
The Creative Stage is a surprisingly affordable under-monitor soundbar with dedicated subwoofer.
Pros:
Small, compact, size
Good variety of audio input options
Good build quality
Good sound quality at higher volume levels
Cons:
Unimpressive sound at lower volume levels
0 notes
Photo

New Post has been published on https://zitseng.com/archives/17889
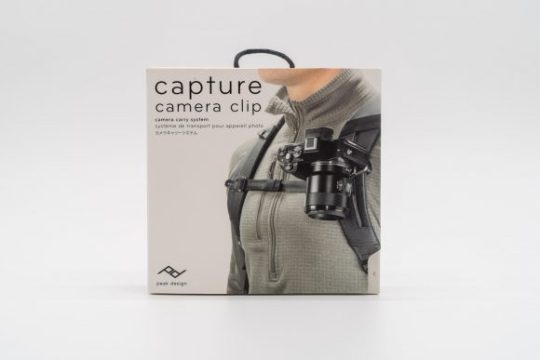
Peak Design Capture Camera Clip Review
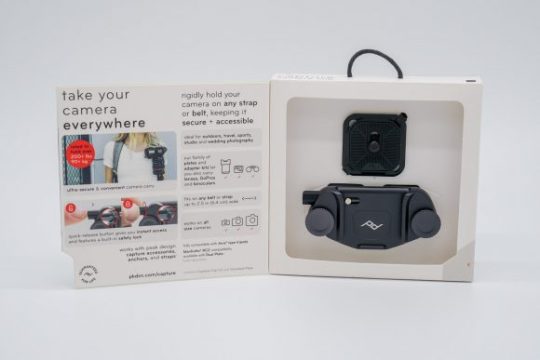
Photographers often want an easy way to carry their camera, being able to keep both hands free but easily pick up their camera to shoot at any time. A camera strap works, but Peak Design’s new Capture Camera Clip keeps your camera secure and rigidly attached, yet conveniently accessible to use any time.
The problem with straps is that when not in use, the camera simply hangs loosely, leaving it to swing around as you walk, brisk walk, or engage in other active body movements. This isn’t very safe for your camera as it may constantly hit yourself, others around you, or worse, hard objects around you.
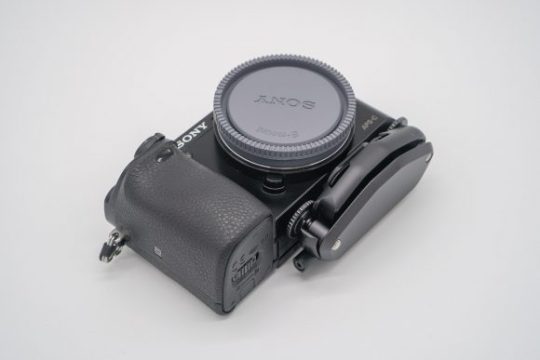
Peak Design’s Capture Camera Clip, on the other hand, locks your camera rigidly to your belt, backpack strap, or other attachment on your body. Even with brisk body movements, including abrupt turns, the camera stays close up to your body.
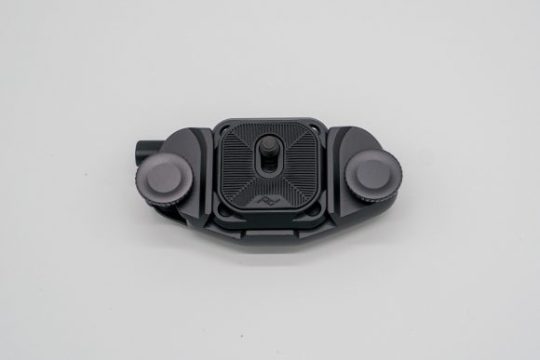
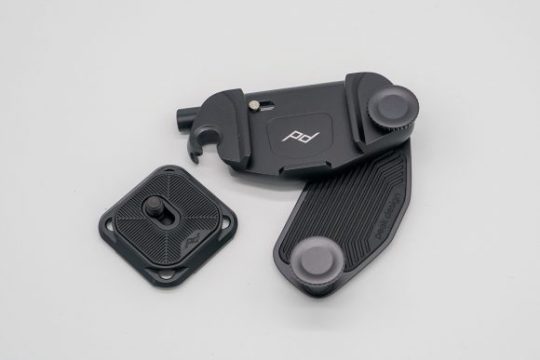
There are two parts to the Capture Camera Clip. The base clip attaches to something on your body, such as your waist belt. It’s well made from smooth anodised aluminium. This base clip itself has two parts. You can either loosen one screw to swing it open on one side, or remove both screws so the two parts separate altogether.
Either way, the base clip attaches onto your waist belt, or of you prefer, your backpack strap. An embedded grip in clip ensures maximum slip resistance wherever you attach it to.
The plate attaches to the bottom of your camera. This is an Arca-Swiss compatible plate, so it can be used with other Arca-Swiss clamps you may have, such as on tripods or other mounts.
There is some flexibility to move the screw on the plate so you can adjust the plate position on your camera. I needed to move mine forward of the camera in order to not obstruct the opening of the camera’s back LCD screen.
Mounting the camera onto the clip is extremely easy. The plate can slide into the base clip on any of its four sides. Once fully in, the plate will lock in-place with a clearly audible mechanical click.
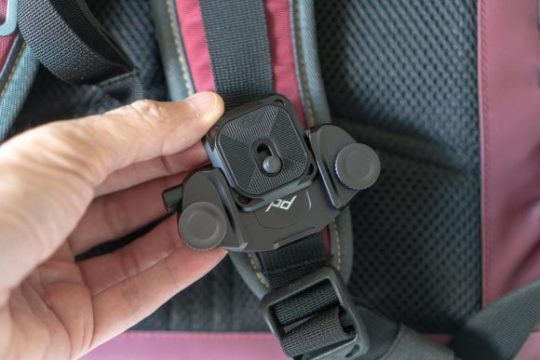
At this point, the camera is securely locked into the clip. The plate will not slide out of the clip. In order to release the plate, you will need to press the quick-release button on the side.

It’s not easy to accidentally press that quick-release button. Remember that the button is behind the camera which is not pictured in the above photo. If, however, for any reason you feel that you need to mitigate against that unlikely scenario of accidentally pressing the quick-release button, the button itself can be locked by twisting to the side.

The quick-release button cannot be pressed when it is locked. The plate cannot be released unless you press the quick-release button. Your camera, thus, is quite securely locked to the clip. Now, just make sure your clip is securely attached.
The large thumbscrews you see in the above photos are for quick easy attachment and removal of the clip. If you think your clip can be somewhat permanently attached, you can replace those thumbscrews with another included set of hex screws. You will need to use an Allen key, which is also included. These screws cannot be loosened by hand, hence you cannot make easy on-the-go adjustments of the clip.

Apart form the clip, plate, two sets of screws and the Allen key, the Peak Design Capture Camera Clip comes with a pouch.
This is “version 3” of the Capture Camera Clip. There are earlier versions of this clip. The primary improvement in version 3 is its smaller, lighter and lower profile. Its total weight is just 84 grams, but it holds up to 90 kg of equipment. I don’t think you’re going to carry even a quarter of that. The clip will accommodate straps up to 64 cm wide, and 1.5 cm thickness (with thumbscrews) or 2.2 cm (with hex screws).
The Peak Design Capture Camera Clip is available from Amazon at US$69.95 (affiliate link), and ships directly to Singapore. You can choose between black and silver colours.
While there are similar clips that cost less, I recommend you consider the quality and reputation of the manufacturer, especially when you’re depending on the clip to secure expensive photography gear.
0 notes
Photo

New Post has been published on https://zitseng.com/archives/17882
Better Security With YubiKeys

Passwords aren’t enough in these times. You need multi-factor authentication, sometimes more, but most of these measures are usually cumbersome to use. Yubico is trying to change that by providing ubiquitous security that is easy to use. Their line of YubiKeys hardware devices are now available in Singapore.
The concept behind YubiKeys is simple. Plug the gadget into your computer’s USB port, and it will provide second-factor authentication to numerous online services, including Google, Facebook, and Dropbox. YubiKeys can also be used to replace passwords, or be part of a multi-factor authentication scheme.
Yubico sent me a bundle of their latest 5 series YubiKeys for this review: YubiKey 5 NFC, YubiKey 5 Nano, YubiKey 5C, and YubiKey 5C Nano. They all provide the same basic functionality, and differ primarily in the type of USB port.

The main benefit of using these YubiKey gadgets is with their second-factor authentication features. Yubico introduced the YubiKey Neo in 2014 with FIDO U2F support. As a quick introduction, this is the FIDO (Fast IDentity Online) Alliance’s U2F (Universal Second-Factor) open authentication standard that Yubico co-developed with Google. U2F require browser support on the user end, and this is available in Chrome, Microsoft Edge, Firefox, among others.
The new 5 series YubiKeys support newer standards, most importantly FIDO2, the successor to U2F. The full list of supported security functions are:
Static passwords (not the best thing to use)
Yubico OTP (old OTP scheme, proprietary)
OATH – HOTP (event-based)
OATH – TOTP (time-based, requires additional app)
Smart Card PIV-compatible
OpenPGP
FIDO U2F
FIDO2
Secure Element
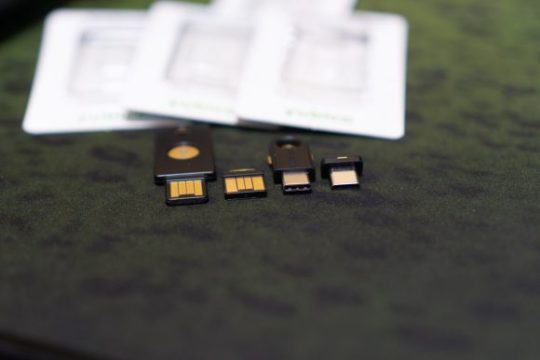
Which YubiKey 5 series gadget you should get comes down primarily to the USB port type and form factor you’re comfortable with. The YubiKey 5 NFC does support NFC, and is the only one (in the 5 series) to do so, allowing you to use it for seamless and secure tap-and-go experience with mobile devices or external NFC readers.
A cool new feature of the YubiKey 5 series gadgets is the recently announced support for password-less login to personal Microsoft accounts (MSA). With the latest update to Windows 10 version 1809 and existing native support in Microsoft Edge, all consumer Microsoft accounts now support password-less login via FIDO2/WebAuthn. Really, no passwords. (Aside: I personally don’t think this is entirely a great idea, because it means your account security now comes down to not losing this hardware gadget.)
If you’re interesting to get YubiKeys in Singapore, they are distributed by DT Asia. Prices start at US$45 (S$62).
0 notes
Photo

New Post has been published on https://zitseng.com/archives/17845
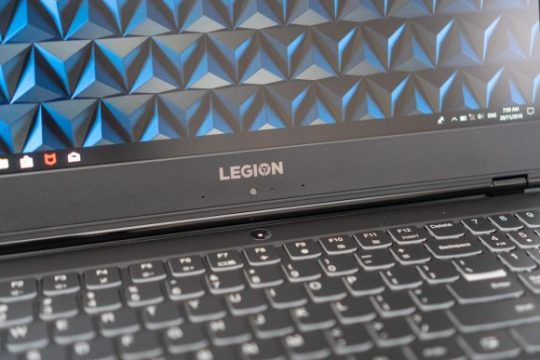
Lenovo Legion Y530 Review
PC gaming usually requires some high-performance hardware, and if you’re looking for that in a laptop, you’ll typically be looking at some really expensive laptop. Lenovo’s new Legion Y530, however, will get you excellent gaming performance without breaking the bank.
The Lenovo Legion Y530 looks like a rather conventional laptop, at least as compared with other gaming laptops that seem to scream out to get attention. In fact, the Legion Y530 might even pass off as a laptop for work. The only thing fancy with it is the white-coloured “Y” in the LEGION branding on the lid of the laptop.

One thing is for sure, the Lenovo Legion Y530 is a powerhouse. To suit its gaming purpose, its powerful H-class 8th generation Intel Core i7 processor is supplemented by NVIDIA GeForce GTX 1050 Ti graphics. It also has plenty of ports for everything you need to connect to it.
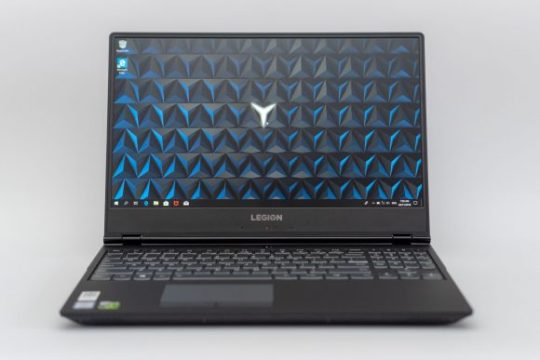
The Lenovo Legion Y530 comes with a 15.6-inch anti-glare IPS display. It has 250 nits of brightness. The main letdown of this display is that it’s just Full HD resolution, with no upgrade option. The lower resolution, no doubt, will help games run faster.
At 250 nits, this display is bright. It’s colour performance, however, isn’t impressive. At just 93%, 64% and 69% coverage for sRGB, NTSC, and AdobeRGB, respectively, the Legion Y530’s colour coverage isn’t good, but perhaps this won’t matter that much for most gaming.

With the large keyboard deck on the Lenovo Legion Y530, the keyboard is spacious, with room for a dedicated number pad and proper full-sized arrow keys. The keys are nice to type on, with 1.7 mm of travel and good tactile feedback for general typing. Gamers, however, may still find the keys slightly on the soft side.
Given the generous size of the keyboard, particularly with it stretching edge-to-edge, the touchpad comes as a little bit of disappointment due to its small size. The touchpad supports Windows Precesion Drivers, and there are two physical buttons below. For gaming, however, I think you’d probably use an external mouse.
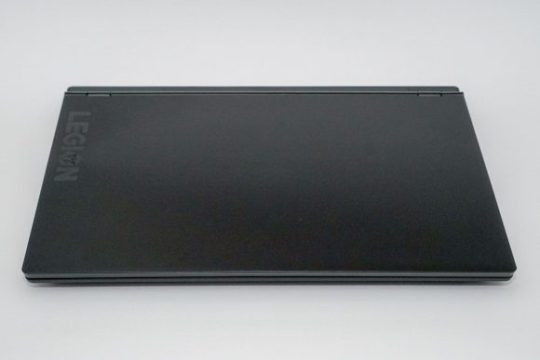
The Lenovo Legion Y530’s chassis measures 365 x 260 x 24.2 mm, and weighs from 2.3 kg. Given the 15.6-inch display and powerful innards, the Legion Y530 can pass off as being relatively compact, at least for a gaming laptop.
As I earlier mentioned, the Lenovo Legion Y530 has a generous offering of ports.

Starting from the left side, there is one USB 3.1 port and a 3.5 mm combo audio jack.
There’s another USB 3.1 port on the right side of the Lenovo Legion Y530.

Most of the ports, however, are on the back of the Lenovo Legion Y530.
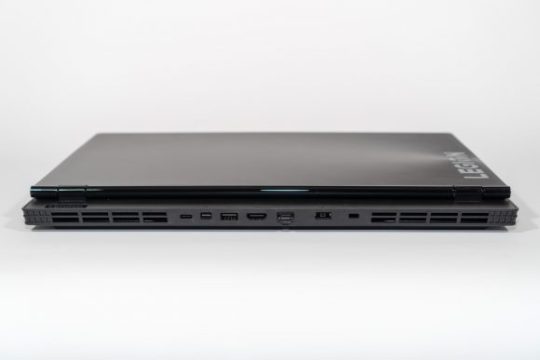
First, there’s a USB Type-C port, a Mini DisplayPort, yet another (the third) USB 3.1 port, HDMI port, Gigabit Ethernet RJ45 port, and power input connector. The Lenovo Legion Y530 supports DisplayPort 1.4 and HDMI 2.0 standards. The USB Type-C port on this notebook does not support Thunderbolt.
In addition to the Gigabit Ethernet port for network connectivity, the Lenovo Legion Y530 also supports 802.11ac with 2×2 antennas. It also has Bluetooth 4.1 support.
Under the hood, my review unit came with an Intel Core i7-8750H with 24 GB memory (8 GB DDR4 2666 RAM + 16 GB Intel Optane memory). and NVIDIA GeForce GTX 1050 Ti 4 GB DDR5 memory.
Performance was excellent.
PCMark 10 Extended: 5507 (overall), 8063 (essentials), 6533 (productivity), 5585 (digital content creation), 8450 (gaming)
3DMark: 3941 (TimeSpy), 1800 (TimeSpy Extreme), 30729 (CloudGate), 26902 (Sky Diver)
Geekbench: 4813 (single), 18996 (multi), 125745 (compute)
For such a large notebook, Lenovo only provided a smallish 52.5 WHr battery in the Legion Y530. In PMark 8 Home Conventional Battery tests, the Legion Y530 ran for only 158 minutes.
In terms of thermal management, the Lenovo Legion Y530 does a good job keeping temperatures in check. The fans can spin up some 54 dB of noise, however, though you probably wouldn’t hear them if you’re gaming with a headset. Keyboard temperatures hit up to 54°C.

The USB Type-C port cannot be used for charging. You need to power the Lenovo Legion Y530 with the included 135 Watt power adapter.
The Lenovo Legion Y530 is available in stores now, with a retail price from S$1,799.00 onwards.
Conclusion
The Lenovo Legion Y530 is a powerful gaming laptop that won’t break the bank.
Pros:
Compact size for a 15.6-inch display gaming laptop
Good CPU and NVIDIA graphics hardware
Very good performance
Good keyboard
Cons:
Only Full HD resolution
No Thunderbolt 3
0 notes
Photo

New Post has been published on https://zitseng.com/archives/17837
Random Musings #1

I’m trying something new with this post. I’m calling it Random Musings. Typically, each regular blog post focuses on one single topic. My Random Musings, however, will revolve around two or more topics, quite likely completed unrelated.
This arrangement will allow me to share short, random, thoughts that I’m eager to write about from time to time, but yet find I don’t have sufficient meaningful, in-depth, content to fit my regular style of posts. Random Musings will be an excuse for me to break away with a different style. I’ve been thinking of doing this for some very long time, and I think I should just kick off this idea and see if it will work out.
Random Musings won’t be the norm, but I do envision this to be a series of occasional posts. As with this post, I don’t plan to have meaningful post titles per se. I’ll likely make tweaks along the way with how these Random Musings are presented.
So with that introduction out of the way, I’ve two items to share about in this post.
The first is about WordPress 5.0 which was released two days ago. Going by the bump in the major version number, this is a big update to WordPress. The big change, though, seems to be primarily with the new Gutenberg editor. This has been something I’ve been preparing for since I refreshed this blog website with a new coat of paint in September. (The actual work commenced before that.)
The Gutenberg editor is supposed to present a WYSIWYG view, not unlike the old editor, which is now referred as the classic editor. Gutenberg is a complete change in the WordPress editing experience. While it starts out as just being an editor, Gutenberg will eventually revolutionarise customisation and site-building in WordPress.
It’s been a struggle the last few months to keep up with the flurry of Gutenberg changes as WordPress heads towards its version 5.0 release. The issue is that the Gutenberg backend editor styling is out-of-sync with the frontend rendering. I certainly hope with WordPress 5.0 released, these changes will down, or at least stop messing up the styling.
It’s been a struggle keeping up with the stylesheet changes needed to ensure the Gutenberg backend editor looks the same as the WordPress frontend rendering. The new Guternberg, however, provides more powerful layout capabilities, and more control over the edits. I’ve not used much of the capabilities in this blog, and certainly not regularly either, but I’ve been tested them in a separate development environment.
One of the new features of the Windows 10 October 2018 update, also known as version 1809, is the introduction of Windows Modern Driver, also known as Universal Windows Driver. Microsoft describes this as “a single driver package that runs across multiple different device types, from embedded systems to tablets and desktop PCs”.
There aren’t many Modern Windows Drivers at this time, but at the end of November, Intel released their first Modern Windows Driver for several of their modern integrated GPUs. This driver is version DCH 25.20.100.6444.
There are some caveats with upgrading to Modern Windows Driver, as detailed on Microsoft’s driver page. You should read and understand what you’re getting into. Windows Modern Driver includes a base driver, plus optional component packages, and an optional hardware support application.
I went ahead to upgrade my Yoga 920, and everything worked fine, including the display brightness adjustment problem that I fixed by using drivers downloaded directly from Intel instead of using Lenovo’s.
I hope Windows Modern Drivers will work out to be a nice solution to get driver updates from component manufacturers, without having to depend on the PC manufacturer to update their software. This is the situation I was in: the display brightness adjustment bug wasn’t getting fixed by Lenovo.
0 notes
Photo

New Post has been published on https://zitseng.com/archives/17824
Lazada X Tronsmart 12.12 Sale


The last major shopping event of the year, the 12.12 sale falling on 12th December, is coming up real soon as we draw to the close of 2018. This is your last chance to grab gifts for the year-end festive season. I’ve partnered with Lazada to do a partial reveal of the Lazada X Tronsmart Surprise Box in their 12.12 sale.
If you’re unfamiliar with Lazada Surprise Boxes, here’s a quick explanation. The Surprise Boxes contain mystery items, hence the surprise element. They each have a brand or theme, such as Tronsmart which I will share in this post. This gives you an idea of what might be in the box. The Surprise Boxes are sold at discounted prices of $29, $49, or $99, depending on the brand. The value of the items within will be over $100.
The Lazada X Tronsmart Surprise Box will sell at $29, and you can buy them at varying time slots during the Lazada 12.12 Campaign which runs from 10 to 12 December.
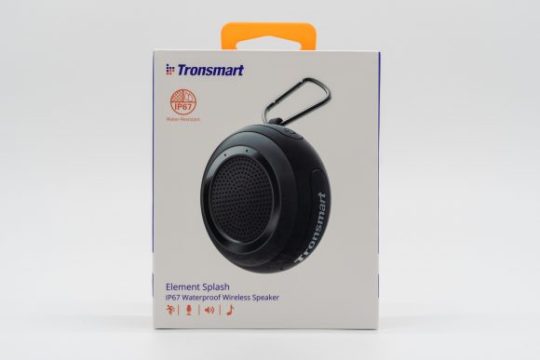
There are a total of three items in the Lazada X Tronsmart Surprise Box. I am revealing just one of the item, the Tronsmart Element Splash IP67 waterproof wireless speaker. This item, on its own, sells for $59.90 on Lazada right now.

The Tronsmart Element Splash speaker portable Bluetooth speaker. The disc shape speaker is about 10 cm in diameter and 4.5 mm high, and covered in a rugged soft rubber finish.
It is IP67 rated, so you can bring it to the shower, pool, or anywhere with water without worrying about water damage. Its 7 Watt speaker produces loud music with good bass.
While the Tronsmart Element Splash itself is a mono speaker, you can pair two of them together to work in stereo mode.

The controls on the Tronsmart Element Splash are on the side of the unit. They are large and clearly marked. You can play/pause music, adjust volume, and skip tracks.
You can also take calls with the Tronsmart Element Splash. The built-in microphone doesn’t seem to be very sensitive though, so I don’t imagine you’d want to use this for hands-free calls regularly. It is, however, convenient to have the option available.

On the underside, under a rubber seal, there’s a Micro-USB port for charging, and a microSD card slot.
Battery life on the Tronsmart Element Splash is rated for 10 hours.
If you’re keen to get a waterproof Bluetooth speaker, do consider this Tronsmart Element Splash. It’s retail price currently at $59.90 makes the Lazada X Tronsmart Surprise Box already very attractive, since you only pay $29, but still get two other extra items in the box.
Do remember to watch out for the Lazada 12.12 sale.
0 notes
Photo
New Post has been published on https://zitseng.com/archives/17805
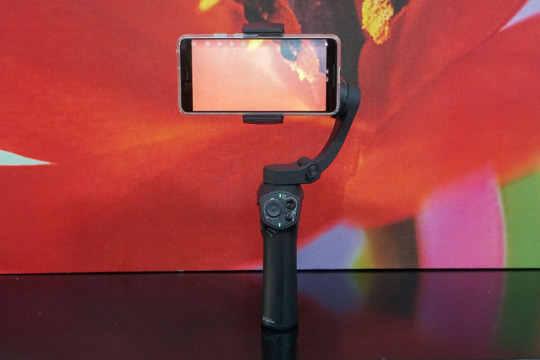
Snoppa Atom 3-Axis Gimbal Delivers


You know some crowdfunded projects fail to deliver. Most deliver, but their products are just okay. Once a while, however, some manage to deliver a spectacular product with awesome value. My Indiegogo-crowdfunded Snoppa Atom 3-axis smartphone gimbal arrived last week and it is amazing.
Snoppa is a Chinese company based in Shenzhen, and over the last few years, they’ve successfully brought to market several gimbal products. There are devices designed to reduce camera shake while they are hand-held to record video, particularly if you also need to move at the same time.
The Atom is the 4th gimbal from Snoppa, and the 2nd specifically designed for smartphones. It’s a feature-packed full 3-axis gimbal that folds into a relatively compact size.

The Snoppa Atom ships in a decent, professional, retail packaging. The gimbal is packed neatly inside. I did wish that Snoppa had provided a little bit more instructions to help new users get started. The pictorials inside the box aren’t quite good enough for newbies. There were no instructions to download their mobile app, which has lots of helpful information. I think to get started, users should have been advised to download the Snoppa mobile app.
It did take me a while to figure out how to unfold the Atom. Then I powered it on without a smartphone mounted, resulting in severe motor vibration which I later learnt from the app should be avoided, and that I was in fact supported to mount my smartphone in it first.

The Snoppa Atom is very well-built. It’s lightweight, at 440 grams, yet feels robust. Despite its low, affordable, price, the Atom doesn’t feel cheaper than more premium gimbals. The hand grip is comfortable to hold. An added rubber strip on the grip helps to provide some friction and reduce accidental slips. A tripod mount screw hole under the grip can also be used if you prefer to use a tripod.
Setting up the Snoppa Atom is quick and simple. There’s one push lock to unfold the arm and free the pan mechanism, and then two more twist locks to free the tilt and rotate mechanism. The jaw grip opens up to accommodate smartphone widths from 55 to 90 mm, and thickness up to 9 mm. This is wide enough for the Pixel 3 XL with a phone case I’ve used in my tests.
Snoppa has designed the Atom’s jaw grip to avoid pressing the buttons on smartphones that may happen to come under the jaw. This gimbal can handle a payload of up to 310 grams, so this can easily include the weight of a phone case and maybe even some attachment lenses.
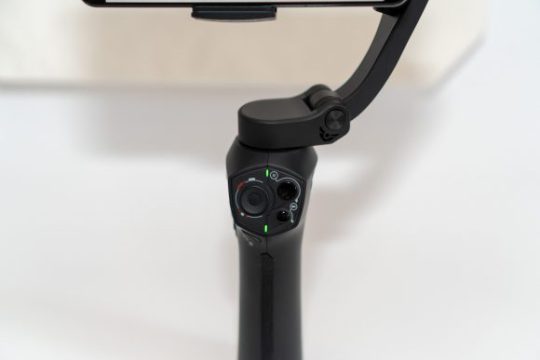
There are plenty of physical controls on the Atom, some of which are configurable. On the front, there’s a joystick for motorised pan and tilt control. There are two more buttons to start/stop recording and to call up the app menu.

On the back, there’s a trigger that accomplishes several functions depending on how it is pressed. It can lock the direction, enable fast tracking, or reset the gimbal’s direction. There’s also an anonymous button below it, referred to as the “back button” in the app, used to switch between fixed/follow tilt mode, and to turn on/off wireless charging.
Oh that’s right, the Snoppa Atom supports wireless charging, so it can be used to supply the smartphone with power. Alternatively, power can also be supplied to the smartphone through a USB Type-C on the side of the jaw grip. Beside that USB Type-C port, there’s also a 3.5 mm audio jack to connect to the smartphone’s headphone jack, so the Atom an feed audio from its own external microphone port to the smartphone.

The Atom’s external microphone port is on the side the of the hand grip. Below it, there’s a slider switch that can be configured to either control focus or zoom. There’s a button labelled “M”, which you can configure for various functions. The default is to switch orientation between landscape/portrait, and turn around 180° so you can record selfie videos with the main camera of your smartphone.
Finally, there’s a power slider switch under the primary front panel controls.

The Snoppa Atom itself is charged through a USB Type-C port. I’m really happy that Snoppa has bothered to provide modern USB ports, when even some bigger manufacturers still continue to use Micro-USB ports for their products. The Atom’s battery has 2000 mAh capacity, and Snoppa claims it can run for up to 24 hours, provided of course you don’t use it to charge your smartphone.

You can use the Snoppa Atom without their app, if you wish. The gimbal will work with any other video recording app. However, the Snoppa mobile app, which is available on both Android and iOS, is needed for a number of functions.
Snoppa’s app does a decent job of video recording, and it does offer a number of useful features. The app supports continuous auto-focus, but you can also fully control focus, ISO and white-balance manually. The app provides face tracking and object tracking capabilities. You can record static time-lapse and motion time-lapse.
For still photo captures, the Snoppa mobile app can also record panorama, light field, and night shots.
The Snoppa mobile app also allows you to calibrate the gimbal, and to adjust for drift. Firmware updates are also performed over the air, via the app.

Included in the Snoppa Atom’s retail packaging, you get USB Type-C cable, L-shape USB Type-C charging cable, L-shape Lightning charging cable, L-shape 3.5 mm audio cable, and a carrying pouch. The basic bundle also includes a small table-top tripod which is packed separately.
I’ve used the Snoppa Atom for a couple of hours thus far, and I’m extremely impressed. The gimbal is well-built and works very well. There are a good number of physical controls, some of them configurable. I like that they use USB Type-C ports. The Snoppa mobile app is packed with useful functions.
The Snoppa Atom will rank as one of my two most liked crowdfunded gadgets this year.

During the crowdfunding campaign on Indiegogo, the Snoppa Atom was available at US$79, plus US$15 shipping to Singapore. Right now, you can still order the Snoppa Atom, with the basic bundle starting at US$139 (inclusive of shipping to Singapore).
Conclusion
The Snoppa Atom is an impressive 3-axis smartphone gimbal that is well-made and works very well.
Pros:
Well-built, foldable, lightweight design
Many physical controls
Built-in wireless charging
Built-in portrait/landscape and selfie orientation change
Multiple tracking modes
I can’t actually think of a real con without nitpicking.
0 notes
Photo

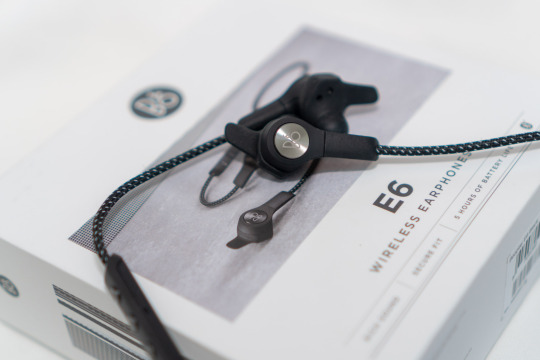
New Post has been published on https://zitseng.com/archives/17786
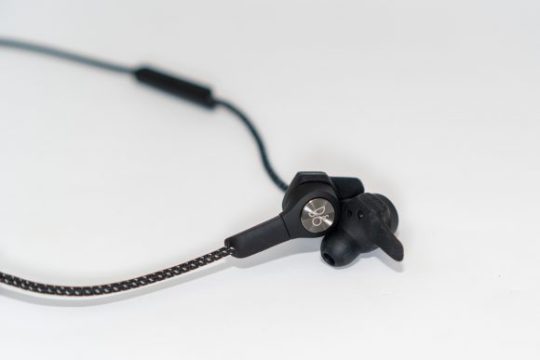
B&O Beoplay E6 Review

Music seems to have become an essential part of many people’s fitness regime, and to that end, we have no shortage of Bluetooth headphones designed for sports. B&O’s new Beoplay E6 is an excellent pair of fitness-oriented in-ear headphones, especially if you actually care about music quality.
The Bang and Olufsen brand, otherwise known by the abbreviations B&O, is well recognised around the world. They waded into the market for fitness-oriented headphones a few years ago. The new B&O Beoplay E6 looks to be an upgrade from the Beoplay H5.
In a nutshell, this is a Bluetooth wireless in-ear headphones with connecting behind-the-neck wires and a smart, contemporary design. Each earpiece is feels robust, covered with nice soft-feel silicon, and feature the B&O logo on a metal face-plate.
Braided wires coming out from below the earpieces look like they will take the stress from continuous sporting activities. I did find that they produce quite a bit of microphonics, the noise that is transmitted as the cable rubs on your clothing or your skin. Ordinarily, this can be distracting, though less noticeable if you’re also engaged in intensive activity.

The three-button remote and microphone module, made of plastic, is about three inches down from the left earpiece. You’ll find the usual volume controls, and the centre multi-function button does many things, from power, play/pause, skip tracks forward and backward. The B&O Beoplay E6 can also trigger your smartphone’s voice assistant with a long-press of the multi-function button.
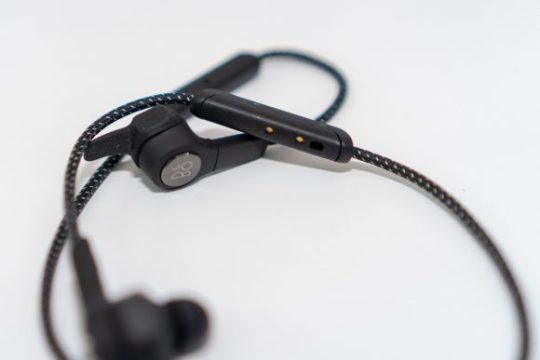
There’s also a similarly-styled battery module down the wire from the right earpiece. This nicely keeps the B&O Beoplay E6 balanced when you wear them. Small pins on the underside are used for charging, using the included charging dock. Unfortunately, this means there’s one extra thing you need to keep track of, and more importantly, make sure you don’t lose. I know Micro-USB doesn’t look so cool, but it’s more practical.
Thanks to the ear fins, the earpieces fit in my ears very securely. A secure fit is definitely very important with in-ear headphones that are meant for sports, because otherwise any vigorous activities would easily dislodge them. The earpieces themselves are a little larger than I’d like.
As with any in-ear headphones, it pays to select the correct sized ear tips to ensure that the B&O Beoplay E6 fits properly. The perfect fit is needed for the best music quality, and if you’re looking at B&O gear, I expect that the sound quality matters much to you.
The B&O Beoplay E6 does not disappoint when it comes to music quality. Of course, it’s a Bang and Olufsen, and at that price point, you’d certainly expect some decent quality. Still, it’s worth noting that the Beoplay E6 definitely lives up to my expectations.
The built-in 2 x 50 mAh batteries provide 5 hours of playtime at moderate volume levels. A nice bonus is that you can charge the Beoplay E6 while listening to music.
Music in the B&O Beoplay E6 is delivered through electro-dynamic 6.4 mm diameter drivers. The bass is strong, tight, and precise. It’s not overwhelming, and perhaps not at the level that would impress bass heads, but it does deliver a punch. The mids are clear, and throughout to the high end, I continue to hear impressive crispness and detailed nuances in the music. Overall, the B&O Beoplay E6’s audio performance is excellent.

For connectivity, the Beoplay E6 supports Bluetooth 4.2 with AAC codec. It supports HD-AAC, but I’m surprised not to find aptX HD or LDAC support. You can use the Bang and Olufsen mobile app to tweak your listening experience, such as to control EQ settings.
The Beoplay E6 is listed as splash and dust resistant. It’s very light, weighing in at just 21 grams.
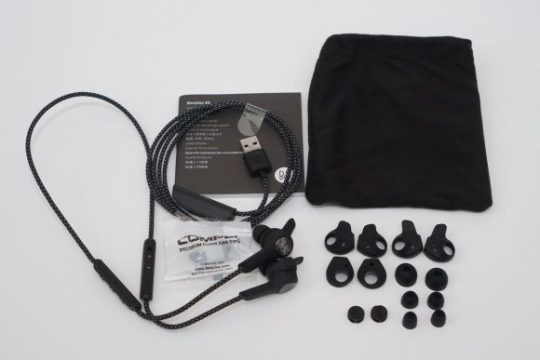
Included in the retail packaging, the B&O Beoplay E6 comes with four pairs of silicon ear tips, three pairs of silicon ear fins, one pair of memory foam ear tips, two cable clips, a charging dock, and a cloth carrying pouch.
The Beoplay E6 comes in the colours black and sand. The review unit I have is black.
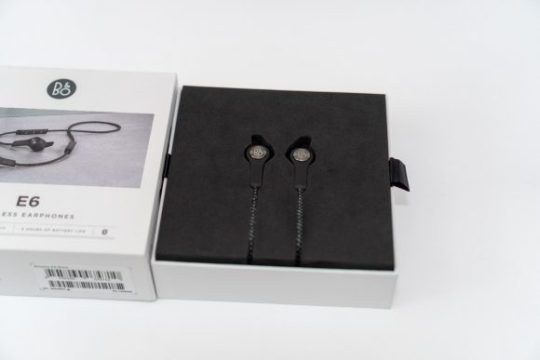
The B&O Beoplay E6 retails at S$460, and is available at Bang & Olufsen Grand Hyatt, Bang & Olufsen Takashimaya, Bang & Olufsen TANGS, Analogue +, Apple Premium Resellers, Changi Airport Duty Free, Newstead, Robinsons, and selected leading independent retailers.
Conclusion
The B&O Beoplay E6 is a in-ear headphones designed for sports, and lives up to the brand’s expectation of great music quality.
Pros:
Great music quality
Secure fit in ears
Robust, durable build
Smart, contemporary design
Cons:
Some microphonics from cable
No aptX support
0 notes
Photo
New Post has been published on https://zitseng.com/archives/17778
Ugreen 2-in-1 Micro-USB and Type-C Cable
There’s usually not much to say about USB cables. They’re utilitarian. Even 2-in-1 cables. So I was quite surprised that the Ugreen 2-in-1 cable I bought recently turned out to be actually a USB hub as well. I can use both the Micro-USB and Type-C device end at the same time.
I would have loved to have USB Type-C rule the world by now. Unfortunately, I still do have many devices using Micro-USB, and there are still new devices this year that continue to use Micro-USB. Like it or not, I’ll still have to deal with Micro-USB in the foreseeable future.
Hence I recently started to look for more 2-in-1 cables to help reduce the different number of cables I have to carry or keep around. I came across a few that are similar to the “UGREEN 0.5Meter 2 in 1 Micro USB Cable + Type C Cable 2.4A Fast Charging USB Cable” in this review.
As you can tell from the product title, this is a short 0.5 metres cable which is great for carrying around. The USB Type-A end connects to a computer, and the other end has a Y-split to a Micro-USB connector and a Type-C connector.
The interesting thing about this cable is that it isn’t just a simple dumb splitter. It is actually a USB hub. This means that not only does the cable carry data, but you can use both the Micro-USB and Type-C connectors at the same time, and connect two different devices to your computer.
You can also tell it’s a USB hub because Windows 10 immediately gives a notification when only the cable alone is connected to the computer. This is a USB 2.0 cable, in case you were hoping the Type-C end might support USB 3.0.
I probably don’t need to use both connectors at the same time, at least not most of the time anyway, but having that convenience of a built-in hub is really nice. The short cable length makes it easy to keep tidy, and it won’t take up much space or make a mess when stored with other items in your bag.
This cable currently sells on Lazada for just S$9.01, with free delivery (and some waiting).
0 notes
Photo

New Post has been published on https://zitseng.com/archives/17766
Fossil Q Explorist HR Review
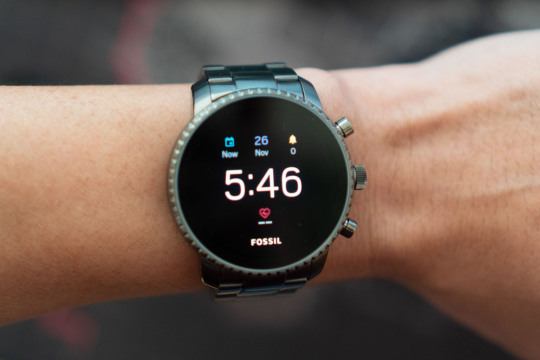

Their smartwatches are not as common as those from Apple of Samsung, but Fossil does have an impressive lineup of smartwatches. The latest in their Gen 4 series of Android smartwatches launched this year is the Q Explorist HR.
Like how the conventional non-smart timepieces that Fossil is known for, the Q Explorist HR is a handsome, fine-looking, and robust smartwatch running Google’s Wear OS. It looks like a proper timepiece, something that you could wear to a dinner date. That’s something important to me. I like smartwatch functions, but I like my watch to first look like a proper timepiece. The Q Explorist HR didn’t disappoint in this regard.
The Q Explorist HR is a large watch. I find the 45 mm watch case bordering on being a little too large, even for my wrist which isn’t small. The round watch case is made of stainless steel, with thickness coming in at 13 mm. It looks good, but that material gives the watch a weight of some 125 grams, just a little too heavy for my liking. There too much weight swinging on my wrist if I wear it for a run.
For people who like large chunky watches, however, I’m sure the Q Explorist HR will be extremely satisfying.

The gorgeous 1.4-inch AMOLED display has a resolution of 454 x 454 pixels. As like all newer Wear OS smartwatches, the display has no flat tyre. You get a full round watch face with bright, vibrant colours, and deep blacks. The Q Explorist HR supports an always-on display mode, so you can always see the time, without having to perform awkward gestures to wake up the display.

There three buttons on the side of the watch case. The middle one is the main crown which launches the app drawer, or Google Assistant if you long-press it. You can turn this button to scroll through the display. The other two buttons, above and below the crown, are shortcut buttons which you can program to launch your favourite apps.
As the Q Explorist HR runs Wear OS, it can do everything that you’d expect from any Wear OS smartwatch. This includes voice integration with Google Assistant.
There are a number of watch band options. My review unit has a matching smoke gray coloured stainless steel strap with single pusher foldover clasp closure. You can easily change the strap; just look ones with 22 mm width.
One of the highlights of the Q Explorist HR is the heart rate monitoring function. This is often the most wanted feature for fitness and sports tracking.

The built-in GPS sensor allows the Q Explorist HR to track your running route without having to bring along your smartphone. Your fitness data, including steps, heart rate, and GPS route, are sync’ed to Google Fit once the Q Explorist HR connects back to your smartphone.
You can take the Q Explorist HR swimming. With 3 ATM water resistance rating, you can swim with confidence, and even a dive down to 30 metres.
Under the hood, the Q Explorist HR is powered by Qualcomm’s Snapdragon Wear 2100 chipset with 512 MB of RAM and 4 GB of storage.
Wear OS runs fine on the Q Explorist HR, and I didn’t find any performance issue. However, Wear 2100 is a little dated, and with Qualcomm’s new Wear 3100 now appearing in new smartwatches, some people may want to hold out for an updated hardware.
A bigger concern is battery life. It ranges from average at best to mediocre. The Q Explorist HR will last a whole 24 hours if you use it moderately, without sports/GPS functions. If you push this smartwatch harder, you’ll find yourself needing to top-up its charge before the day is up. It’s not fun to worry about battery life.
The Q Explorist HR has NFC functions. However, Google Pay isn’t supported over Wear OS here in Singapore.
For connectivity, the Q Explorist HR supports Bluetooth Smart 4.1 Low Energy and 802.11 b/g/n Wi-Fi.

In the box, the Q Explorist HR comes with extra strap chain links, a magnetic charging connector, and some pieces of documentation.

The Fossil Q Explorist HR retails at S$469 to S$489, depending on options.
Conclusion
The Fossil Q Explorist HR is a handsome, fine-looking timepiece you can wear to a dinner date, with smartwatch functions you can use at all other times.
Pros:
Fine-looking timepiece
Great AMOLED display
HR and GPS built-in
3 ATM water resistance
Cons:
Battery life isn’t great
0 notes
Photo
New Post has been published on https://zitseng.com/archives/17757
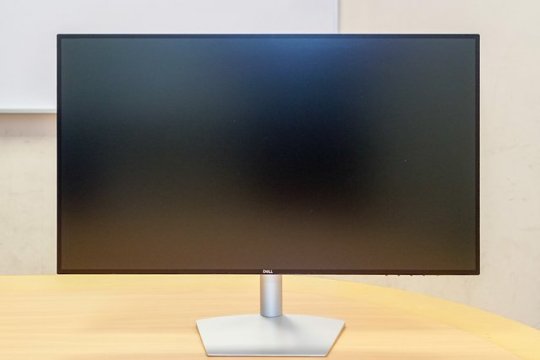
Dell S2719DM Monitor Review


Dell’s new S2719DM monitor joins the company’s lineup of many great monitors. The Ultrathin S2719DM, however, isn’t just another fine monitor. It manages to stand out from the crowd with its slim and elegant design. In fact, with small bezels, thin edges and curved back, the S2719DM somewhat resembles an Apple iMac display.
The thin edges of the S2719DM monitor tapers down to just 5.5 mm, and the maximum 29 mm thickness of the curved back isn’t all that much. This is a svelte looking monitor. It also features Dell’s trademark InfinityEdge bezel, which measure 6 mm on the top and sides, and 8 mm on the bottom.

The S2719DM monitor not only looks good in its design, but also in its display performance. Its 27-inch IPS panel is LED backlit with 2560 x 1440 at 60 Hz QHD resolution. With HDR support, the S2719DM reaches up to 600 cd/m² peak brightness, with typical brightness at 400 cd/m². This monitor can get very bright. Contrast ratio is typically 1,000:1, but can dynamically go up to 8,000,000:1!
Dell claims 85% DCI-P3 performance. My own tests find 70% NTSC coverage and 75% AdobeRGB coverage. Unfortunately, this means the S2719DM is at best above average, not in performance-leading territory. For the average consumer, I should say the Dell S2719DM’s display is good.
I’m not fond of glossy screens, so I’m happy to see a matte finish display on the S2719DM. Although matt finishes often seem to affect image sharpness, I do find the S2719DM’s display to be detailed and crisp. Movies are very enjoyable on this monitor.

The S2719DM supports only two HDMI ports. I had hoped for more ports. There is a headphone jack on the back, next to the HDMI ports. Given the location of the headphone jack, it’s probably best used for desktop speakers, since accessing it to plugin your headphones may be somewhat inconvenient.
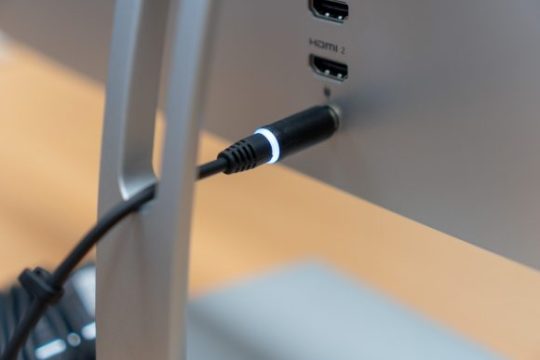
Power is supplied with an external power brick. The DC cord to the monitor has a nice LED ring around the connector, which I find rather superfluous since in normal operation no one is going to be able to see that LED.
That iMac-esque design is limited to the S2719DM’s main chassis. The stand is different. Like on the iMac, this stand supports tilt only, 5° forward and 21° back. I don’t mind the lack of pan, but I would really love to have vertical height adjustment.

Buttons on the S2719DM are located under the bottom edge on the right. The four-button cluster, or five in you include the slightly larger power button, is easy to find. You’ll get the usual, straight-forward Dell menu controls.
The beautiful Dell S2719DM monitor retails at S$689.
Conclusion
The Dell S2719DM is a beautiful QHD monitor that looks good not just in design, but also in display performance.
Pros:
Slim, svelte design
Sharp, crisp, QHD resolution
Very bright
Great contrast, HDR support
Cons:
Only 2 HDMI inputs
No vertical adjustment
0 notes
Photo
New Post has been published on https://zitseng.com/archives/17740
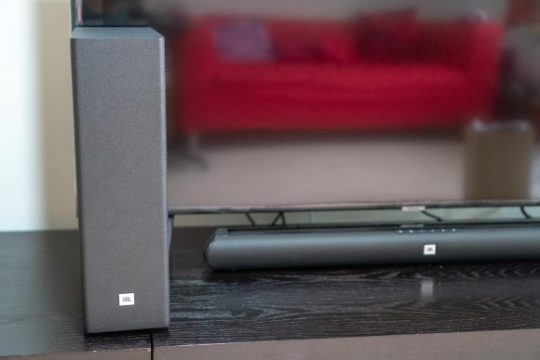
JBL Cinema SB150 Review
Built-in TV speakers are generally good enough for casual TV entertainment. However, if you want to truly enjoy movies on a large screen TV, you’ll find an investment in a dedicated sound system goes a long way to improve your experience. For my recent TV upgrade, I decided to get the JBL Cinema SB150 soundbar.
The JBL Cinema SB150 is an entry-level soundbar, but it does come with a separate subwoofer system for a full 150 Watts of 2.1 stereo sound. It’s light on features, but gets the job done good enough. It’s also very budget friendly.
The soundbar itself is relatively compact, with dimensions measuring 80 x 8.9 x 6.4 cm (WxDxH). It fits under my Samsung 55-inch Ultra HD 4K Series 7 Smart TV.
The subwoofer is a relatively slim unit that measures 40.9 x 8.9 x 80 cm (HxWxD). A nice feature of the subwoofer unit is that it connects wirelessly to the soundbar, so no cable connections are required between the two of them. You can easily place the subwoofer anywhere in your TV room, as long as there is a power supply available to power it.
The SB150 soundbar supports audio input via optical S/PDIF, 3.5 mm aux, and Bluetooth. There is no HDMI ARC support, and the USB port on the back is only for software updates.
The physical controls on the SB150 soundbar are all located on the top-front edge. The buttons have a nice soft-touch rubber material.
There’s also a LED light below, hidden behind the front grills for status indication. The LED is quite subtle, should not distract from your movie enjoyment.
Sound quality from the SB150 is reasonably good. The subwoofer produces powerful deep bass that you can easily feel. The subwoofer volume can be adjusted independently from the main soundbar, but only via the remote control.
There are three fixed equaliser settings, News, Music, and Movie, to choose from. These also can only be selected from the remote control.
Both a 3.5 mm audio cable and optical S/PDIF cable are included in the retail packaging, so you can readily hook up the SB150 to your TV.
The JBL Cinema SB150 soundbar has a list retail price of S$299, although you can easily find discounts. I bought mine for just S$178 during a recent promotion.
0 notes
Photo
New Post has been published on https://zitseng.com/archives/17738
Google SG Black Friday Sale

Thanksgiving isn’t a holiday in Singapore, but that doesn’t mean we don’t want Black Friday sales. This year, Google has humoured us by offering a smallish Black Friday sale on the Google Store in Singapore.
The sale begin on 22 Nov 2018 at 4 pm, and runs till 26 Nov 2018 at 3:59 pm.
Unlike the really exciting offers that U.S. people are enjoying, we have some watered down discounts:
S$100 off all Pixel 3 smartphones, all sizes, colours and storage capacities, with final prices from S$1,149 to S$1,449
S$30 off on Google Home Mini, now at S$49
S$70 off on Google Home, now at S$119
S$10 off on Chromecast, now at S$55
The discount rates on the Google Home and Google Home Mini are probably the best. For the rest, the discounts are rather little. However, I suppose any discount is still better than nothing at all. Especially if you’re eyeing Pixel 3 smartphones, the alternative options to buy from overseas Google Stores may present difficulties with warranties.
If you’re eyeing any of these items, check out the Google Store from 4 pm today.
0 notes
Photo
New Post has been published on https://zitseng.com/archives/17710
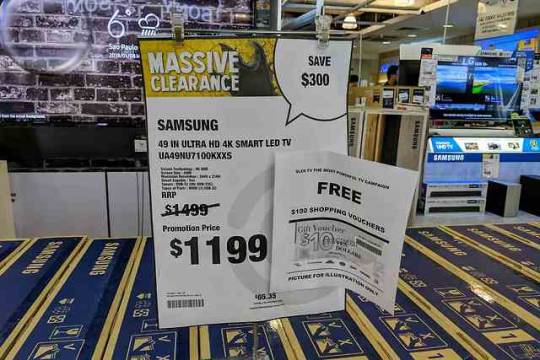
Deceitful Salespeople


I recently bought a TV from Courts, and I was originally going to write about how much I must have disappointed the salesperson. I had declined to buy anything else despite how hard he tried to peddle them. However, on hindsight, I think this is more about how I refused to be deceived by their salespeople.
The sales tactics of some of these salespeople can, at times, be at least deceitful, if not bordering on cheating. It’s one thing to be clever about pushing more sales, but quite another to misinform the customer and misrepresent the facts.
While preparing to write this post, I noted that I had previously written about a poor experience at Courts. I don’t know if this is a pattern of behaviour that is also prevalent in other large retail chains. I expected more professionalism from larger retail chains, and I did have better experiences with Harvey Norman, but perhaps I am misguided about Courts.
I don’t want to get into the incessant stalking and overly zealous selling (just to put it gently), I was more annoyed about what happened after I decided on the TV to get. The sale was pretty much done, but the pushy selling would not stop.
The salesperson asked about the devices I connected to it. I thought he was just trying to make friendly banter. Then it emerged that he wanted to sell me HDMI cables. Without knowing what cables I already have, he declared that I have to buy new cables. Without knowing what cables I already have, he suggested that my existing cable would not work. He warned me that the installer that delivers the TV to my house cannot be held liable for a non-working setup if I refuse to buy his cables.
I don’t mind buying new cables if they are reasonably priced. However, he was trying to sell me S$49 HDMI cables, supposedly a tremendously great value because it had been heavily discounted from S$99!
I politely declined and explained to him that I already have HDMI cables. But no, he insisted with a new 4K TV, I needed superior quality HDMI cables. I pointed out that my existing cables are already working, my devices are only Full HD, so while I understood there are different types of HDMI cables, I did not need his new cables, and surely my existing ones must work with the new TV.
We probably went back and forth about the cables for at least a good 10 whole minutes. He extolled the capabilities of his cable. It was necessary for sharper, clearer, and better picture quality. That’s so untrue.
You should know that HDMI is a digital signalling protocol. Unlike analog signals, whatever signal encoded and transmitted at source will be decoded correctly to the original data stream, as long as you use proper, compliant, cables according to specified conditions.
There are a lot of lies you’ll hear about HDMI cables. I last wrote about HDMI cables over four years ago. You should read about it. There are newer HDMI standards since then, i.e. HDMI v2.0 specifications, which are required for 4K resolution at 60 fps. It’s true that your old cables may not be up-to-spec to support 4K @ 60 fps. Older HDMI v1.4 cables, however, are still good for Full HD (and 4K @ 30 fps) video sources even when output to a 4K TV. There is nothing a new HDMI v2.0 cable can do better than an old HDMI v1.4 cable if your video source is just Full HD.
My Courts salesperson also asked if I needed a Digital TV antenna. Without knowing where I lived, and just based on the fact that my apartment was on a certain floor, he declared I needed a certain active Digital TV antenna that cost S$49. This antenna has a range of 40 km, he stressed, suggesting that the range was somehow necessary for me, even though, again, he didn’t even have a clue as to where I lived! I declined.
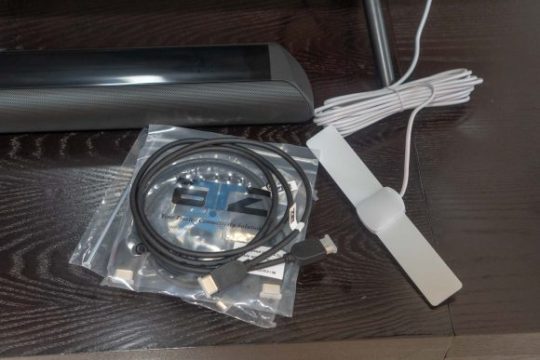
For the record, I eventually bought a HDMI v2.0 cable for S$7, and a active Digital TV antenna for S$25, both from Lazada. They work fine. I could have gotten a far cheaper Digital TV antenna, but for various reasons I chose this more expensive one. I found that even a passive Digital TV antenna worked just fine for me!
I also declined a sound bar that was suggested to me. What Courts was selling at about S$280, I bought for S$178 from the brand’s official store.
This was not over. I was handed over to another Courts salesperson to finish up the purchasing details. I’m not sure why the first salesperson couldn’t do it, but perhaps he failed to get me to buy anything else, so he passed me on to another colleague to have another go. That’s right, because the second person also tried to sell me a HDMI cable. This time, I was offered a S$19 cable. It’s so cheap! It was the last piece! Why would I decline a S$19 cable? This fella looked at me as if I was crazy to not want this deal. Again, I was warned that my old cable would not work as good as their new cable.
Well, I know for a fact that S$19 is just simply too much to pay for a HDMI cable.
Can you see how easily less savvy customers might have been deceived by these salespeople? The lies about HDMI cables are just too much.
It’s Courts’ prerogative to use a strategy to attract customers with discounts on big ticket items, then earn from higher profits on related accessories. However, they ought to be honest with customers, particularly when customers look to them for advice and recommendations. I personally wouldn’t mind slightly higher prices on accessories just for the convenience of having everything bundled together.
We may disagree on how much a premium is reasonable. $59 for a $7 cable is certainly too much for me, but if there’s a willing buyer, maybe you could say it’s the seller’s gain. Not nice of them for sure, but not something manifestly wrong.
Outright lying to customers, however, is very clearly wrong. Yet, I highly doubt my experience is not representative of what’s happening in the stores. While I don’t doubt Courts would condone such behaviour, I do wonder if they are simply unaware of the problem, or are they choosing to ignore the problem?
One thing that physical brick and mortar stores have over online shopping is that human touch, to develop relationships and provide personable services. Where they can’t compete in price and convenience, they can make up with trust, credibility, and loyalty.
If I cannot walk into a physical retail store and expect to receive credible advice that considers my best interest, I don’t know why I should bother to buy anything from them instead of an online store. The physical retail stores remain good only for me to see (and maybe demo) big ticket items before I purchase them online.
At end of the day, for customers, I think you owe it to yourself to do your homework before/when you shop. Alternatively, rely on a trusted friend to help you out.
0 notes
Photo

New Post has been published on https://zitseng.com/archives/17692
Lenspen Elite DSLR Cleaning Kit


I’ve used Lenspen lens cleaning pens for several years, and already have a few of them. I recently got another set of them, the new Lenspen Elite DSLR Cleaning Kit. This is a three-pen set, now in a new white colour instead of the older black-coloured set.
For those unfamiliar, the Lenspen lens cleaning pen is a dual-sided cleaning instrument. One end has a retractable soft brush for sweeping off dirt from the lens surface. The other end is more interesting. Protected by a screw tip cover, you’ll find a carbon-charged felt tip.
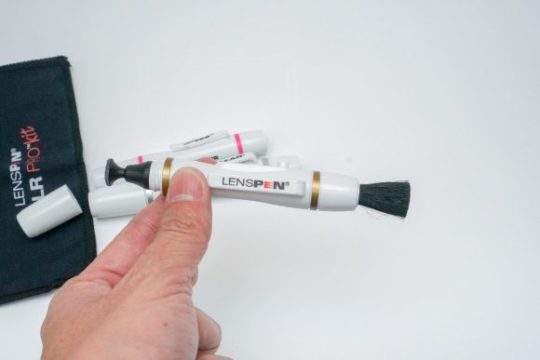
The carbon-charged felt tip is designed to clean off fingerprints, smudges and oily marks. Each time you screw back the cap, you’ll recharge the tip with more carbon so that it can do more cleaning work again.
The Lenspen carbon-charged felt tip is very convenient to use, as well as to stow away when you’re not using it.

The Elite DSLR Cleaning Kit comes with three pens:
The largest one is for cleaning lenses.
The next one is for filters.
The smallest one is primarily used for the viewfinder.

The kit also comes with a microfiber cloth pouch to store the three pens. It’s black, as you can see in the photo above, different from the light-coloured one in the older kit.

Lenspen says the pen is good for 500 uses, so it should last you quite a long time, easily a couple of years even if you use just a few times a week. You’d probably want a replacement sooner.
The new Elite version of the Lenspen is available on Lazada at S$26.09.
0 notes