
zoominhealth-blog
ZoominHealth
Daily Dose of Wellness
24 posts
Don't wanna be here? Send us removal request.
Last Seen Blogs

diamondsdirect21
Diamonds Direct USA Worldwide

siriusly-mhm-blog
Alex

gandz
Thiết Kế Sân Trường Vườn Trường Mầm Non Chuẩn

thesims4-adventure
Meu querido diário...

dearprudencesyko
olisykobmth
Text
Liver Spots: Causes, Symptoms, And Treatment
What Are Liver Spots or Age Spots?
Liver spots or Age spots are black, brown, and grey spots on the skin. Sun causes damage to our skin, that is why they occur more on the parts of the body which are exposed to the sun than others. Liver spots are commonly found in adult peoples older than 50 and younger people who spend more time in the sun.
Generally, Liver spots are harmless, and they don't need any type of treatment, but sometimes it can cause cancer. These spots are found mainly on face, neck, shoulders, hand, and legs. The spots – also called lentigines, lentigos. It causes an increase in the production of cells known as melanocytes that increase melanin in the skin, which turns the skin darker.
Symptoms
Liver spots can occur anywhere on the skin, but generally, they found on sun-exposed areas like the backs of hands, tops of feet, face, neck, shoulders, chest and upper back.They are light to dark brown and black in color.Generally, they found in an oval shape.Many times they are small. Several spots can group together and form larger areas of darkened skin.Changing skin tone.They do not cause any pain.
Causes
Exposure to UV light: Ultraviolet rays are harmful that causes liver spots, So age spots are found on that skin which receives the most sun exposure like face, the back of hands, shoulders, upper back, upper feet, and forearms.
Skin Conditions: The skin, which is very sensitive or having light color found more liver spots.
Medications: Certain medications can cause dark spots because they make the skin hypersensitive to sun exposure
Poor Diet: Poor diet is also one reason for the liver spots.
Other Causes: Pregnancy, poor liver function, Addison's disease, Hemochromatosis (excessive iron), Pituitary tumors
Treatment
You should be aware of the causes and symptoms of age spots. Prevention is always better than treatment, you can prevent age spots and other dark spots on your face by following a few simple tips. Let's attention on a few basics tips that are very essential for liver spots prevention:
Age spots or Liver spots are treated by some medications, advised by dermatologist, plastic surgeon, or skin care professionals.
There Are Few Conventional Treatments Like:
Medication: Use prescribed bleaching cream which lightens your liver spots in several weeks or months. And sunscreen with highly recommended SPF 50 is also the best way. Apply this medication to the affected areas of your skin and see the result in a few months.
Laser And Intense Pulsed Light Therapy: Lasers and intense pulsed light have been used to safely and effectively treat a diverse array of cutaneous conditions, including acne, age spots or liver spots and many more skin problems. This therapy destroys melanin-producing cells without damaging the surface of the skin. It needed 2 to 3 session. Liver spots lighten gradually after a few weeks or months. But sun protection is essential after this therapy.
Freezing (Cryotherapy): The term cryotherapy literally means treatment using a low temperature and refers to the removal of skin lesions by freezing. The most common substance used by doctors for the liver spots and for the extra pigment is liquid nitrogen. But this treatment may temporarily irritate the skin.
Dermabrasion: A dermatologist or plastic surgeon "sands" your skin with a unique instrument. This procedure ensures that you get a new, smoother layer of skin to replace the skin that’s gone to the treatment. Dermabrasion is usually best for people with white complexion. In the case of dark people, dermabrasion can cause scarring or discoloration.
Microdermabrasion: Microdermabrasion works on all skin types and colors. It uses tiny exfoliating crystals that are sprayed on the skin. This treatment is best for problems like dull skin, brown spots, and liver spots as well.
Chemical Peel: A chemical peel is a technique used in liver spots to improve the appearance of the skin on the face, neck, or hands. In this treatment, the doctor applies a chemical solution to the skin, which causes it to exfoliate and eventually peel off. Regenerated skin will be smoother than the old one.
Tips For Lowering The Effect Of Liver Spots
Avoid The Sun: Avoid sun exposure as much as possible during peak hours from 10 am to 4 pm in summers, and 10 am to 2 pm in the rest of the year. The sun is at its most powerful when at its highest point in the sky. Protect yourself in the car also because UV rays pass easily through the glass. If it is urgent to go outward, you can use an umbrella too.
Apply Sunscreen: It is sun protection to apply sunscreen. Every day, 15-30 minutes before you go outside apply it on your face, back of your hands or exposed areas. So buy a broad-spectrum sunblock, which protects you from both the UVA and UVB rays of the sun. It is highly recommended that sunscreen should have at least 40 SPF. If you are going to be outdoors for any length of time, reapply every two hours.
Cover Up: If you are going outside in the midday when the sun at hot, you need to cover up properly. Wear full sleeves clothes, or you can cover it with gloves also, and cover your legs with lightweight fabrics. Use an umbrella during outside.
Wear A Sunhat And Sunglasses: Wear a sunhat with a wide brim of at least 10 cm. This protects your face and neck from direct sun rays. And wear good qualities sunglasses, which protect your soft eyes from the sun. Your hat should be with cotton lining because it will give more protection than woven straw.
Live Healthily: Eat plenty of vegetables and fruits and also do exercise regularly to improve blood circulation to the skin. You should drink lots of water because on sunny days water keeps hydrate your body and skin will be healthy.
Conclusion
All treatments have some side effects, so discuss with your doctor about your option. But mentioned tips are beneficial for everyone not only for the liver spots but also for keeping your skin glowing always.
Read the full article
0 notes
Text
Dengue Fever: Symptoms, Causes, and Prevention
Dengue has taken the form of the epidemic disease over the years, affecting more than millions each year all around the world. Being a viral disease, there is no proper medication which could prevent the occurrence of dengue or the spread of this deadly disease. Dengue is spreading by a dengue mosquito.
Dengue fever is dominant mainly in tropical areas because the climate favors the breeding and the spread of the virus which causes dengue. And the disease becomes more grave and deadly during the wet summer days and early autumn since it is during these seasons that the climate remains humid with warm temperature.
Dengue Symptoms
As because the symptoms of dengue fever and Chickengunia are closely related, doctors always prefer a dengue blood test to ensure that the patient is suffering from the concerned disease only.

Image Credit - Kisspng
However, as a precautionary step for not misinterpreting dengue with normal viral fever, here are the signs and symptoms of dengue.
High Fever: Dengue fever is characterized by an abnormal rise in the body temperature, within 102°F to 104°F.
Body Pain: Owing to the fever, most of the times patients complain of suffering from severe body aches, especially in muscles and joints.
Nausea: Nausea feeling is often accompanied by vomiting, especially after eating something.
Rashes: As the dengue virus first affects the Lagrange’s receptors in the skin, red rashes are very common in patients suffering from the disease.
Fatigue: The feeling of tiredness, dizziness & weakness are common in dengue.
Decreased Appetite: Patient don't feel hungry and sometimes, they feel too lethargic to even drink water or take a small morsel.
Blood Pressure: Dengue is often associated with low blood pressure, and hence the weakness.
Platelets: Dengue platelet count in always low than the normal one, and in severe cases, it even goes lower than 1 lakh.
Warning Signs
It is imperative for everyone to understand when the dengue symptoms are converting themselves into deadly ones, risking the life of patients, irrespective of age.
So, here are the major warning signs that you need take care of-
There will be severe abdominal pain coupled with cramps. Nothing will stay in your stomach for too long and hence, you will start vomiting too often. The gums usually start bleeding. In more severe cases, the dengue virus causes the rupture of blood capillaries of the gut and hence blood appears in the vomit. Blood pressure increases, thus causing the person shortness of breath, and in some cases rapid breathing. If not treated at the right time, the patient will start feeling more restless and weak. At the last stage of dengue, multiple organ failure is the major symptom, causing the death of the patient,
Causes
Generally, dengue fever is caused by the bite of an infected female Aedes mosquito. However, the female Aedes mosquito is just the vector carrying the main causative agent of Dengue, which is a virus.
Virology
The virus causing the dengue fever is a RNA virus belonging to the family of Flaviviridae. Though initially only four strains of the virus were known to the medical world, a fifth serotype was discovered in 2013. Scientist and microbiologists from WHO has said that the fifth serotype is a result of the evolution of the protein coat envelop which envelops the main cytoplasm and the genetic material of the virus.
The viral activity of the microorganism is mainly due to the complexity of the proteins inside the RNA material. Five different types of structural proteins and enzymes are there which contribute to the changes introduced to the immune system of the host body.
Which Mosquito Causes Dengue?
The dengue virus name is DENV and it is transmitted from an infected person to a healthy person by the female Aedes mosquito. Four main species of the Aedes mosquito are responsible for the transmission of Dengue-
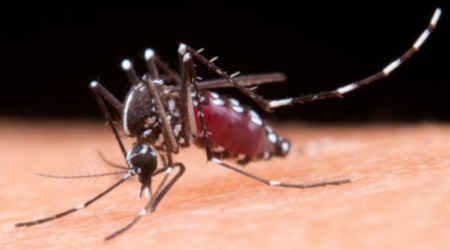
Dengue Mosquito
Aedes aegyptiAedes albopictus Aedes polynesiensisAedes scutellaris
However, the main dengue mosquito responsible for the transmission of the disease is Aedes aegypti. The breeding places of this particular mosquito species is in areas located within the tropical and sub-tropical climatic zones. These climatic zones provide warm and humid weather for the eggs to hatch and the larvae to survive.
HOW TO PREVENT DENGUE?
Preventing Dengue is the only option to keep yourself safe and sound even in the rainy seasons. However, these prevention steps aren’t only for your home but also for the surroundings.
So, here are some of the best dengue prevention steps:
Make sure you are keeping your home clean and tidy. Do not allow clean water to accumulate anywhere because that’s the breeding ground of the Aedes mosquito as this is one of the most important dengue remedies. Make sure you are either dressing up in full-sleeved dresses or using mosquito repellant skin creams. Spray insecticides both inside your home and also on the outside. Make sure your garbage is not more than one day in the litter box. If you see even the slightest symptom, go for a doctor or do a dengue blood test.
How To Cure Dengue At Home?
1. Take Adequate Rest
Since dengue fever cannot be treated with medicines or vaccines, patients should seek medical advice and take rest. It is a must to keeping in mind the comfort of the patient. Let the patient rest in a cold place, keep AC or cooler for them.
2. Drink Plenty Of Fluids
Drink plenty of fluids like water, fresh juice, soups, and coconut water as it will help to keep the water content of the body high. Take around 4-5 liter liquid daily. Be sure to have some liqueurs every 2 hours or even earlier. In dengue the conditions are bad only when there is a shortage of water in the body.
3. Take The Recommended Medicines
Dengue will be cured quickly by taking more medicines, it is a false one. Taking excessive medication can also cause side effects. So the patient should take medicines prescribed by the doctor at the right time. Do not take drugs like ibuprofen in dengue fever since this can increase the risk of bleeding.
4. Note How Often The Patient Goes To Urinate
If the patient goes to urinate every 6 hours, then it shows that there is no shortage of water in the body. This is a good sign. If it does not, then definitely talk to your doctor and also pay attention to the color and volume of urine.
5. Stay Away From The Miracle Cures Of Dengue
There are some miraculous drugs in the market that claim to end dengue, but there is no scientific evidence for them. Do not eat them as they are not reliable. This medicine has the potential to harm you more than it benefits you.
6. Take Care Of The Patient
You should take care of the patient as much you can. To reduce the dengue fever, give the patient a bath with a wet strip. It is helpful in reducing body temperature. And also focus on the patient's breathing condition during fever, especially when the patient does not have a fever. If the patient is not breathing even when there is no bleeding, then take him to the doctor.
7. Use of Mosquito Net
Put the dengue patient inside the mosquito nets so that the mosquito couldn't suck the infected blood and don't spread the disease in others.
Life-Cycle Of Dengue Mosquito
Just like any other insect, Aedes mosquitoes also undergo a lot of successive transitions until they become a complete adult female mosquito, carrying the virus of the disease.
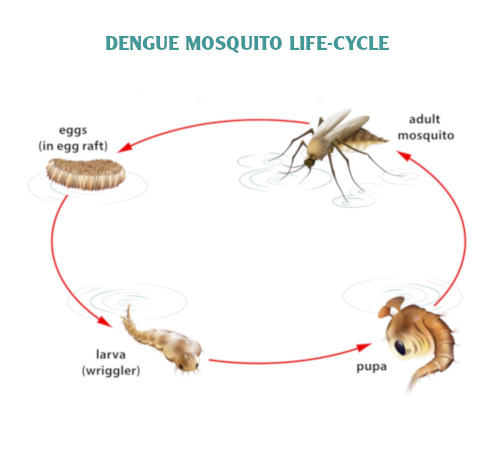
Dengue Mosquito Life-Cycle
The female mosquitoes lay the eggs on the inside of the containers in dry conditions while in wet conditions the eggs are laid on the water surface. Once the hatching season arrives, the eggs hatch and the larval stage starts. The entire larval stage is divided into four different instars. Each time, the larvae undergo developments, tissue differentiation, and segmentation to form the adult larvae. During these four stages, the mosquito larvae shed the skin three times. After the fourth stage, the larva enters the metamorphic stage, in the form of pupae. Here, the pupa undergoes metamorphosis while being in a cocoon. Both the larva and the pupa stages of the dengue mosquito are aquatic and on completion of the metamorphosis, the fully grown mosquito breaks from the cocoon and flies off.
You should also read : What To Eat In Dengue: Dengue Patient Diet
Read the full article
0 notes
Text
Dark Spots: Home Remedies to Remove Dark Spots?
Dark spots are one of the most common problems in today's world and every other person is affected by this. And Everyone has a common question to ask "How to remove dark spots?". If you are one of them, then you have to be stressed because these are not caused by excessive exposure to the sun, not from the age only.
No matter what is the reason behind developing dark spots but they are not dangerous. They do make you look older that's why people want to remove dark spots.
There are numerous medical methods by which you can treat those dark spots. Most of these procedures are costly and sometimes they end up being a failure. Below are the best home remedies which can help you in removing these dark spots.
Some of the Best Remedies to Remove Dark Spots-
Lemon Juice

Lemon Juice
When it comes to treating the skin diseases no matter the type of diseases then there is no best option then the lemon. Lemon contains the citric acid which helps in removing all the dead cells(dark spots) and makes skin glow naturally. But you must remember that going out in the sun right after the application of lemon can give adverse results. Lemon is not good for extra sensitive skin. If you have this type of skin then going for other home remedies is best for you.
How to Apply
Cut a half lemon and squeeze it, apply the juice on the spots at least twice a day. It will help to remove or lighten the dark spots.
Honey and Yogurt

Honey and Yogurt
Yogurt has the lactic acid and also offers the bleaching properties which helps in making the skin lighter in many tones. Honey also posses many herbal properties which nourish the skin and helps you in revealing the skin.
How to apply
Blend honey and yogurt to create natural bleach that can lighten dark spots. For making this mixture, add one tablespoon of yogurt and one tablespoon of honey. Apply this mixture and leave it for 30 minutes to dry. Then wash with normal water and apply this once a day.
Purple Onion

Onion
Onions are also effective when it comes to removing dark spots (age marks) because they contain the sulfur compounds which serve as an antiseptic agent. The smell can be irritating but this is the best remedy for those who find lemons or vinegar too irritating.
How to apply
You can also use purple onions and obtain the same results as lemon juice. All you have to do is rub the juice on the affected areas and wash it off with warm water. Results of one study indicate that purple onion skin may lighten dark spots.
Aloe Vera

Aloe-vera
Aloe vera can treat many skin diseases because it offers both moisturizing and anti-
inflammatory properties which keep the skin feeling fresh and young. The Aloe vera plant contains chemicals that slough away dead cells and encourage the growth of new, healthy ones.
How to apply
So, simply take a little fresh aloe vera gel from a live plant, if available. And rub it on the affected area and leave it for 30 minutes, then wash it with normal water. You can leave it overnight also. If you have not lived aloe vera plant then you can buy aloe vera gel from the market also. Thus, it will help to lighten the marks of dark spots.
Apple Cider Vinegar

Apple Cider Vinegar
Apple cider vinegar has the alpha hydroxyl acids which is equally effective as anti-aging creams to help lighten those age spots. Like lemon juice, apple cider vinegar contains an acid that is known to help lighten sun and dark spots.
How to apply
For the best result, mix apple cider vinegar with olive oil, because olive oil protects skin from dryness. Apply it and leave for 20 minutes and wash with normal water.
Chickpea Mask

Chickpea Beans
Chickpea or garbanzo beans can be used as an excellent face mask and helps in fading the dark spots.
How to apply
Chickpea mask is very essential for dark spots. For the preparation, take 1/4 cup of water and 1/2 cup of boiled chickpea. Mix it well for making a uniform paste. Then apply it on the dark spots and leave it for 20 minutes until dry. You don’t need to wash it, just let the dried paste come off on its own. Repeat it every night for the best result.
Buttermilk

Buttermilk
It is a very effective home remedy to removing dark spots, it contains lactic acid which tends to lighten the skin without causing any irritation.
How to apply
For this, take some buttermilk and dip a cotton ball and apply it on the affected area. Wash it after 15-20 minutes. If your skin is oily or acne prone, you can mix a little lime juice or tomato juice to the buttermilk and apply it on your skin.
Papaya

Papaya
Papaya has enzymes that help in treating these dark spots in a natural way. Along with removing these dark spots, it helps in adding more glow in your appearance.
How to apply
All you need is green papaya and a knife. Cut off a slice of the papaya skin and hold the fleshy side of the papaya to all the age spots for about 20 minutes. You can also apply the pulp for 20 minutes. For getting better results to use this remedy every day.
Conclusion on Dark Spots
All the mentioned remedies can help you in treating your dark spots Problem just in a matter of days without spending too much money. These natural ways are extremely beneficial for those who wish to live a herbal life instead of using cosmetic creams which are nothing but a mixture of very dangerous chemicals. We hope you will get extraordinary benefits.
Read the full article
0 notes
Text
Chamki Fever: Symptoms, Causes, and Treatment
What is Chamki Fever?
Chamki fever is a rare disease caused by viral infection mainly herpes simplex viruses (HSV). Mostly chamki fever affect children, elderly patients and persons with low immunity which cause brain swelling, sometimes death may occur in severe cases. This condition is also called brain fever or acute encephalitis syndrome. High temperature and humidity during summer seasons considered to be an ideal situation for the outbreak of brain fever, which has symptoms of high fever, vomiting and unconsciousness. Recently in Bihar and Uttar Pradesh death rate of children increases due to chamki fever.
Can Chamki Fever Spread?
Yes, viruses which cause chamki fever can spread from infected patients. So, care should be taken to avoid contact with an infected person.
Causes of Chamki Fever
Bacterial infection or viral infection may cause this condition. But the exact cause of Chamki fever is often unknown.
Mosquito bite-mosquito-borne viruses can cause infection and the symptoms might appear within 5 to 15 days after exposure to a mosquito bite.
Herpes simplex virus (HSV)-brain fever caused by herpes simplex virus is rare but can result in significant brain damage and death.
Enteroviruses-this virus can cause an illness with flu-like symptoms, eye inflammation and abdominal pain.
Childhood infections-common childhood infection such as smallpox, chicken pox viruses may cause brain fever or secondary encephalitis.
Signs and Symptoms of Chamki Fever
Important Signs in Children are-
Vomiting
High-grade fever and the temperature is more than 100.4*F(38*C)
Bulging occurs in the infant skull region
Child won’t take mother feed or bottle feed properly
Body stiffness
Baby doesn’t stop crying
Symptoms of Mild Cases-
Fever
Headache
Drowsiness
Sick feeling and loss of energy
Severe Cases Can Cause
A high fever or rise in temperature
Nausea and vomiting
Convulsion (seizures)
Problem with speech or hearing
Memory loss
Coma or death
Restlessness
Irritability
Stiff neck
How to Detect This Brain Fever?
Blood test-blood test is a common test for all type of infection. It is used to detect any presence of virus or bacteria in the blood which causes chamki fever. This blood test also shows if the body is producing any specific antibodies against germs or infections.
CT scan or MRI -computer tomography and magnetic resonance imaging technique is a recently advanced scanning technology to detect any swelling and bleeding in the brain.
EEG-electroencephalogram (EEG) records the electric signals in the brain. It is useful to detect any unusual brain waves in case of brain fever.
How Long Does Chamki Fever Last?
In case of severe symptoms of brain fever, the symptoms may last up to a week. Full recovery can take longer time sometimes it will take several weeks or months.
How To Prevent This Fever?
Brain fever can’t be prevented, but we can avoid the illness.
Vaccination or Immunizations-children should avoid contact with anyone who already has a chamki fever. Immunization schedule recommended by a doctor should be followed to avoid common childhood illness.
To avoid mosquito bites and tick bites children should wear long sleeves and long pants.
Use mosquito or insect repellent.
Avoid standing or playing near stagnate water, because stagnant water is breeding grounds for mosquitoes.
Keep your environment clean and wash your hands regularly with antiseptics or soaps.
Treatment
Corticosteroids used to reduce brain swelling.
Anticonvulsants drugs may be given to a child having seizures.
Acetaminophen can be given to reduce fever and headaches.
Antibiotics won't work against viral encephalitis, so antiviral drugs should be taken as per the doctor advice to treat brain fever which caused by a viral infection.
In some cases, brain swelling can cause a lasting problem like memory loss and speech problems. Speech therapy or occupational therapy can help in these cases.
Read the full article
0 notes
Text
How To Use Menstrual Cup and Benefits
One of the major changes that females have to face upon the onset of puberty is the start of the menstrual cycle. Biologically, it’s the body’s natural instinct to reproduce. But, if the female vagina doesn’t receive ant sperm, the ovum which has implanted itself on the endometrial walls will eventually disintegrate and hence, the blood vessels supplying blood to the cell will also be ruptured. As a result, blood flow starts which is known as menstruation and this phase lasts from five to seven days every month.
Females need to use different products to ensure that the blood doesn’t stain their clothes. Sanitary napkins, tampons, and so many other systems are there but the newest and the most efficient addition is the menstrual cup.
What is a Menstrual Cup?
A menstrual cup is a reusable rubber cup that is inserted into the vagina and placed over the cervix to collect menstrual flow. It is a feminine hygiene product and it’s basic purpose is to prevent menstrual fluid from leaking onto the clothes or bed sheets. Unlike tampons and pads, menstrual cups don’t absorb the blood but collects it instead. It is an ideal menstrual aid for all kinds of sports, traveling, swimming, cycling, diving, trekking, caving, dancing, climbing, bowling, walking, driving, sitting, sleeping or common daily usage.

Internal View of Menstrual Cup
After long research, I found it as a magical product for women. I am using it since 8 months and found that I am in freedom in these days. I don’t feel leakage even during standing or sitting somewhere and it’s easy to pass out through the urine just like normal days without feeling suffocated. Even sometimes I forget that I have periods. So, I feel its amazing and suggest that every woman should try it.
How to Use Menstrual Cup?
When it’s a new technology, obviously you might feel scared about the procedure of using the cup. But, here are 5 points you need to follow to use Menstrual Cup to make your periods painless and free–
1. Relax
Inserting a menstrual cup will be easier when you are relaxed.
2. Wet the cup
It is easier to insert a cup when it is wet. First, you need to dampen your vulva or the entrance of the vaginal tube either with water or with a aqueous lubricating solution. Also, don’t forget to wet the rim of the cup before inserting. Now, showers will be the ideal place for using the menstrual cup.
3. Insert and ensure
If you are tensed about how to insert menstrual cup, then here’s the answer. You need to first fold the cup in C shape and gently insert the folded cup into your vagina, tilting it back to the base of your spine. Make sure the cup is sitting on a lower position inside your vagina to get the full advantage of this technology.
4. Wait for the ‘pop’
When the cup is inside, it will pop open, creating a light suction. The suction is how the cup prevents leaks, so use your finger to check if it is fully unfolded.
5. Remove and empty
With clean hands, gently pull the stem of the cup downwards until you can reach and grip the base of the cup. Pinch the base to release the suction and take it out gently. You may need to use your pelvic muscles to push your cup lower in the vagina to help you reach the base with your fingers. Once you will remove the cup from your vaginal tube, empty the content in the toilet and wash the cup thoroughly.

Steps to use Menstrual Cup
Get the right size
According to me, the size of cup should be based on age factor and flow of bleeding. Adults and young age women who are below the age of 30 and not given vaginal birth should choose the small size of cup. And above 30 years, women who have given birth vaginally should choose the large size. On the other side, if you have low flow or medium flow, choosing the smaller or medium size is more feasible. But if you have heavy flow, you should choose the large size.
You can choose your best size from the brand of menstrual cup also which you are going to purchase, because different brands have different sizes.
If you choose the wrong size, then leaking issues might arise which will ultimately put you in either an embarrassing situation or into discomfort. So, ensure that you are reading the guidelines for the menstrual cup size of a particular brand you wish to purchase. This will help you to have the cup which will fit tight into your vaginal tube, thus not causing any leakage of blood.
Availability in the market
Menstrual cups are still an unfamiliar concept in Asia, and that’s the reason why local drugstores and pharmacies have failed to recognize that there is a market for reusable menstrual products. But you can purchase it online from Amazon, Snapdeal and Flipkart, etc. There are a lot of brands available like Sirona, Diva, Ruby and Eva Cups, etc. But Sirona Menstrual Cup is cheaper than others.
There is no doubt that menstrual cups are more expensive than the normal sanitary pads. However, Menstrual Cups can be used for many years, which makes them more favorable compared to tampons and disposable pads in the longer term. Depending on the female’s cycle and habits, within about six to 12 months a menstrual cup can start to save money compared to buying pads or tampons.
Pros & Cons of Menstrual Cup
Pros
Cons
Reusable You may have an allergic reaction depending on the quality of the cup. Leak Proof You may face challenges in finding correct Cup size Sleep Better Cleaning and Sterilizing it No Dryness High startup cost for good quality cup Comfortable
No Chemicals
Odor Free
Reduce Risk for TSS (Toxic Shock Syndrome)
Money Saver
Better for Environment
After Insert feel free for at least 12 hours
Note: if you are feeling any type of problem with a menstrual cup or having the question that are menstrual cups safe, then you should consult your doctor before using it. Otherwise, it is amazing.
Read the full article
0 notes
Text
Glowing Skin: Home Remedies and Causes
Every woman has a desire to have healthy and glowing skin. After all, flawless and brilliant skin is the way to wear your confidence without faltering in anything you are doing. It makes you bold enough to raise your own voice. However, it’s not at all easy to get flawless and glowing skin, even if you are taking thousands of different medicines for the same. But thanks to natural ingredients available at our home as remedies for glowing skin.
Why Your Skin is Becoming Dull With Each Day?
In today’s time, it is challenging to maintain the natural glowing skin, thanks to the immense pollution level and the regular stress that you go through every day. Some serious factors make your skin dull and dry. Let’s have a look at the reasons why your skin is becoming lifeless with each passing day.
Stressful lifestyle Hectic work schedulesInadequate sleepExcessive smokingDrinking alcoholLack of nutritional diet PollutionExposure to harmful sun rays (UVA/UVB)
We can control a few of them, but yes, we can escape from a few, like stopping smoking or getting proper at every night. But, even then it’s not sufficient to bring back the natural glow of your skin.
How to Get Glowing Skin Instantly?
Skin, though has a straightforward structure, it’s functionality is quite complicated. That’s the reason why it’s challenging to bring back the shine and glamour of the skin overnight. You cannot rely on medicines only, mainly because they are made of chemicals only.
It is due to these reasons that were relying on herbal products is much better than spending a lot over those chemical drugs and creating a massacre with your skin.
So, here we have described some of the best home remedies for glowing face.
Turmeric

Turmeric
This bright yellow colored powder has immense health benefits, thanks to the antioxidants and healing agents present in it. Turmeric is an excellent antiseptic and skin lighting agent that helps minimize scars and other marks.
It contains curcumin, the bioactive compound which makes Turmeric one of the best beauty tips for face. The scars left behind from the acne can be treated with the daily application of the Turmeric paste.
How to use?
You need to make a paste of Turmeric powder and gram flour along with a little bit of rose water. Mix gently till you get the consistency and then apply it on your skin. Leave the paste of fifteen to twenty minutes and then wash your face with warm water.
Coconut Oil

coconut oil
Application of coconut oil is one of the best skin care tips to combat many skin problems. It works best for dry and dull skin and also locks the moisture in the skin.
Here are the few benefits of using coconut oil!
Vitamin E and other essential fatty acids like lauric acid present in coconut oil help in making the skin smooth and supple. Coconut oil helps in restoring the collagen fibers, thus acting as an anti-aging solution. Vitamin E, Vitamin A, and other antioxidants prevent the skin damage from free radical generation and also from the UV rays. The high water content in the coconut oil helps in moistening your skin, thus giving a natural glow to the dermal layers.
How to use?
Lightly warm the coconut oil until it turns liquid, and apply it on your face and neck. Massage in the circular direction. You can either wash it off after 30 minutes or leave it overnight. For using the coconut oil as a scrubber, add one tablespoon of granular sugar into it. The combination of sugar and the fatty acids in the coconut oil will help you to exfoliate your skin.
Aloe Vera

Aloe-vera
When you are concerned about how to have glowing skin, aloe vera will serve as the perfect answer for the confusion. The antibacterial properties of aloe vera gel help to get rid of skin related problems like acne, pimples, dryness, blemishes, etc.
Apart from this, here are some of the best benefits of aloe vera that will leave you utterly amazed.
Aloe vera gel helps in soothing the redness from the sunburns. It also helps in reducing the skin irritation and rashes if you have any on your face. As aloe vera gel has high water content, it adds a lot of moisture to your skin, thus making it supple and soft. Aloe vera has antibacterial properties which help in fighting off the acne. The aloe stimulates the regeneration of collagen fibers, thus tightening your skin. Zinc acts as an astringent, and another antioxidant prevents the generation of free radicals.
How to use?
Use 1: Take some aloe vera gel and mix a few drops of lemon juice in it. Apply it evenly on your face and neck. Leave it on the skin for 15 minutes. Wash it off with lukewarm water to see the glow on your skin.
Use 2: Cut a small piece of aloe vera and make sure to squeeze out the gel gently or you can purchase aloe vera gel from the market also. And apply it on your face and hands properly. Not only does it effectively moisturize your skin, but it also helps to create a protective barrier for skin pores that block impurities from entering. Leave the gel on your skin for around thirty minutes, and once it has dried up, wash it with clean water thoroughly.
Honey

Honey
Often people are concerned about how to get a glowing face and hence, they use lots of chemicals. But, they don’t even give a look at that one thing which they use daily for other purposes, and that is honey. Honey does have a lot of benefits when it comes to providing a natural glow to your face or lightening the scars.
The enzymes present in honey helps in moisturizing the skin deeply, thus fighting off the dryness in an impeccable manner.Honey is rich in antioxidants and acts as an antiseptic. These properties help honey to act as a scrubber and hence exfoliate the skin. Honey acts as a lightener and helps to lighten the dark spots, acne scars, and other form of spots. Honey helps in reducing the inflammations and the redness of the epidermis due to sunburn. The antibacterial properties in honey help in treating the acne and the pimples.
How to use?
Use 1: Take equal quantity of raw milk and honey in a bowl. Mix them well and apply it all over the face and neck. Allow it to sit on the skin for 15-20 minutes and wash off with fresh water. Repeat every alternate day. This is one of the easiest yet very effective remedy with honey for glowing skin.
Use 2: In a simple way, apply honey evenly on clean and damp skin. Massage it for a few minutes and leave it on for another five to ten minutes. Wash the honey off with lukewarm water. You should apply it every alternate day.
Use 3: You can use honey and sugar face scrub. For that need 2 tbsp of honey, 3 tbsp of sugar, 1 tbsp of olive oil and 1 tbsp of lemon juice. Mix it well and apply on face and neck, gently scrub your skin in circular motions with your fingertips for a couple of minutes. Then wash your face with lukewarm water. Apply it 2-3 times a week.
Olive Oil

Olive-Oil
Olive oil works wonders on the skin. Apart from providing glowing and healthy skin, it also helps in fighting other skin problems such as blackheads and whiteheads.
Here are the few benefits of olive oil that makes it one of the best face glow tips.
Olive oil is a hub of different vitamins like Vitamin A, D, K, and E. It prevents the aging of the skin and the formation of the wrinkles owing to the antioxidants present in the oil. The hydration property of olive oils helps in moisturizing the skin. It also helps in fighting off the bacterial infections, especially the acne, and other ones.
How to use?
For best result, we should use extra virgin Olive oil. Take a few drops of the oil and apply it on the face and neck. Gently massage upwardly for one to three minutes. After that dip a small towel in bearable hot water and cover your face until it comes down on room temperature. Repeat it 2 to 3 times and Clean your face and neck with that towel.
Read the full article
0 notes
Text
Skin Types: How to Know the Types of Skin Tones?
What is your skin type? What an elusive question! YES, it's true.
It is very important to know your skin type before you plan to try skin care products.
How many Skin types are there?
There are four basic skin types:
NormalDryOily andCombination skin
Body skin types are determined by genetics. It can change over time with changes in age, diet, and hormones. This means that your skin type may change.
But when we purchase skin products, we feel very confused because we don't know our skin type. So, it's mandatory to know skin types because better choice means better efficiency.
Normal Skin

Characteristics of Normal Skin.
It is free from skin blemishes.Its pores are fine, hardly visible.You will find skin tone is even, clear and smooth.It has radiant skin.
Normal skin out of different skin types is a good balance of moisture, small pores, and an even tone. It's neither too dry nor too oily.
Normal skin doesn't experience breakouts that often. A person who has normal skin type may not observe changes in their skin throughout the day.
Dry Skin

Dry skin has a lack of moisture. So, it can feel tight and rough and look dull especially on cheeks and around eyes. In some cases, itching and burning may occur. Generally, Extremely dry skin shows signs of cracking and fissuring.
Dehydration is a leading cause of dry skin, so drinking plenty of water can make a significant difference in how your skin feels and looks.
Causes of Dry Skin.
The moisture of your skin depends on the supply of water in the deeper skin layers and on perspiration.
How Skin loses water and moisture?
Perspiration: Heat, Stress, and activity lead to loss of water from glands.Trans-epidermal Water Loss: it is a passive way in which skin diffuses about half a liter of water a day from deeper skin layers.
Dry skin is also caused due to lack of-
Natural Moisturizing Factors(NMFs)- includes urea, amino acids, and lactic acid. All these help to bind in water.Epidermal lipids such as Ceramides, fatty acids, and cholesterol are required for healthy skin barrier function.
Some Extremely Dry Skin.
Various certain areas of the body like hands, feet, elbows, and knees are prone to :
RoughnessChapping with a tendency to form rhagades or cracksCallusesScalingFrequent itchiness.
Oily Skin

Oily skin has a glossy shine with visible pores. It is prone to blackheads, pimples and other types of acne.
If you don't treat your oily skin, pores in the skin can become clogged and enlarged, and dead skin cells may accumulate. Symptoms of oily skin appear mainly along the “T-zone” area (forehead, nose, and chin) of your face.
In moderate and severe cases, papules( also known as small bumps with no visible white or black head) and pustules (are medium sized bumps with a noticeable white or yellow dot at the center). It makes skin appear red and inflamed.
Characteristics of Oily Skin.
Sometimes pores seem enlarged and are visible.Skin looks thicker and paler.Skin is prone to various form of acne.Skin is shiny and greasyOily skins look plumper and less aged
All the individuals with oily skin types should wash their face with a gentle cleanser and use skin care products which are noncomedogenic so it does not clog the pores.
A benefit of this skin type is that it usually ages at a slower pace because of the extra moisture, keeping skin hydrated and less prone to wrinkles.
Some of the Causes of Oily Skin
Many issues Trigger the Overproduction of Sebum.
It can be because of genetics.Some hormonal changes and imbalances.MedicationStressComedogenic cosmetics.
Combination skin

Combination skin is oily in some parts of the body and dry in others. Mostly it can be seen oily in T zones (forehead, nose, and chin) and dry on cheeks and around eyes. The dry parts and oily parts require different skin care regimens. This skin type is very common.
What causes of combination skin?
All the oiler parts of combination skins are caused by an overproduction of sebum. All the dried parts of combination skin caused by a lack of sebum and a corresponding lipid deficiency.
Some Characteristics of Combination Skin Types
It has oily skin centered around the chin, nose and forehead.It is prone to acne on chin, nose and forehead. Mouth, eyes, and cheeks have dry or normal skin.It has enlarged pores around the chin, nose and forehead.
Individuals with combination skin types are required different skincare regimes. It treats their skin regions differently with their specific conditions.
Other Skin Factors
Various Skin Types of Color
Skin color and ethnicity influence how our skin reacts to external forces like sun, pigmentation disorders, irritation and inflammation. Also, Basic skin color is determined by the density of the epidermis and the distribution of melanin. Sometimes redness of the skin is also a useful measure of skin condition. It indicates how successful our circulation is. It can be helpful in identifying conditions such as couperose and rosacea.
Skin Sensitivity
Sensitive Skin is the skin which is irritated by different factors. All the factors are generally tolerated by well-balanced skin, such as skin care products or high and low temperatures. For some people, sensitive skin is a permanent condition, and sensitivity is triggered by certain internal and external factors. It occurs when skin's natural barrier function is compromised. It causes water loss and allows penetration of irritants.
Skin Undertones.
It has cool, warm or neutral undertones. It comes through your skin from underneath of the surface to affect its overall hue.its not about how your skin color is, you can have a warm, cool and neutral undertone.
Cool: it has hints of blush pink or a ruddy complexion.
Warm: it has yellow, sallow, peachy, or golden.
Neutral: Have no obvious overtones.
How to determine your skin tone?
You need to figure
The surface color of your skin.Your undertones.
Surface color is what you see first in the mirror. You have an idea if your skin is light, medium, or dark.
Fair: if you are fair you can bur easy.
Light: if you have generally light-colored skin, you have more yellow or beige undertones than fair skin.
Medium: your skin is more of medium color and has potential olive undertones.
Dark: you have dark skin.
How can your surface skin color change?
Your skin surface color can change depending on various things. If you tan in the summer, for some instance, it will get darker, and then lighten again in the winter. It can be affected by redness, rosacea, hyperpigmentation, dryness, and dullness. All these are things you try to keep constant by taking good care of your skin. You can hide or smooth out with cosmetics.
Read the full article
0 notes
Text
Indoor Plants: Best 5 Small HousePlants for Oxygen
Why Indoor Plants are so important? Plants will always be the most divine blessing of nature for human beings, not because they are our primary source of food and other supplements but because plants are our living source. Without them, there is no point of the existence of life forms on this planet, all species alike. The green plants are the base of the entire oxygen cycle, thanks to their ability to produce oxygen during photosynthesis. So, more the plants, more balanced will be the atmospheric composition.
However, with the current scenario of the Earth’s green cover, it is imperative to say that the level of oxygen is fluctuating a lot. Moreover, also, with the plants being cut down, the level of carbon dioxide and other harmful gases is increasing with each passing day. The Air Quality Index in most of the metropolitan cities is not too satisfactory, and that is one of the reasons why nowadays people are looking forward to using the indoor plants for ensuring that they can live in a safe and toxic-less environment.
Indoor plants for oxygen are becoming quite popular nowadays, thanks to their unique ability to make the air toxin free and safe to inhale. Not only this, some indoor plants have purification properties, which filter the air and make sure that you can live freely. So, let us have a look at some of the best indoor plants that you can plant for getting free oxygen.
Golden Pothos

Golden-Pothos
This plant is very efficient at removing indoor pollutants such as formaldehyde, trichloroethene, toluene, xylene, and benzene. A study has found that there is a decline in this property with an increase in the molecular weight of the pollutants. The plant is sometimes used in aquariums where they are placed on top of the aquarium and allowed to grow roots in the water. Sometimes, Golden Pothos are used in malls, offices, and in other commercial spaces, thanks to their uncanny decorative essence and attractive leaves which make them a remarkable sight.
As an indoor plant, it can reach more than 2 meters in height if it is given adequate support (a tutor to climb). The ambient temperature required for the survival of the Golden Pothos is about 17°C to 30°C, which makes it suitable for common spaces as well as for air-conditioned rooms. The maintenance requirement for this plant is also negligible since all you need to do add water to the soil regularly.
Palm Trees

Palm-Tree
Based on the height and type of leaves, we have found many varieties of indoor Palm Trees, which are albeit a productive floral species to reduce the level of air pollution. Palm trees are of many different genera, which make it possible for you to widen your choice options. For instances, here are some particular indoor plant strains that you can look for!
1. Chinese Fan Palm has fan-like leaves which provide it an artistic beauty.
2. Areca Palm is what you can call as a bamboo plant and can grow to become quite a lush green foliage.
3. Parlor palm can be placed in living rooms in the presence of moderate light.
4. Another aesthetic palm tree variety is the ponytail palm whose leaves branches out and forms a ponytail shape.
Snake Plant

Snake-Plant
This is another evergreen indoor small house plant that is known to improve your indoor air quality. According to NASA, it is one of the best houseplants for absorbing airborne toxins, including formaldehyde, nitrogen oxide, benzene, xylene, and trichloroethylene. The best part of Sansevieria is that they can be grown in robust conditions also and hence do not require an extensive list of care and other facilities. Snake plant is quite durable, and unlike other decorative plants, it is indeed challenging to kill the plant.
Sansevieria is one of those plants that produce most oxygen during the nighttime by converting the CO2 into O2. Another added benefit to having several Sansevieria in your home is that they have the power of alleviating the symptoms of toxic allergies in the air.
Dracaena Fragrans

Dracaena-Fragrans
You may already be growing an indoor plant dracaena plant as part of your houseplant collection; in fact, you may have several of the easy-care house plant dracaenas. The best part of this species is the growth of strap-like structures with different colors, which make them an excellent choice for decorating your indoors. Make sure that you are placing your plant in front of an open window but in the presence of filtered light. This can be easily achieved with the help of a sheer blind or curtain that will allow diffused sunlight to enter the room. Room temperatures of 60-70 F. (15-21 C.) are best during the day, with night temperatures about 10 degrees cooler.
NASA has approved the Dracaena species to be one of the best answers to your query of how to keep air clean. Moreover, that is why nowadays you can get a lot of different strains in the market.
1. Anita Dracaena has a relieving grassy structure which grows to a small height.
2. Dorado Dracaena has dark green leaves with yellow side straps running on both sides.
3. Florida Beauty Dracaena has been said to be the most beautiful variety, thanks to the occasional yellow patches on the otherwise green leaves.
Aloe Vera

Aloe-Vera
Aloe Vera is one of the best indoor plants for oxygen, thanks to the fantastic property that has made it possible for them to release oxygen even at nights. Apart from this, Aloe Vera is also known to be the best air purifier owing to the fact that it can absorb certain harmful chemicals from the air like formaldehyde and benzene compounds.
The maintenance need for the plant is not too much that you cannot meet up to. Aloe Vera is a succulent plant that needs little to a negligible amount of water for survival. However, make sure that the place where you will be keeping the plant gets ambient sunlight because aloe vera can never grow in shady areas.
Read the full article
0 notes
Text
Remedies For Hair Fall and Hair Growth
Everyone knows how it feels once your hair fall begins. Before things become worst given below are the best home remedies for hair fall which will definitely help you in slowing down your hair fall.
Let’s be honest growing hairs just in days or weeks or any such claim is nothing but a white lie. But research has proven that there are some herbs which can help you in regaining your hair growth.
Let’s jump into the best home remedies for hair fall and growth.
Remedies for Hair Fall
Onion Juice
Onions help fight against scalp infections, while the sulfur content improves circulation blood to the hair follicles. It helps in increasing hair growth and also controls hair fall.

How to make the mask?
Take one onion, grind it and then squeeze out the juice.Take one cotton ball and dip in the onion juice and apply it to your scalp.Massage it for 5 to 10 minutes.Leave it for 20 to 30 minutes and then wash it with normal water and a mild shampoo.Follow this procedure once a week and see the difference.
Fenugreek Seeds
Fenugreek or Methi seed is the most effective home remedies to stop the hair fall. It repairs the hair follicles and helps in regrowth. It also prevents itchy and dry scalp. Fenugreek seeds are the natural conditioner for hair.

How to make the mask?
Boil water and Soak the fenugreek seeds overnight in it.Drain out the water and grind it to a fine paste and apply it to your scalp from root to hair tips.Leave the paste for about 30- 40 minutes.For keeping your scalp moist you can use the shower cap.Rinse it with normal water.You don’t have to use any shampoo.Doing this twice a week for a month can be game-changing when it comes to controlling the hair fall.
Egg Mask
An egg has sulphur, phosphorus, selenium, iodine, zinc and protein which is an amazing combination of nutrition and can increase the hair growth.

How to make the mask?
All you have to do is just separate the egg white in a bowl and add a teaspoon of olive oil and honey.Make a paste and apply it to the roots of your hairs.After 20 minutes, do the shampoo.
Remedies for Hair Growth
Yogurt and Honey
It is best combination for dry, frizzy and damaged hair.

How to make the mask?
Add 1/2 cup of yogurt with 1/4 cup honey and 2 tablespoons of olive oil.Mix it well and apply this paste on the scalp and roots.Leave it on for 30 minutes and rinse with normal water.Apply this paste once a week.
Aloe Vera
According to many ayurvedic doctors that when it comes to boosting hair growth and reducing hair fall there Aloe Vera is the best home remedies for hair fall. It is also effective in reducing problems of scalp like itching and flaking.

How to make the mask?
Take an Aloe Vera and extract the pulp in a bowl and mix it well.Apply it to your hair and scalp and leave it for about 45 minutes.Rinse with normal water.You can do this three to four times a week to see better results.
Other than this, you can add 2 tablespoons of olive oil and 2 tablespoons of honey in Aloe Vera, apply it on your scalp and hair. After 30 minutes, wash it off with normal water with a mild shampoo.
Amla
The most common reason for the hair loss is the deficiency of Vitamin C. Amla has plenty of Vitamin C which gives strength to the hair follicles and ultimately stops hair fall.

How to make the mask?
Boil the dried amla with coconut oil until its colour becomes black.Massage your hair with this oil after it becomes cool.Keep it for 20 minutes and after that wash off with the help of shampoo.
Green Tea
Green Tea does wonders in promoting hair growth and dealing with the problem of hair falling.

How to prepare the mask?
Take two green tea bags and soak them into the hot water. Let the water cool down.Apply this solution to your hairs and massage your scalp very gently.Use this mixture as an after shampoo conditioner and apply it twice in a week for better results.
Coconut Milk
Coconut milk has fats, proteins and minerals which are essential for the hair growth and re-growth.

How to prepare the mask?
Take a coconut and squeeze its milk.Apply it to your hairs with the help of hair dye brush.Cover your head with a towel and leave it for 20 minutes.Now, remove the towel and wash your hair with the cold water and shampoo.
Massage with Coconut Oil
Don’t confuse between two coconut oil and coconut milk. Coconut oil has antimicrobial and antioxidants properties that help in coping with scalp infections and boosts the strength of your hair.

How to do hair massage?
Just take the coconut oil and massage your hair. This will help you in improving the quantity of your hair and will minimize the hair fall.
Neem Leaves
There are numerous benefits of Neem leaves. One of them is these leaves are extremely beneficial to treat the hair fall problem because of its antifungal, antibacterial and anti-inflammatory properties. Neem leaves to aid in reducing dandruff.

How to prepare the mask?
Take 10-12 neem leaves and boil them till the water in the vessel becomes of half of its quantity.Let the mixture cool down and then apply it to your hairs for 30 minutes.Do this two times in a week you will see the difference.
Beetroot Juice
Beetroot has Vitamin B6, C, folate, magnesium, betaine, and potassium which are crucial for having healthy hairs.

How to prepare the mask?
First, take 7-8 beetroot and boil them in water.Make sure you boil the water till it becomes half of its quantity.Now grind the leaves and add 1 tablespoon of henna.Apply it for 20 minutes and wash it off with luke-warm water.
Conclusion
We hope above mentioned best home remedies for hair fall control and regrowth will help you in dealing with the different kind of hair problems. No matter you are dealing with dandruff problem or hair fall, they will help you in every situation.
Note: In any case, you must not alter any medical or doctorial advice with these tips. If you think your problem is becoming very serious then without one second of delay have an appointment with the doctor.
Read the full article
0 notes
Text
Healthy Foods for Kids of All Age: 10 Best Ideas
In the present day’s scenario, it is quite hard to get a kid to eat healthy foods that are good for their health containing all required nutrients, minerals and vitamins. Most kids ignore salads, vegetables, and fruits as they are interested in junk foods like pizza, burger, etc. This results in frequent illness and also chances of getting affected by germs too. Kids want some tasty as well as variations in the taste from the food cooked every day. Thus a smart idea would be cooking a healthy food recipe with the healthy ingredients with some variation which could be both fun as well as tasty too. Here are some such healthy foods for Kids which will be liked by kids of all ages.
Pancakes with Carrot Filled
Carrot is one of the healthiest and nutritious foods in the market which is claimed to be the perfect health foods for kids. It is rich in natural antioxidants, proteins, Vitamin K, fiber, carotene, etc which are essential for kids of all ages. Most kids ignore carrot due to the lack of kick to it such as sweeteners, spiciness, etc and thus lacks the nutrients supplied by it. However, the pancake is normally liked by every kid due to the texture, taste and looks too with a good odor and thus stuffing carrot in pancakes would rather be a smart choice for making your child eat the essential nutrients in it. This is probably the healthiest snacks for kids which they can never refuse due to the outer texture.

Procedure to Make
Start with fine grating of the carrots and prepare the batter which is normally used to makes pancakes.Mix grated carrots to the mixture that is normally stuffed inside the pancakes.Stuff the mixture to the batter when you put it on the pan.Make sure to close the two ends of the batter together so the carrot looks like filling inside the pancakes.Cook until it gets golden brown and use cheese for a good texture and then serve hot.
Banana Spirals with Peanut Butter
Both banana and peanut butter both are other healthy foods for kids which are filled with proteins, vitamins and essential nutrients that are necessary for the health of kids mostly below 10 years of age. If your kids seem to be vexed with the routine dishes made with banana or peanuts or ignoring to consume them separately too then you can go with this dish having the natural nutrients of both of them from the core. This will also add some fun and uniqueness from the routine dishes which most kids are fond of. Moreover, it can be a good alternative to the common peanut sandwich which is not liked by most kids. Banana spiral peanut butter also has an unique texture with the delicious looking presentation too which can be a perfect dish for breakfast as well as snacks for the kids of all ages.

Procedure to Make
Start with mixing the regular peanut butter with yogurt bought from the market or made with home products.Whisk the mixture until it gets smooth.Coat the soft mixture on the banana slices gently making sure that the bananas remains solid with the mixture coated in it.The banana mixture turns gooey slowly which can be complemented with rolls or as a dessert?Just stuff this gooey mixture in the roll or a dessert and it is ready to serve.Make sure that the bananas are enough in the stuff to get more of the essential vitamins, proteins and minerals.
Mozzarella Sticks
Most kids are vexed with the routine dishes in home and thus remain desperate for foods available road side or hotels which don’t guarantee healthy quality. One of the best ways to make your kid stick with the home foods routine is to make healthy snack recipes every day. Mozarella sticks are also a uncommon dish which has an appealing texture that every kid will love to eat as a breakfast or dinner. Moreover, cooking this dish is quite easy and baking them can be simplified with a microwave oven.

Procedure to Make
For making this yummy dish, chicken cubes and sweet corn sauce are needed. Boil the chicken cubes and marinate them in the sweet corn sauce.Add mozzarella cheese, marinara sauce and breadcrumbs to it.Toast the breadcrumbs in salt and oregano and cut them into two parts.One of the parts will be melted and wrapped inside the chicken and the other will be in solid form.Before frying wrap the mixture using a little flour and mix it will with the bread crumbs.Serve it hot and your kid will fall in love with the Mozarella sticks.
Chicken Nuggets
Fried foods are one of the favorites of kids of all ages no matter what is stuffed inside it but they are not healthy foods for kids from any aspects. Thus baking them is one of the effective alternatives to get the same taste and texture to a great extent. Chicken nuggets are one of this kind which can give the same taste either it is fried in oil or baked in the oven. Apart from this, chicken is one of the items in the kids cooking list that will never be refused at all. This is extremely delicious and the odor, as well as texture, will leave your son mouth watering providing every essential proteins and vitamins in the meat itself.

Procedure to Make
Preheat the oven to 400 degrees which is essential to bake the chicken.Slice the chicken pieces into pieces and make the spice mixture to add with the pieces of chicken.After the spicy coating coat it with flour and dip this coated piece in egg.Add Panko powder to the pieces and make sure it is evenly spread.Place the pieces in the rack of oven and cook until it is done with golden brown colored texture.Flip the pieces halfway and serve hot to your kids.
Chicken and Vegetable Soup
Soup with green vegetables is one of the most perfect and healthiest foods enlisted in pyramid of kid’s recipes for all ages. This can provide the essential protein from the meat as well as nutrients, vitamins and minerals from the vegetables too. Everything that is required for kids is supplied with this bowl of soup that not only looks well with the tasty texture but also feels delicious like any other chicken soups too. Moreover, being a perfect recipe for kids takes less time than the typical snacks like deep fries and other fast foods.

Procedure to Make
Begin with frying the
green veggies like spring onion, spinach and cabbage in a pan with light amount
of oil or butter to add taste and texture to them.Now heat some cheese in
a separate pan.Add some carrot,
capsicum and celery to the fry pan.Take another bowl and
boil the chicken broth and paste in them.Add pepper powder and
salt for seasoning and then mix them by garnishing with some cheese sprinkles
and melted cheese on them.You are all set to serve
the hot and healthy bowl of chicken veg soups to your kids.
Oatmeal
Oat has some essential proteins and carbohydrates required for a growing child as an essential part of a regular diet. However, most kids don’t like the taste and texture of oats and thus ignore them. Oat meals are of several types that includes sweet as well as spicy dishes too. The feel of the tasteless oats is the reason why most kids ignore them. This oatmeal can be an alternative of such oat dishes and can be liked by your kids too. Moreover, it is also quite a healthy one having the nutrients of fruits too.

Procedure to Make
Take a small bowl of
oatmeal and boil it with milk until it get consistent.Add some strawberries,
bananas, apple and orange after getting them caramelized and add some honey to
all of them to enhance the taste of fruits.Use jaggery and honey
instead of sugar while boiling the oat meal with milk to make it healthy.The fruits should be
used as toppings for the oat meal and garnish them with some chocos to make it
look delicious. Yummy oatmeal is ready
to serve your kids as breakfast or snacks.
Honey Ginger Chicken
Chicken is a rich source of low-fat protein which helps to maintain muscle mass of the body. It is also a good source of phosphorus, selenium, Niacin etc which are essential for every kid those who are participating in sports activities or any strength programs too. However, fried chicken and the dishes made with fried stuff on it are not at all healthy food for kids and considered as junk food too. Thus this sweet flavored chicken dish can replace those greasy fried dishes and can also serve with rice too.Healthy Foods for Kids

Procedure to Make
Get some boneless
chicken breasts or thighs and combine the required spices such as chilli
powder, pepper powder, salt, and ginger paste and sprinkle some lemon juice
too.Mix the spices
altogether and coat the chicken pieces until it gets required consistency.Leave the chicken in
the refrigerator overnight.Add some butter or oil
in a pan and put the chicken in the pan and leave it to boil.Bake the chicken to
425° and then dip them into corn starch and place bake it until it gets to the
brown or golden brown color. Toss some honey on it
and serve warm after the honey gets settled on the chicken.
Fruit Smoothie
Most kids are not interested in eating raw fruits and vegetables when added to curries and thus smoothie is the best way to supply the nutrients to your child. Smoothie is a best form of snacks and breakfast which can be packed with all kinds of fruits to make it delicious. Some vegetables can also be added to smoothies after caramelizing them by adding sugar, Jaggery or honey. Kids can’t recognize the fruits and veggies stuffed in it due to the sweetness.

Procedure to Make
Take some fruits like
strawberries, apple, and pomegranate seeds and make sure they are freshly cut.Add some essential
nutritious vegetables such as spinach and cabbage only after adding honey and
caramelizing them separately.Use some frozen berries
with plain yogurt and mix it well.Fruits and the yogurt
and berries mixtures go into the boiled and chilled milk.Freeze it until it gets
cream like consistency.After taking the bowl
out of refrigerator add some honey on the top of it and then serve in a glass bowl to kids.
Salmon and Corn Patty
Corn is also a very healthy food for kids and others as well which is a rich source of antioxidant carotenoids such as lutein and zeaxanthin which are required for a healthy eye. It is also a rich source of essential vitamins, minerals, and nutrients required for the growth of the child. Consumption of whole grain corn such as sweet corn tends to be quite essential for the kids below 10 years of age. Burnt corn or sweet corn soup are not liked by kids mostly thus making a patty with the stuffed corn and salmon can be a good alternative for such kids.

Procedure to Make
Start with mashing the
boiled potatoes in a bowl and blend them to reduce molds as required.Add some sweet corn and
salmon to another bowl with the scrambled eggs and cheese.Make a ball of all
these items by pressing in between fingers until they get enough consistency.Potatoes can help to
make any shape preferred by kids.Dip the balls in the
bread crumbs which are toasted and fry until it get golden brown color texture
on it.This can supply high
amount of protein to the kids with the delicious taste they are fond of and
will never regret at any cost.
Muffin Egg Pizza
Besides providing healthy foods for kids, it is also essential to make them interested in those dishes so that they never eat junk foods from outside. Junk foods such as pizza and burgers are most liked by children all over the world thus to replace those renowned dishes some efforts can be taken in the home itself. This muffin egg pizza is one of such type that is going to be a favorite dish of your child which they will demand every day on breakfast as well as snacks in the evening.

Procedure to Make
Boil some eggs in a
boil and cut the hard boiled eggs to pieces.Those thin cut eggs
should be toasted with some English muffins.Add cheese slices and olive
oil to the top of muffin and then add egg slices as well as tomatoes.Grate some cheeses and
top on the made mixture.Add salt, pepper and
chilli powder for seasoning and serve it to your kids.
Read the full article
0 notes
Text
Anaemia: Symptoms, Causes, and Treatment
What is Anaemia?
Anaemia is derived from Greek word which means “without blood”. Anaemia is a reduction in red blood cells (RBCs) or haemoglobin in the blood which leads to decreases the oxygen carry capacity of blood.
What is the Function of Haemoglobin and Red Blood Cells (RBCs)?
Haemoglobin in red blood cells is the only carrier which transport oxygen from blood to the lungs and from lungs it reaches all the body tissues in the form of oxyhaemoglobin.
Normal Values of Haemoglobin
Men->13g/dlWomen->12g/dlChildren->10.5g/dl
Type of Anemia and its Classification
a). Types of Anemia Based on Morphology
Normochromic, Normocytic Anaemia
Anemia of chronic disease Haemolytic AnemiaAnemia of acute haemorrhage Aplastic Anemia
Hypochromic, Microcytic Anaemia
Iron Deficiency Anemia Thalassemia Anemia of chronic diseases
Normochromic, Macrocytic Anemia
Vitamin B12 deficiency Folate deficiency
b). Types of Anemia Based on Clinical Picture
Iron deficiency AnemiaMegaloblastic AnemiaPernicious AnemiaHaemorrhagic AnemiaHaemolytic AnemiaThalassemia AnemiaSickle cell AnemiaAplastic Anemia
Anaemia Symptoms
Skin and Mucous Membrane: Paleness, coldness, yellowing.Respiratory System: Shortness of breath, dyspnea (difficulty in breathing).Muscles: Weakness of muscles.In Cardiovascular System: Palpitation, rapid heart rate(tachycardia).Digestive System: Nausea, vomiting, abdominal discomfort and constipation.Excretory System: Renal function gets disturbed leads to kidney disease.In Reproductive System: Menstrual cycle get disturbed leads to menorrhagia, oliguria or amenorrhea.Central Nervous System: Headache, drowsiness, lack of concentration, restlessness, dizziness, and fainting.
Causes of Anaemia
Different types of anaemia and its causes are mentioned below:
a). Iron Deficiency Anaemia
Poor dietary intake of iron rich foods. An intestinal disorder such colon disorder, intestinal polyps and intestinal cancer which affects absorption of iron from small intestine, result in iron deficiency anaemia.
b). Pernicious Anaemia
Loss of parietal cells in the stomach due to destruction by our body immune system which decrease the absorption of vitamin B12.This is the main cause for pernicious anaemia.
c). Thalassemia
It is caused by mutation defect in the DNA cells which produce haemoglobin.
d). Sickle Cell Anaemia
Sickle cell disease is a type of hereditary disorder which produce sickle shaped or crescent shaped red blood cells. This abnormal shaped RBCs affect the haemoglobin production and leads to anaemia.
Anaemia Associated with Active Bleeding
Wounds, chronic ulcer, heavy menstrual bleeding, and cancer-related problems.
Anemia Associated with Kidney Disease
kidney release a special hormone called erythropoietin, this hormone helps the bone marrow to produce RBCs. In kidney disease, the production of hormone gets diminished and cause anaemia.
Anaemia in Pregnancy
Water weight gain in pregnancy dilutes the blood, it may be reflected as Anemia.
Anaemia due to Poor Nutrition
Inadequate intake of vitamin B12 and folic acid in diet leads to decrease production of red blood cells which cause anaemic conditions.
Haemolytic Anaemia
Some hereditary condition cause rupture of red blood cells(haemolysis) and become dysfunctional.
Anaemia Associated with Medications
Side effects of certain drugs such as seizure medication, HIV medication, some antibiotics (penicillin, chloramphenicol) may cause anaemia.
Aplastic Anaemia
Bone cancer destroys bone marrow cells which produce red blood cells (RBCs). This condition is also called anaemia associated with bone marrow.
Diagnostic Test
Complete Blood Count (CBC)
This test determines the severity and type of Anemia (microcytic Anemia or small sized blood cells, macrocytic Anemia or large sized blood cells, normocytic Anemia or normal sized blood cells) from taken blood sample. Information about other blood cells, white blood cells and platelets are also detected in CBC test.
Stool Haemoglobin Test
Tests for blood in stool which detect bleeding from the intestine or the stomach. (stool occult blood test).
Peripheral Blood Smear
In this test the blood cells from the sample placed under a microscope to determine the size shape and number of red blood cells.
Liver Function Test
It is a common test to determine how the liver is working, which may give an idea about other underlying diseases causing Anemia.
Kidney Function Test
This test determines whether any kidney dysfunction causing Anemia.
Management of Anemia
Increase iron and folic acid rich food in your daily diet.Alcoholic beverages should be avoided because it interferes with the utilization of essential nutrition.Mainly pregnant women should monitor the haemoglobin level in blood regularly and iron supplements should be taken as per the doctor advice to avoid complications.If any underlying diseases causing anaemic condition should be treated as per physician advice.
Read the full article
0 notes
Text
Yoga For Weight Loss And Flat Stomach
Yoga is a complete science that unites the body, mind, and spirit. It creates a significant difference in one’s behavior, thoughts, and attitude. It is very helpful to overcome from stressful life and for being healthy. Yoga is very helpful if you need flat Stomach and weight loss.
Yoga Poses For Weight Loss
Triyak Tadasana
According to Vedic Yoga by Maharishi Patanjali, there are 10 Yoga asanas that work very effectively in weight loss.
Steps:
Stand straight and raise your arms horizontally very slowly till your shoulders.Then turn your palm and raise your arms upwards and touch both hands and slowly. After this put your joined palms on your head and raise your arms upward while bending toward the right side by inhaling. Then come back with the upward rising of the arms by exhaling. Again bend left side very slowly by inhaling, and come back by exhaling. Do slowly first and then fast. Now relax.
Read Full Article
Trikonasana
Steps:
Stand straight with 2-3 feet gap in legs and start with raising your arms up until parallel to shoulders. Bend as much as possible toward left. Touch your toes with the left hand. And raise your right hand upward with front facing palm. Do same by bending towards the right side with touching right toes with the right hand and raise straight your left hand. Then relax. Repeat this position rapidly for 25 -50 times. According to Baba Ramdev, you can lose your weight 1 kg per day.
Read Full Article
Konasana
Steps:
Stand straight and raise your arms till your shoulders.Then touch your left foot by the right hand and raise your left hand upward and bend downward as possible. The palm of the left hand should be in front. Do the same with your left hand. After that, this process should be fast, so that your chin touches your knees every time. Then relax. Do this 25-50 times.
Read Full Article
Padahastasana
Steps:
Inhale slowly and then raise your arms upwards for stretching your body. Exhale and bend forward until the palm rests on the ground. Maintain this posture from 10 to 30 seconds. Now inhale and come up slowly and stretch the arms above the head. Exhale and slowly return to the starting position. Then relax.
Read Full Article
Chakki Chalanasana
Steps:
Sit with legs stretched out, in front of the body. Interlock the fingers of both hands and whole the arms out straight in front of the chest. Bend forward as much as possible. Hands should pass above the toes and your thighs in clockwise and anti-clockwise. During this, your arms should be straight. Try to move the body from the waist.
Read Full Article
Paschimottanasana
Steps:
Sit with stretched out legs in front of the body. After that straighten your arms till your shoulders horizontally with raising your arms upper from your head and bend slowly and touch your foot toes. Then touch your elbow with the ground. Now go back in sitting pose with raised arms. Again touch your toes and elbow with the ground. Repeat this activity rapidly for 20-30 times. Then relax.
Read Full Article
Makarasana
Steps:
This activity is for relaxation. Lie flat on the carpet and stretch out the legs together at full length. Bring one hand under the chin, overlapped by another hand. Spread the legs comfortably apart. Rest your chin on the upper hand. Then do this pose taking 10-25 deep breaths. Return to the starting position slowly.
Read Full Article
Bhujangasana
For performing this Asana lie down on the floor and make sure your belly is touching the floor. Put your legs together and toes stretched backward. Keep your palms near the chest and bend the head and the back upwards in the conversation position. Don’t try to lift your body too much because bending is important than lifting. Repeat this asana three to six times.
Read Full Article
Padvritasana
Steps:
In this asana, lie down on the floor and stretch your body. Then raise your right leg and circulate slowly in clockwise and anti-clockwise. After that come back your leg in relax position. Then do the same with your left leg. Continue this practice 25-50 times. Then relax.
Read Full Article
Dwichakrikasan
Steps:
This asana is like cycling while lying down. First, raise your both legs and run like the cycle. Then join both legs and run like the cycle. Continue this exercise for 25-50 times. Then relax.
Read Full Article
Markatasana
Steps:
Lie down on the ground. Stretch out your arms in the level of your shoulders with the palms facing down. Fold your knees and bring your heels close to your buttocks while keeping the sole of your feet flat on the ground. Inhale and drop both knees to your right with the right leg resting on the floor. Your knees should be facing one side and your face others. Breathe normally and hold this position as you can. And repeat the same toward the opposite side. Then relax.
Read Full Article
Conclusion
You will get positive result, when you start doing "Yoga For weight loss" described in this article. I would recommend don't give up just keep doing these yoga asanas and definitely you will get expected result.
Read the full article
0 notes
Text
How To Handle Postpartum Period With A NewBorn?
The time during the pregnancy is one experience and the time after is another, and albeit the most struggling one and we know this period as postpartum. On one side you are very excited to be with your newborn but on the other side you are equally worried and to some extent depressed too. It’s not easy to take care of both your own ailing health and your newborn’s one during the postpartum period.
The postpartum period is one of the toughest times in the lives of new parents, especially in the lives of the mother. No book can ever prepare you about how to treat your newborn, how to pacify your wailing kid, and how to latch him/her to your breast.
So, here is a simple guide for the new mothers to properly implement the postpartum care and make sure that both the mothers and babies are healthy and happy, physically and mentally.
Know How to Soothe a Crying Baby
One of the main concerns in the postpartum period is how to pacify a crying kid. Babies wail not only when they are hungry but also at tikes if their skin is itchy because of the nappy or they want to sleep. Most of the times, babies cry because they seek mother’s warmth for sleeping, and this is the case for the newborns till the fourth to fifth week. So, being a new mother, you need to know how to stop your baby from wailing and crying her heart out.
Rock the baby if he/she has not stopped crying after removing the reason for the disturbance.Check whether the skin is red and if yes, then apply some cold washcloth over the area to sooth the pain.Cuddle with him, soothe him to make him stop crying.
Learn How to Latch Your Baby
Learning how to feed your baby is a part of the postpartum care and when you do so, make sure you are relying only on trustworthy options. You can ask the midwife to make you learn how to handle a newborn while feeding breast milk, how to latch the baby to the nipple and how to make sure he is not choking on the milk.
Don’t Let Your Baby Sleep During Feeding
Many times, you will
find that you baby has fallen asleep while you feeding them. This should not be
allowed because once they fall asleep, they won’t suck the milk and hence will
stay unfulfilled stomach. So, keep the baby awake either by rubbing the temples
or swirling the fingers on the cheeks. And once awake, he/she will drink the
milk to the fullest and will sleep for longer times.
Let Your Baby Bond With His/Her Dad
The best remedy to ward off postpartum depression is to allow your kid bond with the father. The father-children bonding should be nurtured from the very beginning and not after the kid grows up. This will give you some time to yourself and will also help you to cope up with the symptoms of postpartum depression.
Read the full article
0 notes
Text
Constipation: Causes, Home Remedies and Tips
If you haven't pooped today, you may be experiencing constipation. It is a common problem these days because of the imbalance diet, stressful and busy lifestyle. Constipation may increase the chances of distension and discomfort. It's time to look for constipation remedies.
Causes of Constipation
Imbalance dietStressful and busy lifestyleDehydrationIrregular eating habitsDeficiency of fiber in food and fruitsLack of physical activitiesSome medications such as narcotics, antidepressants, and iron pills
Symptoms of Constipation
Passing stool fewer than three times a weekHard and dry stool that's difficult to passsense not entirely empty or not getting satisfactionSwollen belly gas problemPain in the abdomenFeeling like blockage
Ayurvedic Home Remedies
You should eat a balanced diet and do some basic exercises to keep away yourself from constipation. Get more fiber by adding fruits, vegetables, and whole grains to your meals. Ayurveda recommends specific remedies to relieve constipation and improve your overall digestive health.
Triphala Powder

Triphala Powder
When it comes to the best Ayurvedic home remedy for constipation, then Triphala can give instant relief from this pain. Triphala is a mixture of the dried fruits of Amala (Indian gooseberry), Bibhitaki (Terminalia bellirica) and Haritaki (Terminalia chebula). It's not habit-forming, and it doesn't irritate the bowels, it is great for treating constipation. Triphala regularly will provide relief from constipation, and this can be taken life long with no side effects.
Raisins (kishmish)

Raisins
Raisins are high in fiber. We should consume them with an empty stomach after soaking it in water overnight. When we soak it in water, it works as natural laxatives. It prevents constipation and keeps the digestion process strong.
Guava

Guava
Guava is high in fiber and enriched with vitamin C. Dietary fiber with water may help prevent constipation, making your bowel more regular. Regular eating of Guava is helpful, but it should eat in raw form. Seeds are tough but should gulp them with pulp. Chewing can create a constipation problem.
Milk with Ghee

Milk-with-Ghee
Milk has all the essential minerals and vitamins which are necessary for the proper functioning of the digestion system. It is recommended that take 1 or 2 tablespoons of deshi ghee and add it in 1 glass of hot milk. Drink bedtime will be very effective in relieving constipation.
Flax Seeds

Flax-Seeds
Without a doubt, Flaxseed is nature’s preferred health remedy for constipation. So take 1 tablespoon whole flaxseed and dip them in 1 cup room-temperature water for overnight or 4 to 12 hours. Then strain through a fine cloth and drink it. You should drink twice per day until you are having regular motion.
Isabgol (Psyllium husk)

Isabgol
Isabgol is rich in dietary fiber. It helps in relieving constipation and makes the digestive system healthier. You can take 1-2 tablespoon of Psyllium husk and mix it in water or milk until your constipation passes. It should be taken not more than twice per day. But it is recommended that you should consult with your doctor before starting treatment with isabgol.
Bael Fruit

Bael-Fruit
Bael fruit is the best natural medicine to cure constipation. It is laxative in nature, and Regular consumption of the pulp of this fruit with salt or black pepper removes the toxins from the intestines. It should be preferably taken in its original form before dinner.
Castor Oil

Castor-Oil
Constipation Remedies - Castor Oil
Castor oil is known as a stimulant laxative. It works by increasing the movement of the intestines, which helps the stool to come out. Castor oil is a liquid that you take by mouth. For the proper doses, should read the instruction given on the product- package or should consult your doctor. It is highly recommended that it should be taken in the day time, not bedtime because of its results very fast in 2-6 hours.
Senna

Senna
Senna is an FDA-approved nonprescription laxative. It is used to treat constipation. If other remedies fail, try the mother of all natural laxatives, senna. It should work in about 8 hours. So most people prefer to take it at bedtime. Take 20 to 40 drops at night, But don't take it for a long time.
Common Tips for Constipation:
Drink lots of water:
If you are taking fiber, you need to drink lots of water, at least 2 liters a day. Fiber is extremely absorbent. If you don't drink enough, your stool may become hard and painful to pass.
Hot Drink:
If your habit is taking some hot drink in the morning is good for bowel loosening. You can take coffee, tea, and any herbal tea; If you are not habitual of them, you can take hot water with lemon juice or honey may stimulate the colon as well.
Never ignore nature's call.
If you do, you are asking for a case of constipation.
Never try to force a bowel movement,
It can strain your heart, sometimes a sudden heart attack.
Conclusion
We hope now you know everything about treating this problem at your home. This is not an alternative to medical advice in any way. If the problem is severe, then you must go to the doctor without delaying even a single second.
Read the full article
0 notes
Text
Headache: Best Home Remedies for Headache
About Headache
Headache is a common problem. People often take medicines to overcome headaches, which may have some side effects. But using these home-made remedies, you will also get relief, and they will not have any side effects.
Basically, There are Four Types of Headache-
Tension headache, Migraine headache, Cluster headache, and Sinus headache. There may be many causes of headache, in which physical changes are due to genetic reasons, excessive smoking, excessive consumption of alcohol and lack of water in the body, such as pain in the eyes, which can lead to a headache.
Let us tell you about the home remedies to avoid headaches through this article, And the best part is that it is completely natural and safe.
Headache Remedies
Drink Lots of Water

Water
Many times there is a headache due to lack of water. So, there should not be a shortage of water in the body in any condition. We should normally drink 2-3 liter water per day.
Ginger

Ginger
Ginger is an immediate home remedy to relief in headache. It helps in reducing inflammation in the blood vessels in the head. To make a practical solution, grind up 1/2 teaspoon of ginger, stir it into a glass of water and drink, you can also add lemon juice in it.
Basil or Tulsi

Basil Leaves
Basil is known to relax the muscles, due to stressful muscles; light headache is generated so you can use basil to get relief. Take a cup of water, add three or four basil leaves and boil it on low flame for a few minutes, after boiling add some quantity of honey and drink it. You can also use fresh basil leaves to chew and massage the basil leaves on your forehead too, it also provides relief in headache.
Caffeine

Caffeine
Have a cup of strong coffee or tea. It reduces blood vessel swelling and help to relieve headache. You can take tea with Ginger, Basil, and caffeine. These all are useful in headache. It is recommended that you can take one or two tea in a day.
Oil Massage

Head Massage
Oil massage in headache is very effective. Massage helps in blood circulation in the blood arteries of the head. Take care that message should be with oils like almond, olive and coconut oil, etc. If you have the headache, then it is mandatory that the oil should be warmed slightly so that it will be effective.
Lavender Oil

Lavender Oil
It helps to ease tension and relieve the pain of a headache.
Take lavender oil and massage onto your forehead. Now lie down and enjoy the scent of the oil fully. To maximize the relief, just choose a cold and dark room for the process. Or sprinkle some drops of lavender oil on your hands and take its fragrance.
Peppermint

Peppermint
Peppermint helps to open blood vessels, causing the headache. Take a long breath to smell the peppermint oil, you will get relief in your headache. Simultaneously, prepare a mixture of 3 drops of peppermint oil with a spoonful of almond oil and mix some water in it and massage the surrounding area of your neck.
Acupressure Massage

Acupressure Massage
Acupressure point is considered effective for relief from headache. Press and massage the fleshy area between thumb and forefinger. Do this for a minute or two and then repeat on the other hand. It will help in reducing headache.
Hot Compress

Hot Compress
For a tension headache, place a hot compress on your forehead or the back on your neck. The heat will help to relax knotted-up muscles in this area.
Cold Compress

Cold Compress
Wrap a couple of ice cubes in a cloth or use an ice cube. Cold constricts blood vessels, and when they shrink, stop pressing on sensitive nerves. Because headache pain sometimes originates in the nerves in the back of your neck, try moving the compress to muscles at the base of your skull.
Try Chamomile Tea

Chamomile Herbal Tea
Applying chamomile oil or drinking chamomile tea is also beneficial in case of migraine. Chamomile has the Polyphenols and flavonoids which are known for their anti-inflammatory properties. There is an old but very effective Persian formula for the pain relief. This formula contains the added benefits of the sesamine. Trying chamomile tea is very effective whenever you feel that migraine is taking over you.
Take Feverfew Tea

Feverfew Herbal Tea
Feverfew leaves are one of the most effective remedies for migraines headache. Having a large leaf or 3 small leaves every day can be extremely beneficial. You can also add a salad for the better taste. Their taste is bitter, so adding honey or sugar can decrease the bitterness of this medicine.
The most beneficial way for having the feverfew leaves is steeping them and making a feverfew tea. But there are some cautions for the feverfew leaves and tea. Feverfew leaves can cause problems for pregnant or breastfeeding women. For some people, feverfew tea can cause ulcers and skin irritations.
Try Nasya And Jala Neti

Nasya And Jala Neti
Ayurveda runs on dosha theory of body types and people with vata, and pitta doshas are more likely to have the migraine problem. Treatment methods in Ayurveda are different for a different type of bodies. Naysa, Shirodhara, Jala neti, and yoga nidra are some of the amazing remedies for migraine headache.
Meditate To Relax

M
This technique is being used for ages for the mental peace and well being of mind. But you must do this practice every day because in case if you don't do so, then you would find the meditation very tough on the day of a migraine attack.
Choose a peaceful place and sit comfortably. Be in the present fully. Training the brain for focusing on a specific thing like breath or a flame or by passively observing the thoughts and emotions is also beneficial for sustaining mental peace. It will help you in dealing with stress and headache.
Visualize Happy Thoughts

Visualize
Visualization is quite effective for pain relief. You can relive the past happy experience in your mind, which will make your mind to release the happy chemical.
Conclusion
All these remedies are effective for many types of headache. But keep in mind that there are several types of pain which demand the doctor' attention. Make sure you use these remedies only for normal pain. If you feel that the problem is causing more discomfort than having a consultation with the doctor is recommended.
Read the full article
0 notes
Text
Dark Spots: Home Remedies to Remove Dark Spots?
Dark spots are one of the most common problems in today's world and every other person is affected by this. And Everyone has a common question to ask "How to remove dark spots?". If you are one of them, then you have to be stressed because these are not caused by excessive exposure to the sun, not from the age only.
No matter what is the reason behind developing dark spots but they are not dangerous. They do make you look older that's why people want to remove dark spots.
There are numerous medical methods by which you can treat those dark spots. Most of these procedures are costly and sometimes they end up being a failure. Below are the best home remedies which can help you in removing these dark spots.
Some of the Best Remedies to Remove Dark Spots-
Lemon Juice

Lemon Juice
When it comes to treating the skin diseases no matter the type of diseases then there is no best option then the lemon. Lemon contains the citric acid which helps in removing all the dead cells(dark spots) and makes skin glow naturally. But you must remember that going out in the sun right after the application of lemon can give adverse results. Lemon is not good for extra sensitive skin. If you have this type of skin then going for other home remedies is best for you.
How to Apply
Cut a half lemon and squeeze it, apply the juice on the spots at least twice a day. It will help to remove or lighten the dark spots.
Honey and Yogurt

Honey and Yogurt
Yogurt has the lactic acid and also offers the bleaching properties which helps in making the skin lighter in many tones. Honey also posses many herbal properties which nourish the skin and helps you in revealing the skin.
How to apply
Blend honey and yogurt to create natural bleach that can lighten dark spots. For making this mixture, add one tablespoon of yogurt and one tablespoon of honey. Apply this mixture and leave it for 30 minutes to dry. Then wash with normal water and apply this once a day.
Purple Onion

Onion
Onions are also effective when it comes to removing dark spots (age marks) because they contain the sulfur compounds which serve as an antiseptic agent. The smell can be irritating but this is the best remedy for those who find lemons or vinegar too irritating.
How to apply
You can also use purple onions and obtain the same results as lemon juice. All you have to do is rub the juice on the affected areas and wash it off with warm water. Results of one study indicate that purple onion skin may lighten dark spots.
Aloe Vera

Aloe-vera
Aloe vera can treat many skin diseases because it offers both moisturizing and anti-
inflammatory properties which keep the skin feeling fresh and young. The Aloe vera plant contains chemicals that slough away dead cells and encourage the growth of new, healthy ones.
How to apply
So, simply take a little fresh aloe vera gel from a live plant, if available. And rub it on the affected area and leave it for 30 minutes, then wash it with normal water. You can leave it overnight also. If you have not lived aloe vera plant then you can buy aloe vera gel from the market also. Thus, it will help to lighten the marks of dark spots.
Apple Cider Vinegar

Apple Cider Vinegar
Apple cider vinegar has the alpha hydroxyl acids which is equally effective as anti-aging creams to help lighten those age spots. Like lemon juice, apple cider vinegar contains an acid that is known to help lighten sun and dark spots.
How to apply
For the best result, mix apple cider vinegar with olive oil, because olive oil protects skin from dryness. Apply it and leave for 20 minutes and wash with normal water.
Chickpea Mask

Chickpea Beans
Chickpea or garbanzo beans can be used as an excellent face mask and helps in fading the dark spots.
How to apply
Chickpea mask is very essential for dark spots. For the preparation, take 1/4 cup of water and 1/2 cup of boiled chickpea. Mix it well for making a uniform paste. Then apply it on the dark spots and leave it for 20 minutes until dry. You don’t need to wash it, just let the dried paste come off on its own. Repeat it every night for the best result.
Buttermilk

Buttermilk
It is a very effective home remedy to removing dark spots, it contains lactic acid which tends to lighten the skin without causing any irritation.
How to apply
For this, take some buttermilk and dip a cotton ball and apply it on the affected area. Wash it after 15-20 minutes. If your skin is oily or acne prone, you can mix a little lime juice or tomato juice to the buttermilk and apply it on your skin.
Papaya

Papaya
Papaya has enzymes that help in treating these dark spots in a natural way. Along with removing these dark spots, it helps in adding more glow in your appearance.
How to apply
All you need is green papaya and a knife. Cut off a slice of the papaya skin and hold the fleshy side of the papaya to all the age spots for about 20 minutes. You can also apply the pulp for 20 minutes. For getting better results to use this remedy every day.
Conclusion on Dark Spots
All the mentioned remedies can help you in treating your dark spots Problem just in a matter of days without spending too much money. These natural ways are extremely beneficial for those who wish to live a herbal life instead of using cosmetic creams which are nothing but a mixture of very dangerous chemicals. We hope you will get extraordinary benefits.
Read the full article
0 notes
Text
What To Eat In Dengue: Dengue Patient Diet
Being a viral disease, there is no medical cure for Dengue. That’s the reason why doctors and biologists prefer many other options, albeit the other ones as a cure. Platelet count is reduced to an extensive amount in dengue. So doctors always suggest ensuring that the diet is full of juicy foods, no matter if it is in the form of natural fruits or plenty of water. It is very important for the Patient or the caretaker to know what to eat in dengue. Here are some of the best foods which you should include in your diet, especially when you are confused about what to eat in Dengue.
And amidst these alternative cures, Dengue diet is one of them!
Drink Lots Of Water

In Dengue, drink as much water as possible to keep the body hydrated, which will also help reduce the symptoms of headache and muscle tension, which are the results of excessive dehydration. Apart from this, water can help to flush the body and eliminate excess toxic substances which can complicate viral effects of the pathogen. Drink adequate water and other fluids like coconut water, papaya leaf juice, giloy juice, pomegranate juice and other juices at frequent intervals to keep your body well hydrated.
Papaya Leaves

Papaya leaves are said to be the most effective medicine for dengue fever as they enhance the digestive power of the body, as well as works to dissolve the protein in the body. Apart from this, the amount of platelets increases rapidly after drinking this juice. If you are using the papaya leaves for treating Dengue, then extract fresh juice from the leaves by crushing them in a mortar, or you can also chew the leaves after washing them properly.
Giloy Stem

Giloy can be quite beneficial in dengue fever. This increases the metabolic rate and strengthens the resistance capability of the body, along with helping in protecting the body from infection. The stems can be boiled and served as a herbal drink. Using giloy in any form two to three times a day will help you to lower the consequences of dengue fever.
Basil or Tulsi Leaves

Tulsi is a stimulator for the immune system, and hence, it is one of the best things to have during the Dengue season, even if you are not suffering from the viral disease. The antioxidants present in this herbal plant helps in boosting the immunity and hence, act as a perfect cure for the Dengue. When mixed with honey or ginger, the juice can become more active.
Pomegranate

Bleeding is one of the significant symptoms in severe Dengue and hence, pomegranate serves as the best cure for the bleeding. The fruit is enriched with multivitamins like A, C, E, and even folic acid- all of which are best for increasing the blood cell count, especially the RBCs and the platelets. However, dengue patients should drink juice regularly.
Goat Milk

One of the major causes, why your immune system can easily get affected by the dengue virus, is the lack of selenium in your body. That’s why drinking one cup of goat milk everyday lessen the chances of getting the disease. And if the milk is given to a patient, the blood platelet count increases, thus minimizing the effect of the viral pathogen as goat milk is rich in selenium.
Fenugreek

Fenugreek seeds or the leaves help in flushing the toxins out of the blood system. Thus lowering the chances of increased protein activity of the viruses. Also, Fenugreek plays an active role in reducing sleep stress and helps in easing the muscular pains.
Coconut Water

Coconut water is rich in electrolytes and dissolved ions, which help in increasing the blood count of the body and also in detoxifying the blood. It dramatically increases the water concentration, thus helping in minimizing the effects of dehydration.
Orange

Orange is a rich source of Vitamin C, which helps in flushing out the toxins from the blood and strengthens the immune system. Eating freshly cut orange or drinking the juice of the same will help you to treat Dengue effectively.
Porridge And Vegetable Soup

Porridge is highly digestible for the body and hence reduces any digestive problem you are facing due to the dengue fever. Along with that, the vegetable soup is highly nutritious for the body, and the nutrients act as an immune booster for the organization. This enables your body to fight off the infection.
You should also read : Dengue Fever: Symptoms, Causes, and Prevention
Read the full article
0 notes