Statistics
We looked inside some of the posts by artoftakogami-blog and here's what we found interesting.
Average Info
Notes Per Post
28K
Likes Per Post
14K
Reblog Per Post
14K
Reply Per Post
8
Time Between Posts
17 days
Number of Posts By Type
Link
2
Text
2
Photo
9
Video
4
Last Seen Tumblr Blogs


Fun Fact
Tumblr has been providing a Korean-language service since 2013.
Link
So...where are the feminists- feminazis whining about women rights?
Oh wait, they’re whining about “manspreading”, genderbending as transphobic, 1st world oppressions and things that only applies to them/is for their personal gain.
.Instead of you know, I don’t know fight for these kind of REAL oppression?
#feminists#feminism#sjw#sjw logic#women rights#honor kill#world news#wtf#REALoppression#mildly infuriating#society#mass murder
2 notes
·
View notes
Text
Motivational Quotes to Keep You Drawing!
Art is not always fun. It’s not supposed be If it was easy or fun everybody would do it. And there’s days in which we want to quit. To stop completely and never be able to be the artist we could potentially become. These quotes below help me reinforce the artist I want to be. Sharing some of them to hopefully help anybody and for self reference in case I lose them. (:
“But when you’re out there partying, horsing around, someone out there at the same time is working hard. Someone is getting smarter and someone is winning. Just remember that. Now, if you want to coast through life, don’t pay attention to any of those rules. But if you want to win, there is absolutely no way around hard, hard work. Just remember, you can’t climb the ladder of success with your hands in your pockets.“ - Arnold Schwarzenegger
"You have to remember something: Everybody pities the weak; jealousy you have to earn.” - Arnold Schwarzenegger
“Be hungry for success, hungry to make your mark, hungry to be seen and to be heard and to have an effect. And as you move up and become successful, make sure also to be hungry for helping others.” - Arnold Schwarzenegger
“6 rules to succes: 1. Trust yourself; 2. Break some rules; 3. Don’t be afraid to fail; 4. Ignore the naysayers; 5. Work like hell; 6. Give something back.” - Arnold Schwarzenegger
"If You’re Tired Of Starting Over, Stop Giving Up.” - Shia LaBeouf
“Nothing is impossible… you should get to the point where anyone else would quit and you’re not going to stop there. NO! What are you waiting for?! DO IT!” - Shia LaBeouf
“When you want to succeed, As bad as you want to breathe, Then you’ll be successful.” - Erik Thomas
"Some of you love sleep more than you love success!” - Erik Thomas
“Cry to keep going!! Don’t cry to quit! You already in pain,You already hurt! Get a reward from it!” - Erik Thomas
“Everything you’re afraid to do or you put off just becomes mental baggage and really pulls you down.” - Erik Thomas
“Anything to keep from being a lazy asshole. To me it’s all about breaking the ego and never stop looking up at what you could be” - Dave Rapoza
“Don’t fear perfection. You’ll never reach it” - Salvidor Dali
12 notes
·
View notes
Text
reblogging because i’ve been having wrist pains e.e
How to use a tablet without hurting your wrist
This is a tutorial I’ve written two years ago. I still see a lot of people having problems with hand pains while using a tablet so I thought I might post in on tumblr where it should get to more people than on my LJ. If you use tablet you might want to look at it, if your friends use tablet you might want to show it to them.
Protect your hands and back before it’s too late~!!
Original text starts here:
I realized, that I’ve encountered many professional artists online that have problems with wrist that are caused by using tablet. No wonder: you can find tons of tutorials on graphic software, but you won’t find any on actual USING the tablet. Well, it is simple: you install the drivers, plug the tablet in, personalize the buttons, if you have any, and start drawing the same way as you did with the pencil, right? Well… NO! That is why I decided to write this entry tutorial. Please, read if whether you’re just a beginner, or a professional that has been painting for longer than I have lived; the issue is much too grave for people living of making art to simply be ignored.
Keep reading
7K notes
·
View notes
Photo


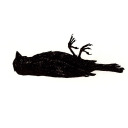
We’re Fucked by Takogami
Well maybe if Dilim lifts his head up from the map for a second... A man and his mount was having a journey in the snowy mountains of the North when all so suddenly they got transported. Now they're stuck in the other side of the world! 3. Your Tokota is mysteriously stranded in foreign territory, be it another part of Tokotna or some place even more exotic/foreign, such as a poacher's den, a zoo or a desert on the other side of the globe. They must discover a way to either survive in their new surroundings or find their way home.
1 note
·
View note
Photo


Stelly and Amihan Library Cuddles (c) Takogami with process gif
Stelly and Amihan spending some time in his huge library. Ami loves reading romantic novels and listening to Stelly telling her about his family, who and what he is. It helps her know about what she is and where she came from since it's especially hard being a mutt. Stelly is seen above reading to her the Rose' family history and somewhere along the session Ami suggested something something about adding some more names in the book. ;D More of them here
Using references (a LOT) of it really helps. I didn’t used any at the start except for the poses but it really looked off to me. I went ahead and then picked up references for each subject. Worked well in the end I supposed xD
#myart#myocs#stellami#processgif#walkthrough#stepbystep#digitalart#illustration#storybook#draw your otp#art#vintagedesign#dragonshapeshifters#librarycuddles#romance#couple#castlelibrary#noble
1 note
·
View note
Photo


Please click the “Read More” for the full explanation! <3
For months (or a year now), I've been having difficulties with the grayscale to color technique. I've only recently started to get the process after several tutorials and frustrations. I mainly watch youtube for the processes and watch speedpaints to soak in the process. I once gave up with this technique when after several tries the colors came out muddy. I've been used to the color first technique. I'll be listing the pro's and con's of starting out with a greyscale technique. Do keep in mind that these are all subject to my opinion/observations and I am in no way teaching this as the only way to deal with it. I am just merely sharing my own way of dealing with it xD The example above is made with a hooman head but this can be done with any subject as well as a subject with a background C: Pro's: - Your values are always in check. - You do not get stuck with what colors to use only to re-do them again. With greyscale, the values are set and separate from the color layers. You can redo the colors without re-doing everything. - You limit yourself to only using the grey palette providing you focus on the values first instead of details (e.g . Con's: - Depending on the way it is dealt, it adds another couple of hours to the process in finishing a piece. Sketch > Base > Greyscale > Color > Color corrections > Details > Refining - Colors can get muddy with the finished product so you have to to always keep your values in check. Below are the steps with the explanations of each steps. I did my very best to explain each and I have also included the palette I used. This can be applied in any art program (as long as they have layer adjustments like color/soft light and overlay to name a few). Steps: HOLD ON! First and foremost let's go ahead and check my brush setting. I use a slightly tweaked round hard brush with a 10% spacing and transfer turned on (both in pen pressure option). I have my brush in either 80% or 100% opacity. I rely mostly with how hard I press my pen than with the flow and opacity settings. However if you would rather do the opposite, you can tweak with the flow and opacity options to have the effect you want when painting. - Palette I used. I only used a grey as my neutral color and a slightly darker purple as my shade. I never use black or white when I shade. I always have the shadows, even when very very dark, to at least have a little bit of colorf in them. It prevents the muddy look. Same with the highlight. - Layers I have. I almost always only have less than 5 layers when I paint. This is different with larger and full illustrations with complex bgs. Sketch: This is where everything starts. Depending on how big the piece will be, it will be a plain sketch or a sketch from a thumbnail. Either way, this is where you will start. You don't have to make it very very clean. It's just the "skeleton" to your piece. You do not need to fuss on details in this stage, be free and do not be afraid of mistakes at this point. Just let your hand draw what your mind wants it to draw. I have my sketch as a normal layer. Tako, I have finished my sketch! Base + Shadow:Good job! The next path you will take is laying the base. Choose a very neutral gray for it. After that, it's time for you to take that dark color (not black) and lay it where light does not hit your subject. This will be your shadow. I have the layer locked so I won't be able to paint outside of the base color. Always remember to take not of how hard you press with your pen (pen pressure) when laying in the shadows and highlights and when blending the shadow to the base. In this stage it is best to paint like a sculptor like this. You will need knowledge with how 3d objects work. Color: You are done with the greyscale yay! Now time to lay in the colors. This is somewhat hard for those attempting this technique for the first time. I have experienced muddy colors afterwards but I will explain to you how to avoid that. First, set your brush at 80% opacity and create a new layer above the base layer and set it in Color mode. I found this mode to be the best as it does not affect your values too much. Lay in a base color (a reddish brown tone) to set in the final colors. Next carefully lay in the proper colors of your subject. At this stage, I took in mind the rule of Color zones of the face. He will look like an alien for a time but do not fret we are just beginning C: What about the highlights, where are they?? Highlights: It is now time for it, do not worry! You have to have confidence and merge the color layer with the base. Then create a new layer on top and set it to Soft light and choose a light shade of your light source. Then lightly brush it along the planes where light will touch your subject. I made sure to be careful in this stage to avoid a very overly exposed subject because this is not the final stage. Refining: Next step I do is I merge the highlights layer with my original layer. Once that is done, it is time for me to paint and refine the shadows and highlights as well as to fix the colors of the subject. This is the stage where you would also want to correct any mistakes you want to change such as anatomy or additional stuff you want to add in. Details: Once I am satisfied with the overall look of my subject: the colors, shadows and highlights. I start to lay in the details starting with the eyes. Viewers will most usually focus on faces first so this is the part where I lay in the details first. Any color that seems to be dominant which are not supposed to be, I paint it over lightly. I slowly build up the look and paint over everything to refine it. Finalizing: I am now overly satisfied with everything with my piece and if you are too it is time for us to finalize stuff. I put in more reflective lights and create a new layer and set it to overlay. I then choose a nice shade of any saturated warm color and lightly brush it wherever the light touches my subject. It is also the stage where I finally go and paint the freckles and his scars. I then create a new layer adjustment called Levels and Curves to adjust the final overall values and color of the subject. IT IS DONE! Yay! It is a very long process and you will need patience and of course the passion for it. Your art will look "shitty" at the start as all creations look in the beginning but once you push through and be patient with it will become what you want. Usually xD It is also helpful to study how the old masters paint! Anyways, thank you for reading and I hope that this is helpful in any way! Feel free to ask in the comments below and I will do my best to answer. Some helpful videos: - How to paint like the old masters - Grayscale to Color Tutorial - Sara Tepes - Grayscale to Color Tutorial - Artgerm - Grayscale to Color Tutorial search results youtube/a> and James Gurney xD gurneyjourney.blogspot.com/
#myart#tutorials#process#grayscaltocolor#howto#art#illustration#walkthrough#stepbystep#artwithexplanation#painting
1 note
·
View note
Photo

Environment Studies
References:
https://www.pinterest.com/pin/416934877988528154/
https://www.pinterest.com/pin/365354588506278743/
https://www.pinterest.com/pin/293156256976291969/
https://www.pinterest.com/pin/387239267942116904/
3 notes
·
View notes
Photo

WIP screenie (Grayscale layout) of mine and Hiramana’s ocs :D
Amihan and Stellaris
I’m being very slow but will get there e.e This might be the first proper illustration I have done after a year of hiatus from masterpieces.
3 notes
·
View notes
Link
Hi guys!
I’ve started a gaming tumblr and everything game related will be posted there ;u; Mostly Witcher 3 and DAI screenshots. Some survival building projects and videos will be posted there too :D
Art of my inquisitors and such will be posted here with their respective tags. Hope ya’ll have a good day guys <3
1 note
·
View note
Video
(via https://www.youtube.com/watch?v=yLumOnmM27s)
“Will you be my friend?”
#myart#speedpaint#process#tokotas#friendship#winterlandscape#illustration#story#ocs#originalcharacter#amihan#caliris
1 note
·
View note
Photo

Face Studies
Specifically, noses because...noses *sheksfist*
1 note
·
View note
Video
(via https://www.youtube.com/watch?v=bEJ_IkvFktg)
Commissioned image of a friend’s characters. :D
#myart#speedpaint#anasirch#illustrations#tokotas#digitalart#canines#ferals#portraits#friendshipbetweenpeopleandanimals#lovethisoneverymuch
0 notes
Photo

Bombs and Times by Caeruu
Here's an old portrait I did for my main champ and I wanted to incorporate a little something in it. I wanted to also portray her differently, like a psycho and not cute-sy like her other fan arts ;v; ) I hope I did well! Cookies for ye if you managed to decode the roman numerals on her tongue :> Yes, I ship Jinx and Ekko just because.
Time spent: 19 hours Tools: Paint Tool Sai, Photoshop cc
#Jinx#Ekko#ekkoxjinx#LeagueofLegendsart#fanart#myart#digitalart#anasirch#takogami#portrait#bombsandtimes
0 notes
Photo

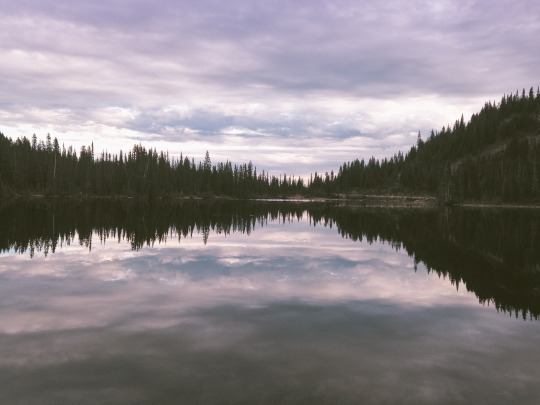


In a wish, I’m still dreaming
Reflection Lake, Mt Rainier National Park
instagram
21K notes
·
View notes
Photo

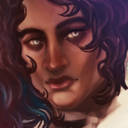
Self Portrait 14/01/17 | Photoshop Cc17
I've been studying a lot of old master paintings and was inspired to do a self portrait. Tried to make it look like an oil painting as well as clothing from the past :D
2 notes
·
View notes
Video
By some magical mistake, a wolf transformed into a woman during midnight. The handler is confused and she's pissed.
I did a speedpaint after ....a year lol. Hope you enjoy :D
(via https://www.youtube.com/watch?v=rmgZkOphB5g)
0 notes