
Changed from Cosplaying-Turtle. Side blog for crafty and cosplaying things, as well as for collecting references for things I might be interested in messing with later
Don't wanna be here? Send us removal request.
Statistics
We looked inside some of the posts by crafty-turtle and here's what we found interesting.
Average Info
Notes Per Post
146K
Likes Per Post
83K
Reblog Per Post
63K
Reply Per Post
72
Time Between Posts
19 days
Number of Posts By Type
Photo
6
Text
6
Video
4
Note
1
Last Seen Tumblr Blogs


Fun Fact
Tumblr has 16.74 million mobile monthly users in the US.
Photo

Wig Hack Wednesday #5 ! Have you ever wanted to use the same wig for that one character who can’t decide if she wants to wear her hair in twin tails or let her hair down? (Aka Nozomi from Love Live) Or, have you found a perfect wig color for your character but the wig just doesn’t come with a back-parting? Well, here is one way you can fufill your cosplay goals on a budget! Also good for when you want to re-purpose a wig for different characters. For this demo, I’m using a Venus in grass green from Arda Wigs. I love this color and the length is perfect for Mallow from Pokemon Sun and Moon. My goal is to add a back-parting to the Venus base wig but make it detachable in case I wanna use the wig for other cosplay. - Part the wig down the middle in the back, and clip the hair away on each side. Cut the hair from the inside layers of the wig to use as wefts for this project. By leaving the outer layers uncut, when you tie the wig into twin tails or let the hair down completely, it will hide the trimmed part - Use Tacky glue (or other glue that dries clear but flexible) on the tip of a small piece of hair. Use your fingers to squeeze the hair flat to make sure the glue covers all of the hair on the tip of that piece. Wait until it almost dries - Put more glue in the back side of the piece of hair by the tip. Press the hair piece down onto a strip of soft felt sheet. I happened to find a nude colored one that matched me, but you can use acrylic paints to get the level of color you want (paint the felt strip prior to the start of the project) Also, I find that holding up the felt strip and pressing the glued hair down allow more control and help create more “curve” shape from the center part - Once you finish gluing hair down on the whole felt strip, turn it over, and hand-sew some wig clips on the back side. 1 inch spacing between each wig clip worked well for me. You’ll need about 4-5 wig clips for the whole felt strip - Now you can clip the felt strip onto the main wig in the back. Make sure you leave two small pieces of hair from the main wig at the top where your felt strip would go - Clip the felt strip in place. Make sure it doesn’t come off when you tuck on it. Take the little piece of hair from the main wig that you left out earlier, and section it in half on each side - Criss-cross the hair pieces to hide the “seam” of the top of the felt strip - Comb and blend the hair from the main wig with the hair from the felt strip, and tie your twin tails - You can unclip the felt strip later and comb down the hair to use the same wig as a normal long wig! Another good thing about this method is that you can use your felt strip for other projects if you buy other wigs from the same company later and in the same color. Or, you can turn an ombre wig into twin tail style for J-fashion shoot and wear the wig as a long wig the next time. This is not the “best” way to do back-parting, but I wanted to focus on being cost-effective and easy enough for beginners to attempt. Have fun wiggin’!
1K notes
·
View notes
Text
Estimating Yardage

If you need a quick estimate of how much yardage is on a bolt do a quick count of how many times it’s folded around the bolts cardboard core. 2 folds is roughly 1yard.
748 notes
·
View notes
Video
youtube
Embossing Fake Leather Tutorial
Example of Kili’s sleeves
Tutorial by: LouBelle Cosplay Tutorial Link: https://www.youtube.com/watch?v=rI98-Zddw3Y
385 notes
·
View notes
Video
youtube
Tracer Goggles TUTORIAL
Tutorial by: Sakuraflor Tutorial Link: https://www.youtube.com/watch?v=kgda1lGk2Kc
275 notes
·
View notes
Photo


Itsy Bitsy Hems
When hemming super sheer and delicate fabrics, I am always reminded of that quote from Futurama, “When you do things right, people won’t be sure you’ve done anything at all.”
I learned this technique from Vicky, one of my frequent co-workers on shows, who is honestly far too modest considering all of the amazing costumes she has made over the years. (She doesn’t really have social media etc.) I forget the exact reason it came up, but she said it was a favorite technique she would use on delicate dresses she made for Coleen Atwood films. The key is adding machine paper (Like from an adding or cash register machine) a nice roll of almost computer-paper weight paper, nothing fancy like the shiny chemical reactant kind. This method is a little time consuming, but with practice you can get amazingly clean hems that are 1/8” - 1/16 on even the most difficult of fabrics.
For this tutorial I documented sewing the skirt of my Evelyn Cosplay, because the skirt is one continuous piece of fabric (about 5 yards) I really wanted the hem to be as clean as possible, and this technique is perfect for that. The Top two photos were Taken by Eric Anderson, or my finished costume at the Exposition Rose Gardens in Los Angeles.
Step 1 - Lay your fabric/hem edge on a flat surface, like a big table or the floor. It is important to let the fabric sit as you want it to be hemmed. So if its bias and you want the hem stretched out/ to ripple, stretch the fabric gently. If you want it natural - lying relaxed and so on. pin the adding machine paper under the hem, keeping the desired hem tension. On curved areas tear and angle the paper. Basically you are using the paper to “block out” the desired hem once sewn.
Step 2 - Stitch about 1/2” from your cut edge, as shown. (I had a 1/2” Seam allowance on my pattern) Once it’s all stitched to the paper, take out your pins and go to the iron. Using the paper as an anchor, use the iron to press the fabric on the stitch line so the seam allowance folds over onto itself. You want a clean sharpe fold. Remove the paper gently. I find it easiest to tear one side free, taking advantage of the stitch perforations. The second side will fall away much easier; any lingering little bits can be gently wiggled loose with a pin.
Step 3 - Stitch a second line of stitching next to the first/now the folded edge. If you stitch 1/8” your finished hem will be close to 1/8”, 1/16 will be 1/16” etc. I find I get a nicer result if I *very* gently pull the fabric taunt while sewing this second line. Using very small scissors (I have a curved pair I like for this) trim off the seam allowance as close to the second line of stitching as you can. Press.
Step 4 - Folding the hem one more time on the second stitch line (or as close as you can get it) stitch through all layers. Again, I find I get a nicer result if I *very* gently pull the fabric taunt while sewing. Trim off your thread tails, press it again and Viola! Done.
2K notes
·
View notes
Text
Sewing Needles
One thing it’s really important to remember is that not all needles are suited for all types of fabric. It can really help you out to use the right sewing needle, and keep you from potentially ruining your fabric.

Chart source: http://www.sewitworks.com/needle-guide/fabric-needle-thread/
1K notes
·
View notes
Text
The Juliet Strap. Bridals best kept secret.
You’ll find them on most strapless bridal gowns, if the style allows for it, but you wont see much mention of them online.
I haven’t been able to find any tutorials, no explanation, just the occasional reference on a bridal site. Sometimes they’re wrongly called a waist stay, other times I’ve seen them called an elastic bustier, but Juliet strap is what we call them, and its less confusing. The manufacturers who make our dresses for us (I work with a bridal designer) have never been confused when we asked for a Juliet strap in a dress.


Its a wide strap of elastic thats sewn into the side seams and has a closure like a bra band. I’ve seen them up to about 8 inches wide, the one in the picture is about 3.
What does a Juliet strap do? It holds the front of the dress to you! If its wide enough, it will also act as a bit of a corset.
The strap helps hold the front up, and against your body. And keeps the movement of the front to a minimum. If you’re worried about a dress falling down, or not giving enough support in the front, its an easy alteration that will improve the fit. however, It works best with boning.
It would be the perfect addition to a bunny suit, or strapless dresses like Neo Queen serenity.
14K notes
·
View notes
Video
tumblr
Cosplay (and general sewing) life hack- easy pleats with a fork! For all those school girl uniform cosplays and more :)
68K notes
·
View notes
Photo

Madoka Petticoat Tutorial
I have been wanting to make this for a while since I get a lot of questions about my petticoat and Madoka cosplayers in general seem rather lost when it comes to her ridiculous skirt. Enjoy my tutorial! Feel free to ask questions!
Tutorial by RuffleButtCosplay Tutorial Link: https://rufflebuttcosplay.deviantart.com/art/Madoka-Petticoat-Tutorial-254359187
389 notes
·
View notes
Video
instagram
My HeatNBond tutorial!! 🤗 This is how I made the gold parts in my Goddess Mercy cosplay! Its also how I made my Emily scarf, and tons of other cosplay stuff. Hope this helps!! And let me know if you want me to do more videos like this! . . #cosplay #cosplaytutorial #cosplaytips #cosplayvideo #cosplayguide #heatnbond #cosplaysewing #tutorial #cosplaydiy #diy #mercycosplay #overwatchcosplay
2K notes
·
View notes
Photo


Originally posted on Facebook - Old Trenchy
52K notes
·
View notes
Text
Cosplay 101: Adhesives
This is meant as a beginner primer for adhesives (that we use [enough to know a bit about {mostly}]). This is meant as an outline that covers the general details of each kind of adhesive. The links direct to the wikipedia page on the adhesive if you want to know more about the full details.

Cyanoacrylate: CA glue for shorthand, aka Superglue or krazyglue. However, if something is marketed as a super/krazyglue and doesn’t contain cyanoacrylate, it’s not a CA glue. This is our go-to glue. It’s strong, but a bit brittle and can melt the crap out of some materials.
Pros:
Strong
Widely available
Cleans up with acetone nicely
Can glue most things together (EVA foam, paper, styrene all work well)
Many consistencies available (thin, thick, gel)
Quick dry/cure time, can be quickened with CA accelerante
Can be mixed with baking soda for an effective gap filler (CA cement)
Safe to use on EVA foam
Readily available anywhere that sells adhesives
Cons:
Fumes/strong smell, ventilation and/or a respirator required if working with large amounts of CA glue
Brittle and non-flexible
Melts polystyrene (EPS/XPS foam aka Styrofoam)
Fumes can leave cloudy residue
Rapid exothermic reaction with leather, cotton, and wool that can cause burns and even fire
Shelf life of about a year unless kept somewhere dark and cool (like the fridge)

Polyvinyl Acetate: Also known as white glue or Elmer’s glue. Useful but a bit basic and requires open evaporation.
Pros:
Pretty safe, just don’t straight-up drink it or rub it into your eyes or nose
Great for paper and other open structure materials (fabric, some open-cell foams)
Widely available
Water-soluble
Inexpensive
Readily available anywhere that sells adhesives
Cons:
Relatively weak and brittle when cured
Needs open-air evaporation to dry
Water-soluble
Long dry/cure time

Gorilla Glue: We’ve used this one a few times and it seems to work fairly well
Pros:
Strong bond
Non-solvent, won’t melt things most of the time (stable with XPS foam)
Readily available anywhere that sells adhesives
Cons:
Needs clamping/pressure to cure properly
Long cure time
Expands during cure process, can squirt/drool out of joint (might be a good thing too, though)

E6000: A strong and flexible glue, great for fabrics or gluing things to fabrics.
Pros:
Very flexible, can hold up to a little stretching even
Strong bond with a bit of surface sanding
Can glue many kinds of things together (EVA foam, fabric, styrene, paper, leather all work well)
Dries clear (though air bubbles and edges can be visible)
Readily available anywhere that sells adhesives
Cons:
Solvent-based, will eat through polystyrene, pretty pungent smell
Long cure time
Can smear easily during curing
May ooze out of the tube and glue the cap to itself (plies might be required to unscrew the cap if this happens)

JB Weld: An incredibly strong 2-part epoxy. I use this a lot to strengthen a mechanical joint.
Pros:
Incredibly strong, can be used to join engine parts together
Fairly shock resistant
Works great on most surfaces
You can drill, tap, sand and carve it once fully cured
Cons:
Very long cure time, about 24 hours
Not flexible at all
Requires a very good joint and a lot of surface prep
Can be brittle under torsion
Needs more cleanup than single-part adhesives

2-part Epoxy: This is a massive group of adhesives so I’m only going to mark the basics
Pros/Cons:
Strong
Cure time can vary from a few minutes to days
Needs more cleanup than single-part adhesives
Ranges from glass-hard to pretty flexible after it cures

Hot-melt adhesive (aka Hot glue): A craft standard and fairly material-safe way to adhere things together.
Pros:
Works on everything that doesn’t melt or [easily] catch fire
Fairly strong with a good joint surface
Pretty safe if you don’t touch the nozzle or glue while it’s hot
Safe to use on polystyrene
Great for EVA foam armor/props
Inexpensive
Glue itself can be versatile and used for filling molds.
Glue sticks can come in a variety of colors
Cons:
Can be a bit messy, nozzle keeps leaking sometimes and leaves threads of hot glue everywhere
May be visible under thinner materials if the glue isn’t smoothed out
Can straight-up melt or ignite some materials (spot test or look up the melting point of the material)
May be only semi-permanent in some cases, depending on the surfaces
Can melt when exposed to heat (don’t leave pieces glued together with hot glue in a hot car)

Contact cement: An adhesive that is applied to both surfaces, allowed to dry, then pressed together. Barge and Weldwood (US) are brands commonly used in cosplay. Rubber cement is not a contact cement.
Pros:
Very strong, practically permanent once bonded together
Great for EVA foam armor/props (the main go-to for a lot of foamsmiths)
Cons:
Fumes require ventilation and/or a respirator
Requires a ready supply of brushes for application
Shelf life up three months to a year depending on storing conditions. Throw away if the cement begins to set up in the container
Melts polystyrene
Cures in 5-10 minutes, but EVA foam may require a second coat due to its tendency to absorb materials
2K notes
·
View notes
Photo

Cosplay Tip:
Treat yourself to quality when you can: invest in makeup, quality fabrics and good tools.
210 notes
·
View notes
Note
Any advice on what to do when you've discovered a photographer is selling cosplay pics of you without your permission?
This is a touchy subject, and I hope you don’t mind me answering publicly because I think all cosplayers should be informed of this stuff.
There’s a lot that goes into the rights of cosplay photos and most of it is situational.
For the most part: When the picture is taken, the photographer owns the rights to the copyright and you do not.
Regardless of you posing for them or you have designed and created the costumes, they own the rights to the photo and can distribute it how they like. Commercial (for profit) or not.
NOW you do have RIGHTS (but not copyrights.) In a private shoot or setting, he can really only sell the photos if you signed a release form or you two discussed what was okay and you consented. IF YOU DIDN’T DO THIS, and nothing was agreed upon, you do have rights to get them to stop selling. But you cannot have the rights to sell the photo yourself or to have them take it down from non-commercial areas. They could still feature it in a magazine, for example. This is called the right to publicity. And model release forms extend or waive these rights. But if it is commercial, they need your consent.
So my recommendation is to email them; calmly and concisely and say that while you understand he owns the rights to the copyright of the image, you did not consent to them selling anything in your likeness and you’d like them to stop.
Now here’s a few kickers:
If this photo was taken at a public setting, AKA A CONVENTION, and not a con? They get to sell the photo. Period. There is few exceptions. Going to a con and getting your photo taken at it in a non-private setting pretty much negates any right to publicity you have. :/ It gets a little grey in the areas of a photog taking you to a private shoot area of the con. You have right to publicity there, but your attendance to a public event favors the photog here.
If you paid them to take the photo, they must cease and desist immediately. Thats the only time everything favors you. AND EVEN THEN its usually best to back that up with paperwork, photographer release/model release photos. But in this case they are technically a hired employee to you.
If you want to go more thorough with this, BGZ did a fantastic write up about Cosplay photography copyrights here.
But remember to always, always, talk to your photographers about whats okay to do with photos. And selling/or editorial releasing them. Because on the flipside, a photographer can tell you to stop disturbing a photo, even just on social media, if they wanted to. (And thats without a form being signed too.)
168 notes
·
View notes
Photo

Bow tie Tutorial
Keep reading
98 notes
·
View notes
Text
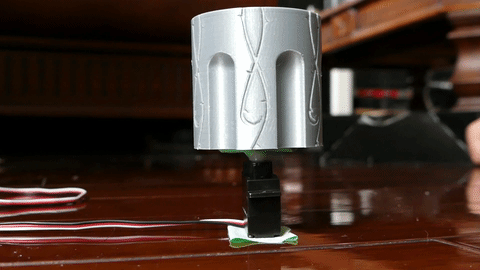
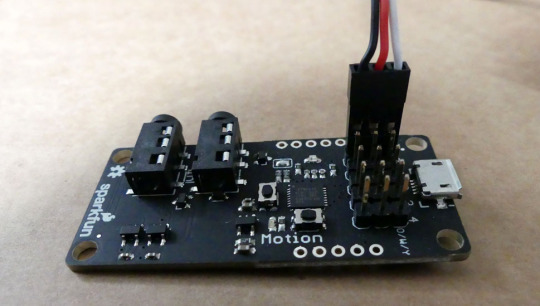
Sparkfun’s Spectacle - Objects in Motion
Sparkfun (www.sparkfun.com) sent me their new Spectacle (https://www.sparkfun.com/pages/spectacle) kit to play with. Spectacle is made for people who don’t want to get into electronics as a hobby but want to add lights, sound or motion to their projects. Rather than deal with soldering and code you plug the boards together and program with their web app. You can check out the app here: https://spectacle.sparkfun.com/ Today I am looking at their motion kit: https://www.sparkfun.com/products/14171
What it Comes With:
1x Spectacle Director Board This is the first board in your circuit. It allows for a battery pack or power adaptor to plug in to power your project and it has a program audio port that allows you to upload your script.
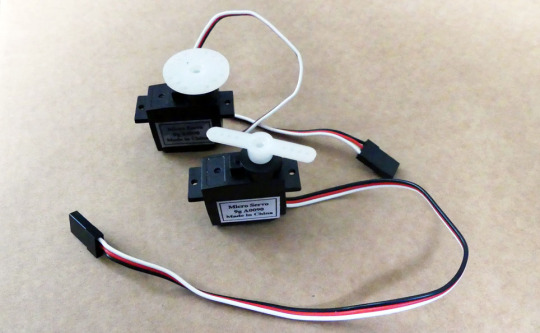
1x Spectacle Motion Board This board allows for up to five micro servos to be attached and included in your project.
1x Spectacle Button Board This board has an on-board button and 8 slots for additional buttons to be added.
2x Sub-Micro Size Servo The servos do the moving! Up to five micro servos can be included for each motion board. These servos also come with a package of attachable micro arm/horns. (Not actual arms! There is a circle, cross, diameter line and radius line which allow you to attach objects you want moved.)
2x White Concave Button Two arcade style buttons attached to microswitches.
4x Female Spade Connector Wire — 3ft These connector wires connect your buttons to the button board.
3x Audio Cable TRRS — 3ft Audio cables are used to easily connect boards together and allow you to upload your script to the director board.
1x USB micro-B Cable — 6ft
1x USB Wall Charger — 5V, 1A
2x USB Lithium Ion Battery Pack — 2.2Ah These are used to power your device. You can either plug the director board directly into the wall or power it with a battery pack. An additional battery pack can be added to the motion board should your servos require more power.
My Set Up:
Wall plug > Director Board > Motion Board
I followed the Motion Board Hookup Guide (https://learn.sparkfun.com/tutorials/spectacle-motion-board-hookup-guide) which used the “Virtual Board” (a programming option, not a physical board) to set the servos to run at periodic intervals rather than at the push of a button. This cut down on some bulk and would work for projects were continuous or periodic motion would be more beneficial than button activation! I stuck the micro servo in place with some tape and also attached a 3D printed cylinder I had lying around to try it out with the weight.

Notes on Weight:
The micro servos have a Torque of 16.6/20.8 oz-in. (4.8/6.0V). I believe this means that it can support 16.6/20.8 oz (1.04/1.3 lbs) of weight at one inch away from the axis. I’ve also read that these numbers are based on ideal conditions so it is better to halve the weight. (So roughly one servo can support 8.3/10.4oz (0.52/0.65lbs) of weight within one inch away from the center). I am not entirely sure on my math there but I had no issue getting it to turn some of our 3D printed parts. I think it would work well with most lightweight cosplay pieces.
For Cosplay:
The servo has a limited rotation, moving ~90° in either direction. I think a lot of projects would benefit from a full 360° turn. You can alter servos to allow for a broader ranger of motion but since this is a beginner kit I hope they can include a continuous rotation servo as an option.
That said, the servos are good. They come with multiple arms/horns and make it easy to add motion to a variety of projects. Really easy to put together and get started when you follow their hookup guide. Definitely a good beginner kit for adding motion but you might need to fiddle with the numbers to get the timing down.
Like the lights, there is still a lot of bulk that comes from using the cables. So this will work best in props that have room to run the wires and insert the servos.
Notes
If it doesn’t work, check the connection between the servo and the board. On my first run through the servo didn’t move and it was because I pinned it in backwards. Woops!
Check out the other Spectacle posts by clicking here.
148 notes
·
View notes
Text
I decided to update my Amaterasu cosplay because to be honest I wasn’t really that happy with it.

I got a better red for the face markings, I’m using snazaroo face paint because it tends to be more vibrant on skin than lip liner (it also doesn’t smudge and turn my wig’s bangs pink as easily). I’m still debating on using the black and red hair ties again because I don’t think it’s really needed. I did make a white and red kanzashi, and fixed the way the ears are attached to the wig (though one ear is slightly higher than the other).

Here’s a close up of the kanzashi. It’s made of satin ribbon shaped and hot glued to a barrette. It’s got some dangling beads and a plastic pearl bead as the center.

I remade the top and decided to leave it sleeveless because I have divine retribution as a shield on my forearm, and they just kind of got in the way with the old one. Instead of the really bad costume hakama I just made a red skirt (because making actual hakama is a bit out of my skill level right now), and I made a black and white obi to hide where the top meets the skirt. In place of the bow on the back I have the astral pouch (not shown because I didn’t take a picture of the back, but it’s the same as last year’s). There’s a red cord as decoration as well as a smaller kanzashi style flower. I got to sew everything instead of getting a pre-made costume, which makes me happier with it already.

I re-skinned and painted a folding fan, mostly so I have some form of keeping cool, that also goes with the costume.

Otherwise the props haven’t really changed much since last year.
44 notes
·
View notes