
Love and Deepspace combat gremlin.ASIA GMT+8 EN
Last active 4 hours ago
Don't wanna be here? Send us removal request.
Statistics
We looked inside some of the posts by luminafights and here's what we found interesting.
Average Info
Notes Per Post
43
Likes Per Post
34
Reblog Per Post
8
Reply Per Post
1
Time Between Posts
2 days
Number of Posts By Type
Text
17
Last Seen Tumblr Blogs


Fun Fact
Post activity is at the highest at 4:00 pm EDT; notes peak at 10:00 pm EDT.
Text

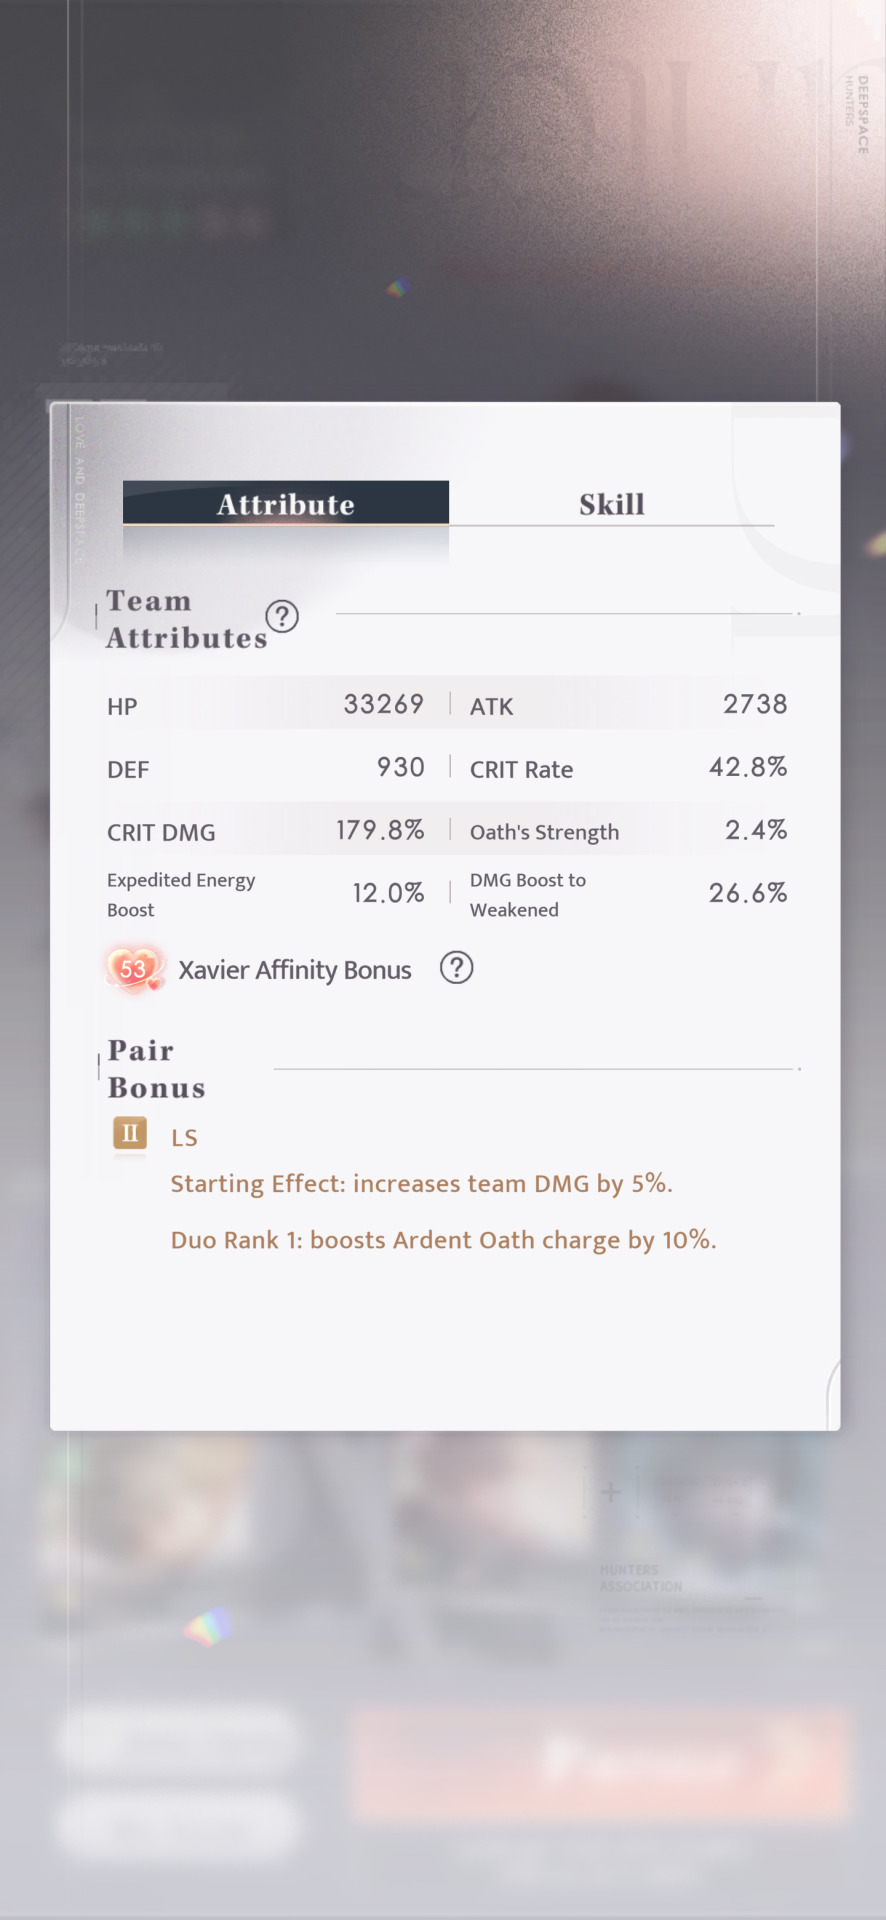
░ 𝐃𝐢𝐫𝐞𝐜𝐭𝐢𝐨𝐧𝐚𝐥 𝐎𝐫𝐛𝐢𝐭: 𝐅𝐢𝐫𝐞 𝟏𝟔𝟎 ⠀ 𝐆𝐚𝐦𝐞 𝐕𝐞𝐫𝐬𝐢𝐨𝐧 𝟑.𝟎 ⠀ ① ᴄᴏᴍᴘ: Abysswalker Rafayel, R0 ⠀ ① ᴡᴇᴀᴘᴏɴ: Hunter Claymore ⠀ ② ᴄᴏᴍᴘ: Lemurian Sea God Rafayel ⠀ ② ᴡᴇᴀᴘᴏɴ: Ballad of Ebbs
⠀⠀-------------------------------------------
⠀⠀⠀☑ Stella Match⠀⠀☐ Brute Force ⠀⠀⠀☑ Video
⠀⠀-------------------------------------------
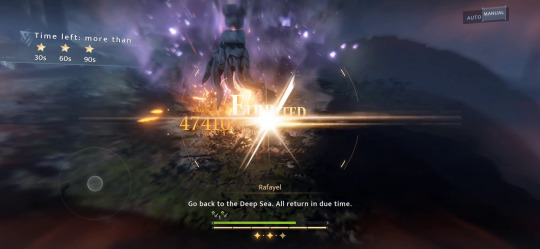
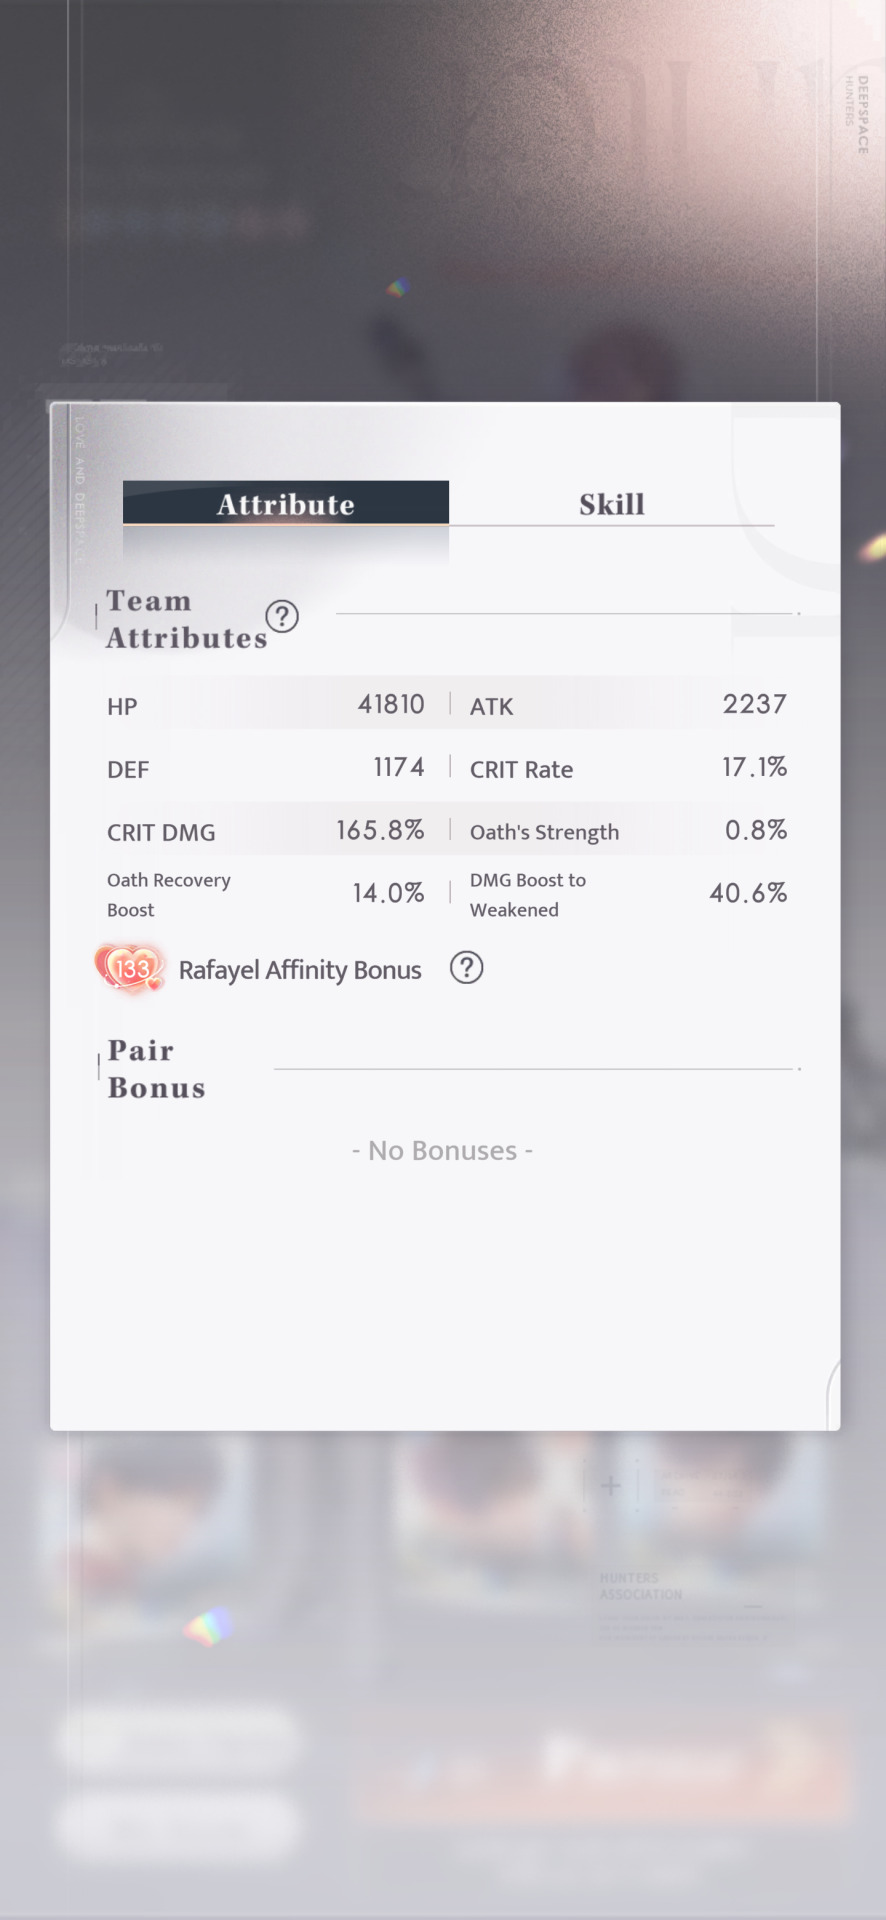
My first fire orbit with Lemurian Sea God! I'm looking forward to climbing more with him. ❤️ T2 playstyle has to be adjusted to account for not having the R0 MS rank bonus benefits.
𝐕𝐢𝐜𝐭𝐨𝐫𝐲── .✦


𝐒𝐭𝐚𝐭𝐬── .✦


𝐕𝐢𝐝𝐞𝐨── .✦
youtube
𝐍𝐨𝐭𝐞𝐬── .✦
2025-06-26 3:17 PM
T1 notes: - Weakness build. - Strategy is to prioritize cornering the red talons to the northwest corner during the first weakness, and to keep them cornered there for most of the fight. - After entering the arena, quickly target the red cat on the left. Wait for the second cat to appear before using resonance. Switch target to the talon on the right as resonance animation is playing. - Support skill for a small stagger as you close in on the talons to start pushing it to the northwest corner. - I focused on the talons until they were under 1x HP before switching to the cats. - Ideally, all enemies are in weakness for both oaths. T2 notes: - Hybrid build (CR + D2W). I have just over 40% crit rate here, but if you can get it to 50-60% without dropping too much D2W then that is ideal. - Because MS cards aren't used, basic attacks don't shorten Sea God Mark cooldown, and the weakness timer doesn't get extended by 1s. - Resonance rotation into Divine Favor for the first half of the fight: -- Support skill -> resonance -> CA -> active skill -> CA. Then, do filler damage (I spam CAs) -> support skill -> resonance (shieldbreak) -> Divine Favor. -- If you are wearing an Expedited Energy beta, use an active skill before shieldbreak for a bit of extra damage. - Divine Favor rotation: -- Start: CA -> active skill -> CA -- Then, Dash -> filler damage (I do 4BA) -> active skill -> CA. Repeat until Divine Favor is over. - After the weakness phase past the 1:00 mark, support -> resonance, then focus on building up the bars and use Divine Favor. - You can fit 2 active skill -> CA combos before using the final resonance -> oath -> Divine Favor at 0:16.

#love and deepspace combat#deepspace trials#fire orbit#fire orbit 160#abysswalker rafayel#lemurian sea god rafayel#rafayel love and deepspace#hunter claymore#ballad of ebbs#flamma ignis#ignis golem#stella match#video#game version 3#love and deepspace#lumina fights#Youtube#milestone
0 notes
Text

░ 𝐒𝐞𝐧𝐢𝐨𝐫 𝐇𝐮𝐧𝐭𝐞𝐫 𝐂𝐨𝐧𝐭𝐞𝐬𝐭: 𝟔/𝟏𝟔-𝟔/𝟑𝟎 ⠀ 𝐆𝐚𝐦𝐞 𝐕𝐞𝐫𝐬𝐢𝐨𝐧 𝟑.𝟎 ⠀ ᴛᴇᴀᴍ ᴀ: Abysm Sovereign Sylus, R0 ⠀ ᴛᴇᴀᴍ ʙ: Lemurian Sea God Rafayel, R0 ⠀ ᴛᴇᴀᴍ ᴄ: Abysswalker Rafayel, R0
⠀⠀-------------------------------------------
⠀⠀⠀☑ Stella Match⠀⠀☐ Brute Force ⠀⠀⠀☑ 36/36 ⠀⠀⠀☐ +20%⠀⠀☐ +30%⠀⠀☑ +40% ⠀⠀⠀☑ Video
⠀⠀-------------------------------------------
First SHC with Lemurian Sea God! Ignore my 20% OR for Team B, it's not needed, I only put that on for the DEF substats. This was a good season for me overall!

𝐕𝐢𝐜𝐭𝐨𝐫𝐲── .✦


The question marks Seasonal Boost Memories were so funny LOL
𝐓𝐞𝐚𝐦 𝐀── .✦


youtube
𝐓𝐞𝐚𝐦 𝐁── .✦


youtube
𝐓𝐞𝐚𝐦 𝐂── .✦


youtube
𝐍𝐨𝐭𝐞𝐬── .✦
2025-06-23 3:15 PM
✦ Team A: 1:30 clear, weakness build. Pleasantly surprised that I could take it this low, for a Team A fight. Focused more on dodging and grouping. - Using charged attack near a cluster enemies of will fill your HP up close to full. This helps towards the Fury resonance (more HP = more damage). - Remember to use active skill shortly after Fury resonance, for the fluctuation buff. Always use Fury resonance. - Support skill to stagger enemies in weakness. - For wave 1, group enemies 2 at a time. These cats are difficult to herd all at once. I prioritize the green cat because it can disappear = wastes more time, pushing it towards one of the red cats. - Wave 2 mobs are more manageable. Pale Mysts will float away from you, while Dark Mysts will chase you, so stick close to the Pale Mysts as you're grouping. - You can use Pale Myst's damage puddle as a trigger for active skill parry, if you need to. ✦ Team B: 1:30 clear, hybrid build (CR 40% + D2W). These stats are on the low side and rely on crits to a decent degree, and is also dependent on how quickly you can do the combos. Took some tries. Thanks to Sylusblobbu for her big brain strat on the Metaflux phase! Resonance rotation: - Support skill -> resonance -> CA -> active skill -> CA. Then, 3BA -> dodge -> 3BA -> dodge -> CA -> filler damage/support skill -> active skill -> CA -> 2BA* -> resonance (shieldbreak) -> Divine Favor. -- *This is needed to refresh Sea God Mark in time for Divine Favor. Divine Favor rotation: - Start: CA -> active skill -> CA - Then, Dash -> filler damage (I do 4BA) -> active skill -> CA. Repeat until Divine Favor is over. - It's important to learn how to do this combo fast, especially towards the end of the fight. Team B notes: - If dragon interrupts my combo, I restart the fight. Otherwise, I do the resonance rotation into Divine Favor. Kill the dragon within one weakness. - You can hit Alterum with basic attacks as he's loading in, if you need to refresh your Sea God Mark. - After Divine Favor, support skill -> resonance ASAP. Benedict will initiate Metaflux phase shortly after. - In Metaflux phase, the timer will stop ticking down, but you have 12s to look for the phantom with the red aura and kill it. - For this strat, get the phantom to just a sliver of health, then use resonance. If you do it right, the first hit of resonance will kill the phantom, and the second hit will break Alterum's shield -> Divine Favor -> victory! This saves you precious 2-3 seconds on the timer. ✦ Team C: 1:31 clear, hybrid-ish build (CR + CDMG + D2W)? Crit Rate is on the low side, but the fluctuation gives a Crit Rate boost, I say it evens out. - Resonance -> support skill to keep mobs from moving right away. - Back to back active skills for the Myst fight. No resonance. - Pay attention to beacon stacks so there's as little overflow as possible, and get as many Searing Slashes in. Collecting a beacon will give an ATK buff for a short time, Searing Slash additionally gives a crit rate buff for a short time - FRANGERE SLASH INTO THE SPIN! Drop a beacon into the spin!!

#love and deepspace combat#senior hunter contest#shc#abysm sovereign sylus#lemurian sea god rafayel#abysswalker rafayel#sylus love and deepspace#rafayel love and deepspace#fiend reaper#ballad of ebbs#hunter claymore#stella match#36/36#40 boost#video#game version 3#love and deepspace#lumina fights
2 notes
·
View notes
Text


⋆˙⟡ Double Core Drop is back! Your first ten Core Hunt drops for the day are doubled until June 29th.
—
This is a good time for you to push yourself to clear the highest level of Core Hunts that you can, if you haven't already!
Remember:
Core Hunt 7 guarantees 1 SSR protocore per run.
Core Hunts 8 and 9 is a chance of up to 2 SSR protocores per run.
Core Hunt 10 guarantees 2 SSR protocores per run.
Good protocores make a world of difference in combat. Seize this opportunity to farm for really good ones! Good luck, and happy hunting!!

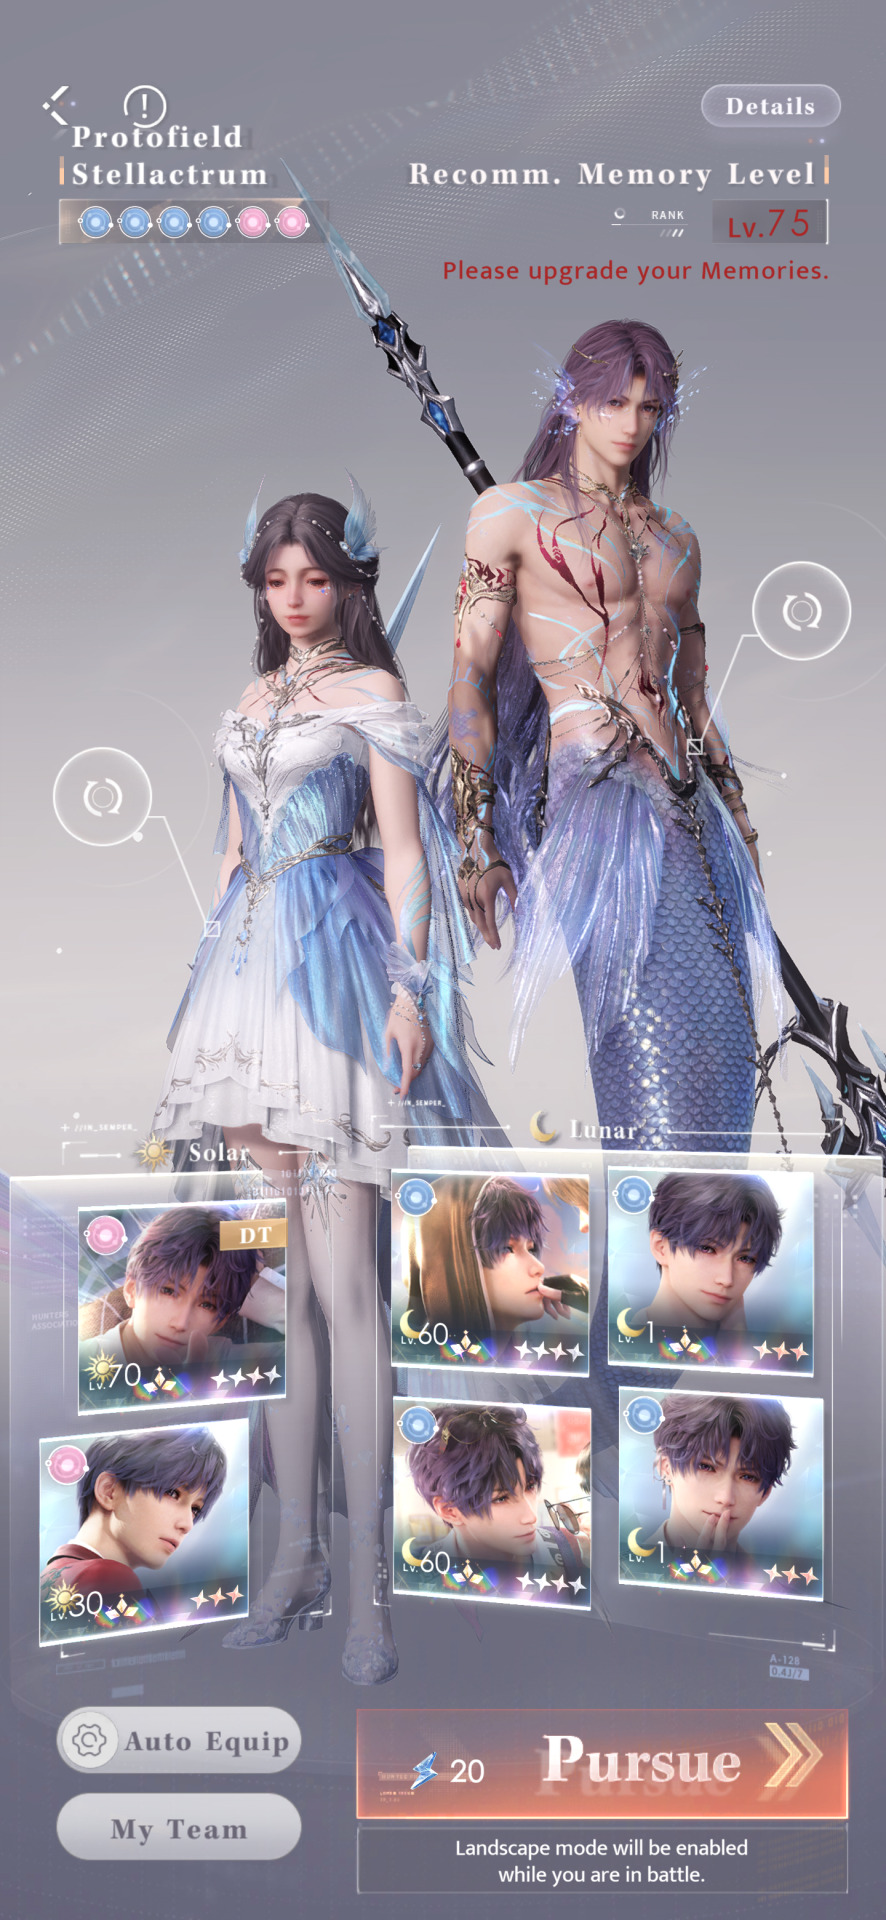
🧜♂️ Additionally, I posted some references for Core Hunt 10 using the new Lemurian Sea God Rafayel companion, if you want to use him to clear! All are stella matched and using the exclusive weapon.
Disambiguation 10 Purple/Yellow - R0 Lemurian Sea God
Fusion 10 Green/Red - Lemurian Sea God
Dissociation 10 Blue/Pink - Lemurian Sea God
The double drop bonuses are indicated by the upward arrow icon on the upper right corner. If you scroll to the right, you'll see the first set of drops. Visual under the cut.

#love and deepspace combat#love and deepspace#core hunt#double core drop#protocores#lemurian sea god rafayel#ballad or ebbs#rafayel love and deepspace#lumina fights
6 notes
·
View notes
Text
UPDATE: The wording for the Support Skill and Passive Skill have been changed from "invincible" to "unstoppable".


Mistranslations in Lemurian Sea God (MS) Rafayel's EN skill descriptions
Those thinking of pulling for MS, please be aware that most of the "invincibility" descriptors in EN are actually interruption resistance "霸体".
‼️ Please be informed before you pull ‼️ Only Riptide Rend (Active Skill) has invincibility. Images and clip under the cut.
Image 1: Tide Cleaver (Support Skill) and Deepfall Rite (Passive Skill) are all interruption resistance "霸体". You still take damage.
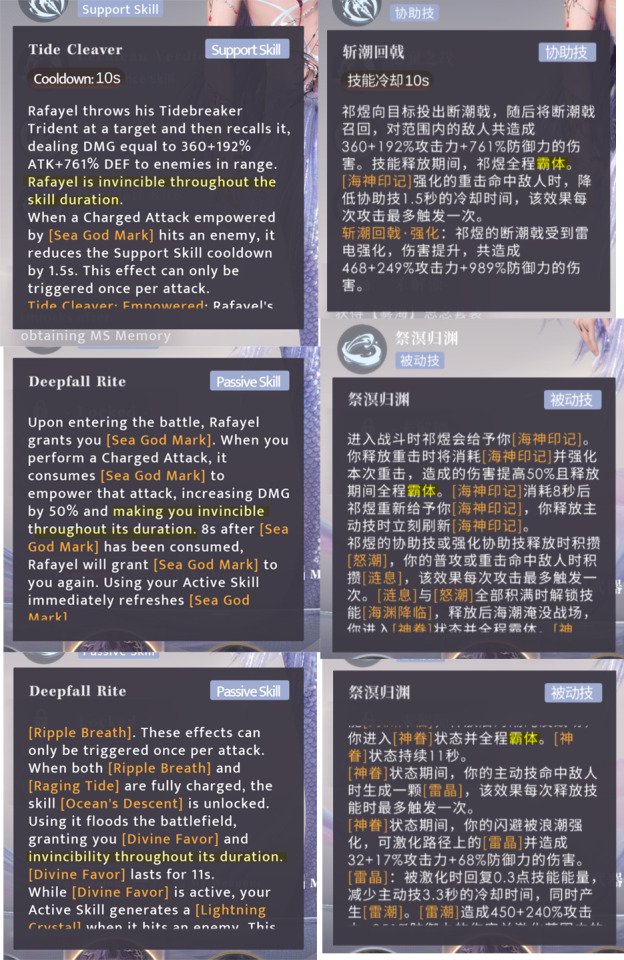
Image 2: Riptide Rend (Active Skill) grants invincibility "无敌", meaning no interruption AND no damage. For comparison, Caleb Ultimate Weapon X-02's oath also says "无敌" for Synced Awakening (Ardent Oath) which grants invincibility.

Clip: Shows Divine Favor where I don't get knocked back but still take damage.
youtube
#love and deepspace#love and deepspace combat#lemurian sea god#lemurian sea god rafayel#rafayel love and deepspace#bug report#lumina fights
8 notes
·
View notes
Text

░ 𝐂𝐎𝐑𝐄 𝐇𝐔𝐍𝐓: 𝐃𝐢𝐬𝐬𝐨𝐜𝐢𝐚𝐭𝐢𝐨𝐧 𝐀𝐫𝐞𝐚 𝟏𝟎 ⠀ 𝐆𝐚𝐦𝐞 𝐕𝐞𝐫𝐬𝐢𝐨𝐧 𝟑.𝟎 ⠀ ᴄᴏᴍᴘᴀɴɪᴏɴ: Lemurian Sea God Rafayel ⠀ ᴡᴇᴀᴘᴏɴ: Ballad of Ebbs
⠀⠀-------------------------------------------
⠀⠀⠀☑ Stella Match⠀⠀☐ Brute Force ⠀⠀⠀☐ 3 Star Pass ⠀⠀⠀☑ Video
⠀⠀-------------------------------------------
Finishing strong for this set of core hunt clears! Weakness build.
𝐕𝐢𝐜𝐭𝐨𝐫𝐲── .✦

𝐒𝐭𝐚𝐭𝐬── .✦
𝐕𝐢𝐝𝐞𝐨── .✦
youtube
𝐍𝐨𝐭𝐞𝐬── .✦
2025-06-20 3:23 PM
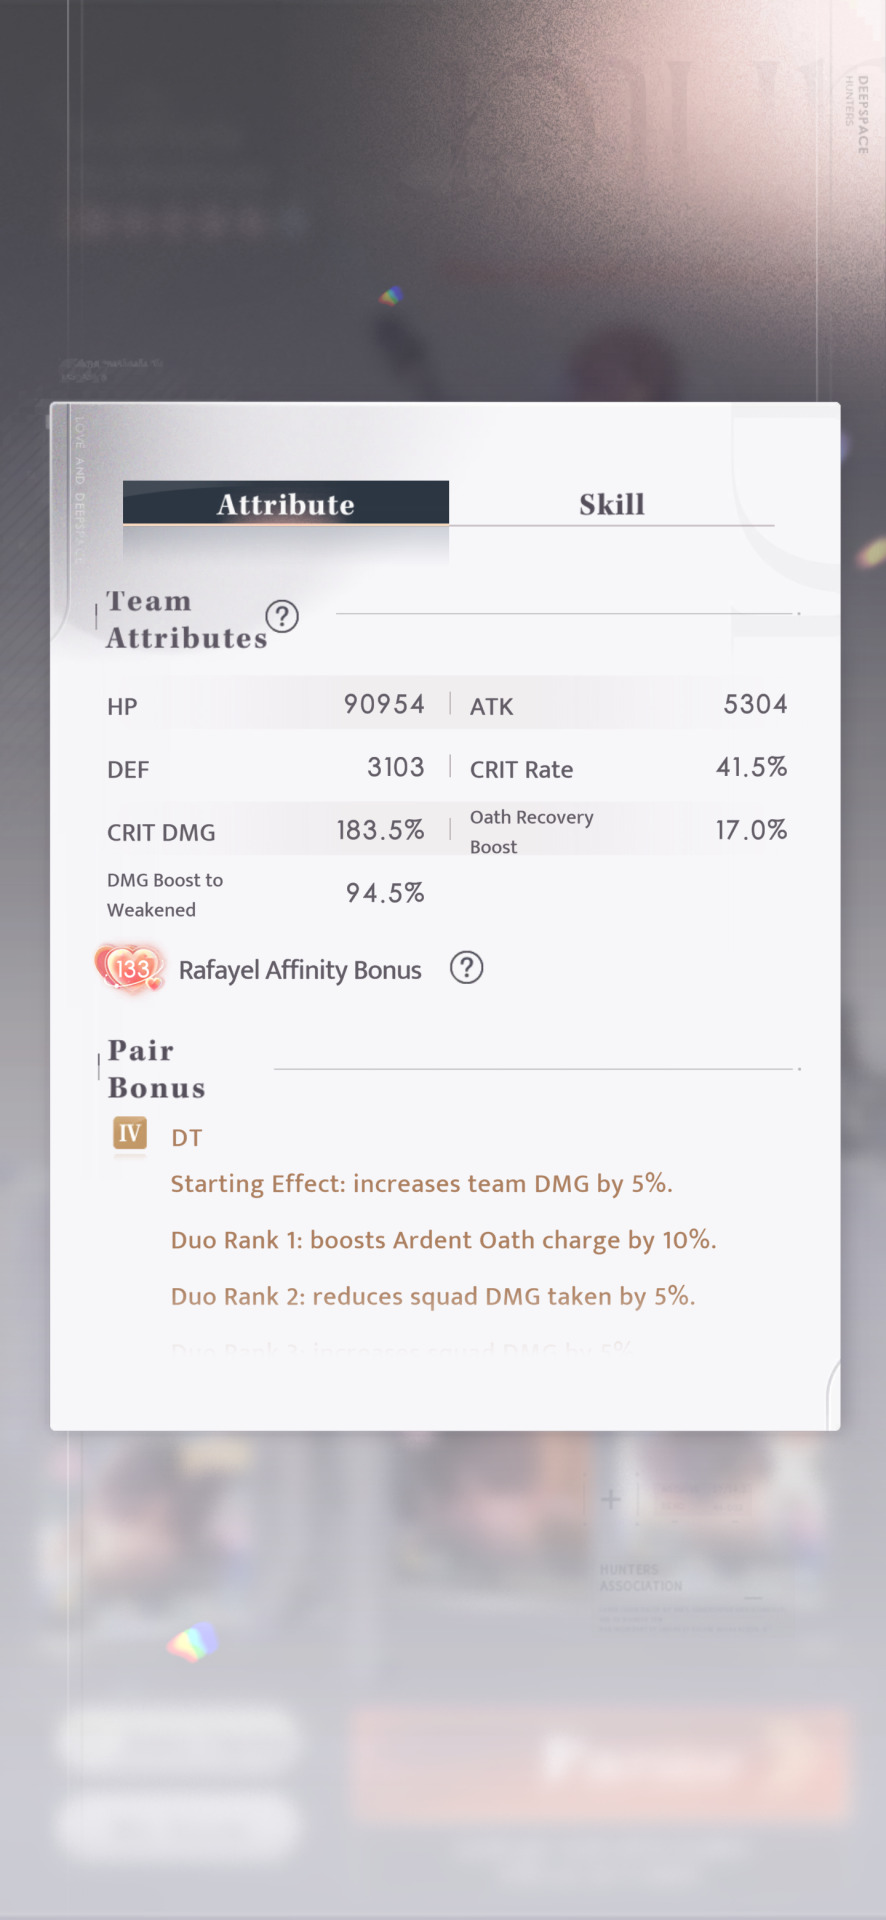
🧜♂️ Lemurian Sea God basic gameplay and tips: - MS is a DEF scaling companion. Prioritize building DEF. - The goal is to fill up both sides of the bar with support skills (right bar) and basic/charged attacks (left bar) to enter Divine Favor phase, where you'll deal the most damage. - 2 support skills are needed to fill up the right bar. Get into the habit of prioritizing clicking support skill after each Divine Favor phase. - Support skill doesn't need a target to fill up the right bar. However, your basic/charged attacks need a target to fill up the left bar. - You have to dash over the orbs to manually detonate them. This shortens the active skill cooldown. - When Sea God Mark is up, charged attack becomes a powerful diving attack. If active skill is also available, use the combo: CA -> active skill -> CA - When you don't have MS cards equipped, you don't get the Sea God Mark cooldown reduction from basic attacks. Fight notes: - If the deer does the dash attack as its first attack, I reset the fight. It's not worth the damage loss. - The resonance timing is a bit tight for the first minute, so don't delay too long with using them. - Do a shieldbreak at 1:05 to get the first oath smoothly into weakness at the 1:00 mark. -- If the deer does a screech and rains ice puddles at around 1:10 or earlier, use resonance right away instead of waiting for 1:05. Still use the first oath at 1:00. Otherwise its lock phase will mess up your oath timing. - After the first oath and Divine Favor phase, support skill -> resonance. Fill your bar quickly until the next support skill -> Divine Favor. -- The deer can can disappear and reappear elsewhere during this phase. Be aware of that as you attack. - The deer will enter a long lock phase at around 20% 2x HP. Don't go past that point until your final resonance at 0:15 to fit the second oath into weakness at 0:01.
𝐑𝐞𝐥𝐚𝐭𝐞𝐝 𝐂𝐥𝐞𝐚𝐫𝐬── .✦
[2025-06-18] ✦ Disambiguation 10, 2 Oath - R0 Lemurian Sea God (Ballad of Ebbs)
[2025-06-20] ✦ Fusion 10, 2 Oath - Lemurian Sea God (Ballad of Ebbs)

#love and deepspace combat#core hunt#dissociation area#dissociation area 10#core hunt 10#lemurian sea god rafayel#rafayel love and deepspace#ballad of ebbs#elysian cervus#stella match#video#game version 3#love and deepspace#lumina fights#Youtube
0 notes
Text

░ 𝐂𝐎𝐑𝐄 𝐇𝐔𝐍𝐓: 𝐅𝐮𝐬𝐢𝐨𝐧 𝐀𝐫𝐞𝐚 𝟏𝟎 ⠀ 𝐆𝐚𝐦𝐞 𝐕𝐞𝐫𝐬𝐢𝐨𝐧 𝟑.𝟎 ⠀ ᴄᴏᴍᴘᴀɴɪᴏɴ: Lemurian Sea God Rafayel ⠀ ᴡᴇᴀᴘᴏɴ: Ballad of Ebbs
⠀⠀-------------------------------------------
⠀⠀⠀☑ Stella Match⠀⠀☐ Brute Force ⠀⠀⠀☐ 3 Star Pass ⠀⠀⠀☑ Video
⠀⠀-------------------------------------------
I'm using one of the newly minted green 4-star solar cards from the event, because why not? Weakness build.
𝐕𝐢𝐜𝐭𝐨𝐫𝐲── .✦

𝐒𝐭𝐚𝐭𝐬── .✦


𝐕𝐢𝐝𝐞𝐨── .✦
youtube
𝐍𝐨𝐭𝐞𝐬── .✦
2025-06-20 12:32 AM
🧜♂️ Lemurian Sea God basic gameplay and tips: - MS is a DEF scaling companion. Prioritize building DEF. - The goal is to fill up both sides of the bar with support skills (right bar) and basic/charged attacks (left bar) to enter Divine Favor phase, where you'll deal the most damage. - 2 support skills are needed to fill up the right bar. Get into the habit of prioritizing clicking support skill after each Divine Favor phase. - Support skill doesn't need a target to fill up the right bar. However, your basic/charged attacks need a target to fill up the left bar. - You have to dash over the orbs to manually detonate them. This shortens the active skill cooldown. - When Sea God Mark is up, charged attack becomes a powerful diving attack. If active skill is also available, use the combo: CA -> active skill -> CA - When you don't have MS cards equipped, you don't get the Sea God Mark cooldown reduction from basic attacks. Fight notes: - If the golem dives into the ground within the first 30s, reset the fight. Generally, the more that the golem dives in the fight, the more set back you are with damage. - Do a shieldbreak at 1:05 to easily get the first oath within weakness at the 1:00 mark. - With my stats, the boss goes into lock phase after the first oath's weakness phase. Keep attacking the golem to build up your bar, then use resonance when the lock phase is over. Shortly after, support skill -> Divine Favor. - Active skill gives you invincibility. Use this to your advantage when you dodge during this Divine Favor phase. - Final resonance at 0:15 so you can use the second oath within weakness at 0:01.
𝐑𝐞𝐥𝐚𝐭𝐞𝐝 𝐂𝐥𝐞𝐚𝐫𝐬── .✦
[2025-06-18] ✦ Disambiguation 10, 2 Oath - R0 Lemurian Sea God (Ballad of Ebbs)
[2025-06-20] ✦ Dissociation 10, 2 Oath - Lemurian Sea God (Ballad of Ebbs)

#love and deepspace combat#core hunt#fusion area#fusion area 10#core hunt 10#lemurian sea god rafayel#rafayel love and deepspace#ballad of ebbs#petro golem#stella match#video#game version 3#love and deepspace#lumina fights
0 notes
Text

░ 𝐂𝐎𝐑𝐄 𝐇𝐔𝐍𝐓: 𝐃𝐢𝐬𝐚𝐦𝐛𝐢𝐠𝐮𝐚𝐭𝐢𝐨𝐧 𝐀𝐫𝐞𝐚 𝟏𝟎 ⠀ 𝐆𝐚𝐦𝐞 𝐕𝐞𝐫𝐬𝐢𝐨𝐧 𝟑.𝟎 ⠀ ᴄᴏᴍᴘᴀɴɪᴏɴ: Lemurian Sea God Rafayel, R0 ⠀ ᴡᴇᴀᴘᴏɴ: Ballad of Ebbs
⠀⠀-------------------------------------------
⠀⠀⠀☑ Stella Match⠀⠀☐ Brute Force ⠀⠀⠀☐ 3 Star Pass ⠀⠀⠀☑ Video
⠀⠀-------------------------------------------
He's finally here! What better way to start him off than by fighting a creature of the deep? Weakness build.
𝐕𝐢𝐜𝐭𝐨𝐫𝐲── .✦

𝐒𝐭𝐚𝐭𝐬── .✦

𝐕𝐢𝐝𝐞𝐨── .✦
youtube
𝐍𝐨𝐭𝐞𝐬── .✦
2025-06-19 1:22 AM
🧜♂️ Lemurian Sea God basic gameplay and tips: - MS is a DEF scaling companion. Prioritize building DEF. - The goal is to fill up both sides of the bar with support skills (right bar) and basic/charged attacks (left bar) to enter Divine Favor phase, where you'll deal the most damage. - 2 support skills are needed to fill up the right bar. Get into the habit of prioritizing clicking support skill after each Divine Favor phase. - Support skill doesn't need a target to fill up the right bar. However, your basic/charged attacks need a target to fill up the left bar. - You have to dash over the orbs to manually detonate them. This shortens the active skill cooldown. - When Sea God Mark is up, charged attack becomes a powerful diving attack. If active skill is also available, use the combo: CA -> active skill -> CA - Spam basic attacks to shorten the Sea God Mark cooldown whenever needed. I find 3BA -> dodge -> 3BA combo to be a comfortable way to do it. Fight notes: - Before each shieldbreak, make sure that Sea God Mark is up, to prepare for Divine Favor phase. Divine Favor rotation: -- Start with CA -> Active Skill -> CA. -- Dash over orb -> 2BA or CA -> Active Skill -> CA (repeat this until phase is over) - Do at shieldbreak at 1:05 to get the first oath in comfortably by 1:00. - After the first oath weakness phase, after resonating once, focus on triggering another Divine Favor phase quickly. - Final resonance at 0:05-0:15 to get the second oath in by 0:01.
𝐑𝐞𝐥𝐚𝐭𝐞𝐝 𝐂𝐥𝐞𝐚𝐫𝐬── .✦
[2025-06-20] ✦ Fusion 10, 2 Oath - Lemurian Sea God (Ballad of Ebbs)
[2025-06-20] ✦ Dissociation 10, 2 Oath - Lemurian Sea God (Ballad of Ebbs)

#love and deepspace combat#core hunt#disambiguation area#disambiguation area 10#core hunt 10#lemurian sea god rafayel#rafayel love and deepspace#ballad of ebbs#deluge wyrmlord#stella match#video#game version 3#love and deepspace#lumina fights
1 note
·
View note
Text
Mistranslations in Lemurian Sea God (MS) Rafayel's EN skill descriptions
Those thinking of pulling for MS, please be aware that most of the "invincibility" descriptors in EN are actually interruption resistance "霸体".
‼️ Please be informed before you pull ‼️ Only Riptide Rend (Active Skill) has invincibility. Images and clip under the cut.
Image 1: Tide Cleaver (Support Skill) and Deepfall Rite (Passive Skill) are all interruption resistance "霸体". You still take damage.
Image 2: Riptide Rend (Active Skill) grants invincibility "无敌", meaning no interruption AND no damage. For comparison, Caleb Ultimate Weapon X-02's oath also says "无敌" for Synced Awakening (Ardent Oath) which grants invincibility.
Clip: Shows Divine Favor where I don't get knocked back but still take damage.
youtube
#love and deepspace#love and deepspace combat#lemurian sea god#lemurian sea god rafayel#rafayel love and deepspace#bug report#lumina fights#Youtube
8 notes
·
View notes
Text

░ 𝐃𝐢𝐫𝐞𝐜𝐭𝐢𝐨𝐧𝐚𝐥 𝐎𝐫𝐛𝐢𝐭: 𝐅𝐢𝐫𝐞 𝟏𝟓𝟑 ⠀ 𝐆𝐚𝐦𝐞 𝐕𝐞𝐫𝐬𝐢𝐨𝐧 𝟑.𝟎 ⠀ ᴄᴏᴍᴘᴀɴɪᴏɴ: Abysswalker Rafayel, R0 ⠀ ᴡᴇᴀᴘᴏɴ: Hunter Claymore
⠀⠀-------------------------------------------
⠀⠀⠀☑ Stella Match⠀⠀☐ Brute Force ⠀⠀⠀☑ Video
⠀⠀-------------------------------------------
Tried a frenzy run where I paid closer attention to the beacon stacks! Hybrid build (CR + CDMG + D2W), leaning more towards crit.
𝐕𝐢𝐜𝐭𝐨𝐫𝐲── .✦

𝐒𝐭𝐚𝐭𝐬── .✦


𝐕𝐢𝐝𝐞𝐨── .✦
youtube
𝐍𝐨𝐭𝐞𝐬── .✦
2025-06-15 3:11 PM
If you're factoring in Searing Slash into your frenzy kills, refer to the video for how I collected the beacons for waves 1 and 2. Wave 1 notes: - Manual target the frenzy enemy when it appears. - Resonance -> support skill to delay the enemies from moving right away. - Consistently being able to kill this frenzy enemy is a good benchmark for a clear. Wave 2 notes: - Keep the shielded dog at north. Get Raf of yourself hit by the dash attack will stop it in its tracks (like in this video). - Switch target to the frenzy enemy as soon as it shows up. - Use resonance -> oath at 2:04-2:11, so that oath hits the shielded mob during weakness. Alternatively, hold it until beacon stacks are full, for Searing Slash to hit in weakness. - If you finish wave 2 ahead of 1:35, you can choose to ignore the frenzy in wave 3. Any later and you may have to get the third frenzy buff to clear. In this run, I didn't have to. Wave 3: - Since I'm ignoring the third frenzy, I use resonance on the boss as soon as it shows up. I let resonance damage deal with the frenzy enemy for the most part. - Use the second oath at around the 1:00 mark even if the boss is not in weakness. In this run, I didn't realize that it did the invincibility jump just as I used resonance -> oath, so both hits missed. 💀 - The boss will enter lock phase at around 50% 2x HP. You can keep attacking it during this phase. - Save final shieldbreak for 0:04-0:13 so you can use the third oath during weakness.

#love and deepspace combat#deepspace trials#fire orbit#fire orbit 153#abysswalker rafayel#rafayel love and deepspace#hunter claymore#frenzy#foulwings#stella match#video#game version 3#love and deepspace#lumina fights
2 notes
·
View notes
Text

░ 𝐃𝐢𝐫𝐞𝐜𝐭𝐢𝐨𝐧𝐚𝐥 𝐎𝐫𝐛𝐢𝐭: 𝐅𝐢𝐫𝐞 𝟏𝟓𝟎 ⠀ 𝐆𝐚𝐦𝐞 𝐕𝐞𝐫𝐬𝐢𝐨𝐧 𝟑.𝟎 ⠀ ① ᴄᴏᴍᴘᴀɴɪᴏɴ: Abysswalker Rafayel, R0 ⠀ ① ᴡᴇᴀᴘᴏɴ: Hunter Claymore ⠀ ② ᴄᴏᴍᴘᴀɴɪᴏɴ: Abysswalker Rafayel ⠀ ② ᴡᴇᴀᴘᴏɴ: Hunter Claymore
⠀⠀-------------------------------------------
⠀⠀⠀☑ Stella Match⠀⠀☐ Brute Force ⠀⠀⠀☑ Video
⠀⠀-------------------------------------------
I haven't spent time with Arbiterwings for a long time, I'm happy to have finally learned it! Weakness build for both teams. T2 took a looot of trial and error.
𝐕𝐢𝐜𝐭𝐨𝐫𝐲── .✦


𝐒𝐭𝐚𝐭𝐬── .✦


𝐕𝐢𝐝𝐞𝐨── .✦
youtube
𝐍𝐨𝐭𝐞𝐬── .✦
2025-06-12 3:31 PM
T1 fight notes: - For most of the fight, focus target on the Sentrywings (red bird). The Galewings (blue birds) will chase you. - Resonance -> support skill to keep them from moving right away. - I tend to wait until 2.25-2.5 energy before resonance, so that I have 1 energy to use for the active skill right away. T2 strategy: - Let the first set of feathers detonate on their own, kill second set of stone feathers ASAP, kill the boss in 3 back to back weaknesses. 2 oaths used. This strat is only useful if you can kill the second set of stone feathers by 0:45 or earlier. The sweet spot for me is 0:47-0:48. - It helps tremendously to know the attack pattern and layout of the feathers: -- During stone feather phases, the boss will always alternate between a thunder line attack and a thunder ball attack. For example, if it starts with line attack, the feather phase will go: Stone feather spawn -> line -> ball -> line -> ball, and feathers explode. Second phase will follow the same pattern. -- You can bait the thunder line to a certain direction. You can dodge the thunder ball by dodging towards it, or sidestepping it. -- In between stone feather phases, the boss will either do a feather attack (like in my video, up to 3 times), or a 3 thunderbolt attack (stay away from the middle for this). -- The 5 stone feathers form a U shape. To dodge the explosions, position yourself at the top of the U, and dodge towards the center. - Delays are your enemy. Avoid triggering protective skill and avoid using empowered support skill. T2 fight notes: - My beacon usage is budgeted for 3 Searing Slashes: second stone feather phase, first weakness, and third weakness. - There's no super specific order to kill the second stone feathers. Visualize the U shape and get them down by 0:45 or earlier. For my run specifically, this is what I did: -- Before the stone feathers spawn, use support skill to drop a beacon. I pick it up -> quickly into resonance -> quickly into oath, to delay Searing Slash. -- Prioritize using support skill as it comes up. Important for Searing Slash timing later on. -- Active skill early, so that it's off cooldown when the boss's shields break. - For the nuke phase: -- Keep prioritizing support skill use. Use oath within weakness. -- First weakness: This is the only weakness where I can do the optimal claymore combo consistently, so I do that here for some extra damage. -- Second weakness: Searing Slash triggers. 1 active skill only. -- The boss will lock if it completes 2 random attacks here. Shieldbreak it before then and/or at 0:14 at the latest. -- Third weakness: I do the reliable claymore combo here because otherwise it clips into the boss's lock phase. Searing Slash triggers again.
Sidenote: I got Raf to affinity 130 from the voice call for clearing this fight! ❤️

#love and deepspace combat#deepspace trials#fire orbit#fire orbit 150#abysswalker rafayel#rafayel love and deepspace#hunter claymore#galewings#arbiterwings#stella match#video#game version 3#love and deepspace#lumina fights#Youtube
1 note
·
View note
Text

░ 𝐃𝐢𝐫𝐞𝐜𝐭𝐢𝐨𝐧𝐚𝐥 𝐎𝐫𝐛𝐢𝐭: 𝐅𝐢𝐫𝐞 𝟏𝟒𝟖 ⠀ 𝐆𝐚𝐦𝐞 𝐕𝐞𝐫𝐬𝐢𝐨𝐧 𝟑.𝟎 ⠀ ᴄᴏᴍᴘᴀɴɪᴏɴ: Abysswalker Rafayel, R0 ⠀ ᴡᴇᴀᴘᴏɴ: Hunter Claymore
⠀⠀-------------------------------------------
⠀⠀⠀☑ Stella Match⠀⠀☐ Brute Force ⠀⠀⠀☑ Video
⠀⠀-------------------------------------------
This is a Dormant Luminivore stage using hybrid build.
𝐕𝐢𝐜𝐭𝐨𝐫𝐲── .✦

𝐒𝐭𝐚𝐭𝐬── .✦


𝐕𝐢𝐝𝐞𝐨── .✦
youtube
𝐍𝐨𝐭𝐞𝐬── .✦
2025-06-10 9:01 PM
Fight notes: - Push mobs to the middle, around 70% away from the boss, before using resonance to gather all of them up nicely. If the mob is too far away the resonance might not reach all mobs. - If you accidentally gather the enemies too close to the boss, you can use support skill to delay them from moving for a couple of seconds. - Save oath for the boss. - Start the Luminivore fight at 1:25 at the latest, so you can use the first oath at around the 1:00 mark (0:56 latest) during weakness. - There's a long lock phase at around 25% 2x HP. Ideally get a resonance or a shieldbreak before then. - Shieldbreak at 0:13 (0:04 latest) to get the second oath in before the timer ends.

#love and deepspace combat#deepspace trials#fire orbit#fire orbit 148#abysswalker rafayel#rafayel love and deepspace#hunter claymore#dormant luminivore#luminivore#stella match#video#game version 3#love and deepspace#lumina fights
1 note
·
View note
Text

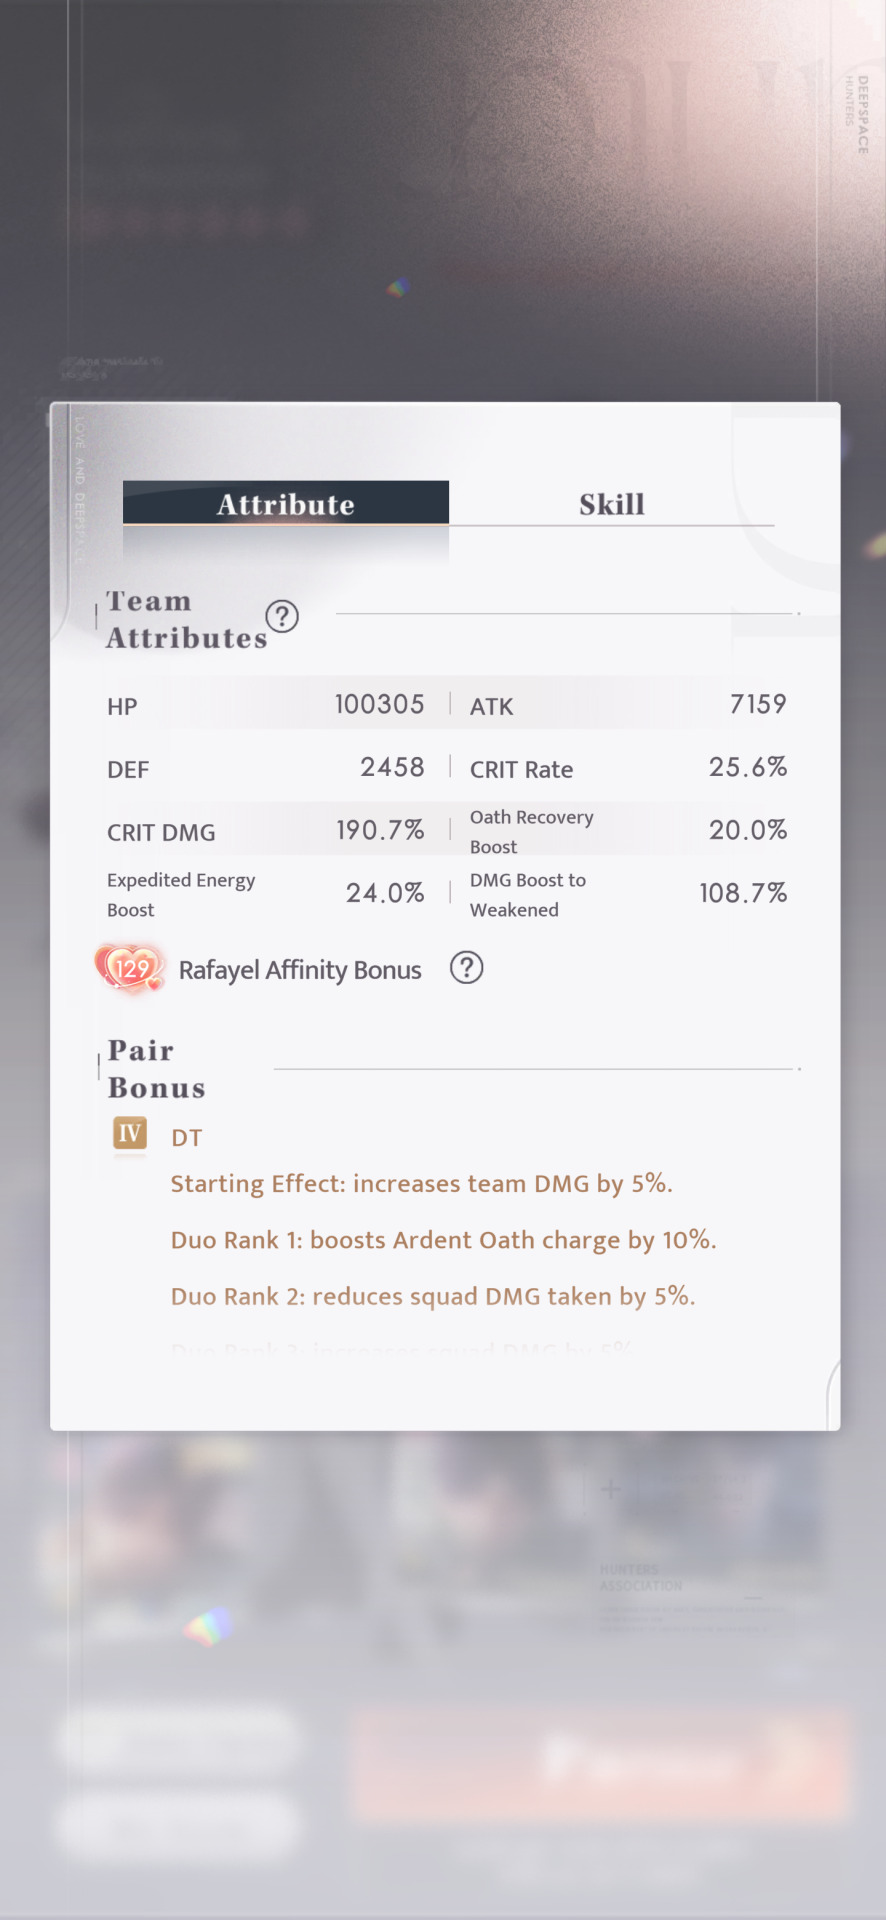
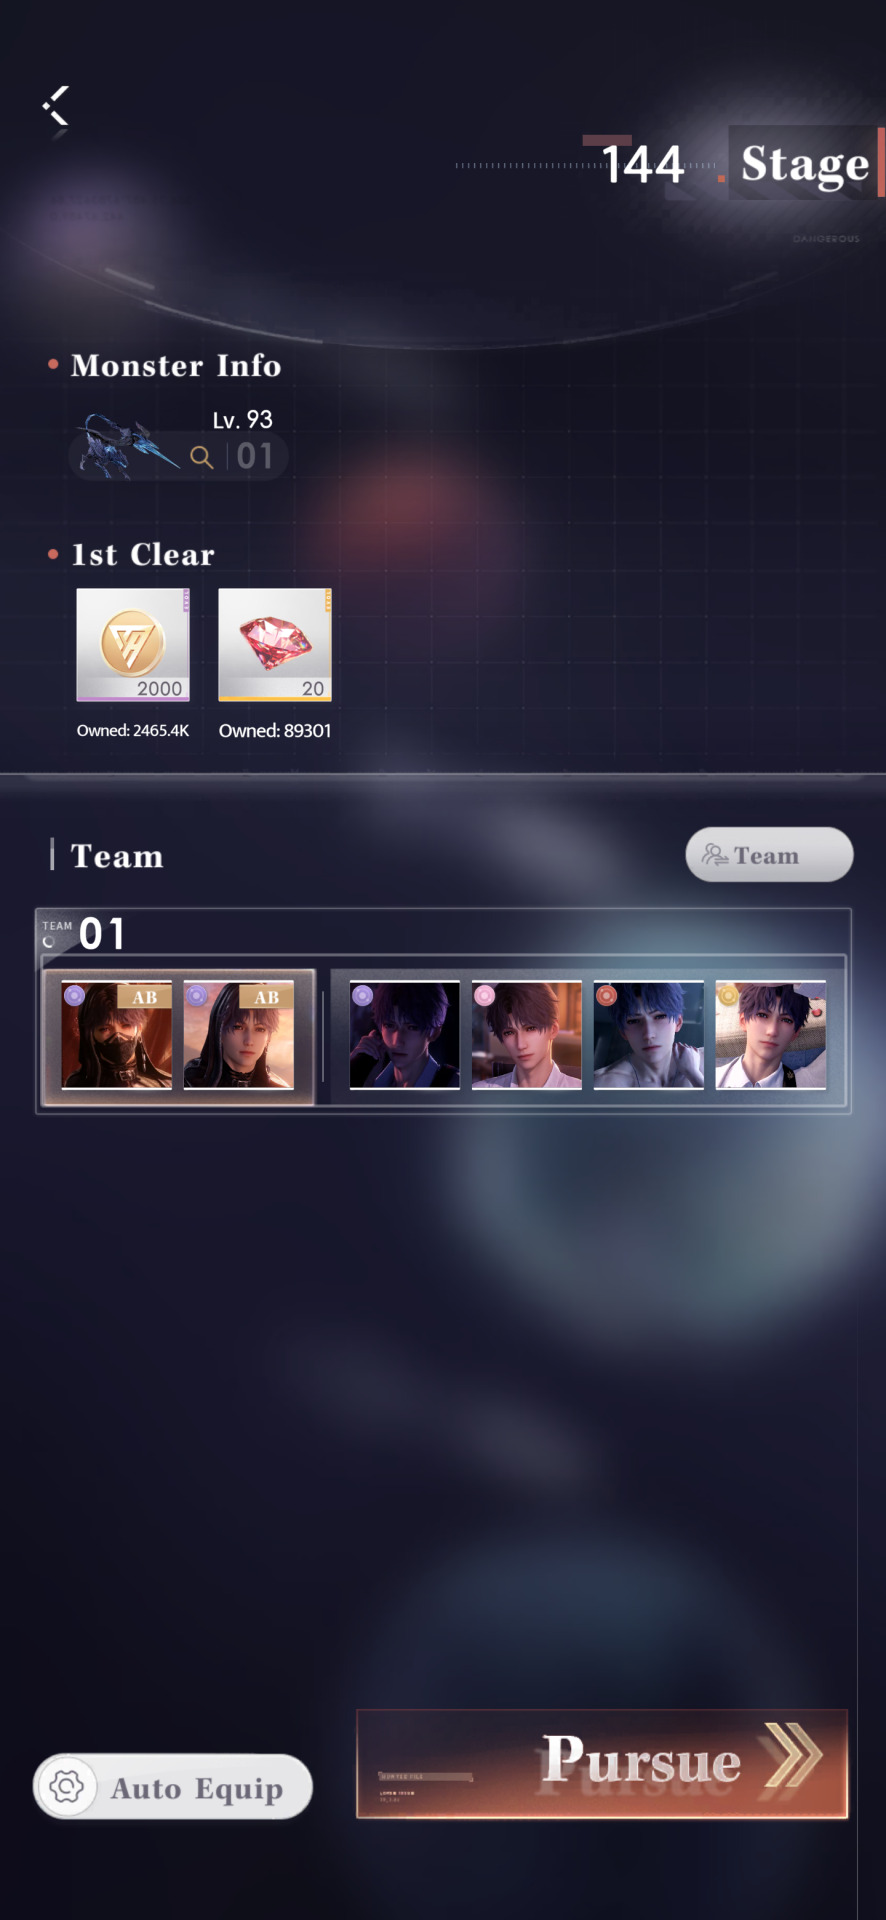
░ 𝐃𝐢𝐫𝐞𝐜𝐭𝐢𝐨𝐧𝐚𝐥 𝐎𝐫𝐛𝐢𝐭: 𝐅𝐢𝐫𝐞 𝟏𝟒𝟒 ⠀ 𝐆𝐚𝐦𝐞 𝐕𝐞𝐫𝐬𝐢𝐨𝐧 𝟑.𝟎 ⠀ ᴄᴏᴍᴘᴀɴɪᴏɴ: Abysswalker Rafayel, R0 ⠀ ᴡᴇᴀᴘᴏɴ: Hunter Claymore
⠀⠀-------------------------------------------
⠀⠀⠀☐ Stella Match⠀⠀☐ Brute Force ⠀⠀⠀☑ Video
⠀⠀-------------------------------------------
This took many tries by nature of this wanderer type being so chaotic. Raise your stats as much as you need to mitigate the randomness. Hybrid build (CR + CDMG + D2W). +15 Oath Recovery and +15 Expedited Energy to maximize your chances of success.
𝐕𝐢𝐜𝐭𝐨𝐫𝐲── .✦

𝐒𝐭𝐚𝐭𝐬── .✦

𝐕𝐢𝐝𝐞𝐨── .✦
youtube
𝐍𝐨𝐭𝐞𝐬── .✦
2025-06-07 8:52 PM
General notes: - A lot of this fight will be up to enemy attack randomness. Feeling frustrated is normal, give yourself some grace. - Because Spurtails are so chaotic, stagger them as much as possible by: -- Following up resonance with a support skill, ideally targeting the Spurtail closest to the front. -- Quick charged attacks (dodging/animation canceling before claymore calibrates). Do this especially when the Spurtails are right up against each other. -- Shieldbreaking them. - The Spurtails can disengage from manual target when they do that big jump attack. Watch out for when it happens so you don't get disoriented. - It's easier to group the Spurtails when they're against the wall. - Distribute damage evenly between the Spurtails. You want them at around 70% 1x HP or lower by the time you use oath. - You can switch target in the middle of resonance animation. Fight notes: - Use resonance back to back, as soon as it's off cooldown. With +15 EE, that means using only 1 active skill during weakness. It's important that the active skill hits both Spurtails. - If the Spurtails scatter immediately after the first resonance, or if they are too separated from each other during the first 30s, I reset the fight. - Wave 1 is more predictable for grouping. Do your best to finish it quickly and buy yourself more time for wave 2. - If you can kill wave 1 without using the first oath by 1:00 or earlier, you have the option to save it for wave 2 when the Spurtails show up, for some extra damage. Use first oath at 0:56 at the latest. - Use your last resonance at 0:04 and finish enemies off with oath.

#love and deepspace combat#deepspace trials#fire orbit#fire orbit 144#abysswalker rafayel#rafayel love and deepspace#hunter claymore#dps check#spurtail#video#game version 3#love and deepspace#lumina fights#Youtube
0 notes
Text

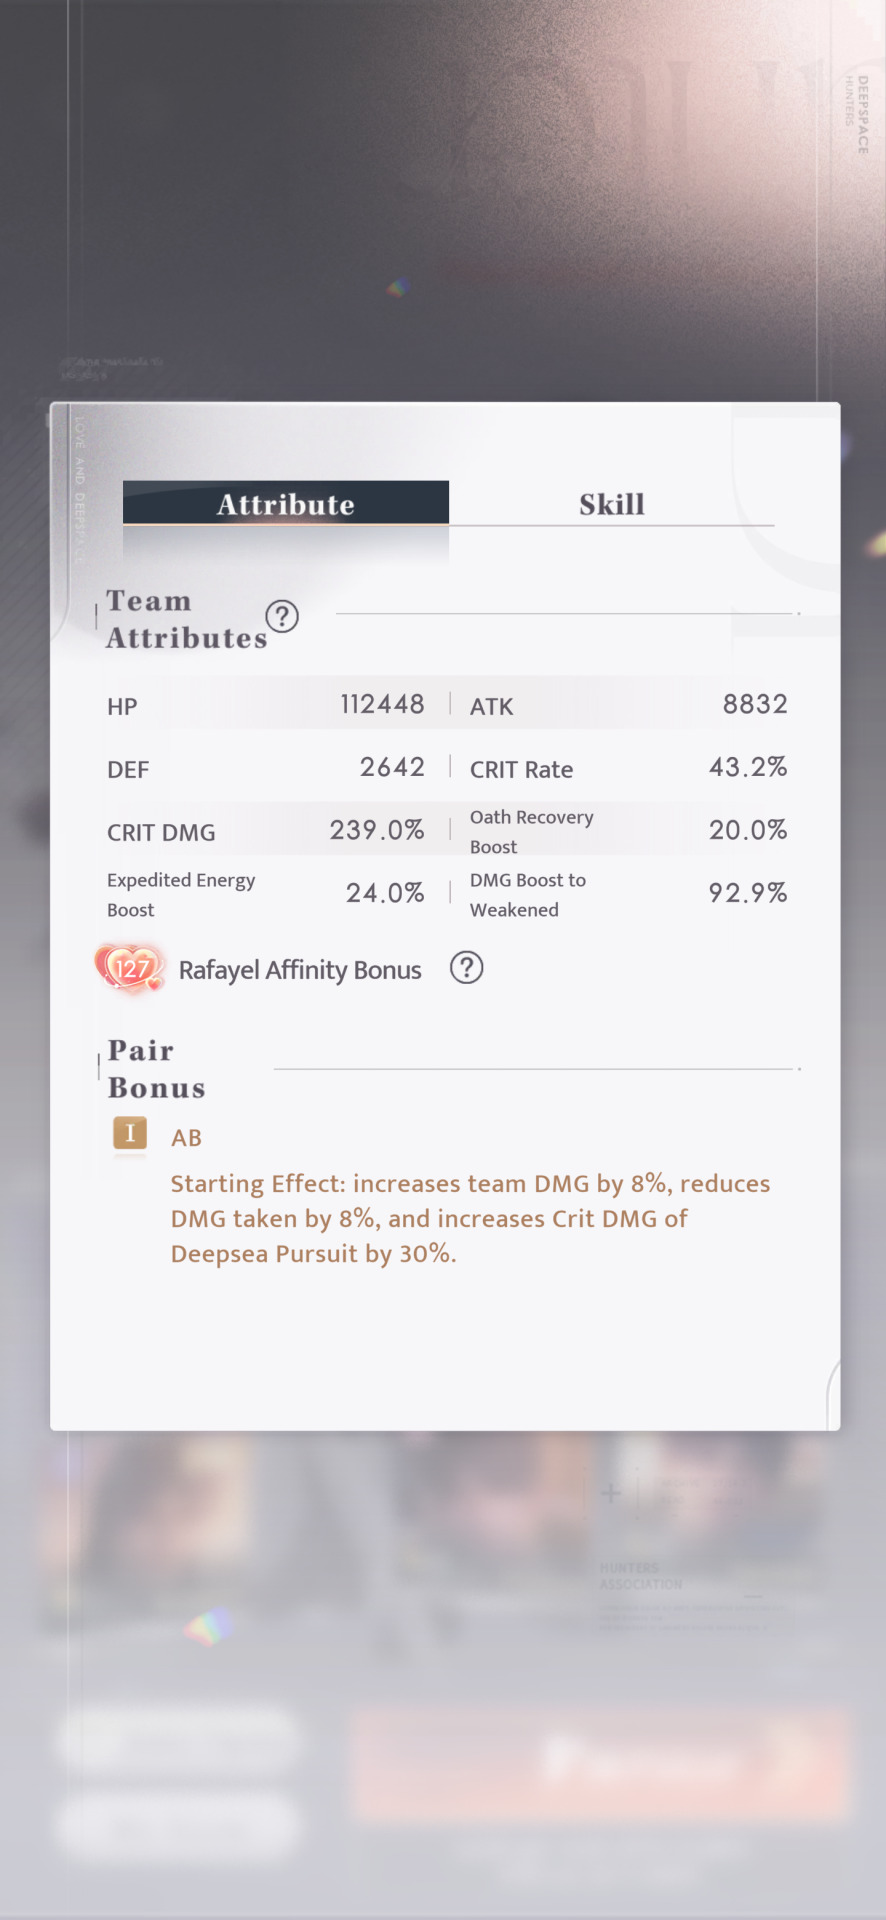
░ 𝐒𝐞𝐧𝐢𝐨𝐫 𝐇𝐮𝐧𝐭𝐞𝐫 𝐂𝐨𝐧𝐭𝐞𝐬𝐭: 𝟔/𝟐-𝟔/𝟏𝟔 ⠀ 𝐆𝐚𝐦𝐞 𝐕𝐞𝐫𝐬𝐢𝐨𝐧 𝟑.𝟎 ⠀ ᴛᴇᴀᴍ ᴀ: Fresh Paint Rafayel ⠀ ᴛᴇᴀᴍ ʙ: Phantom of the Siren Rafayel ⠀ ᴛᴇᴀᴍ ᴄ: Artist Rafayel
⠀⠀-------------------------------------------
⠀⠀⠀☑ Stella Match⠀⠀☐ Brute Force ⠀⠀⠀☑ 36/36 ⠀⠀⠀☐ +20%⠀⠀☐ +30%⠀⠀☑ +40% ⠀⠀⠀☑ Video
⠀⠀-------------------------------------------
I've been looking for a chance to do this in SHC. This is the season!! So proud of these clears! All three Rafayel standard companions, all R3 4-star solar pairs.
Shout out to VegaValent for inspiring me to meme. 💖

𝐕𝐢𝐜𝐭𝐨𝐫𝐲── .✦


𝐓𝐞𝐚𝐦 𝐀── .✦


youtube
𝐓𝐞𝐚𝐦 𝐁── .✦


youtube
𝐓𝐞𝐚𝐦 𝐂── .✦


youtube
𝐍𝐨𝐭𝐞𝐬── .✦
2025-06-04 5:13 PM
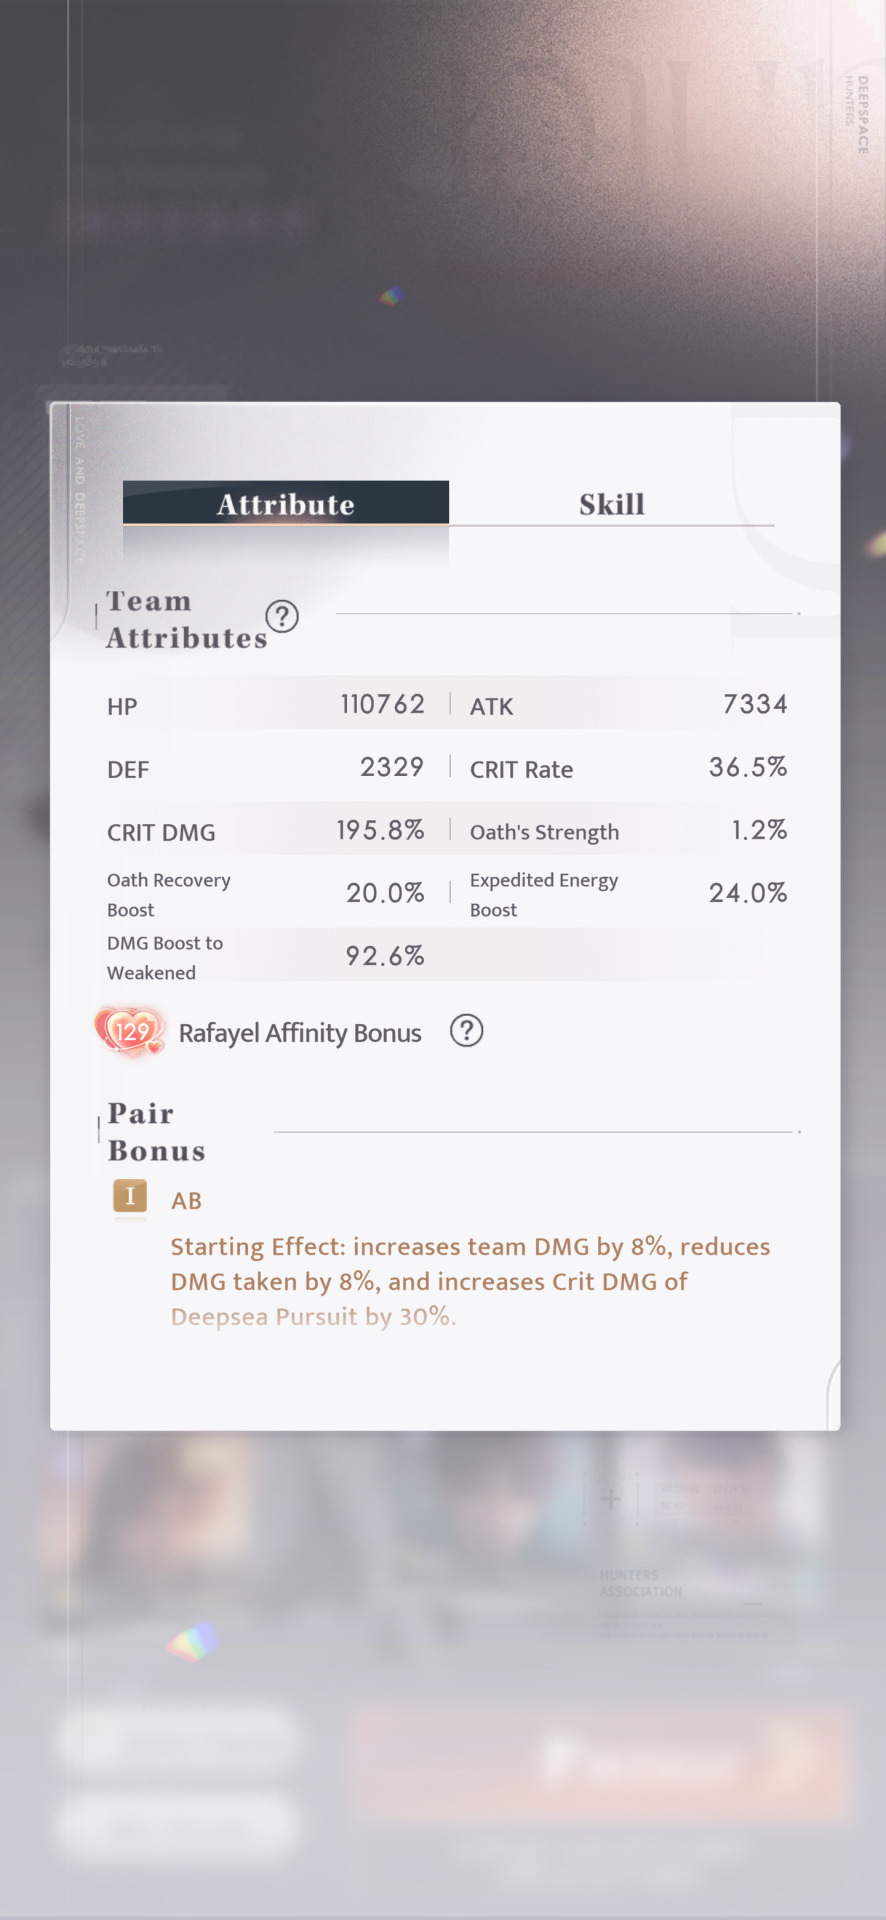
✦ Team A: 1:35 clear, weakness build. This took many many tries to figure out and then execute. - The more bloomed the rose marker (Tinctus) is, the better when it detonates with active skill/resonance/oath. Generate and bloom the rose with basic attacks, charged attacks, and support skills. - Heatshredders and Sawshredders are "flimsy". You breathe on them and they stagger. This makes it trickier to group them, especially for Fresh Paint who has a massive knockback effect when using resonance. Some things that helped: -- Before using resonance on Heatshredder, line it up so its back is pressed against another enemy. Otherwise the knockback sends it so far away that it's out of range for the shieldbreak. -- The knave in wave 2 roots in place when it's shieldbroken. It can be used as a "wall" to use for grouping. -- Sawshredders will chase you. -- Fresh Paint Raf's support skill will push the enemies by a decent amount. - Ideally, end wave 1 within one weakness window, or just a few seconds after it. What I did here was focus on Heatshredder, then do a blind active skill and pray that it hits the two Sawshredders behind me. When the gamble paid off it bought me an extra 8s. - Wave 2 has to end at 2:00 or earlier, and be able to resonance the wave 3 boss as soon as it spawns. - In wave 3, hug the boss's left arm. Attacks from its right arm are harder to predict and dodge. - Use oath at the very start of weakness to gain the fluctuation buff, follow with active skill, gather 3 claymore stacks, then active skill again. ✦ Team B: 1:32 1:31 clears, hybrid build (CR + D2W). I cleared on claymore before I realized what the fluctuation was, then did it again with sword. Took a decent amount of attempts with both weapons, but it was easier with sword. - Use charged attack before big damage for even bigger damage, courtesy of the fluctuation. - Using support skill at max Harmony/using empowered support skill will leave a black puddle that deals damage over time and gives 10% increased damage taken to enemies inside it. - I prefer to start from the left side of the arena, and push mobs towards the right side as I attack. - Number of enemies you need to kill each wave and where the shielded enemy will spawn: -- Wave 1: 1 enemy, spawn far right -- Wave 2: 3 enemies, spawn center -- Wave 3: 3 enemies, spawn center - The knaves are easier to kill compared to the wyrms. - In wave 3: -- For the claymore clear, I used oath to finish off the 3 mobs and get the shielded enemy to spawn quicker. The latest I would use oath was at 1:45, giving me ~10s to kill the shielded mob. -- For the sword clear, I held off using oath until the shielded mob was in weakness. The latest I would use the resonance was at 1:34 to give me some few seconds allowance to finish off any enemies that were still alive. ✦ Team C: 1:31 clear, weakness build. Watch the video for specific skill timings. - In wave 2, while waiting for resonance to come back up, I use basic attack combo to delay the enemy from using its thorny puddle attack. Getting hit by this restores the enemy's health. - Trigger an empowered support skill before the final shieldbreak to get max Flame Lily buff stacks. - Final shieldbreak at 1:43 at the latest.
𝐋𝐢𝐧𝐤𝐬── .✦
Shout out to my meme clear homies!
VegaValent with all Xavier - Distant Youth, Evol Police, Deepspace Hunter
RNY with Fresh Paint, Deepspace Pilot, Evol Police

#love and deepspace combat#senior hunter contest#shc#fresh paint rafayel#phantom of the siren rafayel#artist rafayel#rafayel love and deepspace#hunter claymore#hunter sword#stella match#36/36#40 boost#video#game version 3#love and deepspace#lumina fights#Youtube#milestone
3 notes
·
View notes
Text

░ 𝐃𝐢𝐫𝐞𝐜𝐭𝐢𝐨𝐧𝐚𝐥 𝐎𝐫𝐛𝐢𝐭: 𝐋𝐢𝐠𝐡𝐭 𝟓𝟎 ⠀ 𝐆𝐚𝐦𝐞 𝐕𝐞𝐫𝐬𝐢𝐨𝐧 𝟑.𝟎 ⠀ ①② ᴄᴏᴍᴘᴀɴɪᴏɴ: Evol Police Xavier ⠀ ①② ᴡᴇᴀᴘᴏɴ: Hunter Claymore
⠀⠀-------------------------------------------
⠀⠀⠀☑ Stella Match⠀⠀☐ Brute Force ⠀⠀⠀☑ Video
⠀⠀-------------------------------------------
Light Orbit 50 stats. Evol Police Xavier for both teams!
𝐕𝐢𝐜𝐭𝐨𝐫𝐲── .✦

𝐒𝐭𝐚𝐭𝐬── .✦


𝐕𝐢𝐝𝐞𝐨── .✦
youtube
𝐍𝐨𝐭𝐞𝐬── .✦
2025-05-30 12:39 PM
Evol Police tips: - Immobilized (two yellow bands around the enemy) will keep the enemy in place and apply a 20% increased DMG taken to the enemy. -- Deal a lot of damage while enemies are Immobilized. - Empowered support skill will trigger Immobilize immediately. T1 notes: - Weakness build, because we break shields often. - At the start, push the Pale Myst (white) and a Dark Myst (black) into a corner. The goal is to keep the mobs around this general area for easier grouping. - Group at least 2 enemies at a time. Switch target to the ungrouped enemy after a while. - Dark Mysts will chase you, Pale Mysts will move away from you. -- Watch for when the Pale Myst floats away. Push it back into the group when it does. - Use a resonance between 1:03-1:10, so you can use the first oath at 1:00 during weakness. Prioritize using oath at 1:00 over using the resonance. - If you timed your first oath properly, you can use a second oath during the last few seconds of the fight. T2 notes: - Used hybrid build (Crit Rate to 40%, the rest into DMG to Weakened). Crit build (Crit Rate + Crit DMG) is also a good option. This is because most of the fight is done outside of weakened state. - Evol Police is great for this boss because his Immobilize debuff can trigger even if we don't use resonance. - Expedited Energy instead of Oath Recovery. The timing for 2 oaths is awkward with this boss. (I do have 10% OR from the solar pair R1 bonus, mind) - Start the fight with resonance. After that, use active skills back to back. - When the camera zooms out and there's a red circle marker under the boss, it will start to spin. Be brave! Use an active skill into the boss towards the end of the spin for some extra damage. - After the spin, it will go into Pale Myst mode (white aura) and gain protocore shields. This is the only time that we will use resonance in this fight to break its shields. - Use oath during weakness. - Using 2 active skills during weakness with Evol Police is tight, don't worry about it if you can only fit in 1. - After this the boss will go into Dark Myst mode (black aura, no shields) again, so spam active skills exclusively until the fight is over.

#love and deepspace combat#deepspace trials#light orbit#light orbit 50#evol police xavier#xavier love and deepspace#hunter claymore#dark myst#myst#stella match#video#game version 3#love and deepspace#lumina fights#Youtube
6 notes
·
View notes
Text

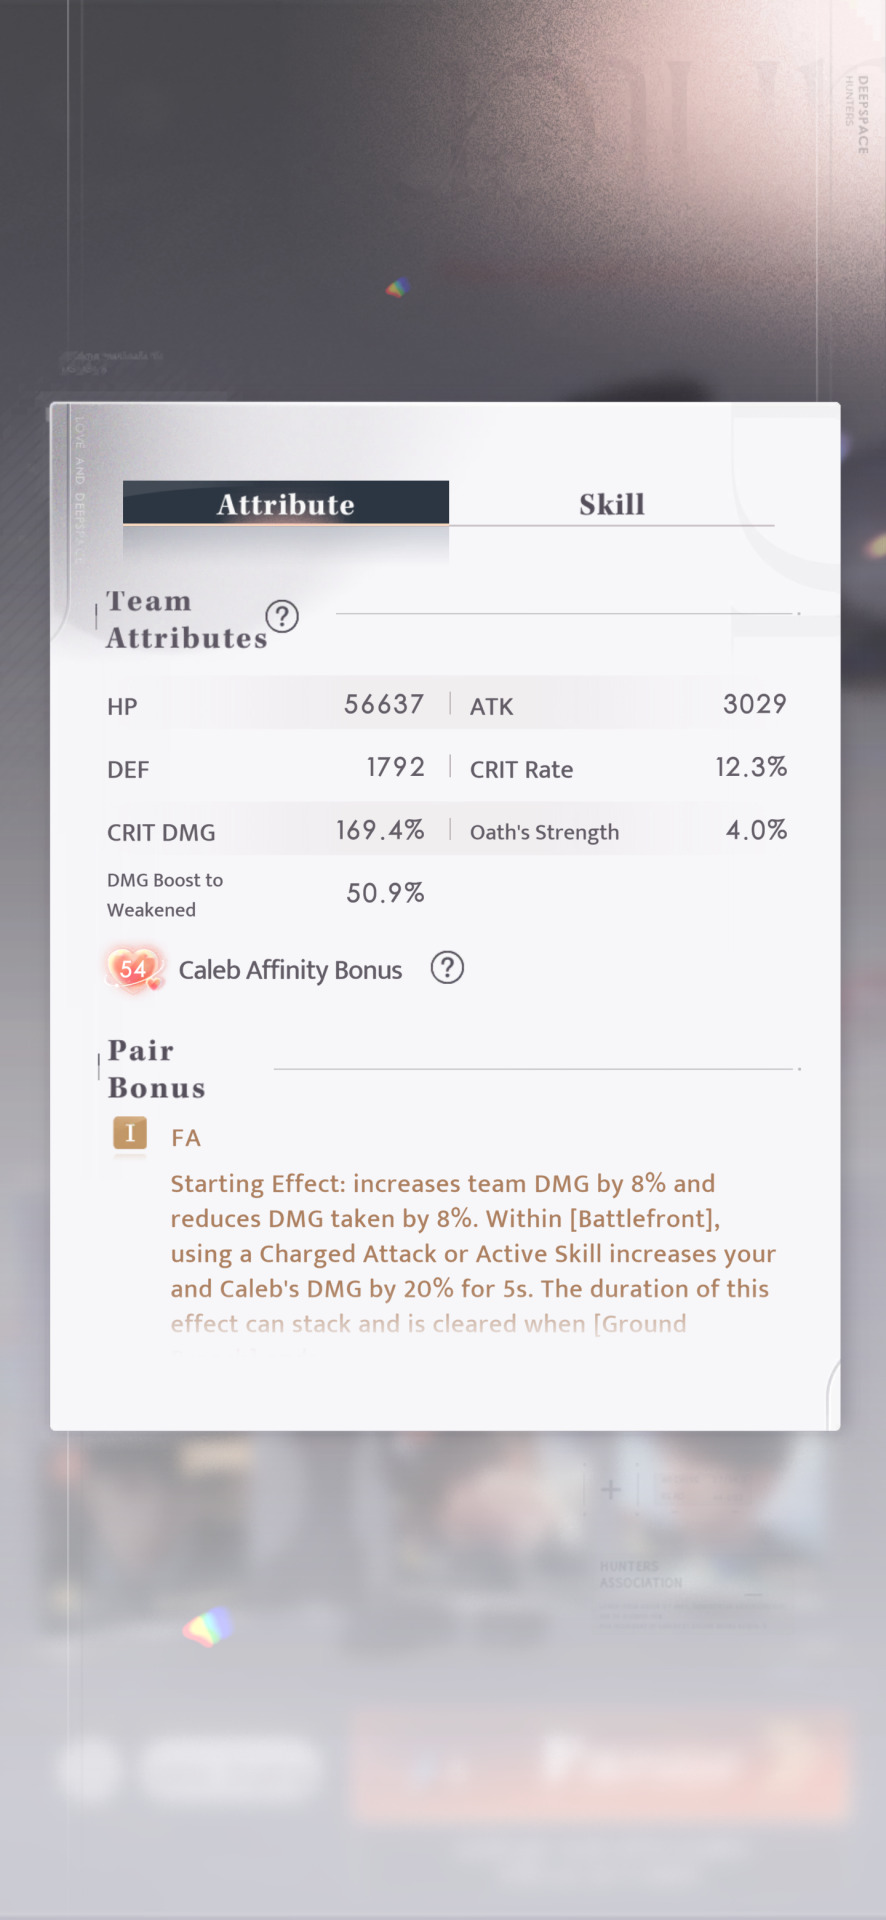
░ 𝐁𝐎𝐔𝐍𝐓𝐘 𝐇𝐔𝐍𝐓: 𝐌𝐫. 𝐁𝐞𝐚𝐧𝐢𝐞 𝟗 ⠀ 𝐆𝐚𝐦𝐞 𝐕𝐞𝐫𝐬𝐢𝐨𝐧 𝟑.𝟎 ⠀ ᴄᴏᴍᴘᴀɴɪᴏɴ: Farspace Colonel Caleb, R0 ⠀ ᴡᴇᴀᴘᴏɴ: Skybreaker-SN
⠀⠀-------------------------------------------
⠀⠀⠀☐ Stella Match⠀⠀☐ Brute Force ⠀⠀⠀☐ 3 Star Pass ⠀⠀⠀☑ Video
⠀⠀-------------------------------------------
The Colonel is back to bully Beanie for Double Bounty Drop. 😎 Weakness build, pretty straightforward gameplay.
𝐕𝐢𝐜𝐭𝐨𝐫𝐲── .✦

𝐒𝐭𝐚𝐭𝐬── .✦
𝐕𝐢𝐝𝐞𝐨── .✦
youtube
𝐍𝐨𝐭𝐞𝐬── .✦
2025-05-28 7:11 PM
Fight notes: - Build up Firepower quickly with Zerom stacks (dash to get them) and full basic attack combo. - Use active skill off cooldown. - During resonance, CA -> 2BA and Active Skill -> 2BA spam. Angle yourself so that are shooting Beanie towards the wall so that he doesn't keep moving around. Ground Breach and/or oath right before weakness ends. - Generally, stay close to Beanie, so that when the gift boxes appear he still takes damage from your charged attacks. - If you're lucky, you'll get DEF Bonus or ATK Bonus buff from the gift boxes.

#love and deepspace combat#bounty hunt#mr beanie#beanie 9#farspace colonel caleb#caleb love and deepspace#skybreaker sn#stella match#video#game version 3#love and deepspace#lumina fights#Youtube
4 notes
·
View notes
Text

░ 𝐃𝐢𝐫𝐞𝐜𝐭𝐢𝐨𝐧𝐚𝐥 𝐎𝐫𝐛𝐢𝐭: 𝐋𝐢𝐠𝐡𝐭 𝟒𝟖 ⠀ 𝐆𝐚𝐦𝐞 𝐕𝐞𝐫𝐬𝐢𝐨𝐧 𝟑.𝟎 ⠀ ᴄᴏᴍᴘᴀɴɪᴏɴ: Evol Police Xavier ⠀ ᴡᴇᴀᴘᴏɴ: Hunter Claymore
⠀⠀-------------------------------------------
⠀⠀⠀☑ Stella Match⠀⠀☐ Brute Force ⠀⠀⠀☑ Video
⠀⠀-------------------------------------------
Only had enough deltas to raise Crit Rate to 40%. Needed the boost from all 3 frenzies because my Crit DMG and DMG to Weakened is still very low for this.
𝐕𝐢𝐜𝐭𝐨𝐫𝐲── .✦

𝐒𝐭𝐚𝐭𝐬── .✦


𝐕𝐢𝐝𝐞𝐨── .✦
𝐍𝐨𝐭𝐞𝐬── .✦
2025-05-27 9:39 PM
Evol Police tips: - Claymore is not the most compatible weapon with Evol Police playstyle, but the claymore damage makes up for it. - Immobilized (two yellow bands around the enemy) will keep the enemy in place and apply a 20% increased DMG taken to the enemy. -- In other words, deal a lot of damage while enemies are Immobilized. - Empowered support skill will trigger Immobilize immediately - take advantage of this. Wave 1 notes: - Push the 2 enemies north. Switch target to the frenzy as soon as it spawns, then use resonance. - If you can't kill this frenzy comfortably within the time limit, that's a sign that you need more stats. Wave 2 notes: - Keep the Lupus (shielded dog) where it spawns. If it dashes, get hit to stop its dashing. - Resonance -> oath as soon as the frenzy spawns. - Kill the frenzy first, then finish off the Lupus. Wave 3 notes: - Position behind where the dragon will land to anticipate the frenzy spawn. - It helps a lot to get an empowered support from the dragon spin here, because you can use it to hold both the dragon and the frenzy in place for resonance. - After the first resonance, focus on pushing the frenzy towards the dragon, then resonance (shieldbreak) -> oath to finish off the frenzy and attack the dragon during weakness. - You can keep attacking the dragon during lock phase. Unless you are using an Expedited Energy cube, don't use active skill during this phase. Save energy for another shieldbreak. - I used my final resonance earlier than usual here because I know that I could already kill the dragon. Normally, I would wait until 0:13-14, just in case I can fit one last oath into the last few seconds.

#love and deepspace combat#deepspace trials#light orbit#light orbit 48#evol police xavier#xavier love and deepspace#hunter claymore#frenzy#foulwings#stella match#video#game version 3#love and deepspace#lumina fights
0 notes
Text


⋆˙⟡ Double Bounty Drop is back! Your first 30 Bounty Hunt drops for the day are doubled until June 1st.
—
This is a good time to farm materials for card ascensions and card levels, so work hard and push higher on those bounty hunt levels! Happy hunting!
1 note
·
View note