#1/72 Scale Model Paint Masks
Explore tagged Tumblr posts
Visit Tumblr Blog
Explore Tumblr blogs with no restrictions, modern design and the best experience.
Last Seen Tumblr Blogs


Fun Fact
Tumblr Inc. is funded by 13 investors.
Text
Japanese Roundels - Hinamaru
Scale Modelling Paint Masks for Japanese Roundels (Hinamaru) used on aircraft during WW2.
These are made from quality kabuki sheets and digitally cut.
#WW2 Aircraft#1/32 Scale Model Paint Masks#1/48 Scale Model Paint Mask Sets#1/48 Scale Model Paint Masks#Japanese Aircraft#WW2 Scale Model Paint Mask Sets#WW2 Scale Model Paint Masks#WW2 Scale Model#Roundels#Roundel Masks#Scale Model Paint Masks#Paint not Decals#Scale Model Paint#Scale Model Painting#1/48 Scale Japanese Roundels#1/48 Scale Japanese Roundels Paint Masks#1:48 Scale Japanese Roundels#1:48 Scale Japanese Roundels Paint Masks#1/32 Scale Japanese Roundels#1/32 Scale Japanese Roundels Paint Masks#1:32 Scale Japanese Roundels#1:32 Scale Japanese Roundels Paint Masks#1/48 Scale Japanese Paint Masks#1:48 Scale Japanese Paint Masks#1/32 Scale Japanese Paint Masks#1:32 Scale Japanese Paint Masks#1/72 Scale Japanese Roundels#1/72 Scale Japanese Roundels Paint Masks#1:72 Scale Japanese Roundels#1:72 Scale Japanese Roundels Paint Masks
0 notes
Text
Plastic Skies - Model 6: Saab Draken

Been a while, huh? To be completely honest, it hasn’t actually been that long since the last model, but I held up on writing this until after Christmas for no particular reason.
For those who haven’t seen these, this is my ongoing journal of getting back into building aircraft model kits, a hobby that I tried out for a couple of years when I was a kid but never really got into. And that’s part of why this particular one is at least a little important.
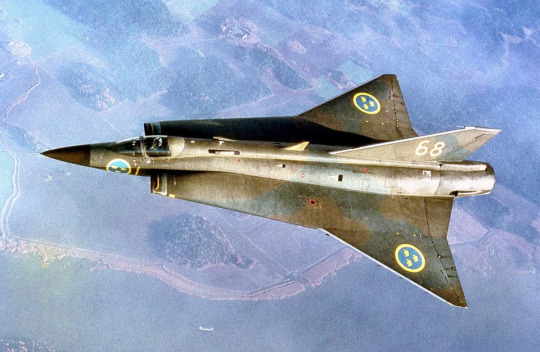
I like the Saab Draken quite a bit. Developed right after WWII as a supersonic fighter-interceptor and built in the early years of the Cold War, the Draken was able to reach speeds of Mach 2 and is also the first aircraft capable of doing the Cobra Maneuver, one of those aviation things that looks like someone hacked real life:
(It’s kinda funny that the plane’s name, “Draken”, can mean either “Dragon” or “Kite”)
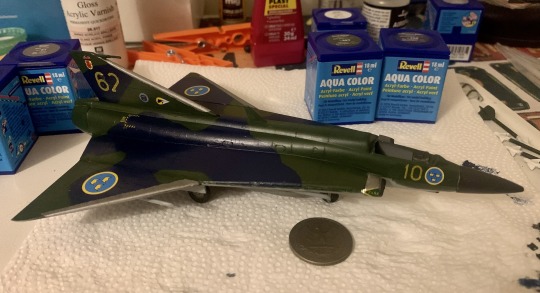
I also love its general shape, its double delta wings and wide body making it look more like a starfighter than an airplane. But the main reason why I like the Draken is because it was one of the first model kits my brother built when we were kids. Which makes it one of the very first model kits I’d ever seen. So when I went looking for a 1/72 scale kit to finally move away from the tiny 1/144′s that I’d been focusing so much on, this very generously-priced Draken caught my eye right away. It was pretty much the same price as the Tomcat and Flanker, plus it gave me an opportunity to pait camouflage again, so after a quick trip to a new shop it was mine.

I was happy to see that I had all the tools I needed for this build except for some blue paint. The shop I bought it from didn’t have it, so I took at as an opportunity to go to another one and also pick up a few extras I’d been looking at. Namely, a can of brush cleaner and a rotating platform with elevated hooks to paint smaller parts which I... actually didn’t get much use out of and kinda regret. But it might be useful someday!

The build itself was surprisingly pleasant. After all these models, I’m happy to see I’ve grown an eye for getting the pieces properly glued and balanced, so no more crooked tailfins or wings. Or, well, not as crooked as in previous attempts.
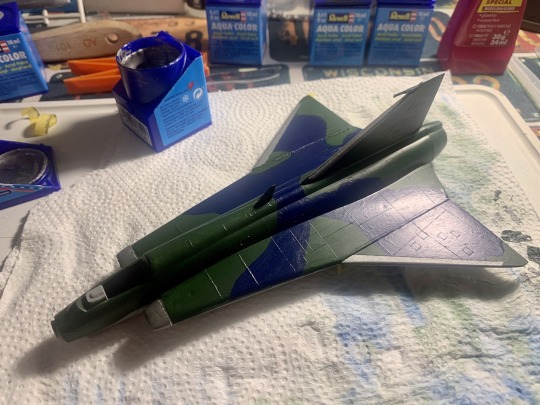
I’m also pretty happy with the paintjob I gave this old gal. It’s a bit thicker than in the reference pictures, but the extra space and a bit more care when thinning the paints made it so the brush strokes aren’t quite as visible as in other models, which was my main goal here. Also, getting the silver stripes required a bit of masking tape use which also went a lot better than other times.

Likewise, I’m pleased with how the landing gears came out. The frontal one is still a bit crooked and the gates aren’t exactly right to the original plane, but the improvement is there. Which is always one of the most encouraging things with any hobby or activity: watching you get better at it. Overall, I was having a nice, relaxing time with my Draken, watching it quickly take shape while also enjoying the process. Painting in particular was really fun and rewarding. It didn’t escape my attention that I was, in a way, one-upping my brother. He never painted his Draken, after all. Although while I was working on this, I did unlock a very, veeery vague memory of one of us attempting to paint at least one kit and being very disappointed at the results. I can’t remember which one of us or what kit but the image was still there, hazy in my mind. I should ask him someday.

So yeah, a good time was had by all rrright up until the decals came out. Turns out Mistercraft’s decals are somehow both tough and fragile. Even after dunking them a long time in water, the only thing that could get them out of the sheet were my fingers, which imediately opened up a whole can of problems which you can already see in the pic above if you look closely enough.
The decal mishaps meant two things: first, that I decided to skip on the big yellow dragon/swordfish decal that would’ve otherwise covered most of the plane’s fuselage. And two, that I was gonna have to weather at least a bit of it to give it a worn-out look. If only to justify the busted up decals.

The weathering job ended up being once of the nicest parts of the model somehow. Thanks to the extra surface to work with, I was able to really fine-tune the sludge wash into something that looks pretty good to my eye. I didn’t do the same for the top of the plane, though that’s mostly because I’m saving up to buy some proper panel liners that will most likely give me a much better look than anything this wash could do.
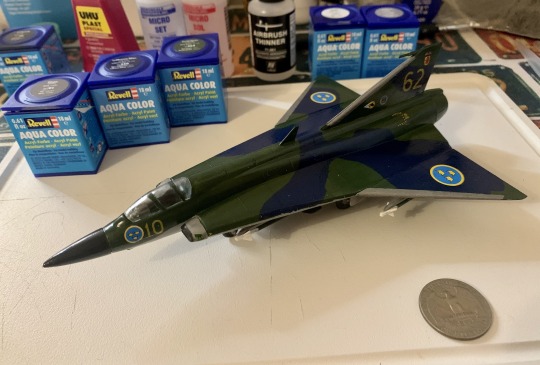
Speaking of the top, one thing I did for this Draken that I haven’t done for any other plane so far was paint the canopy. I took an extremely fine brush to it, and while it was pretty intimidating at first, I was able to get it painted pretty alright and without having to clean it or use thinners. It’s still a bit gooey and that’s my fault for not using masking tape, but for a first experience, it was still quite nice.

After that, all that was left was give it a couple coats of matte varnish, and the Draken was ready. The combination of a decent enough paintjob and the nostalgic value meant I was quick to show it off to everyone and their dog, who were pretty impressed with it. So the jump up in scale ended up being a real success, in more than one ways. Not only did it serve me a sweet slice of circularity and was a mostly comfortable build: the best part of making this Draken was the confidence it left me with.

I know I’m not a huge pro and I’m sure I’m reaching the ceiling of my personal skills and/or the level of detail I care to get into, but if this is as good as I can make a model, I feel pretty satisfied. Content. And more importantly, I finally feel ready to tackle the Final Boss of this whole endeavor. The model that I desperately want to Get Right. The model that will be, if everything goes well, the first thing I build in 2023.
I’m very, very excited for it.
#My stuff#Hobbies#Journals#Good ol' Swedish planes#I'd like to build a Gripen too someday#They're nice planes Harold#Also#Man#Europe sure seems to love their delta wing planes huh?#Wonder what's up with that
15 notes
·
View notes
Photo


Bandai Star Wars 1:1000 Blockade Runner Vehicle Model unboxing photoset November 30th, 2018
Here it is, the highly anticipated Corellilan Corvette, aka “Blockade Runner,” in 1:1000 scale by Bandai! Between this and the 1:72 B-Wing, Bandai really made me happy this year in terms of Star Wars kits this year. The detail on this kit is exquisite, and considering that it is in 1:1000 scale, nobody should complain about any inconsistent box scale. Stickers are provided instead of decals, but it should be possible to use these stickers as painting masks instead.

Here’s the ship’s bridge.

Some of the escape pods have been jettisoned.


It’s possible to run SMDs into these engines to light them up. the December 2018 issue of Model Graphix magazine shows how.
#bandai#star wars#corellian corvette#blockade runner#バンダイ##スターウォーズ##プラモデル##ブロッケード・ランナー#plastic model
10 notes
·
View notes
Photo
So FINALLY I get to show these two pieces off.
The originals can be found on my DeviantART here and here:
http://fav.me/dau0alj
http://fav.me/dau0fpy
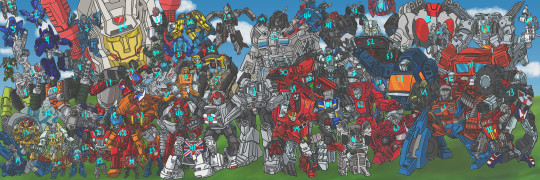
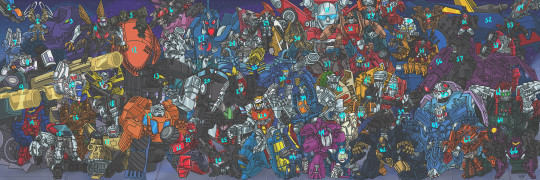
After doing a lot of the art for Renegade Rhetoric and Echoes and Fragments, I was on a GoBots high…probably mostly because before all this I knew little to nothing about GoBots, so it was fun breaking into something new and being a part of breathing new life into this underdog franchise. I had expressed to Jim Sorenson my overly ambitious goal to eventually draw and redesign every GoBots character, if for no other reason, just for fun. Eventually Jim approached me with just the opportunity, except for something actually canon…so that was a huge plus. He told me that Andrew Hall was interested in a huge poster of literally everybody from GoBots…so I was down.
While it still wasn’t exactly clear WHAT the poster would be used for, the project evolved into a set of two posters: one for all the Guardians and one for all the Renegades. And more specifically, they were to homage the “Goodbye Convoy” and “Goodbye Megatron” posters that came with the respective gift sets.
http://www.tfw2005.com/boards/attachments/10-jpg.27332166/
So my mission was to complete both of these posters, include every GoBots character, and makes them all recolors/retools of existing Transformers designs so as to avoid any copyright/trademark fiascos. (Actually, any Hasbro-owned design was at my disposal, though I was able to manage sufficiently within the realm of Transformers.) Oh, and the amount of time I originally had to complete the posters decreased significantly, offering me only two months to complete them both. (And having a family, full-time job, and not being an amazingly quick/efficient artist made this quite the challenge.) But I sold my soul, and got to work…and HOO BOY did I work, but - dear fragging Primus - I actually did it! Finished each one in exactly a month…and I must say that these posters have been my most grandiose artistic undertakings, and I was quite astounded and impressed with myself for actually completing something so damn huge AND doing it on time (OK, well…each one went like a day over my deadline, but whatevs :P) Drained as I was at the end of it all, I was also at the same time super invigorated to start doing some more art to help out with Beast Wars: Uprising, and my confidence in myself as an artist had increased drastically. Also, with the enormity of these projects, everything after that seemed thoroughly achievable. (Oh, and I later found out these posters would actually be used in the Spatiotemporal Challengers finale…so that was really exciting…and then literally 10 minutes before the story went live, they were apparently cut from the story. But Jim was still so kind to use them for Renegade Rhetoric. So either way, I’m still quite enthused!)
But I won’t get into everything else regarding my adventures doing Fun Pub art right now. The focus of this post is on the GoBots posters and some things I’d like to share about them.
So I did a ton of research and did my best to include every (or nearly every) GoBots character in these two posters. I made sure to include every Guardian and Renegade from the Challenge of the GoBots cartoon (including show-exclusive characters) as well as every toy-exclusive character as well - and not just the ones from the “main” toy line, but the obscure, miscellaneous ones as well. I specifically begged Jim to include Scooter Bot (which he fortunately supported), so I threw in the other weirdos like “AM Radio”, “Laser Gun”, “Trans AM”, and the other non-RoGun Arco GoBots. Considering these guys were factionless, Jim and I had to group them accordingly…so they’ve now been sorted onto their appropriate for these posters. We also agreed that the model kit character “Turbo Teen” was TOO weird to justifiably include, so he’s been left out.
Jim said I didn’t HAVE to include Rock Lords, Jewel Lords, and Fossil Lords, but I was feeling REALLY ambitious (and I’m a self-destructive completionist at heart), so I did my best to include them. In the end though, due to time restraints and the fact that it would visually be very difficult to include THAT many additional characters that weren’t even GoBots proper, only the major ones made the cut. Boulder, Nuggit, and Magmar were the most significant Rock Lords, so they got to squeeze their way into this cacophony, and Solitaire was the representative Jewel Lord. Sadly, none of the Fossil Lords or Narlies made it.
Regrettably, its been several months since I’ve finished these posters, and I’ve very recently discovered some more super obscure characters from play sets and other merchandise that I would’ve included had I known about them previously. There’s A-Tak from the HO Train Set, the little dude from the Mystery Tunnel Roller Coaster, the four different colored Bubble Blowers, the 3-in-1 Communication System, and some little guy that literally turns into the GoBots logo. (OK, so that one would probably have been too weird to use too…but still.) I’m sure one day I’ll draw them, though.
Now more specifically regarding everyone I did draw, I’ve compiled a guide to who’s who and what bodies they’re modeled after. Also to note, in order to resemble the original GoBots characters as much as I could beyond just a paint job, I chose different heads from OTHER Transformers characters that most resembled the original heads of the GoBots characters…or at least the ones that most readily came to mind when I referenced the GoBots characters’ original designs.
So here’s a list of everybody (with numbers matching the above images):
Guardians
1. Command Center - CW Sky Lynx (with the legs out) 2. Flip Top - CW Alpha Bravo 3. Guide Star - Generations Payload with G1 Beachcomber’s head 4. Bent Wing - CW Powerglide 5. Ace - DotM Powerglide 6. Bolt - TF 2010 Highbrow with Armada Oval’s head 7. Bullseye - G1 Windsweeper with G2 Hooligan’s head 8. Sky Fly - Armada Ramjet 9. Steamer - Go-Bots Randy with G1 Bumper’s head 10. Blaster - Armada Wreckage 11. Baron/Professor Von Joy - Alternators Camshaft (modified so the top of the car becomes his head) 12. Solitaire - Armada Thunderwing with Animated Red Alert’s head 13. Bullet - G1 Shouki 14. Night Ranger - Cybertron Lugnutz 15. Boulder - BW Under-3 with Infiltration Ratchet’s head (specifically Guido Guidi’s cover for issue #2) 16. Nuggit - BW Eggbot with MTMTE Fulcrum’s head 17. Good Knight - TF 2010 Hubcap with Armada Incinerator’s head 18. Small Foot - G1 Gears 19. Dive-Dive - Cybertron Deepdive 20. Shotgun - WFC/FoC Shockwave with MTMTE Rung’s head 21. Rifle - TR Galvatron (modified to have G1 Sentinel “guard” head) 22. Scope - Universe 08 Nightstick 23. Squirt - CW Shockwave with Armada Stormcloud’s head 24. Pistol - AM O.P. 25. Tic Toc - Movie Meantime 26. Scooter Bot - Generations Metroplex (with a modified face) 27. Spay-C - OC Raker with TF 2010 Sea Spray’s head 28. Path Finder - G1 Cosmos 29. Royal-T - CW Quickslinger with Prime Vehicon head 30. Treds - G1 Warpath 31. Man-O-War - G1 Seaspray 32. Beamer - G1 Windcharger 33. Dart - RotF Knock Out 34. Raizor - G1 Rotorstorm with Armada Gunbarrel’s head 35. Road Ranger - G1 Huffer 36. Motosan/Mr. Moto - Armada Sureshock 37. Defendor - Movie Brawl with Classics Jetfire’s battle mask head 38. Dumper - CW Long Haul 39. Dozer - CW Bonecrusher with CW Scrapper’s head 40. Tri-Trak - DotM Backfire with Cybertron Ransack’s head (with an added mouthplate) 41. Jack Attack - Classics Bumblebee with Armada Iceberg’s head 42. Rest-Q - G1 Hubcap 43. Leader-1 - CW Air Raid with CW Quickslinger’s head 44. Twister - Energon Bulkhead with CW Onslaught’s head 45. Hitch Hiker - G1 Omega Spreem 46. Courageous - OC Sky Sweeper 47. Mach-3 - CW Fireflight 48. Wrong Way - G1 Spinister 49. Space Hawk - Prime Star Hammer 50. Major Mo - Universe 08 Prowl with his head from Echoes and Fragments 51. Super Couper - TF 2010 Hubcap 52. Rumble - BM Blastcharge 53. Tail Pipe - Masterpiece Sideswipe with Cybertron Red Alert’s head (with an added mouthplate) 54. Zeemon - G1 Firecracker (modified so the top of the car becomes his head) 55. Turbo - CW Breakdown 56. Scratch - G1 Trailbreaker with G1 Arcee’s head 57. Throttle - Cybertron Offshoot with CW Counterpunch’s head 58. Hi-Way - modified TF vs. G.I. Joe “Bus Decepticon” 59. Scooter - CW Groove 60. Hans-Cuff - CW Streetwise 61. Van Guard - G1 Skids 62. Sparky - G1 Runamuck with Universe Roulette/Universe Shadow Striker’s head 63. Street Heat - Universe 08 Sunstreaker with MP Ironhide’s head 64. Trans AM - G1 Roadhandler with RID01 Hot Shot’s head 65. Wrecks - Armada Scavenger with Timelines Strika’s head 66. Ridge Runner - Spittor’s Cybertronian form from BW: The Gathering 67. Heat Seeker - G1 Dreadwind 68. Spy-Eye - Classics Jetfire with G1 Whirl’s head 69. Apollo - Armada Sky Blast 70. Pumper - CW Hot Spot with CW Hook’s head 71. Staks - CW Optimus Prime with his head tucked in 72. AM Radio (who I’m calling Radio-Head) - Spychanger Prowl 2 (modified so the top of the car becomes his head) 73. Tork - Cybertron Dirt Boss with Armada Spiral’s head
Renegades:
1. Thruster - Victory Thunder Arrow 2. Twin Spin - PCC Searchlight 3. Quick-Step - Hero Mashers Grimlock 4. Traitor - Animated Waspinator with G1 Ransack’s head 5. Geeper-Creeper - Energon Strongarm 6. Grungy - OC Sky Sweeper 7. Bad Boy - G1 Powerglide 8. Bug Bite - Classics Bumblebee 9. Nemesis - Prime Bumblebee Battle Suit 10. Chaos - G1 Flywheels with Armada Jetstorm’s head 11. Decker Decker - Bendy-Bus Prime 12. Scales BM Thrust (modified so the cycle-mode’s head becomes the robot mode’s head too…except it’s G1 Rippersnapper’s head) 13. Slicks - G2 Double Clutch with Cybertron Hardtop’s head 14. Pow Wow - G1 Crankcase with Armada Blurr’s head (with the “side wings” removed) 15. Psycho - TR Blurr (modified so his cockpit becomes his head) 16. Magmar - Protoform Optimus Prime with LSotW Impactor’s head 17. Stinger - Masterpiece Tracks with G1 Searchlight’s head 18. Destroyer - Classics Broadside (with his turret turned around so he has a cannon for a face) 19. Fly Trap - RB Salvage 20. Herr Feind/Doctor Go - G2 Blowout (modified so the top of the car becomes his head…and added a monocle) 21. Fitor - Classics Ramjet 22. BuggyMan - G1 Beachcomber 23. R-Navi (BM Technorganic Waspinator) 24. Laser Gun - Masterpiece Shockwave with G1 Onslaught’s head 25. Crasher - Classics Mirage 26. Cy-Kill - Generations Wreck-Gar with CW Dragstrip’s head 27. Monsterous - IDW Monstructor with BW Tripredacus’ head (specifically based on Don Figueroa’s design): — Fright Face - Slog — South Claw - Wildfly — Weird Wing - Bristleback — Heart Attack - Birdbrain — Gore Jaw - Scowl — Fangs - Icepick (They’d probably all have different heads, but obviously I didn’t need to figure them out for this project.) 28. Sky-Jack - G1 Talon with Armada Jolt’s head (with no mouthplate…as per his appearance in the PS2 game and pack-in comic) 29. Zero - RotF Ransack with SotW Ostaros’ head 30. Breez - PCC Searchlight with G1 Pipes’ head 31. Puzzler - modified CW-styled Combiner with RB Chase’s head: — Tic Tac - TF 2010 Tracks (modified to transform into a Combiner body) — Pocket - CW Breakdown — Crossword - CW Dead End — Zig Zag - CW Streetwise — Rube - CW Wheeljack — Jigsaw - CW Blackjack (They, also, would probably have been given different heads had it been necessary.) 32. Water Walk - CW Powerglide (with modified “sunglasses-styled” eyes/visor) 33. Stallion - G1 Trip-Up with BW Manta Ray’s head 34. Gunnyr - Armada Jetstorm 35. Evil One - RotF The Fallen 36. Tank - BM Tankor with MTMTE Trailbreaker’s head 37. Destroyer (the other one) - RotF Depthcharge 38. Clutch - Movie Dropkick 39. Cop-Tur - Energon Bulkhead with Universe 08 Jolt’s head 40. Vain Train - G1 Yukikaze 41. Crane Brain - CW Hook 42. Screw Head - UW Nosecone (modified so his drill becomes his head but with G1 Soundwave’s face 43. Binoc - Movie Longview 44. Odd Ball - RB High Tide with Armada Thrust’s head 45. Tux/Stretch - Animated Stretch (without the mustache) 46. Spoons - RoTF Dirt Boss with G1 Hook’s head (with an added mouthplate) 47. Gong - Movie Meantime 48. Re-Volt - G1 Doubledealer with Action Master Treadshot’s head 49. Blast - BM Blastcharge 50. Night Fright/Blades - TF 2010 Tomahawk with Armada Dune Runner’s head 51. Snoop - Armada Terradive with MTMTE Nautica’s head (without the antenna) 52. Zod - G1 Trypticon 53. Warpath - Classics Divebomb 54. Rogue Star - Prime Sky Claw 55. Spoiler - G1 Freewheeler 56. Dactyl - Armada Laserbeak 57. Loco - RoC D-Go 58. Block Head - CW Mixmaster 59. Bladez - Cybertron Unicron (slightly modified so his claws extend on the side of his hands and not over them) with BM Thrust’s head 60. Hornet - Animated Slapper (with added wings) 61. Scorp - Energon Scorponok (with a slightly modified head design) 62. Pincher - Energon Slugslinger with BW Manterror’s head (specifically based on his design from The Gathering) 63. Klaws - Energon Sharkticon with G1 Venom’s head 64. Vamp - Cybertron Megatron with G1 Chop Shop’s head 65. Bugsie - BM Scavenger with BW Retrax’s head 66. Creepy - Cybertron Scrapmetal with BW Tarantulas’ head
Additional notes:
Anyone who had already been given a design in Spatiotemporal Challengers kept it.
With Courageous, Grungy, and Nemesis…due to the fact that they’re really just combining battle suits rather than the characters themselves actually combining, it wouldn’t have really carried over properly to represent them as recolored Transformers Combiners. But instead, since they all have vehicles modes as well, we found some TF molds that fit the bill decently enough. And since the Sky Sweeper is made up of Combiner kibble, the design still hints at the notion of combining. And using the Bumblebee Battle Suit for Nemesis carried the whole…well, battle suit theme. So I think those worked out pretty well.
While it it’s PRETTY difficult to tell in the poster, Scales in actually in Thrust’s “3-wheeled robot mode”…since that would be more fitting for Scales than having legs. In a similar vein, Rumble and Blast are in Blastcharge’s “wheels-for-legs” robot mode.
Tic Toc and Gong display a little Easter egg. Tic Toc diplays 10:29 1984, which (after Jim and I did some digging to make sure it was actually accurate despite other reported information) is the original air date of the first episode of the Challenge of the GoBots cartoon. Also his pose is lifted from the 12th Doctor’s iconic stock pose. Gong’s display date of 10:27 1986 is (according to Vector Prime) the air date of “season 2” of Challenge of the GoBots, as recounted by Cy-Kill himself in Renegade Rhetoric. To parallel Tic Toc’s pose, I wanted to give Gong an iconic pose of The Master…but there doesn’t really seem to be one. But I did kind of use this as reference:
http://static.tvtropes.org/pmwiki/pub/images/themasterthumbsup_8908.jpg
Oh, also I’m an idiot and just noticed a couple days ago that I didn’t color Geeper-Creeper’s right arm all the way. I’ll fix that eventually.
But I guess that’s about everything I can think of currently that worth mentioning about this project. It was quite a momentous undertaking, but it was a blast to do, and I’m super grateful to Jim, Andrew, and Fun Pub for giving me the opportunity to do it!
- IKY
#GoBots#Transformers#transformers art#renegade rhetoric#cy-kill#leader-1#Guardians#Renegades#Goodbye#Convoy#Megatron#robots#art#artists on tumblr#action figures#toys#fun publications#IKY#IKY92791#deviantart#maccadam#rock lord
54 notes
·
View notes
Text
German Crosses - Type 4/5 - 1/48 Scale
Scale Modelling Paint Mask Sets for German aircraft.
This is for WWII German Crosses Type 4/5 used during the later years of WWII. There are 8 different sizes in this set with 6 of each size allowing you to paint multiple aircraft at the same time.
Type 1 - Available in 1/32 and 1/48 Scale
German Crosses Type 2 used on German Aircraft during the early stages of World War 2. These are the crosses with the black cross centre, white and black surrounds. Available in 1/24, 1/32 and 1/48 scale each set comprises 10 sizes with 4 of each size included (40 Total)
German Crosses Type 3 used on German Aircraft during the early years of World War 2. These are the crosses with a black centre and white corners. Available in 1/24, 1/32, 1/48 and 1/72 scales, each set has 12 diiferent sizes, each set includes 4 of each size (48 Total).
German Crosses Type 4/5 used on World War 2 era aircrafts. These are the crosses without the cross centre and either white or black corners. Available in 1/24, 1/32, 1/48 and 1/72 scale each set comprises 8 sizes with 6 of each size included (48 Total)
German Crosses Type 6/7 used on late World War 2 era aircrafts. These are the crosses without the cross centre and the thin black or white corners. Available in 1/24, 1/32, 1/48 and 1/72 scale each set comprises 4 different sizes with 6 of each size (24 Total)
Multi Sets
Available in 1/32 and 1/48 scale for either early war crosses (1,2,3), late war crosses (4/5, 6/7) or full sets
#WW2 Scale Model Paint Mask Sets#WW2 German Aircraft#WW2 German Crosses#Scale Modelling Aircraft Paint Masks#Scale Modelling Paint Mask Sets#The Crafting Well#thecraftingwell#The Crafting Well Paint Masks#1/48 Paint Stencil#1/48 Scale Model Paint Stencils#1/48 Scale Model Stencils#Scale Model Paint Stencils#Paint Stencil#Artist Paint Stencil#1/48 Scale Model Paint Mask Sets#Scale Model Paint Masks#Decal Replacement Paint Mask Sets#Decal Replacement#Paint not Decal#1/48 Scale Model Paint Masks#German Aircraft Scale Model Paint Masks#WWII German Cross Type 4/5#1/48 Scale WWII German Crosses Type 4/5#1/48 Scale WWII German Crosses Type 4/5 Scale Model Paint Masks#WWII German Crosses Scale Model Paint Masks#WWII German Crosses Type 4/5 Scale Model Paint Masks#1/48 Scale WWII German Crosses
0 notes
Text
A6M Zero (Tora)
Scale Model Paint Masks for the A6M Zero (Tora)
#1/48 Scale Model Paint Masks#1/72 Scale Model Paint Masks#1/32 Scale Model Paint Masks#1/48 Paint Masks#1/48 Paint Stencil#1/72 Paint Masks#1/72 Paint Stencil#1/32 Paint Masks#1/32 Paint Stencils#1/48 Japanese Aircraft Paint Masks#1/32 Japanese Aircraft Paint Masks#1/72 Japanese Aircraft Paint Masks#1/72 Zero Scale Model Paint Masks#1/48 Zero Scale Model Paint Masks#1/32 Zero Scale Model Paint Masks#1/72 Tora#1/48 Tora#1/32 Tora#Tora Paint Masks#Tora Scale Model Paint Masks#Zero Scale Model Paint Masks#Zero Model Paint Masks#Paint Masks for 1/48 Scale Zero#Paint Masks for 1/48 Scale Tora#Paint Masks for 1/72 Scale Tora#Paint Masks for 1/72 Zero#Paint Masks for 1/32 Scale Tora#Paint Masks for 1/32 Scale Zero
0 notes
Text
Spitfire MK.V
Scale Model Paint Mask Sets for 1/32 and 1/48 Scale Spitfire MK.Vb and VCard. Markings IR-G, DL-Z, DB-R, SH-Z, UF-X, J-AK, AE-A, and AV-R. These contain all the British Roundels, Fin tails and markings needed for decal replacement.
1/24 Scale is available upon request.
AE-A - S/N EP120, Roundels, Markings, Fin Flashes, and Serial Number in Kabukki Sheet.
UF-X - S/N EP689, Roundels, Markings, Fin Flashes and Serial Number in Kabukki Sheet.
AV-R - S/N BM590, Roundels, Markings, Fin Flashes and Serial Number in Kabukki Sheet.
Made from quality kabuki sheets these masks are flexible and can be used multiple times if handled correctly. Thin in design they won’t leave a ridge around your painted insignia like some vinyl mask sets can do. These will also not stretch or shrink as vinyl is known to do. These will allow you to paint aircraft markings and insignias in place of decals, this allows better weathering and a quality looking finish.
#1/48 Scale Model Paint Mask Sets#1/48 Scale Model Paint Masks#1/32 Scale Model Paint Masks#1/72 Scale Model Paint Mask Sets#1/48 Spitfire Mk.V#1/32 Spitfire Mk.V#Spitfire Mk.V Paint Masks#Spitfire Paint Masks#1/48 Spitfire#1/32 Spitfire#1/72 Spitfire#1/72 Spitfire Paint Masks
0 notes
Text
Plastic Skies - Model 4: Su-27 Flanker

Having finished my first Revell model and feeling quite pleased with the results (as seen last time), I really wanted to keep the ball rolling while also trying out new things. The Tomcat was fine and all, but it’d left me wanting to try another camo scheme. A more complicated one, this time. I thought I knew what I was getting into. I did not.
By this point, the internet in general and youtube in particular were an indispensable resource, not just in teaching me how to do things but also in showing me that they could be done at all. For example, I knew I could use masking tape to paint different parts of a plane with different colors almost seamlessly, but it took a couple of videos to show me I could also use tape to paint camouflage by putting the tape on the plane, drawing the scheme with a marker, taking the tape off, cutting it around the drawn bits and then using that as a sort of stencil. It was brilliant, and more importantly, simple. Intuitive. Easy.

So on my next trip to the shop, I grabbed an extra roll of tape, some new brushes, pliers, droppers for paint, glue for transparent parts, and three extra paints: one white, one lighter shade of gray and one metallic steel. On the way back, I was also lucky enough to find a crafts shop where I got the marker I needed for the tape but also a very tiny spatula that I knew was useful for putty purposes. My tool kit, such as it was, only kept growing. And I felt proud of knowing exactly what each and every one was for.
Speaking of kits, the same hobby shop also netted me another Revell 1/144 model, this time an Su-27 Flanker. Again, way cheaper than a 1/72 model, so if I screwed this up, it wouldn’t be a big loss. And despite my confidence, I was still very aware of the high probability of screwing this up. I thought about painting it in the camo shown in the box, but I’d already done a curved scheme on the Mirage. I wanted something more adventurous. More unusual. More... angular. Eventually, I narrowed things down to two candidates:
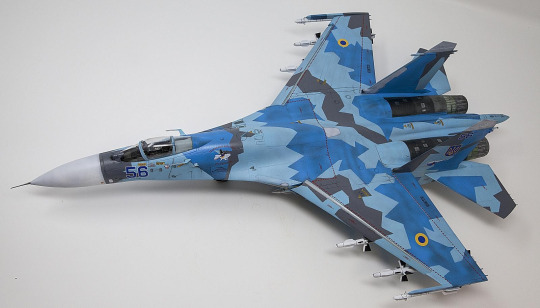
This was my first choice, since I liked the idea of having a more colorful plane in my collection, but then I realized this kind of camo belongs to the Ukrainian air force. And dumb as it may sound, I felt a little guilty about the idea of plastering a bunch of Russian red star decals over it. So I went with option number 2:
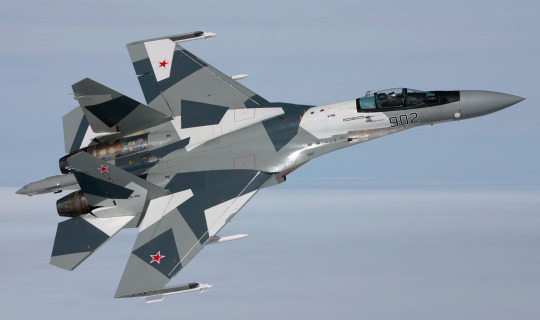
This one is a camo scheme used on Russian prototypes of planes way more advanced than the Su-27, but I liked the look and already had two of the tones required. Plus, this camo was in Ace Combat 7, so I knew that, if I needed a good reference, I could always just boot the game up and give it a look there. Which, for the record, I absolutely did.

The undercarriage looked pretty daunting, but the kit’s cheap price spurred me on to try. No half-assing this one. Do or die. So I started doing. The initial build and painting went mostly fine, but I did run into a couple of issues. Namely, some of the parts didn’t fit that well and I went overboard with the base gray coat. That’s something I really need to work on, since lately I’ve noticed my brush strokes are very visible and paint tends to bunch up everywhere. But more on that later.
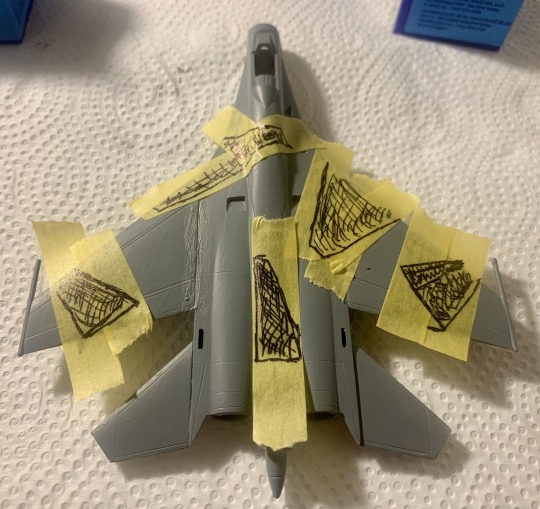
With the base fuselage done, I grabbed the masking tape and set about doing the things YouTube had taught me. And almost immediately I realized this was not going to be even half as easy as it looked. A lot of it could be chalked up to inexperience, for sure, but also, working at this tiny scale meant that the tape stencils were minuscule and the area of application even smaller. Plus, I’d never used masking tape to this extent, so I wasn’t sure how to properly handle it, which led to a lot of messy spots. Still, the shapes were there. Fuzzy and hairy, but there.
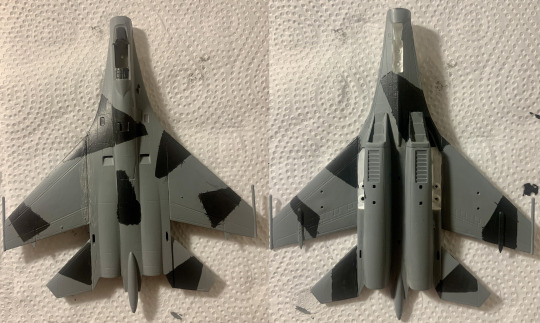
And then the white paint happened. And things really started to go to shit.

The worst part, the absolute worst, was putting the brush on and just seeing the paint sneak under the masking tape and escape into the panel lines. It was mortifying. But I just kept telling myself it didn’t matter, that once the shapes were made I could just grab the gray and black paints back and clean things up. Which I absolutely did, but by then, painting this model had become an absolute kick in the dick. That growing discomfort bothered me more than it should because painting had quickly become more or less my favorite part of making these models. Far from the intimidating Herculean task I’d conceived it to be in the past, painting was fun. It was A Good Time. Except when it wasn’t.

Eventually, I did clean the model up as best as I could, added the last couple of shapes, fell in love with the metallic steel paint, placed the (mercifully VERY few) decals and entrusted myself to the power of varnish. Maybe a matte finish would, well, maybe not save it, but make it look slightly less shit. And to its credit, it did exactly that, but not much more.

The final result is very much a “Better when seen from afar” affair. The closer you get, the worse it looks, especially in and around the white parts. There’s one bit of camo that is literally the wrong way (can you spot it?). Pooled up paint is everywhere, smudgy little spots still remain, and if you stare at it long enough, you can see my desperation mounting on every visible stroke. But at the end of the day, I’m still pretty happy with it. I’d tried something relatively complex and gotten something quite decent in return. I even used a bit of red for the inside of the (ridiculously tiny and impossible to separate without doing some damage) landing gear doors. I’d promised not to half-ass this one and I’m glad to have kept that promise.
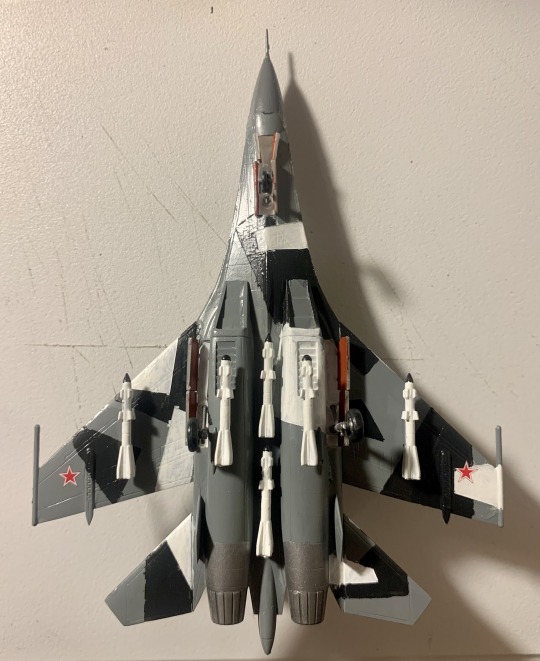
Once I started showing the finished model and the process around, a couple of artist friends of mine, who I deeply cherish and respect, made my day by calling it “impressive”. And despite all the obvious imperfections, I have to agree with them. There’s something impressive about this one. My secret, selfish hope is that someday, some guest at my house will look at it with eyes wide open and loudly ask the same question I asked every time I saw pictures of models with similar jagged, splinter camo schemes: “Dude, how the FUCK did you do this?”

And my answer will be “Not easily.”
#My Stuff#Hobbies#Journals#Friends don't let friends paint splinter camo#Also#No#I still don't feel brave enough#To paint canopies#Maybe once I buy the smallest brush in the world#But for now#Nah
6 notes
·
View notes
Photo

New to The Crafting Well available to order soon Modelling Paint Masks in 1/48, 1/72, 1/35, 1/32 scale #airfixmodels #familyrunbusiness #smallbusinessnetworking #modelpainting #scalemodels #scalemodelbuilder #thecraftingwell #etsyseller #thecraftingwellstore #mymodellingworld #paintmasks #pmmodel #spitfire #hurricane https://www.instagram.com/p/BwG9-Mtn0ov/?utm_source=ig_tumblr_share&igshid=72kurfqy8fx
#airfixmodels#familyrunbusiness#smallbusinessnetworking#modelpainting#scalemodels#scalemodelbuilder#thecraftingwell#etsyseller#thecraftingwellstore#mymodellingworld#paintmasks#pmmodel#spitfire#hurricane
0 notes