#Scale Model Paint Masks
Explore tagged Tumblr posts
Visit Tumblr Blog
Explore Tumblr blogs with no restrictions, modern design and the best experience.
Last Seen Tumblr Blogs


Fun Fact
Tumblr Inc. is using 66 technologies for its website.
Text
Japanese Roundels - Hinamaru
Scale Modelling Paint Masks for Japanese Roundels (Hinamaru) used on aircraft during WW2.
These are made from quality kabuki sheets and digitally cut.
#WW2 Aircraft#1/32 Scale Model Paint Masks#1/48 Scale Model Paint Mask Sets#1/48 Scale Model Paint Masks#Japanese Aircraft#WW2 Scale Model Paint Mask Sets#WW2 Scale Model Paint Masks#WW2 Scale Model#Roundels#Roundel Masks#Scale Model Paint Masks#Paint not Decals#Scale Model Paint#Scale Model Painting#1/48 Scale Japanese Roundels#1/48 Scale Japanese Roundels Paint Masks#1:48 Scale Japanese Roundels#1:48 Scale Japanese Roundels Paint Masks#1/32 Scale Japanese Roundels#1/32 Scale Japanese Roundels Paint Masks#1:32 Scale Japanese Roundels#1:32 Scale Japanese Roundels Paint Masks#1/48 Scale Japanese Paint Masks#1:48 Scale Japanese Paint Masks#1/32 Scale Japanese Paint Masks#1:32 Scale Japanese Paint Masks#1/72 Scale Japanese Roundels#1/72 Scale Japanese Roundels Paint Masks#1:72 Scale Japanese Roundels#1:72 Scale Japanese Roundels Paint Masks
0 notes
Text

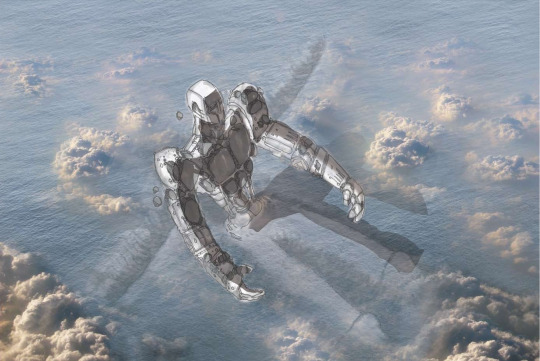
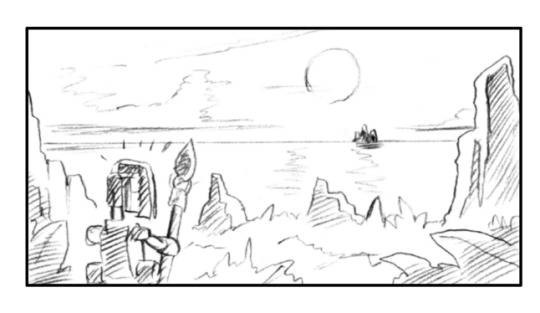
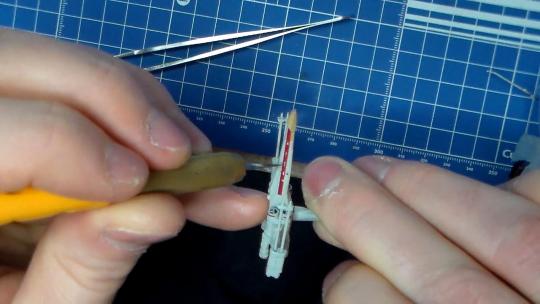
TIE wings mostly complete
#I didn’t anticipate how quickly my brain went “ooh TIE fighter’’ when the masking tape came off#model making#kitbash#scale model#mini painting#my art#scratchbuilt#spaceship#miniature art#star wars
21 notes
·
View notes
Text
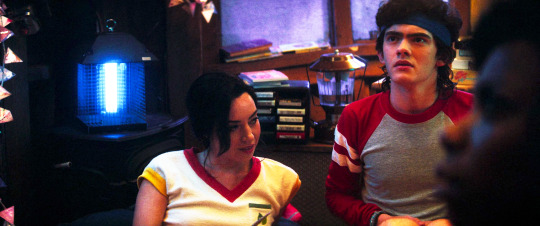
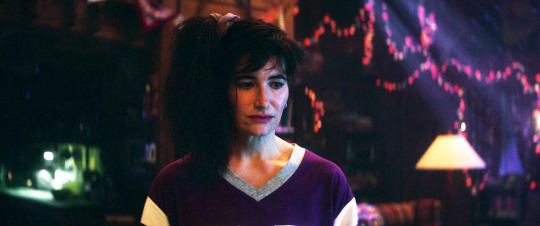
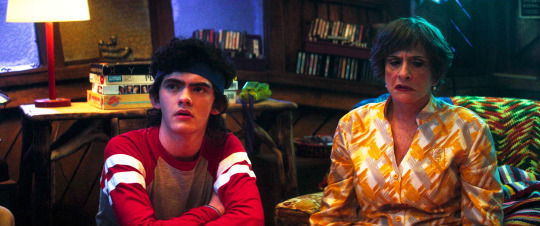
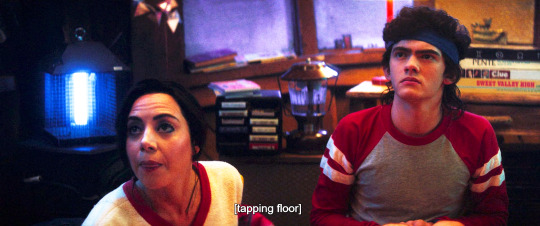
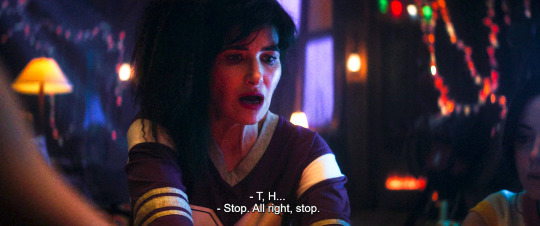
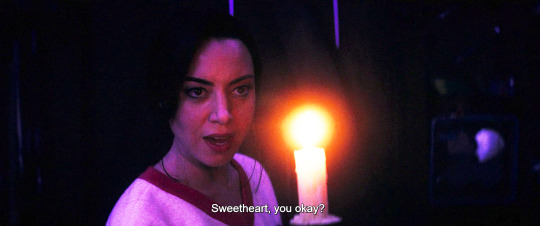
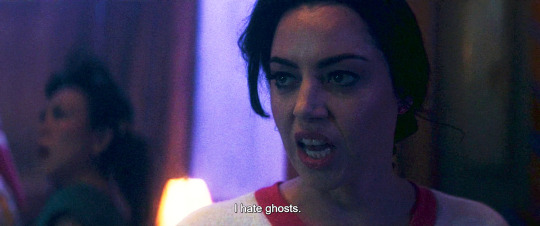
Agatha All Along deep dive: episode 5 part 3
(Wandavision entries: [1][2][3])
(AAA entries: ep1 [1][2][3][4] ep2 [1][2][3][4] ep3 [1][2][3] ep4 [1][2][3][4][5][6][7][+1] ep5 [1][2][3][4][5] ep6 [1][2][3] ep6 [1][2][3] ep7 [1][2][3][4][5][6] ep8 [1][2][3][4][5][6][7][8][9] ep9 [1][2][3][4][5][6])
when I first watched this I reallllllly hoped sharon was about to come back. but she wouldn't have ever called herself mrs. hart, that was an obvious giveaway
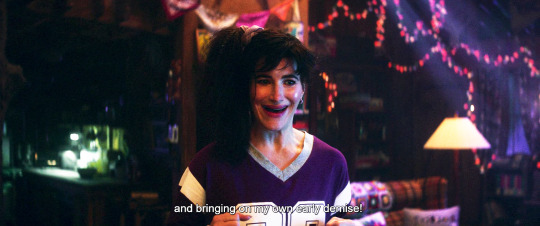
I know I'm repeating myself but - THIS MOTHERFUCKER
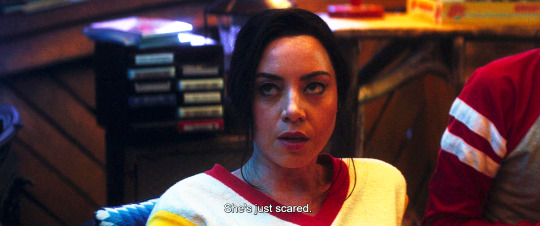
aw of course alice is immediately protective. that's so hot of her.
rio you'll have to stop being delighted by her antics, you're only enabling her at this point
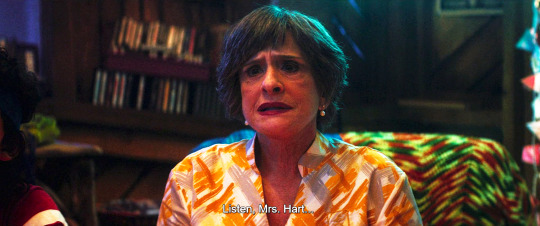
agatha you fucker. and kudos for the excellent debra jo rupp impression, kathryn.
it's sweet and so sad that lilia fell for it. she consistently loses her seer abilities when dealing with the guilt for the people she couldn't save

jen is so done
rio is dismissive but also soft when she says this. and then she raises her eyebrows at agatha, as if dating her to deny it.
you can literally see her mask falling off.
billy shakes his head, disappointed. this is the first time he sees agatha fall so low
rio is like, come back here and face the music, my darling. she's really not letting her off the hook anymore
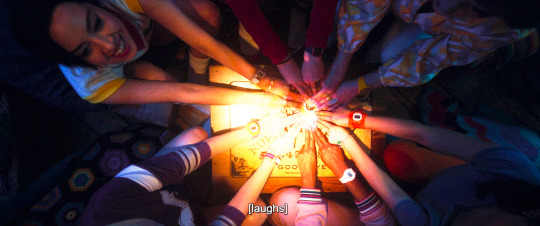
rio laughing in delight when death is mentioned, like yes! that's me! I'm here! just happy to be included!
agatha's panic is so overwhelming she's already at the point when she bolts. but there's no running this time. billy, like wanda, is merciless.
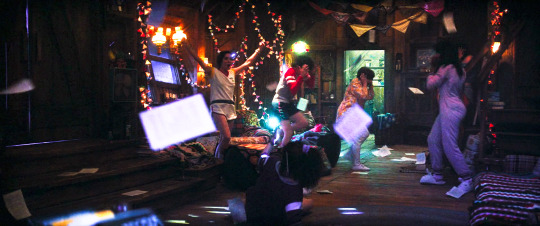
screaming so awful that lilia jumps back to episode 2 to escape it. meanwhile, rio.
(is jen wearing bunny slippers lolll)
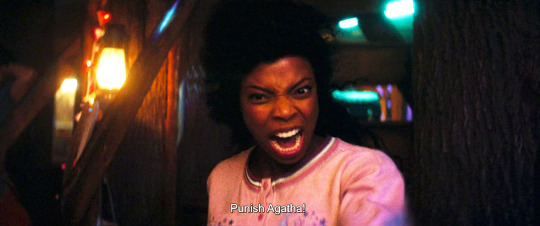
yes, yes, it's hilarious that she had to spit out her retainer. but dear god evanora getting to jen first because she's the one agatha hurt the most.
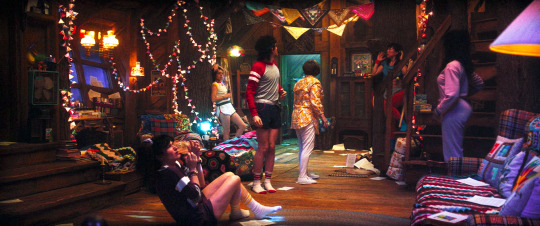
now rio is casually modeling. she's making a great show of not caring about what agatha is going through
her coven turning her back on her. again.
sorry for always pointing out what rio is doing, but aubrey is killing me. now she's going oh well! you heard what the lady said! looks like I'm not the only one who thinks you're a piece of shit!
and despite it all rio (who, once again, is not allowed to kill a fly) is not doing what everybody else is doing. she's just being butthurt at agatha
the essays I could write about agatha's internalized misogyny

oh billy, no. you didn't ever realize all the shit you were stirring.

wow this particular line coming from jen really hurts
rio is trying to decide if she's into zombie agatha, lol. it's like she's always in a different show than everybody else. or rather, she's transcending genres, she's always doing her own thing because the Road doesn't affect her. while the others see real danger, she sees painted sets she can cut through with her knife.

but look what happens next. rio suddenly turns serious, and there's even a hint of panic in her voice. it's as if she realized this is not all tricks and smoke.
and finally, she fully comprehends how dangerous billy is. like, the staggering scale of it. chaos magic creates life in an artificial way that goes against everything rio stands for. wanda did not create an illusion of Vision, she made a real, alive vision out of thin air. billy himself was created the same way. and now he has effectively brought back evanora - not a pale imitation, a ghost Evanora functionally indistinguishable from the real thing, just as full of hatred and just as capable of hurting agatha. if it wasn't personal before!
you know, I didn't like this episode as much as the others on first watch, but I was wrong. there is a lot to unpack here. like many things on AAA, it's all in the subtleties.
go to episode 5 part 4
#agatha all along#agatha deep dive#agatha harkness#rio vidal#jennifer kale#billy maximoff#alice wu gulliver#lilia calderu#character study
157 notes
·
View notes
Text
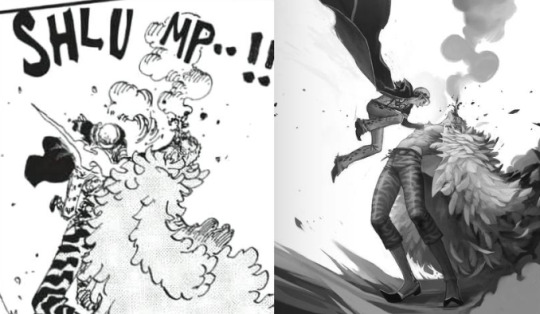
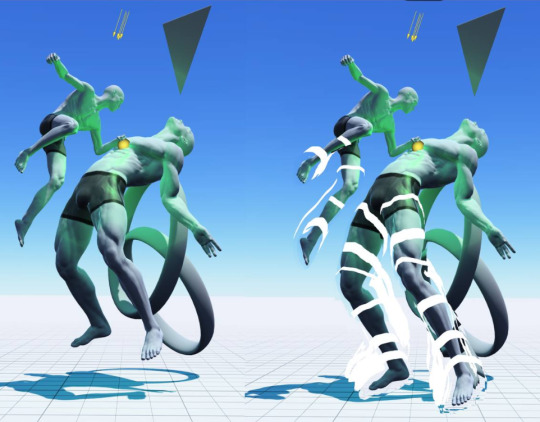
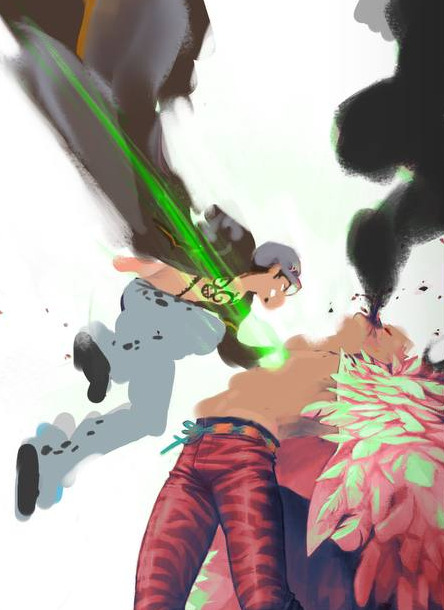
Gamma Knife - painting process
I had so much fun painting this piece and I want to share some behind-the-scenes stuff on how it was made.

I would like to thank MagicPoser for making it possible to try poses, scale, angles and lighting and saving my ass so many times. I use the app on my iPad but there's a free browser version too.
So I wrangled these 3D dudes into the poses I wanted and then I cut them to pieces and stretched them out to make them as leggy as they're supposed to be. Before I did that though I spent forever trying to pick the angle I wanted to paint. Including two other screenshots I considered using before settling, because it's fun. (nevermind Doffy's weird arm angle, it wasn't going to show anyway. The smoke-placeholder makes it looks like he's in The Sims though which is cute. That thing's about to go so red.)

Then I started sketching. I quickly moved Law higher up and changed his pose to make him more curled up, elbow-to-knee, legs bent etc for more intensity. MagicPoser is great as a reference but the end result gets pretty stiff and boring if you follow the 3D models too closely, and I wanted swoosh. So I painted some swooshy shapes to figure out the movement I wanted for the whole painting. Purple swooshes for the curve of Law and the direction of his jump. Pinker purple for Doflamingo's leg and spine arcs.
The b/w image below also shows the rough base for the feather coat. It's painted with a flat, tapering oil brush that created nice curves that I could refine later.


Skipping lots and lots of work to get to the next step. It's all rendering and detailing, mostly done with the HB pencil brush.
Coloring! I started by creating a gradient map bit lots of color steps. I kind of knew what I wanted but there's a lot of trial and error involved while picking colors and dragging sliders. In Photoshop I'd do this on an adjustment layer but in Procreate I do it by copying all visible layers (three finger slide, copy all visible) and making a new layer out of them where everything's merged (three finger slide, paste)

I then put that layer in Color-mode on 77% over the grayscale image after playing around and testing lots of things. I rarely know what I want before I see it. I copied that layer again and put it in Add-mode on a very low opacity because it looked neat. Every image is a new adventure when it comes to layer blending modes, there is no right or wrong here, you just have to test things until you find an effect that you like. Huge potential for happy accidents in this step.
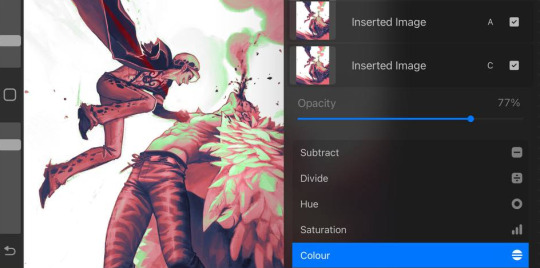

I didn't want everything to be pink so I created a new Color-layer to paint skin, clothes and radiation. Lowered opacity to let the pink base shine through slightly, for a cohesive and more natural look. Color-mode on full opacity often looks a bit flat and washed out unless combined with something else.
There's a lot more that happened after that but it's all detail stuff, effects, lots of layers with soft airbrushed gradients on various blending modes. Also directional perspective blur where I masked out some feathers to still be sharp against the blurry ones in the back, a quick and easy way to create a sense of movement and depth.
Again, thanks MagicPoser, I would have cried so much and probably given up over the angle of Doflamingo's head without your help 🙏
113 notes
·
View notes
Text
The "Mystery" of the Sleeping Mata Nui

Bionicle is, by volume, pretty bad¹. I think this is indisputable at this point. There are some cool base concepts that were completely ignored by the final story in favour of kidnapped expat americans, and toothy gangsters lounging on couches, I've done a post previously about some of the earlier ideas behind the so called "ignition arc" that, shockingly, makes sense of one of the most nonsensical sequences of events ever put to paper.
Now, I'm quite a big fan of the GSR, despite it being firmly outside of the roughly 18 months² of Bionicle I think matters. I've made a 3D model of it³, I've painted a legoes version of it, I love it. Now, outside of Mata Nui Rising being a legitimately great piece of animation, and the design of the robot itself being amazing, what really draws me to the GSR as a concept is that is is very core to the series itself. Right from the start it was always planned to reveal that the island the series was set on had formed⁴ over the face of a massive robot.
It predates the line even being called Bionicle.
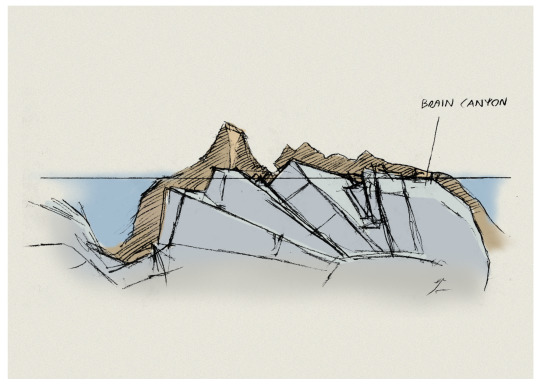
Recently I saw this map again. Its a terrible map, I think most will agree. Its just utter nonsense, even the story penned by Greggory T Farstey seems to not pay any heed to this map.
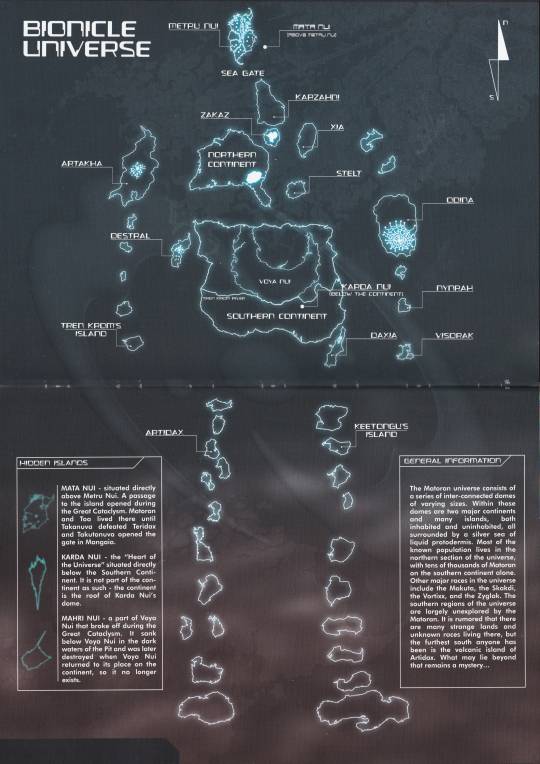
But this time I noticed something. This is a map of the GSR, the islands on the sides are supposed to be in its arms. They're at its sides. They didn't do the pose...
Right from the start, the idea was that the GSR would by lying on the ocean floor with his arms and legs spread out.
Seemingly aping the Vitruvian Man image, a famous anatomical study by da Vinci⁵. An early internal image makes this clear.
And this pose was quite key to the series as a whole, being depicted on the face of the Mask of Life, a mask that eats people.
So I, and probably many people, had just assumed that the GSR was lying on the sea bed in this pose, it just fits too well. I think its just one of those things that the community had come to accept.
But this map threw it all in to doubt, because...I don't think anything actually depicting that pose was ever officially released.
Now, I'm not going to go in to some big "Oh that pose isn't CANON!!!" thing, because I don't care about canon⁶ one bit. I just find it funny how they just failed to show one of the key images of the series.
The closest we get is this image from somewhere of the GSR floating in space scanning things I guess. Idk I don't care.

For the record, we know the GSR was lying in that pose. This is a fact.
Concept art from that time makes it clear, and there's even a blocking animation found in a puddle of goo⁷ that shows the animation from a fixed angle, showing that yes he was in that pose.
I'm not saying this is a failure of the Mata Nui rising animation. Its one of the best things to come out of later Bionicle. Its well filmed and really shows the sheer scale of the robot. I wouldn't have had it any other way.
I think what this comes down to is them trying way too hard to hide the final reveal, that this was all taking place in and around a massive robot.
If you look at the sketch posted earlier you can see that part of the hand is sticking out of the water, forming what are known as the three finger islands. These islands have been seen in other art predating the Bionicle name.
And there was attempts to bring them back, having them appear after the Toa defeat Makuta.
But unfortunately they never made it in to any final material.
So I guess, to try and bring this to some sort of conclusion, I think this is just an example of how poorly managed Bionicle was in the later years. There were good ideas there, a lot of them made sense and worked both from a micro scale as conflict for the Toa, and from a macro scale of them repairing the GSR, its just unfortunate that so many of these ideas were ignored entirely.
They just kinda....forgot to ever depict the GSR on the ocean floor, to make it tie in to the Life Mask imagery.
Its funny but also tragic.
~
I remember once I was treated like an alien for not just liking Bionicle wholesale. I was weird for having opinions about it, having parts I liked and parts I didn't⁸. Nowadays it doesn't seem quite as bad, I don't know if its just the groups I associate with, or if the fandom has gotten a bit more reflective in recent years.
But I think, at the end of the day, love it or hate it, all Bionicle fans can agree on one thing: The Mata Nui GSR was B4, one of 6 large robots that travelled through space with their mothership in this configuration:
Its not even worth mentioning at this point. Its just common sense.
¹-By weight though its merely mediocre. ²-Bionicle ended the instant the Toa went in to the Bohrok Hive. ³-Its now known to be horribly inaccurate because of🦆 ⁴-Camouflage system believers, just leave. Block me. You are not welcome here and I don't want you reading my posts. Your existence disgusts me. ⁵-That posting here would get my account banned. ⁶-Technically, if you are a supporter of the one true canon of Greg, you have to reject the GSR lying in this pose, and accept that map as the only canon representation of the GSR on the sea floor. ⁷-🦆goo ⁸-AKA having standards.
anything.
25 notes
·
View notes
Text
The stream was pretty quiet with just soft music playing in the background.
It was very late at night/very early in the morning.
And Leo and Donnie were sitting on the floor, giving eachother Manicures and Pedicures, along with apparently facials.
The two were in color coded space themed shorts, and hoodies, the lack of bandanas on their 3D models was interesting to say the least.
The two weren't talking verbally, those who paid attention would notice that their hand tracking was picking up altered sign language. Along with other gestures and body language, made it kinda obvious they were gossiping about something or other.
Next to them on the floor was a big box of various beauty products, nail care stuff including nail polish, and some seemingly random big pair of clippers and large nail file.
The twins didn't show what products they use, but judging by the containers they might be homemade. Which wouldn't surprise some people given that the Twins both had Science Degrees.
Not to forget a small pile of snacks, and a couple big bottles of soda that were mostly store brand or foreign.
Leo was currently using some stuff to clean Donnies face, preparing his skin/scales for a face mask. While Donnie was meticulously working on Leo's feet, using the mentioned big nail file, and some tools.
The chat was locked into emoji only mode a while ago because some people wouldn't stop making comments about their feet. Though a number of emotes where banned for obvious reasons.
A bit of time later after both had their pedicures done, along with the facials, a semi familiar Rat in a brown Japanese robe entered the studio.
"Blue? Purple? Whatever are you doing up this..." Splinter pauses to look at a nearby clock, "Early? Don't you both have work today?"
Donnie gestures with his one free hand to the nail care, beauty stuff, and their faces.
"You couldn't sleep so you're having a mini spa day at 4 am." Splinter interprets. He then grabs a big cushion, and joins the Twins on the floor, "I won't give you a hard time if you help me with my nails, and some skin care."
The audience then gains something of an interpreter in the form of Splinter half relaying what the Twins were 'talking' about.
Some of the gossip was about an affair, cheating or legal stuff.
"Oh so not to different from that Novella you recommended to me Blue." Splinter says back to what was relayed, "I still want to track down a couple dramas that I think you would like. Though they ended a while ago, though I can't recall if they ended naturally or were canceled. Purple will you help me find them later?"
Donnie agrees while getting up to wash the facial off.
Leo started to carefully paint Splinters nails switching colors on each nail after getting the Okay to do so.
There was more 'gossip' exchanged between them, with Leo and Donnie still signing while Spliter talked. Sometimes Splinter would tell a story from his acting days though leaving out which movie or show he was talking about.
The audience was mixed on what to think of the whole thing.
----------------
Masterpost
I literally had no plan for this. Just multiple ideas that didn't sound that great after I started to write, so they were deleted.
#rottmnt au#tmnt au#vturtles!#tmnt#rottmnt donatello#rottmnt donnie#rottmnt leonardo#rottmnt leo#rottmnt disaster twins#rise donatello#rise donnie#rise leonardo#rise leo#rottmnt splinter#rottmnt lou jitsu#lou jitsu#teenage mutant ninja turtles#rottmnt#rise of the teenage mutant ninja turtles#tmnt 2018#rise tmnt#rise of the tmnt#tmnt rise
25 notes
·
View notes
Text
Tiny Terzo Reliquary!
It’s finally finished! I decided to keep the embellishments to a minimum instead of doing a lot of tiny paper cutting when my hands have been really stiff with the cold weather, but I absolutely love how it turned out!!!


He now lives with my other little figures on my music shelf and I’m already planning to make one for my Copia figure when I get it next year >:)
Compiled progress shots and thoughts on the project below the cut! (Heads up, I ramble a lot)
If I was to make it again I would definitely have planned the roof section better and made the base in full panels instead of sections to minimise seams. I also would make sure I painted the inside before construction and put the plastic for the windows in last instead of having to mask them off for painting.
It’s made of a combination of 1mm and 2mm mount board (also called chip board I believe?), clear plastic from some packaging, stretch velvet and bamboo toothpicks. Ideally, I would have made it from acrylic because that’s much stronger but that would require a laser cutter or a jigsaw, two things I don’t have lol but the mount board takes paint much better without needing too much priming and sanding and cuts much easier with a scalpel.


I crocheted the lace using single strands of embroidery thread and a .6mm crochet hook. It was the first time I ever did any crochet on that scale and it was actually really fun and I’m planning a few more crochet lace projects in the future. Although I don’t recommend doing micro crochet if you’re very tense and have long nails because I was putting SO MUCH pressure on my thumbnail on the hand I was holding my work with that I actually had to take a break overnight because my nail bed was starting to hurt and didn’t stop hurting for like four days. Learn from my mistakes. If anyone’s interested, I put the stitches I used on one of the older update posts but it’s a very basic row of double crochet scallop stitches on a base of a single row of slip stitches to keep it small


The tufting on the back plate was done by marking out a lattice grid on a rectangle of mount board that was slightly smaller than the space it would sit in on the removable plate and punching the holes with my awl. I then chopped up some foam from an old bra that I’d already harvested the hooks and eyes from and glued that to the piece of mount board before covering with some stretch velvet. I tried doing the tufting in a few different ways. Originally I wanted to do it just with little French knots to look like buttons but I ended up not liking it so I took them all out and tried a couple of different methods for doing a lattice before landing on what you see in the photos. I went over in one long stitch along all the left to right diagonals and then did the same with the right to left diagonals and put in tiny couching stitches at all the intersections through the holes in the mount board to pull them in and give it that tufted look
I’ve really missed doing things like this. I went to college to study model making because my dream was to work in theatre either as a prop builder or set designer but with my disabilities I realised that kind of career that required a lot of work with heavy machinery and a lot of time on my feet isn’t a viable choice for me, so it’s nice to get back into something I’m really passionate about while also making something relating to my special interests
#the band ghost#papa emeritus iii#papa terzo#this little thing is my pride and joy#I wish I’d been able to do more tiny details but my hands are always very sore this time of year so I want to keep them in good shape#I bought some ring splints for my right hand that should be arriving at the end of the month so hopefully those will help!!
44 notes
·
View notes
Text

satosugu mailman au 💌
a very special delivery for @kymsys's birthday! how many days will it take for satoru to fall in love with his new mailman? let's find out!!
here's part one for my tumblr pals to enjoy! however, i'll be posting this work over quite a few days over on twitter/x, so please head over there if you want to follow along! if you don't have an account, i'll be uploading the entire thing to my ao3 when it's done — so don't fret ♥️ enjoy the fic!!
There were three things Gojō Satoru loved above all else: sweets, scale model kits, and sleep. He was a simple man in that sense — really, he asked for very little except a healthy supply of sugary treats, the occasional plastic mech, and an undisturbed lie-in seven days a week. So, when the shrill ring of his doorbell wrenched Satoru from a beautiful dream at exactly 8am on a Monday morning? Needless to say, he wasn’t pleased. Now, Satoru wasn’t an unreasonable person. He understood that the rest of the world started moving a little earlier than him — which is why Satoru had taken special measures to protect his precious rest without hindering anyone else. He’d chosen a job that allowed him to work from home, forgone the company of a housemate in favour of living alone, and — most importantly for a hobbyist like Satoru who ordered more kits, paints, and crafting tools than any one person needed — installed a secure parcel drop box outside his front door, preventing the need for anyone to pester him. That’s why Satoru didn’t bother getting out of bed after the first ring, assuming that the person who’d decided to disturb him would eventually figure it out for themselves. Perhaps they were a bit slow though — because less than thirty seconds later, the doorbell came screaming through the house again. Swearing into his pillow, Satoru pulled the duvet up to his ears. All he could do was hope they’d leave quickly so he could snatch at least some sleep in the 45 minutes left until his alarm went off. No such luck. Right when Satoru thought it was safe to relax, the doorbell started up again — and this time, it didn’t stop. With a stream of profanities falling from his lips, Satoru hauled himself out of bed, seeing red as he stomped down the stairs and marched across the hallway to the front door. He flung it open with a frustrated snarl, preparing to share some choice words with the impatient piece of shit on the other side — only for his insults to die on his tongue at the sight of the man standing before him. The broadest shoulders he’d ever laid eyes on; thick arms, tanned and toned; a muscular torso tapering down to a tiny waist — and all packaged in a uniform, for god’s sake. When Satoru finally managed to lift his jaw off the floor, he looked up at the man’s face and the damn thing unhinged from his skull all over again. He was all sharp cheekbones and sunkissed skin and the sweetest smile Satoru had ever seen. Perhaps a little too sweet now that he really looked at it. ‘I think your doorbell is broken.’
Sure, the guy was hot — easily the prettiest person Satoru had ever seen — but that didn’t stop his eye from twitching at the blatant passive aggression masked behind that sickly sweet smile. Satoru matched it with one of his own. ‘I assure you, it’s not.’ ‘Oh, I’m so sorry!’ Satoru didn't think he seemed sorry in the slightest — even if his voice did sound like melted chocolate. ‘I’ve got a parcel for Gojō Satoru?’ When hot mailman tilted his head to the right, a lock of glossy black hair fell into his face. Too short to secure in his bun and too short to tuck behind his ear, he simply brushed it away from warm eyes the colour of honey. Satoru wondered if every part of him was as gorgeous. ‘It needs a signature.’ Shocked out of his stupor, Satoru's gaze travelled to the box at the right of the door. ’The regular guy always puts them in there.’ Hot mailman simply beamed at him. ‘Do I look like the regular guy to you?’ No, Satoru thought. There’s nothing regular about you. As though he could read minds, hot mailman winked at him. ‘Then I’ll need a signature, please.’ And god — he was so effortlessly charming that, for the first time in his life, Satoru found himself speechless. For a long moment, he simply stood there, gawping like an idiot. When hot mailman eventually quirked an amused eyebrow in his direction, Satoru had no choice but to take the signature pad being waved at him, managing to make a hash of his name before wordlessly handing it back. Having completely and utterly embarrassed himself, Satoru had started to retreat into the safety of his home when a strong hand closed around the edge of the door. Hot mailman popped his head around the side. ‘You forgot your parcel.’ Satoru watched those amber eyes as they slid down the length of his body — and hot mailman's sickly sweet smile morphed into a devilish grin. ‘Your clothes, too.’ Glancing down at himself, Satoru’s heart stopped in his chest when he realised he’d answered the door in nothing but his boxers — and not fitted Calvin Kleins that emphasised what he was working with either. No, the ratty, stretched out Digimon boxers he’d owned since he was 17. With a mortified squeak, Satoru snatched the parcel from hot mailman’s hands and slammed the door in his face, uncaring of whether his stupid bangs got caught in the doorframe. Tossing the package onto the floor, Satoru brought his palms to his rapidly heating cheeks, taking a moment to stare into the silence of his hallway. Then, he summoned all the air in his lungs and let out the single loudest ‘fuck!’ he’d ever produced. Hot mailman’s beautiful laughter travelled down the entire length of the driveway.
#hbd my love!! 🫰#jjk#jujutsu kaisen#satosugu#jjk fanfic#jujutsu kaisen fanfic#jjk fic#gojo satoru#geto suguru#sugusato#stsg#sgst#五夏#夏五#goge#gego#呪術廻戦#glo's writing#fushiglow
104 notes
·
View notes
Note
could i see tommy coolatta from hlvrai please and thank you? :O
Sure. Here's your silly lad.
At first glance, this dragon almost appears normal. However, on close inspection, you will quickly realize that things are very much not right. It almost looks like someone took the model of a dragon from an N64 or PS1 game and put it in reality without bothering to make it more realistic. It even moves like a character from an old 3D video game. The scale patterns and excess skin on this dragon's body make it almost seem like it's wearing clothes (specifically a white lab coat, a light blue undershirt, white pants (the tail's scales are also white), black shoes, and a maroon tie with black stripes) even though it isn't actually wearing clothes. The back of its head looks like someone's bald head that has been partially painted black, but this is masked by it usually wearing a propeller hat large enough to cover its fake baldness.
It doesn't seem to have a breath weapon...
#your favorite character#dragon#dragon au#dragons#dragon catalog#western dragon#half live vr but the ai is self aware#half life#hlvrai#tommy coolatta#tommy hlvrai#hlvrai tommy
7 notes
·
View notes
Text
German Crosses - Type 4/5 - 1/48 Scale
Scale Modelling Paint Mask Sets for German aircraft.
This is for WWII German Crosses Type 4/5 used during the later years of WWII. There are 8 different sizes in this set with 6 of each size allowing you to paint multiple aircraft at the same time.
Type 1 - Available in 1/32 and 1/48 Scale
German Crosses Type 2 used on German Aircraft during the early stages of World War 2. These are the crosses with the black cross centre, white and black surrounds. Available in 1/24, 1/32 and 1/48 scale each set comprises 10 sizes with 4 of each size included (40 Total)
German Crosses Type 3 used on German Aircraft during the early years of World War 2. These are the crosses with a black centre and white corners. Available in 1/24, 1/32, 1/48 and 1/72 scales, each set has 12 diiferent sizes, each set includes 4 of each size (48 Total).
German Crosses Type 4/5 used on World War 2 era aircrafts. These are the crosses without the cross centre and either white or black corners. Available in 1/24, 1/32, 1/48 and 1/72 scale each set comprises 8 sizes with 6 of each size included (48 Total)
German Crosses Type 6/7 used on late World War 2 era aircrafts. These are the crosses without the cross centre and the thin black or white corners. Available in 1/24, 1/32, 1/48 and 1/72 scale each set comprises 4 different sizes with 6 of each size (24 Total)
Multi Sets
Available in 1/32 and 1/48 scale for either early war crosses (1,2,3), late war crosses (4/5, 6/7) or full sets
#WW2 Scale Model Paint Mask Sets#WW2 German Aircraft#WW2 German Crosses#Scale Modelling Aircraft Paint Masks#Scale Modelling Paint Mask Sets#The Crafting Well#thecraftingwell#The Crafting Well Paint Masks#1/48 Paint Stencil#1/48 Scale Model Paint Stencils#1/48 Scale Model Stencils#Scale Model Paint Stencils#Paint Stencil#Artist Paint Stencil#1/48 Scale Model Paint Mask Sets#Scale Model Paint Masks#Decal Replacement Paint Mask Sets#Decal Replacement#Paint not Decal#1/48 Scale Model Paint Masks#German Aircraft Scale Model Paint Masks#WWII German Cross Type 4/5#1/48 Scale WWII German Crosses Type 4/5#1/48 Scale WWII German Crosses Type 4/5 Scale Model Paint Masks#WWII German Crosses Scale Model Paint Masks#WWII German Crosses Type 4/5 Scale Model Paint Masks#1/48 Scale WWII German Crosses
0 notes
Note
Thank you for sharing how you did the head sculpt! If youd be able to go into more detail I'd truly appreciate it!
Started typing and then before I knew it tips turned into a tutorial so I reformatted the whole thing into a loose step-by-step of how to make them.
This is a tutorial on how to add details to heads like Isahla's neck detail, so not quite how to make everything from scratch but 90% of it at least.
This tutorial will teach you how to bake details on to a head's normal map. I'm using a scar in this tutorial as an example but you can paint any details you like this way. The things to be aware of are:
this tutorial assumes you've got some basic knowledge of Blender and sculpting in Blender. It also assumes you know how to navigate tools like Photoshop or GIMP.
this tutorial won't explain how to make diffuse/other maps match the normal map. That's kind of a whole separate thing with a lot of different methods that can go with or against this one.
this tutorial can be applied to the body as well as the head.
this tutorial won't explain how to blend details across seams (wrist, neck, ankles).
this tutorial can't be applied to… mostly everything else. Skyrim normal maps are special like that, and that's why I love 'em.
And so I don't overwhelm you before going in, here's a quick rundown of the entire process: We're taking the player's head and preparing it for sculpting. We'll sculpt in the details we want. Then we bake out that sculpted detail into a normal map. Then we edit the player's existing normal map to include the new detail. And that's all.
Also, everything can be done with freeware so you have no excuses. Let's go.
1 Preparing the head.
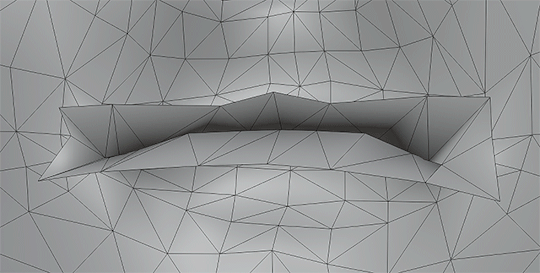
Exporting your character's head from the game isn't always necessary, but it is encouraged. The closer the head in Blender is to the shape of the head in the game, the more accurate your details will be to their head shape. If you don't wish to use a specific head, feel free to use any other head you like, whether thats the vanilla head, High Poly Head, ECE's head, etc. There is a difference between these heads that should be noted, typically in the UV space, but for individual cases it's not too important. Exporting is done with RaceMenu, and the resulting nif file can be imported into Blender using the PyNifly plugin available here. If you struggle with this plugin, converting the nif file to another format through Outfit Studio is also possible. When the head is in Blender, remove any clutter. We don't need anything except the head model for this so we can remove scar and eyebrow masks, eyes, hair, and so on. Now, duplicate the head model so you have two copies of the same head, and for clarity, label your heads low and high poly. I'll be distinguishing between my heads with a _low/_high suffix. We don't need the low poly for now so you can hide it. Your scene should look something like this:

I'm going to sidebar a little bit here to mention that there are two ways to prepare the head for sculpting. One is by "cleaning" the model which I've detailed below. Another (and the method I prefer) is to use Blender's Human Base Meshes bundle (available here) and just scaling and contorting the sculpt-ready model they have to the shape of your character's head. If you feel confident doing that unguided, skip the rest of this step.
Right-click the model and choose Shade Smooth. Enter into edit mode, tap 1 to enter vertex selection, A to highlight everything, and M to merge vertices (choose By Distance). The distance will need to be tweaked depending on the scale the model was imported at but you'll want to merge enough that model isn't splitting when you sculpt later. It should look indistinguishable from before, but there should be no aggressive seam lines like on the back of the head. In Edit mode, go into Edge selection and Alt-Left Click the border of the neck. Alt-F to Fill. Get inside the head and repeat the process for the back of the lips like you see below.
The head should now be prepared for sculpting. You can verify this by attempting to Remesh it, and if it bugs out, there's probably a hole somewhere.
2 Sculpting the head.
This guide isn't going to have a tutorial for sculpting in it as there's plenty online. The techniques you use are up to you. Personally, I'm a large-detail-to-fine-detail kind of person. That said, Dyntopo is far more intuitive and was how I made Isahla's neck details way back when. You do not need to sculpt every detail on the head although there's nothing stopping you; just do your best to keep the head as close to its original shape as possible. Also, if you have a computer that's struggling with higher poly counts—you can absolutely remove entire parts of the model that you aren't going to use later.
For this example, I've haphazardly cut two scars into a head I had previously sculpted for a different mod. Again, you do not have to sculpt the entire head.
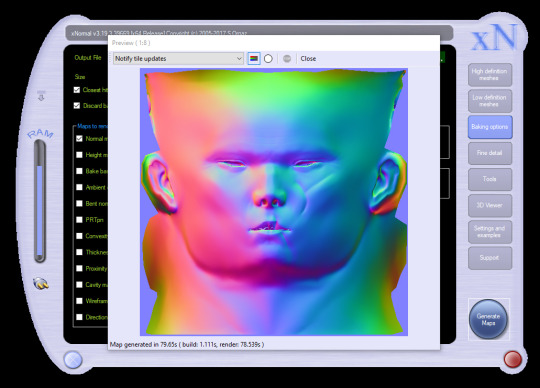
3 Baking.
Once you're done, you'll need to export the two heads as .obj files. Remember to name them in a way that you can recognise them as either high or low poly. You can see my export settings below. You may need to tweak these depending on how the bake goes.
For baking, I'll be using xNormal (available here). It's the shadiest looking site on the modern web but it is what it is. Feel free to use another if you find yourself with a better alternative. If you aren't familiar with baking or what it is, it's a process where we take all the detail from the sculpt, compare it with the low poly in a software like xNormal, and it outputs a texture that can be used to mimic the sculpt's detail.
In xNormal, click 'High definition meshes' in the top-right. Right-click, 'Add meshes'. Locate your high poly obj file and select it. Repeat the same steps for the 'Low definition meshes' tab, then move on to the 'Baking options' tab. In 'Baking options', start by defining a location for the output texture in the 'Output File' field. Name it whatever you like--it'll automatically slap a "_normals" suffix on the end. Bitmap is fine but it's up to you. Set the size to the same size as the normal map you're currently using. For most skin textures these days, your normal map will be 4096x4096. Under 'Maps to render' is a large list of maps you can output but for this we want to only have Normal map checked. Click the three dots beside it. Change the settings to match what I have below.

These changes are important because Skyrim bodies use model space normal maps instead of tangent space, and their world Z direction is inverted. Just don't ask me why. You can now 'Generate Maps' in the lower-right. This process can take a little while and if done correctly, the resulting window should look something like this:
If it's looking like a complete mess and nothing like this, I'm sorry to say you may have a bit of troubleshooting to do. Make sure both meshes are set to use exported normals, and make sure your normals are oriented properly in Blender (see guides on face orientation). It may also help to choose the triangulate option on the high poly model on export.
If yours looks mostly the same but maybe the colours are in different orientations, you can try inverting the "swizzle coordinates" and regenerate the map or invert the colour channels in Photoshop/GIMP. You want Red on the left, Green on the top, Blue at the front.
If yours has all sorts of odd marks around the lips, eyes and ears like mine, that's to be expected. Fixing those spots is outside of the scope of this tutorial.
4 Finishing the texture.
For this next step, I'll be using Photoshop. Feel free to use GIMP or Paint.NET, even. You should be able to follow along mostly fine. If you have never edited Skyrim textures before, this may be difficult to follow, and it's not really the space for a tutorial on it. So, I'll quickly address the following:
GIMP 2.10.10+ should have DDS support already.
Paint.NET has DDS support already.
Photoshop requires a plugin. There are two. Hell, I think there's three. I don't know why. I'm using Intel's plugin available here.
If for whatever reason things aren't working out in one program, you can always switch to one of the others.
LE users should export their normal maps uncompressed.
SE users should export theirs at BC7 (Fast, Linear with Intel but don't quote me on that).
I don't know if any of the non-Photoshop ones support BC7 compression or not. If it doesn't, go uncompressed.
First, load your character's current normal map into the program. Then load your new normal map you got from xNormal into the program on top of the first. Name the two layers however you like, or don't, but for clarity's sake, I'll be referring to the original map as Base and the new map as Scar. Attach a layer mask to Scar (if you aren't familiar with layer masks and how they work, pause now, look it up. Super simple; very useful.) and start to subtract all the stuff that you don't need. You should see the Base layer showing up behind it, filling in all the areas you're erasing.

You'll notice very quickly that the Scar layer will be much smoother than the Base layer, and probably has some differences in hue. Use a really soft brush if you need to blend out the skin. Minor differences in colour value go a LONG way here, so if you see noticeable lines or contours where your new map meets the old one, those will also show up in the game. Do your best to eliminate them if you can. Also, don't be afraid to erase some of the details you're trying to add. Making sure it blends in is the key.

Here's a gif showing the texture I started with, and how it looks with the scar. Note that other than the scar itself, there's nothing new that's been added to the image. This is to keep things as consistent with the original work as possible.
When that's done, you can export it as a .dds file. Make sure not to export with the Alpha channel, as it's unused and will add significantly to the size of the file.
Aaaaand, finally, that's it. Sort of. There's still a lot more you can do but it's all easy tweaking from here on.
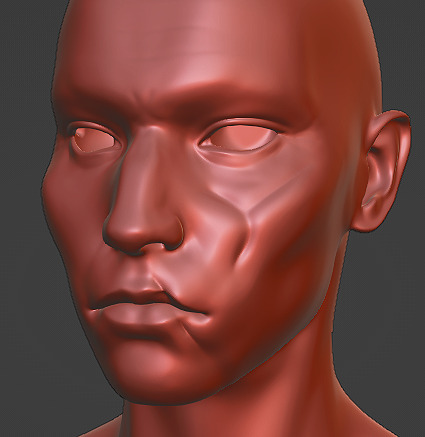
Here's how mine turned out:

Even without changes to the diffuse or specular maps, the depth still stands out a lot and if you're willing to keep going and adding details to all three maps, you can really make it stand out.
#asks#skyrim#sorry for the delay in the response btw i came down with something over the weekend and im just coming back now#looking over this whole thing now is honestly really embarrassing#ill be looking over it again and again before bed#but im sure the right people will want it#if thats you then you're welcome <3#skyrim mods#skyrim modding#tutorial#i have a tutorial tag now ig#artsick
22 notes
·
View notes
Text

MPC Empire Strikes Back Hoth Rebel Base build update August 4th, 2023
Here I'll post updates on what I have done to incorporate the X-Wings included with this kit into the diorama I'm working on. Unfortunately, the Y-Wings are just too goofy looking, and they were sculpted without proper reference material. After a discouraging setback with trying to use fiber optics to light the X-Wings' engines, I decided to go all out and use red 0402 SMDs for the engines.
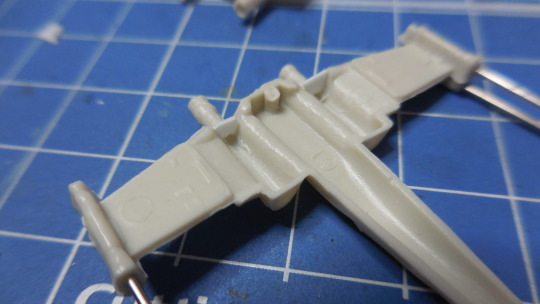
Channeling out the engine cans was not too difficult of a task. the X-Wings come sculpted with only one laser cannon per side so in order to give them four laser cannons, I used sewing pins, capped with Wave 2mm semi-circular plastic sticks cut into segments to represent the flash suppressors at the tip of each. I just needed to drill a hole into the center of each of these segments.
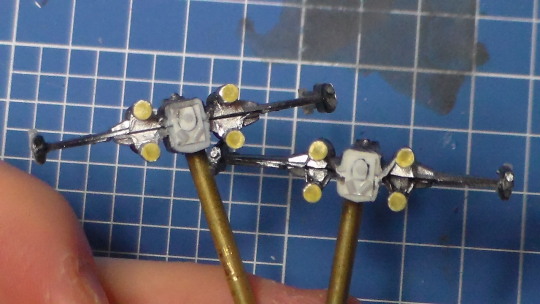
Once the SMDs were fastened into position using 2 part Wave epoxy glue (which smells really badly). Once the X-wings' top and bottom halves were glued together, I added back plates that I had invented on my own to sort of represent the detail that's supposed to go there. I used masking circles by HiQ Parts to protect the SMDs.

The next step was to add detail to the tips of the engine nacelles. The way the kit comes, they look rather featureless. I used Wave plastic pipe cut into segments for the nacelle tips and plastic plate to create the T-sections. They look nice! Check out this comparison before/after picture:

I airbrushed these X-Wings with Model Master Camouflage Gray acrylic paint.

I had scanned the excellent Fine Molds decals for this kit, mathematically sized it down to the proper scale, and printed them out on Fine Molds clear decal paper.
I distressed the decals with my hobby knife as I saw fit, in order to create paint chips. That's it for this update. I'm nearly done!
46 notes
·
View notes
Text

Another AI generation. I hope you find the prompts useful for design your own images. I keep experimenting, and the failures are frustrating, so I figured I'd share what I've found so far.
Model: AlbedoBase XL (SDXL) CFG Scale: 16 CLIP Skip: 2 Steps: 40
Positive prompt: view from an angle, medical stock photograph, portrait, busty beautiful thicc african voluptuous plus-size model under anesthesia, large black conic plastic oxygen mask covering her nose and mouth, closing her eyes, falling asleep, big sleepy eyes, worried look, unconscious. nebulizer, black tubing. overhead view of hospital operating room. diffuse studio lighting. bokeh, sharp focus. nurse holding the rubber mask on her nose. nurse pushing her down into bed. warm colors. pink floral sundress. big sleepy eyes. head turned to the side. maroon cardigan, satin bra. extremely high quality RAW photograph, detailed background, intricate, Exquisite details and textures, gentle lighting, bokeh, sharp focus, film grain. uniform lighting.
Negative prompt: bad image, ugly, cartoon, painting, illustration, toothbrush, skirt, leggings, smile, white skin, european, asian, skinny. makeup, fake, doll, glamorous. old, wrinkled. shiny, neon. green:0.1. blanket, clothes. brush strokes. pale skin. gloves. goggles, swimcap. eye contact. man, masculine, beard, childish, child, kid, elderly, weird, incomplete. anime, 3d, render, cgi, doll, fake, cartoon, 3d modeling, worst quality, low quality. blur, incomplete, painting, illustration, ugly. 2girls, extra head, two heads. gloves, cloth mask. bindi, dot, wound, cut, hole. bright, neon. vent, fan, filter. old, elderly. plastic skin, doll, toy, miniature, fake, artificial
4 notes
·
View notes
Text
Procedurally Creating Stylized Rocks in Blender
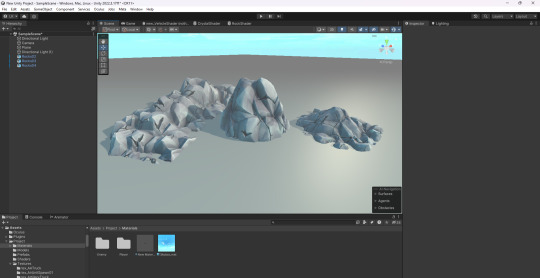
I have this method of quickly generating rocks without spending a lot of time texture painting or modeling them so I documented a bit of the process. (This isn't a step-by-step guide since it is an advanced technique and I don't have time to break it down in full detail atm. It also requires the GrabDoc Blender addon for baking textures and a photo editor that allows you to do smart tiling, which in my case I use Photoshop.)
The gist of it is using blender's shader editor to generate a texture for a rock-like surface. This basically requires using the voronoi texture (distance to edge) and noise for masking and distorting the jagged lines. I work in layers of voronoi at varying scales to get a variety of rock-like shapes in varying sizes and use different blending modes to mix them together. I also use noise to create surface depth and mask some edges for a more organic variety of shapes. I use these methods to create splitting cracks.

I render the resulting texture as a height map and use a photo editor to make the texture tileable. I use the texture tile in Blender as a base for the rock material, apply it to a plane, and use GrabDoc to render different maps (normal, height, albedo, curvature, and ao). I create a lowpoly blob mesh, add a subdivision modifier, and use the height map to displace the mesh in UV space. I apply all modifiers, go to edit mode and decimate the geometry of the mesh until it is at an appropriate resolution for a game engine.
All of this takes about an hour to set up, but once it is done it is so easy to make decent stylized rocks. These aren't the highest quality, but I always hated modeling and texturing rocks (because it is absolutely boring) and this is by far the easiest and fastest way make a whole bunch of them. Procedural generation can be EXTREMELY effective when you're in a pinch.
2 notes
·
View notes
Text

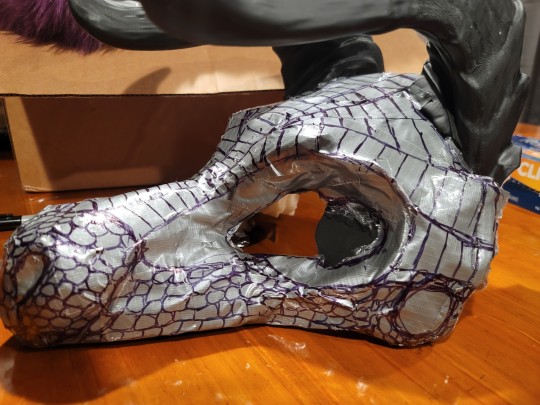


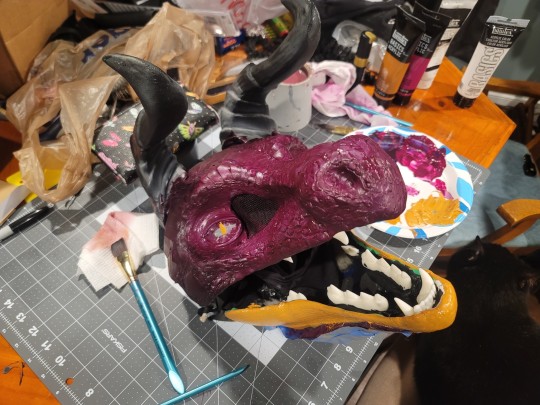
How I made the mask! Mask was 3d printed out of pla. I made the 3d model from a couple of different free models from thingiverse. After that I made a template for scales, cut foam sheets into scales for the fore head and nose and glued them on. Then I used eva foam clay to make the scales for the rest of the face, including sculpting eyelids around the glass eyes. Added mesh to the holes beside the eye where i would see out of. Teeth and tongue were made by AkelaTakaWolf on etsy. Padded the inside with foam and attached both mask parts to a balaclava. Added a hinge to the jaw so it stayed centered and moved with the top part of the mask. Then paint!
5 notes
·
View notes
Text
A Step By Step Guide For WWII Model Plane Building
Building model planes is a fascinating hobby, especially when it involves recreating historical aircraft from World War II. In this blog post, I'll guide you through the process of WWII model plane building, from choosing the right kit to adding realistic details.
1. Choosing the Model Kit:
Start by selecting a model kit that suits your skill level and interests. Popular WWII aircraft include the Spitfire, Mustang, Zero, and Messerschmitt. Check the kit's scale and reviews to ensure it meets your expectations. There are many places you can go to purchase your kit. Many hobby websites like Hobbylinc, Mega Hobby or ebay will have plenty of options for you.
Before you make your purchase, you will want to check out some review websites to make sure you are getting the model and quality you expect.
2. Gathering Materials:
Before you begin your build, you will want to make sure to have the following materials on hand:
Model kit
Hobby knife and cutting mat
Plastic cement or glue
Sandpaper (various grits)
Paints and brushes - some models will come with paint and others will not. Be sure to read the packaging to see if you need to purchase it separately
Decals
Tweezers for handling small parts
Clear sealant (for a glossy finish)
3. Assembly:
The key to assembling a model is patience but some additional steps are laid out below:
Carefully follow the kit instructions, organizing parts before starting.
Use the hobby knife to remove parts from the sprues, and sand edges for a clean fit.
Dry-fit components before applying glue to ensure proper alignment.
Assemble major sections (wings, fuselage) and let them dry completely before moving on.
4. Painting:
Painting your model can be fun and is an important step to make your model more realistic:
Research historically accurate color schemes for your chosen aircraft. - Some models will contain the color codes you need to purchase.
Prime the model with a suitable primer to enhance paint adherence.
Paint small details first, working towards larger areas.
Use masking tape to create clean lines between different paint colors.
Apply decals following kit instructions.
5. Weathering and Detailing:
If you decide that your model needs to be more realistic, try some of the below techniques.
Add realistic wear and tear using weathering techniques (dry brushing, washes, and chipping).
Detail cockpit interiors with tiny instruments, seats, and control panels.
Consider adding aftermarket accessories like photo-etched parts for extra detail.
6. Final Assembly:
Once any extra details have been added, you will want to put together your new model:
Attach remaining components, such as landing gear, propellers, and antennas.
Double-check alignment and make any necessary adjustments.
Seal the model with a clear finish to protect the paint and decals.
7. Display and Photography:
Once your model is complete, you should show off your accomplishment:
Create a display base that complements the aircraft's historical context.
Experiment with lighting for dynamic photos, showcasing your model from different angles.
8. Community Engagement:
Lastly, you should feel free to share your model far and wide! This is an important way to build community.
Share the building experience through a blog post, documenting challenges and successes.
Include photos at various stages of the construction process.
Discuss historical aspects of the chosen aircraft and any interesting anecdotes related to its service.
Connect with fellow modelers on forums or social media platforms.
Share your blog post and seek feedback from the modeling community.
Building a WWII model plane is not just a hobby; it's a journey through history. Enjoy the process, learn from each build, and share your passion with others in the modeling community. Happy modeling!
2 notes
·
View notes