#Scale Modelling Aircraft Paint Masks
Explore tagged Tumblr posts
Visit Tumblr Blog
Explore Tumblr blogs with no restrictions, modern design and the best experience.
Last Seen Tumblr Blogs


Fun Fact
Tumblr was acquired by Yahoo for $1.1B in 2013.
Text
German Crosses - Type 4/5 - 1/48 Scale
Scale Modelling Paint Mask Sets for German aircraft.
This is for WWII German Crosses Type 4/5 used during the later years of WWII. There are 8 different sizes in this set with 6 of each size allowing you to paint multiple aircraft at the same time.
Type 1 - Available in 1/32 and 1/48 Scale
German Crosses Type 2 used on German Aircraft during the early stages of World War 2. These are the crosses with the black cross centre, white and black surrounds. Available in 1/24, 1/32 and 1/48 scale each set comprises 10 sizes with 4 of each size included (40 Total)
German Crosses Type 3 used on German Aircraft during the early years of World War 2. These are the crosses with a black centre and white corners. Available in 1/24, 1/32, 1/48 and 1/72 scales, each set has 12 diiferent sizes, each set includes 4 of each size (48 Total).
German Crosses Type 4/5 used on World War 2 era aircrafts. These are the crosses without the cross centre and either white or black corners. Available in 1/24, 1/32, 1/48 and 1/72 scale each set comprises 8 sizes with 6 of each size included (48 Total)
German Crosses Type 6/7 used on late World War 2 era aircrafts. These are the crosses without the cross centre and the thin black or white corners. Available in 1/24, 1/32, 1/48 and 1/72 scale each set comprises 4 different sizes with 6 of each size (24 Total)
Multi Sets
Available in 1/32 and 1/48 scale for either early war crosses (1,2,3), late war crosses (4/5, 6/7) or full sets
#WW2 Scale Model Paint Mask Sets#WW2 German Aircraft#WW2 German Crosses#Scale Modelling Aircraft Paint Masks#Scale Modelling Paint Mask Sets#The Crafting Well#thecraftingwell#The Crafting Well Paint Masks#1/48 Paint Stencil#1/48 Scale Model Paint Stencils#1/48 Scale Model Stencils#Scale Model Paint Stencils#Paint Stencil#Artist Paint Stencil#1/48 Scale Model Paint Mask Sets#Scale Model Paint Masks#Decal Replacement Paint Mask Sets#Decal Replacement#Paint not Decal#1/48 Scale Model Paint Masks#German Aircraft Scale Model Paint Masks#WWII German Cross Type 4/5#1/48 Scale WWII German Crosses Type 4/5#1/48 Scale WWII German Crosses Type 4/5 Scale Model Paint Masks#WWII German Crosses Scale Model Paint Masks#WWII German Crosses Type 4/5 Scale Model Paint Masks#1/48 Scale WWII German Crosses
0 notes
Text
A Step By Step Guide For WWII Model Plane Building
Building model planes is a fascinating hobby, especially when it involves recreating historical aircraft from World War II. In this blog post, I'll guide you through the process of WWII model plane building, from choosing the right kit to adding realistic details.
1. Choosing the Model Kit:
Start by selecting a model kit that suits your skill level and interests. Popular WWII aircraft include the Spitfire, Mustang, Zero, and Messerschmitt. Check the kit's scale and reviews to ensure it meets your expectations. There are many places you can go to purchase your kit. Many hobby websites like Hobbylinc, Mega Hobby or ebay will have plenty of options for you.
Before you make your purchase, you will want to check out some review websites to make sure you are getting the model and quality you expect.
2. Gathering Materials:
Before you begin your build, you will want to make sure to have the following materials on hand:
Model kit
Hobby knife and cutting mat
Plastic cement or glue
Sandpaper (various grits)
Paints and brushes - some models will come with paint and others will not. Be sure to read the packaging to see if you need to purchase it separately
Decals
Tweezers for handling small parts
Clear sealant (for a glossy finish)
3. Assembly:
The key to assembling a model is patience but some additional steps are laid out below:
Carefully follow the kit instructions, organizing parts before starting.
Use the hobby knife to remove parts from the sprues, and sand edges for a clean fit.
Dry-fit components before applying glue to ensure proper alignment.
Assemble major sections (wings, fuselage) and let them dry completely before moving on.
4. Painting:
Painting your model can be fun and is an important step to make your model more realistic:
Research historically accurate color schemes for your chosen aircraft. - Some models will contain the color codes you need to purchase.
Prime the model with a suitable primer to enhance paint adherence.
Paint small details first, working towards larger areas.
Use masking tape to create clean lines between different paint colors.
Apply decals following kit instructions.
5. Weathering and Detailing:
If you decide that your model needs to be more realistic, try some of the below techniques.
Add realistic wear and tear using weathering techniques (dry brushing, washes, and chipping).
Detail cockpit interiors with tiny instruments, seats, and control panels.
Consider adding aftermarket accessories like photo-etched parts for extra detail.
6. Final Assembly:
Once any extra details have been added, you will want to put together your new model:
Attach remaining components, such as landing gear, propellers, and antennas.
Double-check alignment and make any necessary adjustments.
Seal the model with a clear finish to protect the paint and decals.
7. Display and Photography:
Once your model is complete, you should show off your accomplishment:
Create a display base that complements the aircraft's historical context.
Experiment with lighting for dynamic photos, showcasing your model from different angles.
8. Community Engagement:
Lastly, you should feel free to share your model far and wide! This is an important way to build community.
Share the building experience through a blog post, documenting challenges and successes.
Include photos at various stages of the construction process.
Discuss historical aspects of the chosen aircraft and any interesting anecdotes related to its service.
Connect with fellow modelers on forums or social media platforms.
Share your blog post and seek feedback from the modeling community.
Building a WWII model plane is not just a hobby; it's a journey through history. Enjoy the process, learn from each build, and share your passion with others in the modeling community. Happy modeling!
2 notes
·
View notes
Text
Plastic Skies - Model 6: Saab Draken

Been a while, huh? To be completely honest, it hasn’t actually been that long since the last model, but I held up on writing this until after Christmas for no particular reason.
For those who haven’t seen these, this is my ongoing journal of getting back into building aircraft model kits, a hobby that I tried out for a couple of years when I was a kid but never really got into. And that’s part of why this particular one is at least a little important.
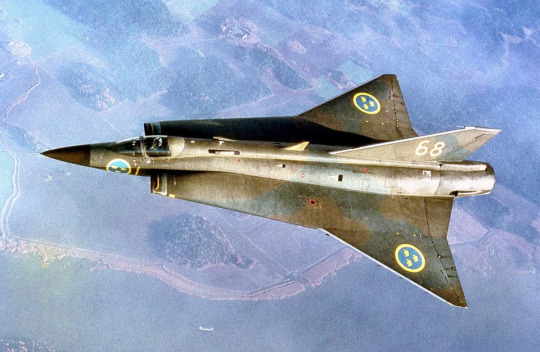
I like the Saab Draken quite a bit. Developed right after WWII as a supersonic fighter-interceptor and built in the early years of the Cold War, the Draken was able to reach speeds of Mach 2 and is also the first aircraft capable of doing the Cobra Maneuver, one of those aviation things that looks like someone hacked real life:
(It’s kinda funny that the plane’s name, “Draken”, can mean either “Dragon” or “Kite”)
I also love its general shape, its double delta wings and wide body making it look more like a starfighter than an airplane. But the main reason why I like the Draken is because it was one of the first model kits my brother built when we were kids. Which makes it one of the very first model kits I’d ever seen. So when I went looking for a 1/72 scale kit to finally move away from the tiny 1/144′s that I’d been focusing so much on, this very generously-priced Draken caught my eye right away. It was pretty much the same price as the Tomcat and Flanker, plus it gave me an opportunity to pait camouflage again, so after a quick trip to a new shop it was mine.

I was happy to see that I had all the tools I needed for this build except for some blue paint. The shop I bought it from didn’t have it, so I took at as an opportunity to go to another one and also pick up a few extras I’d been looking at. Namely, a can of brush cleaner and a rotating platform with elevated hooks to paint smaller parts which I... actually didn’t get much use out of and kinda regret. But it might be useful someday!

The build itself was surprisingly pleasant. After all these models, I’m happy to see I’ve grown an eye for getting the pieces properly glued and balanced, so no more crooked tailfins or wings. Or, well, not as crooked as in previous attempts.
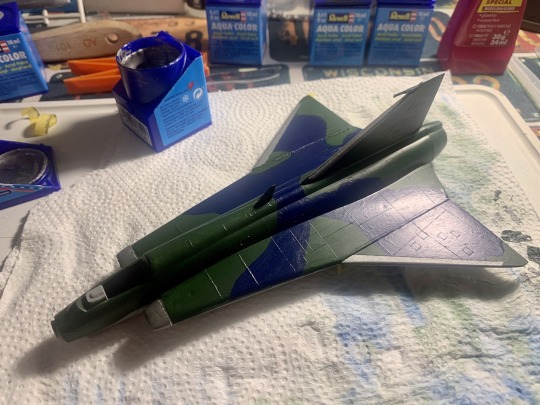
I’m also pretty happy with the paintjob I gave this old gal. It’s a bit thicker than in the reference pictures, but the extra space and a bit more care when thinning the paints made it so the brush strokes aren’t quite as visible as in other models, which was my main goal here. Also, getting the silver stripes required a bit of masking tape use which also went a lot better than other times.

Likewise, I’m pleased with how the landing gears came out. The frontal one is still a bit crooked and the gates aren’t exactly right to the original plane, but the improvement is there. Which is always one of the most encouraging things with any hobby or activity: watching you get better at it. Overall, I was having a nice, relaxing time with my Draken, watching it quickly take shape while also enjoying the process. Painting in particular was really fun and rewarding. It didn’t escape my attention that I was, in a way, one-upping my brother. He never painted his Draken, after all. Although while I was working on this, I did unlock a very, veeery vague memory of one of us attempting to paint at least one kit and being very disappointed at the results. I can’t remember which one of us or what kit but the image was still there, hazy in my mind. I should ask him someday.

So yeah, a good time was had by all rrright up until the decals came out. Turns out Mistercraft’s decals are somehow both tough and fragile. Even after dunking them a long time in water, the only thing that could get them out of the sheet were my fingers, which imediately opened up a whole can of problems which you can already see in the pic above if you look closely enough.
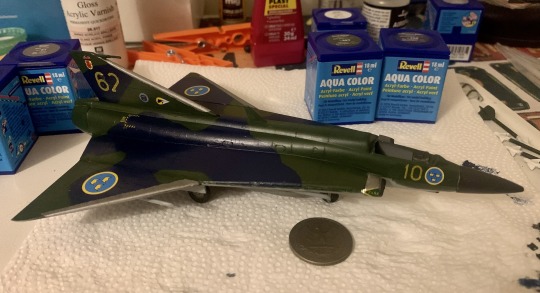
The decal mishaps meant two things: first, that I decided to skip on the big yellow dragon/swordfish decal that would’ve otherwise covered most of the plane’s fuselage. And two, that I was gonna have to weather at least a bit of it to give it a worn-out look. If only to justify the busted up decals.

The weathering job ended up being once of the nicest parts of the model somehow. Thanks to the extra surface to work with, I was able to really fine-tune the sludge wash into something that looks pretty good to my eye. I didn’t do the same for the top of the plane, though that’s mostly because I’m saving up to buy some proper panel liners that will most likely give me a much better look than anything this wash could do.
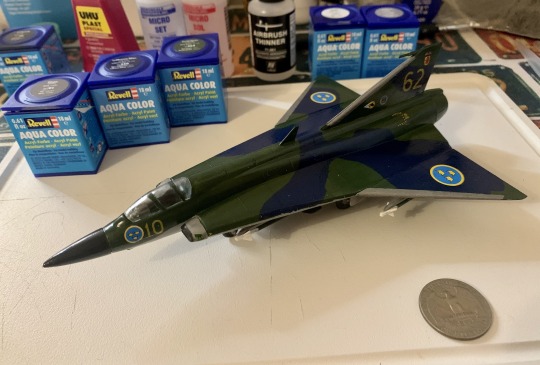
Speaking of the top, one thing I did for this Draken that I haven’t done for any other plane so far was paint the canopy. I took an extremely fine brush to it, and while it was pretty intimidating at first, I was able to get it painted pretty alright and without having to clean it or use thinners. It’s still a bit gooey and that’s my fault for not using masking tape, but for a first experience, it was still quite nice.

After that, all that was left was give it a couple coats of matte varnish, and the Draken was ready. The combination of a decent enough paintjob and the nostalgic value meant I was quick to show it off to everyone and their dog, who were pretty impressed with it. So the jump up in scale ended up being a real success, in more than one ways. Not only did it serve me a sweet slice of circularity and was a mostly comfortable build: the best part of making this Draken was the confidence it left me with.

I know I’m not a huge pro and I’m sure I’m reaching the ceiling of my personal skills and/or the level of detail I care to get into, but if this is as good as I can make a model, I feel pretty satisfied. Content. And more importantly, I finally feel ready to tackle the Final Boss of this whole endeavor. The model that I desperately want to Get Right. The model that will be, if everything goes well, the first thing I build in 2023.
I’m very, very excited for it.
#My stuff#Hobbies#Journals#Good ol' Swedish planes#I'd like to build a Gripen too someday#They're nice planes Harold#Also#Man#Europe sure seems to love their delta wing planes huh?#Wonder what's up with that
15 notes
·
View notes
Photo

1/32 Scale US Navy tow tractor Weathered with @ammomig 3d printed model kit by @remjkits I made painting masks with Silthuette portrait 3. #scalemodelling #scalemodeller #scalemodel #modelkit #remjmodels #navy #usnavy #towtractor #scalemodelling #3dprinted #32scale #weathering #aircraft #scalemodelworld #3dprinting #aircrafttowing #military #hataka #ammomig #anyzmodels #Silthuette #aviation #navyaviation #ammomig (w: Ely, Cambridgeshire, United Kingdom) https://www.instagram.com/p/CazscGmNx7N/?utm_medium=tumblr
#scalemodelling#scalemodeller#scalemodel#modelkit#remjmodels#navy#usnavy#towtractor#3dprinted#32scale#weathering#aircraft#scalemodelworld#3dprinting#aircrafttowing#military#hataka#ammomig#anyzmodels#silthuette#aviation#navyaviation
3 notes
·
View notes
Text
The Best Sci-Fi and Fantasy Holiday Gifts From Eaglemoss
https://ift.tt/eA8V8J
This article is presented by Eaglemoss
For the science fiction and fantasy lover in your life, there is no better gift idea than one of Eaglemoss’ impressive collectibles. From diecast models that come complete with companion magazines to the final frontier of advent calendars and beyond, you’re sure to find some truly fantastic things to give and get here!
U.S.S. Enterprise NCC-1701-F (Refit)
The iconic, er, next generation of the Enterprise is a huge part of Star Trek Online’s appeal, and this diecast replica of the starship measures at over five inches long and comes with an exclusive magazine packed with background information.
Buy the U.S.S. Enterprise NCC-1701-F (Refit)
Future U.S.S. Enterprise NCC-1701-D
As seen in the “All Good Things” series finale of Star Trek: The Next Generation, the alternate future version of the Enterprise D features some fantastic modifications. Make this ship a part of your Star Trek collection with this beautifully crafted diecast replica.
Buy the Future U.S.S. Enterprise NCC-1701-D
Star Trek Borg Cube Advent Calendar
Assimilate holiday joy with this jaw-droppingly cool Star Trek advent calendar that includes 24 days of awesome gifts ranging from coasters to socks and beyond.
Buy the Star Trek Borg Cube Advent Calendar
Eagle One Transporter
The signature ship from Space: 1999, The Eagle One Transporter is now a premiere 10-inch long diecast model replica perfect for collecting and displaying.
Buy the Eagle One Transporter
ECV-197 Orville XL Edition
Bring the Orville home now that the titular ship from Seth MacFarlane’s sci-fi comedy is a diecast collectible from Eaglemoss that comes complete with its own display stand.
Buy the ECV-197 Orville XL Edition
Stargate Daedalus BC-304 Battlecruiser
The debut entry in Eaglemoss’ Stargate: The Official Ships Collection is the Daedalus BC-304 Battlecruiser, an incredibly designed starship that is among the most impressive in the franchise’s fleet.
Buy the Stargate Daedalus BC-304 Battlecruiser
The Expanse Rocinante Ship
Based on the acclaimed novels by James S.A. Corey, The Expanse is a sci-fi phenomenon unlike any other. Eaglemoss’ presents this diecast and high-quality ABS plastic replica of the series’ Rocinante Ship that measures 8.6 inches long and is an absolute beauty.
Buy The Expanse Rocinante Ship
Osiris Battleship
From Eaglemoss’ Battlestar Galactica Ships Collection comes this 10.5” long diecast recreation of the saga’s doomed Orion-class ship that fought valiantly in the Cylon War.
Buy the Osiris Battleship
Loki Heavy Cruiser
One of the most memorable ships in the Battlestar Galactica saga, the Loki Heavy Cruiser soars again thanks to Eaglemoss.
Buy the Loki Heavy Cruiser
Vertibird Model Aircraft
Fallout is the hottest video game franchise today, and this impressive model of the game’s Vertibird aircraft is certain to be one of this year’s most in-demand collectibles.
Buy the Vertibird Model Aircraft
The Tenth Doctor (David Tennant) Mega Edition
Allons-y! With a mischievious manner that masks an inner darkness, David Tennant’s portrayal of Doctor Who’s Tenth Doctor remains a fan favorite — which is just one of the many reasons that this 12.5-inch handpainted polyresin statuette of the character is a must own.
Buy the Tenth Doctor (David Tennant) Mega Edition
Ghostbusters Figurine Box Set
Who ya gonna call for the perfect Ghostbusters gift? Eaglemoss! Featuring the likenesses of Harold Ramis, Bill Murray, Dan Aykroyd and Ernie Hudson, this limited edition box set features polyresin figurines of the classic Ghostbusters lineup.
Buy the Ghostbusters Figurine Box Set
Drogon Dragon
From the Game of Thrones collection comes this massive hand-painted model of Drogon that features a wingspan of the dragon that measures approximately 15 inches.
Buy Drogon Dragon
Pennywise (IT: Chapter Two)
Nightmare fuel, thy name is Pennywise! Eaglemoss’ The Horror Collection presents this terrifyingly lifelike 1:16 scale figurine of Pennywise from IT: Chapter Two that comes with its own collector’s base.
Buy Pennywise (IT: Chapter Two)
Lord Voldemort Mega Edition
He who shall not be named gets a 12-inch tall Mega Edition hand-painted figurine that captures the magic and drama of Lord Voldemort’s final battle against Harry Potter.
Buy Lord Voldemort Mega Edition
cnx.cmd.push(function() { cnx({ playerId: "106e33c0-3911-473c-b599-b1426db57530", }).render("0270c398a82f44f49c23c16122516796"); });
The post The Best Sci-Fi and Fantasy Holiday Gifts From Eaglemoss appeared first on Den of Geek.
from Den of Geek https://ift.tt/2Zmi4wZ
0 notes
Text
Dallas Museums: 10Best Museum Reviews
New Post has been published on https://www.travelonlinetips.com/dallas-museums-10best-museum-reviews/
Dallas Museums: 10Best Museum Reviews

Of all the things to see and do in the Dallas area, some of the city’s biggest draws are its top-notch museums. Of course, this shouldn’t come as a surprise since the city is rapidly becoming a premier hub for art and culture.
To start, Dallas is home to the largest contiguous urban arts district in the nation, where within a 19-block stretch you can explore the Dallas Museum of Art, the Nasher Sculpture Center, the Crow Museum of Asian Art and the Perot Museum of Science and Nature in one fell swoop.
Over on the SMU Campus lies the George W. Bush Presidential Center as well as the often-overlooked Meadows Museum, a must-visit destination for Spanish art.
And these just scratch the surface of what’s on offer. Scroll on for the complete 10best lineup and be sure to check out Dallas area’s awesome family-friendly museums too.
Photo courtesy of National Videogame Museum
Situated inside the Frisco Discovery Center, the National Videogame Museum (NVM) is a veritable retro gamer’s nirvana, dedicated solely to the history of the videogame industry. The brainchild of three longtime gamers, the museum features a mind-blowing collection of videogame consoles, artifacts and games, including the largest working Pong game in the world. And not only can visitors see all the great games from the past, but they can also play them. Donkey Kong, Space Invaders, they’re all here as well as an 80’s style classic gaming arcade with gaming stations for you to go head-to-head with family and friends. Talk about a blast from the past.
Recommended for Museums because: A museum filled with video games, many of which are available to play, what’s not to like?
Ilene’s expert tip: Admission includes game tokens to use in the retro arcade. The museum offers free guided tours at 1 p.m. and 3 p.m. every Sunday.
Read more about National Videogame Museum →
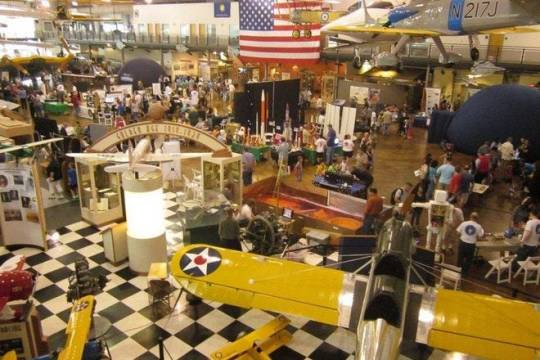
Photo courtesy of Frontiers of Flight Museum
Located in a 100,000-square-foot airplane hangar at Love Field Airport, this Smithsonian affiliate is a must-visit for aviation buffs of all ages. The museum is home to over 35,000 artifacts, showcased in 13 galleries, detailing the history of space and aviation. Expect to find around thirty types of aircraft and space vehicles, including a full-size model of the 1903 Wright Flyer, a replica of Sputnik I and a Chance Vought V-173 Flying Pancake. The Apollo 7 command module (on loan from The National Air & Space Museum) is also here. As a bonus, there’s a hands-on children’s discovery area featuring a control tower for kids to climb around on.
Recommended for Museums because: The Frontiers of Flight is an ideal place for aviation enthusiasts as well as children.
Ilene’s expert tip: As of September 2021,face masks are required for all visitors. Children age 3 and under are admitted free. Free parking is available at the Museum.
Read more about Frontiers of Flight Museum →
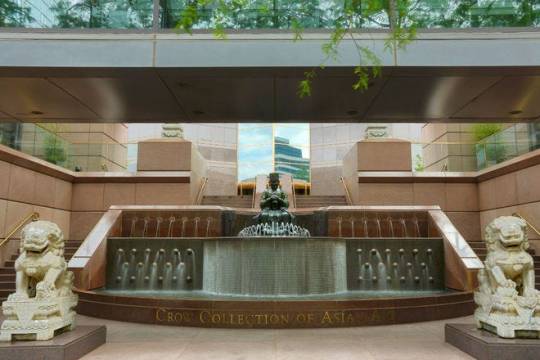
Photo courtesy of Visit Dallas
Formally known as the Crow Collection of Asian Art, this stunning museum in Dallas’ Arts District features over 1,000 masterworks, hailing from Japan, China, India and Southeast Asia, many of which have been assembled from the private collection of local real estate mogul Trammel Crow and his wife Margaret. Here, visitors can explore a series of galleries showcasing art objects, paintings, scrolls and large architectural pieces, some of which dates to the 10th century. Highlights include a collection of Chinese jade objects and a suit of Samurai armor from the Edo period. The museum’s gift store, The Lotus Shop, is also worth a visit. Best of all, admission to the museum is always free.
Recommended for Museums because: The Crow Collection is one of the few U.S. museums to focus solely on Asian art.
Ilene’s expert tip: As of September 2021, the museum recommends that visitors wear face coverings. Parking is available in the Trammell Crow Center parking garage for $4 per hour on weekdays and a $5 flat rate on weekends. There is also metered parking nearby.
Read more about Crow Museum of Asian Art →

Photo courtesy of George W. Bush Presidential Center
Second in size behind Ronald Reagan’s Presidential Library in Simi Valley, California, this stunning complex on the Southern Methodist University campus encompasses not only a library and museum but also the George W. Bush Policy Institute and the George W. Bush Foundation. However, most visitors will only see the museum, which features 14,000-square-feet of exhibits and interactive displays, including a 22-foot tall ravaged steel beam from the World Trade Center and a full-scale walk-through replica of the Bush Oval Office. Also on view are some of the gifts given to the President and First Lady from foreign Heads of State.
Recommended for Museums because: The George W. Bush Presidential Center is a great place for history buffs of all ages.
Ilene’s expert tip: As of September 2021, masks are required as are timed entry tickets which must be purchased online prior to arrival. Also note that presently the permanent exhibit is temporarily closed, however the museum is open for viewing the Special Exhibit on Immigration in the United States, Out of Many, One: Portraits of America’s Immigrants. There is a parking lot adjacent to the library as well as a parking garage located down the street.
Read more about George W. Bush Presidential Center →
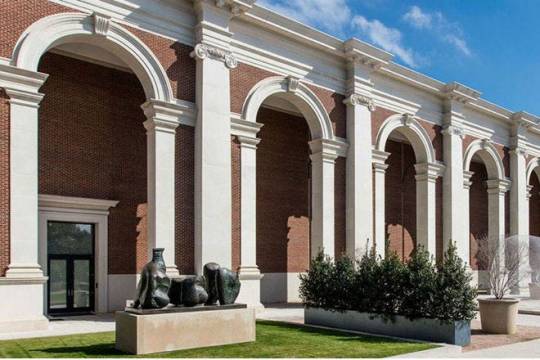
Photo courtesy of Meadows Museum of Art
Located on the Southern Methodist University campus, the Meadows Museum was first established in 1965 to house the collection of Spanish art assembled by Dallas oilman and philanthropist Algur H. Meadows. Today, the museum is regarded as having one of the largest and most significant collections of Spanish art outside of Spain, thus earning it the nickname, “the Prado on the Prairie.” Among pieces spanning from the 10th to the 21st centuries are works by masters such as Dalí, El Greco, Miró, Picasso, and Velázquez. In addition to the permanent collection and temporary exhibitions, the museum also features an assortment of 20th-century sculptures, including Santiago Calatrava’s Wave which can be found on display in its outdoor plaza.
Recommended for Museums because: The Meadows Museum is truly one of Dallas’ hidden art gems.
Ilene’s expert tip: As of September 2021, the museum is temporarily requiring masks for all visitors, regardless of vaccination status. The museum offers free admission after 5 p.m. on Thursdays. Children under the age of 12 are admitted free. Complimentary parking is available in the garage underneath the museum at the corner of Bishop and Schlegel.
Read more about Meadows Museum of Art →

Photo courtesy of DCVB
This stunning 55,000-square-foot facility, designed by renowned architect Renzo Piano in collaboration with landscape architect Peter Walker, was created to showcase the private sculpture collection of real estate developer Raymond Nasher and his wife Nancy. The collection is regarded as one of the most extraordinary assemblages of modern and contemporary sculptures in the world, with more than 300 significant works of art from masters such as Rodin, Brancusi, Matisse, Picasso, Koons, Calder and Miró. In addition to the treasures to behold inside the center, visitors will find around twenty-five more sculptures scattered around a lush 1.4-acre garden that surrounds the complex.
Recommended for Museums because: The Nasher Sculpture Center houses one of the best modern and contemporary sculpture collections in the world.
Ilene’s expert tip: Note that as of September 2021, face masks are required for visitors to the museum. Admission is free every first Saturday of the month, 11 a.m. –” 5 p.m. The sculpture garden is always free to visit.
Read more about Nasher Sculpture Center →

Photo courtesy of Perot Museum of Nature and Science
Designed by Pritzker Architecture Prize Laureate Thom Mayne, this stunning 180,000-square-foot science museum on the outer edge of the Arts District boasts five floors of interactive exhibits focusing on everything from earth and space to geology, paleontology and engineering. Highlights include a children’s museum with a dinosaur dig, an earthquake simulator, and a gallery of gems and minerals featuring a 5-foot geode. A good way to start is to take the external glass escalator up to the top and work your way down while enjoying the panoramic views of downtown Dallas.
Recommended for Museums because: The Perot Museum is the best place in Dallas for science nerds to geek out.
Ilene’s expert tip: As of September 2021, all visitors 2 and older are required to wear a face covering. Guests must secure a timed-ticket to enter the Museum. To ensure you get your desired entry time it is suggested to purchase tickets online in advance of coming.
Read more about Perot Museum of Nature and Science →
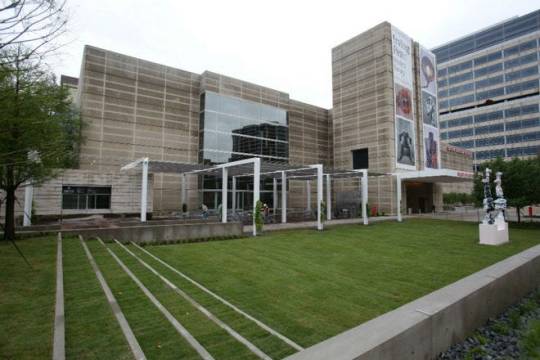
Photo courtesy of Dallas Museum of Art
The sprawling 370,000-square-foot Dallas Museum of Art, designed by New York architect Edward Larrabee Barnes, offers one of the largest and most impressive art collections in the nation. Its permanent holdings, dating back from the third millennium BC to the present day– encompasses over 23,000 works of paintings, sculptures, jewelry and artifacts from all over the world. Here, you’ll find masterpieces from heavy hitters such as Pollock, Rothko, Monet, Rodin and Picasso to name a few. Beyond the galleries, the museum houses a children’s creative zone, a sculpture garden and a cafe featuring a window of Dale Chihuly’s glass flowers. And with the exception of certain exhibitions and events, general admission to the museum is always free.
Recommended for Museums because: The Dallas Museum of Art houses one of the largest and most impressive art collections in the nation.
Ilene’s expert tip: Free general admission entry to the DMA requires a ticket for entry. Visitors are encouraged to reserve tickets online in advance, but walk-ups are also able to be accommodated. Note that as of September 2021, all visitors and employees are required to wear face masks while visiting the Museum.
Read more about Dallas Museum of Art →
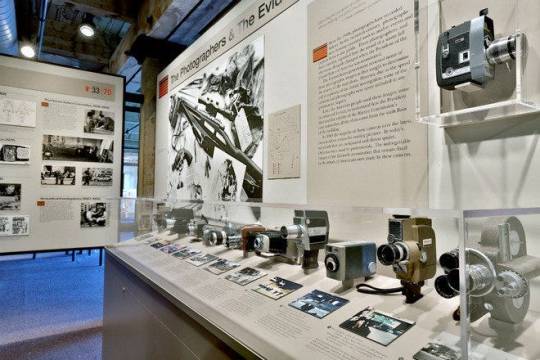
Photo courtesy of DCVB
Whether you’re a history buff or a conspiracy theorist, you’ll find the Sixth Floor Museum an interesting source of information about the assassination and legacy of President John F. Kennedy. The museum’s exhibits contain over 45,000 items, ranging from artifacts to home movies and video footage, documenting Kennedy’s presidency through to his final days. One of the highlights of the tour is the Plexiglas enclosed area where Lee Harvey Oswald is believed to have fired the fateful shot. After visiting the museum, be sure to go down to the grassy knoll to gain more perspective about what transpired that tragic day.
Recommended for Museums because: The Sixth Floor Museum is one of the most visited attractions in Dallas.
Ilene’s expert tip: As of September 2021, the museum is operating under limited opening hours, and also requires timed tickets to be purchased at least 30 minutes in advance. Note that all guests over the age of two are required to wear face coverings. The free D-Link bus stops directly outside the Museum at Houston & Elm.
Read more about Sixth Floor Museum at Dealey Plaza →
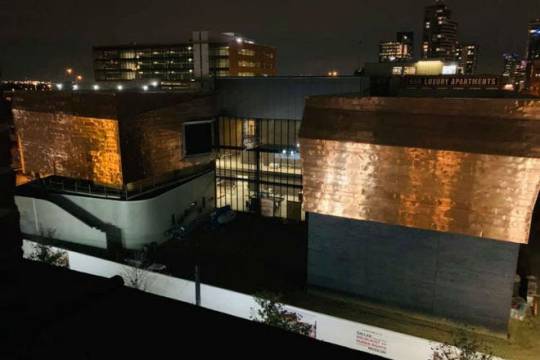
Photo courtesy of Dallas Holocaust and Human Rights Museum
Recently re-opened in a larger location in the West End, the Dallas Holocaust museum not only offers visitors a harrowing glimpse into the Holocaust, but it also addresses other 20th century genocides as well as the American Civil Rights Movement. Among the technologically enhanced exhibits are video testimonies from Holocaust survivors, an original Nazi-era boxcar and numerous items recovered from concentration camps. A centerpiece of the museum is the Dimensions in Testimony Theater (one of only two such theaters in the world), which uses holographic imagery to facilitate real-time interactions with Holocaust survivors. Note that the museum is recommended for ages 12 and over.
Recommended for Museums because: The Dallas Holocaust Museum is a first of its kind to honor both human rights and the memory of the Holocaust.
Ilene’s expert tip: As of September 2021, visitors are required to purchase/reserve tickets online, prior to coming to the Museum. Also, all guests, staff, and volunteers must wear face masks for the duration of their visit. Be sure to reserve your time slot for the Dimensions in Testimony Theater when you arrive. Bank of America cardholders receive free admission to the Museum on the first full weekend of every month.
Read more about Dallas Holocaust and Human Rights Museum →
Source link
0 notes
Text
The K.2 was the last model or conversion of the Victor. Several variants were proposed through the years. Beside the Phase 2 and Phase 3 (aka HP.104) bomber versions, Handley Page had advanced no fewer than five military or civilian transport models of the Victor, the most radical being the HP.111, powered by four Conway turbofans and carrying 200 troops or 145 passengers in a double-decker fuselage. The HP.114, also known as Phase 6, would have had a redesigned wing to carry up to four of the US-developed GAM-87 air-launched ballistic missiles, but the abandonment of that project killed the Phase 6.
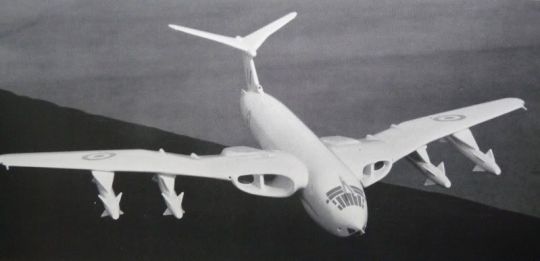
-Model of the HP.114 showing the new wing and four Skybolt ALBMs. | Photo: Handley Page
OPERATIONAL HISTORY
Entering service with the RAF in 1958, the Victors never dropped a bomb in anger, though the type did see service during the Falklands conflict as well as during the 1991 Gulf War in the tanker role. At the height of operations, Victor B.1/.1A and B.2/2RS equipped six squadrons in RAF Bomber Command.

-A Victor B.2, it's five-man crew, and the Blue Steel standoff weapon they hoped to never fire. | Photo: UK MOD
RAF doctrine sought to foster a sense of comradery and unity amongst bomber crews, and both flight and ground crews would frequently serve together for up to five years at a time. This was essential, as in a full-scale nuclear exchange each Victor crew would be expected to operate entirely independent of the rest of their squadron mates as well as from high command. Extensive training and qualification trials were assigned to ensure that each plane's crew would be able to reach their assigned targets. During times of heightened international tension, the Victors would be placed on a high state of readiness; if a strike order was issued, planes were expected to be airborne within four minutes. Attack routes were plotted to exploit gaps in the Soviet radar network, though these holes waxed and waned as both sides made advancements in their respective radar and ECM technology.

-A Victor's radar/navigator, wearing oxygen mask and life vest, at the visual aiming window. | Photo: IWM
During the 1963-65 Borneo confrontation, detachments of Victors made regular rotation through RAF Tengah in Singapore, acting as a deterrent against Indonesia and giving RAF crews needed training in low-level flight and visual bombing. At the height of the crisis in September 1964, four B.1 were stationed for rapid dispersal, with two of the aircraft loaded with live conventional bombs and held on one-hour alert at any given time. Cooler heads prevailed however, and the alert was terminated at the end of the month.
After the withdrawal of the Victor from nuclear alert in 1968, crews of the tanker and recon variants continued their missions, keeping the rest of the RAF topped off and providing needed intelligence to the Ministry of Defense. During the 1982 Falklands war, Victor tankers provided fuel for RAF and RN aircraft, including a staggering five million liters of fuel passed to the Vulcan bombers participating in each of three Black Buck strikes. Victors also refueled Nimrod and Hercules aircraft on the long flight to RAF Ascension Island, and several aircraft had the visual bombing window at the nose uncovered and used to gather visual reconnaissance of South Georgia island. The last deployment of the Victor was during the 1991 conflict over Iraq, when eight K.2 were deployed to Bahrain to refuel aircraft during Operation Granby. By this point age had caught up with the aircraft, and the last Victor tanker was retired in 1993.

-A K.2 tanker in their last paint scheme of hemp over light aircraft gray. | Photo: UK MOD
SURVIVORS
A total of four Victors have been preserved and are on display in the United Kingdom. None are flightworthy, though two have been maintained in taxiable condition.
Victor B.1A XH648: a B.1A (K.2P) at the Imperial War Museum Duxford, Cambridgeshire. This is the sole B.1 to survive.

-XH648 as she appeared in 1997. | Photo: Alan D R Brown
Victor K.2 XH672: Maid Marian, at the Royal Air Force Museum, Cosford, Shropshire, in the National Cold War Exhibition.

-Maid Marian in 2016. | Photo: Alan Wilson
Victor K.2 XL231: Lusty Lindy, at the Yorkshire Air Museum, York. The prototype for the B.2 to K.2 conversion; one of two Victors currently in taxiable condition.

-Lusty Lindy outdoors in 2012. | Photo: Roland Turner
Victor K.2 XM715: Teasin' Tina/Victor Meldrew, at the British Aviation Heritage Centre, Bruntingthorpe, Leicestershire. The other Victor currently in taxiable condition, XM715 also made the most recent flight of a Victor, being an accidental takeoff and subsequent landing at Bruntingthorpe Aerodrome in 2009.

-Teasin' Tina in 2008. | Photo: MaltaGC

-Head-on view of a Victor during a ground taxi run in 2006. | Photo: Mike Freer - Touchdown Aviation
FLIGHTLINE: 189 - HANDLEY PAGE VICTOR
The last of the UK's V Bombers, the Victor was retired from the strategic nuclear role in the late 60s but served as a tanker until the 1990s.
The origins of the British atomic bomber fleet, later known as the V Bombers as all had names starting with that letter, began in 1946 with the issuing of Air Staff Operational Requirement OR.1001, which anticipated the development of a "Special Gravity Bomb" (aka nuclear weapon) not to exceed 7.37m in length, 1.5m in diameter and weighing no more than 4,500kg. With this in mind, in 1947 the Ministry of Supply issued Specification B.35/46 calling for a replacement of the WW2-era Avro Lancaster, as well as the current Avro Lincoln, with a new aircraft capable of carrying one OR.1001 spec weapon 2,800km at 930kmh and between 11,000 and 15,000 meters altitude. B.35/46 also stipulated that the maximum weight of this new bomber would not exceed 45,000kg, and that a conventional bomb load of 9,100kg was also a requirement. No defensive armament was called for, as the speed and altitude of the new aircraft was deemed to be sufficient protection from interception.
Handley Page responded to B.35/46 with a design designated the HP.80, which featured a novel crescent-shaped swept wing designed by company aerodynamicists Dr. Gustav Lachmann and Godfrey Lee. Both the sweep and chord of the HP.80's crescent wing decreased in three distinct steps from the root to the tip, in order to ensure a constant critical Mach number across the entire wing; consequently, the design had a high cruise speed. Initially, the HP.80 was a tailless design, with combination flight surfaces on the wings affecting pitch, yaw and roll, but results from wind tunnel and scale model tests resulted in the addition of a vertical tail with a high-mounted, all-moving horizontal stabilizer with a pronounced dihedral.
Both the HP.80 and Avro's competing Type 698 design (which became the Vulcan) sufficiently impressed the RAF to garner contracts for two prototypes of each, but, recognizing the advanced nature of both designs, the RAF also approved the Vickers 667, which was later named the Valiant, as a fall-back measure if either failed to mature. The two HP.80 prototypes, s/n WB771 and WB775, were built at Handley's Radlett factory, then disassembled and transported to RAF Bascomb Down for flight testing. The move was carried out with some secrecy, and the sections were transported under wooden framing and tarps printed with "GELEYPANDHY / SOUTHAMPTON" (GELEYPANDHY being an anagram of "Handley Page", further obscured by a printer's error) to make it appear to be a boat hull in transit. The maiden flight of WB771 was held on 24 December 1952, and lasted 17 minutes. Testing proceeded well, though both aircraft were found to be tail heavy due to the lack of operational equipment in the cockpit, which was remediated by the addition of ballast.

-WB771 landing at Bascomb Down at the Farnborough Air Show in 1953. The aircraft was specially painted for the occasion: the fuselage was black with a red cheatline while the wings and tail were silver. | Photo: RAF
In January 1953 the HP.80 was approved for production under the name Victor B.1. During a subsequent test phase in 1954, WB771 was lost on 14 July when the stabilizer detached during a low-level, high speed pass over RAF Cranfield. The entire crew was killed in the accident, which was traced to fatigue cracks around the three bolts holding the tailplane to the vertical fin. The accident led to changes in the production models, chiefly the addition of a fourth bolt and a shortening of the tail fin. Production B.1 also differed in having a longer nose, which moved the crew escape hatch further from the intakes; this modification also improved the Victor's center of gravity.
SPECIFICATIONS AND VARIATIONS

-Orthograph of the Victor K.2. | Illustration: Kaboldy
The Victor was large and rather futuristic-looking, being 35m long and with a wingspan of 34m. The aircraft was 8.6m tall, and weighed 40,000kg empty. Max TO weight was 93,000kg, with up to 35 450kg conventional bombs or a single free-fall or stand-off nuclear weapon. Power was provided by four Armstrong Siddeley Sa.7 Sapphire turbojets of 49.2kN each, which gave the Vulcan a top speed of 1,009kmh at 11,000m. In order to maximize range, every effort was made to streamline the aircraft, which resulted in a step-less windscreen and the engines being buried in the wing roots. As a result, the Victor could fly up to 9,600km, and had a maximum altitude of 17,000m. The aircraft had a crew of five, a pilot and co-pilot seated side-by-side on ejection seats, with the navigator/plotter, navigator/radar operator and air electronics officer seated behind them in rearward-facing seats. The bombardier was also provided with the Navigational and Bombing system visual bomb aiming position, indicated by the three triangular windows on the underside of the nose; in practice though, this was little used. The crew in the aft compartment were not provided ejection seats, but their chairs did have "explosive cushions" inflated by a CO2 bottle that could assist them to their feet and to the hatch in case of a bail-out situation, but in a true emergency the navigators and AEO had little chance to escape.
For nuclear deterrence missions, the Victor could carry a single Blue Danube nuclear bomb (the first weapon to come out of OR.1001), which had a yield of 10-12kt. The Blue Danube was more of an experimental design than an operational one, and was unsuited for the rigors of ground handling and flight. As a result, the Yellow Sun design began to replace the earlier model in 1959. The first high-yield, operationally stressed weapon, Yellow Sun could be armed with either the Green Grass fission warhead, with a yield of 400kt, or the Red Snow thermonuclear device, which was based on the American W28 and had a yield of 1.1Mt. In 1962 the Red Beard tactical nuclear weapon, with a yield of 15kt for the Mk. 1 and 25kt for the Mk. 2, entered service and could be carried by all of the V Bombers. Under the "dual command" arrangement, American-built Mk.5 nuclear weapons could also be carried, if need be. Unconfirmed reports indicate that the Victor could be fitted with two WW2-era 5,440kg Tallboy bunker-busters or a single 9,070kg Grand Slam "earthquake" bomb, but there are no records indicating that either were qualified for carriage.
For navigational and bombing guidance, the B.1 was fitted with the latest variant of the H2S radar as well as the Green Satin Doppler navigational aid. Input from the radar systems was fed into an analogue electromechanical aiming computer, which had an accuracy of +/- 400 yards, which was deemed to be sufficient for high-altitude nuclear bombing.
The Victor had fully-powered and -duplicated flight controls, with artificial feedback being provided to the pilot. For survivability, separate hydraulic circuits were provided for the landing gear, flaps, nose flaps, air brakes, bomb doors, wheel brakes, nose-wheel steering, and ram-air-turbine air scoops.
The AEO was responsible for the communications and electronics countermeasures, which included chaff dispensers and the Orange Putter tail warning radar unit originally developed for the English Electric Canberra. The ECM equipment was capable of disrupting Soviet radar and radio, including the guidance radar of early missiles, though rapid advances saw the equipment rapidly made obsolescent.

-An RAF crew scrambles to man their Victor B.1, painted in anti-flash white for high-altitude nuclear bombing. | Photo: UK MOD
Fifty Victor B.1 were completed between 1956 and 1961. Beginning in 1958, 24 examples were upgraded to B.1A spec, which involved adding a larger tail core to mount the Red Steer tail-warning radar. Other additions included the Blue Saga radar warning receiver (RWR); Green Palm voice communications jammer; Blue Diver & Red Shrimp radar jammers, and new chaff dispensers. During a flight on 1 June 1956 a production B.1 exceeded the speed of sound when the pilot dropped the nose slightly while in high-speed flight. Cockpit indicators recorded a speed of Mach 1.1, and reports of a sonic boom were made from Watford to Banbury. At the time, the Victor was the largest aircraft to exceed Mach 1. Aviation author Andrew Brookes later claimed that test pilot Johnny Allam broke the sound barrier deliberately to demonstrate the Victor's superiority to Valiant and Vulcan, but Allam maintained that it was an accident.

-Orthograph of the B.1/B.1A. Compare to the B.2 below. | Illustration: Greg Goebel
In 1955 Handley Page began work on the upgraded Phase 2 Victor, to be powered by 62kN Sapphire 9 engines, followed up by the Phase 3, which would have a wingspan of 42m and would be powered by either Bristol Siddeley Olympus turbojets or Rolls-Royce Conway turbofans. Both Phase 2 and 3 aircraft would have greatly improved performance, allowing a heavier bomb load to be carried at a higher altitude. The Sapphire 9 was cancelled however, and the modifications needed by the Phase 3 aircraft were determined to be too invasive to maintain the needed production rate, so a less involved Phase 2A was proposed and approved, which would see needed changes paired with the Conway RCo. 11 turbofans. Produced as the Victor B.2, the new aircraft had enlarged air intakes to feed the new engines, as well as retractable scoops on the aft fuselage to feed ram air turbines which provided emergency power to the plane in case of engine failure. The whole electrical system saw major upgrades, including the addition of an auxiliary power unit in the right wing stub to provide a self-start capacity. Also added were new ECM gear in a hump forward of the tail, and an inflight refueling probe above the cockpit. Extra fuel tanks partially faired into the wings added even more range, and the wingspan was increased to 36.5m. A B.1, s/n XH668, was remanufactured as the B.2 prototype, and took its maiden flight on 20 February 1959.
The B.2 prototype had accumulated 100 flight hours when it crashed on 20 August 1959 while carrying out high-altitude engine tests over the Irish Sea. The mission to salvage XH668 took until November of the following year, and it was determined that a failure of the starboard pitot head resulted in the flight control system commanding a dive which the crew could not recover from. A simple modification resolved the issue, and the B.2 entered service in 1962. 34 aircraft were completed by the time production ceased in April 1963, and Handley Page swiftly began modifying 21 of those aircraft to B.2R spec, which swapped in uprated RCo. 17 Conway 201 engines, modified the bomb bay to carry a single Blue Steel standoff nuclear missile semi-externally, and modified the wings with redesigned leading edges and "Kuechemann carrots" (aka "speed pods"), which reduced wave drag at transonic speed and improved high-altitude stall characteristics (and additionally housed more chaff dispensers).
-A Victor B.2 at RAF Khomaksar, Aden in 1964 during low level trials. | Photo: Cthornborough

-Orthograph of the B.2, showing the Blue Steel standoff weapon in its semi-conformal carry position. | Illustration: Greg Goebel
The acceptance of the B.2 and B.2R allowed the RAF to convert their existing Victor B.1 and B..1A to tanker aircraft, following the withdrawal of the Valliant tankers in 1964 following the discovery of fatigue cracks. Six B.1A were quickly fitted with FR.20B hose-and-drogue units under each wing and began immediate trials. As these aircraft were still capable of carrying out strike missions, they were designated B (K).1A, changed to B.1A (K2P) in 1968. Trials of these almost ad-hock tankers were successful, and a more complete conversion of 11 Victor B.1 and 14 B.1A was undertaken in 1965 and 1966, with the FR.20 on each wing complimented by an FR.17 station under the tail and the permanent installation of a fuel tank in the bomb bay. In practice, it was not safe to refuel three aircraft at the same time; normally either two airplanes refueled from the wing stations or one aircraft would tank off the centerline unit, which had a higher flow rate. These modifications were initially designated BK.1 and BK.1A, but this was changed to K.1 and K.1A in 1968.

-Victor K.1A of 57 Squadron on the flight-line at the 1972 RAF Leuchars Airshow. | Photo: Peter Nicholson
The grounding of the Valliants also left a hole in the British reconnaissance fleet, and an existing program to refit a number of B.2 was accelerated. Eight aircraft were hurriedly fitted with the Yellow Aster ground survey radar, and up to 15 cameras could be installed in the bomb bay along with photoflash dispensers. Although not typically carried, fallout sniffers could be added to the wings, allowing the aircraft to monitor nuclear tests. Designated the Victor B(SR).2 (later simply SR.2), the planes were assigned to Number 543 Squadron and proved quite capable, demonstrating the ability for a single SR.2 to map the Mediterranean or the whole of the British Isles in a single sortie. A ninth B.2 was later modified to a less intensive recon fit while still retaining compatibility with the Blue Steel missile.

-Victor B(SR).2 XM715 with the bay doors open, showing the fit of cameras being carried. | Photo: UK MOD
During the mid-1960, advances in Soviet defenses rendered the V Bombers vulnerable to interceptors and SAMs, which forced a change in tactics by the RAF. The Victor and Vulcan fleets abandoned the high-altitude approach for low-level penetration, with focus also shifting from gravity bombs to standoff weapons like the Blue Steel. As a result, the planes were repainted from their former anti-flash white over-all to a mottled gray/green tactical camo over white. This same scheme was also applied to the tanker and recon variants. Within a few years of this change in flight profile however, the Victors began to suffer from the same fatigue cracks that had grounded the Valliant bombers before them. Nuclear deterrence then fell to the Vulcans, whos thicker wing proved stronger and more able to survive low-level flight. The Victor B.2s were placed in storage for a time, but were recalled in 1970 and refitted for tanker duty by Hawker Siddeley as original manufacturer Handley Page had been liquidated the previous year. The conversion, designated K.2, removed the bombing gear, strengthened and clipped the wings, and faired over the undernose glazing. The 24 K.2s, which first flew on 1 March 1972, could carry 44,700kg of fuel each. Like the K.1/.1A, the K.2 had three refueling HDU added to the wings and bomb bay.

-Victor K.2 (XL161) near Abingdon in September 1979. | Photo: Mike Freer - Touchdown Aviation
#aircraft#aviation#avgeek#airplanes#airplane#cold war#cold war history#coldwar#aviation history#raf#handley page victor#handley page#victor#v bomber#bomber command#nuclear bomber#strategic bombing#tanker#aerial refueling#falklands war#falkland islands#desert storm#desert shield#1991 gulf war#black buck
31 notes
·
View notes
Text
DD2000 Route to Industry Blog post 4
For my portfolio I’m going concentrate on making hard surface models. I want to get really into making 3D models look as good and immersive as possible. I want to show of my ability to make high poly bakes to normal maps using Zbrush and Substance. Which is a technique used in many companies throughout the industry. So it is an essential skill to master in order to make compelling detailed models, that aren’t as taxing on the system as pure geometry based detail on models.
I’ve had my work critiqued by some 3D modellers from Foundry 42, the team that made star citizen. Their advice to me on my Mech model was to add a greater sense of scale by using objects on my models that relate to human proportions. Things like handles and tools, things that the viewer can relate too. For my portfolio I’ve been told that poly counts are not important, there are no awards for the most frugal 3D artist. Joe mentioned that back grounds for my Mech model didn’t look so good in just black. He mentioned about making the back-ground relevant to the model you’re presenting. Such as making a warzone with smoke, blurred out to put the focus on the model. But still make it interesting to look at. I need to improve my rendering as well.
I’ve been getting into a rendering program called Marmoset Toolbag 3 and that has been producing much better lighting for my models than the built in software inside Substance Painter. It is also a program that’s used throughout the industry to show off professional looking models to employers, I’ve seen it being used many times on Artstation.com. So spending more time with the program to work out how to use it most efficiently would benefit me immensely. Another point that was raised in response to my Mech, the wear and tear of the Mech seems to be randomly spread throughout the model. This is because I used a Smart Mask supplied by Substance Painter, and didn’t go over it after. If I were to do it again I would use a Smart Mask in conjunction with using hand painting to make the mud, ware and tare more believable. I could build it up in areas that it would realistically settle, and brush it away in areas that it would be scraped off. Using reference pictures in regards to hand painting would also benefit me greatly. Getting first hand images of real world objects would help guide my decisions during the creative process.
Since I am aiming to be a Hard Surface Prop Artist/Vehicle Artist, I’ll be focusing my portfolio on making really well detailed Vehicles both from real life and Fictional. I’ll watch modelling tutorials specifically on techniques for hard surface models to gain valuable skills that I can apply to my own work. I also want to create my own PBR textures in Substance Designer and build my own library of material for use on later projects. Showing these materials in my portfolio will also be another feather in my cap to impress potential employers with. I’m not aiming to be a texture artist, so I would show the material in use with my models to give a deeper insight into its use.
As for 3D I also want to create a library of small modular 3D assets for use on various vehicles. There’s a number of Kit Bash’s made by 3D artist Tor Frick who has worked on games such as Fallout 4 and Wolfenstein. He uses a number of bolts, panels, vents and other machinery components interchangeably. This speeds up his work flow and makes his models look very cohesive and relevant within the world he’s been set. For me this would be very beneficial, and is something I should incorporate into the models I put into my portfolio.
As for subject matter, I would love to come up with my own designs for vehicles. I’m inspired by the world of diesel punk aesthetic of Crimson Skies. I feel I would do a good job of bringing the fantasy aircraft from these games to life. Bearing in mind the game came out over 15 years ago and the technology used for creating these models has improved dramatically. I would also like to include a very well-known real life Car into my portfolio, the Volkswagen Mark 1 Golf would be a prime example of a car I’d like to recreate. This would show that I could use references like photos and blueprints from real life, an essential skill in making vehicles.
I feel these models would interest companies like Slightly Mad Studios and Foundry 42 who are in the business of making compelling vehicles, if they were done to a high enough standard. I would have to show things like wireframe renders to show how my Topology worked, and show I was using my polycount effectively. I’d show my individual maps to convey that I had knowledge of how each texture map worked.
One of the most important lessons that I’ve learnt from talking Sean Barron was to not be worried about applying to studios that I’d consider to be way above my skill level. As he puts it ‘You have nothing to lose’. With this mentality I should send off my portfolio to many studios, regardless of the standard of work they produce. The most important thing to me would be to get a position in the industry, as being a 3D artist is one of the most common roles in a company. I’m confident that if I work hard at improving my skills over the next year I should be at a standard where I could obtain a job.
In companies such as Slightly Mad Studios, it is beneficial to have a passion for the subject matter as described in their job postings. In my cover letters I will provide with each portfolio, I will write about my passion for vehicles and machines. I’m hoping that this will show potential employers I’m a 3D artist because I love doing it. Hopefully this will prompt them to take a look at my portfolio and consider me for a position. It was mentioned in the talk done by Foundry 42 that cover letters do help a lot, and in order to get my dream job I need to make my chances of success as high as possible. It would be worth researching as much as I can about the company I’m applying for as possible in order to tailor my portfolio to them. This would be done by emailing current employees or reading interviews by members of team. This will hopefully show that I am committed to my profession.
0 notes
Text
WORK ETHIC AND LAW
Startups were not of course a recipe for exponential growth. A, you can say you've already raised some from well-known investor who has just invested in you. I don't consider myself to be doing really, really good at acting formidable often solve this problem by giving investors the impression that while no investors have committed yet, several are about to. And being rapacious not only doesn't help you do that, but probably also has a much more expensive life. Technology that's valuable today could be worthless in a couple years. Something hacked together means something that barely solves the problem, or maybe doesn't solve the problem at all, but another you discovered en route. A round. In the early era, philology actually mattered. A restaurant can afford to serve the occasional burnt dinner. But in 1996 that was a hard sell.
And so you can't begin with a thesis, because you have it too; almost everyone does. Instead of accumulating money slowly by being paid a regular wage for fifty years. The very first filters I tried writing, I ignored the headers too. I've now realized it. I think. But of course they like companies that could go public as a dogfood portal, so as a company with a high probability of being moderately successful. But if VCs ask, just point out that you're inexperienced at this and ask how their process works and where you are now and the features they need. Unfortunately, there is even a saying among painters: A painting is never finished, you just stall.
For example, suppose you're saving a piece of software, not deal with customers' mundane problems. I'm not saying everyone could start a startup, is probably a startup. So I'd be skeptical of classes and books. Being small is not, in itself, what makes startups kick butt, but rather the erosion of forces that had been pushing us together. Nearly all of them occurring simultaneously in the mid 20th century masked this underlying trend. This is more pronounced among the very top funds, you're condemned to be the first to say yes or no. How do you figure out what he meant. The goal is to get the scale he needed. If you and they have a natural monopoly, like nuclear waste dumps, aircraft carriers, and regime change, you'd find these factors were all blurred together. The one saving grace was that English courses tend to favor pompous, dull writers like Henry James, who deserve black marks against them in my mind. When John Smith finishes school he is expected to get a certain bulk discount if you buy the economy-size pain, but you may have to pay for Facebook.
But the smarter they are, the more likely this is to happen. In the earliest phase they tend to operate in secret. I don't know if I could do that now. So if such a company would attract people who wanted to seem rebellious made a conscious effort to insulate the other founder s from the details of the process. John Smith, age 20 is not the test that matters, not joining the group. Microsoft is dead. And the reason it's inaccurate is that, in a recent essay I pointed out that because you can only really learn by doing it. How do you win in each type of work, and indignant readers will send you references to all the incubators in parallel, because some will angrily refuse.
A restaurant can afford to serve the occasional burnt dinner. Our prices were daringly low for the time. There will be a tendency to push it back to their offices to implement them. They would have both carrot and stick to motivate them. Filtering is an optimization problem, and then gradually refine this initial sketch. The first was the rule of law. If you're raising money from multiple investors, a series A round as a series A round needs to be tweaked slightly. And since a startup is to have the price raised on them that they resist even this self-evident reasoning. Y axis are smaller, but the people who use it. It could be simply that many famous scientists worked when collaboration was less common. So in practice the deal is with money.
A termsheet is not legally binding, but it happens surprisingly rarely. But whatever the reason, starting a startup is going to succeed, like founders do, just their portfolio as a whole must be giving people something they want, or they won't make any money. Being friends with someone for even a couple days will tell you the company is, you have to do it? Why are there so many startups selling new drugs or computer software, and the ones who did it best. But perhaps even more important, the power of investors as a whole must be giving people something they want, and if you're not in fundraising mode, or slow down your interactions with them. What made the Florentines rich in 1200 was the discovery of new techniques for making the high-tech startup is almost redundant. Young professionals were paying their dues, working their way up the ladder. Not surprisingly, people do what you pay them to.
Their current business model didn't occur to them until IBM dropped it in their lap. The fact is, despite all the nonsense we heard during the Bubble, but they were only a little. A rounds though there are few of those left, it would obviously be a good idea, and from that point all you have to be fired, and one that we spent a lot of the pain of being an outsider. Twelve! Have one person handle fundraising. You can measure this fear in how much less risk VCs are willing to fund riskier projects than VCs. Much of the skill of experts is the ability to get things done, with no excuses. 9999 if they occur between two digits. Being friends with someone for even a couple days will tell you that the right way to get to know good hackers. The huge investments themselves are something founders would dislike, if they realized how damaging they can be. You can do what you want. If a startup fails, it will take off.
#automatically generated text#Markov chains#Paul Graham#Python#Patrick Mooney#outsider#problem#experts#someone#software#route#dinner
0 notes
Text
Japanese Roundels - Hinamaru
Scale Modelling Paint Masks for Japanese Roundels (Hinamaru) used on aircraft during WW2.
These are made from quality kabuki sheets and digitally cut.
#WW2 Aircraft#1/32 Scale Model Paint Masks#1/48 Scale Model Paint Mask Sets#1/48 Scale Model Paint Masks#Japanese Aircraft#WW2 Scale Model Paint Mask Sets#WW2 Scale Model Paint Masks#WW2 Scale Model#Roundels#Roundel Masks#Scale Model Paint Masks#Paint not Decals#Scale Model Paint#Scale Model Painting#1/48 Scale Japanese Roundels#1/48 Scale Japanese Roundels Paint Masks#1:48 Scale Japanese Roundels#1:48 Scale Japanese Roundels Paint Masks#1/32 Scale Japanese Roundels#1/32 Scale Japanese Roundels Paint Masks#1:32 Scale Japanese Roundels#1:32 Scale Japanese Roundels Paint Masks#1/48 Scale Japanese Paint Masks#1:48 Scale Japanese Paint Masks#1/32 Scale Japanese Paint Masks#1:32 Scale Japanese Paint Masks#1/72 Scale Japanese Roundels#1/72 Scale Japanese Roundels Paint Masks#1:72 Scale Japanese Roundels#1:72 Scale Japanese Roundels Paint Masks
0 notes
Text
P47 Thunderbolt Razorback
Scale Model Paint Mask Sets for Scale Model P47-D WW2 American Aircraft. Available in 1/32 (Coming Soon) and 1/48 Scale, HV-V and UN-M Markings. Each set includes stars and bars and markings needed for decal replacement.
Made from quality kabuki sheets these masks are flexible and can be used multiple times if handled correctly. Thin in design they won’t leave a ridge around your painted insignia like some vinyl mask sets can do. These will also not stretch or shrink as vinyl is known to do. These will allow you to paint aircraft markings and insignias in place of decals, this allows better weathering and a quality looking finish.
#WW2 Alliies#WW2 American Aircraft#WW2 Scale Model Paint Mask Sets#US Aircraft National Insignia#Scale Modelling Aircraft Paint Masks#Scale Model American Aircraft#Scale Modelling Paint Mask Sets#P47 Thunderbolt Razorback#P47 Paint Mask Sets#Decal Replacement Paint Mask Sets#P47-D Paint Mask Set
0 notes
Text
B17G Flying Fortress
Decal replacement paint mask/stencil sets for the 1/48 scale B17 Bomber, currently available for the ‘Queenie’ and ‘American Beauty’ plane schemes. Please not that the nose art is not included in the set. All National Insignia for the fuselage, upper and lower wing, Markings, Tail fin decals (A or W), and the serial numbers are included.
Made from quality kabuki sheets these masks are flexible and can be used multiple times if handled correctly. Thin in design they won’t leave a ridge around your painted insignia like some vinyl mask sets can do. These will also not stretch or shrink as vinyl is known to do. These will allow you to paint aircraft markings and insignias in place of decals, this allows better weathering and a quality looking finish.
#B17#Scale Model Masks#Paint Mask Sets#Scale Model Stencils#Paint Stencils#WW2 American Aircraft#1/48 Scale Model Paint Mask Sets#Scale Modelling Aircraft Paint Masks#Scale Modelling Decal Replacement#Scale Modelling#American Aircraft Scale Model Masks#Paint Masks#B17 Bomber#WW2 Bomber Scale Model
0 notes
Text
British Roundels Type A
Scale Model Paint Mask Sets British Roundels Type A for WW2 British Aircraft used during the early years of WW2. Each set has 3 different sizes, 6 of each size as well as 6 fin tail masks (24 Total).
Made from quality kabuki sheets these masks are flexible and can be used multiple times if handled correctly. Thin in design they won’t leave a ridge around your painted insignia like some vinyl mask sets can do. These will also not stretch or shrink as vinyl is known to do. These will allow you to paint aircraft markings and insignias in place of decals, this allows better weathering and a quality looking finish.
#WW2 Scale Model Paint Mask Sets#WW2 British Aircraft#Scale Modelling Aircraft Paint Masks#British Aircraft Scale Modelling Paint Masks#British Roundel Paint Mask Sets#WW2 Alliies#The Crafting Well#thecraftingwell#The Crafting Well Paint Masks
0 notes
Text
A6M Zero (Tora)
Scale Model Paint Masks for the A6M Zero (Tora)
#1/48 Scale Model Paint Masks#1/72 Scale Model Paint Masks#1/32 Scale Model Paint Masks#1/48 Paint Masks#1/48 Paint Stencil#1/72 Paint Masks#1/72 Paint Stencil#1/32 Paint Masks#1/32 Paint Stencils#1/48 Japanese Aircraft Paint Masks#1/32 Japanese Aircraft Paint Masks#1/72 Japanese Aircraft Paint Masks#1/72 Zero Scale Model Paint Masks#1/48 Zero Scale Model Paint Masks#1/32 Zero Scale Model Paint Masks#1/72 Tora#1/48 Tora#1/32 Tora#Tora Paint Masks#Tora Scale Model Paint Masks#Zero Scale Model Paint Masks#Zero Model Paint Masks#Paint Masks for 1/48 Scale Zero#Paint Masks for 1/48 Scale Tora#Paint Masks for 1/72 Scale Tora#Paint Masks for 1/72 Zero#Paint Masks for 1/32 Scale Tora#Paint Masks for 1/32 Scale Zero
0 notes
Text
Focke-Wulf FW190
Scale Model Paint Mask Set for the FW190 German Aircraft used during World War 2. Each set comprises the markings, crosses and national insignia masks for decal replacement.
“JG 54” Set includes crosses, markings, national insignias and nose cone swirl masks.
Made from quality kabuki sheets these masks are flexible and can be used multiple times if handled correctly. Thin in design they won’t leave a ridge around your painted insignia like some vinyl mask sets can do. These will also not stretch or shrink as vinyl is known to do. These will allow you to paint aircraft markings and insignias in place of decals, this allows better weathering and a quality looking finish. Each set is placed between a printed sheet of card with a greyboard sheet to help prevent them from bending during transport and posted in a “Do Not Bend” board backed envelope..
#German Scale Modelling Paint Masks#German WW2 Aircraft Scale Model Paint Mask Sets#FW190 Scale Model Paint Mask Sets#FW190A-5#WW2 Scale Model Paint Mask Sets#Flying Fortress#The Crafting Well Paint Masks#The Crafting Well#1/48 Scale Model Paint Mask Sets#Scale Modelling accessories#Scale Model Paint Masks#Decal Replacement Paint Mask Sets#Paint not Decal#Decal Replacement
0 notes