#1. changed her hook and yarn sizes
Explore tagged Tumblr posts
Visit Tumblr Blog
Explore Tumblr blogs with no restrictions, modern design and the best experience.
Last Seen Tumblr Blogs


Fun Fact
The average Tumblr user visits about 67 pages every month.
Text
my favorite thing in pattern notes on ravelry is when a crafter says "I followed the pattern except" and proceeds to list so many changes that their result is nearly unrecognizable from the original pattern
#I am becoming one of these people btw#but there's a woman in the pattern notes of this cardigan I'm making who:#1. changed her hook and yarn sizes#2. changed her stitch from the simple one in the pattern (her choice is GORGEOUS and I need info)#3. removed an increase step (she wanted a square neckline)#4. adjusted row counts to alter the arm holes#5. added internal pockets#and 6. changed the hem and edging stitches completely#at this point I think all she did was follow the basic stitch count but even then I'm not positive#mine
7 notes
·
View notes
Text
one of my coworkers brought sunflower starts to the library the other day and i nabbed them so i'm making her sunflower coasters as a thank you!!!! 🌻🌻🌻

i'm following the "2-in-1 Sunflower & Chamomile Coaster Set Crochet Pattern" pattern by CandyyarnShop on etsy for them!! i'm using a thicker yarn (my leftover k+c cotton yarn, RIP joann's 🥲) and 4mm hook though so i dropped a row from the center of the flower to accommodate the size change and i think they're coming out so cute!!!!
#megaracrochets#crochet#finished project#crochet sunflower#crochet coaster#sunflower coaster#candyyarnshop#coaster#sunflower
390 notes
·
View notes
Text
the last metroid is in captivity
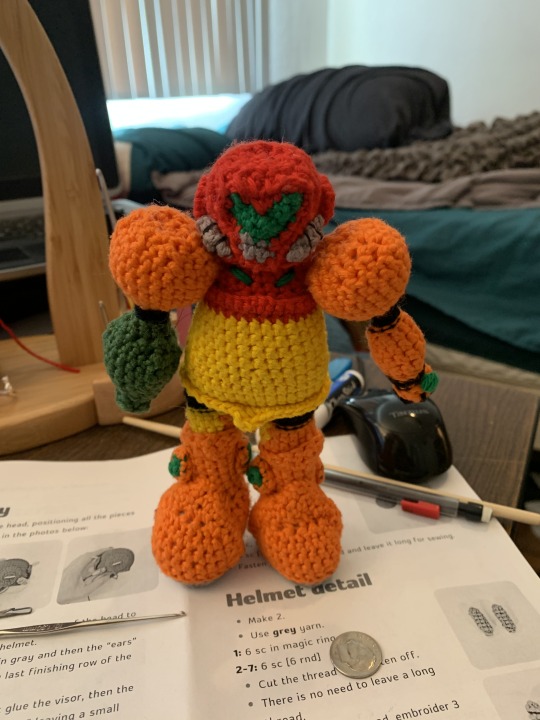
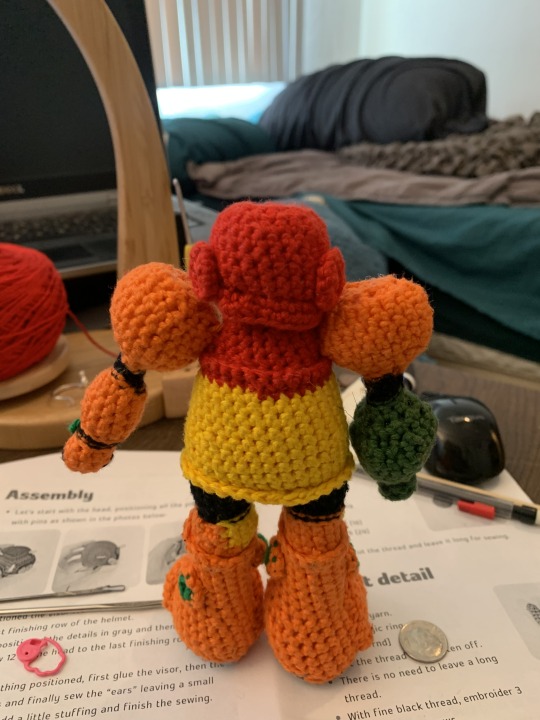
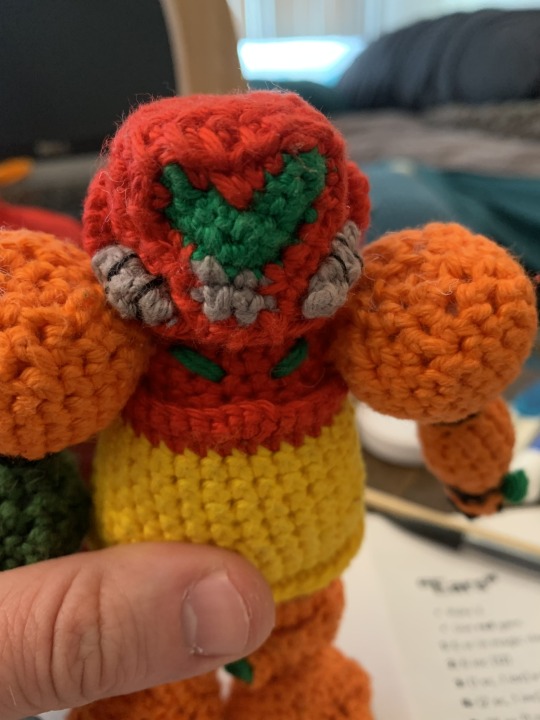

[image ID: six photos of a crocheted plush of Samus, from the Metroid series, from different angles. Samus wears a power suit with a red head and chest, a yellow torso, and orange arms and legs. Her shoulders are extremely large. Her right arm is a green cannon. End ID.]
pattern credit: Ateliê Danielle Magalhães, Ko-fi
Samus Aran! Our favorite lesbian icon space warrior! I saw this pattern and IMMEDIATELY knew I needed it.
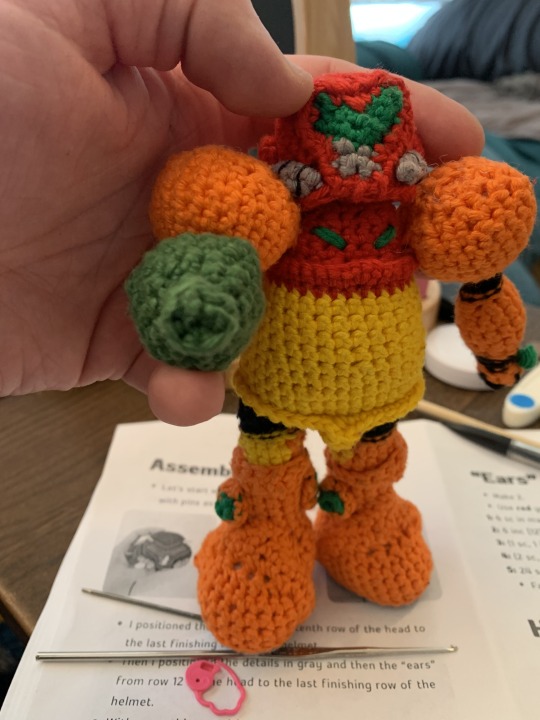
I did make a pretty significant change to the pattern. The original pattern had her head be WAY bigger than I made it, but the thing is… Samus’s shoulders are, like, the size of her head, if not bigger. That’s kind of one of her core attributes, visually. Giving her a giant bobblehead just felt extremely wrong because then it would be bigger than her shoulders! Soooo I had to scale the head down by about half (or maybe 1/4 because of how volume works? Idk, I used like half as many rows and the biggest rows had about half as many stitches as the pattern’s version), and the only part of that that was annoying was the little gray pipes on her face.
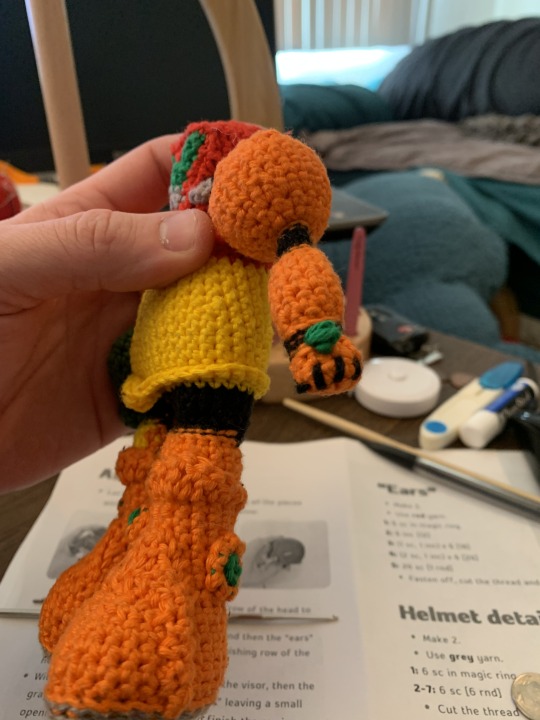
I’m proud of the fingers on the left hand, along with the green disc on it (which is, on my plush, basically just a big French knot)!
the feet are really big and I reinforced them both with some plastic and some cardboard, so she stands up better than most other plushes I’ve made (including others where I’ve reinforced the feet), and that’s satisfying.
I used primarily a size C/2.75 mm hook and size 3/DK cotton yarn, and she stands about 6 inches / 16 cm tall.
also she needed a companion, so…
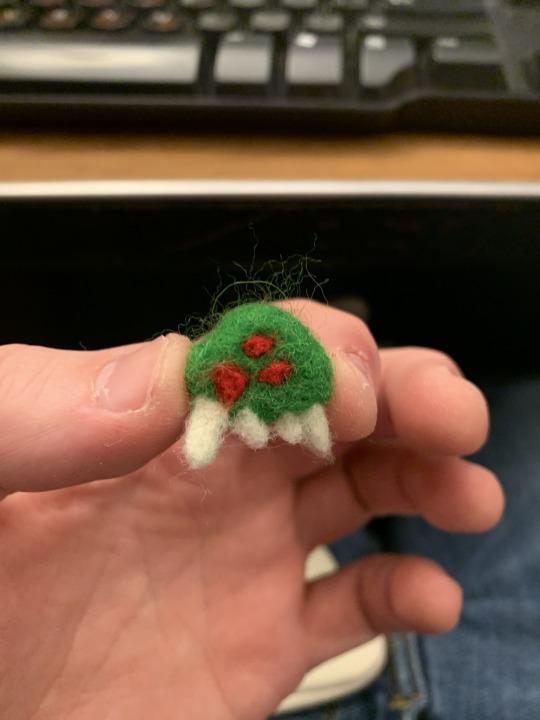
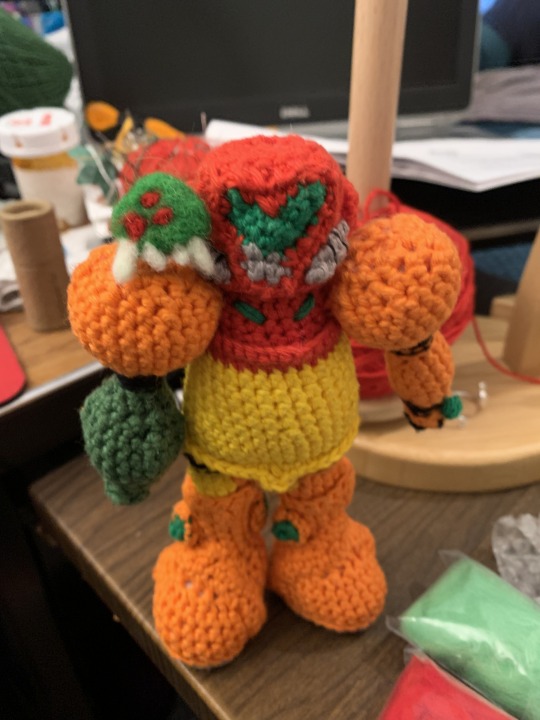
[image ID: two images of a very small needle-felted metroid. It has a green dome-shaped body with four teeth on the bottom. Three red orbs are visible on the body. The first picture is just of the metroid; in the second picture, the Metroid is on the shoulder of the Samus doll. End ID.]
I decided to needle-felt a little metroid for her! Maybe we’ll say it’s The Last Metroid, based on the size. This needle-felting stuff is fun, gotta say.
75 notes
·
View notes
Text
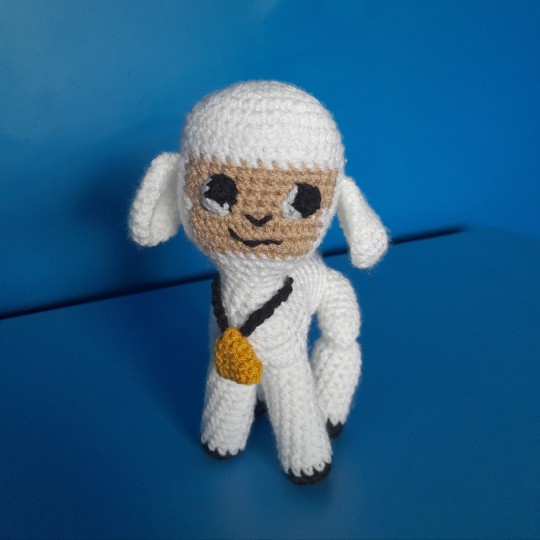
Chirin the lamb -- free crochet pattern
Ravelry PDF download here for free!
February's pattern is the little lamb Chirin from the movie Ringing Bell (1978), also known as Chirin no Suzu. It's up for free on Youtube if you want to give it a watch, it's one of my favourite Japanese animated films, a tale of grief and revenge.
Soon it will be spring, and lambs will be born on the farms near my home. It's my mother's favourite time of year because sheep are her favourite animal, and we always enjoy seeing the lambs out in the field.
For a PDF (large text, dark mode variant available) that contains more pictures, the Ravelry link is above.
Pattern under cut.
Young Chirin stands about 20cm (8in) tall and can stand without support.
You will need DK yarn in the following colours:
- white (less than one ball)
- tan or light brown (less than half a ball)
- black (less than half a ball)
- yellow (small amount)
You will also need:
- a 3.5mm hook
- pins
- a darning needle
- stuffing
- scissors
This pattern was developed for DK yarn and a 3.5mm hook. It will probably work with other sizes, so long as the hook is a size smaller than the yarn label calls for to give the best amigurumi tension.
The parts are made separately and attached to the body by sewing. Assembly will be explained. The head and body are made in one piece.
There is some simple line embroidery later to add the nose and mouth.
Head
Start in white, keep tan handy
1. 6sc into a magic ring [6]
2. 6inc [12]
3. (sc, inc) x6 [18]
4. (sc, inc, sc) x6 [24]
5. (3sc, inc) x6 [30]
6. (2sc, inc, 2sc) x6 [36]
7. (5sc, inc) x6 [42]
8. 42sc [42]
9. 42sc [42]
10. 6sc, (dec, sc) x3, (sc, dec) x3, 18sc [36]
11. 6sc, change to tan in the last stitch, 12sc, change to white, 18sc [36]
12. 6sc, tan: 12sc, white: 18sc [36]
13. 6sc, tan: 12sc, white: 18sc [36]
14. 6sc, tan: 12sc, white: 18sc [36]
15. 7sc, tan: 10sc, white: 19sc [36]
16. 7sc, tan: sc, 3inc, 3sc, 3inc, sc, white: 18sc [42]
17. 7sc, tan: 17sc, white: 18sc [42]
18. 7sc, tan: 3dec, 5sc, 3dec, white: 18sc [36]
You're now finished with the tan yarn.
19. (2sc, dec, 2sc) x6 [30]
20. (3sc, dec) x6 [24]
21. (sc, dec, sc) x6 [18]
Stuff the head.
22. (sc, dec) x6 [12]
23. 12sc [12]
24. 12sc [12]
25. (3sc, inc) x3 [15]
26. (2sc, inc, 2sc) x3 [18]
27. (sc, inc, sc) x6 [24]
28. (3sc, inc) x6 [30]
Round 29 will comprise of short rounds.
29.a 23sc. Turn, don't chain.
29.b Skip 1. 16sc. Turn, don't chain.
29.c Skip 1. 14sc. Turn, don't chain.
29.d Skip 1. 12sc. Turn, don't chain.
29.e Skip 1. sc, dec, 4sc, dec, sc.
Now you'll go around in full rounds again. Move your stitch marker to your new starting point.
30. 3sc down the slope. Across the open stitches, (2sc, inc) x4, sc. 3sc up the slope. Across the open stitches at the top, 3sc, dec, 3sc. [30]
31. 5sc, (2sc, inc) x3, 7sc, (sc, dec) x3 [30]
32. 6sc, (2sc, inc) x3, 6sc, (sc, dec) x3 [30]
33. 7sc, (2sc, inc) x3, 7sc, (sc, dec) x2, sc [31]
34. dec, 7sc, (2sc, inc) x3, 7sc, (sc, dec) x2 [31]
35. sc, dec, 7sc, (2sc, inc) x3, 7sc, dec, sc, dec [31]
36. sc, dec, 13sc, inc, 12sc, dec [30]
37. (3sc, dec) x6 [24]
38. (sc, dec, sc) x6 [18]
Stuff the body to fill out the shape.
39. (sc, dec) x6 [12]
40. 6dec [6]
Finish off. Sew the tail through the outer loops of the remaining stitches and pull to cinch the hole shut. Knot and hide the end.
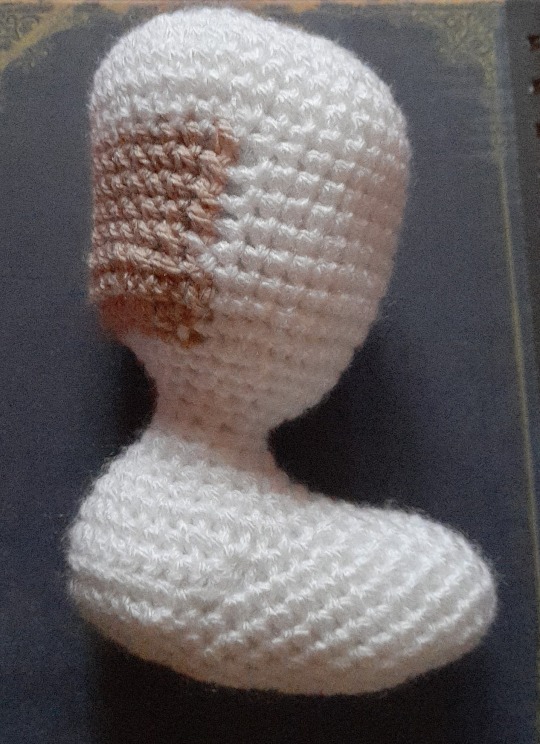

He may look like a strange swan now, but after assembly he'll look like Chirin the lamb.
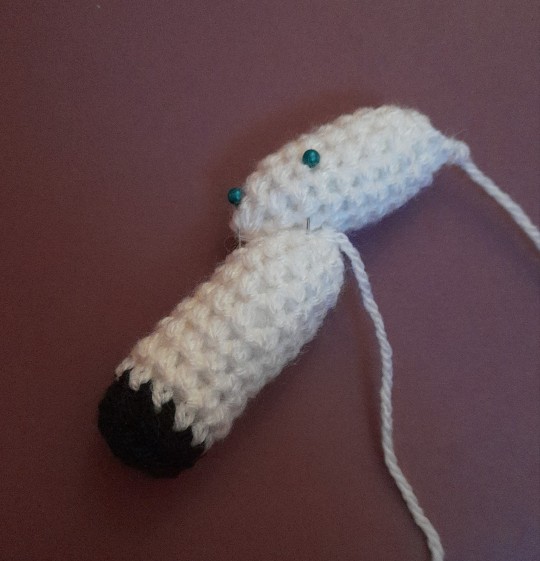
Front Legs x2
Start in black, have white handy
1. 6sc into a magic ring [6]
2. 6inc [12]
3. In the back loops only, 12sc [12]
Change to white. Continue in both loops.
4-14. 12sc (11 rounds) [12]
15. 11sc. Chain and turn, 5sc.
Finish off and leave a tail for sewing. Stuff.
Back Legs, Lower x2
Start in black, have white handy
1. 6sc into a magic ring [6]
2. 6inc [12]
3. In the back loops only, 12sc [12]
Change to white. Continue in both loops.
4-12. 12sc (9 rounds) [12]
13. 6dec [6]
Finish off, leaving a long tail. Stuff then cinch the end shut, and leave the tail out for sewing.
Back Legs, Upper x2
In white
1. 6sc into a magic ring [6]
2. (sc, inc) x3 [9]
3. (2sc, inc) x3 [12]
4-8. 12sc (5 rounds) [12]
9. 6dec [6]
Finish off, leaving a long tail. Stuff then cinch the end shut, and leave the tail out for sewing.
Tail
In white
1. 6sc into a magic ring [6]
2. (sc, inc) x3 [9]
3. 9sc [9]
4. 9sc [9]
Slip stitch and finish off. Stuff lightly.
Ears x2
In white
1. 8sc into a magic ring [8]
2. 8inc [16]
3. (sc, inc) x8 [24]
4-6. 24sc (3 rounds) [24]
7. (sc, dec) x6 [16]
8. 16sc [16]
9. (2sc, dec) x4 [12]
10-11. 12sc (2 rounds) [12]
Slip stitch and finish off. Don't stuff, squish the ears flat.
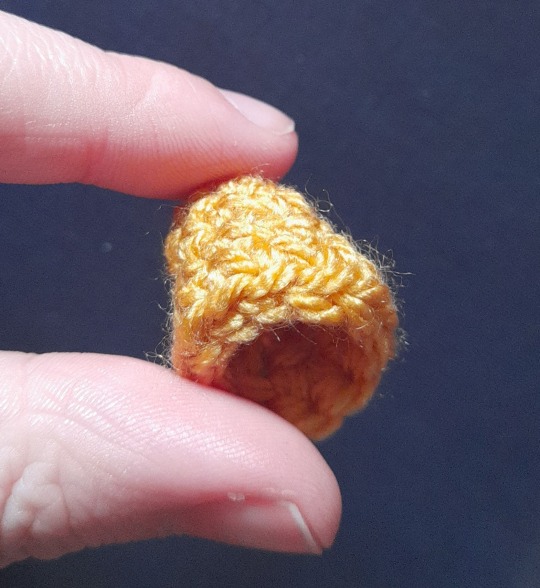
Bell
In yellow
1. 6sc into a magic ring [6]
2. (sc, inc) x3 [9]
3. 9sc [9]
4. 9sc [9]
5. (inc, 2sc) x3 [12]
Slip stitch. Finish off and hide the tails. The chain will be made after assembly for the best idea of how long it should be.
Eyes x2
Start in black, have white at hand
1. 4sc into a magic ring [4]
2. Change to white. sc, inc, slip stitch.
Leave the last stitch unworked and finish off.

The legs overlap their ends. Done and pinned, see the breakdown below. Note the angled connection of the rear legs to the hips.
Assembly breakdown:
The front legs should be attached with their flaps at the shoulders so the openings fit into the curves. Attach high on the shoulder; there should be space beneath for both front legs.
The rear leg pieces should be assembled with the magic rings pointing downwards and the tail ends pointing up. The upper leg attaches atop the end of the lower leg, forming a familiar animal leg joint. Use the lower leg's tail to connect the pieces of the legs together and leave the upper leg's tail free for the hip joint.
To attach the rear legs, pin both legs firmly to the hips at an angle and check whether all the legs are level. It should be able to stand at this point if you place them correctly. If the legs are too floppy to stand, they may need more stuffing. When satisfied with the balance, sew them on.
The tail should be attached at the very end of the body, angled backwards and slightly upwards.
Bell Chain
In black/grey
Make a slip knot. Chain approximately 21, so you have a chain that loosely fits around Chirin's neck. Try it on before you attach it, because everyone's chains are a different tension.
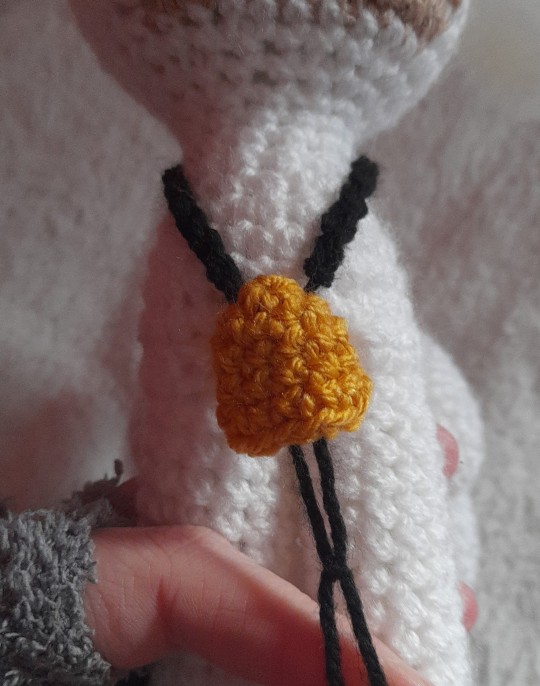
When it looks okay, cut the yarn. Thread the ends into the bell, secure with knots, and hide the ends. The bell can be sewn down to keep it from swinging, if desired.
Now all that's left is the head!
If the ears flap too much or stick out, secure the middle of the ear to the head. Some flapping of Chirin's ears is expected.

The ears should be pinned horizontally along their open edge. The edge of the ear that is closest to the face should be pinned one stitch below and one stitch away from the corner of the tan. See photo.
The eyes should be attached one stitch away from the top edge of the face, approximately 4 stitches between them. For best results, sew on the white edge with a white tail, and the black edge with a black tail.
Make sure the eyes are looking in the same direction! Otherwise he'll end up looking quite dazed...
The embroidery is simple: using black yarn, sew a small and shallow V between the bottom of the eyes for the nose, and a curved line below for a gentle smile.
And done! Our lovely little lamb is finished. Hopefully nothing bad will happen to Chirin that changes his life forever. 🐺
#crochet free pattern#amigurumi#crochet#stuffies#artists on tumblr#sheep#lamb#chirins bell#chirin no suzu#ringing bell#70s anime#cute crochet pattern#ravelry#spring#february 2025 had to be a sheep. but i'm gonna really mix it up in march
7 notes
·
View notes
Text
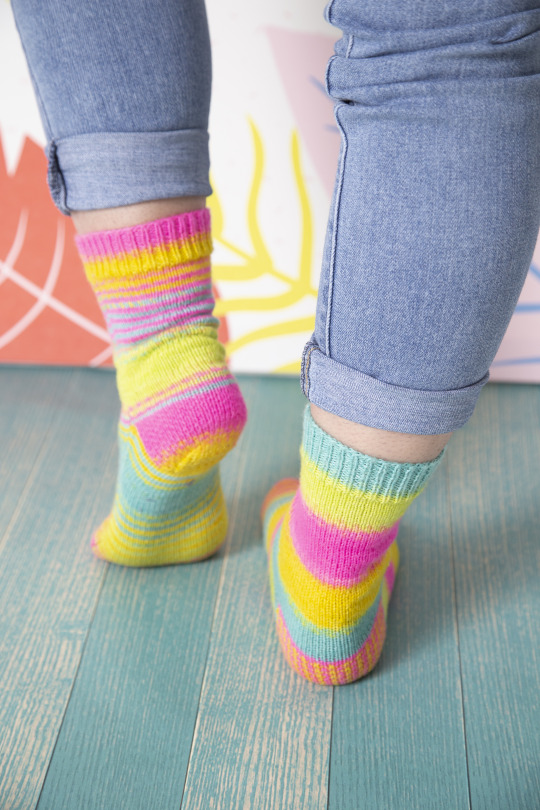
sock project #1 :: crochet


first boot socks finished! i used laceweight wool yarn to avoid bulkiness. followed this pattern for the toe and foot, then switched to this one for the heel flap onward. i wasn't sure if they'd come out fine enough to make a practical / comfy boot sock, but actually i'd say these are officially now my best boot socks (even over my knitted ones), particularly bc i like how strong the heel is. & to assuage the common complaints of crochet: these are more elastic than people give crochet credit for + with such small stitches, the textured nature of crochet isn't really an issue. the pattern is easy (laceweight would be the most difficult aspect for beginners), almost no math, and they work up actually pretty quickly thanks to the linked dc stitch. they feel spongy and sturdy, a good boot sock that i'd gladly wear all day! that said, i do have some notes for next time i crochet boot socks (yeah, i want more) to get a better fit, please see below the readmore if you're interested! but to sum up:
10/10! if you want a good sturdy sock and don't care about fancy colorwork, i highly recommend giving crochet a chance
ok i had some problems making these to mark upfront:
i underestimated crochet's capability for elasticity. i feel like 'crochet isn't stretchy' is just a stereotype made up by Big Knit. they stretch really well. i can't do math, but i'd say they hit around that 10% elasticity marker that knitted socks have. but i was so concerned they wouldn't stretch at all that i made them to my measurements and, ultimately, a bit too big. it's not a disastrous problem, but next time i crochet socks, i need to make them a bit smaller and trust the elasticity when i put them on.
the next 2 are definitely a me problem. first, i have small feet (US 3 / EU 33) and a short heel. obv this means i had to mess around w the patterns a lot. i'm extremely lucky that crochet is adaptable for this (how well this will go in knitting is making me nervous), but it did make the heel/ankle part of the pattern a bit difficult to follow. i'll get into my solution below. but this also fed into my previous problem with elasticity, bc i often overestimate how large my feet are -- i get nervous about fit (surely i can't be this child sized! no, i am, for sure) and go larger than my actual measurements -- and i'm 100% certain this contributed to this pair of socks being a bit too big. like again, these socks are still a fine pair to wear, but i wanna work on getting a better fit next time, so i need to be better about trusting my measurements.
my laceweight yarn was gifted and i think it was handspun, bc omg, the dark brown yarn especially was inconsistent. it's not a big problem, but i had to frog multiple times bc the yarn weight would suddenly change and i'd overshoot my measurements. but this means i can only give measurements; i can't provide a firm pattern this time around for my socks.
anyway, here's how i got this pair of socks and my notes for the future:
Toe: i just followed the original pattern. 2.5mm hook, increased up to 56 sc until i got to 5cm long. the yarn i have is considerably thinner than hers, so 2.5 was honestly too large and it shows, but i was also... too lazy to find my 2mm hook and switch in the beginning. lol. anyway, next time i crochet socks, i'll use 2mm for the toe too. that'll smooth out the join at the toe/foot for sure. but rn idc, it's just to note in the future
Foot (pie): this is when i switched to 2mm hook / dark brown / linked dc. i also added one more increase to the first row (64 linked dc) to make up for the switch in hook size + the dark brown yarn's inconsistency. the width is perfect (~9.75cm across; ~20cm circumference i guess), no notes. the foot portion for me is 11.5 cm long -- with the yarn's inconsistency, that means 24 rows for the 1st sock and 21 rows for the 2nd sock lol. however, the foot length is also the most ill-fitting part of my socks; they're for sure too long. next time, i should take off at least 2.5 cm from the length and go from there
Heel flap / turn: switched yarns again and to sc. the heel flap is just over 1/2 of my sock width and it had to be divisible by 3. this was the only important math for my socks really, thank god. but 64 / 2 = 32, i went up to 36 sc just for funsies. my heel flap was 4.5 cm (18 rows), which i'd say worked out fine. then just continued with the heel turn as instructed -- 12 sc for the heel turn part
Heel/Ankle: ok well starting out the ankle was... interesting. the heel and the foot did not match up well, the heel was too short to really meet with the foot part, so crocheting across both wasn't going to work well. and making the heel flap longer didn't work well with my feet when i tried them on -- even when positioned correctly, the heel pulled away from my ankle. idk if that makes sense, it just wasn't working. my best guess is my actual heel is shorter than expected lol. anyway, my best solution has been to add 1 row sc, turn, 1 row linked dc to the heel part to make it match with the foot, then just carry on (76 linked dc). it worked out fine, whatever
Ankle: i also have thin ankles, which i tried to account for but not enough. anyway, once i was a few rows into the ankle, i decreased to get those 76 stitches to 62 linked dc (every 5th stitch decrease worked well enough). i pulled the ankle of my 2nd sock in a few more stitches for a better fit (57 dc), which is pretty noticeable in my pic lol, but that was a smart move. when i followed the video tutorial, it made the ankle ill-fitting for me. for my next socks, i need to pull the ankles in to 57 (or less) more quickly. i suspect that'll help with the bunching at the front of my ankle, there's too much space there for sure. but i think making the foot shorter and bringing the ankles in more / more quickly will help make the next pair better fitting
i've been wearing ill-fitting / kids shoes (almost always unbelievably horrible quality) + socks for my entire life. i can't find boot socks my size. led to quite an appreciation of bespoke footwear. and i've been working on getting custom boots, but boot socks have always been impossible for me. these crocheted socks are a bit too big still, sure, but i can't convey how cool it is to wear a sock that has a heel fitted for me. it's actually so fucking exciting! i mean, there's a lesson in the value of a bespoke item (esp for something that supports your feet!) over the mass-manufactured options. but even just customizing patterns to fit you better is such a useful thing!!
and that is a lesson that i learned from nalbinding, the queen craft of customization, which is next up for the sock project!
#sock project#hush vassa#textiles#happy to answer any questions ig#there's sm cat hair in these socks lol thanks laila
2 notes
·
View notes
Note
ask meme: how many crochet projects do you have going at the moment ‘:|

Okay so it’s only four rn everyone cheer and clap for me HGHGH ideally I would take pictures but I don’t wanna get up so I’m just gonna talk about them <3
1. Halloween sugar cookie sweater!! This is definitely my biggest project as of right now, it’s meant to look like those Pillsbury ghost, jack o lantern, and cat sugar cookies and it’s so CUTE!! It’s seriously such a me pattern, I love it. I have the front panel entirely done, I need to finish the border for the back panel, crochet the shoulders for it, sew the two panels together, and then crochet the sleeves and add ribbing. Honestly that’s probably less work than what I’ve already done like it really shouldn’t take super long to finish, I just have chronic can’t finish things disease. That being said I did spend a good chunk of money on both the pattern and the yarn and plus it’s so cute that I really gotta try to finish it.
2. Cardigan for my sister! I literally just said that I have chronic can’t finish things disease and if you want proof of that then this cardigan was supposed to be done for my sister’s birthday in the summer! And then it was supposed to be done by Christmas! It is halfway done! To be fair I hate the pattern I chose to do 😭 it’s a granny hexagon cardigan and it actually looks pretty cool but it takes FOREVER to work up (probably my fault for using a 3.75 mm hook but it matches the yarn my sister wanted) and it’s literally halfway done like if I really put my mind to it then I could finish it. That being said just thinking about it fills me with dread LMAO I’m thinking about doing either a raglan or patchwork cardigan instead because I would like to actually gift her the cardigan I’ve been promising for like 10 months now 🤡
3. Beetlejuice inspired vest: this project is sitting halfway done on my table right now TAUNTING ME. I was having such a fun time with it when I got the genius idea last night to try it on for size. It is way too big which means I have to frog almost the entire thing!! Trying to tell myself it’s a good thing because it’ll be quicker to work up if it’s smaller but it’s also disappointing because I have to undo my work!! Also to clarify when I say beetlejuice: it’s this bulky yarn that changes color from black to dark purple, lilac, chartreuse, and neon yellow-green. Such a fun combo that I had to have when I saw at Michaels
4. Forever ago I told @loelett that I would make them a bat. Said bat literally only needs feet, to be sewed together and stuffed, and shipped out. I struggled so much with the feet that it got put on the back burner 😭 but other than that it went well HGHG
This isn’t even counting the ideas I have that haven’t made it to the crocheting stage yet (I want to make an iwtv sweater so badly it makes me look stupid) but hopefully I can finish these up soonish so that I can start on new ideas!!
ALSO I FEEL THE NEED TO SAY THAT I LOVE CROCHETING AND CONSIDER MYSELF GOOD AT IT BECAUSE I FEEL LIKE THIS POST SEEMS KINDA DOWN JGVHGGHG i would literally be unstoppable if I had the motivation to finish things is what this post amounts to. Thank you for coming to my ted talk
10 notes
·
View notes
Note
1. what’s your favorite color? (surprisingly i dont know)
2. what’s a book you read at twelve that has profoundly impacted who you are as a person?
3. favorite line from revenge?
(bonus, what size crochet hook do you typically use?) i wonder if you can tell who i am based on these questions lmao :)
LOL your typing style gave it away i think. you may be too new of a mutual but i have never been defeated by an anon asking me who they are HAHA
favorite color(s): blue grays, like the clouds; really deep sensual reds and forest greens. can't explain it
life changing book: percy jackson HAHA. a childhood friend got me into them, lent me her copies, and i read the series (5 books) through three times in two weeks. and i have been obsessed with greek mythology and storytelling ever since. thank u uncle rick
favorite line from revenge: man.... asking me this is like asking me to pick a favorite child. they're all so special to me. but if i HAD to choose i'd probably narrow it down to something from chapter 6! i really really like how i portrayed the passage of time there, and how i connected the scenes on either side of the page breaks.
fav crochet hook size currently is my I hook! it's green :) and works nicely with my yarn thickness for a smoother crocheting experience.
2 notes
·
View notes
Text
Alright! So this got way more love and excitement than I was expecting, and while I can't test out a pattern and write one, I can try and explain how I made her, for those who want to give it a go. This isn’t very precise and I improvised a lot of this, so good luck?
Materials:
brown eyelash yarn (I had 100g and leftovers) – yarn one
some brown/tan colour changing yarn (I used about half of a large ball) – yarn two
two balls of tan/yellow DK yarn (I used most of it) – yarn three
a teeny bit of dark brown DK yarn for the Toes and eye embroidery
a teenier bit of white yarn for the TEETH
two yellow safety eyes
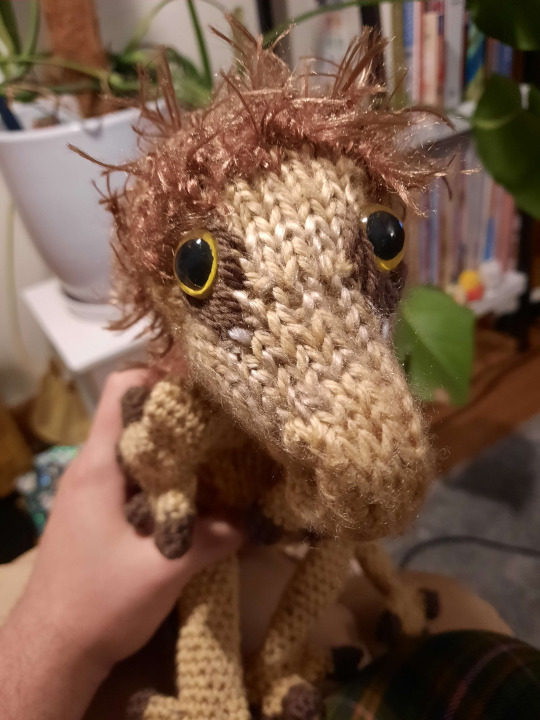
stuffing
5mm knitting needles
5mm crochet hook
large darning needle
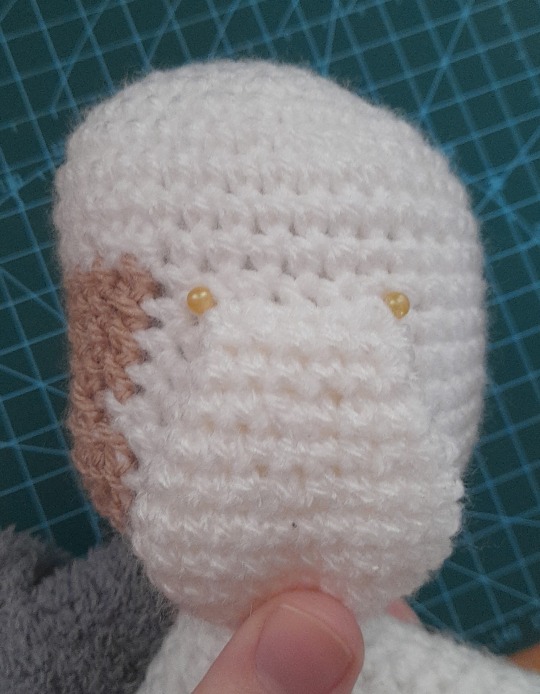
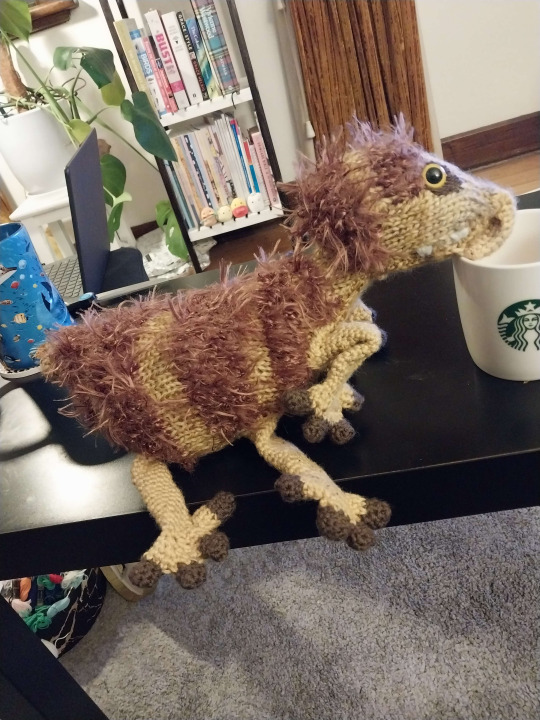
Body: The body was knitted with 5mm needles, and with two yarns at a time. I used yarn two for the whole thing, and alternated between yarn one and yarn three to create a stripy look. I didn’t measure this, I just kind of did what felt right. You want to use yarn three for the face and neck however, and yarn one for the top of the head.
I mostly copied this pattern for a lamb from Ravelry: https://www.ravelry.com/patterns/library/lamb-27
The modifications I made were:
start with about 15 extra rows of 9 stitches so she has a trunk
ignore the ears, you don’t need those
I added 2-4 extra rows in at the neck of straight stitch (between row 8 and row 9)
I forgot I added those extra rows when making the belly and fucked up and had to quickly patch it with another few rows under her chin
I ignored everything about wool changes and needle sizes, use the instructions about for that
You don’t need the legs either
Legs: Now the first disclaimer I’m giving for the legs was that I miscounted her toes and then made six emergency toes and sewed them on. Here’s what I should have done. These are made with crochet.
Make 24 little brown toes.
Round 1: 6sc into a magic loop Rounds 2-4: Sc in every stitch (6 stitches).
Bury the ends and trim them, and change to the tan/yellow yarn.
Round 5: Take four of your little toes. Work 1sc into three stitches on the first, second, and third toes. Work 1sc into all six stitches of the fourth two. Then go back and do the remaining three stitches on the third, second, and first toe. Join and place a marker (24 stitches). Round 6: 2sc, decrease two together x4, 4sc, decrease two together x4, 2sc (16 stitches)
Round 7: Sc, decrease two together x3, 2sc, decrease two together x3, sc (10 stitches)
Rounds 8-28: Sc in every stitch (10 stitches).
Round 29: 2sc in each stitch, slip stitch to finish (20 stitches).
You don’t need to stuff the legs at all, but leave a long tail to sew them on to the body.
Finishing:
Sew the trunk so it curls under.
Sew on the legs, and sew the front legs so they’re bent if that’s how you’d like to pose your Lita. Embroider with some dark brown around the eyes like so:

I also did a couple of white stitches at the point of the arc for added Spice.
Give her some teeth with embroidery again, and congrats! You have a baby centaur!
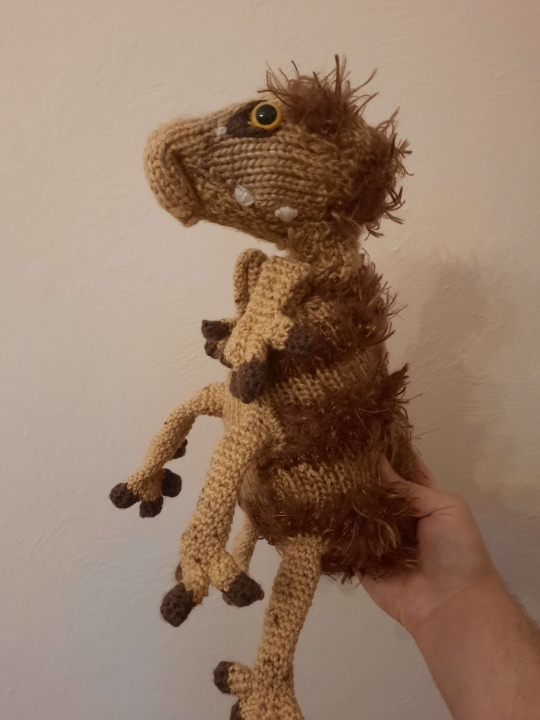
For my final ever knitting/crochet project I completed a little baby Talita from @jayrockin's comic Runaway to the Stars as a gift for my husband. I'm so pleased with how she worked out!
3K notes
·
View notes
Text
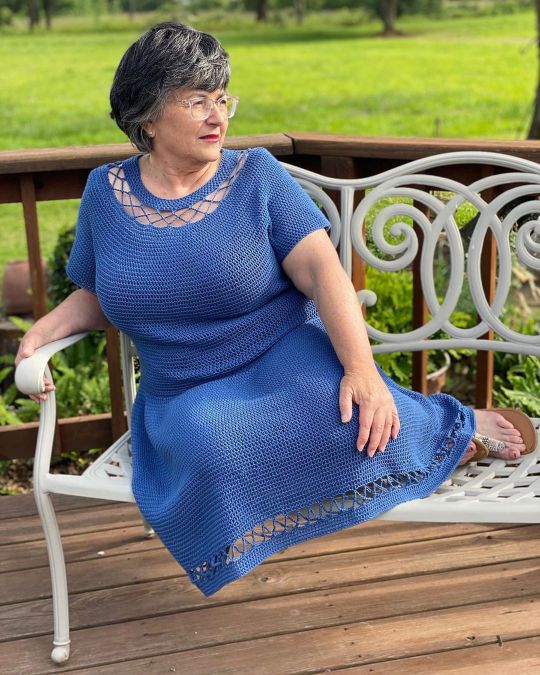
September 2020 Reveals
For our crates this month, we collaborated with crochet designer and all around inspiration, Maya Luna Corazon as our influencer partner! Maya creates her designs from the heart and with beautiful intentions to teach eager crafters how to be empowered by their creations. Inspired by the nature around her and the beauty of femininity, Maya brings beautiful designs to life with crochet in size inclusive designs. Her pieces often feature chic laciness and unique shapes that come together to create masterpieces. Maya's love of crochet has grown to inspire others to not only create but to share their love of crochet in return by teaching others how to run a successful crochet business. We are thrilled to be working with Maya this month and can’t wait to share her design for our Membership Crate with you!

The theme for September is Paradisio. It has us dreaming of cotton candy blooms on trees, crystal blue waters and vividly colored birds. This month's crates are hyper-colorful and bring intensity to your stash to jump start your creativity!

Ready to find your September inspiration? Let’s take a look at our reveal video.
youtube
KnitCrate Membership
Our September Membership Crate features our Audine Wools Sleek: 55% Fine Merino Wool, 30% Baby Alpaca, 15% Mulberry Silk. This sumptuous yarn is worsted weight and 220 yds (201m) in each 100g skein. Each Membership Crate will have 2 matching skeins to bring elegance to your next project.
PLEASE NOTE: There is an error on the washing instructions for this yarn. It is not machine washable. Hand wash only, cool water, lay flat to dry.
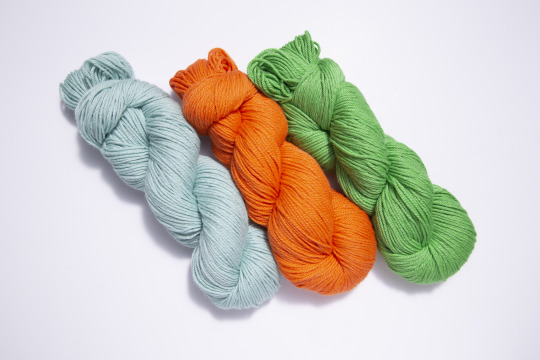
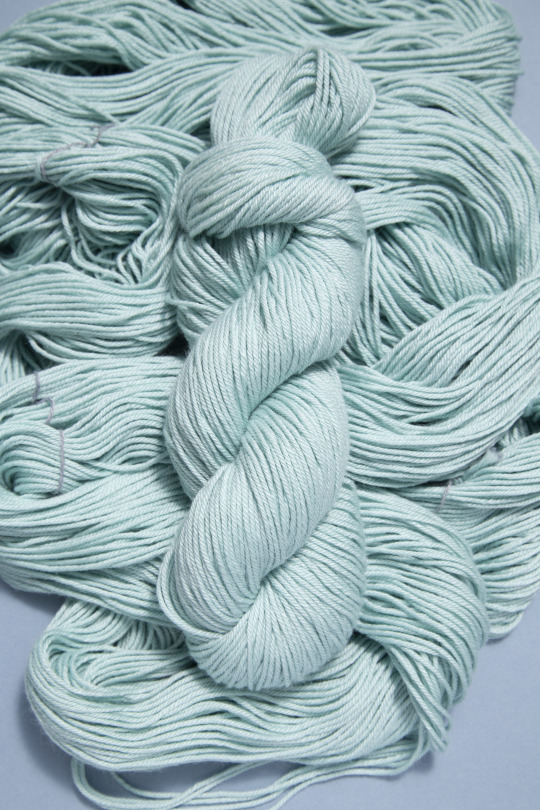
Energize Me: Bliss
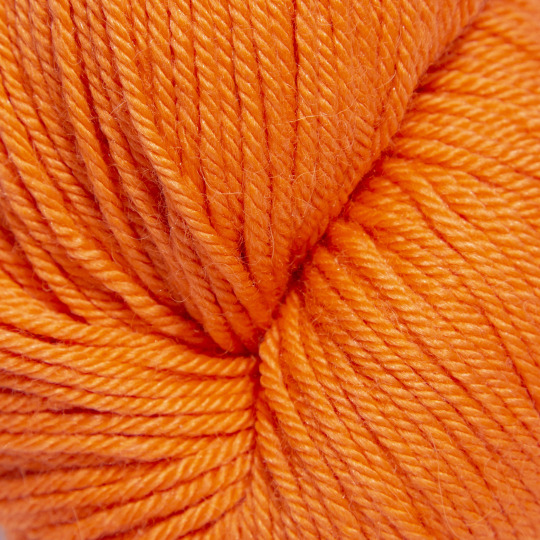
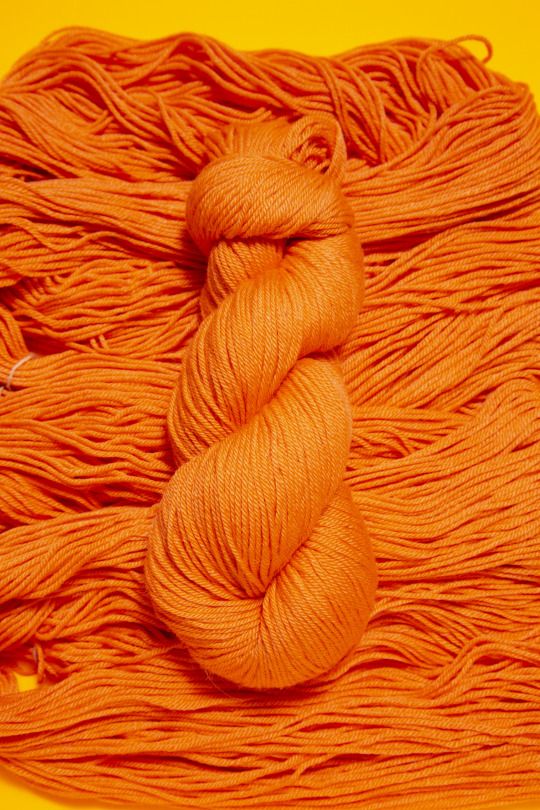
Just as its name implies, this blissful shade is one you’ll find in the orange tones of a late summer sunset.
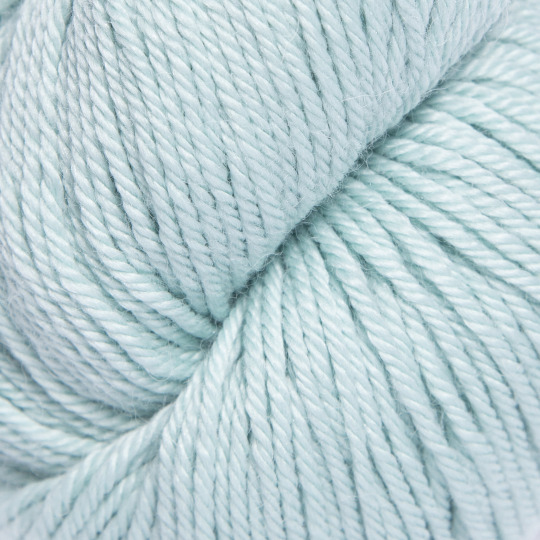
Chill Out: Utopia
This soothing blue shade has us thinking of the most perfect day where you could sit for hours watching the waves gently roll by.
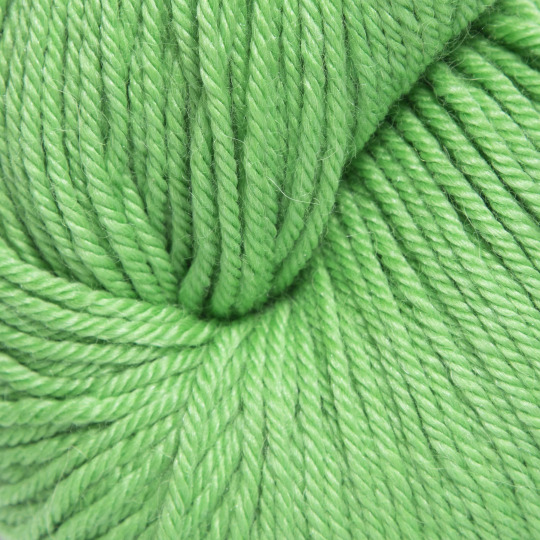
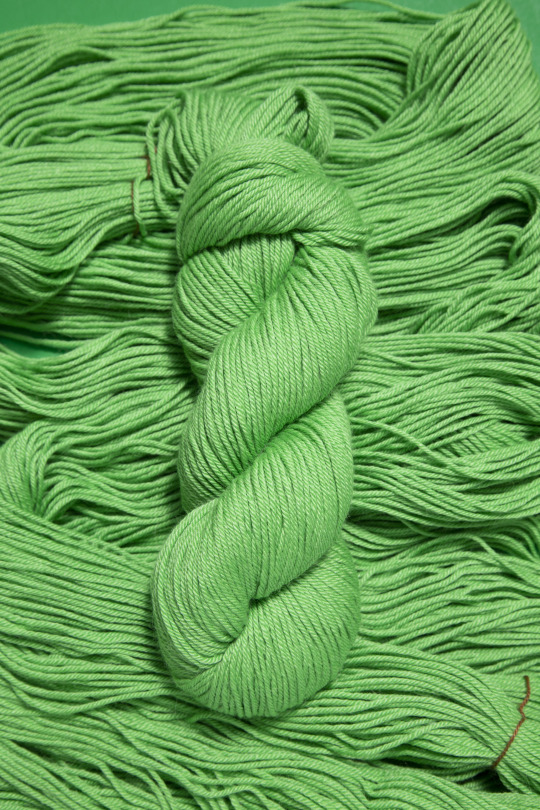
All Natural: Unwind
The fuzzy green feathers of tropical birds is what comes to mind with our All Natural colorway ideal for the softness of this yarn.
Membership Patterns
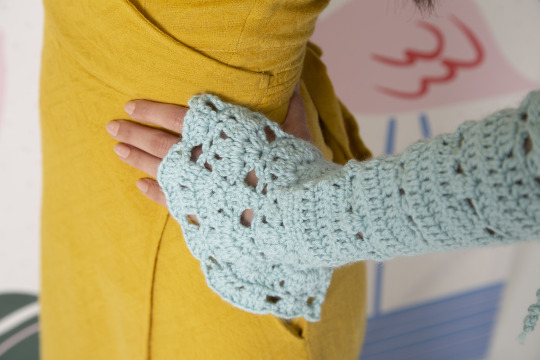
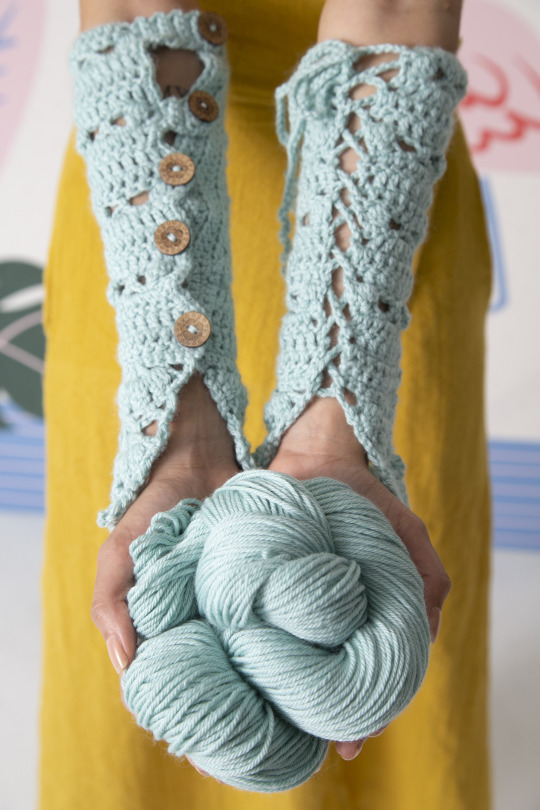
This month’s crochet pattern comes from our influencer partner, Matinee Maya Imchum (aka Maya Luna Corazon). Valentina is a set of fingerless gloves with small sections of lace in the arm and blooming rows of lace that can be worn around the hands or folded down as a cuff. They are sized from Small to 2X with size adjustments to help you find your best fit. Also included are 2 different closures: laced ties and buttons. Choose the closure that works best for you to create this beautiful piece!
CROCHET Pattern Details
Hook: US G/6 (4 mm)
Yarn Needed: 180 (195, 210, 220, 230)yds (165 (179, 192, 202, 211) m) used/ 1 (1, 1, 1, 2) skeins needed
Notions: Scissors, tape measure, tapestry needle, 0.5" (15mm)buttons (10)
Finished Size: Forearm circumference 1" (2.5 cm) below elbow: 8–9 (9.5–10.5, 10.5–11.5, 11.5–12.5, 12.5–13.5)" / 20–23 (24–26.5, 26.5–29, 29–32, 32–34) cm
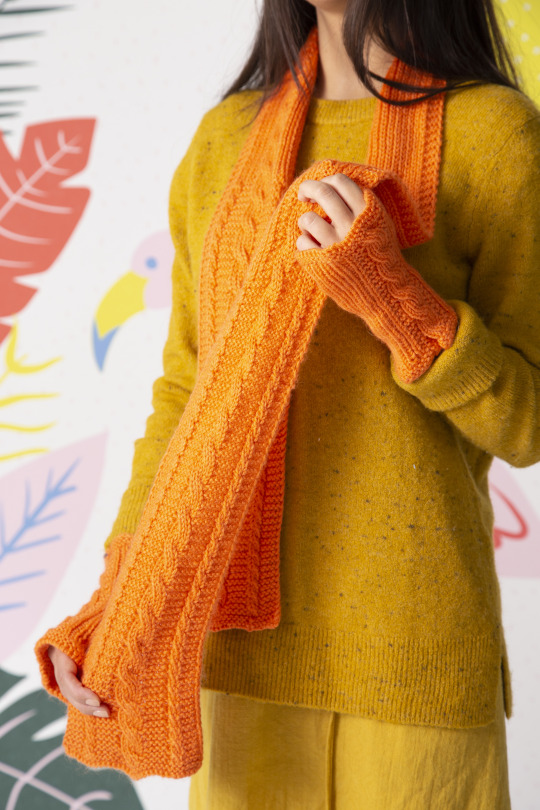
This month’s knit design is brought to us by Katrina King of Threaded Dream Studio. The Cheerful Scarf & Mitts include gorgeous cables that pop in the Audine Wools Sleek. Perfect for the autumn months ahead!
KNIT Pattern Details
Needles: Mitts: US 5 (3.75mm) set of 4 dpns (for mitts); Scarf: US 5 (3.75mm) 10" (25 cm)straight needles
Yarn Needed: Mitts: 90 (107, 125) yds (82 (97, 114.5) m) 0.5 (0.5, 0.75) skeins needed; Scarf: 286 yds (261.5 m) 1.5 skeins needed
Notions: Stitch markers (2), locking stitch marker (1), cable needle, waste yarn or stitch holder, tapestry needle
Finished Size: Mitts: 7" / 18 cm long; 5 (6, 7)" / 13 (15, 18) cm) circumference; Scarf: 65” (165 cm) long x 4.5" (11.5 cm) wide

Not a member yet? Join today!
Sock Crate Membership
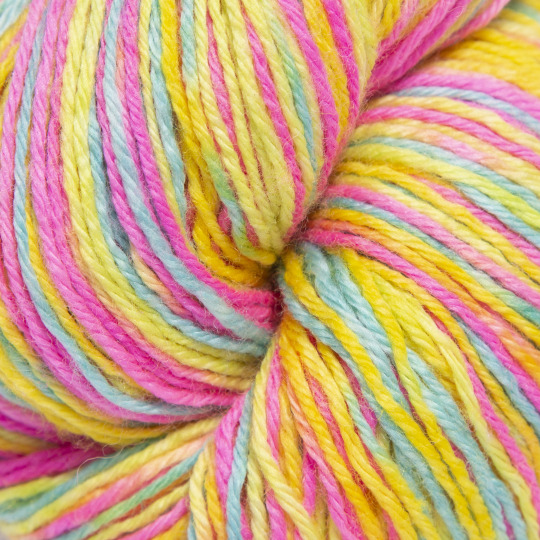
Our September Sock Crate Membership yarn is Knitologie Block Sock, 80% Superwash Merino Wool and 20% Nylon. Each 100g skein gives you 400 yds (366m) of self-striping joy for your next sock project.
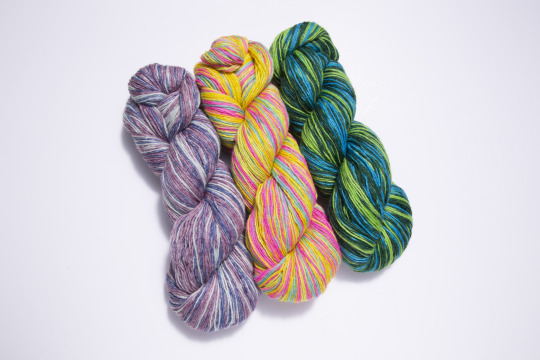
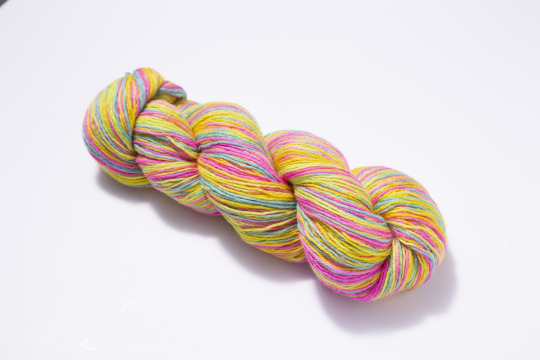
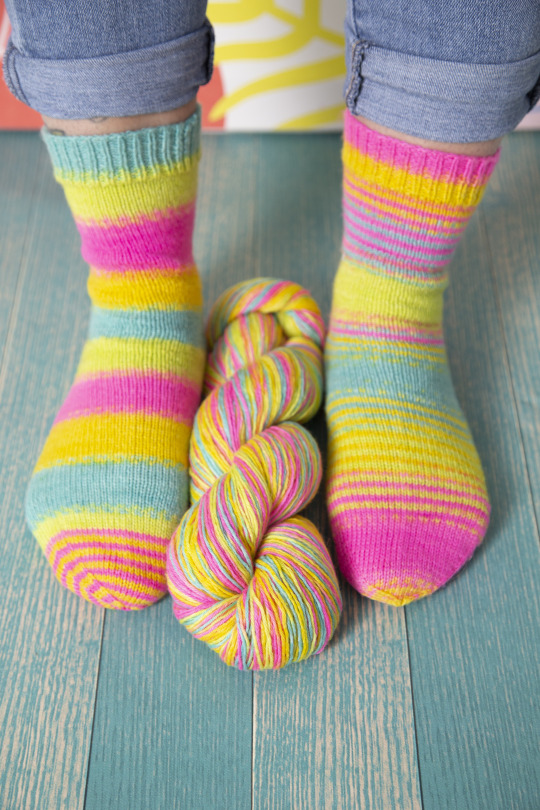
Energize Me: Pep
You’ll definitely have a little pep in your step with these vibrant pinks, blues, and yellows cascading down your socks.
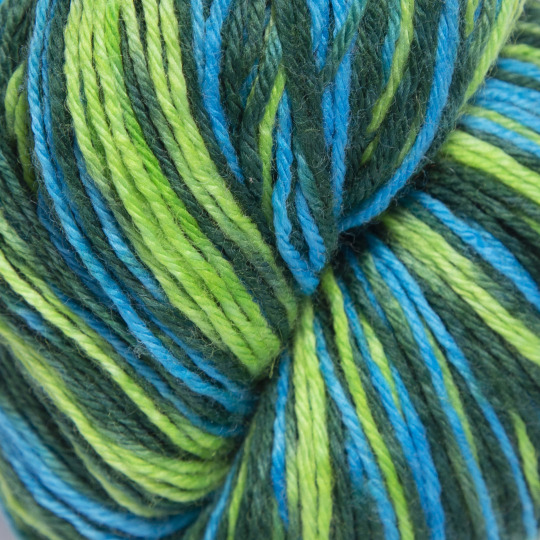
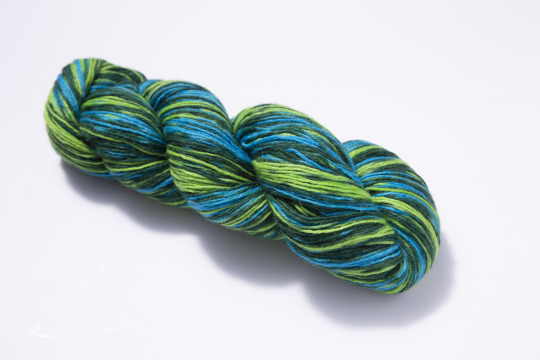
Chill Out: Terrace
This colorway has us dreaming of moonlit evenings as gentle winds breeze through trees and lull us to sleep.
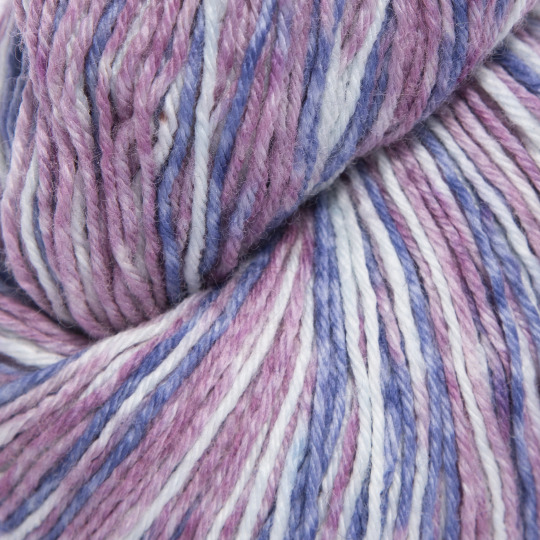
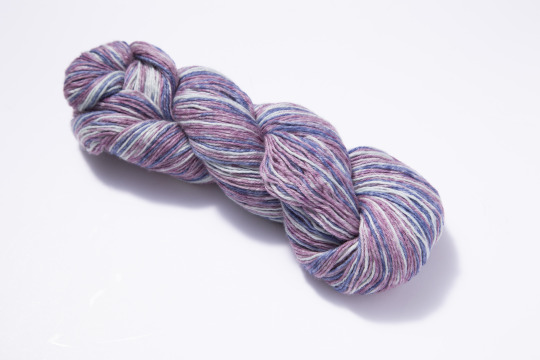
All Natural: Buoy
Heathered mauves and purples stripe with pale natural tones throughout this colorway that will make for a stunning pair of everyday socks.
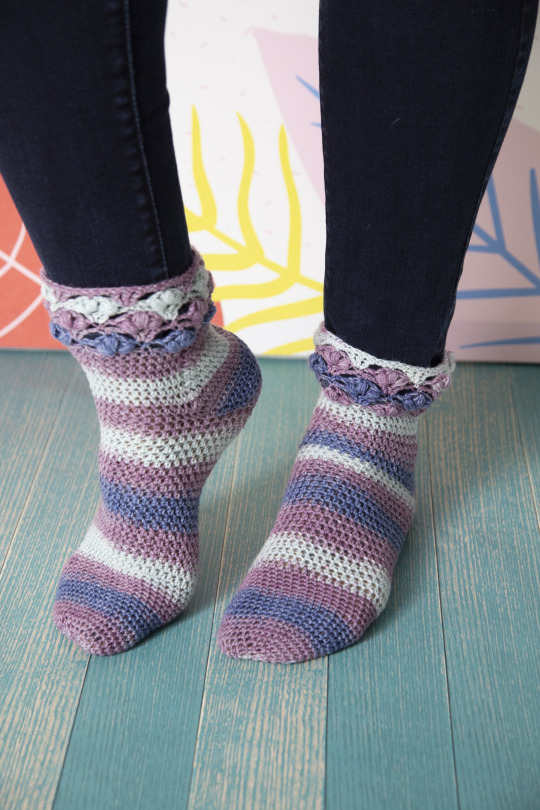
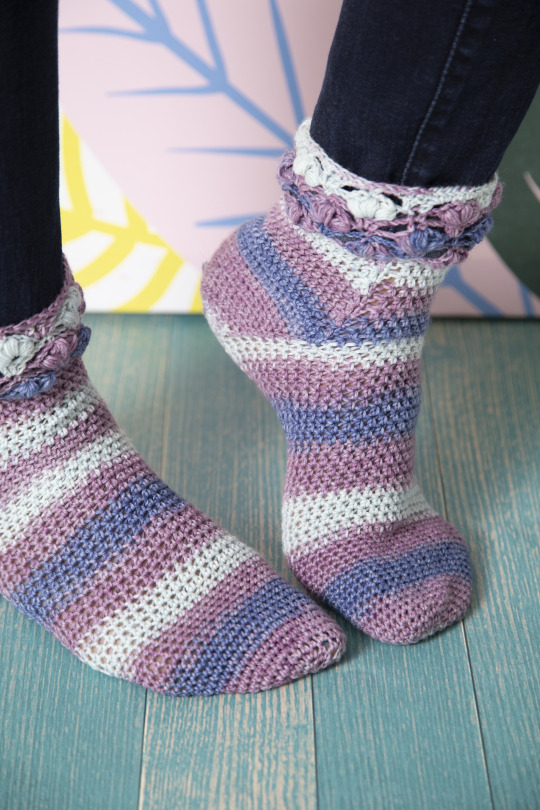
Sock Crate Membership Patterns
Katrina King also created the Puffy Socks this month that highlight the long color changes of the Knitologie Block Sock. A single crochet foot combines with a puffy, lacy cuff that is both cute and comfy.
CROCHET Sock Pattern Details
Hook: US F/5 (3.75 mm)
Yarn Needed: 240 (296, 360) yds(219.5 (270.5, 329) m) used / 1 skein needed for all sizes; additional yarn may be needed for longer foot sizes.
Notions: Tapestry needle, scissors, tape measure
Finished Size: Circumference: 7 (8, 9)" / (18 (20.5, 23) cm). Length is adjustable for your personal fit.
The ever-amazing Kate Atherley has truly spoiled us this month! The Serendipitous Socks don’t offer just one way to work with self-striping yarn, but two! You will have loads of fun creating this pair of cuff-down sock with a no-graft toe (SQUEAL!!).
KNIT Pattern Details
Needles: US 1.5 (2.5 mm) needles of choice for working small circumferences in the round, traditional or flexible DPNs, 1 long circular for magic loop, 2 shorter circulars, or sock-length circular with secondary method for heel and toe.
Yarn Needed: 204 (237, 270, 303, 336, 369,400) yds (186.5 (217, 247, 277, 307,337.5, 366) m) used / 1 skein needed for all sizes (longer cuff or foot sizes may need additional yarn)
Notions: Digital scale to weigh out the yarn, tapestry needle.
To fit foot/leg circumference: 6.5 (7,7.5, 8.5, 9, 9.5, 10)" / 16.5 (18, 19, 21.5,23, 24, 25.5) cm
Foot and leg circumference: 6 (6.5,7, 7.5, 8, 8.5, 9)" / 15 (16.5, 18, 19, 20.5,21.5, 23) cm
Foot length: adjustable to fit
Leg length: adjustable to preference
Want to join Sock Crate Membership? You can do it here!
Don’t Forget - Share Your Crates with Us!
Share the arrival of your KnitCrates with us on social media! Use the hashtag #unravelyourknitcrate on Facebook, Instagram, and Ravelry, and we’ll select one person from each platform each month to win 3 free months of KnitCrate!
#knit#knitter#knitting#knits#knittersgonnaknit#knitters#@knittersofinstagram#knittersofig#knittersofravelry#knitters of tumblr#knittersoftheworld#knittersofinstagram#crochet#crocheting#crocheting socks#crochetersofravelry#crochetersoftheworld#crocheters of tumblr#knitcrate#knitcrate membership#knitcrate crochet
3 notes
·
View notes
Text
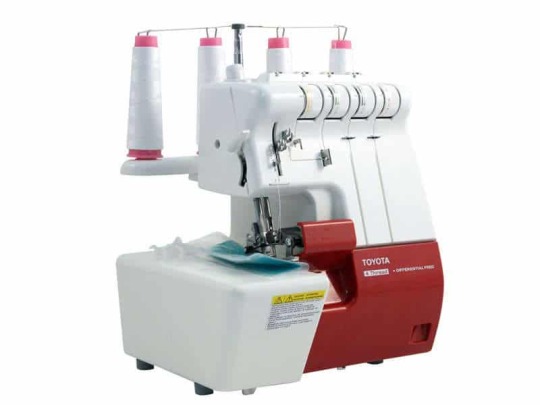
Toyota SLR4D overlocker test and review
The biggest sewing brands wouldn't have a full range if they didn't carry sergers. Most of them have therefore developed their own models. But which serger to choose? We submitted the Toyota SLR4D serger to our test and we give you our opinion.
Introducing the Toyota SLR4D Serger
Toyota has bet on originality for the design of its SLR4D serger, which stands out among its sisters with a pretty two-tone hood. But visual appeal is not the only argument put forward by the Toyata SLR4D serger. With its four spool holders, it allows you to sew in 3 or 4 threads to join and overlock the fabrics, while cutting the excess fabric. All in one pass. And it comes with accessories to allow the seamstress to get to work quickly and give free rein to her creativity. Presented as a mid-range serger, its 90 watts of power allows you to work quickly and well. The result is very satisfying. Toyota's SLR4D serger retails for around €250. Technical characteristics of the Toyota SLR4D Here are the main technical characteristics of the Toyota SLR4D serger: Overlock in 3 or 4 threads; Power: 90W; 1500 stitches per minute; Differential training; Adjustment of thread tension bobbin by bobbin; Color code for donning; Stitch adjustable in width and length; Adjustable presser foot pressure; Pre-Strung Yarn Cones; 7 standard accessories provided; 1 pliers, 1 screwdriver, 4 threads for wire spools, oil; 3 needles size 14; 2 size 11 needles; Weight: 8.1 kg. Its strengths The colorful design of the Toyota SLR4D serger brightens up equipment often mistakenly considered difficult to use because of its appearance. This is not the case, especially since the Toyota SLR4D is delivered pre-threaded, which helps to visually see how the threading is done and allows you to get to work immediately. For the following uses, threading is guided by a color code which simplifies the operation and makes it accessible even to beginners. The accessories that come with the serger are a real plus for the seamstress, especially novices who need to build their equipment to start their new passion. With 90 watts of power for 1500 stitches per minute, the Toyota SLR4D serger produces beautiful projects in a minimum of time. The overlock can be made with 3 or 4 threads and the stitch can be adjusted in width and length. And with the differential, the fabric is perfectly held in place. The presser foot pressure is also adjustable. The seam therefore has a superb finish, flawless, and it is resistant. The seamstress can work with various materials in various styles: elastic, smooth or gathered fabrics... according to her creativity. Sure of the quality of its SLR4D serger, the manufacturer Toyota guarantees it for 2 years. The price displayed at less than 250 € is competitive for such a product. Its weak points Despite the manufacturer's efforts to make threading the Toyota SLR4D serger easier, it remains laborious the first few times. In particular, the hook is quite difficult to put in place. Adjustment therefore requires time and patience. Like any good serger, the Toyota SLR4D can produce rolled hems. However, on this machine, it is essential to change the plate and the presser foot. Other models dispense with this constraint. Despite Toyota's good reputation for tailoring, spare parts are in short supply. In the event of a breakdown, repair will be difficult and even impossible for some parts. This is for example the case of knives, the top one of which cannot be unscrewed. However, these are wear parts. If the overlock in 3 and 4 stitches already offers great possibilities, other overlockers also offer sewing in 2 threads. On this model, this functionality is not present. With its 8.1 kg, the Toyta SLR4D overlocker is quite heavy and its transport can be easy, although possible despite everything. Which seamstress is it for? Because it is ready to use and delivered with many accessories, the Toyota SLR4D serger is more intended for beginners. Its low price also benefits them and makes it an ideal serger to get your hands on. Given the great difficulty in finding spare parts, the machine is not very scalable and the after-sales service is almost non-existent. Professional seamstresses will therefore move on and turn to other models of sergers, more appropriate to their needs. The Toyota SLR4D serger can be a good choice for those on a budget who are looking for a functional serger for the short to medium term. Our opinion on the Toyota SLR4D serger During our test, the Toyota SLR4D serger revealed real assets that will satisfy beginner seamstresses for their projects. As soon as the package was opened, the discovery of the many accessories was a pleasant surprise. The features deliver what they promise and the job is done well. But notable weak points were also noted during our test and the seamstress must be aware of them to make the right choice. In particular, she will have to be skilled and patient enough to successfully thread her machine when the first spools have been used and expect to have to change sergers in the event of a breakdown. The quality-price ratio remains very interesting, due to the low budget required to afford this overlocker. However, the purchase of the Toyota SLR4D serger is to be considered in the short or medium term if you are a seasoned seamstress. Read the full article
#Elna#embroidery#embroidery designs#embroidery machine#serger#sewing#sewing machine#sewing reviews#sewing tips
0 notes
Text
Fallout: Atlantis
A Fallout game by somebody who has never played Fallout and is just now reading the wikis
So, I took @tyrantisterror‘s “Your Own Personal Fallout” post way, way too seriously for someone with no connection to the games.
Name and Location of The Wasteland: the Tidewater Expanse (the Chesapeake Bay plus several feet of sea level rise). Distinct from the Capital Wasteland due to the 30 miles and water barrier separating them.
Time Period: the more I try to learn about the Fallout timeline the more my head hurts
Primary Slice of Americana: Kitschy tourist traps, the way some states have urban and rural areas abutting each other so closely (the Tidewater Expanse transitions very quickly from settlement to farmland/waterways/waste), a soupcon of Moby Dick-esque whaling yarns
Central Thematic Conflict: Identity: who are you, in a world of chaos and change? What do you choose to center yourself around? Do you find solace in ideals? In aesthetics? In challenges? People have different answers to that question.
PC’s Title: The Reporter
PC’s Motive for Exploring the Wasteland: You're a newspaper with a staff of one, but by gum are you going to make your paper the best ever! You travel around the Tidewater Expanse looking for people's stories, interviewing them and possibly doing journalistically unethical things by involving yourself in their stories.
Bestiary
Recurring Creatures and Robots: ‘Cause it’s not Fallout without radroaches, Deathclaws, and ghouls
Humanoid:
Ghouls
Super Mutants: Some dipshits tried to keep FEV at the Aberdeen Proving Ground and made super mutants again, proving that we never learn from our fucking mistakes.
Synths
Mammalian:
Brahmins, which curiously have red-and-white or black-and-orange patches
Dogs
Radstags and yao guai, which likewise have the Maryland flag pattern
Reptilian:
Gulpers, which are human-sized, fast, brightly colored, and hide in the undergrowth/under logs and buildings. They're referred to as burners, since some of them can breathe fire.
Lakelurks/mirelurk kings, evolved diamondback terrapins. Referred to as landlurks, they can use tools, have language, and are treated as people in the Tidewater Expanse, often retrieving things from the drowned cities.
Pinkclaws, deathclaws whose shrimp-rich diet has made their keratinous structures bright pink. Their horns have fused into head-crests that vaguely resemble beehive hairdos. They are found exclusively as the battle mounts of the Hons.
Arthropod:
Bloatflies
Bloodbugs
Giant ants
Giant mantises
Mirelurks (referred to as baylurks), since they're canonically blue and horseshoe crabs.
Radroaches
Wanamingos, using @bogleech's flea-wanamingo idea.
Robots:
Eyebots
Mr. Handys/Gutsys/Nannys
Assaultrons, protectrons, sentrybots (found at the Aberdeen Proving Ground)
New Creatures and Robots:
Various kinds of giant fish (pumpkinseeds, eels, perch, killifish, and whatnot).
Bagels, shrieking flocks of seagulls which lower your Karma when you kill them as a "Rime of the Ancient Mariner" reference.
Bugbears, giant jumping spiders taken from the Bogleech Fallout bugs article, occupying the same "killer rabbit" role as wig-wigs in the Edge Chronicles.
Chessies, otter-like creatures that are actually Chesapeake Bay Retrievers mutated to live in a watery environment. They mob your boat, although sometimes it's out of affection.
Crabkens, colony organisms made of hundreds of thousands of blue crabs, which wrap tentacles made of crabs around boats and pull them to the bottom of the Bay.
Goblins, hairless raccoons that dig through ruins.
Hugbugs, giant, mutated lovebugs, the corpses of which can be made into goo bombs and the living of which will swarm you and cook you to death like Japanese honeybees.
Iron crabs, aquatic spy robots that look like crabs.
Loxo zombies, humans infected with a mutated version of Loxothylacus panopaei, with larva-bearing barnacles on their guts. Loxo zombies are obsessed with the propagation of their larvae, but often retain their original personalities.
Misties, island-dwelling wild horses with the ability to turn invisible.
Pentecost lice, a mutated version of Cymothoa exigua found in various fish and in some humans. They have human-sounding voices, and some claim they are oracular.
Snakeheads, humanoid snakehead fish who wear human masks and try, buffoonishly, to infiltrate our society.
Snallygosters, vaguely birdlike/dragonlike creatures with one eye, metal beaks, and a fringe of tentacles surrounding their beaks.
Factions
Faction 1: The Watermen (The Well-Intentioned But Flawed One)
Leader: Captain Cate Claw, a salty-mouthed woman who runs a fishing boat and uses a mirelurk claw as a hook
Goal: To care for the Tidewater Expanse and survive off its bounty
Distinctive Visual and Behavioral Theme: The Watermen all wear stereotypical yellow hats and raincoats, often with some sea-beast trophy. While they make an effort to care for the Tidewater Expanse, there are many who backslide into overfishing.
Faction 2: The Proven (The Obviously Evil (But Partially Justified?) One)
Leader: Jack Utsumi, a severe-looking and internally tortured scientist
Goal: To utilize the technology of Edgewood (see below) to bring order to the land and possibly restore it to its former glory. Utsumi doesn't want conflict, but many of his henchpeople do.
Distinctive Visual and Behavioral Theme: The Proven are very clean-cut, and enjoy white garb and well-maintained equipment. They incorporate the Brotherhood of Steel's tech thing, but with a less shiny aesthetic than regular Fallout: their tech is black, boxy, and flat, with a somewhat ENIAC switchboard look. The Proven aren't xenophobic, but they do buy heavily into the myth of "make it on your own", ignoring that they're the ones who found all the fancy toys.
Faction 3: The Hons (The Amoral But Not Necessarily Evil One)
Leader: Attila the Hon, a powerful, motherly woman with a scarred face, stilted way of speaking, and flamboyant feathered overcoat
Goal: To make the world a safe space for arts and performance
Distinctive Visual and Behavioral Theme: Think Baltimore "Hon" culture meets old sword-and-sandal films. They employ press-on claw gauntlets, detachable beehive hairdos filled with angry bees, and floral-patterned lorica armor. As previously mentioned, they ride pinkclaws.
Faction 4: The Criers (Actually Interesting Fourth Choice)
Leader: Mr. Raven, a ghoul and former Edgar Allan Poe reenactor, who tries to use "Nevermore" at any opportunity he can get
Goal: To remember history that would otherwise be forgotten
Distinctive Visual and Behavioral Theme: The Criers dress like a mishmash of historical periods, having been cobbled together relics from historical reenactment societies. They research the history of the Tidewater Expanse, both before and after the Great War. Many of them stay permanently in character.
Companions
Male Unaffiliated Companion: Carl Cramer is the smiling-crab-logo-shirted proprietor of the Crab Mart, the convenience store in the Cape (see below). He can be convinced to come adventuring with you to give the Crab Mart a proper mail-order service. He has no fear, but also no sense of self-preservation, and his morality is heavily centered around whether or not people will be able to acquire snacks and household goods with ease and efficiency.
Female Unaffiliated Companion: Ori Paimana, a tall and friendly woman who runs the Cape Marina, and is perhaps overly eager to talk to you about spears, harpoons, and other implements of pointy death. She makes a mean clam chowder. She can be convinced to come adventuring with you to cover any perceived ineptitude with boats or fear of bay monsters.
Robot Companion: Joanna, a synth who wants to leave Kent (see below) behind and find her own way in the world.
Canine Companion: Dwayyo, a loner, a rambler, a rogue, a Captain Ahab with a twinkle in their eye and significantly better intentions than Ahab. Dwayyo is a humanoid dog-thing on the trail of Schnell Geist (see below); think the Kate Beaton "Nemesis" comics.
Third Nonhuman Companion: Dr. Dinky is a landlurk and a skilled science educator. He is also extremely small and frequently falls on his back. It is implied that he is centuries old and can remember his life before the Great War. (There is a real Dinky, a denizen of the education center at the Smithsonian Environmental Research Center in Edgewater, MD.)
Evil Companion: vehicle and weapons dealer Big Bill Hell isn't a bad person, necessarily. However, he is incredibly foul-mouthed, claims that he'll fuck the spouses of people he dislikes, and will cheat you out of every cent you've got. Has a horrifying "Challenge Pissing" attack.
Faction 1 Companion: Barnacle Billie, an ecologist working for the Watermen. She may or may not have deliberately become a loxo zombie in an ill-thought-out if effective attempt to transition.
Faction 2 Companion: Babs Eldridge, a computer programmer with the Proven. She has a mother and a sister to provide for, and wants them to be safe.
Faction 3 Companion: Sweet Sal, a beehive-sporting protectron who talks in a LARGE, HAMMY VOICE about GLORIOUS COMBAT. May harbor a crush on the Reporter.
Faction 4 Companion: Samuel Smythe, a minuteman with the Criers who fights with an oversized town crier's bell, and loves the idea of spreading news to the Tidewater Expanse.
Other NPCs:
Violetta Vaughn, one of the Criers in Naptown, who's trying to build airships to ease travel in the area.
Schnell Geist, a giant albino Snallygoster. Reputedly intelligent, Schnell Geist is the Moby Dick of the area.
Natty Boh, the flamboyant, one-eyed mayor of More, and Domino, his hulking assaultron bodyguard. Mayor Boh is head-over-heels in love with local desalination plant owner Ms. Utz, but is absolutely terrible at words, leaving Domino to play the Cyrano.
Locations:
Starting Town: the Cape (Cape Saint Claire, an Annapolis suburb). The Cape's primary conflict is a Hatfields-and-McCoys-esque conflict between two families whose initial conflict is implied to have been competing soccer moms.
Small Town 1: the Glen (Glen Burnie). Here you'll meet the Proven, accused (in one case rightly) of atrocities by some local Watermen. There's also a collection of Criers trying to focus on exploring the ruins of BWI.
Small Town 2: Kent (Kent Island). Kent is a Stepford Wives-esque community, with synths (some of whom don't know they're synths) turning out cheerful, idyllic trinkets for people using what remains of the island as a stop on the water routes.
The Big City: More (Baltimore). More is the bustling metropolis, and the trade hub and entertainment center of the Tidewater Expanse. It is the headquarters of the Hons, and where you meet Sweet Sal, as well as Big Bill Hell.
The Less Big City: Naptown (Annapolis). Naptown is abuzz with activity from the Criers, looking to recover historic items, and home to some very good crab places. You'll meet Barnacle Billie here.
The Sketchy City: Edgewood (Aberdeen Proving Ground). Edgewood is full of weapons dealers, mercenaries, and folk seeking to plunder the stores of the Aberdeen Proving Ground. You'll meet Babs Eldridge, and the rest of the Proven, here. The Proven look down upon the rabble of Edgewood.
Faction 1 Headquarters: The Academy, formerly the Naval Academy and now repurposed as the largely pacifist and scientific academy of the Watermen.
Faction 2 Headquarters: the Arsenal, a former army compound near Edgewood.
Faction 3 Headquarters: Hon Street, an enclave located within More, patrolled by pinkclaws and actually a nice, if very loud, place to live.
Faction 4 Headquarters: the Historic London Town and Gardens, remarkably well-preserved.
Scary Sidequest Dungeon: Druid Ridge. A drowned catacomb beneath the former cemetery. Something haunts it. Something powerful and monstrous. Something that you'd mistake for the statuary. Something artificial that came back to its namesake's old resting place…
Funny Sidequest Dungeon: The Maryland State House, final goal of a National Treasure-esque mission the Criers send you on. Its puzzles are … pretty dang goofy.
Tedious and Enormous Sidequest Dungeon: Crabcracker Cove. A giant mirelurk nest where you have to collect samples from every single mirelurk you kill. It takes a long-ass while to get them out.
Super Weird Sidequest Dungeon: Long Bridge. A covered bridge in the north that is far bigger, far darker, and takes far longer to cross than by rights it should. Contains the holographic ghosts and ghost people from Dead Money, way too many crying baby noises, and a Goatman.
The Obligatory Vault: Vault 18. Vault 18 was designed to protect the culinary knowledge of the world, and taught its denizens to treat recipes with ritual importance. Its denizens wear yellow metal armor and plague doctor masks filled with 18 sacred herbs and spices.
I fucking hate Old Bay seasoning.
44 notes
·
View notes
Text
Week 1: Face Scrubbies!
The Craft: Crochet!
What I Made: So for the first project of my Crafty Resolution, and thus the first week, I crocheted a set of face scrubbies, which are essentially tiny wash cloths specifically for washing your face. I’ve been having trouble remembering to wash my face, and I thought these might help, and might be a cute little addition. Plus, it meant I didn’t need to buy wash cloths, so it saved me money and used a craft supply I already had!

The Reasoning: I decided to make circular scrubbies, slightly harder but immensely cuter to me. I started off making two large ones but by the time I finished the second one I thought they were maybe TOO large, and instead made a tiny one. This seemed a lot more like what I was after, so I made four more, for a total of seven. With two large scrubbies and five small ones I figure this is a great sample to see if this works for me, and if it does, I may make a large batch later on!

How I Made It: I used 100% cotton yarn because that’s supposed to be softer on the face, easier to wash, and I had a butt-ton of it from a bag of yarn I got from goodwill. The specific yarn I used is Peaches and Creme in the color Limeade. I used a us size H (5mm) crochet hook, and started with a magic circle. For the first three rounds on the large scrubbies and the first two rounds on the small I followed Bella Cocos Tutorial on a flat circle .

For the first round I chained three, did eleven double crochet (treble by her UK terms), slip stitched into the top of the chain three, and then for the second I chained three and did two double crochet into each of the 12 stitches, counting the original chain three, until I had 24 stitches, then slip stitched into the top of the second chain three. (She really does explain this better.)
For the large size I chained three and then did a second double crochet into the same stitch, one into the next, then two double crochet, alternating until I had 36, then slip stitched to the top of the chain three again, and this time I changed up from Bella Coco’s tutorial. I chained two and did single crochet stitches, two in the first stitch, then two stitches with only one, then two in the third stitch, repeating the pattern of 2 single crochet, crochet single crochet twice, until I had 48 stitches, slip stitched into the top of the chain two, chained one, snipped the yarn, pulled through, and tied it off. Then I threaded in the ends.

For the smaller size I instead did single crochet for the third round, where it alternated 2 single crochet and 1 single crochet every other stitch, and then chained one and pulled through like at the end of the large one.

Conclusion: I now have seven face scrubbies that are soft and nice to touch! I haven’t tested them with soap yet but I did give one go with water a try once I finished. And oh MY GOD. They’re gentle while you use them but left me with a tingling faintly scrubbed feeling afterwards that left me feeling SO damn clean.

And even after scrubbing vigorously, there was no sign of wear or tear on the cotton yet!

All in all, I’m really happy with these. And so far, with my crafty resolution! I’ve been wanting to try making face scrubbies for a while but hadn’t had the chance or the energy, and this prompted me to find the time and energy. It’s also got me excited thinking about what to make next— Guess we’ll have to wait and see!
1 note
·
View note
Text
Marceline Amigurumi Pattern

Any weight yarn can be used but make sure to use a smaller hook than the recommended size.
You will need: Silver-grey yarn Dark grey yarn Blue yarn Red yarn Black yarn (large amount for hair) White yarn (very small amount) Safety eyes Stuffing Stitch markers (anything to mark a stitch works)
Abbriviations: ML = magic loop SC = single crochet ST = stitch(s) RNDS = rounds SC2TOG = single crochet two stitches together (decrease) BLO = back loops only FO = fasten off/finish off CH = chain
Head:
Begin with silver-grey yarn.
1. ML of 6 SC (6ST) 2. 2SC in each ST around (12ST) 3. (2SC in next ST, SC in next ST) 6 times (18ST) 4. (2SC in next ST, SC in next 2 ST) 6 times (24ST) 5. (2SC in next ST, SC in next 3 ST) 6 times (30ST) 6-11 (6RNDS). SC in each ST around (30ST) 12. (SC2TOG, SC in next 3 ST) 6 times (24ST)
Insert eyes between rounds eight and nine about five stitches appart. Making sure the beginning of the round is at the back of the head. Sew on a mouth and some teeth using small lengths of white and black yarn. Begin to stuff head.
13. (SC2TOG, SC in next 2 ST) 6 times (18ST) 14. (SC2TOG, SC in next ST) 6 times (12ST) 15. SC in each ST around (12ST)
Body:
Change to dark grey yarn.
To create the V-neck in her shirt find the stitch in the front middle of round fifteen, count one stitch back and mark it. Change to silver-grey yarn when you reach the marked stitch. Work the next four stitches in silver-grey yarn then change back to dark grey for the rest of the round.
16. (2SC in next ST, SC in next 3 ST) 3 times, changing colour where needed (15ST)
To continue the V-neck, work round seventeen until you reach the second silver-grey stitch. Change to silver-grey yarn. Work the next two stitches in silver-grey then change back to dark grey for the rest of the round.
17. (2SC in next ST, SC in next 4 ST) 3 times, changing colour where needed (18ST)
To give her boobs, find the first silver-grey stitch in round seventeen, count two stitches back and mark that stitch.
18. SC in each St until you reach the marked ST. 2SC in next 2 ST, SC in next 2 ST, 2SC in next 2 ST. SC until you reach the end of the round. (22ST) 19-20 (2RNDS). SC in each ST around (22ST)
Find the two stitches in the front middle of round twenty, count four stitches back and mark that stitch.
21. SC in each ST untill you reach the marked one. SC2TOG 2 times, SC in next 2 ST, SC2TOG 2 times. SC until you reach the end of the round. (18ST) 22-23 (2RNDS). SC in each ST around (18ST) 24. (SC2TOG, SC in next 7 ST) 2 times (16ST) 25. SC in each ST around (16ST) 26. (SC2TOG, SC in next 6 ST (14ST) 27. SC in each ST around (14ST) 28. (2SC in next ST, SC in next 6 ST) 2 times (16ST) 29. (2SC in next ST, SC in next 7 ST) 2 times (18ST) 30. SC in each ST around (18ST)
Change to blue yarn.
31-33 (3RNDS). SC in each ST around (18ST)
Make sure the body is stuffed to your liking before proceeding to the legs.
Legs:
To split the body in half find the two stitches in the front middle of round thirty-three and mark them. Count nine stitches after that and mark this stitch as well. You should have to count past your active loop. Once you have split the body into two rounds of nine you can remove the markers. You may also have to remove the second of the two markers to work into that stitch depending on your materials.
34a. SC until you get to the first marked ST. Skip next 9 ST, SC in each remaining ST, (9ST) 35-41a (7RNDS), SC in each ST around (9ST)
Stuff leg to desired firmness.
42a. (SC2TOG, SC in next ST) 3 times (6ST) 43a. SC in each ST around (6ST) 44a. (2 SC in next st, SC in next 2 ST) 2 times (8ST)
Change to red yarn. Or wait a couple stitches if the colour change would end up on the front of the leg.
45-52a (8RNDS). SC in each ST around (8ST)
Find the stitch in the front middle of round 52a and mark that stitch.
53a. SC until you reach the marked ST, 2SC in next 2 ST, SC in each remaining ST (10ST)
Find the stitch in the front middle of round 53a and mark that stitch.
54a. SC until you reach the marked ST, 2SC in next 2 ST, SC in each remaining ST (12ST)
Stuff bottom half of leg.
55a. In BLO SC2TOG 6 times, FO (6ST)
Finish stuffing and sew the hole shut.
Draw up a new loop of blue yarn in the first stitch you skipped on round thirty-three, leaving a length of yarn for sewing the groin shut.
34b. CH 2 (counts as one ST) SC in next 8 ST (9ST) 35b. SC into 2CH space, SC in next 8 ST (9ST) 36-41b (6RNDS). SC in each ST around (9ST)
Stuff top half of leg.
42b. (SC2TOG, SC in next ST) 3 times (6ST) 43b. SC in each ST around (6ST) 44b. (2SC in next ST, SC in next 2 ST) 2 times (8ST)
Change color to red yarn or wait a couple stitches if the colour change would end up on the front.
45-52b (8RNDS). SC in each ST around (8ST)
Find the stitch in the front middle of round 52b and mark it.
53b. SC until you reach the marked ST, 2SC in the next 2 ST, SC in each remaining ST (10ST)
Find the stitch in the front middle of round 53b and mark it.
54b. SC until you reach the marked ST, 2SC in next 2 ST, SC in each remaining ST (12ST)
Stuff the bottom half of the leg.
55b. In BLO SC2TOG 6 times, FO (6ST)
Finish stuffing and sew the hole shut. Sew the hole between the legs closed as well.
Arms (make 2):
Begin with silver-grey yarn.
1. ML of 6 SC (6ST) 2. SC in each ST around (6ST) 3. (2SC in next ST, SC in next 2 ST) 2 times (8ST) 4-9 (6RNDS). SC in each ST around (8ST) 10. (SC2TOG, SC in next 2 ST) 2 times (6ST) 11. SC in each ST around (6ST) 12. (2SC in next ST, SC in next 2 ST) 2 times (8ST) 13-18 (6RNDS). SC in each ST around (8ST) 19. (SC2TOG, SC in next 2 ST) 2 times, FO leaving a length for sewing arms to body (6ST)
Stuff arms to your desired firmness. Sew to the body at rounds seventeen and eighteen.
Tie strands of black yarn about six inches long to the head. The length really depends on the height of your doll though.
To attach the strands insert your hook into a stitch and out an adjacent stitch. Pull a loop of yarn through then fasten off by grabbing both ends of yarn and pulling them through the loop. To make the hair fall more naturally make sure you insert your hook into a lower stitch and out an adjacent higher stitch.
#marceline#marceline the vampire queen#adventure time#amigurumi#crochet#dolls#toys#stuffies#plushies#cute#kawaii
29 notes
·
View notes
Text
Anything-$00000DE9
NAME Darius ID 26 42 16 97 ALIENRACE Hybrid, human, other OCCUPATION biologist
Chapter Warnings cybernetics, missing/dismembered limbs (not described in detail/mentioned), body horror, medical treatment that isn't forced, gun, talk of murder, Chapter Characters Remus, Janus
AO3 Chapter 1 Previous Chapter Next Chapter
Dee’s arm was buckled into the passenger seat. When he looked at it, the mental connection he had with it caused it to twitch and spark. He stared at it. Static rumbled in his ears, piercing a high frequency sound. If he tilted his head all the way to the side, the static could sink through his skull like a sieve.
He took his good arm, his real one, and plastered it onto the stirring wheel of the ship. He could not come back like this. If they—If they—There would be little left to savage.
His entire body was screeching in pain, and yet he did not make a single sound as he started the engines. With the single hand on the wheel, he looked like he was on a relaxing joy ride in the middle of a Sunday afternoon. Expressionless, he stared off into the screen beyond, eyes catching on the grains of fire in the sky. The pressure of the acceleration on his wounds made his stomach drop, nausea overwhelming the pain and acid splashing into his guts.
Half awake, the ship did most of the work. It knew where Dee wanted to go.
Hopefully Dei’dra would not know. Dee did not have the time to cloak and hide his tracks. She probably would. Dee did not have the energy to care.
He barreled into the atmosphere of the planet. The fire encrusting the capsule matched the fire in his lungs. His body was flung forward and back, pulses, like racing over speedbumps, as the ship fell into a pile of garbage.
With little dignity, Dee pried the door open and stumbled into the pile of trash—He kicked his way through, drunkenly finding his way through the yard—It took longer than expected for Remus to find him, as he unceremoniously parked in the back of the lot—
“—Oh fuck, my arm.” Dee spoke aloud as he realized he forgot to grab it. He swerved his body back towards the garbage, but Remus, hovering over him, stopped him in his tracks.
In an uncharacteristically low hush, Remus held him by the shoulder and spoke so close to his face he might as well been whispering in his ear. “I’ll get one of my bots to grab it.” Remus hooked his arm around Dee’s waist, almost hoisting him up to his squishy side, leading the way to the medical bay.
His voice returning into its typical jovial tune, Remus continued, “b’sides, butts are where it’s at.”
Only catching bits and pieces at this point, Dee muttered something about “butts” and “implants”, and “they ain’t touching my ass”, lowly and incomprehensibly.
Remus chuckled, and ushered Dee through the maze of junk, stumbling multiple times.
A robot the size of a medium-sized dog trotted into the garbage pile, digging its way into the passenger seat. Its butt in the air swished back and forth excitedly as it reached for the arm. Its head only consisted of a claw or grabber. As it emerged from the pile, Remus looked back and laughed at the sight of a dismembered arm flailing about in its maws.
Dee grumbled, unamused by whatever Remus was laughing about, and continued forward, each step like bare feet on burning asphalt.
Remus kicked open the door to the medical bay, practically carrying Dee in his arms; the cyborg was slowly sinking away into the sand, dragged to the white painted room.
Dee’s head was nodding off but refused to subside to unconsciousness. His skull hammered down and then rose, back and forth, struggling. Remus took a moment to check his eyes, the artificial one was sharp, out of focus like a camera, while the other was red and watering, twitching, holding onto focus like a lifeline.
Remus might have thought about what the heck this man had been doing. What he had been put through. What experiments were performed on him, like some carnival of oddities. What could have gotten him into this situation, falling apart in his arms like a broken statue, worn after years of sandstorms.
He might have, but he did not have time. Yet it still clicked in his mind, something that simply pinpointed it all, that sorted through the anything, and found exactly who he was holding in his arms at this moment.
And seeing him here, in his arms, he could not help but feel overwhelmed, as if he himself shared Dee’s pain. He could hear at this moment every piece of equipment in his junkyard, the low buzzes and hums banging onto the side of his head like drums.
Remus placed Dee onto the operating table—softly, gently, like a tea set. The clink and quiet thump pounded into the air, reverberating into the stale room. Dee looked up at him, mouth shaped into a grimace, but his eyes were light as air, glimmering like sunlight on the clouds, looking at both nothing and everything and Remus.
It was as if in that moment his visage gave up everything; far too used to having no agency in Lab C and ready for everything to happen; so, he might survive. Remus sucked in a gulp of air and turned away to ready his equipment and himself—
—Dee felt the sun on his face as he woke up.
Remus reached out towards the half-awake cyborg. His palm hovered over his cheek, and he watched Dee carefully, searching for something Dee did not know he could give.
Something in his body pushed Dee to lean into the palm, the soft silky skin gently cooling his face.
Remus chuckled. “Sleep good?”
Dee blinked again. The room was so bright, light emitting from every wall and counter and table. All he could see was Remus, like he was in a dream.
“I guess.” Dee said even though he had never quite experienced a sleep like that before. Something that happened in an instant, but also in a forever. A restful break from reality.
Remus rubbed a thumb over his cheek: Dee vaguely wondered what Remus was holding on to his face like this for, what he was looking for, what he was inspecting.
Dee blinked slowly; his breath cast away from him. Remus smiled, his dark eyes round and jovial. Pounding in his chest, in his ears, in his throat, Dee’s heart picked itself up from shattered sand.
“You know,” Remus began in a melodic tune. He leaned in closer "I think you're my favorite piece of trash that’s ever landed in this junkyard," a casual humor in his voice dragged into the air.
But—oh—there was Something—Something in Remus’s eyes that looked relieved that Dee was alive.
Dee scoffed. “I’m trash? Do you own a mirror?”
Dee sat himself up on the bed. He glanced around, looking at the blankets around his legs. Dee tried to remember the last time he slept in a bed.
A quilt. A knitted blanket. Very loud and mismatched colors and strange graphic designs. As if whoever created both blankets took whatever scrap fabric and yarn they had and combined them together with no color scheme in mind. He took a moment to knead the knitted blanket in his hands, scrunching the yarn and lacing his fingers through the holes.
The tension in his shoulders lessened, and he took a breath. Remus’s hand had moved away from his face. The side of the face that was his. He could feel the slight moisture linger still, as if the man had pecked his cheek. Remus simply stood there, unmoving, sitting in a chair, and there was something odd and familiar about this scene, this memory that would play in his mind whenever the screen would go dark.
Usually, the man wore what he pulled out of his closet without looking. By closet, he meant the patch of the junkyard that looked to have slightly more fabric than others. Or at least, that was what Remus told him when he had commented on his bold fashion statements the first time. He was wearing something else. The dark sweater had a collar that looked like it had been stretched and torn. The knit was tucked into baggy pants. Simple. Patches of what looked like moss-covered garments. Dee scrutinized his head, his body, all the sensations that made up himself, confused, attempting to understand this feeling of melting.
A tress of frilly stock, scarred and white, was swept across the top of Remus’ mane of external gills. Dark patches of green like freckles covered his face, and underneath the stains were a smooth olive green. Dee opened his mouth to say something, but he found that he could not.
He turned his head away, breathing in the air; moisture, dirt, musk, spice, he could not place the smell. His legs were warm, sweating under the blanket. He could not say anything, as if he was reborn all over again, without a name or a face, but instead here, in this place, there was a pleasant softness that he found when he looked at the knit and the patches of olives.
Like fish swimming around each other in a pond, different sensations floated throughout his body: a tight ball in his chest, a thought he could only describe as want, and a heavy weightlessness making his skull tap the ceiling.
“You could stay here if you wanted to.”
Alarmed, Dee stared at him.
“No, I couldn’t. Don’t be silly.”
“Well, its fine with me if you wanted to. Plenty of room. I mean, you’ve already crashed at my place before.”
Dee swatted his arm, and he begun in a lighthearted tone, “it’s not like she would follow me over here and get her goons to pick me up and shoot you in the head—” and Dee was out of breath, throat full of gravel, as he saw Remus’s expression change from soft dirt to stone.
“She’d really do that, huh.” For the first time since Dee woke up, Remus looked away from him. “I guess you got ‘plot stuff’ to do before you can settle down anywhere, Mr. Space Protagonist.”
Dee did not say it aloud, only letting his jaw hang loose and eyes narrow.
“Oh!” Remus said, “I got a present for you.” And Remus bent down and pulled up a cardboard box that had the text “cannnned beanz” and “Big Saucy Bangers” scrawled across it. He placed the box in Dee’s lap and shimmied his shoulders, smiling.
Dee looked at the box, then at Remus, then back at the box.
“Go on, open it! It won’t bite—not this time.” Not that Remus had ever given Dee anything that would bite him before.
Dee opened the box slowly, carefully inspecting it for any hidden mechanisms.
A gun.
Or at least that’s what it looked like. Sort of. It had a wooden handle and a dark metal barrel.
“So, I am not the best at programming, but I noticed what amounted to a safely lock on your blasters. I figured if you ever needed to, uh, go old school, this would come in handy. I can help you figure out how to shoot it if you like! It’s kind of hard to figure out at first, but I eventually got the hang of it.”
It occurred to Dee what he could use this for.
Like cold air twisting into hot, swirling winds collided against his ribcage. He moved his fist, still clenching the blanket, and brought it up to his sternum, hunching over the box. His diaphragm twitched as his lungs held in as much as it could and refused to let go.
He could use this to—
—As if he hadn’t already killed somebody before.
But oh—oh something—the possibility had felt so far, so dreamlike, that simmering revenge a burning candle in a window, keeping him afloat from afar, it was engulfing him. He heard Remus calling out for someone, vaguely, full volume, right next to his ear, but then he also didn’t. He lifted his head up and his hands were numb, and he might have been shaking—
—Looking into Remus’s dark eyes, sunken, sparkling, like a gunmetal lagoon, Dee felt his heart join the chorus of his entire body collapsing in on itself at the idea of—the idea of—He couldn’t think, all he could do was vomit the emotions spilling out from his torn chest.
“I woke up one day, the first time I ever remember doing that, and all I could feel was that I needed to kill her. Before I even knew who she was, what she did, I knew somewhere that she needed to die. I just had to remember why.”
Remus did not have a response to that. Well, if he did, it would have been wildly inappropriate. So instead, he leaned forward, held Dee’s shoulder, and pressed his body to his in a warm embrace. Dee leaned his face into his collarbone, limply, needing something to squeeze away the tight knots in his chest—
—How long had Dee sat there? Chatted about nothing with Remus? Slowly, he felt a buzzing in his skull. White noise. A communicator of some kind. Dei’dra was trying to reach him. He knew he had to leave, for Remus’s sake.
He had a cup of coffee in his hands. He noticed rain out the window. A light rain, with a sky clear with sunlight, sun settling into the mountains of trash. Of the junkyard. How picturesque.
Remus was rambling about something, his voice climbing mountains and paragliding down cliffs.
“So, wait, you have no memory of your life before the bitch hijacked ya? I don’t think I can trust a human that doesn’t have a phase from high school that they regret.”
“What?” He really had no idea.
“Yeah, trust me. I work with humans a lot. It’s just necessary somehow? I wouldn’t know.”
Dee twisted his head to the side, squinting to look at him.
“Yeah, anyway, so, you mentioned you needing to leave. I’m not, uh, kicking you out or anything,” And Remus had the audacity to look bashful, “And I would probably prefer to keep an eye on you after that nasty injury you just had, but, uh, I can’t keep you.”
Dee left, but something about that last line made his heart swear.
Made him swear on something.
#ts (In Other Worlds)#ts (INW)#ts Janus#ts deceit#ts the dragon witch#ts storytime#ts storytime 2021#ts big bang#ts Virgil#sarcasm writes#sarcasm ts fic#thomas sanders#sander sides#sander sides fic#ts Anything#ts Remus
0 notes
Photo
I'm excited yet terrified to join in on this incredible #creativerootschallenge created by @knitbrooks. Hi I’m Denise. I’m excited, because I can learn more about you, the amazing people in the fiber community that I have come to admire… Terrified because I’m 61 and I feel as though I’m not savy enough to hang in this technology driven world.
1. My creative journey started at a very young age. My grandmother had a baby shop that was part of her house. All of the clothes were handmade by local women. I remember going with my grandmother in her 1958 Chevy to the homes of these farmers wives (who didn’t know how to drive) to pick up these delicately hand sewn items all crisply ironed and wrapped in tissue paper. My “admiration” for all things handmade evolved into “doing” when my grandmother stuck a crochet hook and yarn in my hand at the age of 7. 2. As I grew older my crochet journey took a back seat, but my “crafts” (I sooooo HATE that word) journey never ended. Crafts remained a small part of my adult life. Today, my passion for crochet has blossomed. Through a virtual webinar last summer, I jumped into the world of crochet testing and instagram. 3. I have a mission. I am a mature plus size person. Prior to summer of 2019, as much as I love crochet and have a passion for making garments…everything I looked at and made did not make me happy. All those crochet garments just didn’t work for me…too young looking and not flattering to my curves. This Instagram fiber community has changed my life. I want to shout at the top of my lungs that there are garments that are wearable and flattering for the everyday working woman. Things that can actually be worn to work and to family oriented social events that are not overtly sexy or frumpy looking. I have soo much I want to say to those who are stuck in the world of crochet scarves and blankets. There is so much more than that. I have a voice and a message…I just don’t know how to get it out. Shown above: Pattern: Lattice Lace Dress * Designer: @by.stephanie.erin * Yarn: Premier Bamboo Fair @premiryarns * Color Indigo #creativerootsweek1 #creativerootschallenge (at Maurice, Louisiana) https://www.instagram.com/p/CE0GsvchsVL/?igshid=y605co8o70sx
0 notes
Note
I've started to crochet! Do you have any tips or good patterns to try? 😄
Ooooh, congratulations!! It’s actually a really fun hobby, and you can create a lot of cool things with crochet. Blankets, plushies, tablecloths, etc.
I started out with a medium gauge (like a US size 9) of yarn and a 7.0 mm hook (but I would advise something a bit smaller, like 5.0-6.0 mm). Read up a tiny bit on crochet hooks and how to hold them! As you learn how to crochet, your preferences on how you want to hold the hook and what kind of crochet hooks and yarns you need will change, so keep adjusting as you learn more. Like, I started out with 100% metal hooks, but I gradually moved on to metal hooks with a grip since they felt more comfortable. It’s all up to you.
Next, I would advise learning how to slip knot and make a crochet chain first. Those form the basic foundations of most stiches:
Slip Knot
Chain Stiches (ch)
Fastening off
Then, start learning the basic stitches using the chains you make.
Single Crochet (sc)
Double Crochet (dc)
Half Double Crochet (hdc)
Treble Crochet (tr)
Slip Stitch (sl st)
I would personally also advise you to learn how to make a magic ring, since it’s come in handy for a lot of things I’ve done that are circular in size.
Once you learn those basic stitches and skills, you can start working on patterns! A personal favorite of mine is granny squares. Flat circles are fun to practice as well! Here’s some beginning crochet patterns as well: here and here. For plushes, you can start out simple, like with a simple ball, or one of the plushes by Planet June (who is one of my favorite crochet pattern designers, she’s got some really nice, easy-to-follow patterns on her site). YouTube has a lot of good tutorials as well, so I’d also advise going there too just to browse!
Also, if you’re still confused after some of the tutorials I linked, there are plenty of others on the web you can google I’m sure. There’s tons! I’m more of a visual person, and I found video and picture tutorials easier to learn from.
Some tips I’ve learned from my crochet journey are:
1. Practice, practice, practice! You’d be amazed at how much you can improve, even if you’re creating the same thing over and over. The more you familiarize yourself with your crochet, the better you will get. It becomes almost second nature after a while, believe it or not.
2. It’s okay to make mistakes! Sometimes, the little mistakes can either be room for learning, or, they add individuality to your piece.
3. Try different things! Learn new stitches and try different types of things to crochet. It’s actually really fun (like, I just learned how to bobble stitch the other day, and it was pretty neat).
Hope this helps!
14 notes
·
View notes