#4to3 tutorial
Explore tagged Tumblr posts
Visit Tumblr Blog
Explore Tumblr blogs with no restrictions, modern design and the best experience.
Last Seen Tumblr Blogs


Fun Fact
Post activity is at the highest at 4:00 pm EDT; notes peak at 10:00 pm EDT.
Text
4to3 Conversion workflow/tutorial
Hi!
So, I know I haven't done that many, start to finish 4to3 conversions yet. But I experiment and help other people a lot behind the scenes, and I soak up teachings from knowledgeable people such as @simlicious @justmiha97 @thornowl @virtual-hugs, a little bit of @elvgreen and more people like a sponge, and have learnt a lot the past months. So I thought I'd write down what I do when I was working on the Aria dress! While it's a bit chaotic, this essentially functions as a very thorough 4to3 tutorial.
The above document contains my workflow, from start to finish. I use blender 3.6 (unless mentioned otherwise) and no milkshape at all.
It is VERY thorough, long, and can be lowkey overwhelming. I hope my table of contents at the beginning is clear enough. All the links are clickable, so you can just go to where it interests you. If you wonder about it, it's most likely in there, can be extrapolated from the information or I can brainstorm and experiment a how-to(-fix) if needed.
Some notes of what it includes:
Adapting the TS4 normal, specular and shadow maps to ts3
A clean finishing method to get EAXIS-like finishes that allows you to optimize the UV lay-out (nicer textures!) and further minimize clipping.
A quick texture making method to adapt the TS4 texture(s) to a brand new, potentially very different TS3 UV-layout. If you're lucky (it sometimes acts up) the actual texture-changing takes 5 seconds - puzzling the new UV lay-out beforehand would be the hardest part! (But it's also fun, puzzling!)
Very Precise bone assignment
Manually editing morphs, with some tricks for e.g. the fit morph...Why do fit morphs have such ugly boobs, even vanilla stuff?
Bonedelta editing to animate well with pregnant bellies or wide skirts.
... And more. I put my heart and soul into this!
Some things I'd like to try out in the future:
Experimenting with adapting the original TS4 bones to TS3 right there in blender.
Look at more efficient methods for editing morphs and FTOM and age conversions more in-depth (I didn't include the FtoM because it is just lots and lots and lots of proportional editing)
Converting a high-poly Alpha mesh to be more optimized and maxis-match, while keeping good topology and castability. (Likely lots of dissolving edges like here, rather than purely the decimate modifier, which often messes up the topology)
Any questions or something that isn't clear in the doc, don't hesitate to ask!


#sims 3 tutorial#cc tutorial#4to3 conversion#4to3 conversion tutorial#4to3 cas tutorial#4to3 tutorial#sims 3 clothing tutorial#4to3 clothing tutorial
92 notes
·
View notes
Text


So...day 1 of followers' gift goodies begins! Here's my first offering, a set of four mirrors: two conversions and two edits using existing EA painting frames.
4to3 Get to Work "The Swish and Flick" Mirror
Quite surprising no one has ever converted this elegant mirror that looks good on hallways and living rooms, so I did the honor. One CAStable channel with a price of §685. Polycount: 350 (hLOD)/220 (mLOD)
2to3 "Obviously Modern" Wall Mirror
As far as I know this one's also not yet converted to TS3 (I sure hope so lol). Also with one CAStable channel, with a price of §399. Polycount: 320 (hLOD)/181 (mLOD)

Store Waning Moon "Short Life of the Raccoon" as Mirror Frame
This is the sample mirror I showed in this mini tutorial I made, finally available for download. Two channels, priced §100. Polycount: 128 (hLOD)/54 (mLOD)
Movie Stuff "Western Ways" as Mirror Frame
Not only I made this thing into a working mirror, but also tilted the frame a little so that it sits flat on the wall. I also added a clean preset because the default one looks dirty however you recolor it. Three channels for the first preset and two for the clean version, priced §300. Polycount: 666 (hLOD)/212 (mLOD)

*All of them are found in Decor > Mirrors. And they are all shiftable too.
DOWNLOAD: Simfileshare | Mediafire
197 notes
·
View notes
Text
Grrr. This is totally unfair, but --
WHY THE HECK DO SO MANY CC CREATORS THINK THAT ONLY YAs ARE WORTH CREATING FOR?
Tons of folks must just open this game to have gorgeous digital models to dress up and pose.
Which, sigh, is a totally legit use case for this game. It's just that so many cc creators seem to fall into this category. I can't count how many times a cc creator I've followed has asked for requests, and I just say, "Anything you like for any age other than adult," and the creator answers, "Oh, I don't do that stuff."
TS4 didn't help by making the teen category nonexistent, so that 4to3 conversions completely skip an age category out of hand. (That wouldn't even necessarily be so bad if TS4 teens didn't look exactly like adults; when I play TS4, I use the shorter teens mod.)
Also, did I mention that EA is just as bad as fan creators??
The correct answer is always to do it yourself. We're all volunteers who do the stuff we like, and nobody owes anybody anything. I've worked my way through some age conversion tutorials and produced some hair I felt was usable, but my clothes have never passed muster. I'm just a much better script modder than I am a modeler or an animator.
Grrr. It's just so frustrating sometimes.
30 notes
·
View notes
Note
Hi! I've been a follower for awhile of you and Sara as I play TS3!
I started becoming a creator and learning to Convert 4to3 items in my game which has been so fun for me.
I tend to love a certain style that I can't find in most cc creators so I want to make my own eyes, skins, skin details/ tattoos etc. to make my sims.
To keep it short is there any tutorials you learned from on how to make skin and eyes and tattoos? Any tips you could give to help out someone who is trying to learn themselves and start a simblr?
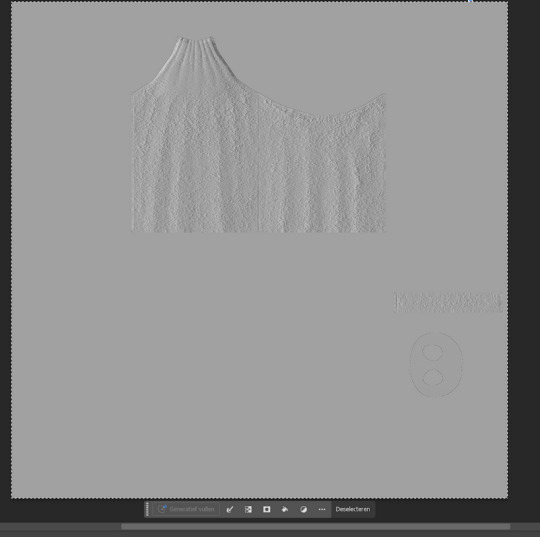
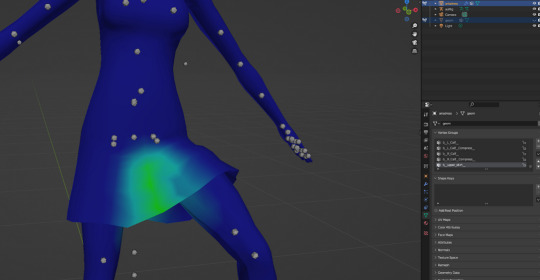
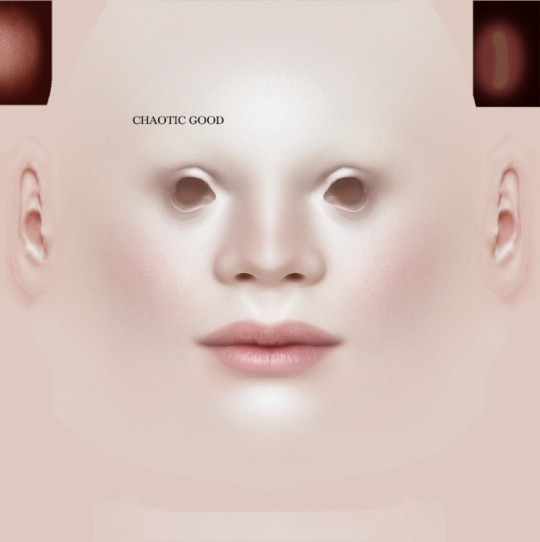
Hello!! That is definitely why Sara and I started making stuff, it makes your sims feel more like your own characters when you can add the personalized touches yourself. Sara and I have been skin blending for a long time (around since 2016 I wanna say) and we're mostly self taught, I don't remember a lot of people wanting to share their skin blending techniques back in the day. The most I can do is to link you to here and browse through their tutorials they have shared. The other basic tips I can share is that Sara and I use the 3D mode in photoshop for all of our skins, you'll need to get .dae files to open in photoshop which you can find here, find a base skin, doesn't have to be terribly detailed just so you know where the eyelids, nose, and mouth should go as well as the ears. Make sure you make a new layer before pasting whatever details you want to add otherwise when you merge it down on the 3D side it'll go onto whichever layer you were on (then you gotta completely redo it and it's a pain in the ass). ALSO! You can use liquify to move stuff around better in the 3d mode, I use multiply when placing stuff first so I can line it up where it needs to go. I've also seen some skins where people haven't matched the scalp correctly or there's a line where the body and the head meet, my trade secret is to use the eyedrop tool and grab the color on the face dds then just paste it completely in the scalp and on the body I use a soft brush and drag it over the very top of the neck on the body dds. As for eyes and tattoos, eyes are definitely like making makeup in the regard that you can make them recolorable and they go in the makeup category so if you have any experience with that it's not too hard, just make sure if they're not recolorable to set the color in TSRW to white so they show up properly in game. Tattoos I always add directly to my sims skins, accessory tattoos look awful in game, they glare under the light and they're blurry, easier to just add them to the skin, for the body you can just paste them on in 2D but for face tats I recommend using the 3D mode instead because of warping, black tattoo with a white background I tend most of the time to set the layer to multiply and it looks fine.
For examples of tattoos warping:
You want the tattoo to be here so if we place it like so in the 2D mode it looks fine right?
Wrong because it is going to look like this in game

So instead paste it in 3D mode like so and then merge it down
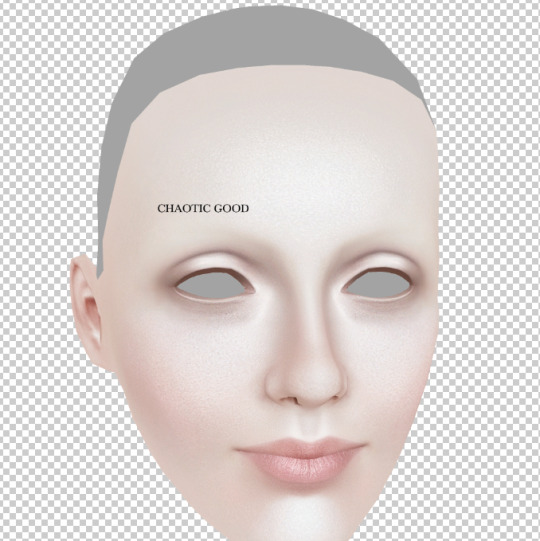
It'll look like this in the 2D mode but it's fine! It'll look correct in game!

I was kinda spit balling but I hope this helps even a tiny tiny bit!
23 notes
·
View notes
Text
Conversion process/tutorial for freefall water wall
As inquired by @dailycard, I’m sharing the conversion process for my recent creation: Freefall Water Wall. This guide is NOT intended for beginners as I only show what I think the important steps. If this is the first time you tried to make a conversion, I suggest you try something like Pixel Jackpot’s 4to3 wall decor video tutorial first.
This tutorial will cover:
Using counter shader (part C step 9)
Using phong alpha shader and UV scroll parameter (part C step 6-8)
Making occluder shadow (Part D step 4-15)
This tutorial will NOT cover:
Setting up TSR Workshop (TSRW)
Making object mask
Tools used:
1. Older TSRW (I used the 2.0.86.0 version) for:
Cloning TS3 object base item you want to work on
Importing mesh, because sometimes you can get an error when doing this in the newer TSRW
Changing shader
Adding shader parameter
2. Newer TSRW (I used the latest 2.2.114 version) for:
Exporting TS4 mesh & maps
Changing footprint
Changing bones position
Changing occluder shadow
3. Milkshape & its plugin for TSR Workshop 4. Photoshop
Part A. Prepare the required resources.
A1. In NEWER TSRW:
1. Open the Sims 4 small freefall water wall object. Copy the object’s name, description & price information to a notepad txt file.
2. Export the object mesh. In my case, there is only hLOD available. Considering the mesh is quite low poly anyway, I believe it can be used for as the mLOD as well. The sunshadow is not necessary whatsoever.
3. Export the diffuse map of material 1 (fountain body) & 2 (waterfall effect) as png. Material 0 diffuse map is not necessary because it’s just for drop shadow.

4. Open a similar looking object that has an occluder shadow. I used TS4 Romantic Garden’s Thriumphal Arch of Gluteus Maximus because it has an empty center & covered the upper part (I tested them in game first). Note the value for each of occluder entry (number 3). For this, I just took a photo each with my phone for convenience.

A2. In OLDER TSRW:
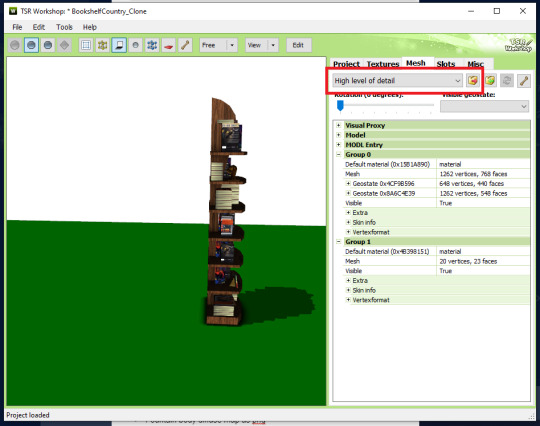
Open a Sims 3 object that fit perfectly against a wall. I used the bookshelf modern high 1x1. Export its hLOD mesh and name it along the line of “Wall Fit Reference Mesh”. I suggest using the older TSRW because sometimes I got an error when exporting in the newer version.
Part A check list:
Object’s name, description & price in a notepad txt file.
Small freefall water wall TS4 hLOD mesh as wso file.
Fountain body diffuse map as png file.
Waterfall effect diffuse map as png file.
EACH of occluder shadow entries value as notes/pictures.
Wall fit reference TS3 object mesh as wso file.
Part B. Editing the resources.
B1. In milkshape:
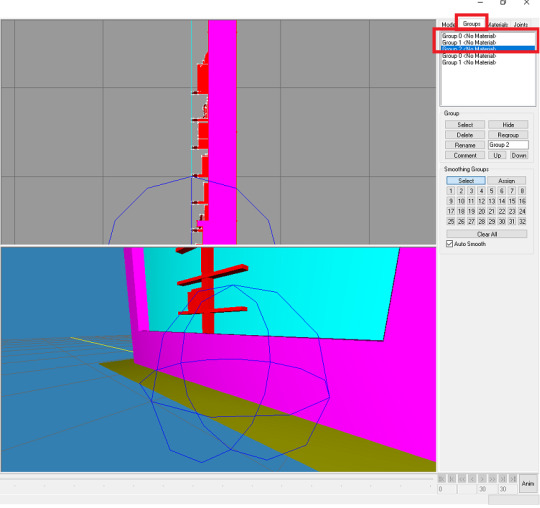
1. Import the small freefall water wall TS4 hLOD mesh. Then import the wall fit reference TS3 object mesh. Your workspace will looked like this:

2. Go to Groups tab. Double click each of the upper “Group 0″, “Group 1″, and “Group 2″ to select them.
3. Go to Model tabs. Choose Move (Number 2). Change the Z value to 0.08 and click Move (Number 3). The waterfall should clip slightly through the reference bookshelf.
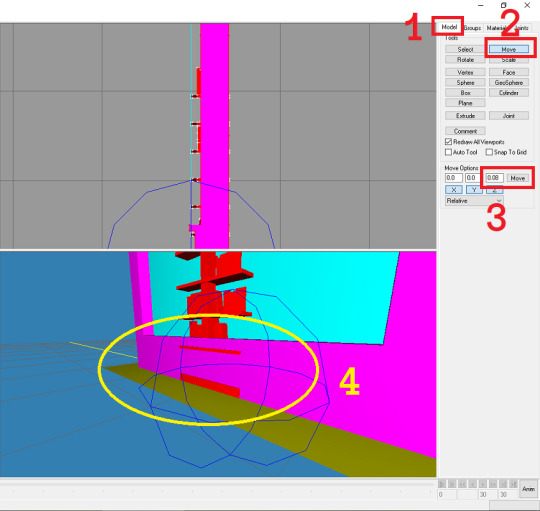
4. Go back to the groups tab. Double click each group again to deselect the upper group 0-2 (Number 1). Select the lower group 0 and click delete. Select the lower group 1 and click delete (Number 2&3).

5. Export as “hLOD edit”.
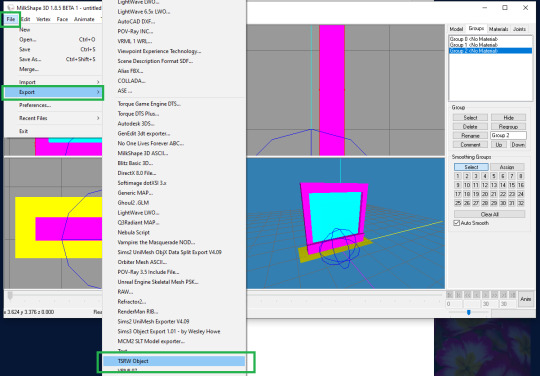
6. Delete the “Group 0″ (red box). Select “Group 1″, rename to “Group 0”. Select “Group 2″, rename to “Group 1” (green box). Export as “mLOD edit”.

B2. In photoshop:
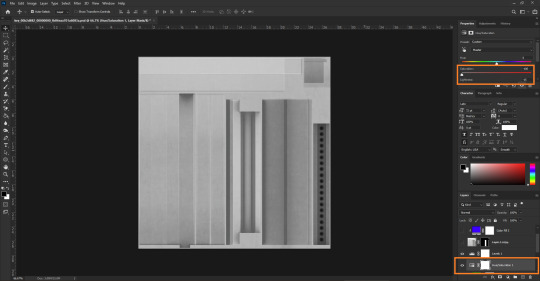
1. Import your fountain body diffuse map png file. Your workspace should looked like this:

2. Add the hue/saturation & levels adjustment layer.

3. In the hue/saturation adjustment layer, under the master control I changed the saturation value to -100 and lightness to -15. Save as “multiplier map” in png format.
4. You can also use the level adjustment layer to tweak its brightness and make the (optional) “specular map” in png format. I didn’t do this step as the lion fountain I’m using as clone doesn’t require it.
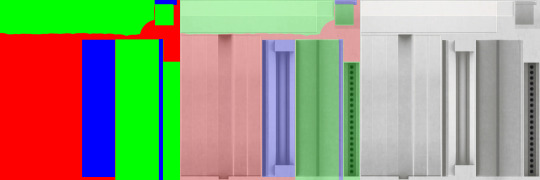
5. Make the masking map in png format. This is more of trial & error though, so I will not explain much. Here’s the mask map comparison I created as reference against the original diffuse map:
Part B check list:
1. Combined these item in milkshape:
Small freefall water wall TS4 hLOD mesh as wso file.
Wall fit reference TS3 object mesh as wso file.
To make:
hLOD edit mesh as wso file.
mLOD edit mesh as wso file.
2. Edited the “fountain body diffuse map as png file” in photoshop to make:
Multiplier map as png file.
Specular map as png file (optional).
Mask map as png file.
3. Unused part A items:
Object’s name, description & price in a notepad txt file.
Waterfall effect diffuse map as png file.
EACH of occluder shadow entries value as notes/pictures.
Part C. Building the object. In OLDER TSRW:
1. Clone the fountain france statue 2x2 TS3 object. Under the project tab, input the object’s name, description & price. Change the item flags. In my case, I do not change anything because I want the waterfall fountain to be found and placed similarly to the lion fountain. Save your project!
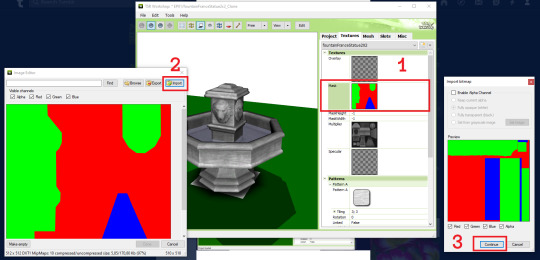
2. Go to textures. Choose the 2nd swatch dropdown option. Click on the smaller dropdown option on the left of it and choose delete.

3. Import your mask map. Do the same to your multiplier & (optional) specular map. Make sure your overlay & stencil maps is empty. You can also change the pattern now or just leave it the same as default. Save your file.
4. Go to mesh tab. Import your “hLOD edit” and “mLOD edit” mesh.
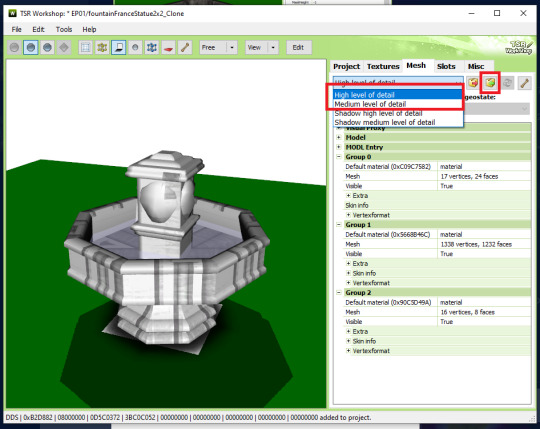
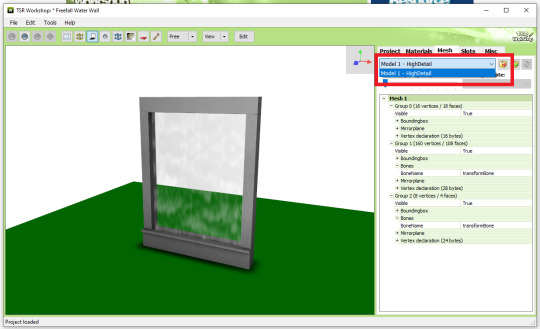
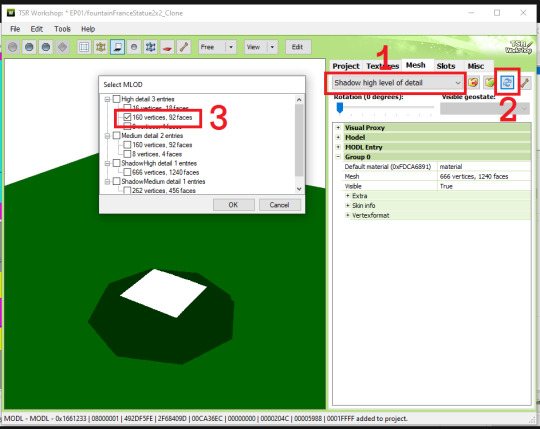
5. Select the “Shadow high level of detail”. Click on the generate shadow mesh. Choose the “160 vertices, 92 faces”. In my case, I can do the same for “Shadow medium level of detail”. Ignore the weird white square for now. We will remove it later. Save your file.
6. Select the “High level of detail” from the drop down menu again (Number 1). Edit the Group 2 material (Number 2). Choose the Phong alpha shader (Number 3). When prompted, choose YES! (Number 4)

7. Click the blue “+ Add” to show a new property window. Choose the UVScrollSpeed from the drop down menu. Click OK.

8. Replace the alpha map & diffuse map with “waterfall effect diffuse map” (Number 1&2). Make empty the Specular map (Number 3). Change the UV scroll speed parameter to 0 ; -0,8 (Number 4). When prompted to update the material definition to all LOD, choose YES (Number 5).
NOTE: If the object animation played in a different direction than intended here, change the UV Scroll Speed Parameter to positive or vice versa.
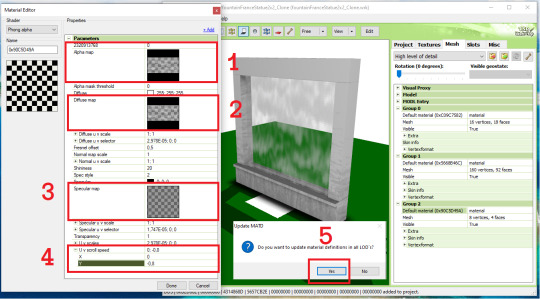
9. Go back to the main mesh tab, now choose to edit the group 1 material (number 1). Change the phong shader to counters shader (Number 2 & 3). If prompted to use the common values for this shader, choose NO! (Number 4). Click Done (Number 5). When prompted to update the material definition to all LOD, choose YES! (Number 6). Don’t forget to check if the changes has been made in the Medium Level of Detail. Save your file.

Part C check list:
1. In the “Project” tab: Edited the object’s name, description & price.
2. In the “Textures” tab:
Imported multiplier, specular (optional), and mask map.
Make sure your overlay & stencil maps is empty or disabled.
Change the pattern (optional).
3. In the “Mesh” tab:
Imported hLOD and mLOD edit mesh.
Generated the sunshadow in “Shadow High” and “Shadow Medium Level of Detail”.
Change the Group 2 Material to phong alpha shader, add the UV Scroll Speed parameter to 0 ; -0,8, import the alpha & diffuse map, and empty the specular map.
Change the Group 1 Material to counter shader.
Part D. Finishing the object. In NEWER TSRW:
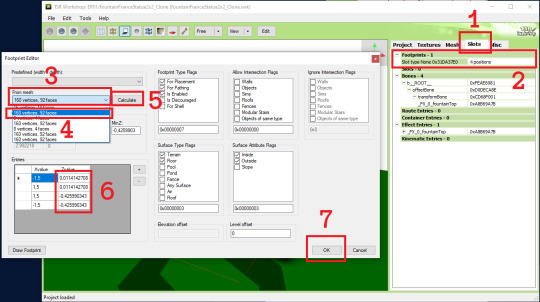
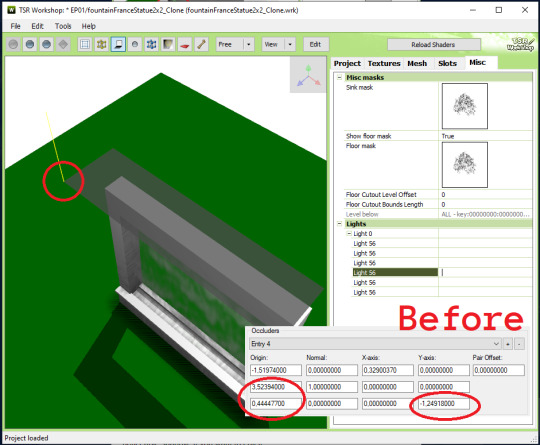
1. Open your saved project. Go to the Slots tab (Number 1). Edit the Footprints (Number 2). Select the first 160 vertices (Number 3&4) and click calculate (Number 5). Change the Z value of 0,0114142708 to exactly 0. Change the value of -0,425990343 to exactly -0,425 (Number 6). Click OK (Number 7).
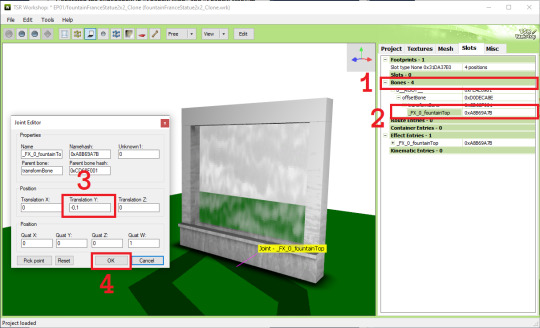
2. Expand the bones group (Number 1). Select the fountainTop entry to edit (Number 2). Change the Translation Y to -0,1 (Number 3). Click OK (Number 4). Save your project.
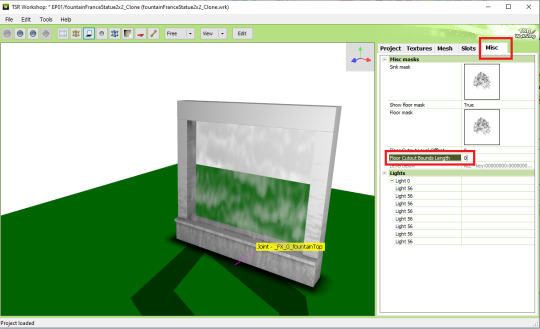
3. In the Misc tab, change the floor cutout bounds length to 0. This will remove the weird white square from before.
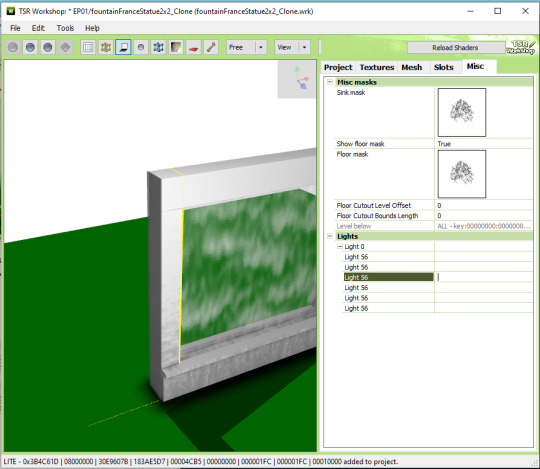
4. It’s recommended to create a new save file now as we will be editing the occulders. Expand the lights section and edit the Light 0 to show the Lite Editor Window (Number 1). Manually replace every occlusion entry value with the ones you noted/took photo of (Number 2). In my case the entry listed here is up to 8 occulders while the reference only had 6, so you can just delete the entry 7 & 8 using the - button.
NOTE: When manually inputing the value, use the tab key to quickly switch to the next value. You can also opt out the last zeroes from the value. If the original value was 1,51974000; you can just input 1,51974 and the zeroes will be automatically added after clicking OK.

5. The occluders should looked like this now. Try familiarizing yourself with each of the occluders by clicking on the light 56 entries one by one before we edit them to fit the object.

6. This is what I think how the occluder value works. Since I couldn’t find other sources, please let me know if I am incorrect. This is based on our occluder #1.
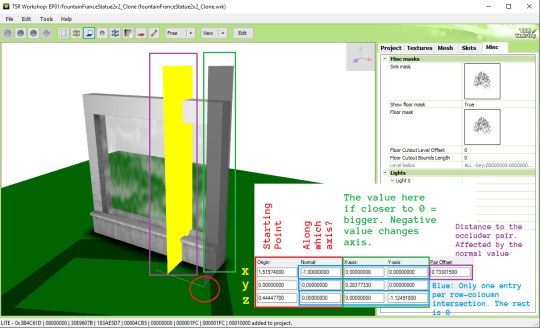
7. Now I want to change the starting point z value so it could fit much better. This whole part is a trial and error process. I changed the value from 0,444477 to -0,1.

8. Referencing to Pocci’s Blog, for the green note I wrote the value are more accurately called inversely proportional (as in 1/n). For example if I know the height of the object is exactly 3 tiles (n), equate 1/3 and I can input the value 0,3333333 to get the perfect height.
9. Next, I think the thickness of the object was 1/3 tiles, so using the equation 1/n and input 3 as the Y-axis z value without changing the - mark.

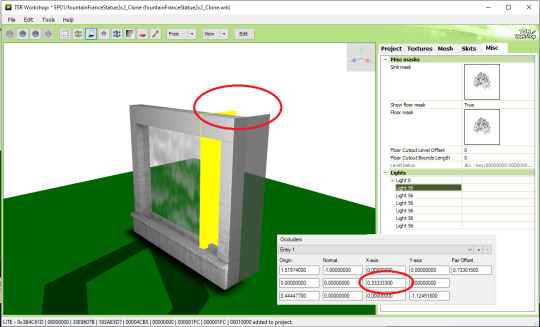
10. Lastly, I want the pair occluder to be closer, so I changed the pair offset value from 0,733... to just 0,28. Now we are finished with occluder #1.

11. Let’s jump to occluder #3 as it was the mirror of occluder #1. We can change the value similar to the occluder #1 while preserving the - value only for the orange circle shown below:
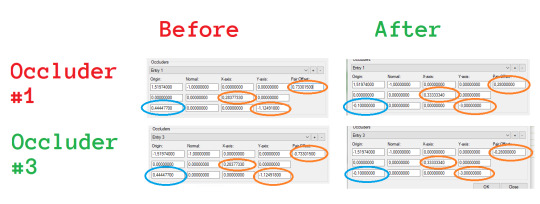
Occluder #3 result:
12.For occluder #6, the starting point is okay. We just need to change the plane size, shown red below:

13. Occluder #5 is similar to occluder #6, but with extra step fixing the starting point. Shown red below:


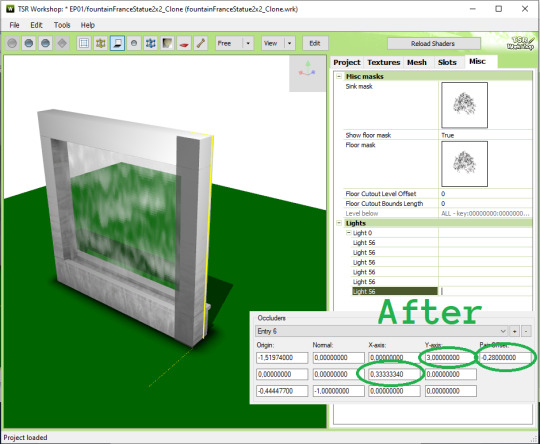
14. For occluder #2, I wanted to move it to the ground because when placed near the ceiling, the shadow they cast seemed less noticeable anyway. The values changed are shown red below:

15. For the final occluder #4, you can either delete them or fixing a few value shown red below. They intersect with the ceiling anyway so they won’t be noticeable if you delete them.

16. DONE! Export your file & test in game :)
thanks for @sims3tutorialhub for a few initial references I used :3
PS: this tutorial does not fully reflect the final published version of the conversion object I made, i.e. it has 2 more variations than described here.
24 notes
·
View notes
Note
Hi! I really want to learn how to convert 4to3 eyebrows and was wondering how did you convert your eyebrows? I’m basically trying to find as much info online as I can and then guessing with rest with common sense but still having a stressful time lol
Hello! Converting eyebrows is quite tricky and requires a lot of patience. There was one good tutorial for eyebrows conversion but the blog got deleted. However, fear not, you can still access it *here*. I adivce you to do what I did - make screenshots of the whole tutorial and save it on your PC, in case it disapppers forever. Everything you need to know is there. Soooo good luck!
12 notes
·
View notes
Note
Hii, hope you're well!
I've been following your tutorial on how to convert objects (4to3) with multiple textures and it's worked great! However, i'm trying to add a 2nd swatch, but when I do it changes the 1st swatch to the 2nd swatches colours.. I'm not sure what i'm doing. Is there a specific process when adding a 2nd with multiple textures?
Thanksss!
Hi!
You cannot add different swatches unless you only change the image in the materials tab and no the ones under mesh properties!
1 note
·
View note
Photo


Tutorial Archive for TS3 CC Creators
Features:
Multiple sources with backups Tutorial Archive is a comprehensive site for TS3 CC creators, covering multiple sources including Tumblr, MTS thread, Simswiki, TSRW, and most important of all, personal blogs. We keep and provide backups for tutorials that might be gone for good when its original pages shut down.
Carefully organized with troubleshoot sections The layout of this site is designed to help beginners to learn CC creation and find answers easier.
Up-to-date tutorials covering 4to3 conversion✨ and videos Lately many newcomers started to learn cc creation due to their need for 4to3 conversion. So we have conversion sections within corresponding categories.
User Guideline:
Visit “Navigation” page for the layout of the archive
Look up in each section or use the search bar at the bottom
For further discussion over cc-making, please move to our discord
Download backup files only when the official link went broken
Make your browser mhtml-compatible to read the backups
To maintain the quality of the tutorials, please help us by reporting broken links or suggesting other useful tutorials
Please feel free to share your opinions or feedback. Happy simming!🎵
💙Special Thanks to our discord guardians/tech consultants, @ktarsims & Kitlith, dear @murfeelee, @nornities & @mspoodle1 for their priceless contribution.💙
172 notes
·
View notes
Text
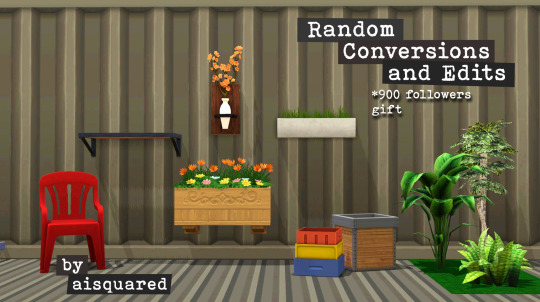
I know I said I'm getting a little rest from making cc, but I just can't sit here knowing I reached 900 followers and do nothing about it. Though these were just unreleased projects that were wating to be posted during the time I had a broken internet at home so no worries, I didn't pressure myself to make these as these were made carefully and with love. So here's a token of gratitude for the huge following I continuously receive all throughout. Thank you everyone! 🥰
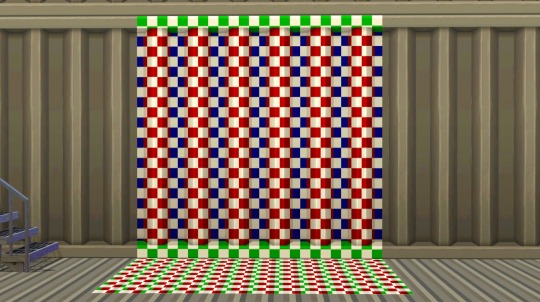
4to3 Eco Lifestyle "Panel to the Metal" Wall
-- Three channels, cost §3, found in Walls > Paneling
4to3 Eco Lifestyle "Layered Paneling" Floor
-- Two channels, cost §4, found in Floors > Metal
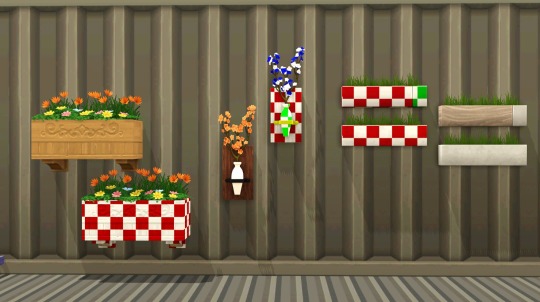
4to3 Cottage Living "All Good Days Daisy Box"
-- Ah yes, this is the plant I showed on the tutorial I shared not a little long ago. One channel with 7 presets for each flower variation, costs §50, found in Decor > Plants. Contains the original catalog description from TS4.
4to3 Seasons "Branching Out"
-- Four channels (yes, even the flowers!), costs §50, found in Decor > Plants. Contains the original catalog description from TS4.
4to3 Spa Day "Wheatless-Wheat Grass"
-- Two variations, one with a single channel and another with two channels. Costs §65, found in Decor > Plants. Contains the original catalog description from TS4.
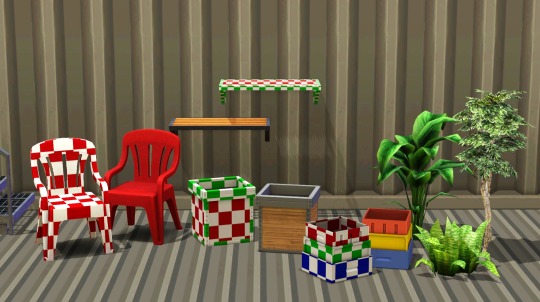
4to3 For Rent "Indoor Outdoor Plastic Chair"
-- I had my eyes set on this plastic chair when For Rent came out, so I know I have to convert it for my game. And anyone else who wants it can have it too! One channel, costs §30, found in Comfort > dining Chairs, Misc. Contains the original catalog description from TS4.
***UPDATE 12 APR 2024: PLEASE REDOWNLOAD!
***The chair's holes are not shown to be transparent. This is now updated with the corrected transparency. Sorry for the inconvenience!
4to3 Greenhouse Haven Kit "The Plant Platform by Plant-It"
-- Two channels, costs §175, found in Surfaces > Shelves, Misc. Shiftable with 7 slots. Contains the original catalog description from TS4.
Decades "JuxtaPlant" Separated Planter* and Plant
-- Self-explanatory, made the planter and plant as separate objects. The planter has the same two channels and a single slot for the plants to put on, price is reduced to §100. The plant is non recolorable and costs §75. Both are found in Decor > Plants.
Fast Lane "Stack O'Storage" as Planter*
-- Aside from being a garage clutter, this stack of crates from Fast Lane can also be a planter of your choice too, also with a slot for your plants. Priced §75, found in Decor > Plants.
Base Game Ficus and Philodendron as Separate Plants
Same with the JuxtaPlant plant, these were also 'depotted' from their vases and can be freely placed in any emptied planters. Non-recolorable, cost §150 (Ficus) and §50 (Philodendron). Both found in Decor > Plants.
*note: these planters will not work with harvestable plants, as these are made for decorative purposes only. If someone wants to remake them as functional planters, please do so!
Everything is base game compatible!
DOWNLOAD: Simfileshare | Mediafire
289 notes
·
View notes