#Backyard Oasis Tips
Explore tagged Tumblr posts
Visit Tumblr Blog
Explore Tumblr blogs with no restrictions, modern design and the best experience.
Last Seen Tumblr Blogs


Fun Fact
25% of US internet users with an annual income of $80-100K use Tumblr.
Text
Explore the process of building a Tiki hut in Collier County. We break down essential regulations, the best construction materials, and tips to elevate your backyard space.
#Tiki Huts in Collier County#Building Tiki Huts#Backyard Tiki Huts#Collier County Tiki Hut Regulations#Tiki Hut Materials#Palm Thatch Tiki Huts#Backyard Oasis Tips#Custom Tiki Huts#Florida Tiki Huts#Big Kahuna Tiki Huts#Tiki Hut Construction#Outdoor Living Spaces#Tropical Backyard Design#DIY Tiki Huts#Professional Tiki Hut Builders
1 note
·
View note
Text

Shot by Kiki London
#egypt trip#traditional art#traditional house#sand castle#sand house#salt lake#desert oasis#sahara#sahara desert#palm trees#fire place#landscaping#patio#outdoors#backyard#travel blog#travel tips#traveller#arch digest#architecture#architectural digest#real estate#home inspo#interior design#interiors#editorial fashion#egyptian#ancient egypt
5 notes
·
View notes
Text
Ristrutturazione di Piscine di Lusso: Consigli Professionali per un Aggiornamento Scintillante
Una ristrutturazione di una piscina di lusso è un investimento gratificante che può trasformare il vostro spazio esterno in un rifugio splendente. Considerando tutti gli aspetti, dalle riparazioni strutturali ai miglioramenti estetici, e coinvolgendo i professionisti giusti, potete ottenere un aggiornamento scintillante che migliora sia la bellezza che la funzionalità della vostra piscina. Che desideriate modernizzare la vostra piscina con le ultime tecnologie o creare un'oasi naturale serena, una ristrutturazione ben eseguita eleverà senza dubbio la vostra esperienza di vita all'aperto.
#villa renovation#“ ”historical preservation#“ ”luxury home#“ ”sustainable design#“ and ”smart home technology“ to help attract readers interested in these topics.#ok write Renovation expert blog title#Sure! Here are some blog title ideas for a renovation expert:#“Mastering Villa Renovation: Expert Tips and Tricks”#“Transform Your Villa: Insights from Renovation Experts”#“The Ultimate Guide to Villa Renovation by Industry Experts”#“Expert Advice on Renovating Historic Villas”#“Renovation Experts Share Secrets to a Perfect Villa Makeover”#“Luxury Villa Renovation: Professional Tips for Success”#“From Drab to Fab: Expert Villa Renovation Strategies”#“Achieving Excellence in Villa Renovation: Expert Recommendations”#“Renovation Experts Reveal How to Modernize Your Villa”#“Inside the Minds of Renovation Experts: Top Villa Transformation Tips”#Feel free to choose or modify any of these titles to best suit your blog's focus and audience.#write for pool renovation#Sure! Here are some blog title ideas focused on pool renovation:#“Dive Into Pool Renovation: Expert Tips and Tricks”#“Transform Your Backyard Oasis: The Ultimate Guide to Pool Renovation”#“Expert Advice on Renovating Your Pool for a Stunning Makeover”#“Pool Renovation: From Outdated to Outstanding”#“The Complete Pool Renovation Guide: Enhance Your Outdoor Space”#“Renovation Experts Share Secrets for the Perfect Pool Makeover”#“Luxury Pool Renovation: Professional Tips for a Sparkling Upgrade”#“Revitalize Your Pool: Expert Strategies for a Stunning Transformation”#“Achieving Excellence in Pool Renovation: Top Recommendations”#“Inside the Minds of Pool Renovation Experts: Transform Your Swimming Space”
0 notes
Text
Creating Your Dream Retreat: Backyard Oasis Ideas on a Budget
Your backyard is more than just an outdoor space; it’s a potential oasis waiting to be transformed into a serene retreat where you can unwind, entertain, and reconnect with nature. Contrary to popular belief, creating a backyard oasis doesn’t have to break the bank. With a bit of creativity and strategic planning, you can turn your outdoor area into a picturesque sanctuary without exceeding your budget. Here are some budget-friendly ideas to help you create your dream backyard oasis:
Define Your Space: Start by defining the purpose of your backyard oasis. Do you envision a cozy reading nook, a vibrant garden retreat, or a space for outdoor gatherings? Once you have a clear vision in mind, delineate different areas within your backyard accordingly. Use elements such as outdoor rugs, potted plants, or decorative screens to create distinct zones for lounging, dining, and relaxation.

Upcycled Décor: Turn trash into treasure by upcycling everyday items into stylish décor pieces for your backyard oasis. Look for discarded materials such as wine barrels, tin cans, and wooden crates that can be repurposed into planters, lanterns, or outdoor furniture. Get crafty with paint, stencils, and embellishments to transform these items into eye-catching accents that elevate the aesthetic appeal of your oasis without breaking the bank.
Thrifty Furniture Finds: Furnishing your backyard oasis doesn’t have to be costly. Shop smart by scouring thrift stores, garage sales, and online marketplaces for budget-friendly furniture finds. Look for sturdy pieces that can withstand outdoor conditions such as wrought iron chairs, wooden benches, or rattan loveseats. With a fresh coat of paint or some decorative cushions, these thrifty finds can add comfort and style to your oasis without draining your wallet.
Low-Cost Landscaping: Enhance the natural beauty of your backyard oasis with low-cost landscaping solutions. Invest in drought-resistant plants and native species that require minimal maintenance and water. Create visual interest with strategic plant placements, varying heights, and textures. Incorporate affordable landscaping elements such as gravel pathways, mulch borders, or decorative rocks to add structure and definition to your outdoor space without breaking the bank.
DIY Water Features: Transform your backyard oasis into a tranquil retreat with the soothing sound of water. Instead of splurging on expensive fountains or ponds, consider DIY water features that are budget-friendly and easy to install. Build a simple bubbling rock fountain using a waterproof basin, a submersible pump, and decorative stones. Alternatively, repurpose an old wine barrel or a salvaged trough into a charming water garden or mini pond.

In conclusion, creating a backyard oasis on a budget is entirely achievable with a little ingenuity and resourcefulness. By incorporating DIY projects, upcycled décor, thrifty finds, and low-cost landscaping solutions, you can transform your outdoor space into a picturesque retreat that reflects your personal style and provides a peaceful sanctuary for relaxation and enjoyment. Let your imagination run wild as you embark on the journey of turning your backyard into your dream oasis without exceeding your budget. For more information, visit us: galpal.net Email Us: [email protected]
#stylish home design ideas#backyard oasis ideas on a budget#expert tips for an organized home#inspiring before & after home renovation#decluttering tips to transform your living space#travel and adventure guides for women#best fashion and stylish trends
1 note
·
View note
Text
5 Outdoor Design Inspiration: Create a Chic and Cozy Patio Oasis
As the temperatures rise, it’s time to take advantage of your outdoor space and transform it into a chic and cozy patio oasis. Whether you have a small balcony or a spacious backyard, there are endless possibilities to create an inviting outdoor retreat. In this article, I will provide you some insider stylist tips, suggest the best buys for your patio makeover, and sprinkle in some useful tips…

View On WordPress
#backyard#balcony#best buys#chic#cozy#decor#how to#makeover#oasis#outdoor space#OutdoorDesign#PatioInspiration#retreat#styling tips#SummerVibes
0 notes
Text


Nestled in the heart of Lombard Drive, this exquisite 2.5-bedroom, 2-bathroom residence embodies the elegance of modern French Colonial design. A harmonious blend of light neutrals and bold dark accents graces both the interior and exterior, creating a timeless aesthetic. The home’s grand façade is framed by lush, meticulously curated gardens, where vibrant red and white hydrangeas weave a captivating tapestry around the estate. Beyond the charming exterior, a private backyard oasis awaits—an entertainer’s dream featuring a striking sunken conversation pit seamlessly encircled by a shimmering pool, perfect for intimate gatherings and luxurious outdoor living.

40 x 30
Residential Lot
2 beds, 1 nursery
2 full bathrooms
Furnished
$570,487
Requirements:
Turn bb.moveobjects on before placing. **optional** TwistedMexi has a script mod that does it for you automatically, so there is no reason to always have to type it in.
T.O.O.L by TwistedMexi.
Required CC - Please refer to the included PDF document for downloading items that were not included in the zip file, as some are still in early access.
One of the cabinets is a recolor; download the original mesh here if you load into the lot and something is missing. The file name is [KKB'sMM]Aesthete - Cabinet ver.2.
The lush red hydrangeas are a recolor; download the mesh here.
Terms of Use:
Do not re-upload my lots and claim them as your own.
You're welcome to edit or modify my builds, but please remember to credit me as the original creator!
Do not put my builds behind a paywall.
I've included some of my recolors, please refer to those posts for their TOU.
Thank you to all CC Creators.
Please let me know if there's any problem with the build. Tag @sarahelizasims so I can see your gameplay and any personal touches you've made!
I sincerely apologize for the number of zip files. I had a tough time finding a way to upload everything at once or compress the main folder as a whole. As a result, I had to create multiple folders to split up the CC. If you have any tips on compressing and optimizing large files, I would greatly appreciate your help!
Please note that this is a very CC heavy build, which might cause lag in your game. I organize CC files to their content creator in my downloads. Make sure you're actively running batch fixes on your files.
My game is DirectX11, so you may need to update your images to DX11 in the Sims 4 Studio.
📥DOWNLOAD (Available for FREE on Patreon)
Floor Plan & Photo Gallery:


#sims 4 cc#ts4 cc#sims cc#ts4 build#sims build#sims download#ts4 download#the sims 4 cc#ts4cc#thesims4#sims 4#simblr#ts4#builds#brindleton bay#newcrest#sarahelizasims#*lombard drive
483 notes
·
View notes
Text

Living in the dune field By Nikki Howard @laddersofsweetmisery
"Where do you go when your home is in someone else’s hands?/Resting on the milk palm of a man who only recently discovered
Dawn dish soap and sand can remove the grease he once told you/was a side effect of working so, so hard and
not a symptom of neglect. no worries darling./A stain he swears can no longer spread infection
when he touches where you wish he would never. I promise I am clean,/cleaner than you could ever deserve.
Where do you go when your home is at someone else’s feet?/Your honeybunch hair dangling above the tips of steel-toed boots
thrown up against the end of a bed. The discounted fusain duvet/a volcano smashed into your gumline. Eternal eruptions filling
your throat like the bulimic middle schooler you/once saw in the mirror. A return to that young girl pining
for something to end in a place you wish you were never./it would feel better if you loosened up, you’re just not trying hard enough.
Where do you go when your home is on someone else’s shoulders?/A position he promises he will raise you to
if you learn how to act right. An oasis he speaks about in pipe dreams/where other girls take it just fine. Your exposed chest heaving
next to a man finally turned away with the warning I can’t marry you/if you can’t do this. Good wives do it all. The engagement ring once thrown
from a second-story window because you forgot how to bow/properly. Back arched ever so slightly. Rainbow girl in a dustbowl.
Where do you go when your home is not a home?/Choking in a kennel when you were promised backyards.
A downward dog panting for water and his black blizzard affirmations:/I’m only trying to break you down, so I can build you up.
Saving face as the inexperienced soldier drafted before your prime/for a battlefield you were never trained to navigate. A limp cadet
with good bones crushed into sandcastles/by the hands you tried to call home."
#thinking of renaming this poem 'Verbatim' ???#writers and poets#poetry#poets corner#poets on tumblr#poem#poems on tumblr#spilled poetry#poetic#dark academia#girlhood#girl interrupted#girlblogging#this is what makes us girls#beauttiful girls#woman#feminist literature#divine feminine#trauma vent#trauma#women writers#women reading#academia#diary
6 notes
·
View notes
Photo

38 Mediterranean Garden Ideas with the Ultimate Olive Tree Aesthetic: Transform Your Outdoors into a Mediterranean Paradise 🌿✨
Discover how to create a stunning Mediterranean oasis right in your backyard! From charming olive trees to vibrant stone pathways, these ideas will inspire you to elevate your garden aesthetics and evoke the timeless beauty of the Mediterranean. Dive into expert tips and breathtaking visuals that will make your outdoor space the envy of all! 🌺🌞
Read more
#MediterraneanGarden#OliveTreeAesthetic#GardenDesign#OutdoorLiving#NatureInspiration#food#foodporn#foodlover#moodboard#food photography#inspo#kitchen#foodpics#foodie
2 notes
·
View notes
Text
What’s the Best Way to Clean Sunroom Window Seals?
Having a sunroom is like having a slice of nature inside your home. It’s a place to relax, entertain, or simply enjoy the view of your garden or backyard oasis. But to truly make the most of your sunroom, you need to keep those windows—and their seals—clean and well-maintained. You might be wondering, "What’s the best way to clean sunroom window seals?" Don’t worry; we’ve got you covered!
Understanding Sunroom Window Seals
Before diving into cleaning methods, let’s talk about why window seals are essential in a sunroom. These seals play a crucial role in maintaining the energy efficiency of your space by preventing drafts and moisture from entering. If your window seals are dirty or damaged, they can compromise your sunroom’s comfort and lead to more significant issues like mold or water damage.
Preparing for Cleaning Your Sunroom Window Seals
Gather Your Cleaning Supplies
To get started, you’ll need a few essential cleaning supplies:
Soft cloths or microfiber towels
Mild detergent or a specialized window cleaner
A spray bottle
A soft brush (to reach into crevices)
A vacuum with a brush attachment (optional)
Inspect the Seals
Before you start cleaning, take a moment to inspect the window seals. Look for any cracks, gaps, or signs of deterioration. If you notice any significant damage, it might be worth consulting a professional to ensure your sunroom remains energy-efficient.
Step-by-Step Cleaning Process for Sunroom Window Seals
1. Dust and Debris Removal
First things first—remove any dust or debris that has accumulated around the window seals. You can use a soft brush or a vacuum with a brush attachment to gently clean this area. This step is crucial because it prevents dirt from becoming mud when you apply your cleaning solution.
2. Prepare Your Cleaning Solution
Fill a spray bottle with a mixture of warm water and a few drops of mild detergent. You can also use a specialized window cleaner if you prefer. Avoid harsh chemicals, as they can break down the sealant over time.
3. Apply the Cleaning Solution
Spray the cleaning solution directly onto the window seals, making sure to coat them thoroughly. Allow the solution to sit for a minute or two. This will help loosen any grime or sticky residue.
4. Gently Scrub the Seals
Using a soft cloth or sponge, gently scrub the window seals, focusing on any areas with visible dirt or mold. For harder-to-reach spots, a soft brush can help get into tight corners without causing damage.
5. Rinse and Dry
After scrubbing, take a clean, damp cloth and wipe down the seals to remove any soapy residue. Then, use a dry cloth to ensure that no moisture is left behind. This is particularly important in preventing mold growth.
Tips for Maintaining Sunroom Window Seals
Regular Inspections
To keep your sunroom in top shape, make it a habit to inspect window seals regularly, especially before the changing of seasons. Catching any small issues before they become significant problems can save you time and money.
Avoid Harsh Chemicals
As mentioned earlier, stick to mild detergents or natural cleaning solutions. Harsh chemicals can erode the integrity of the seals, leading to leaks and drafts.
Weatherproofing
Consider using weatherstripping or caulking to enhance the integrity of your window seals. This can provide an additional layer of protection against the elements.
Seek Professional Help
If you find that your window seals are worn out or damaged beyond simple cleaning, it’s wise to consult a professional. They can provide insights into repairs or replacements that can help maintain your sunroom's comfort and energy efficiency.
Enhancing Your Sunroom Experience
Cleaning and maintaining your sunroom window seals not only preserves your space but also enhances your overall experience in this beautiful area of your home. A clean and well-maintained sunroom is inviting and allows you to enjoy the natural light and views without distractions or discomfort.
Your Dream Sunroom Starts Here
Ready to take your sunroom to the next level? At Screenmobile, we specialize in custom sunroom solutions that offer year-round comfort and style. Our sunrooms are designed to enhance your home’s value while providing a cozy retreat that you can enjoy no matter the season.
Imagine having a stylish space that protects you from the elements while allowing you to bask in the beauty of your surroundings. Our team is dedicated to helping you design a sunroom that fits your lifestyle and enhances your home.
Don’t wait to transform your outdoor living experience! Visit Screenmobile of South Bend for a consultation and explore our custom sunroom options today. Your dream sunroom awaits!
2 notes
·
View notes
Text
Where Should You Plant Trees for Maximum Benefits?

Planting trees isn't just about adding a touch of green to your landscape; it's like creating your own personal outdoor oasis. Trees are the unsung heroes of our environment, providing shade, improving air quality, and even boosting your property's value. But where you plant these leafy wonders can make all the difference. In this guide, we'll show you how to plant trees strategically to maximize their benefits, from creating a cool, shady retreat to blocking out those pesky winds. Let's get planting!
1. Plant Trees to Maximize Shade
Want to turn your home into a cool oasis during the scorching summer months? Planting shade trees is like installing a natural air conditioner. By strategically placing trees on the east, west, and southwest sides of your home, you can block the sun's rays and keep your indoor spaces cool and comfortable. And the best part? Deciduous trees, like those that shed their leaves in the fall, offer a two-for-one deal. They provide shade in the summer and let the sunshine in during the winter, helping you save on heating costs. It's like having a natural thermostat in your backyard!
2. Create Natural Windbreaks
Tired of battling those pesky winds? Planting trees as windbreaks is like building a natural fortress to protect your property. A strategically placed row of trees can shield your home, garden, and outdoor structures from the elements. Imagine having a cozy, wind-free retreat in your own backyard. To get the most out of your windbreak, plant them on the side of your property that faces the prevailing winds, usually the north or northwest. And for year-round protection, evergreen trees are your best bet. Plant them in staggered rows, and watch them work their magic in blocking those pesky winds. It's like having your own personal windshield!
3. Improve Energy Efficiency
Want to save some green on your energy bills? Trees aren't just for looks; they can also be your secret weapon for energy conservation. In addition to providing shade in the summer, strategically planting trees to the north or northwest of your home can act as a natural windbreak, keeping your house cozy and warm during the chilly winter months. It's like having your own personal energy-saving shield. And here's a bonus tip: planting smaller shrubs and trees close to your house can create an insulating layer of air, further enhancing your home's energy efficiency. Your trees are working harder than you think!
4. Enhance Privacy and Noise Reduction
Want to create a private oasis in your backyard? Planting trees is like building a natural fence that provides privacy and peace of mind. By strategically placing dense, fast-growing trees around your property, you can shield your outdoor spaces from prying eyes and create a more intimate atmosphere. And trees reduce noise pollution. Plant tall trees in a staggered formation near the source of the noise, and let them soak up the unwanted sounds. Evergreens are like a year-round privacy curtain, providing a thick barrier against noise and unwanted views. So, plant away and enjoy your newfound privacy!
5. Encourage Wildlife and Biodiversity
Want to create a wildlife haven in your backyard? Planting native trees is like rolling out the red carpet for your feathered and furry friends. These trees provide food and shelter for local wildlife, making your yard a nature lover's paradise. To attract birds, pollinators, and small mammals, group multiple trees together in a secluded corner of your yard. It's like building a mini wildlife sanctuary!
Just a friendly reminder: If you're inviting wildlife into your backyard, avoid planting trees too close to your home or driveway. Falling leaves and animal activity can be a bit messy, so choose a spot that's away from high-traffic areas. Let your wildlife guests enjoy their natural habitat without causing any inconveniences.
6. Consider Soil and Drainage Conditions
Before you start planting, it's important to understand your soil's personality. Some trees prefer moist, soggy soil, while others are more drought-tolerant. It's like finding the perfect roommate for your yard! To figure out your soil's preferences, you can test it yourself or consult with a local expert in tree care service in Portland, Oregon. They’ll be able to recommend tree species that will thrive in your specific conditions, ensuring your trees have a happy and healthy home.
7. Avoid Planting Too Close to Structures
Think of your trees like your neighbors. You want them to be friendly and harmonious, but not too close for comfort. Planting trees too close to your home, driveway, or underground utilities can lead to some serious drama. As trees grow, their roots can become invasive, causing damage to foundations, plumbing, or sidewalks. It's like having a neighbor who digs up your garden or accidentally cuts your power.
To avoid any tree-related conflicts, make sure to plant large trees at least 15-20 feet away from your home and structures. And always look up before you plant! Trees that grow too tall can become a safety hazard, so be mindful of overhead power lines. Let's keep the peace in your neighborhood and avoid any tree-related drama.
Final Thoughts
Planting trees is like creating a masterpiece in your backyard. It's not just about choosing the right colors (or tree species), but also about placing them strategically. Think of your trees as pieces of a puzzle, each with a unique role to play. By considering factors like sunlight, wind direction, soil conditions, and proximity to structures, you can create a harmonious landscape that benefits you in countless ways.
If you're feeling overwhelmed by all the choices, don't hesitate to consult with a local certified arborist. They're like tree whisperers, with expert knowledge of the best species and placements for your specific landscape. With their guidance, you can create a thriving garden that will bring joy and beauty to your home for years to come.
3 notes
·
View notes
Note
Would Curtis get an above ground pool or dig one up himself?
If Curtis is gonna change his backyard space, he is going all the way.
Meaning he is getting everyone together and they are gonna pitch in.
Ella is excited, she wants to run the large equipment they have to rent to dig up the space. Sophia is already planning on how often she is coming over to Uncle Curtis's and Auntie Y/N to play... Kraken. You didn't think it was something like mermaids right? That kid loves her cryptids like her auntie does.
Honey is all concerned about the placement because you don't want any of the gardens disrupted. Those were Lillians gardens and you take great pride in how you brought them back to life. Curtis assures you that he wouldnt do anything that will damage those gardens. But you're so excited! You loved Jade's pool in Florida and it feels like such a luxery.
Grey is already doing the math in how much concrete they are gonna need to pour and then laying out the pool liner and such. Yona is helping him with the math, bringing up lots of great tips in how to get the most out of their pool space.
Edgar is debating with Ella about running the equipment, he is certified and might be the better choice. Picture Ella rolling her eyes at him with a smart remark.
Claude is already going online to find them the best deal and break out a shovel to start digging. This girl is ready to get a pool party started. Tanya offered to supervise while handing Timmy a shovel to help. Timmy is not as enthusiastic about that idea but can't wait to do some awesome cannonballs into the pool.
And Curtis, hell he is getting more excited about this, not only does he get to build something, he and his girl get to have a little oasis to share. Already is is planning on installing a hot tub too, but that's a surprise for you later. He already had those plans drawn up too.
Thank you for the ask Babes!

4 notes
·
View notes
Text
The Ultimate Guide to Building Tiki Huts in Collier County

If you’re dreaming of creating the perfect tropical paradise in your backyard, building Tiki huts in Collier County is the way to go. Tiki huts provide a relaxing, island-inspired atmosphere that’s ideal for entertaining or simply enjoying your outdoor space. However, the process of constructing a Tiki hut involves more than just selecting the right materials. From understanding local regulations to choosing the best building techniques, this guide will help you turn your vision into reality.
Local Regulations for Building Tiki Huts in Collier County
Before starting any construction, it's essential to understand the local regulations in Collier County regarding building Tiki huts. In many areas, Tiki huts may not require permits because they are considered temporary structures. However, each county has its own building codes, so it’s crucial to check with the local authorities for any specific guidelines.
In Collier County, Tiki huts that are constructed using natural materials like palm fronds may be exempt from permits, as long as they don’t have electrical or plumbing installations. To avoid delays or fines, consult the Collier County Building Department to ensure that your project meets all local requirements.
Partnering with an experienced company like Big Kahuna Tiki Huts ensures that all regulations are followed, making the process hassle-free.

Choosing the Best Materials for Your Tiki Hut
The materials used in building Tiki huts in Collier County play a crucial role in determining their durability and aesthetics. The primary material for authentic Tiki huts is palm thatch, which gives the structure its signature tropical look. Palm fronds not only provide natural insulation, keeping the hut cool, but they are also sustainable and eco-friendly.
In addition to palm thatch, many homeowners choose pressure-treated pine for the frame due to its durability and resistance to the elements. This material ensures that your Tiki hut can withstand Florida’s weather conditions, including heavy rain and strong winds.
For those looking for long-term maintenance, synthetic thatch is another option. It replicates the look of natural palm but lasts longer and requires less upkeep.
Tips for Creating the Perfect Backyard Oasis
Building a Tiki hut is about more than just the structure; it’s about creating an inviting space that fits your lifestyle. Here are some tips to consider:
Location and SizeChoose a location in your backyard that maximizes the functionality and enjoyment of the Tiki hut. Consider placing it near a pool or outdoor kitchen to create a complete outdoor living area. The size of the hut should match the space available and your intended use—whether it’s for lounging, dining, or entertaining.
CustomizationOne of the advantages of building your own Tiki hut is the ability to customize it. You can add features like built-in seating, lighting, and even a bar area to enhance the tropical vibe. By working with a professional like Big Kahuna Tiki Huts, you can design a hut that reflects your personal style and complements your outdoor space.
LandscapingTo create a true tropical oasis, incorporate lush landscaping around your Tiki hut. Palm trees, bamboo, and other tropical plants add to the ambiance and help blend the structure seamlessly into your backyard.
Lighting and DécorOutdoor lighting can make your Tiki hut usable even after the sun goes down. String lights, torches, and lanterns are great ways to add ambiance. Additionally, tropical-themed furniture, such as rattan chairs or hammocks, can complete the look of your outdoor paradise.
Professional Construction vs. DIY
While it might be tempting to build a Tiki hut on your own, hiring professionals offers several benefits. Experienced builders like Big Kahuna Tiki Huts are familiar with the specific construction techniques needed for Tiki huts in Collier County, ensuring that the structure is safe and durable. They also have access to high-quality materials and can handle the permitting process if required.
Attempting a DIY project without the necessary skills could lead to structural issues, poor material choice, and even legal problems if local regulations are not met. Working with professionals guarantees a smooth, efficient construction process, resulting in a beautiful and long-lasting Tiki hut.
Conclusion
Building Tiki huts in Collier County can transform your backyard into a tropical oasis, perfect for relaxation and entertainment. By understanding local regulations, choosing the best materials, and considering key design elements, you’ll create a space that enhances your outdoor living experience. Whether you opt for natural palm thatch or a more modern synthetic option, the end result will be a unique and inviting addition to your home.
For expert guidance and professional construction, trust Big Kahuna Tiki Huts to bring your dream Tiki hut to life. Call us at 1-877-249-4038 to start planning your backyard paradise today.
#Tiki Huts in Collier County#Building Tiki Huts#Backyard Tiki Huts#Collier County Tiki Hut Regulations#Tiki Hut Materials#Palm Thatch Tiki Huts#Backyard Oasis Tips#Custom Tiki Huts#Florida Tiki Huts#Big Kahuna Tiki Huts#Tiki Hut Construction#Outdoor Living Spaces#Tropical Backyard Design#DIY Tiki Huts#Professional Tiki Hut Builders
1 note
·
View note
Text
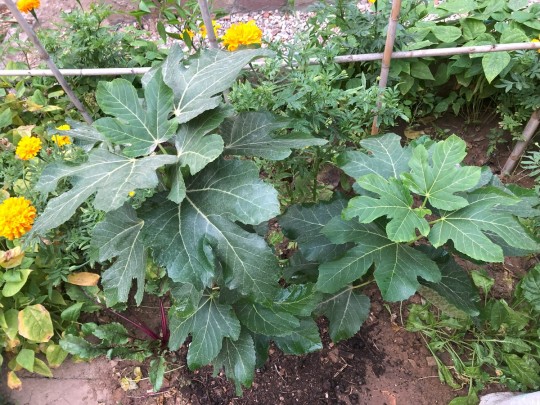
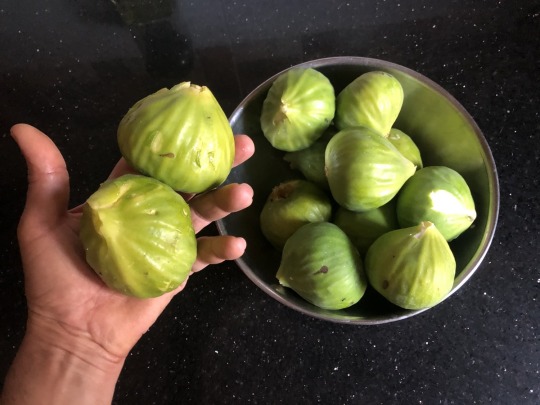
🌳🏡 A Step-by-Step Guide to Planting Thriving Fig Trees in Your Backyard! 🌿🍃
Ever dreamed of plucking fresh, sweet figs straight from your own tree? 🌞✨ Now you can make that dream a reality with our easy-to-follow guide! From choosing the perfect spot and variety to planting, watering, and harvesting, we’ve got all the tips you need to grow lush, productive fig trees in your backyard. 🌱💧
Discover how to:
Select the ideal location for maximum sunlight ☀️ Pick the perfect fig variety for your taste and climate 🌱 Prepare the soil and plant your fig tree with care 🛠️ Maintain your tree with proper watering, mulching, and pruning 💧✂️

Enjoy a bountiful harvest of delicious, homegrown figs 🍇🍴 Join our fig-loving community and share your gardening journey! Whether you're a seasoned gardener or a newbie, our guide will help you cultivate a backyard oasis filled with thriving fig trees. 🌳🏡
Ready to get started? Dive into our guide now and watch your fig trees flourish!🌳✨
A Step by Step Guide to Planting Thriving Fig Trees in Your Backyard
#gardening#garden#gardening tips#lovegardening#gyo#gardening uk#gardenchat#organic gardening#backyard#fig#figs#gardeningtips#FigTreeGuide#BackyardGardening#HomegrownFigs#GreenThumb#gardens#gardenblr#gardencore#gardeners on tumblr#home and garden#my garden#urban gardening#plants#fruit trees
4 notes
·
View notes
Text


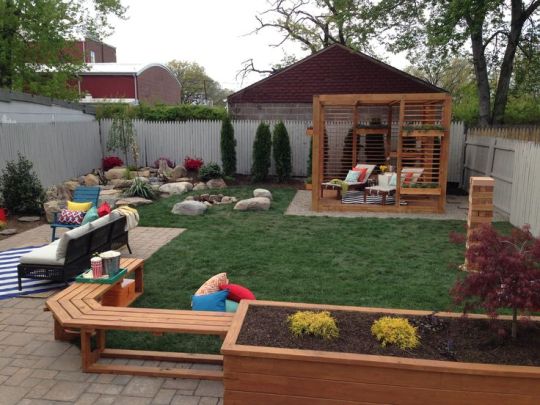

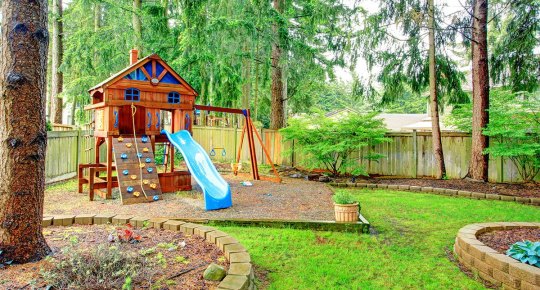
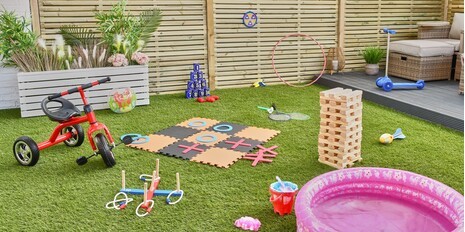
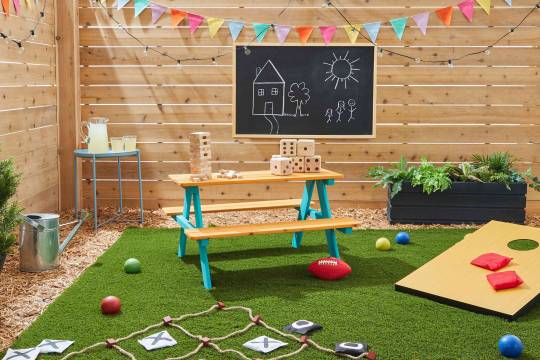

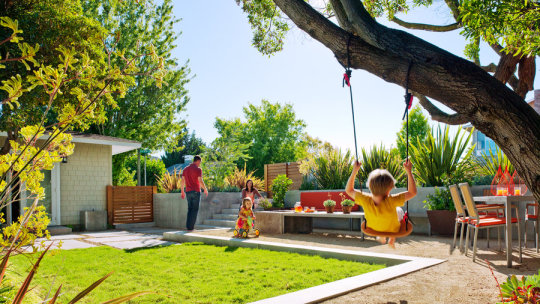
Transform your backyard into a kids' paradise with our landscape design tips! 🌳✨Discover how to create a relaxing oasis where little ones can explore, play, and unwind.
4 notes
·
View notes
Text

Easily Build a Multi-Step Waterfall in Your Backyard
Transforming your backyard into a tranquil oasis can be a rewarding endeavor. One way to achieve this is by adding a multi-step waterfall, which not only enhances the aesthetic appeal but also brings the soothing sounds of flowing water to your outdoor space. In this comprehensive guide, we'll walk you through the process of easily building a multi-step waterfall in your backyard, turning it into a serene retreat.
Planning Your Waterfall Design
Before diving into the construction process, it's essential to plan out your waterfall design. Consider factors such as the size of your backyard, the desired location for the waterfall, and the overall aesthetic you wish to achieve. Sketch out a rough design and decide on the number of steps you want in your waterfall.
Choosing the Right Location
Select a location in your backyard that offers sufficient space for the waterfall and complements the existing landscape. Ensure that there is easy access to a power source for the pump and that the terrain allows for proper drainage.
Designing the Steps
Decide on the number and size of steps for your waterfall based on the available space and personal preference. Opt for natural-looking materials such as stone or faux rock to create a visually appealing and durable structure.
Gathering Materials and Tools
Once you have finalized your waterfall design, it's time to gather the necessary materials and tools for the construction process. Here's a list of items you'll need:
Pond liner
Water pump
Flexible tubing
Rocks or stones for the waterfall steps
Shovel
Level
Rubber mallet
Gloves
Waterproof sealant
Building Your Multi-Step Waterfall
Now that you have everything you need, it's time to start building your multi-step waterfall. Follow these step-by-step instructions for a seamless construction process:
Step 1: Excavate the Area
Begin by digging a shallow pond at the base of your waterfall. Use a shovel to excavate the area, ensuring that it is slightly larger than the dimensions of your pond liner. Level the bottom of the pond to ensure stability.
Step 2: Install the Pond Liner
Place the pond liner into the excavated area, ensuring that it overlaps the edges by at least 6 inches. Smooth out any wrinkles and folds, pressing the liner firmly into place.
Step 3: Position the Water Pump
Place the water pump at the base of the pond, ensuring that it is securely positioned and level. Connect the flexible tubing to the pump, running it up the backside of the waterfall structure.
Step 4: Arrange the Rocks
Start arranging the rocks or stones to create the steps of your waterfall. Begin at the base of the pond and work your way up, ensuring that each step is securely positioned and stable. Use a rubber mallet to adjust the rocks as needed.
Step 5: Create Water Flow
Connect the flexible tubing to the top of the waterfall structure, allowing water to flow down the steps. Adjust the positioning of the rocks to control the flow and create a natural-looking cascade.
Step 6: Seal the Joints
Once the waterfall structure is in place, seal any gaps or joints between the rocks using waterproof sealant. This will prevent water from leaking out and ensure the longevity of your waterfall.
Maintenance Tips
To keep your multi-step waterfall in optimal condition, follow these maintenance tips:
Regularly check the water level and top it up as needed to prevent the pump from running dry.
Clean the pump and filter regularly to remove debris and prevent clogging.
Trim any overhanging vegetation to prevent leaves and debris from falling into the pond.
Inspect the waterfall structure for any signs of damage or wear and tear, and make repairs as necessary.
Building a multi-step waterfall in your backyard is a rewarding project that can transform your outdoor space into a tranquil retreat. By following the steps outlined in this guide and incorporating your own creative flair, you can easily create a stunning water feature that enhances the beauty and ambiance of your backyard.
FAQs
Q1: How much does it cost to build a multi-step waterfall in your backyard?
A1: The cost of building a multi-step waterfall varies depending on factors such as the size of the waterfall, the materials used, and whether you choose to DIY or hire a professional. On average, you can expect to spend anywhere from a few hundred to several thousand dollars.
Q2: Do I need any special skills or experience to build a multi-step waterfall?
A2: While some basic DIY skills are helpful, you don't necessarily need any special expertise to build a multi-step waterfall. Following a detailed guide, like the one provided here, and taking your time during the construction process can help you achieve professional-looking results.
Q3: Can I incorporate lighting into my multi-step waterfall design?
A3: Yes, incorporating lighting into your waterfall design can enhance its visual appeal, especially at night. Consider installing waterproof LED lights along the steps or around the pond to create a stunning nighttime ambiance.
3 notes
·
View notes
Text
Welcome to my blog!
Welcome to my first ever blog!
Whether you're a seasoned gardener or just starting out, I am here to help you cultivate your own piece of paradise. I believe that gardening is more than just a hobby—it's a way to connect with nature, relax, and create something beautiful.
In this blog, you'll find a variety of resources to guide you on your gardening journey. Here’s a glimpse of what you can expect to come in the future:
🌱 Gardening Tips
My gardening tips section will be filled with practical advice to help your garden thrive. From soil preparation to pest control, I will cover all the essentials to ensure your plants grow healthy and strong.
🌿 Plant Care Guides
Each plant has its own unique needs. My plant care guides will provide detailed information on how to care for different types of plants, from popular houseplants to exotic flowers. Learn the best watering practices, ideal light conditions, and proper fertilization techniques.
🍂 Seasonal Gardening
Gardening is a year-round activity, and I have tips and guides for every season. Discover what to plant in spring, how to protect your garden in winter, and everything in between. My seasonal gardening section helps you stay on top of your gardening game no matter the time of year.
🛠 DIY Projects
Get creative with DIY projects! Whether you’re looking to build a raised garden bed, create a compost bin, or design your own plant markers, I will have step-by-step guides to help you complete your projects with ease.
🌸 Garden Design Ideas
A beautiful garden starts with a great design. My garden design ideas will inspire you to transform your space into a stunning oasis. From small balcony gardens to sprawling backyard landscapes, find ideas and tips to make your garden dreams come true.
Let’s Grow Together
I believe in the power of community and encourage you to share your gardening experiences, ask questions, and connect with fellow gardeners. Together, we can learn, grow, and create beautiful gardens.
Thank you for visiting. I am excited to embark on this gardening journey with you. Stay tuned for our upcoming posts and happy gardening!
#gardening#plant care#diy projects#garden design#seasonal gardening#gardening tips#plants#nature#garden#flowers#spring#summer
4 notes
·
View notes