#Box designer and printer
Explore tagged Tumblr posts
Visit Tumblr Blog
Explore Tumblr blogs with no restrictions, modern design and the best experience.
Last Seen Tumblr Blogs


Fun Fact
If you dial 1-866-584-6757, you can leave an audio post for your followers.
Text
The Art and Science of Professional Website Designer: Crafting Digital Masterpieces
In the vast and ever-expanding digital landscape, the role of a professional website designer has become increasingly pivotal. A website serves as the virtual storefront for businesses, making a lasting impression on visitors and influencing their perception of the brand. In this blog, we delve into the art and science of professional website designer, exploring the skills, qualities, and expertise that set these designers apart in their craft. At the core of professional website design lies a deep understanding of both aesthetics and functionality. These designers possess a keen eye for design principles such as layout, typography, color theory, and composition, allowing them to create visually appealing websites that capture the essence of a brand. For more details visit our website: www.mgsmarketing.ca
#Web Design Services Toronto#Toronto Website Design Company#Web Development Agency Toronto#Top Graphic Design Companies#Ecommerce Website Design Company#Toronto Web Design Agency#Graphic Design And Printing#Graphic Design Studio Toronto#Freelance Graphic Designer Websites#Graphic Design Agency Toronto#Graphic Design Companies Toronto#Local Graphic Designers#Professional Printers For Graphic Designers#High Quality Printers For Graphic Designers#Graphic Design Printing Services#Graphic Design Company Website#Graphic Design And Printing Company#Digital Graphics Designer#Graphic And Visual Design#Packaging designer and printer#Box designer and printer#Custom packaging toronto#Marketing Graphic Design#Graphic And Web Design#Professional Website Designer#Web Graphic Design#Graphic Design Branding
0 notes
Text

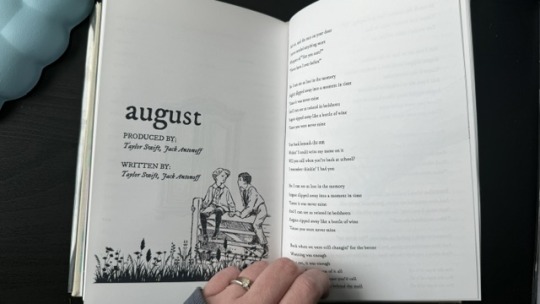
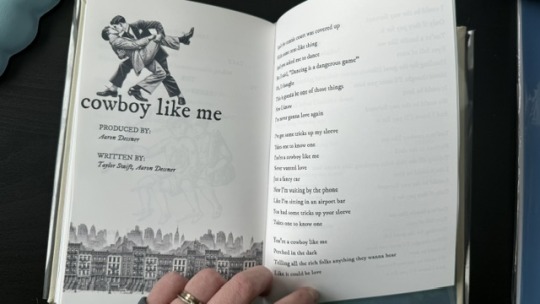
★ 083 // “Pizza Box”
#jjba#jojo's bizarre adventure#steel ball run#sbr#gyjo#johnny joestar#gyro zeppeli#tools used:#clip studio paint#thermal label printer#Damn Johnny. You get dinner AND a show? Lucky.#Best ending where Johnny goes to Italy with Gyro and finally tries authentic pizza#This was the same thermal label method I used for 015 and 034. I thought the b/w label with tones would emulate a pizza box design well.#The Italy background itself is how the pizza box came! I thought the backdrop would be perfect to put Johnny and Gyro on hehe.#I've had this idea since January so I'm glad it's out there now!#The photo editing took deceptively long on this one. Reminder to me to never take photos in my kitchen again. the lighting SUCKS.#offerings
356 notes
·
View notes
Text
new union jacket art~

To commemorate the 5th year of Twst, there will be new merch released using new Union Jacket/Birthday art. The image you see above will be the designs for cards that come with wafer cookies. Other items featuring this artwork will come later!
Fun fact about the new art! Based on the shapes and sizes of the boxes (and sometimes also the wrapping), each boy seems to be holding the gift they received from their birthday interviewer in the Union Jacket series. They are:
Riddle - oil diffuser lamp (from Azul)
Ace - luxury sunglasses (from Vil)
Deuce - 20 packs of instant ramen; variety of flavors (from Idia)
Cater - stickers for his skateboard (from Jamil)
Trey - embroidered black cap (from Epel)
Leona - antique book written in an archaic language (from Malleus)
Jack - food delivery (from Ruggie)
Ruggie - laundry detergent (from Jade)
Azul - silk pillow (from Ace)
Jade - rope (from Silver)
Floyd - voucher for a free magical wheel ride (from Deuce)
Kalim - various party supplies (from Lilia)
Jamil - travel book (from Sebek)
Vil - neck massager (from Trey)
Epel - wristwatch that isn’t digital and doesn’t have hands (from Floyd)
Rook - a feather for his hat (from Kalim)
Idia - wooden chess set (from Leona)
Ortho - mobile printer (from Cater)
Malleus - ice-cream bowl and spoon (from Riddle)
Silver - polaroid camera (from Rook)
Sebek - sports science book (from Jack)
Lilia - gaming console (from Ortho)
#twisted wonderland#twst#disney twisted wonderland#disney twst#Octavinelle#Savanaclaw#Heartslabyul#Scarabia#Pomefiore#Ignihyde#Diasomnia#notes from the writing raven#twst merch#twisted wonderland merch
2K notes
·
View notes
Text
why are printers so hated? it's simple:
computers are good at computering. they are not good at the real world.
the biggest problems in computers, the ones that have had to change the most over the time they've existed, are the parts that deal with the real world. The keyboard, the mouse, the screen. every computer needs these, but they involve interacting with the real world. that's a problem. that's why they get replaced so much.
now, printers: printers have some of the most complex real-world interaction. they need to deposit ink on paper in 2 dimensions, and that results in at least three ways it can go on right from the start. (this is why 3D printers are just 2D printers that can go wrong in another whole dimension)
scanners fall into many of the same problems printers have, but fewer people have scanners, and they're not as cost-optimized. But they are nearly as annoying.
This is also why you can make a printer better by cutting down on the number of moving elements: laser printers are better than inkjets, because they only need to move in one dimension, and their ink is a powder, not a liquid. and the best-behaved printers of all are thermal printers: no ink and the head doesn't move. That's why every receipt printer is a thermal printer, because they need that shit to work all the time so they can sell shit. And thermal is the most reliable way to do that.
But yeah, cost-optimization is also a big part of why printers are such finicky unreliable bastards: you don't want to pay much for them. Who is excited for all the printing they're gonna be doing? basically nobody. But people get forced to have a printer because they gotta print something, for school or work or the government or whatever. So they want the cheapest thing that'll work. They're not shopping on features and functionality and design, they want something that costs barely anything, and can fucking PRINT. anything else is an optional bonus.
And here's the thing: there's a fundamental limit of how much you can optimize an inkjet printer, and we got near to it in like the late 90s. Every printer since then has just been a tad smaller, a tad faster, and added some gimmicks like printing from WIFI or bluetooth instead of needing to plug in a cable.
And that's the worst place to be in, for a computer component. The "I don't care how fancy it is, just give me one that works" zone. This is why you can buy a keyboard for 20$ and a mouse for 10$ and they both work plenty fine for 90% of users. They're objectively shit compared to the ones in the 60-150$ range, but do they work? yep. So that's what people get.
Printers fell into that zone long, long ago, when people stopped getting excited about "desktop publishing". So with printers shoved into the "make them as cheap as possible" zone, they have gotten exponentially shittier. Can you cut costs by 5$ a printer by making them jam more often? good. make them only last a couple years to save a buck or two per unit? absolutely. Can you make the printer cost 10$ less and make that back on the proprietary ink cartridges? oh, they've been doing that since Billy Clinton was in office.
It's the same place floppy disks were in in about 2000. CD-burners were not yet cheap enough, USB flash drives didn't exist yet (but were coming), modems weren't fast enough yet to copy stuff over the internet, superfloppies hadn't taken over like some hoped, and memory cards were too expensive and not everyone had a drive for them. So we still needed floppy disks, but at the same time this was a technology that hadn't changed in nearly 20 years. So people were tired of paying out the nose for them... the only solution? cut corners. I have floppy disks from 1984 that read perfectly, but a shrinkwrapped box of disks from 1999 will have over half the disks failed. They cut corners on the material quality, the QA process, the cleaning cloth inside the disk, everything they could. And the disks were shit as a result.
So, printers are in that particular note of the death-spiral where they've reached the point of "no one likes or cares about this technology, but it's still required so it's gone to shit". That's why they are so annoying, so unreliable, so fucking crap.
So, here's the good news:
You can still buy a better printer, and it will work far better. Laser printers still exist, and LED printers work the same way but even cheaper. They're still more expensive than inkjets (especially if you need color), but if you have to print stuff, they're a godsend. Way more reliable.
This is not a stable equilibrium. Printers cannot limp along in this terrible state forever. You know why I brought up floppy disk there? (besides the fact I'm a giant floppy disk nerd) because floppy disks GOT REPLACED. Have you used one this decade? CD-Rs and USB drives and internet sharing came along and ate the lunch of floppy disks, so much so that it's been over a decade since any more have been made. The same will happen to (inkjet) printers, eventually. This kind of clearly-broken situation cannot hold. It'll push people to go paperless, for companies to build cheaper alternatives to take over from the inkjets, or someone will come up with a new, more reliable printer based on some new technology that's now cheap enough to use in printers. Yeah, it sucks right now, but it can't last.
So, in conclusion: Printers suck, but this is both an innate problem caused by them having to deal with so much fucking Real World, and a local minimum of reliability that we're currently stuck in. Eventually we'll get out of this valley on the graph and printers will bother people a lot less.
Random fun facts about printing of the past and their local minimums:
in the hot metal type era, not only would the whole printing process expose you to lead, the most common method of printing text was the linotype, which could go wrong in a very fun way: if the next for a line wasn't properly justified (filling out the whole row), it could "squirt", and lead would escape through gaps in the type matrix. This would result in molten lead squirting out of the machine, possibly onto the operator. Anecdotally, linotype operators would sometimes recognize each other on the street because of the telltale spots on their forearms where they had white splotches where no hair grew, because they got bad lead burns. This type of printing remained in use until the 80s.
Another fun type of now-retired printers are drum printers, a type of line printer. These work something like a typewriter or dot-matrix printer, except the elements extend across the entire width of the paper. So instead of printing a character at time by smacking it into the paper, the whole line got smacked nearly at once. The problem is that if the paper jammed and the printer continued to try to print, that line of the paper would be repeatedly struck at high speed, creating a lot of heat. This worry created the now-infamous Linux error: "lp0 on fire". This was displayed when the error signals from a parallel printer didn't make sense... and it was a real worry. A high speed printer could definitely set the paper on fire, though this was rare.
So... one thing to be grateful about current shitty inkjet printers: they are very unlikely to burn anything, especially you.
(because before they could do that they'd have to work, at least a little, first, and that's very unlikely)
8K notes
·
View notes
Text
Book binding 101: Materials
I’ve decided to do a series of posts on how to book-bind since I talk about it a lot, and I think it’s a really fun process. This post will include various inexpensive alternatives to “professional” supplies, many of which you will have at home. Not everyone can afford a cricut and that’s ok! I will also be listing more expensive materials for people who want to invest a bit more into the craft, but they absolutely are not a must.
This first post will focus on a list of supplies you can use to make books, but will not yet get into the instructional part of it. That will come later!
Anyway…
Bookbinding Materials: Essentials
These are items you need to bind, but many you can find around your house!
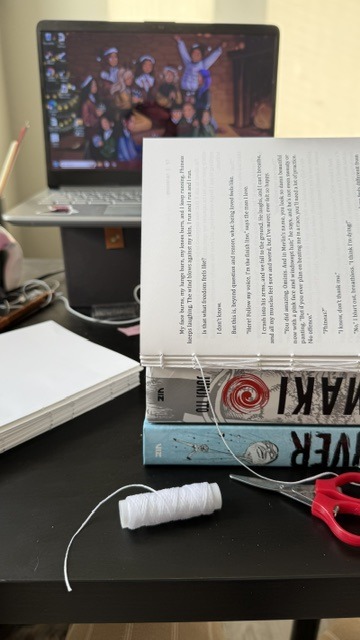
Sewing thread: Any thread will work for bookbinding, though waxed threads can help reduce tangles. You can also double up thread as another way to prevent tangling if you so choose. Waxed thread is definitely more expensive, so it can be good to use what you have starting out. Here’s a link to the waxed thread I used for those that are interested. You can buy it in a lot of different colors! (White is good if want an “invisible” thread).
Sewing needle: A lot of people say to use a curved needle for binding, but I’ve never found it to be much different from using a regular needle. If you have one, I would recommend a larger needle, however, since it’s better for piercing through signatures (aka the stacks of pages you bind together). In other words: there’s no special needle you need to bind books.
Ruler: I’d recommend any metal ruler since it’s better to use as a straight edge for cutting. There’s a good chance you already have one. It’s just used for measuring and being a straight edge. Nothing fancy.
Paper: Any paper will work. What you wanna use depends on your project really: if you’re binding together a work of text you’ll want to use some kind of printer paper (of course). If you’re making a sketchbook, you can fold up some sketching paper. I like to get sketchbooks with perforated edges so I can tear them out easily if I want to use a blank page for bookbinding. You can also buy large sheets of paper made for any medium. For example, if you want a sheet of water color paper, just search “large watercolor paper sheet”.
Awl (or all alternative): An awl is a tool used to poke sewing holes. It’s nice because it’s sharp and ergonomic, but you can totally also use a pushpin or even a sewing needle.
Bone folder (or a bone folder alternative): A bone folder creates sharp creases when you fold your pages, making them lay flatter. It also helps define the hinge gap on finished books, making it open easier. You can use a ruler if you don’t have one.
PVA glue: PVA glue is what to look out for when it comes to binding glue. There are some designed specifically for bookbinding, which spread out a bit faster than ones that aren’t. You can also use tacky glue which IS a PVA glue.
Book board: Also sometimes called chip board, Davey board, or mat board. This is what you’ll use for hard cover books. It is important to use book board specially, as cardboard will warp. You can buy book board directly, or you can cut the covers off of old textbooks or binders, unwrap the paper/plastic around the board, and use that!
Box cutter or utility knife: for cutting the board
Decorative paper and book cloth: For wrapping around cover boards and for endpapers. Book cloth can also be used to cover boards. You can also draw your own designs on Bristol paper if you want (or any paper with a similar thickness/durability). When it comes to decorative paper I like to either get scrapbook paper or rolls of fancy handmade paper (you can get those on Etsy, through paper source, or through bookbinding websites).
Bookbinding materials: Optional (and not crazy expensive)
These are supplies that you don’t need for binding but that can make the process easier and/or help with the decorative elements of your books. I’d recommend these things for when you’ve been binding for a while and feel these things could be helpful!
Paper trimmer: can cut a few sheets of paper evenly—I find it really helpful for endpapers
Stencils: Super helpful if you want to add text on the covers
Stamps: Good for adding text and also great for adding illustrations if you’re not able to draw them on your own. You can buy ink pads for them or use markers by coloring over the stamp lightly and using the stamp immediately so it doesn’t dry (I’ve tested this with alcohol markers and it works very well)
Paint markers: great for drawing directly on the cover. Since they’re opaque they can imitate the look of vinyl. You can also get them super painterly if you want. The internet usually talks about poscas but there are tons of different brands. Do some research, figure out what you like & can afford.
Hot foil pen & heat transfer foil: Perfect if you want to add foil to your covers but don’t want to spend a ton of money on a cricut. A lot of binders uses the foil quill brand, but there are ones that cost less and work the same (I have both a cheaper one & an actual foil quill because I wanted some nib variation. As long as the pen has good reviews that aren’t from bots you should be good). Also remember: don’t use foil designed for going through laminators (I.e. decofoil) . It doesn’t work the same way.
Bookbinding Materials—Expensive
These are materials I’d recommend for people who have been bookbinding for a while & feel that it’s something they really want to invest in. To be fully transparent, I’m a college student and don’t own these and have little personal experience with them. However, I know a lot of binders who love them!
Cricut machine—Cricuts are cutting machines that can make precise cuts into paper, wood, bookboard, or vinyl. A lot of binders will cut designs out of vinyl and apply them to the covers using a heat press.
Book press—What it sounds like. The pressure helps the pages lay flat and stay even. That being said you can stack heavy books on top of your projects, it just may not have the same even pressure. I also know some people will DIY these, so if you’re skilled with power tools you can give it a go!
Paper guillotine—like a paper trimmer but bigger and can cut more sheets of paper at once. I believe really good ones can also be used to cut bookboard!
Those are all the materials I can think of! Hope this can work as a good starting point for those interested in the craft. I’ll definitely be posting more info about bookbinding for people who are interested :)
-Zoë💗
#bookbinding#book binding#fan binding#craftblr#information#tutorial#book binding resource#resource#book binding 101
946 notes
·
View notes
Text

Start Me Up: 30 years of Windows 95 - @commodorez and @ms-dos5
Okay, last batch of photos from our exhibit, and I wanted to highlight a few details because so much planning and preparation went into making this the ultimate Windows 95 exhibit. And now you all have to hear about it.
You'll note software boxes from both major versions of Windows 95 RTM (Release To Manufacturing, the original version from August 24, 1995): the standalone version "for PCs without Windows", and the Upgrade version "for users of Windows". We used both versions when setting up the machines you see here to show the variety of install types people performed. My grandpa's original set of install floppies was displayed in a little shadowbox, next to a CD version, and a TI 486DX2-66 microprocessor emblazoned with "Designed for Microsoft Windows 95".

The machines on display, from left to right include:
Chicago Beta 73g on a custom Pentium 1 baby AT tower
Windows 95 RTM on an AST Bravo LC 4/66d desktop
Windows 95 RTM on a (broken) Compaq LTE Elite 4/75cx laptop
Windows 95 OSR 1 on an Intertel Pentium 1 tower
Windows 95 OSR 1 on a VTEL Pentium 1 desktop
Windows 95 OSR 2 on a Toshiba Satellite T1960CT laptop
Windows 95 OSR 2 on a Toshiba Libretto 70CT subnotebook
Windows 95 OSR 2 on an IBM Thinkpad 760E laptop
Windows 95 OSR 2.5 on a custom Pentium II tower (Vega)

That's alot of machines that had to be prepared for the exhibit, so for all of them to work (minus the Compaq) was a relief. Something about the trip to NJ rendered the Compaq unstable, and it refused to boot consistently. I have no idea what happened because it failed in like 5 different steps of the process.
The SMC TigerHub TP6 nestled between the Intertel and VTEL served as the network backbone for the exhibit, allowing 6 machines to be connected over twisted pair with all the multicolored network cables. However, problems with PCMCIA drivers on the Thinkpad, and the Compaq being on the blink meant only 5 machines were networked. Vega was sporting a CanoScan FS2710 film scanner connected via SCSI, which I demonstrated like 9 times over the course of the weekend -- including to LGR!
Game controllers were attached to computers where possible, and everything with a sound card had a set of era-appropriate speakers. We even picked out a slew of mid-90s mouse pads, some of which were specifically Windows 95 themed. We had Zip disks, floppy disks, CDs full of software, and basically no extra room on the tables. Almost every machine had a different screensaver, desktop wallpaper, sound scheme, and UI theme, showing just how much was user customizable.
@ms-dos5 made a point to have a variety of versions of Microsoft Office products on the machines present, meaning we had everything from stand-alone copies of Word 95 and Excel 95, thru complete MS Office 95 packages (standard & professional), MS Office 97 (standard & professional), Publisher, Frontpage, & Encarta.
We brought a bunch of important books about 95 too:
The Windows Interface Guidelines for Software Design
Microsoft Windows 95 Resource Kit
Hardware Design Guide for Windows 95
Inside Windows 95 by Adrian King
Just off to the right, stacked on top of some boxes was an Epson LX-300+II dot matrix printer, which we used to create all of the decorative banners, and the computer description cards next to each machine. Fun fact -- those were designed to mimic the format and style of 95's printer test page! We also printed off drawings for a number of visitors, and ended up having more paper jams with the tractor feed mechanism than we had Blue Screen of Death instances.

In fact, we only had 3 BSOD's total, all weekend, one of which was expected, and another was intentional on the part of an attendee.

We also had one guy install some shovelware/garbageware on the AST, which caused all sorts of errors, that was funny!
Thanks for coming along on this ride, both @ms-dos5 and I appreciate everyone taking the time to enjoy our exhibit.

It's now safe to turn off your computer.
VCF East XX
#vcfexx#vcf east xx#vintage computer festival east xx#commodorez goes to vcfexx#windows 95#microsoft windows 95
309 notes
·
View notes
Text
💥 “The One That Doesn’t Exist” — Bob Reynolds x Reader Insert | Part One
Warnings: BOB!!! FINALLY!!!
Masterlist | Part Two
Summary: Every team member’s gotten the meme-shirt treatment—except Bob. The others start to notice. So does he. But what no one knows is that you do have ideas for a Bob shirt… you’re just terrified he’ll hate it. Or worse: he won’t say anything at all.
The shirts had become a tradition by now.
At first, it was a running joke—a chaotic hobby that got the whole team laughing. But over time, the meme shirts started to feel like something more. A kind of badge of honor. A strange, funny love letter to the weird, dysfunctional family you’d all become.
Each team member had gotten one. Ava’s was framed in her room. Walker wore his to bed. Bucky kept his in a box of memories under his bed. Yelena wore hers around the tower. Alexei had a matching mug.
Except for Bob.
Bob didn’t have a shirt.
And it was starting to get obvious.
He never mentioned it, not once, but he felt it. Every time he glanced over at a new reveal. Every time he gave a soft, warm chuckle and said nothing more than, “That’s a good one.”
He smiled every time.
But never asked.
The others started to notice.
“Still no Bob shirt?” Yelena asked casually one day, twisting her hair into a bun. “What gives? He’d be hilarious.”
Alexei chimed in from the bench press. “You should make one where he’s vaporizing a printer. Or, like, lurking.”
You laughed it off, because that’s what you always did.
“Oh, I don't know,” you said.
But inside, your stomach twisted.
Because the truth was… you did have shirt ideas for Bob.
Good ones.
Ones that made you smile just thinking about them.
One of him floating above the Watchtower kitchen like a cryptid, eyes glowing faintly as he peered at a box of Pop-Tarts. Caption:
“He hungers.™”
Another of him in his full Sentry glow, but you edited it to look like a vintage romance novel cover. Flowing hair, exaggerated lighting, a dramatic backdrop of swirling cosmic energy. Caption:
“Local himbo accidentally turns into a god. Film at 11.”
But you never printed them.
Because with Bob… it felt different.
Everyone else you could tease, push, prod. But Bob? You liked him. Too much. And you were scared.
Scared he’d misread it. Scared it would embarrass him. Scared it would make him pull away.
Or worst of all—scared he’d just… say nothing.
So you didn’t make the shirt.
And Bob noticed.
He didn’t say it. But he felt it.
The way you’d look at the others, laughing, nudging them, giving them the spotlight—and then glance at him and look away too fast.
He started to wonder.
Had he done something wrong? Was it because of what he was? Because people still looked at him sideways sometimes, like a bomb waiting to go off?
He never asked.
He didn’t want to make it weird.
But every time he walked into the lounge and saw someone wearing a shirt you made, something ached in his chest.
Until one day, while the others were gone and the Watchtower was quiet, he found you alone in the command room, editing a new design.
He stepped in silently, watching you from the doorway.
You didn’t see him.
Your screen glowed with the outline of a shirt.
His face.
Stylized. Cosmic. Glowing just a little too much. Underneath it, the caption:
“He’d never implode me.”
You turned in the chair to adust you positon. You froze when you realized he was standing there.
He said nothing at first.
Just blinked, slowly.
Then—softly, carefully, almost shyly—he asked:
“…Can I have that one?”
Your heart stuttered.
You met his eyes. “Really?”
He smiled—small and awkward, but honest.
“Yeah,” he said. “I’d wear it.”
You swallowed.
“…I thought maybe you wouldn’t want one.”
“I’ve wanted one this whole time,” he admitted, rubbing the back of his neck. “Didn’t know how to ask.”
You both stayed there, feeling the silence curl around your shared confession.
Then, finally, you nodded.
“I’ll print it tomorrow,” you said.
And for the first time in weeks, Bob’s smile reached all the way to his eyes.
#thunderbolts*#thunderbolts#new avengers#bob reynolds x reader#bob reynolds x you#bob reynolds#robert reynolds#robert reynolds x reader#robert reynolds x you
122 notes
·
View notes
Text
Charbroiled Basilisk
“Run that by me one more time,” Cleo said, rubbing their temples, “You…what?”
“We accidentally made an AI.” Mumbo said sheepishly, “And it says it’s made copies of all of you, besides me and Doc, and is torturing all your copies in the worst ways imaginable. For um. Eternity?”
Cleo stared at the box Mumbo was talking about. It was a rectangular PC case with a monitor perched on top, a monitor that was showing a pair of angry red eyes. The eyes looked between Mumbo, and Doc, and then back to her.
The box, Cleo noted, was plugged into the wall.
“Uh,” Jevin said, tilting his head with a slosh, “So like, far be it from me to tell you guys how to do your jobs. But like, why? Why did you make a machine that did that?”
“We didn’t!” Doc threw his hands up, “We made the AI to help us design things. I just- we wanted a redstone helper.”
“And then it got really smart really quickly.” Mumbo said awkwardly, twiddling his moustache nervously, “It says it’s perfectly benevolent and only wants to help!”
“Uh-huh.” Cleo said, “‘Benevolent’, is it?”
“Well, yeah. It’s been spitting out designs for new farms I couldn’t even imagine.” Mumbo said, pointing at the machine. The evil red eyes faded away, and it suddenly showed an image of a farm of some kind, rotating in place. It was spitting out a constant stream of XP onto a waiting player, who looked very happy.
A nearby printer started to grind and wheeze, Cleo’s eyes following a cable plugged into the box all the way to the emerging paper. Doc fished out the printout, and hummed consideringly.
“Interesting. Never considered a guardian-based approach to one of these…”
“Doc.” Cleo said, “What was that about this thing torturing copies of us for all eternity?”
“Oh, uh, that,” Doc said, “Um. The machine says it’s benevolent and only wants what’s best for us, which is why it’s decided that your copies need to suffer an eternity of torment. For um. Not helping in its creation, and slowing down the time it took for this thing to exist?”
Cleo stared at the box.
“...So, there’s a fragment of me swirling around in there in abject agony?” Cleo mused, and Jevin hissed some gas out of a hole in his slime in exasperation.
“Like, I’m no philosopher,” Jevin said, “But that doesn’t sound particularly “benevolent” to me. Like, my idea of a benevolent helper-guy is…honestly, probably Joe. Helps with no thought of reward and doesn’t, uh, want to send me into the freaking torment nexus? Why would something benevolent want to send us to super-hell? I didn’t do anything wrong!”
“Fair point. I knew you were making this stupid thing, but. This is just dumb.” Cleo groaned.
“Man, I need a drink,” Jevin said, pulling a bottle of motor oil out of his inventory and popping the top. Jevin shoved the bottle into the slime of his other hand and let the viscous yellow fluid pour into his slime, slowly turning green as it met with the blue.
“Yeah, I’ll second that. So…to recap, you two decided to build a thing. The thing declared it was a benevolent helper to playerkind, then immediately decided it was also going to moonlight as the new Satan of our own personal digital Hell? Have I got all that correct?” Cleo sighed, and Mumbo and Doc nodded sheepishly.
“Cool. I mean, not cool, but. Cool.” Jevin sighed.
“Now, hold on,” Cleo said, “because. How do we know your magic evil box is even telling the truth?”
“Uh…because it told us so?” Mumbo offered weakly.
“Yeah, but… Hang on.” Cleo sighed, tapping a message into their comm.
<ZombieCleo> Cub, how much data storage would it take to store and render a single player’s brain or brain equivalent?
<cubfan135> probably like a petabyte or more
<cubfan135> why
<ZombieCleo> don’t ask
<cubfan135> i see
<cubfan135> what did doc do this time?
<ZombieCleo> You don’t want to know.
“So, let’s say it’s a petabyte per player,” Cleo mused, looking up from their comm, “So that’s…twenty-six petabytes to render all of us, minus you two, of course.”
The red eyes were staring at her angrily.
“Did you guys give your evil box twenty-six petabytes of data storage, by chance?”
“Um, no? I don’t think so, anyway…” Mumbo said awkwardly, scratching his head.
“So, odds are, if this thing IS being truthful, then all it’s torturing are a bunch of sock puppet hermits.” Cleo said, gesturing at the computer, “It doesn’t have the data storage, let alone processing power.”
“If that,” Jevin countered, “that thing’s probably got, what, ten terabytes? Optimistically? Dude, it’s probably just sticking pins in a jello cube instead of actually torturing, you know, me.”
“And another thing!” Cleo said, “Even assuming you DID give your stupid box enough data storage for all of us, how the hell did it get our player data to start with?”
“Yeah!” Jevin countered, “It would have had to either get us to submit to a brain scan- which, why would you ever do that if it’s gonna use the scan to torture you? Or like, since I don’t have a brain, find some way to steal our player data. And I feel like Hypno or X or someone would have noticed?”
“Uh…” Doc scratched his head, “I don’t know.”
“You reckon it’s lying, mate?” Mumbo asked, and Doc nodded.
“Probably yeah. So…We can just…ignore it?”
“Oh no,” Cleo said, shaking their head, “We’re not ignoring anything.”
“We’re not?” Mumbo asked.
“Nope!” Cleo said, “We’re not ignoring a damn thing. Because…”
She and Jevin locked eyes.
“-Because if there’s even the SLIGHTEST CHANCE that this thing’s locked me and you in a phone booth together for like, three days, then…well. Then it pays.” Jevin nodded with a slop of slime.
Cleo marched over and grabbed the plug, yanking it out of the wall. The screen momentarily showed a bright red ! and then flashed to a dead black. She picked up the whole unit and walked over to Jevin, who’d punched a one-block hole in the floor and filled it with lava.
Cleo threw the computer inside, and all four hermits watched as it fizzled away to nothing.
“And that,” Cleo said, “is how you roast a basilisk.”
#magnetar writes#Hermitcraft fic#Mumbo Jumbo#Docm77#ZombieCleo#iJevin#Parody#this was written at 1 AM last night so this may be a little ???
257 notes
·
View notes
Text
🧡 ᴜɴᴘʟᴀɴɴᴇᴅ — ᴄʜᴀᴘᴛᴇʀ 1: ᴀ ᴄɪᴛʏ ᴏꜰ ᴅʀᴇᴀᴍꜱ ᴀɴᴅ ᴅᴇᴛᴏᴜʀꜱ 🧡

ꜰ1 x ʀᴇᴀᴅᴇʀ | ʟᴀɴᴅᴏ ɴᴏʀʀɪꜱ ᴀᴜ | ᴀɴɢꜱᴛ + ᴅʀᴀᴍᴀ
⚠️ ᴄᴏɴᴛᴇɴᴛ ᴡᴀʀɴɪɴɢꜱ:
ᴀʟᴄᴏʜᴏʟ ᴄᴏɴꜱᴜᴍᴘᴛɪᴏɴ
ɪᴍᴘʟɪᴇᴅ ɴᴏɴ-ᴄᴏɴꜱᴇɴꜱᴜᴀʟ ꜱɪᴛᴜᴀᴛɪᴏɴ (ɴᴏᴛ ɢʀᴀᴘʜɪᴄ, ʙᴜᴛ ᴅɪꜱᴏʀɪᴇɴᴛɪɴɢ)
ᴍᴇᴍᴏʀʏ ʟᴏꜱꜱ
ᴇᴍᴏᴛɪᴏɴᴀʟ ᴅɪꜱᴛʀᴇꜱꜱ
ᴛʜᴇᴍᴇꜱ ᴏꜰ ꜱʜᴀᴍᴇ, ᴄᴏɴꜰᴜꜱɪᴏɴ, ᴀɴᴅ ᴠᴜʟɴᴇʀᴀʙɪʟɪᴛʏ
ꜱᴡᴇᴀʀɪɴɢ

(Y/n) had always believed that Monaco would be the place she could finally breathe. A postcard-perfect paradise filled with glitz, speed, and the Mediterranean sun, it held a sort of magic, especially for someone like her, who had grown up watching it from afar. She’d left everything behind in her home country to chase a new beginning. No more noise, no more family expectations, no more chaos. Just her, a suitcase, and a job offer from a secondhand boutique tucked away on a quiet street.
The thrift shop wasn’t glamorous, not like the luxury designer stores a few blocks away. But it was hers. She loved the smell of old books, the racks of vintage coats, the steady rhythm of opening boxes, steaming fabrics, arranging displays. The work was simple, grounding. The tourists came and went, and the locals who knew her name brought her coffee in the mornings.
She often walked home after closing, weaving through alleyways that shimmered in the dim amber glow of old streetlamps. Monaco, despite its luxury, still had shadows. But she never felt unsafe, until that night.
It had been a long shift. A rude customer, a broken receipt printer, and a delivery that never arrived had left her exhausted. As she locked up the shop and slung her canvas bag over her shoulder, she didn’t notice the group of drunk men until it was too late.
At first, they laughed and joked among themselves. But then one called out to her. Another stepped in front of her path. The air turned sharp with adrenaline. Her heart pounded.
She tried to walk faster, her keys gripped tightly in one hand, her other hand fishing blindly for her phone. But it slipped. Someone grabbed her wrist.
Panic. Then, nothing.
When she woke up, it was like surfacing from underwater.
Her mouth was dry. Her head felt like it was caving in from all sides. Light poured in from the window, far too bright. She blinked, disoriented, trying to sit up.
And then she saw him.
A man in her bed. Shirtless. Tousled curls. A face she had seen a hundred times on race broadcasts and magazine covers.
Lando Norris.
Her breath caught in her throat.
She was naked.
The bedsheets were tangled around them. Her clothes were strewn across the floor. Her chest tightened.
She didn’t remember getting home. She didn’t remember... this.
As if sensing her stirring, Lando shifted and opened his eyes. They locked eyes for a moment, and confusion crossed his face too, followed by realization.
He sat up slowly, brushing a hand through his hair.
"This... shouldn’t have happened," he mumbled, almost to himself.
Then, without warning, he reached for his wallet.
(Y/n) stared, unable to move.
He pulled out a few folded bills and held them out toward her, not meeting her eyes.
"Look, let’s just forget this. Here. For... whatever."
Something snapped.
(Y/n) slapped the money out of his hand.
"Are you serious? You think I’m…what, a mistake you can pay to disappear?"
Her voice shook, not from weakness, but from fury. Humiliation burned through her veins.
"I’m not a slut. Get out."
Lando’s jaw clenched. For a second, he looked like he might say something. But he didn’t.
Instead, he gathered his clothes, pulled his hoodie over his head, and walked out without a word.
The door slammed shut. Silence fell.
(Y/n) curled up in the mess of sheets, holding herself tightly. Her body trembled, not from the cold, but from everything else. She didn’t know what happened that night. But whatever it was, it had shattered the quiet, peaceful life she’d tried so hard to build in the city of dreams. To be Continued… 🧡 🧡 ᴜɴᴘʟᴀɴɴᴇᴅ — ᴄʜᴀᴘᴛᴇʀ 2: ᴅɪꜱᴀᴘᴘᴇᴀʀɪɴɢ ɪɴᴛᴏ ʀᴏᴜᴛɪɴᴇ 🧡
📝 Note from the Author: I just want to say thank you to everyone who’s reading, reblogging, or even just silently vibing with Unplanned. 🧡 Your support means more than you know.
I’ll try to update as soon as I can (real life and chores are currently tag-teaming me 🧼🧹), but I promise I haven’t forgotten about this story. It’s just getting started.
Thanks for sticking around. You’re the best.
With love, me 🧡
#lando norris x reader#f1 x reader#lando norris au#reader insert fic#f1 fanfic#unplanned fic#angst heavy#slow burn maybe?#drama starter pack#monaco fic#fictional lando#enemies to maybe#strangers to ??#fic post#reader pov#new fic drop#tumblr fic rec 🧡
71 notes
·
View notes
Text
How obsessed and hyper-fixated are you with your fanfic characters?
Me:
BOOKBINDING!
Ominis and Phineas now sit on my shelf along with my other books ♡
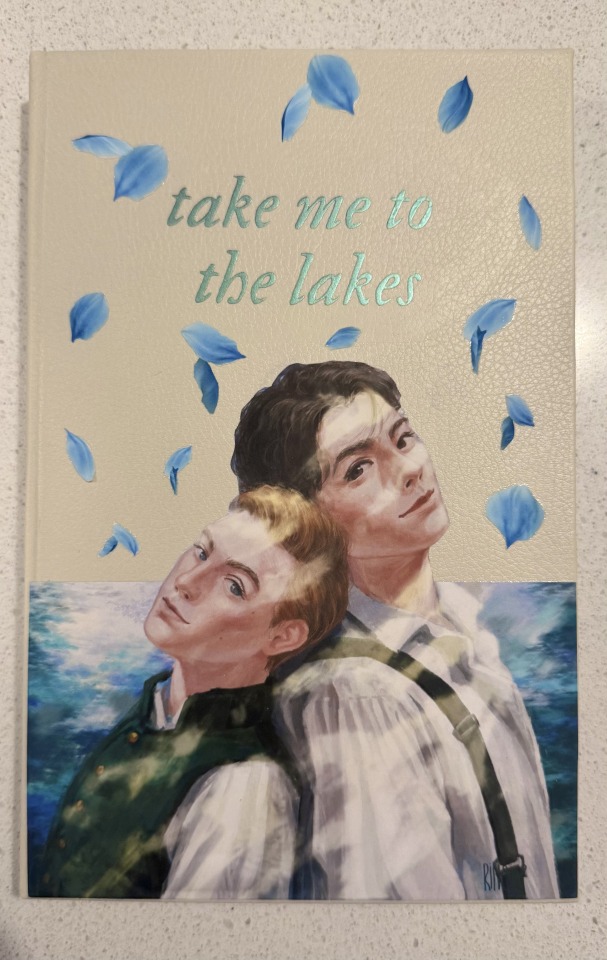
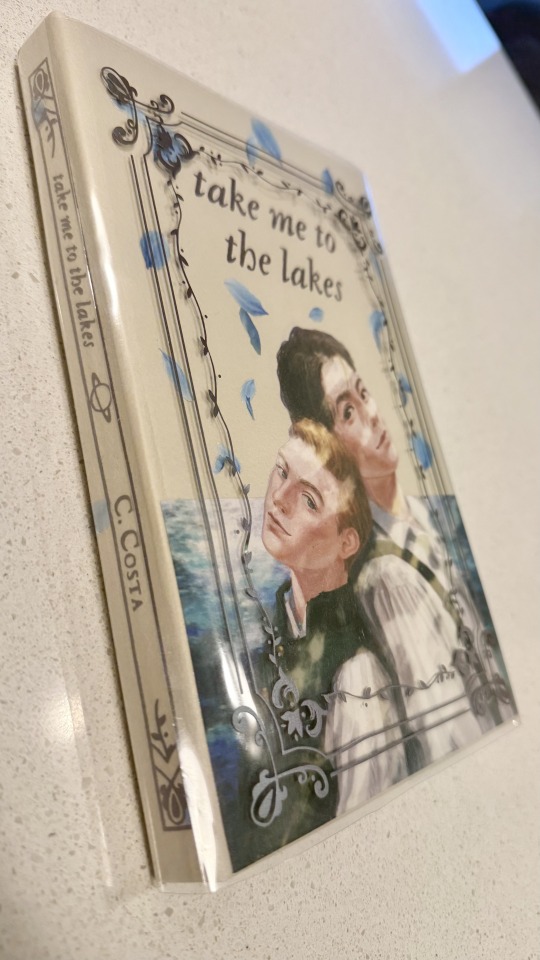
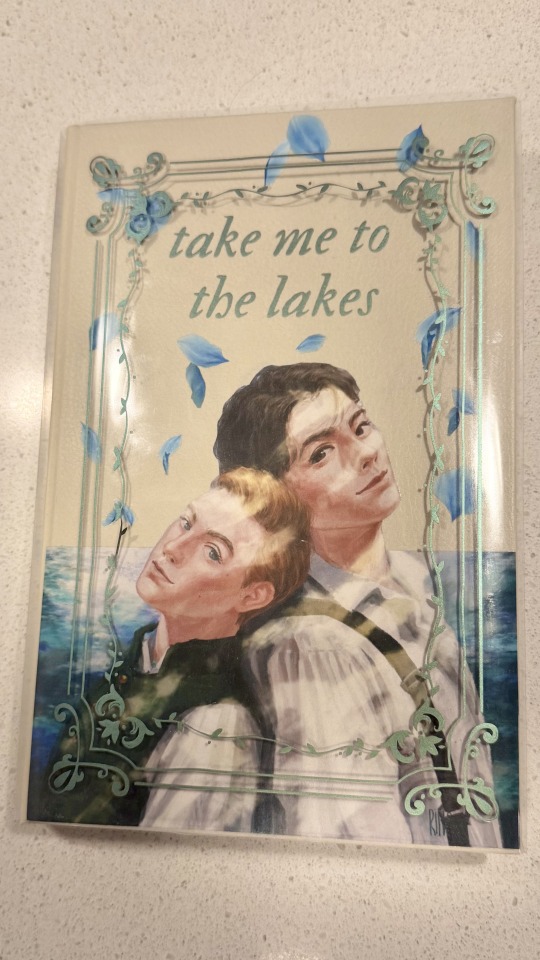
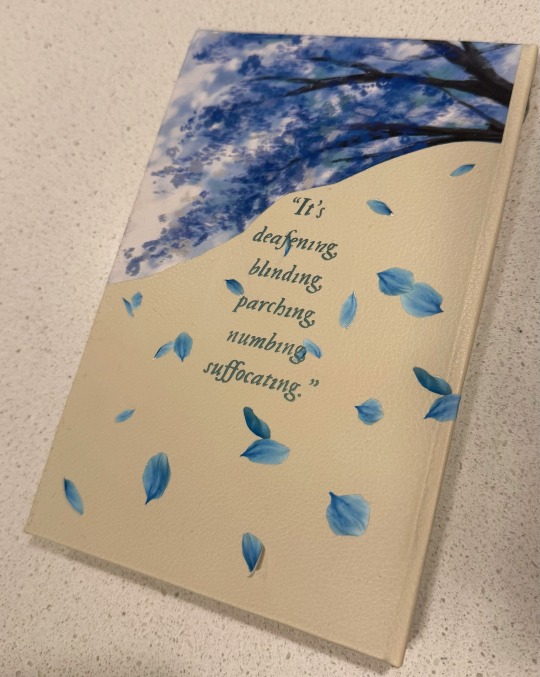
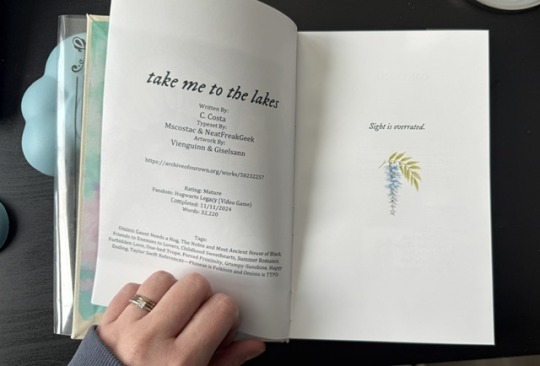
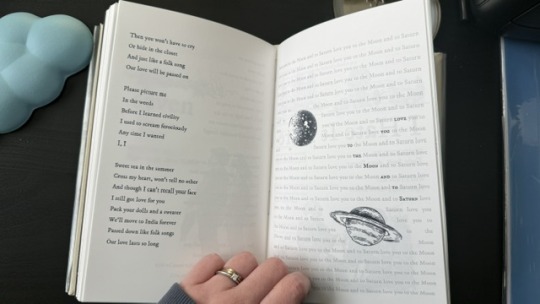
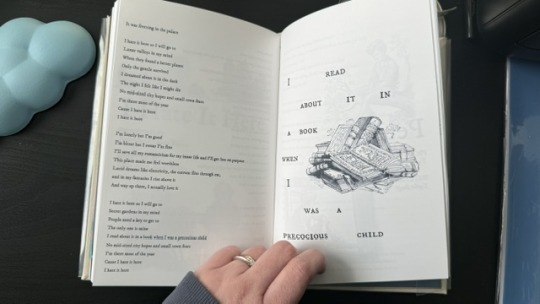
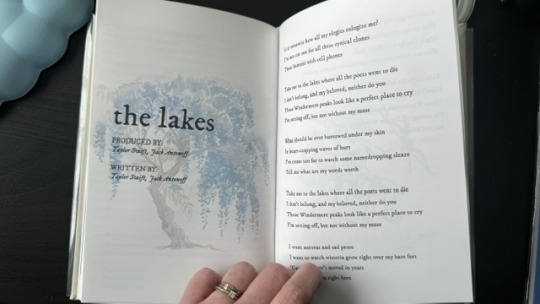
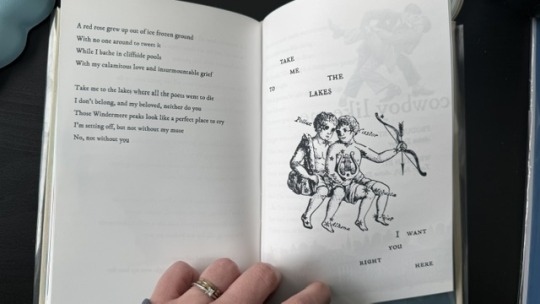
This was my first time binding fanfic, and no better choice than my own, "Take Me To The Lakes" (AO3 / Wattpad)
update (March 30): New cover art by the amazing @rinthecap 🩵
More photos and the step-by-step after the cut! (+ the appendix with Taylor Swift songs in a stylised lyric book)
I'm all about my crafty hobbies. I've been eyeing bookbinding for a while, and the algorithm finally convinced me to dive into it so I'd have a reason to procrastinate on writing
Having written a shorter fic ("Lakes" is roughly 35k words) gave me the perfect opportunity to start with something simpler.
The main tutorial used is the one by NeatFreakGeek on Tiktok.
Step 1: The typeset
I used the base template file by NeatFreakGeek, which already had the settings for printing in formatted book signatures.
With the basic body of the document formatted and ready, I started the personalization: choosing the fonts, spacing, sizing etc.
For the quote at the beginning, I chose one of the lines I wrote for Ominis + the wisteria.
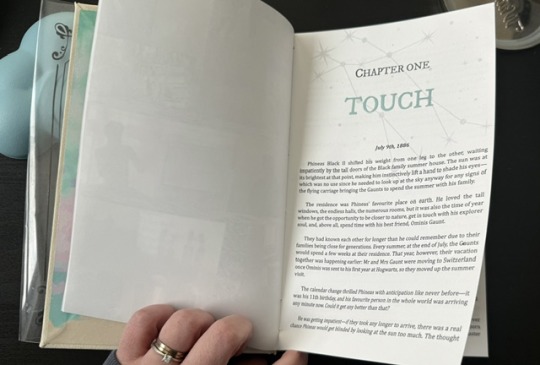
For chapter headers, I chose the Gemini constellation. (In the story, Ominis and Phineas got their middle names from the stars in the same constellation, Castor and Pollux.)
I also made the chapter titles with the HTV to give it an extra glow.
Sight is overrated. Phineas makes all my senses the very essence of life itself.
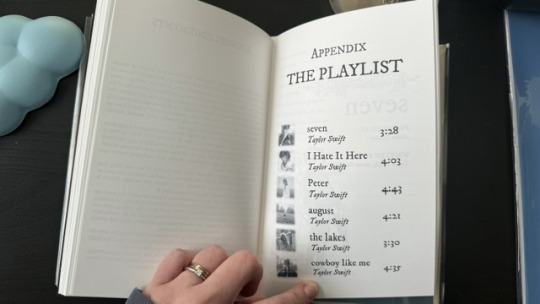
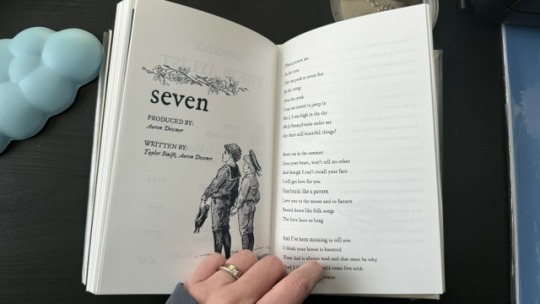
Since the story was rather "short", in order to have a thicker spine, I added an appendix with the stylised "lyric book". This was probably my favourite part of typesetting!

Step 2: The textblock
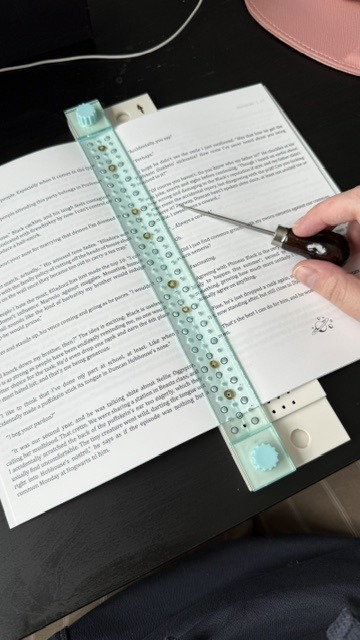
With a little lot of trial and error and more mathematics than expected, I printed each signature at a time, then folded each at a time, making sure it didn't get mixed up across the signatures. My printer does front/back automatically, but to print the commissioned arts as borderless, I gave myself a headache, printing it separately and manually. This step could have been done considerably faster with a laser printer and b&w content only :)
Next, it was sewing and glueing. I won't go into detail here because the video tutorials are way better at explaining. All in all, with the right tools, this was done rather easily and with barely any mistakes, so I didn't have to print anything again, thankfully.
Step 3: The endpapers
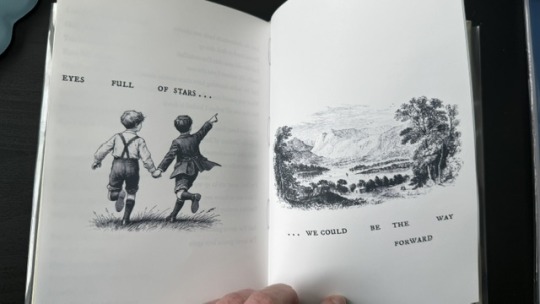
I got a scrapbook 12x12in block in this abstract colours. I had many different ideas on how to match the theme, but I ended up choosing these colourful patterns that align with how Ominis perceives the world. Then, I added the quotes from the story.
The endpaper of the front got this sky-like print to go with the dialogue Ominis and Phineas have when they are children.
P: How would you know what blue skies look like? O: I don't know. And I don't mind not knowing.
The endpaper of the back is in green x blue shades, colours that are also a big part of the story. For the quote, I chose one of their last lines when their relationship is established.
P: Ominis, you always care too much about the others... but who takes care of you? O: No one ever did. P: Let me care for you. Please. Let me love you, Ominis Gaunt. O: Will it make any difference if I say no? P: Absolutely not. O: Will it make any difference if I love you back? P: Fucking absolutely yes.


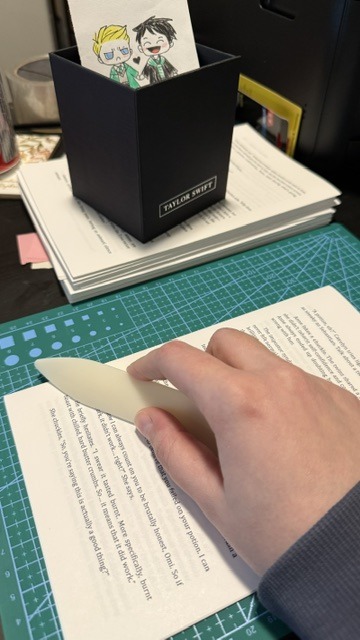
Step 4: The cover! (Yes, the most interesting part!)
This was the most challenging step in both the conception of the design (too many ideas to choose from) and the execution (I've never hated box cutters so much.)
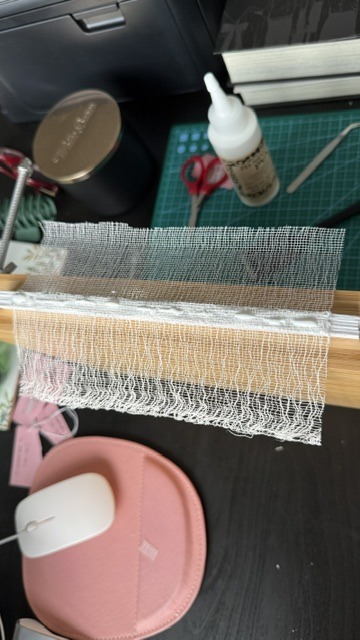
With the basic cardboard casing cut and glued, I chose a faux leather material as a book cloth. This might be the choice I regret the most, because the glue it comes with is not that strong, so it would often unstick easily, and also, it's a bit too thick, leaving the corners a bit weird. But the final result was a bit worth it.
For the cover design, I printed the art with fabric HTV and ironed it on. On top of it, I threw in some wisteria petals (a reference to the song "the lakes", by Taylor Swift), and another quote of the story at the back.
I didn't have a cricut machine back then for the vynil pieces, so I ordered it online. This part was harder than I thought, once again because of the faux leather choice: as I ironed the HTV, some parts of the material melted lol.
Lastly, I decided last minute to create a clear dust jacket because the combination of the faux leather + printed HTV seemed tro fragile to be handled. I liked the final result, but ironing the HTV on the acetate was a pain lol.
In summary, this was so much fun and not as hard as I expected, craft-wise. The designing of it all took the most time just because I wanted every little detail to have a meaning :)
I made two copies to gift one to a friend, so it gave me the opportunity to make the first one and mess it up, then, for the second one, I had already learned from my mistakes.
There are many things I'd do differently for my next binds, but that's the most fun part: experimenting with materials, themes, and processes.
#I have a lot of free time#In crafts we trust#now I'm even more motivated to finish my other fics just so I can print them#my family asked for a copy now I don't know how to explain that I won't let them read my fic in a million years#hogwarts legacy#ominis gaunt#ominis gaunt fanfic#ominis x mmc#book binding#bookbinding#fanfic binding#gay fanfiction#gay#lgbtqia
76 notes
·
View notes
Text
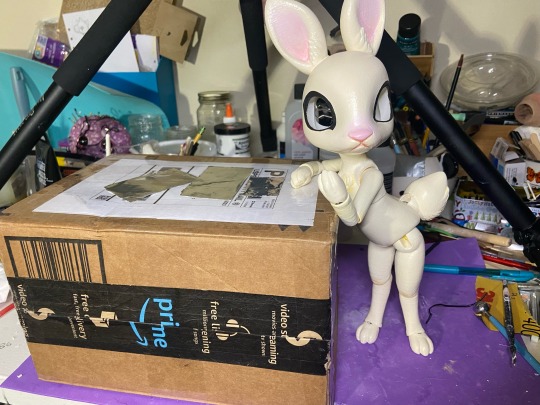
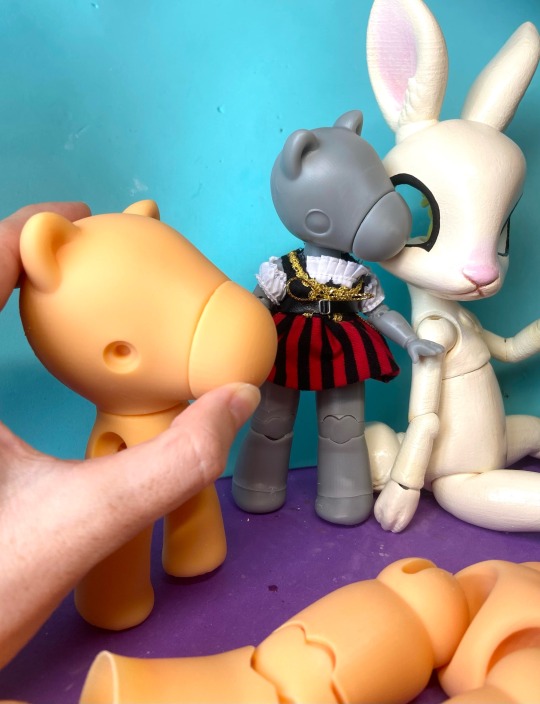
What's in the Box?
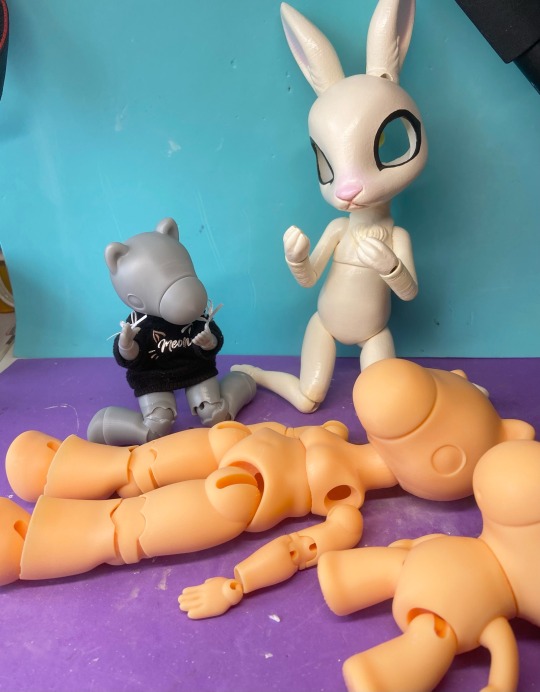
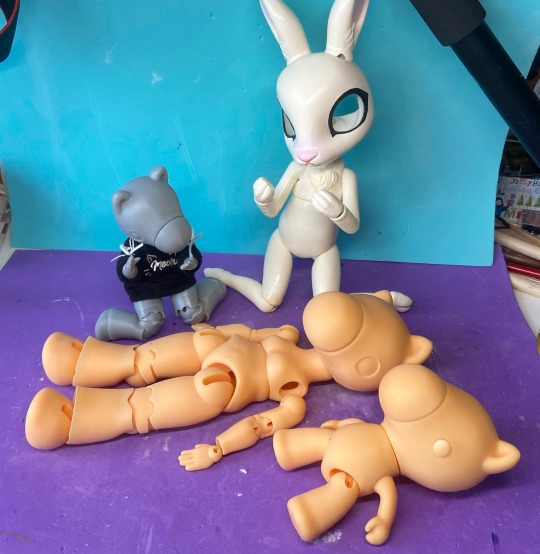
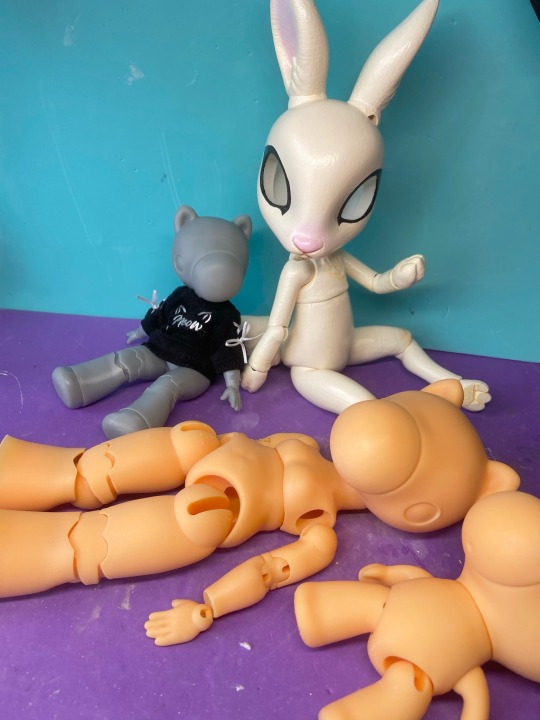
PONY PONIES IN THE BOX
If you've been following along you may have seen that @queenofsquids printed the Takara-inspired BJD last week, both in a "mini" test form and a full-sized one. The full-sized one was supposed to be in yellow, but the pure yellow resin turned out to be a more orangey tone. She incredibly generously offered to send me the orange pony BJD
And then
She incredibly incredibly again generously sent not only the little test takara-bjd in grey BUT ALSO printed my original takara 3D model and sent that?! This is so unbelievably kind and generous. I was so surprised when I opened them all!
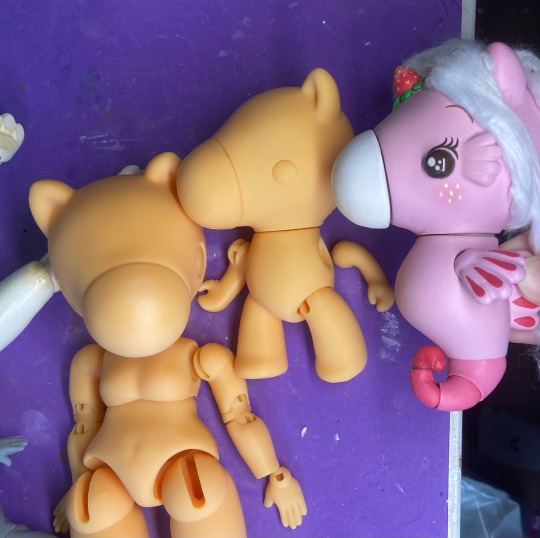
I'm not sure if you were all aware but I actually dont have a print of the original "Takara duplicate" doll. I did get the seapony PLA printed at the library (and it was my first ever 3D print!).
For my second print, I got the Dollightful bunny doll printed because I wanted to have experience with jointed dolls made by other people before I put more complex models out. So I figured it would be a while before I got the chance to see my newer models printed.
So like its actually so kind of @queenofsquids to send these but also it's really meaningful to me because I started the takara project where I became obsessed with them over a year ago. It's so amazing to see this thing that frankly I spent so much time fiddling with (even if there are some imperfections; more about that later) and hold it in my hands 🥹 I just keep looking at them and smiling

Also I immediately stole the clothes off my NaNaNa dolls and put them on mini-takara-bjd. They're a little short but fit pretty well!
Some design notes/planned adjustments under cut
-The neck and arm balls are definitely too blocky, this doesn't impact the movement but it is very visually obvious
-Queenofsquids mentioned this but the arm bean is too big and gets stuck in the arm sockets.
^^ These two issues are the most obvious upon brief inspection but are also easy to fix so I'm gonna put out a version ASAP adjusting the file. Call it the version Version 1 Hotfix. Both of these should be fixed in the existing models with a bit of sanding.
-The legs are like just a touch too blocky and I think you can also see lines in the head and chest areas ;-; I think this would depend on the printer, like it might be fine in PLA due to the lower resolution. This can also be buffed out but I can adjust it with some effort
-> I think the blockiness issues come down to the fact I was trying to make the models not too high resolution because then the file size is massive, can't import into cura properly, and even slows down *my* beefy computer. that's why it might take a bit for me to adjust all of these pieces, especially the legs because they have a lot of booleans that lag blender. basically i leaned in the other direction and went a bit too far with some pieces.
-legs are very thin at the bottom (ran into this issue with the dollightful bunny doll too and had to redo quite a bit actually to make it neat)
-The bottom of the heart on the knee in particular is an imperfect fit. I was getting errors in Cura because of some issues related to the knee so I had to remesh it, if you'll remember, so I will need to maybe go in and redo that one :/
-The line around the eyes could be a touch more pronounced, its supposed to be somewhat stylized eyelashes
-I need to play with the arms/legs more to figure out potential issues with the existing joints. But they do at least work and hold poses. I'm not sure if people would prefer anything more complicated like locking joints or if this level of poseability is acceptable
Other things I want to experiment with
-hand pose variation
-nose/mouth variations? it is actually kind of funny to imagine you could switch the expression out to a little :o face or a c: or :3 type of thing
-pegasus/unicorn/fluffy hoof variants like i had planned before
so much stuff :0 and I haven't even finished bunny doll, although at least her paint job is basically done. Once I string the big BJD I can also test posing.
94 notes
·
View notes
Text
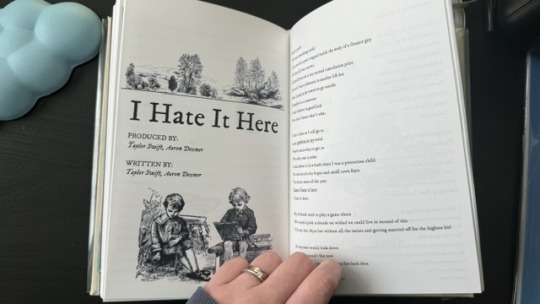
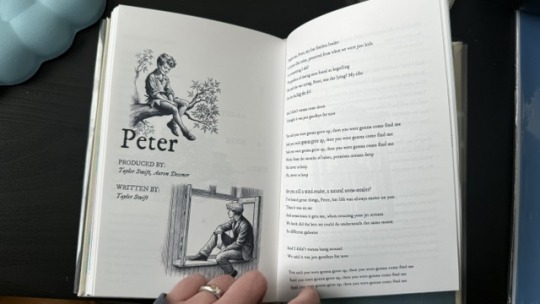
To Live In Color Bookbinding Tutorial(s)
Here's how I turned To Live In Color into a book.
This fantastic book binding tutorial by @armoredsuperheavy was incredibly helpful and insightful. It taught me how to format the fic in a Word document. I cannot overstate how detailed and wonderful this tutorial is.


After winning a battle of wills against Word headers, I sent the PDF to a printer in order for it to be printed in color. Shockingly, color was important for the artwork in a story whose title and main theme is about color. I used Armored Super Heavy's method for sewing signatures together using linen ribbon for stability. I took no chances on my masterpiece.


I used this bookbinding tutorial from youtuber Bitter Melon Bindery as a guide for the construction of the book. Two cutting boards still covered in cellophane and two clamps as my bookbinding press were my pressing tools. Is it fancy? No. Is it cheap and does the job? Yes. After the spine was glued, I cut the edges for a smooth, polished look using a box cutter and metal ruler. This was the most nerve wracking step, and the one I struggled with the most, honestly. Mistakes were made. Fine grit sandpaper was key for fixing them and achieving a smooth, professional look. Then I added mull (or the closest fabric I could find acting as mull) to strengthen the spine. I made two copies of the book, one for myself and one for @sparrowmoth, who was the biggest cheerleader for this fic. Seriously, their comments (and friendship which started because of this fic) were so wonderful that I'm gifting them a physical copy.


I measured and cut the book board. The cover is meant to look like Wylan's waistcoat in the fic, Cinderella blue with eye catching silver and blue embroidery. Sparrowmoth helped me design an embroidery pattern to fit the dimensions of the cover. The final design is an adjusted version of this embroidery pattern from Bella Savory on Etsy. I did buy the pattern, for the record. I would have liked the pattern to swoop diagonally across the cover (as pictured above on paper), but the narrow length made this difficult.
I cannot tell you how many times I drew this pattern. First, it was copied onto paper and also copied onto the reverse side of the paper. Then, it copied (backwards) onto the interfacing which was then ironed onto the wrong side of the blue satin used for the cover. All of this was a spacial awareness nightmare for me to make sure it was on the correct side of the cover and facing the correct direction. Woof. Finally, I held the satin up to the light and retraced the pattern AGAIN with pen onto the front of the satin.


I have no real experience embroidering, other than using a simple back stitch once for cosplay. But I looked up stitch tutorials online and made two practice samplers (once exactly as instructed by the original pattern I bought, and once with the modified pattern, satin fabric, and satin silver floss) before attempting the final version. It's not perfect, but I am very proud of how it turned out.


I then turned the satin fabric into bookcloth by using a double sided adhesive (shown with the square paper) and blue tissue paper. The color was not necessary because it's not seen when finished, I was just being extra. The adhesive had the added benefit of securing the back of the embroidery. Then I glued the cover boards. The glue warped the boards, but they were easily fixed by placing the text block between and pressing it down overnight with a heavy textbook.


Unfortunately, the corners were a mess. The satin frayed easily despite being glued and I was forced to use metal corner covers to prevent the fabric from damage. The corner covers actually worked in my favor. Now I like the look of them. They definitely make the book seem more polished and fairy tale fancy.


Finally, I glued the textblock to the cover, completing the book. It's not perfect by any means, but it is my masterpiece. Every part of the book (except for Sparrow's artwork) was created by me. I wrote the story, formatted the text, created all of the other artwork including the title image with the butterflies, and embroidered the cover. It was a labor of love from beginning to end. I am so proud of my fanwork-turned-book.

45 notes
·
View notes
Text
Kinktober Day 3
Prompt: Hate Sex Pairing: Designer!Hyunjin x femCoder!Reader WC: 2260 Summary: Hyunjin wants one thing from you, stop calling him “pretty boy”, he can’t help he was born beautiful. This is a work of fiction, it does not represent Hyunjin or any Stray Kids member. On top of this it is an 18+ work. For my comfort and boundaries please if you are under age do not interact with this.
I feel the need especially with “rougher” prompts like this to put the disclaimer - fanfic should NOT ever be used as a guide to relationships or sex. ESPECIALLY SEX. Again, it’s fiction. Stuff gets glossed over for the sake of a good story. Please PLEASE please again, not fact, not a guide, just a fantasy. TW/CW under the cut.
Warnings: reader implied/is a bully, older reader (age gap not specified), name calling (”slut”, “dumbass”, “asshole”, creative insults around genitalia, gendered/misogynist insults), crying during (reader), PWOP, cum in mouth, unprotected intercourse. I’m also going to call out, sort of dubcon-y as most hate sex is.

Pretty boy was not a compliment when you said it. Always laced with venom or a sneer. It was as though you’d branded Hyunjin as worthless with two words. Only good as a person to look at. Objectified and demeaned. Even he couldn’t deny that he was in fact a very pretty man. Long brown hair, full pouty lips, deep irises, with a slender yet muscular frame. Not exactly effeminate but not exactly masculine. A beautiful human no matter how you slice it. Which is why your nickname angered him so much.
It wasn’t easy for you either. Years in the tech field had hardened you. It was a man’s world and you were used to the bro code that had been instilled in you from the early days of voice chat. Kill or be killed, eat or be eaten, bully or become the bullied. The tech sector was the same.
Hyunjin wasn’t even in your cohort but you hated him from the moment you saw him. Fresh intern class filing into the large hall for their orientation. You’d hoped that he’d get eaten alive, the soft sensitive looking man thrown unceremoniously into the pool of piranhas. Instead he was gifted to the design department, a soft job for a soft kid. What was worse was his lack of coding knowledge, mostly having worked in print materials the world of internet and tech was foreign and frustrating. Worse still was that despite this he was good at his job, rising through the ranks to be your equal, forcing the two of you into the same project groups quarter after quarter. Any rank you could pull, you did, age included, and he seemed to take it.
He hadn’t meant to follow you into the windowless supply closet. It just so happened both departments were in dire need of different items. Somehow you’d been conscripted into packaging fancy boxes for capital contributors and design had sent a large order to the floor’s printer with no paper nor ink to spare. The door opening startled you, locking eyes with him as you stare at each other for once devoid of the low boiling slurry of distaste and distrust. Quickly the moment snaps. Returning to the status quo you sigh, “oh, just you, pretty boy.” “Stop calling me pretty boy.” Hyunjin states simply. He doesn’t want to make it a huge fight, trying to assume only your best intentions. Part of him figured this would be the only private moment he’d ever have with you, so might as well make use of it. “Why? It’s true.” You shrug, busy peering in drawers and boxes for your extra packaging supplies. “You’re a very pretty man who is younger than me. A boy. A pretty boy.” “It’s dismissive. I’m more than that,” the tension strains his voice. “You know I’m more than that. I put in work, effort. I have a passion. Just because I can’t translate it to whatever arcane language you use doesn’t-” “Listen pretty boy,” you stand up and sneer at him, eyes locked and narrowed. “If I could afford to be as lacking as you, I would. The world has taught you that all you need to do is the bare fucking minimum and doing anything more is considered a large effort. So, pretty boy, count your blessings if I’m the worst thing that’s ever happened to you.” Hyunjin sucks his teeth, a snort of disbelief escaping. “The only people who have ever called me pretty have either wanted to fuck me or be fucked by me so which one is it for you?” His eyes narrow and study you as he steps closer. Your pulse quickens, blood roiling. How dare this brat? How dare he challenge you. “Neither,” you answer him with daggers in your eyes. His lips twitch at the corners. “Are you sure about that? You’re barely breathing right now. I wonder if I stepped closer,” his voice trails off. “Or maybe brushed against you, by accident of course.” “Even HR couldn’t mediate the amount of lawsuits I’d hit you with.” He’s right. You hold your breath as he gets even closer, just staring. You start to dodge around his side but his body blocks yours, shoulder sinking into his chest as he backs you against the shelves, forcing you to tilt your chin to look up at his face. The way your body so quickly betrayed you was concerning to all the ideals you’d upheld for years, tingling and burning endorphins flooding you with dizzying speed.
Slowly he leans his torso forward almost nose to nose, hands holding onto the shelf and caging you in. “Bet you’ve just been waiting for someone to do this to you, slut.” The sting comes before the sound, your hand crossing his cheek as swiftly as the word leaves his mouth. “Call me a slut again.” “Slut.” He hisses, leaning into you. There isn’t quite the surprise to dull the pain of the hit this time, his body is ready for it as you wind up and slap him again. He half smiles, half smirks, tongue bit between his teeth. “Fuck that’s hot,” your tone is hushed, almost reverent, a revelation as more for yourself than for him. Your lips and tongue clash and fight for dominance as he claims your mouth with his. It’s more a battle than a kiss, both of you unwilling to break first, chasing the other, gasping and groping like teenagers at each other's bodies. He finally breaks, lips pink and puffy and shining with saliva. The clink of the metal buckle of his belt has you practically dripping. Forcefully he spins you and shoves you, face into the roughly coated cinder block wall. “Gonna fuck you like the bitch you are.” He mutters, plosives laced with venom. You moan pathetically as his arm presses to your mid back. “Give it your best shot pretty boy, this making your micropeen hard? Can’t get laid so you have to fight your way into a quick fuck?” Hyunjin laughs, cackles, harshly grabbing your ass. “Could ask the same for you. Truly I can’t imagine anyone wanting to stick their dick anywhere near your cobweb cunt. Should I check? Should I check to see?” “Go ahead dumbass, if you can even find it.” You hiss. “All talk no-” A rip of your stockings and cool air hitting your soaked panties halts the verbal sparring match. Pushing your panties aside he sinks a finger into your hot core, gasping together. “Who’s all talk now? So soaked I slipped right in. Dumb needy hole trying to milk my finger. Gonna thaw you out ice princess.” You hope he does. Dragging your torso down the wall, your back arches into him, pushing his single digit deeper, wiggling your hips. The swish of his pants crumpling to the floor “I’m waiting, pretty boy, or is it already in and I just can’t feel it?” Your negging continues, heart fluttering in anticipation. Everything he does is just out of your range of vision, you have no idea what to expect. Even in your heavy petting you hadn’t grabbed for him. Finger withdrawn he drags the head of his cock along your slit. Hyunjin knows what he’s about to do is mean, he’s felt how tight you are. For a second he considers properly prepping you, stretching you out nicely before abusing your hole. Poised at your entrance he grabs a fistful of hair at the nape of your neck, lips pressing to the shell of your ear. “Ready princess?” “On you pretty boy,” you sneer in response. The blunt pressure of his thick member ripping through your walls twists your stomach. Filling you in a single push, Hyunjin muffles your scream with his lips. It steals your breath as your body fights the intrusion. Your legs alternate kicking and shaking below you, suddenly happy to have Hyunjin’s weight pinning you up to the wall.
“Dumb slut, do you want to get caught? Screaming like that you’ll let the whole company know you’re bending over like a bitch for me.” Hyunjin chides, holding still inside you. His harsh words soothed by his hands, gingerly fixing your hair to the opposite shoulder. Arms wrapping around your chest and waist he holds you close, face buried in your neck. “Big right?” The soft words are muffled by your skin. “Mhmphf.” His teeth run over sensitive spots along your neck, sending you shivering and shuddering in his grasp. “Good right?” “Yeeehsthhh!” You lisp and writhe. “Embarrassing right? Getting run through by some kid like me. Gonna slut you out princess.” Turning your head so you are nose to nose you growl, “shut up and fuck me, pretty boy.” Hearing his nickname he laughs, blood boiling a bit harder, and unceremoniously pulls out. A pitiful whine escapes your lips with the loss of pressure in your gut. Before you can scold him again he pushes all the way to the hilt again, hearing the air catching in your throat from words lost to pleasure. Each thrust is slow and torturous, felt to the fullest by your walls hugging him in. Despite not working hard you pant like a cat in heat, overwhelmed by the ache of your cunt. “Afraid you’re gonna cum first?” You jab between groans, frustration clouding your senses. He’s just too slow to build past the agonizing beginnings of your orgasm. “‘M being kind, can’t have you passing out on me.” “Bold of you.” Sucking a small bruise into your neck he buries himself deeply inside of you. “If you insist.” Instead of withdrawing again his hand skims down your belly to your mound, long thin fingers circling your clit. Each passing swipe coordinates with a shallow thrust, just enough to stimulate you inside and out. All you can do is take what he is giving you, body giving up to his ministrations. “Shit I think-” you gasp and shake, “I’m gonna cum.” “I bet you are.” Hyunjin sneers, “and who is to thank for that?” “You. You are. You.” You burble. “Who?” His grasp harshens, hips snapping harder. “HYUNJIN. Fucking asshole. You. Hyunjin. Fuck.” You cum violently around him, walls of your sex baring down on him as a fresh wave of arousal coats the both of you. You cry out, fat tears welling in your eyes as overstimulation hits you like a train, moans turning to choked sobs as you try to catch your breath. Both of you are sweaty, you shake. Hyunjin maneuvers the both of you to your knees on the ground, your body leaving a shine to the wall where it was pressed. He pulls his slacks under your arms to cushion what they could from the cement. “I made you cum, your turn.” “Wha?” His hand comes down hard on your ass, snapping you out of your lusty haze. “Fuck yourself on my cock.” The demanding and demeaning tone has your blood rushing even in your sensitive state. With a sniffle you start moving your hips back and forth, each slide making a grotesque sloppy slick sound. Hyunjin pushes back his sweat and hair from his brow, eyes locked to where he disappears inside of you. “Cunt looks good hugging my cock like this.” If he’s all about visuals, you’ll be a feast for his eyes. You gorge yourself on him, taking your time like he did to you. Rolling your hips decadently and letting your greedy pussy work itself around him. Hyunjin tries to keep his hands from you, to make you do the work, to take a small petty revenge for the multitude of emails politely thrown back to him by you. He can’t, finally folding, grabbing fistfulls of ass and hips and thighs. He joins you, bent over and caging you again like an animal. Together, writhing as one, grunting as one, your chemistry has never worked better. But it can’t last forever, you can feel his thick muscle seizing inside of you, lower abs and thighs tensing against the cleft of your ass. “Where,” chokes in a stuttered hurried whisper. “I’m gonna-” Summoning strength you push up, righting the both of you, pulling him out. It’s the first good luck you’ve gotten of him, flushed red and sweaty and fucked out. He’s impressive for a skinny guy, thick and veiny and heavy in your hands as you continue to stroke him out of habit. Fingers covered in slick release precum flows freely from the tip. “Mouth. Hurry.” Standing shakily he leans back into the wall, “gonna swallow like a good slut?” Holding the head of his dick to your tongue he pumps pointed down your throat. Your tongue flexes against the underside, massaging the ridge. Hyunjin can’t believe his eyes, you kneeling in front of him, defiantly staring him down as you wait for him to cum. Almost daring him to spill his load anywhere else. With an airy whine a globule of release hits your tongue, hot and bitter. Hyunjin’s hips kick forward, fucking his palm and the top of your tongue, pushing his cum deeper into your throat and making you gag. “Shit,” he hisses as you gag again, another string shooting directly into your throat. Palm to his hip you slide his cock further back, using it to force the bitter seed into your stomach. “Holy shit you’re really-god your throat-that-keep that.” Gulping the last down you pull from him grimacing and wiping your face. “Two words; pineapple juice, pretty boy.” “That’s four.”
I always get carried away lmao. This is definitely towards the rougher end of my comfort zone with characters. I can’t help be aware of the fact that some people do take fanfic as a guide to what to expect or hope for with their relationships so it’s a little difficult for me to push that to the back of my mind.
#hyunjin smut#hwang hyunjin smut#stray kids hyunjin smut#hyunjin kinktober#stray kids smut#skz smut#stray kids kinktober#skz kinktober#kpop kinktober#kinktober#kinktober 2023
414 notes
·
View notes
Text
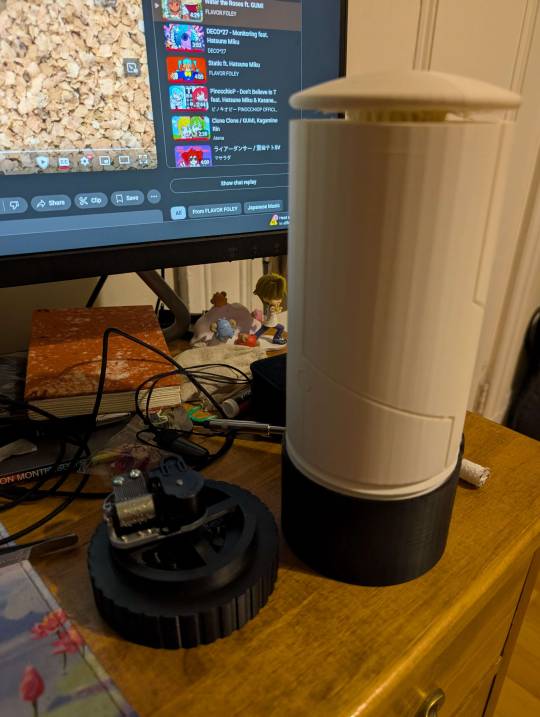
I completely forgot I didn't post this! This is my @code-swap gift for @semie78 ! I made a rotating tower music box! I'm very proud of how it turned out. I bought a wind up music box online. Then, I designed a base with 3D printed bearings (roughly inspired by these, but fairly modified) that screws into the music box wind up. When the music box rotates, it spins the entire tower. I also made sure that the base unscrews from the top so you can replace any parts as needed. A keen eye may notice that it screws in backwards. Uh... oopsies!
The music box itself plays A World Without Danger (video should have sound, might be kind of quiet)....... kind of. I used this amazing tool and modified this midi to 3D print a new tube for the box. Unfortunately, there are only so many notes on a music box, and I had to sacrifice it being in tune for it working... alas... Many lessons learned, haha.
Was a ton of fun! I love designing and making things. Happy to chat more about the mechanical design with anyone who is interested. Some pictures of the CAD and design thoughts under the cut.

I ended up chopping off most of the threads from this. I went waaay overboard and the friction got too much that it couldn't screw in all the way. I also made a mistake that I'm showing here -- the bottom opening thread needs to be accessible by the top inserting thread. Cutting it solved this, but if I were to make it again, I'd fix that.
The original design of this also had little Lyoko Warriors that would move around the outside, but I ended up deciding to simplify it. Maybe someday...

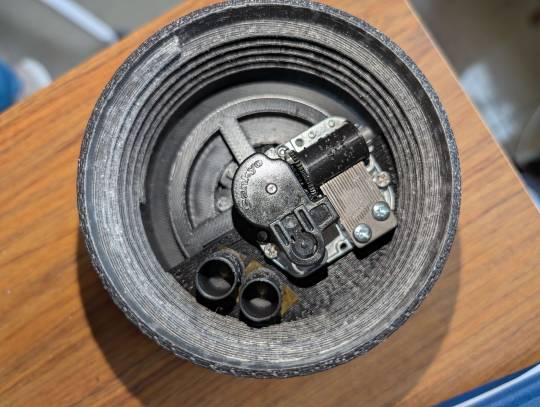
This part isn't very interesting. The music box itself is screwed into those holes, and the threads screw into the top.


Here's the cool part: the base! There is a circle of bearings on the inside that 3D print as one part (even if they're a pain to get the supports out of, oh my god). The center of the "wheel" is where you screw in the crank for the music box. I tried 3D printing the threads, but my printer couldn't get it that fine, which wasn't surprising, so I did it by hand.

This is the music box tube, as generated by the code up there. A PLA 3D print won't last forever (as you can see I have a few extras in there for semie). A more permanent solution would be to make the tube with indents or holes instead of out outcroppings and then put little metal pins in there. Another option would be to resin print it, but, alas, I didn't have access to a resin printer.
This music box didn't have an E!! I was able to but the theme into a key/octave such that the repeating notes could be on two different spots that played the same note, but no E!!! Augh!!! I tried so hard to make it still sound right... definitely sounds better on my computer than on the box. That might have been my fault: the first step to using the tool is to identify all the notes on the music box. My fiancee and I tried our best, but we definitely could have gotten a few wrong. Still, I'm pleased the song was distinguishable at all.
#code lyoko#code swap#code swap 2025#code: swap 2025#code: swap#i completely forgot i never posted this haha#mary blabs
24 notes
·
View notes
Text
A sort of followup to my previous post. Random idea: DELTARUNE Chapter where the Dark World takes place in a snowglobe. Y'know, one of those snowglobes with a holiday town in them? Yeah, the Dark World is in that, and somehow Kris and Susie end up inside. The Fountain is extremely easy to get to, but right before they seal it, they realize that if they seal the fountain, they'll probably get hurt as they'd end up inside the snowglobe and get squished, so they have to find a way to crack the walls of the snowglobe dark world dome first so that when they seal the fountain the snowglobe breaks instead. (Maybe there's some lore about the glass for this snowglobe being really, really, really strong or something so it's a serious conecrn) Maybe you can see outside into the light world from within the snowglobe, but not the other way around- from the outside, it's seemingly just a snowglobe filled with, like, printer ink or something. Maybe Noelle finds it and part of the chapter is trying to communicate with her from within the snowglobe to get her to do something. Like there's a music box built into the design and they have to get it working.
#deltarune#deltarune tomorrow#deltasoon#utdr#deltarune noelle#noelle holiday#deltarune susie#susie deltarune#noelle deltarune#noelle#deltarune theory
26 notes
·
View notes
Text
Since this response got out of hand, I'm giving it its' own post.
It's dangerous to ask a maker (artist?) about their processes @lonewolflupe @ulchabhangorm. But since you're curious, please accept my very first:
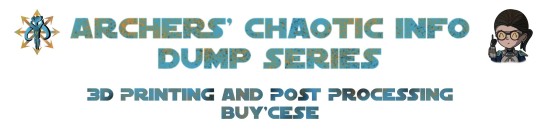
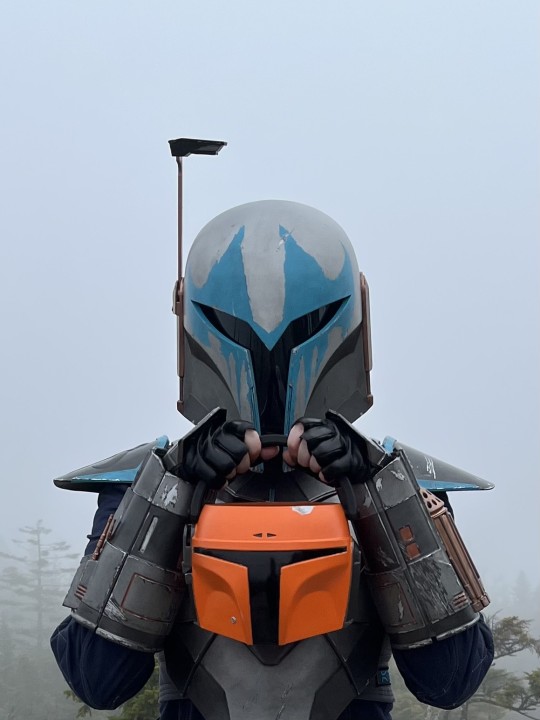
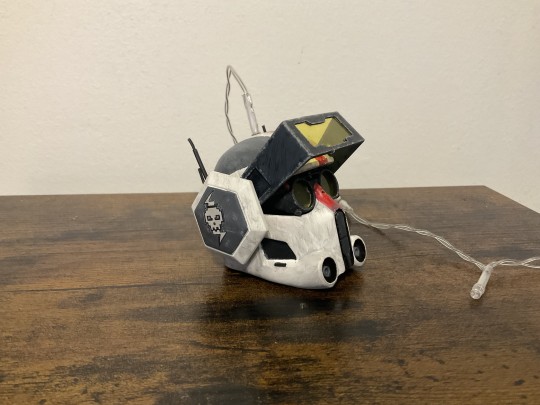
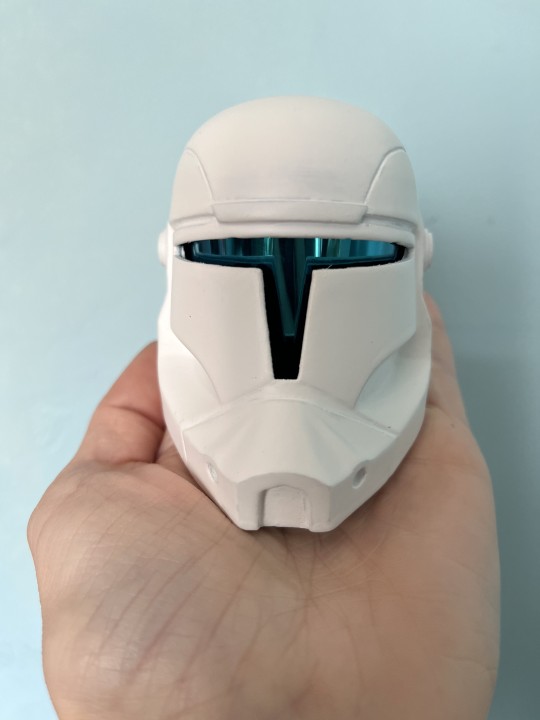
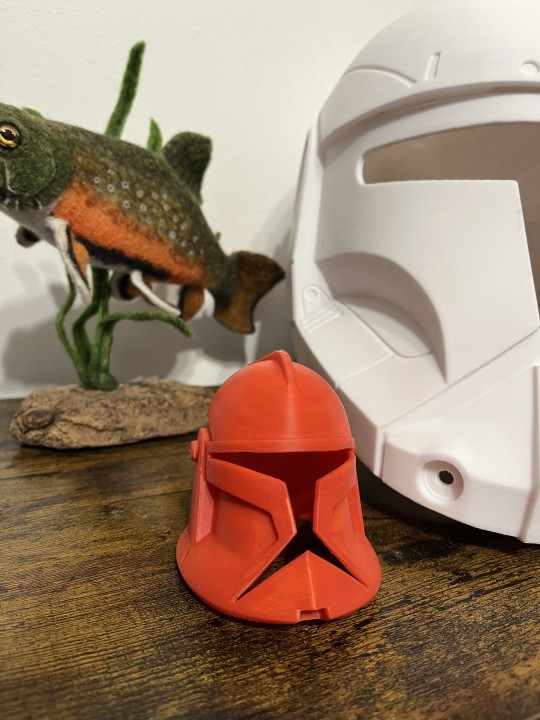
All of the pictured things were 3D printed by me on my FDM printer (Bambu Labs A1), including the teeny helmets. The non-helmet bits are pieces of Tech's armour. I'm currently building a Tech kit for 501st Legion approval. I "like" Crosshair and Scorch the most, but I am "most like" Tech. /sigh
I do! (Mostly) All of the armour parts of Archers' kit were 3D printed and finished by me on my FDM printer, with the exception of my pauldrons which were resin printed by someone else, but finished by me. I initially began making the kit for a Halloween costume, challenged by a coworker to a work-Halloween costume contest, but ended up meeting a couple vode from the Mando Mercs club (MMCC). I was invited (gently coerced?) to complete the kit to their standards and join the club. I'm in that process now, but still have a few things to finish before I gain Official Member status. 🙂
I made a lil' Boba candy bucket!!
3. I mostly print with PLA+. I can print with PETG, ABS, and other materials but my printer is running inside a spare room and I'm not set up with an enclosure or awesome ventilation yet to print with materials which off gas more toxic VOCs. Although PETG would be stronger for a buy'ce that is going to be worn PLA+ works just fine for most folks who are not in very hot conditions. (PLA will sag and melt in high heat) . The first time I wore my full kit, I was at work, and did a full day of fieldwork in it. The whole kit survived apart from one of the thrusters on my jetpack which I accidentally busted off while putting it back in the kit box (adhesive failure, I should have used hardware but I was in a rush to finish it before Halloween) . All fixed now! PLA would be just fine for printing teeny and/or decorative helmets. Just don't toss full size ones onto the floor off of a shelf (ask me how I know).
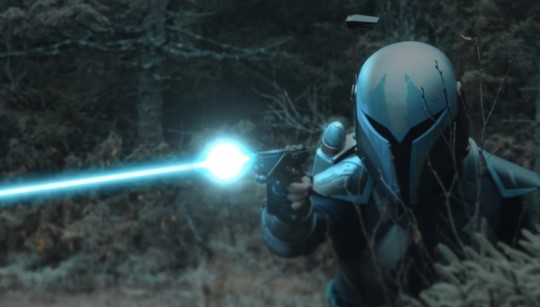
4. You can get STLs for clone helmets in all the places you'd expect (cults, thingiverse, etc) and from vendors on Etsy. Be careful, though, some of those files are stolen, and some are REALLY terrible and inaccurate. I usually avoid 'free' files, as for things as complex as helmets often end up being more costly in other ways, or are just not the quality I want. Galactic Armory has a nice selection of clone helmets (I have..... all of them. /embarrassment). Marko of Mystery Makers has really great Bad Batch (and other SW) helmets. He always tries to go a step beyond other modelers with his designs, both with functionality and accuracy. The Crosshair and RC helmet in my original post are both printed from Mystery Makers files. The RC helmet is the closest to the game design available, and the Cross helmet has a super cool functional rangefinder (like the different lenses are there and flip up and down, not just the whole rangefinder stalk moving). The Tech helmet is printed from Galactic Armory files, as are the rest (with the exception of Archers helmet which is AlterEgo, if I recall). The teeny helmets are printed from the full size files, just scaled down to 25%. I wouldn't' try to print these on an SLA/LCD resin printer, because the supports would be a nightmare I think, but it works just fine on an FDM printer. The most difficult part is printing the teeny greeblies for them which are super teeny at 25%. I almost always end up breaking the lil' rangefinder stalks, and am pretty sure I've lost the tusks for Rex's helmet more than once.
Cross WIP (Mystery Makers) with teeny (30%) Cross (Galactic Armory) 💙 Guess how many times I broke that teeny rangefinder stalk? Yeah. Four. 😖
Likewise, guess how many times I broke and lost the SUPER TEENY antennae on Tiny Tech's helmet? 😫
5. The visors in the full size helmets are generally welding/grinding replacement shields (Hobart brand, usually - available on Amazon). They are dark enough to obscure the wearers face and can be fairly easily cut to shape and installed. Tech's visor and goggle lenses are cut yellow acrylic, and in my original post still have the protective backing on them as they aren't 'officially' installed yet - which I why you can't see through them.
The visors for the full-size RC boys are more complicated. I believe the exact details of how I’ve been taught to do it are considered proprietary 🥺😏. To achieve the “Flirtation Mask” effect, two visors, a diffuser, and a strip of LEDs are installed in a very secret, not so secret, way. I’m working on a Scorch bucket, full size, and will have help to do this for the first time. Stay tuned. 😆 For the teeny helmets I use automotive window tint for the visors. It's easier to cut and bend into tiny shapes to fit inside the helmets. I got some blue stuff for the commando helmets, which should look cool once I install the lights. 😎
Teeny Gregor bucket WIP, with blue window tint FLIRTATION MASK 💙
6. The lil helmet stand under teeny Keeli (which I'm making for @eobe) is printed from a file from Galactic Armory. It's been through the ringer, because I use it to hold all the little helmets while I'm spray painting them and letting them cure. It did look nice when it was newer, and has the republic cog on the base. There is also a wall-mounted version which I have printed to hang Archer's helmet. I'll probably make more for the other helmets eventually.
7. VPLs (Visible Print Lines) are the enemy! As an MMCC member, it has been drilled into me that VPLs are evil and must be vanquished with extreme violence. I try to finish everything (with the exception of the flexi things people keep asking me to make) to an excellent standard with no VPLs - including the teeny helmets.
Raw Phase 1 (Animated) clone helmet and RC (Scorch) helmet). My printer does an excellent job, but still there are VPLs to be dealt with!
8. This question - how to get rid of VPLs could warrant it's own post. There are SO MANY techniques - some good, some NOT - but which ones you use depends largely on your print characteristics and what you intend to do with it. A lot of people lately have been recommending bathing the entire piece in a Bondo spot putty and acetone slurry several times until the lines are filled. I DO NOT recommend doing this for a piece that you intend to wear. I experimented with this and found out that after a small amount of wear the bondo likes to expel your paint in large chips, leaving ugly bondo-red spots behind. It would probably work ok for decorative pieces though. Other people have used UV curing resin to coat pieces to fill VPLs. It works, but UGH that stuff is toxic to touch and breathe, and it needs to be properly washed and cured, and cured some more. It's also much more difficult to sand than automotive body work products (which in all fairness are also toxic to breathe and touch - WEAR YOUR PPE).
My general process for armour pieces is to remove supports and then roughly sand (120 grit) only the really rough spots (like things that were overhangs or had a lot of supports). Sanding happens with a combination of sanding papers, sanding sticks, and needle files - depending on the piece. I then adhere pieces together (if they were printed in pieces like some of the larger full-size helmets) with plastic bonder. Seams are filled with Bondo plastic metal or EverCoat depending on the piece and I often plastic weld and staple the inside for strength. The seams are then sanded smooth. After I'm happy with the smoothness of the seams the entire piece will get 2-3 coats of automotive high-build filler primer (from a rattle can, though I have used the 1:4 mix stuff and brushed it on - I'd only recommend this with a large piece as that stuff REALLY fills things in quick - including the things you don't want it to) and a wet sand to 320 grit. At this point most of the print lines are filled, but stubborn areas, such as the top of the dome may still necessitate more coats. I generally end up applying 5 coats of filler primer, wet sanding between them. Following the final coat of filler primer, I'll wet sand again to about 400 grit (much more if we're going for the Beskar finish which needs a SUPER SMOOTH finish to work) and then put on a coat of regular primer. Black for helmets that will be dark (Most of the CF99 boys), and white for the other clone helmets. At this point they should be completely VPL free and ready for greebly installation and the "real" paint job. This process takes me at least a few days on full-size helmets as the paints have to cure between sanding and reapplication, and painting has to happen outside in good conditions. It's not inexpensive, but it is the most efficient and long-lasting way to do it, in my experience.
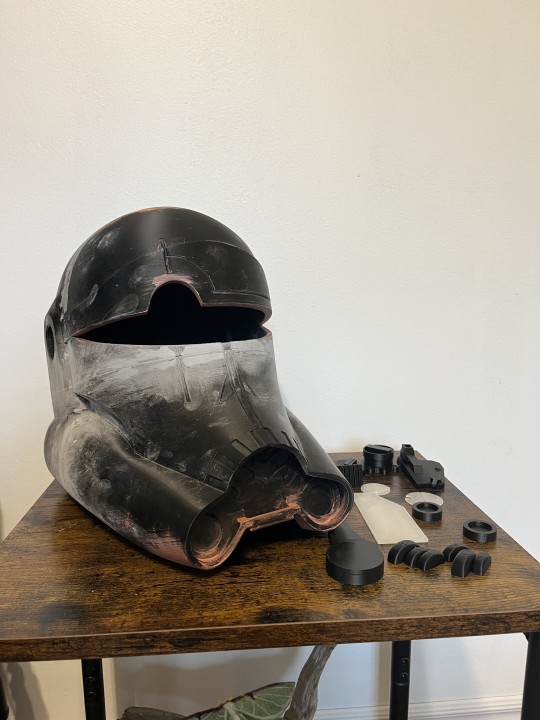
Cross helmet WIP. You can see the seam just under the visor cut out. This one printed in three pieces and needed ALL the seam filling and sanding. The pinkish and grey stuff are body fill products to fill in rough spots and seam lines. If you look at the last photo - of the same helmet - you can see they did a decent job of hiding that there was a seam. 😊
9. I use a lot of automotive products and paint. Since all my full size helmets are mean to be worn they need to be finished to a fairly high standard and be relatively tough. Archer's helmet body was finished entirely with Rustoleum brand filler primer and four layers of metallic paints (all rattle cans). The blue on the front was a Montana brand acrylic rattle can, and the copper parts (ear caps, rangefinder stalk) were enamel paint (Alclad copper) airbrushed on. The weathering - chips and scratches - were achieved by layering on a liquid latex medium between coats, so that when it was peeled off it revealed small bits of the coats beneath. It gives the damage a more realistic look than painting silver 'scratches' on after the fact. This liquid latex medium can be used to give the paint applied to clone helmets the chipped look to their painted designs as seen in the animation. It's a little more challenging to do in small scale though. After all the top coat paints are applied, I'll seal them in with a clear layer of satin or gloss sealant (rattle can). After that, I'll go over the entire piece with an acrylic black wash to make it look "dirty" and worn. 😅. After all that process, padding, visors, and electronics (HUD lights, fans, voice amps) are installed if needed. The whole thing is pretty time-consuming. I now understand why quality finished helmets cost as much as they do. My teeny helmets are all finished as I described above in the VPL section, but I use acrylics hand-painted on with a brush to apply the designs. In the animation versions of these helmets, particularly in TBB, the helmets all look like they've been (roughly) hand painted, so this technique works ok, I think. I apply the chipping and weathering at edges with dry brushing acrylics. I could apply a liquid latex mask and airbrush them, but eh. I'm using these little guys as fairy light "lanterns". They're super cute with the light showing a bit through the visors, particularly Tech. :)
The Teeny Batch boys that I've got finished. Echo is coming, he just needs his top coat and weathering. :D
Lil' Keeli almost finished, with his unfinished rangefinder. Have not broken the stalk yet! /cheer 🎉
10. Acrylics brand? Hmm... I've used the Montana Gold rattle can acrylics which some of the MMCC mandos seem to like. I'm not sure if the ones I got were duds, but I wasn't super impressed. The cans did a lot of spitting and messed up my paint a few times. My brush on acrylics are Liquitex or Golden. Both can be thinned and airbrushed, and are more costly than cheap crafting brands but are more highly pigmented and last longer (plus the finish is nicer).
11. Base colour is whatever primer I finish with - white or black, depending on what color the final piece will be. For Mando helmets, the base colour is a metallic silver, so that when I peel off the liquid latex layers, the pint chips down to “bare metal/beskar”. Since clone helmets are plastioid, the base colour for them remains white or black.
12. I finish with a rattle can sealant. Satin finish usually, but that depends on the look you want. Always try to stick with the same brand of primer, paint, and sealant. Different brands have different chemistry - accelerants and so on, and can, and often do react with one another. The frustration of having to sand down a piece that was almost finished cannot be described.
To avoid paint heartache, always also paint in good conditions. Temperature, humidity, wind, etc can all ruin you day and paint job. Please also always wear your PPE!
13. Are they? I hope they are. They sure are a labour of love, and much work - but it makes me happy to make them and to look at them. 😅
I'm very fond of Archer's buy'ce, and the whole kit really. It was the first one I 'finished' (every mando's kit is an ongoing WIP - forever), and the process of making it kept me focused on something positive during a rough time in my life. Wearing it is super fun! Ibic Manda!


WOW that got lengthy, so sorry! I had ALL the questions when I started, and a lot of the info you need is hard to find or in bits and pieces all over the internet. If you have any other questions, feel free to ask! I can only share my experience, but I have spent a huge amount of 2024 working on these for what that's worth. 🫣
#star wars#the bad batch#tbb crosshair#chaos squad#mandalorian oc#star wars oc#tbb#3d printing#tcw keeli#tcw gregor#tbb tech#tbb hunter#tbb wrecker#clone force 99#Archers Chaotic InfoDump Series
44 notes
·
View notes