#Celosia argentea
Explore tagged Tumblr posts
Visit Tumblr Blog
Explore Tumblr blogs with no restrictions, modern design and the best experience.
Last Seen Tumblr Blogs


Fun Fact
The most popular pages on Tumblr are about Minecraft, GIFs, and David J. Peterson.
Text
Celosia Bloom Day
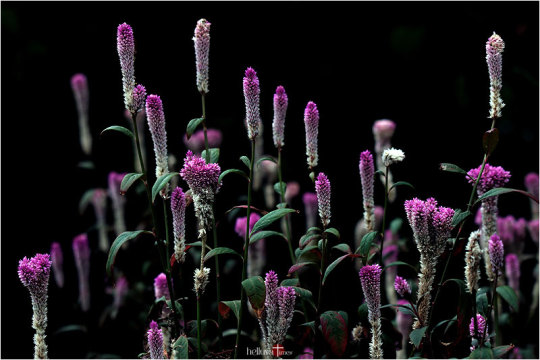
Feather Cockscomb (Celosia argentea) blooming altogether in the Pasir Ris Park on the northeastern coast. Photo credit: Jonathan Chua.
#photographers on tumblr#Amaranthaceae#canon 70-300mm#Celosia argentea#feather cockscomb#flora fauna#flora photography#flower pics#fujifilm photography#fujifilm x-t2
56 notes
·
View notes

Text
Celosia argentea / Silver Cock's Comb at the Sarah P. Duke Gardens at Duke University in Durham, NC
#Celosia argentea#Celosia#Silver Cock's Comb#Plumed cockscomb#Cock's Comb#Cockscomb#Nature photography#photographers on tumblr#Flowers#Sarah P. Duke Gardens#Duke University#Durham#Durham NC#North Carolina
8 notes
·
View notes
Text

ケイトウ(9月20日)#路傍の植物園
Celozja srebrzysta, grzebionatka właściwa, celozja grzebieniasta, koguci grzebień (Celosia argentea)
Celosia argentea, commonly known as the plumed cockscomb or silver cock's comb
#Celozja srebrzysta#Celosia argentea#grzebionatka właściwa#celozja grzebieniasta#koguci grzebień#plumed cockscomb#silver cock's comb#flowers#kwiaty#japan#路傍の植物園#花#ケイトウ#鷄頭
2 notes
·
View notes
Text
Scientific name: Celosia argentea Common name: Silver Cockscomb


#plant#flower#botany#scanned#celosia argentea#silver cocksomb#botanical#herb#tropical#writer#biology#biologist#botanist
1 note
·
View note

Text

Celosia argentea — plumed cockscomb a.k.a. silver cockscomb
6 notes
·
View notes
Photo

Celosia got its name from a Greek word for “burning” due to its flame-like flower heads. Native to tropical regions, Celosia is an annual flower plant renowned for its wide array of floral colours. You can grow celosia from seeds or through cuttings. Gardening experts recommend to plant this annual flowering plant in garden beds, instead of containers. Celosia prefers full sun, well-drained soil, sufficient water and soil temperature above 55F to thrive. Celosia Plumosa, Celosia Cristata, Celosia Spicata are three prominent varieties that you can consider to grow in your backyard. Before you decide to germinate seeds or propagate celosia plant through cuttings, lets first know about the plant. Celosia thrives in warm, sunny spots with well-drained soil. Start from seeds indoors or use cuttings, then transplant outdoors after frost, spacing them 8–12 inches apart. Keep soil slightly moist and fertilize every few weeks. Pinch young plants for bushy growth and deadhead often. Celosia rewards with bright, long-lasting blooms all season. Growing Requirements of Celosia Plant Celosia is an ornamental flowering plant that belongs to the amaranth family, Amaranthaceae. It includes various species such as Celosia argentea, Celosia cristata (cockscomb), and Celosia plumosa (plumed celosia) and Celosia Plumosa. Native to tropical regions of Africa and Asia, celosia is known for its flame-like blooms in shades of red, yellow, orange, and pink, making it a favorite in gardens and floral arrangements. Sunlight: Celosia thrives in full sun. Ensure it receives at least 6 to 8 hours of direct sunlight daily for vigorous growth and vibrant blooms. Soil: Well-drained, moderately fertile soil with a slightly acidic to neutral pH (6.0–7.0) is ideal. Avoid heavy clay soils that retain too much moisture. Watering: Water regularly to keep the soil evenly moist, especially during dry spells. However, avoid overwatering as it can lead to root rot. Temperature: Celosia prefers warm conditions. Optimal temperatures range from 20°C to 30°C; protect it from cold drafts or temperatures below 15°C. Fertilization: Apply a balanced, water-soluble fertilizer every 3–4 weeks during the growing season to encourage lush growth and blooming. Spacing: Space plants about 8–12 inches apart to ensure good air circulation and prevent fungal diseases. Pruning and Maintenance: Remove faded flowers to promote continuous blooming. Minimal pruning is needed, but pinching young plants helps them grow bushier. Celosia’s low-maintenance nature and striking colors make it an excellent choice for borders, containers, and cutting gardens. Best Celosia Flower Varieties to Grow Celosia comes in several eye-catching forms, each adding a unique texture and burst of color to gardens and floral displays. Among the most popular types are Plumosa, Cristata, and Spicata—each known for its distinct bloom style and vivid hues. Celosia Plumosa Also known as Feather Celosia, this variety features upright, feathery plumes that resemble flames. It blooms in fiery shades of red, orange, yellow, and pink. Plumosa is perfect for garden borders and thrives well in containers. Its tall, airy flowers also make excellent cut or dried arrangements. Celosia Cristata Cristata, or Cockscomb Celosia, has crested, brain-like flower heads that are bold and dramatic. The blooms come in deep crimson, golden yellow, and rich magenta. This variety is a striking center-piece in beds and bouquets. It’s long-lasting and draws attention with its unusual, velvety texture. Celosia Spicata Known as Wheat Celosia, Spicata features slender, spike-like blooms that resemble wheat heads. The flowers appear in soft shades of pink, lavender, and silver. Spicata adds height and contrast to mixed borders. It’s drought-tolerant and ideal for both fresh and dried floral arrangements. How to Grow Celosia? Celosia is most commonly grown from seeds, which is the easiest and most effective method for home gardeners. However, it can also be propagated from stem cuttings, especially if you want to replicate a specific variety. Both methods are simple and rewarding when done correctly. How to Grow Celosia from Seeds? Starting celosia from seeds is an excellent way to grow a variety of colors and forms, especially for gardeners who enjoy planning ahead for a colorful summer display. 1. Choose the Right Time to Start Seeds Celosia is very sensitive to cold, so it’s important to start seeds indoors 6 to 8 weeks before the last expected frost date in your area. This allows the plants enough time to grow strong and healthy before being transplanted outdoors when the weather warms up. 2. Select Quality Seeds Choose seeds from a reliable source. There are different types of celosia—like Plumosa (feathered), Cristata (cockscomb), andSpicata (wheat-type). Decide which one fits your garden design, or try a mix for variety. 3. Prepare the Seed Tray or Containers Use a seed-starting tray or small containers with good drainage. Fill them with a lightweight seed-starting mix, which holds moisture without becoming soggy. Avoid regular garden soil, which can be too dense and compact for delicate seedlings. 4. Sow the Seeds Properly Sprinkle the tiny celosia seeds evenly across the surface of the moist soil. Gently press them down with your fingers or a flat tool, but do not cover them with soil—celosia seeds need light to germinate. Mist the surface lightly with water to help the seeds settle. 5. Create a Warm, Humid Environment Cover the tray with a clear plastic dome or plastic wrap to retain moisture and warmth. Place the tray in a warm location where the temperature stays between 68F to 72F. You can also place the tray on a seedling heat mat to maintain consistent bottom warmth, which speeds up germination. 6. Water Carefully and Consistently Keep the soil moist but not wet. Water gently using a spray bottle or from the bottom by placing the tray in a shallow container of water. This helps avoid displacing the seeds and prevents damping-off disease, a common seedling issue caused by overwatering. 7. Germination Time Under ideal conditions, celosia seeds will sprout in 10 to 15 days. Once you see green sprouts, remove the plastic cover and place the tray under grow lights or near a bright window with indirect sunlight to prevent seedlings from becoming leggy. 8. Provide Enough Light Celosia seedlings need 12 to 14 hours of light daily. If natural light isn’t sufficient, use fluorescent grow lights placed about 2 inches above the seedlings. Raise the lights as the plants grow taller. 9. Thin and Transplant into Larger Pots When the seedlings develop two or more sets of true leaves, thin them out by cutting the weaker ones at the base. You can also transplant the strongest ones into individual small pots to give them more space to grow. 10. Harden Off Before Planting Outdoors About a week before transplanting, start the hardening off process. Gradually introduce the seedlings to outdoor conditions—start with 2–3 hours a day in a shaded, sheltered spot, then increase exposure to full sun and wind over the course of 7–10 days. 11. Transplanting to the Garden Once all risk of frost has passed and night temperatures stay above 59F, transplant your celosia seedlings into the garden or containers. Choose a spot that receives full sunlight for at least 6–8 hours a day. Space the plants 8 to 12 inches apart to allow for airflow and prevent fungal problems. Use well-drained soil enriched with compost or organic matter for best growth. Also Read: How to Propagate Zinnias – An Ultimate Guide How to Propagate Celosia from Cuttings? While most gardeners grow celosia from seeds, propagation from stem cuttings is an excellent method for quickly multiplying your favorite varieties. This technique ensures the new plant is genetically identical to the parent, preserving unique colors, flower forms, and other desirable traits. It’s especially helpful for hybrid varieties or rare cultivars that may not come true from seed. Why Choose Cuttings Over Seeds? Ensures identical blooms as the parent plant Faster results compared to seed germination Useful for saving a mature plant before winter Avoids the variability of seed-grown plants Step-by-Step Guide to Celosia Propagation from Cuttings 1. Select a Healthy Mother Plant Start with a strong, pest-free celosia plant. The best time to take cuttings is during the plant’s active growing phase, usually in late spring or early summer. Avoid flowering stems, as they are more focused on blooming than rooting. Tip: Choose a stem with vibrant green growth, no buds or blooms, and no signs of disease or insect damage. 2. Take the Cuttings Using sterilized scissors or pruning shears, cut a 4 to 6 inch long stemjustbelow a leaf node—this is where new roots will most likely form. Strip off the lower leaves on the bottom half of the stem, leaving only 2–3 leaves at the top. This helps reduce moisture loss and stress. If the leaves are large, trim them in half to reduce transpiration and support faster rooting. 3. (Optional) Dip in Rooting Hormone While celosia can root without hormone, applying rooting hormone powder or gel gives your cutting an advantage, especially in less-than-ideal conditions. Dip the cut end into the hormone Tap gently to remove excess Rooting hormone helps stimulate root growth and reduces the chance of fungal infection at the wound site. Check this: How to Grow Blanket Flower (Gaillardia)? 4. Prepare the Pot or Propagation Medium Use a small pot or seed tray filled with a sterile, well-draining rooting mix. Recommended media include: Peat + perlite Cocopeat + vermiculite Perlite + sand Moisten the mix lightly before planting—damp but not soggy. Make a small hole using a pencil or stick, insert the cutting carefully, and firm the soil gently around it. 5. Create a Humid Environment High humidity is crucial for preventing moisture loss and encouraging root growth. Cover the pot or tray with: A clear plastic bag supported by sticks A humidity dome A mini greenhouse Keep the setup in a bright, warm spot(not in direct sun), with temperatures between 68F to 77F. 6. Water and Monitor Mist the cutting lightly once or twice daily Keep the rooting medium moist but never waterlogged Ensure good air circulation to prevent fungal issues Too much water can cause stem rot, while too little can dry the cutting before roots form. 7. Watch for Root Development Celosia cuttings typically begin to root within 2 to 3 weeks. Gently tug the stem after this period—if you feel resistance, roots have formed. If you’re rooting in water, place the cutting in a clear glass with 1–2 inches of water, changing it every 3–4 days. You’ll see tiny white roots begin to emerge along the stem. 8. Pot Up the Rooted Cutting Once a strong root system (1–2 inches long) has formed: Transplant the cutting into a pot filled with regular potting mix Water thoroughly after transplanting Place in indirect sunlight for a few days before introducing it to full sun This helps the new plant acclimate to its environment without stress. 9. Harden Off and Move Outdoors If you plan to plant your celosia outdoors, harden it off by gradually exposing it to outdoor conditions over 7–10 days. Start with 2–3 hours of morning sun and slowly increase time and exposure. Once hardened off, plant in: Full sunlight (6–8 hours daily) Well-draining soil enriched with compost Spacing of 8–12 inches apart to ensure airflow and healthy growth Check this: How to Plant Daylily Bulbs? Plant Care After Transplanting Celosia After transplanting celosia, water the plants thoroughly to help settle the soil around the roots. For the first week, keep the soil consistently moist to support root establishment, but avoid waterlogging. Place the plants in a spot with full sunlight—at least 6 to 8 hours daily. Celosia loves heat and light, so sunny beds or balconies are ideal. Shade or low light can result in weak, leggy growth and fewer flowers. Ensure the soil is well-drained to prevent root rot. You can improve drainage by adding compost or sand to heavy soils. Mulching around the base helps retain moisture and keeps weeds in check. Apply a balanced, water-soluble fertilizer every 3–4 weeks to promote healthy foliage and vibrant blooms. Avoid over-fertilizing, which can lead to lush leaves but fewer flowers. Pinch off the tips of young plants to encourage bushier growth. Regularly deadhead faded flowers to prolong blooming and keep the plant looking tidy. Celosia requires minimal care once established and will reward you with bold color all season. Also Read: How to Propagate Black-Eyed Susan? Conclusion Growing celosia is a rewarding experience for gardeners of all levels, thanks to its bold colors, unique flower shapes, and easy-growing nature. Whether you start from seeds or cuttings, providing the right conditions—sunlight, well-drained soil, and consistent care—ensures healthy, vibrant plants. With a little attention, celosia will thrive in your garden, containers, or borders, adding a stunning splash of color that lasts all season long. Khaja Moinuddin, a computer science graduate, finds joy in gardening and homesteading. Join him on this blog as he shares his experiences in homesteading, gardening, and composting Source link
0 notes
Text
The Heat Tolerant Celosia

Celosia argentea plumosa brightening the landscape at the ongoing Spring Blossoms in the conservatory. Photo credit: Eleanor Chua.
#photographers on tumblr#Amaranthaceae#canon eos rp#canon photography#Celosia argentea plumosa#feather celosia#flora fauna#flora photography#flower pics#tamron 16-300mm
28 notes
·
View notes
Photo

Celosia got its name from a Greek word for “burning” due to its flame-like flower heads. Native to tropical regions, Celosia is an annual flower plant renowned for its wide array of floral colours. You can grow celosia from seeds or through cuttings. Gardening experts recommend to plant this annual flowering plant in garden beds, instead of containers. Celosia prefers full sun, well-drained soil, sufficient water and soil temperature above 55F to thrive. Celosia Plumosa, Celosia Cristata, Celosia Spicata are three prominent varieties that you can consider to grow in your backyard. Before you decide to germinate seeds or propagate celosia plant through cuttings, lets first know about the plant. Celosia thrives in warm, sunny spots with well-drained soil. Start from seeds indoors or use cuttings, then transplant outdoors after frost, spacing them 8–12 inches apart. Keep soil slightly moist and fertilize every few weeks. Pinch young plants for bushy growth and deadhead often. Celosia rewards with bright, long-lasting blooms all season. Growing Requirements of Celosia Plant Celosia is an ornamental flowering plant that belongs to the amaranth family, Amaranthaceae. It includes various species such as Celosia argentea, Celosia cristata (cockscomb), and Celosia plumosa (plumed celosia) and Celosia Plumosa. Native to tropical regions of Africa and Asia, celosia is known for its flame-like blooms in shades of red, yellow, orange, and pink, making it a favorite in gardens and floral arrangements. Sunlight: Celosia thrives in full sun. Ensure it receives at least 6 to 8 hours of direct sunlight daily for vigorous growth and vibrant blooms. Soil: Well-drained, moderately fertile soil with a slightly acidic to neutral pH (6.0–7.0) is ideal. Avoid heavy clay soils that retain too much moisture. Watering: Water regularly to keep the soil evenly moist, especially during dry spells. However, avoid overwatering as it can lead to root rot. Temperature: Celosia prefers warm conditions. Optimal temperatures range from 20°C to 30°C; protect it from cold drafts or temperatures below 15°C. Fertilization: Apply a balanced, water-soluble fertilizer every 3–4 weeks during the growing season to encourage lush growth and blooming. Spacing: Space plants about 8–12 inches apart to ensure good air circulation and prevent fungal diseases. Pruning and Maintenance: Remove faded flowers to promote continuous blooming. Minimal pruning is needed, but pinching young plants helps them grow bushier. Celosia’s low-maintenance nature and striking colors make it an excellent choice for borders, containers, and cutting gardens. Best Celosia Flower Varieties to Grow Celosia comes in several eye-catching forms, each adding a unique texture and burst of color to gardens and floral displays. Among the most popular types are Plumosa, Cristata, and Spicata—each known for its distinct bloom style and vivid hues. Celosia Plumosa Also known as Feather Celosia, this variety features upright, feathery plumes that resemble flames. It blooms in fiery shades of red, orange, yellow, and pink. Plumosa is perfect for garden borders and thrives well in containers. Its tall, airy flowers also make excellent cut or dried arrangements. Celosia Cristata Cristata, or Cockscomb Celosia, has crested, brain-like flower heads that are bold and dramatic. The blooms come in deep crimson, golden yellow, and rich magenta. This variety is a striking center-piece in beds and bouquets. It’s long-lasting and draws attention with its unusual, velvety texture. Celosia Spicata Known as Wheat Celosia, Spicata features slender, spike-like blooms that resemble wheat heads. The flowers appear in soft shades of pink, lavender, and silver. Spicata adds height and contrast to mixed borders. It’s drought-tolerant and ideal for both fresh and dried floral arrangements. How to Grow Celosia? Celosia is most commonly grown from seeds, which is the easiest and most effective method for home gardeners. However, it can also be propagated from stem cuttings, especially if you want to replicate a specific variety. Both methods are simple and rewarding when done correctly. How to Grow Celosia from Seeds? Starting celosia from seeds is an excellent way to grow a variety of colors and forms, especially for gardeners who enjoy planning ahead for a colorful summer display. 1. Choose the Right Time to Start Seeds Celosia is very sensitive to cold, so it’s important to start seeds indoors 6 to 8 weeks before the last expected frost date in your area. This allows the plants enough time to grow strong and healthy before being transplanted outdoors when the weather warms up. 2. Select Quality Seeds Choose seeds from a reliable source. There are different types of celosia—like Plumosa (feathered), Cristata (cockscomb), andSpicata (wheat-type). Decide which one fits your garden design, or try a mix for variety. 3. Prepare the Seed Tray or Containers Use a seed-starting tray or small containers with good drainage. Fill them with a lightweight seed-starting mix, which holds moisture without becoming soggy. Avoid regular garden soil, which can be too dense and compact for delicate seedlings. 4. Sow the Seeds Properly Sprinkle the tiny celosia seeds evenly across the surface of the moist soil. Gently press them down with your fingers or a flat tool, but do not cover them with soil—celosia seeds need light to germinate. Mist the surface lightly with water to help the seeds settle. 5. Create a Warm, Humid Environment Cover the tray with a clear plastic dome or plastic wrap to retain moisture and warmth. Place the tray in a warm location where the temperature stays between 68F to 72F. You can also place the tray on a seedling heat mat to maintain consistent bottom warmth, which speeds up germination. 6. Water Carefully and Consistently Keep the soil moist but not wet. Water gently using a spray bottle or from the bottom by placing the tray in a shallow container of water. This helps avoid displacing the seeds and prevents damping-off disease, a common seedling issue caused by overwatering. 7. Germination Time Under ideal conditions, celosia seeds will sprout in 10 to 15 days. Once you see green sprouts, remove the plastic cover and place the tray under grow lights or near a bright window with indirect sunlight to prevent seedlings from becoming leggy. 8. Provide Enough Light Celosia seedlings need 12 to 14 hours of light daily. If natural light isn’t sufficient, use fluorescent grow lights placed about 2 inches above the seedlings. Raise the lights as the plants grow taller. 9. Thin and Transplant into Larger Pots When the seedlings develop two or more sets of true leaves, thin them out by cutting the weaker ones at the base. You can also transplant the strongest ones into individual small pots to give them more space to grow. 10. Harden Off Before Planting Outdoors About a week before transplanting, start the hardening off process. Gradually introduce the seedlings to outdoor conditions—start with 2–3 hours a day in a shaded, sheltered spot, then increase exposure to full sun and wind over the course of 7–10 days. 11. Transplanting to the Garden Once all risk of frost has passed and night temperatures stay above 59F, transplant your celosia seedlings into the garden or containers. Choose a spot that receives full sunlight for at least 6–8 hours a day. Space the plants 8 to 12 inches apart to allow for airflow and prevent fungal problems. Use well-drained soil enriched with compost or organic matter for best growth. Also Read: How to Propagate Zinnias – An Ultimate Guide How to Propagate Celosia from Cuttings? While most gardeners grow celosia from seeds, propagation from stem cuttings is an excellent method for quickly multiplying your favorite varieties. This technique ensures the new plant is genetically identical to the parent, preserving unique colors, flower forms, and other desirable traits. It’s especially helpful for hybrid varieties or rare cultivars that may not come true from seed. Why Choose Cuttings Over Seeds? Ensures identical blooms as the parent plant Faster results compared to seed germination Useful for saving a mature plant before winter Avoids the variability of seed-grown plants Step-by-Step Guide to Celosia Propagation from Cuttings 1. Select a Healthy Mother Plant Start with a strong, pest-free celosia plant. The best time to take cuttings is during the plant’s active growing phase, usually in late spring or early summer. Avoid flowering stems, as they are more focused on blooming than rooting. Tip: Choose a stem with vibrant green growth, no buds or blooms, and no signs of disease or insect damage. 2. Take the Cuttings Using sterilized scissors or pruning shears, cut a 4 to 6 inch long stemjustbelow a leaf node—this is where new roots will most likely form. Strip off the lower leaves on the bottom half of the stem, leaving only 2–3 leaves at the top. This helps reduce moisture loss and stress. If the leaves are large, trim them in half to reduce transpiration and support faster rooting. 3. (Optional) Dip in Rooting Hormone While celosia can root without hormone, applying rooting hormone powder or gel gives your cutting an advantage, especially in less-than-ideal conditions. Dip the cut end into the hormone Tap gently to remove excess Rooting hormone helps stimulate root growth and reduces the chance of fungal infection at the wound site. Check this: How to Grow Blanket Flower (Gaillardia)? 4. Prepare the Pot or Propagation Medium Use a small pot or seed tray filled with a sterile, well-draining rooting mix. Recommended media include: Peat + perlite Cocopeat + vermiculite Perlite + sand Moisten the mix lightly before planting—damp but not soggy. Make a small hole using a pencil or stick, insert the cutting carefully, and firm the soil gently around it. 5. Create a Humid Environment High humidity is crucial for preventing moisture loss and encouraging root growth. Cover the pot or tray with: A clear plastic bag supported by sticks A humidity dome A mini greenhouse Keep the setup in a bright, warm spot(not in direct sun), with temperatures between 68F to 77F. 6. Water and Monitor Mist the cutting lightly once or twice daily Keep the rooting medium moist but never waterlogged Ensure good air circulation to prevent fungal issues Too much water can cause stem rot, while too little can dry the cutting before roots form. 7. Watch for Root Development Celosia cuttings typically begin to root within 2 to 3 weeks. Gently tug the stem after this period—if you feel resistance, roots have formed. If you’re rooting in water, place the cutting in a clear glass with 1–2 inches of water, changing it every 3–4 days. You’ll see tiny white roots begin to emerge along the stem. 8. Pot Up the Rooted Cutting Once a strong root system (1–2 inches long) has formed: Transplant the cutting into a pot filled with regular potting mix Water thoroughly after transplanting Place in indirect sunlight for a few days before introducing it to full sun This helps the new plant acclimate to its environment without stress. 9. Harden Off and Move Outdoors If you plan to plant your celosia outdoors, harden it off by gradually exposing it to outdoor conditions over 7–10 days. Start with 2–3 hours of morning sun and slowly increase time and exposure. Once hardened off, plant in: Full sunlight (6–8 hours daily) Well-draining soil enriched with compost Spacing of 8–12 inches apart to ensure airflow and healthy growth Check this: How to Plant Daylily Bulbs? Plant Care After Transplanting Celosia After transplanting celosia, water the plants thoroughly to help settle the soil around the roots. For the first week, keep the soil consistently moist to support root establishment, but avoid waterlogging. Place the plants in a spot with full sunlight—at least 6 to 8 hours daily. Celosia loves heat and light, so sunny beds or balconies are ideal. Shade or low light can result in weak, leggy growth and fewer flowers. Ensure the soil is well-drained to prevent root rot. You can improve drainage by adding compost or sand to heavy soils. Mulching around the base helps retain moisture and keeps weeds in check. Apply a balanced, water-soluble fertilizer every 3–4 weeks to promote healthy foliage and vibrant blooms. Avoid over-fertilizing, which can lead to lush leaves but fewer flowers. Pinch off the tips of young plants to encourage bushier growth. Regularly deadhead faded flowers to prolong blooming and keep the plant looking tidy. Celosia requires minimal care once established and will reward you with bold color all season. Also Read: How to Propagate Black-Eyed Susan? Conclusion Growing celosia is a rewarding experience for gardeners of all levels, thanks to its bold colors, unique flower shapes, and easy-growing nature. Whether you start from seeds or cuttings, providing the right conditions—sunlight, well-drained soil, and consistent care—ensures healthy, vibrant plants. With a little attention, celosia will thrive in your garden, containers, or borders, adding a stunning splash of color that lasts all season long. Khaja Moinuddin, a computer science graduate, finds joy in gardening and homesteading. Join him on this blog as he shares his experiences in homesteading, gardening, and composting Source link
0 notes
Text

Celosia argentea var. plumosa 'Dragon's Breath' / 'Dragon's Breath' Cockscomb at the Sarah P. Duke Gardens at Duke University in Durham, NC
#Celosia argentea var. plumosa 'Dragon's Breath'#Celosia argentea var. plumosa#Celosia argentea#Celosia#Dragon's Breath Cockscomb#Cockscomb#Flowers#Edible plants#Nature photography#Sarah P. Duke Gardens#Duke Gardens#Duke University#Durham#Durham NC#North Carolina
2 notes
·
View notes
Photo

Celosia got its name from a Greek word for “burning” due to its flame-like flower heads. Native to tropical regions, Celosia is an annual flower plant renowned for its wide array of floral colours. You can grow celosia from seeds or through cuttings. Gardening experts recommend to plant this annual flowering plant in garden beds, instead of containers. Celosia prefers full sun, well-drained soil, sufficient water and soil temperature above 55F to thrive. Celosia Plumosa, Celosia Cristata, Celosia Spicata are three prominent varieties that you can consider to grow in your backyard. Before you decide to germinate seeds or propagate celosia plant through cuttings, lets first know about the plant. Celosia thrives in warm, sunny spots with well-drained soil. Start from seeds indoors or use cuttings, then transplant outdoors after frost, spacing them 8–12 inches apart. Keep soil slightly moist and fertilize every few weeks. Pinch young plants for bushy growth and deadhead often. Celosia rewards with bright, long-lasting blooms all season. Growing Requirements of Celosia Plant Celosia is an ornamental flowering plant that belongs to the amaranth family, Amaranthaceae. It includes various species such as Celosia argentea, Celosia cristata (cockscomb), and Celosia plumosa (plumed celosia) and Celosia Plumosa. Native to tropical regions of Africa and Asia, celosia is known for its flame-like blooms in shades of red, yellow, orange, and pink, making it a favorite in gardens and floral arrangements. Sunlight: Celosia thrives in full sun. Ensure it receives at least 6 to 8 hours of direct sunlight daily for vigorous growth and vibrant blooms. Soil: Well-drained, moderately fertile soil with a slightly acidic to neutral pH (6.0–7.0) is ideal. Avoid heavy clay soils that retain too much moisture. Watering: Water regularly to keep the soil evenly moist, especially during dry spells. However, avoid overwatering as it can lead to root rot. Temperature: Celosia prefers warm conditions. Optimal temperatures range from 20°C to 30°C; protect it from cold drafts or temperatures below 15°C. Fertilization: Apply a balanced, water-soluble fertilizer every 3–4 weeks during the growing season to encourage lush growth and blooming. Spacing: Space plants about 8–12 inches apart to ensure good air circulation and prevent fungal diseases. Pruning and Maintenance: Remove faded flowers to promote continuous blooming. Minimal pruning is needed, but pinching young plants helps them grow bushier. Celosia’s low-maintenance nature and striking colors make it an excellent choice for borders, containers, and cutting gardens. Best Celosia Flower Varieties to Grow Celosia comes in several eye-catching forms, each adding a unique texture and burst of color to gardens and floral displays. Among the most popular types are Plumosa, Cristata, and Spicata—each known for its distinct bloom style and vivid hues. Celosia Plumosa Also known as Feather Celosia, this variety features upright, feathery plumes that resemble flames. It blooms in fiery shades of red, orange, yellow, and pink. Plumosa is perfect for garden borders and thrives well in containers. Its tall, airy flowers also make excellent cut or dried arrangements. Celosia Cristata Cristata, or Cockscomb Celosia, has crested, brain-like flower heads that are bold and dramatic. The blooms come in deep crimson, golden yellow, and rich magenta. This variety is a striking center-piece in beds and bouquets. It’s long-lasting and draws attention with its unusual, velvety texture. Celosia Spicata Known as Wheat Celosia, Spicata features slender, spike-like blooms that resemble wheat heads. The flowers appear in soft shades of pink, lavender, and silver. Spicata adds height and contrast to mixed borders. It’s drought-tolerant and ideal for both fresh and dried floral arrangements. How to Grow Celosia? Celosia is most commonly grown from seeds, which is the easiest and most effective method for home gardeners. However, it can also be propagated from stem cuttings, especially if you want to replicate a specific variety. Both methods are simple and rewarding when done correctly. How to Grow Celosia from Seeds? Starting celosia from seeds is an excellent way to grow a variety of colors and forms, especially for gardeners who enjoy planning ahead for a colorful summer display. 1. Choose the Right Time to Start Seeds Celosia is very sensitive to cold, so it’s important to start seeds indoors 6 to 8 weeks before the last expected frost date in your area. This allows the plants enough time to grow strong and healthy before being transplanted outdoors when the weather warms up. 2. Select Quality Seeds Choose seeds from a reliable source. There are different types of celosia—like Plumosa (feathered), Cristata (cockscomb), andSpicata (wheat-type). Decide which one fits your garden design, or try a mix for variety. 3. Prepare the Seed Tray or Containers Use a seed-starting tray or small containers with good drainage. Fill them with a lightweight seed-starting mix, which holds moisture without becoming soggy. Avoid regular garden soil, which can be too dense and compact for delicate seedlings. 4. Sow the Seeds Properly Sprinkle the tiny celosia seeds evenly across the surface of the moist soil. Gently press them down with your fingers or a flat tool, but do not cover them with soil—celosia seeds need light to germinate. Mist the surface lightly with water to help the seeds settle. 5. Create a Warm, Humid Environment Cover the tray with a clear plastic dome or plastic wrap to retain moisture and warmth. Place the tray in a warm location where the temperature stays between 68F to 72F. You can also place the tray on a seedling heat mat to maintain consistent bottom warmth, which speeds up germination. 6. Water Carefully and Consistently Keep the soil moist but not wet. Water gently using a spray bottle or from the bottom by placing the tray in a shallow container of water. This helps avoid displacing the seeds and prevents damping-off disease, a common seedling issue caused by overwatering. 7. Germination Time Under ideal conditions, celosia seeds will sprout in 10 to 15 days. Once you see green sprouts, remove the plastic cover and place the tray under grow lights or near a bright window with indirect sunlight to prevent seedlings from becoming leggy. 8. Provide Enough Light Celosia seedlings need 12 to 14 hours of light daily. If natural light isn’t sufficient, use fluorescent grow lights placed about 2 inches above the seedlings. Raise the lights as the plants grow taller. 9. Thin and Transplant into Larger Pots When the seedlings develop two or more sets of true leaves, thin them out by cutting the weaker ones at the base. You can also transplant the strongest ones into individual small pots to give them more space to grow. 10. Harden Off Before Planting Outdoors About a week before transplanting, start the hardening off process. Gradually introduce the seedlings to outdoor conditions—start with 2–3 hours a day in a shaded, sheltered spot, then increase exposure to full sun and wind over the course of 7–10 days. 11. Transplanting to the Garden Once all risk of frost has passed and night temperatures stay above 59F, transplant your celosia seedlings into the garden or containers. Choose a spot that receives full sunlight for at least 6–8 hours a day. Space the plants 8 to 12 inches apart to allow for airflow and prevent fungal problems. Use well-drained soil enriched with compost or organic matter for best growth. Also Read: How to Propagate Zinnias – An Ultimate Guide How to Propagate Celosia from Cuttings? While most gardeners grow celosia from seeds, propagation from stem cuttings is an excellent method for quickly multiplying your favorite varieties. This technique ensures the new plant is genetically identical to the parent, preserving unique colors, flower forms, and other desirable traits. It’s especially helpful for hybrid varieties or rare cultivars that may not come true from seed. Why Choose Cuttings Over Seeds? Ensures identical blooms as the parent plant Faster results compared to seed germination Useful for saving a mature plant before winter Avoids the variability of seed-grown plants Step-by-Step Guide to Celosia Propagation from Cuttings 1. Select a Healthy Mother Plant Start with a strong, pest-free celosia plant. The best time to take cuttings is during the plant’s active growing phase, usually in late spring or early summer. Avoid flowering stems, as they are more focused on blooming than rooting. Tip: Choose a stem with vibrant green growth, no buds or blooms, and no signs of disease or insect damage. 2. Take the Cuttings Using sterilized scissors or pruning shears, cut a 4 to 6 inch long stemjustbelow a leaf node—this is where new roots will most likely form. Strip off the lower leaves on the bottom half of the stem, leaving only 2–3 leaves at the top. This helps reduce moisture loss and stress. If the leaves are large, trim them in half to reduce transpiration and support faster rooting. 3. (Optional) Dip in Rooting Hormone While celosia can root without hormone, applying rooting hormone powder or gel gives your cutting an advantage, especially in less-than-ideal conditions. Dip the cut end into the hormone Tap gently to remove excess Rooting hormone helps stimulate root growth and reduces the chance of fungal infection at the wound site. Check this: How to Grow Blanket Flower (Gaillardia)? 4. Prepare the Pot or Propagation Medium Use a small pot or seed tray filled with a sterile, well-draining rooting mix. Recommended media include: Peat + perlite Cocopeat + vermiculite Perlite + sand Moisten the mix lightly before planting—damp but not soggy. Make a small hole using a pencil or stick, insert the cutting carefully, and firm the soil gently around it. 5. Create a Humid Environment High humidity is crucial for preventing moisture loss and encouraging root growth. Cover the pot or tray with: A clear plastic bag supported by sticks A humidity dome A mini greenhouse Keep the setup in a bright, warm spot(not in direct sun), with temperatures between 68F to 77F. 6. Water and Monitor Mist the cutting lightly once or twice daily Keep the rooting medium moist but never waterlogged Ensure good air circulation to prevent fungal issues Too much water can cause stem rot, while too little can dry the cutting before roots form. 7. Watch for Root Development Celosia cuttings typically begin to root within 2 to 3 weeks. Gently tug the stem after this period—if you feel resistance, roots have formed. If you’re rooting in water, place the cutting in a clear glass with 1–2 inches of water, changing it every 3–4 days. You’ll see tiny white roots begin to emerge along the stem. 8. Pot Up the Rooted Cutting Once a strong root system (1–2 inches long) has formed: Transplant the cutting into a pot filled with regular potting mix Water thoroughly after transplanting Place in indirect sunlight for a few days before introducing it to full sun This helps the new plant acclimate to its environment without stress. 9. Harden Off and Move Outdoors If you plan to plant your celosia outdoors, harden it off by gradually exposing it to outdoor conditions over 7–10 days. Start with 2–3 hours of morning sun and slowly increase time and exposure. Once hardened off, plant in: Full sunlight (6–8 hours daily) Well-draining soil enriched with compost Spacing of 8–12 inches apart to ensure airflow and healthy growth Check this: How to Plant Daylily Bulbs? Plant Care After Transplanting Celosia After transplanting celosia, water the plants thoroughly to help settle the soil around the roots. For the first week, keep the soil consistently moist to support root establishment, but avoid waterlogging. Place the plants in a spot with full sunlight—at least 6 to 8 hours daily. Celosia loves heat and light, so sunny beds or balconies are ideal. Shade or low light can result in weak, leggy growth and fewer flowers. Ensure the soil is well-drained to prevent root rot. You can improve drainage by adding compost or sand to heavy soils. Mulching around the base helps retain moisture and keeps weeds in check. Apply a balanced, water-soluble fertilizer every 3–4 weeks to promote healthy foliage and vibrant blooms. Avoid over-fertilizing, which can lead to lush leaves but fewer flowers. Pinch off the tips of young plants to encourage bushier growth. Regularly deadhead faded flowers to prolong blooming and keep the plant looking tidy. Celosia requires minimal care once established and will reward you with bold color all season. Also Read: How to Propagate Black-Eyed Susan? Conclusion Growing celosia is a rewarding experience for gardeners of all levels, thanks to its bold colors, unique flower shapes, and easy-growing nature. Whether you start from seeds or cuttings, providing the right conditions—sunlight, well-drained soil, and consistent care—ensures healthy, vibrant plants. With a little attention, celosia will thrive in your garden, containers, or borders, adding a stunning splash of color that lasts all season long. Khaja Moinuddin, a computer science graduate, finds joy in gardening and homesteading. Join him on this blog as he shares his experiences in homesteading, gardening, and composting Source link
0 notes