#File renaming tool
Explore tagged Tumblr posts
Visit Tumblr Blog
Explore Tumblr blogs with no restrictions, modern design and the best experience.
Last Seen Tumblr Blogs


Fun Fact
Tumblr.com is the 103rd most visited website in the world.
Text
FileBot
FileBot is a free application designed for those with extensive collections of video files, including TV episodes, anime, movies, and more. This utility offers several unique and practical features, such as managing and downloading relevant subtitles, a navigational panel, and lists for various types of media. Thanks to its minimal interface, FileBot allows users to easily organize items into…
#Anime collection management#Checksum verification#Duplicate file finder#File renaming tool#FileBot#Media file organizer#Media metadata editor#Movie database integration#Subtitle downloader#TV show organizer#Video file management
0 notes
Text
god i love computer programs so much
#twist rambles#just got bulk rename utility and the HOURS this is going to save meeee. it works so similarly to excel (with like. how i do my comic#spreadsheets at least with the data splitting tool with using like oh split at every pound sign or whatever. its awesome i love this so muc#genuinely SO fucking happy i looked into it bc i had about. well. 5100 files to rename manually and this takes like 2 seconds. this rocksss
4 notes
·
View notes
Text
PDQ Docs: The Ultimate Document Management Software for Modern Businesses
In today’s fast-paced business environment, managing documents efficiently is crucial to maintaining productivity, ensuring compliance, and streamlining workflows. Companies are constantly seeking tools that can simplify the document management process while maintaining accuracy and consistency. PDQ Docs is the ultimate document management software that offers businesses a robust solution for organizing, automating, and securing their documents. This powerful software enables organizations to manage their documents with ease, improving overall efficiency and reducing the risk of errors.

What Makes PDQ Docs the Ultimate Document Management Software?
PDQ Docs stands out as the ultimate document management software due to its comprehensive features and user-friendly interface. Designed to meet the needs of businesses of all sizes, PDQ Docs provides a central platform to store, organize, and manage all types of documents. With its cloud-based system, businesses can easily access documents from anywhere, on any device, ensuring seamless collaboration across teams and locations.
The software allows businesses to automate document creation, eliminating the need for manual data entry and reducing the risk of human error. Whether it’s contracts, invoices, or reports, PDQ Docs allows users to generate documents with pre-set templates, automatically populating them with relevant data. This not only speeds up document creation but also ensures consistency across all documents, reflecting the organization’s professional standards.
Simplified Workflow Automation
One of the primary benefits of PDQ Docs as the ultimate document management software is its ability to automate workflows. In today’s business landscape, where time is of the essence, manual document management processes can slow down productivity. PDQ Docs solves this problem by automating routine tasks, such as document creation, data entry, and document approval processes.
Enhanced Collaboration and Document Sharing
Collaboration is a key component of modern business operations, and PDQ Docs excels in enabling teams to work together efficiently. The ultimate document management software provides a centralized document repository, where team members can easily access, review, and edit documents in real-time. This reduces the risk of version control issues and ensures that all team members are working from the most up-to-date version of a document.
Furthermore, PDQ Docs allows users to share documents securely with clients, vendors, or other stakeholders. The software ensures that all shared documents are protected with encryption, providing businesses with peace of mind that their sensitive information is secure. With robust access control features, businesses can also restrict who can view or edit documents, ensuring that only authorized individuals have access to critical information.
Seamless Integration with Existing Systems
Another standout feature of PDQ Docs is its seamless integration with a variety of third-party software solutions. Whether your business uses accounting, customer relationship management (CRM), or enterprise resource planning (ERP) software, PDQ Docs can integrate with these systems to provide a cohesive solution for managing documents. This integration reduces the need for manual data entry, ensuring that all information across platforms remains synchronized and up-to-date.
#ultimate document management software#seamlessly navigate#template management#document generation#document cloning#document renaming#document sending#workflow optimization#efficient document generation#document preparation#enterprise document management#workflow automation#business process management#document archiving#document automation tools#secure file management
0 notes
Text
Streamline File Organization: Unleash Efficiency with Advanced Renamer
Advanced Renamer is a versatile software designed to simplify the process of batch renaming files in various formats. With its comprehensive set of features and user-friendly interface, it caters to the needs of both casual users and professionals seeking efficient file organization solutions. Features: Batch renaming of files and folders Support for numerous renaming methods and…

View On WordPress
#Advanced Tool#Batch Renaming#Bulk Renamer#File Renamer#Metadata Integration#Renamer#software#windows
0 notes
Text

🚀 Clean Launcher App for Windows
Hey Simmers!
I’m excited to share the first public release of my Clean Launcher app—a one-stop, user-friendly tool for managing your Sims 4 mods, cleaning cache and error logs, scanning for duplicates, and backing up important files. All the essentials in one easy Windows app!
What’s in Clean Launcher?
🧹 Clean & Launch Sims 4: Clean cache/error logs and launch Sims 4 in one click. (You can set it to clean only when your Mods folder changes.) Switch between Mods Profiles for different playstyles.
🔎 Scan Mods Folder: Finds duplicates, hidden/zipped/missing files, and more. Fix everything in one click or review/fix issues individually. Expand sections for more details.
📦 Drag & Drop Mod Installer: Drag in ZIPs or mods, or browse for files—they’ll be auto-extracted and sorted into Mods, Tray, or Saves. Great for quickly adding new Sims/Builds.
🗂️ Backup Mods, Saves & Tray: Zip your Mods, Saves, or Tray for backup or easy transfer to another PC.
🧩 Organize Mods Folder: Auto-sort your Mods into simple, detailed, or custom categories (undo anytime). Edit folder names/keywords as needed; update subfolders if you rename or move a parent folder.
👤 Manage Mod Profiles: Create/switch between mod profiles. New CC is detected and you’ll be prompted to import it before switching. CC disappeared? Don't worry, it's safely backed up. Just switch profiles, or in Manage Mod Profiles, go to More>View Backups, to see your stored profiles.
Development is ongoing—if you run into any issues, please report them (including the app’s report file). You can do this in More Tools>Help & Online.

How to Download & Install Clean Launcher
• Download to your regular Downloads folder.
• Note: This is an app for Windows, not a Sims 4 mod—install it like any other program.
⚠️ Antivirus Notice
Because Clean Launcher isn’t “code-signed” (like most indie apps), some antivirus programs may warn or block it by mistake.
You can safely allow or restore the file. Major antivirus programs (Kaspersky, Bitdefender, Avast, etc.) don’t flag it as dangerous (see the VirusTotal scan).
If your antivirus quarantines it, please check the quarantine section and restore Clean Launcher. (Google how to restore files for your antivirus if you’re not sure.)
I’ve submitted Clean Launcher to Microsoft for review—Windows Defender warnings should disappear soon after their next update.
Having trouble installing or updating?
If you see an error like DeleteFile failed; code 5. Access is denied., it usually means Clean Launcher is still running or that you don't have administrator rights.
Fix:
Please ensure that Clean Launcher is completely closed, including from the system tray.
If the error continues, open Task Manager, end any “CleanLauncher.exe” processes, and then try again.
Right-click the EXE and choose Run as Administrator. TL;DR: Clean Launcher is safe. Only 4 out of 79 antivirus programs (none of the major ones) flag it. As long as you downloaded it from this page, you’re fine.
Need more help?
Check the User Guide (download in the post or find it under More Tools > Help in Clean Launcher)
Or leave a comment below!
Need to report a bug? Go here

PATREON (Just join as a free member to access the download!)
617 notes
·
View notes
Text
how to build a digital music collection and stuff
spotify sucks aaaass. so start downloading shit!!
file format glossary
.wav is highest quality and biggest
.mp3 is very small, but uses lossy compression which means it's lower quality
.flac is smaller than .wav, but uses lossless compression so it's high quality
.m4a is an audio file format that apple uses. that's all i really know
downloading the music
doubledouble.top is a life saver. you can download from a variety of services including but not limited to apple music, spotify, soundcloud, tidal, deezer, etc.
i'd recommend ripping your music from tidal or apple music since they're the best quality (i think apple music gives you lossless audio anyway. .m4a can be both lossy and lossless, but from the text on doubledouble i assume they're ripping HQ files off apple music)
i also love love love cobalt.tools for ripping audio/video from youtube (they support a lot of other platforms too!)
of course, many artists have their music on bandcamp — purchase or download directly from them if you can. bandcamp offers a variety of file formats for download
file conversion
if you're downloading from apple music with doubledouble, it spits out an .m4a file.
.m4a is ok for some people but if you prefer .flac, you may wanna convert it. ffmpeg is a CLI (terminal) tool to help with media conversion
if you're on linux or macOS, you can use parameter expansion to batch convert all files in a folder. put the files in one place first, then with your terminal, cd into the directory and run:
for i in *.m4a; do ffmpeg -i "$i" "${i%.*}.flac"; done
this converts from .m4a to .flac — change the file extensions if needed.
soulseek
another way to get music is through soulseek. soulseek is a peer-to-peer file sharing network which is mainly used for music. nicotine+ is a pretty intuitive (and open-source) client if you don't like the official one.
you can probably find a better tutorial on soulseek somewhere else. just wanted to make this option known
it's bad etiquette to download from people without sharing files of your own, so make sure you've got something shared. also try to avoid queuing up more than 1-2 albums from one person in a row
tagging & organizing your music
tagging: adding metadata to a music file (eg. song name, artist name, album) that music players can recognize and display
if you've ripped music from a streaming platform, chances are it's already tagged. i've gotten files with slightly incorrect tags from doubledouble though, so if you care about that then you might wanna look into it
i use musicbrainz picard for my tagging. they've got pretty extensive documentation, which will probably be more useful than me
basically, you can look up album data from an online database into the program, and then match each track with its file. the program will tag each file correctly for you (there's also options for renaming the file according to a certain structure if you're into that!)
there's also beets, which is a CLI tool for... a lot of music collection management stuff. i haven't really used it myself, but if you feel up to it then they've got extensive documentation too. for most people, though, it's not really a necessity
how you wanna organize your music is completely up to you. my preferred filestructure is:
artist > album > track # track

using a music player
the options for this are pretty expansive. commonly used players i see include VLC, foobar2000, clementine (or a fork of it called strawberry), and cmus (for the terminal)
you can also totally use iTunes or something. i don't know what audio players other systems come with
i personally use dopamine. it's a little bit slow, but it's got a nice UI and is themeable plus has last.fm support (!!!)
don't let the github page fool you, you don't have to build from source. you can find the releases here
click the "assets" dropdown on the most recent release, and download whichever one is compatible with your OS
syncing
if you're fine with your files just being on one device (perhaps your computer, but perhaps also an USB drive or an mp3 player), you don't have to do this
you can sync with something like google drive, but i hate google more than i hate spotify
you can get a free nextcloud account from one of their providers with 2GB of free storage. you can use webDAV to access your files from an app on your phone or other device (documents by readdle has webDAV support, which is what i use)
disroot and blahaj.land are a couple providers i know that offer other services as well as nextcloud (so you get more with your account), but accounts are manually approved. do give them a look though!!
if you're tech-savvy and have an unused machine lying around, look into self-hosting your own nextcloud, or better yet, your own media server. i've heard that navidrome is a pretty good audio server. i unfortunately don't have experience with self-hosting at the moment so i have like zero advice to give here. yunohost seems to be a really easy way to manage a server
afterword
i don't know if any of this is helpful, but i just wanted to consolidate my personal advice in one place. fuck big tech. own your media, they could take it away from you at any moment
2K notes
·
View notes
Text
USEFUL SOFTWARE FOR THE SIMS 2

This is a list of programs that will make your life easier if you're an avid Sims 2 player. Click on program titles to get download links.
SimPE The most known software for The Sims 2 that lets you edit package files. You can do basic stuff like rename a Sim, change family name, edit Sims' genetics as well as edit/create mods. Don't use if you have no idea what you're doing, watch a tutorial first or back up your neighborhood beforehand in case you mess something up! The newest version also has a terrain editor.
Sims2Pack Clean Installer The best program for installing downloaded lots and Sims. Those don't just go into Downloads, you need to install them!
Hood Checker This program checks neighborhood references and can clean out ones that are broken. Also useful for bringing back lost graves (it's still good to have NoUnlinkOnDelete).
HCDU Plus The Hack Conflict Detector Utility lets you scan your Downloads folder to check if you have any mods that edit the same aspect of the game, so can potentially be in conflict. Also useful to navigate which mods load first (load order is important for some mods to work).
What Caused This When you have 'testingcheats' on, the game gives you error messages if there's something going on. Not all of them mean there's a serious problem, but What Caused This can help you navigate what the source is. Upload the log file (Documents/EA/TS2/Logs) in the program, give it your Downloads folder and it will scan it to look for the culprit. Might give you straighforward information on which mod conflict caused the issue or that you lack Smarter EP Check for a mod that requires it.
The Compressorizer You can compress your Downloads to take up less space.
Delphy's Download Organiser You can filter your files to a certain category, scan for orphans (files that don't fully work if other files are missing, such as meshes), duplicates, and clean up your Downloads folder in an easier way than trying to track it inside the folder manually.
Outfit Organiser You downloaded CC clothes that the creator marked as outerwear but you think they don't fit in that category? With this program you can quickly change that! It's also doable in SimPE, but Outfit Organiser is a lot easier to use.
CPack Editor If you want to make plastic surgery genetic, there's no need to do it manually in SimPE, especially if it's more than one Sim. In CPack Editor, you just choose your neighborhood's folder, run the program, and it changes ALL surgery faces in that neighborhood to genetic!
Lot Adjuster This program lets you edit already existing lots. If you want a smaller or bigger lot than possible in-game, you can do it here! Also great for creating pavilions or row houses that are all separate lots, as you can get rid of the 2-tile border separating buildings by making the lots smaller and copying them.
Lifespan Builder A simple online tool by Lazy Duchess that lets you make your own custom lifespan without SimPE! You just put the numbers in and download a ready mod. Note: the number in game files is always 1 day shorter than it shows in the Sim's age bar, so example: if you want the toddler stage to be 5 days in-game (as in, it shows "5 days away" after growing up from a baby), you need to put in 4.
832 notes
·
View notes
Text


Potions A Plenty - Potion Brewing Set
Pulling from most every other set of Sun&Moon for potion ingredients, this set gives the sims the ability to brew various potions that affect moods, skills, life states, aging, pregnancy, health, and a variety of other mostly harmless effects.
The Quick Feature Review/Set Breakdown below the cut.
Download - SFS
View Use/Instruction Manual
The Potion Crafting Bench - The heart of the set itself, the potion bench is where components are stored, prepared, and combined into batches of potions. At this station, sims can do the following.
Practice potion making and brew a total of 56 potions that have varying effects when drank by sims
Earn Logic Skill and Science Enthusiasm
Stock materials
Order Supply Bundles to facilitate quicker potion making
Obtain a Writ of Mastery in potion crafting
Keep a tidy workstation by keeping things clean
A set of “basic” potions, and their ingredients will be considered REQUIRED for function. Do not remove those files. Let the manual guide you.
This set is MAC-compatible and requires Smarter EP Check, Easy Inventory Check, Easy Lot Check and Money Globals. These are HARD requirements. The set will NOT FUNCTION without these files.
Access to these is dictated by logic skill level as well as a writ of mastery/Creature Life State/Traits.
This station has 28 decorative slots, as well as a decorative mode to enable/disable effects and an "in use" look at will.
Story Mode Enabled - Skip all the ingredients and steps, just enjoy the end products, or just run the animations on a station for the ease of taking pictures.
*New Feature* - Station Cleanliness. As the station is used, it will obtain dirty points. This dirty level affects the outcomes of potion crafting and increases failure chances. Make sure to keep the cauldron clean to ensure quality products!
*New Feature* - Supply Ordering. For a flat rate, sims can buy a bulk order of various materials needed for any potion. They will be added directly to the station's crafting counts.
All potions can be found in Hobbies/Logic. Complete Dutch and Portuguese translations. If you'd like to translate into your native language, please share your strings with us and we'll update the set proper!
Inventory Tools & New Items
Botanical Book - Pretty and useful. Inventory Tool.
Writ of Mastery - Apothecary Version. Inventory Tool.
Crate of Jars - 6 glass jars needed for potion making.
Cauldron Dregs - Waste produced from cleaning the station or failing in potion making.
Bonus Items
Reference Tome - In game recipe book for all potions
Counter Split OMSP - Give maxis counters a chance to hold more things!
Display Shelves - 9 decorative slots, two versions.
Apothecary Todd Cart and Pavilion - Previously released sets bundled into this set; they have been optimized and renamed, please remove the old versions.
Potion Specifics
Potions come in 5 types: Basic, Folk Remedy Potions, Arcane Potions, Creature/Lifestate Potions, and Poison Potions. The more fantastical the potion, the more complex it is to make.
Please be aware that depending on your playstyle you will have to add more files from other sources or you can delete certain files from this set without worry; For example, if you do not play your game with creature life states or custom creature life states, you may delete anything related to those potions, provided it is not used in another “basic” potion.
Potions are NOT recolorable and will not be made so in the future. If you wish to alter the bottle/potion colors yourself, this may be done in the properties/categorized properties tab of each subset txmt in SimPe, using the stdMatDiffCoef line.
Potions Vs. Teas: You will notice that many potions have the same effects as previously released teas from the Quali-Tea set. So what’s the difference?
Teas are based on cooking and logic skills only. Potions function more on Logic skill level and a Writ of Mastery, OR Witch/Warlock state, and other traits.
Teas are single cup per crafting interactions (except basic hunger teas). Potions will always produce in a batch of 6.
In some cases, Teas require MORE ingredients to make, whereas Potions require LESS ingredients but higher Logic skill and rarer/less natural ingredients.
While potions can have the same effect as a similar tea, more risk is involved with taking them and sims can experience adverse/opposite of intended effects.
319 notes
·
View notes
Text
The Permanent Fix For Counter Texture Glitch
A while ago I posted this tutorial for fixing the counter texture glitch. But it was not perfect and couldn't fix each and every cc counter out there.
I've finally found a fix for that too. Problem was corrupt TXTC resources that needed to be replaced. Now you can download every cc counter that comes in sims3pack and extract them into package and never have the annoying counter texture glitch ever again. Bad news is you have to do it all yourself. But don't worry! it's not that difficult and I've come with pictures.
What you'll need: s3pe, s3oc and texture tweaker 3 - and optionally Sims3Pack Multi Installer or s3ce. The download link for TT3 is in the 3rd post and there's a tutorial here. If you don't have them already, go download them. You can NOT use TSRW for this tutorial since TSRW itself is the problem. :)
First extract the package from the sims3pack using either Multi Installer/Extractor or s3ce. After you have your package file, open it up in s3pe. In my example, I'm using Gosik's New Vintage Kitchen Counter 1. Select the first OBJD resource in the resource list.
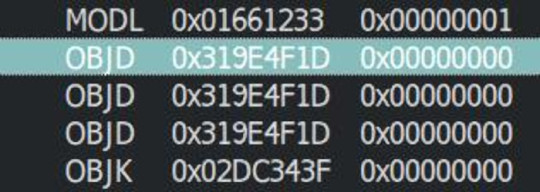
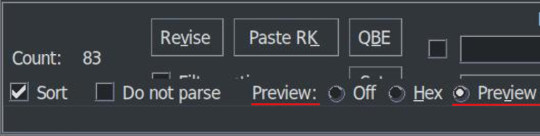
Also make sure you have Preview selected at the bottom of the program window in s3pe.
On the right side, you will see the preview of the resource in text. Scroll down until you see the InstanceName.
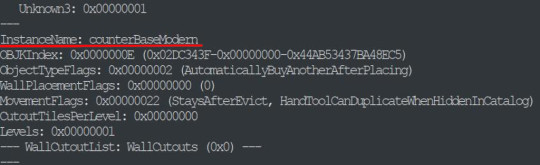
It's usually counterBaseModern but not always. This is the instance name of the object that this counter is cloned from. In modular objects like counters there are multiple objects. For counters, they are base, top and corner. Keep that in mind for now.
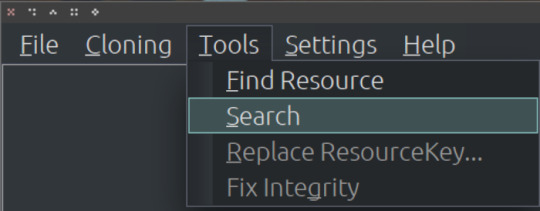
Take a note of or copy the instance name and open s3oc. First, Go to Settings -> Game Folders and make sure game folders are detected. If not, add them manually. You can also define your creator name under the Settings menu. Now, go to Tools -> Search.
Paste the instance name in the search bar; select Resource Name and hit Search.
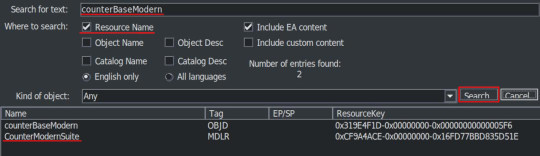
You will have two results: counterBaseModern and CounterModernSuite. I suggest that you clone the suite because it's the modular object that contains all the parts of a counter: base, top and corner. If not, you have to clone every part individually which are counterBaseModern, counterTopModern and counterCornerModern.
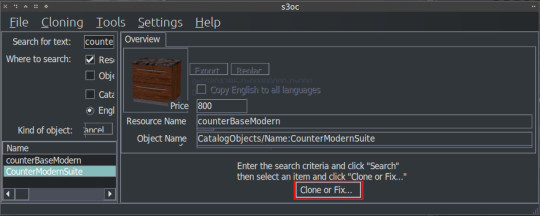
Cloning the Suite makes the process a lot quicker so I'll continue from there. Click on the CounterModernSuite and hit Clone or Fix at the right side.
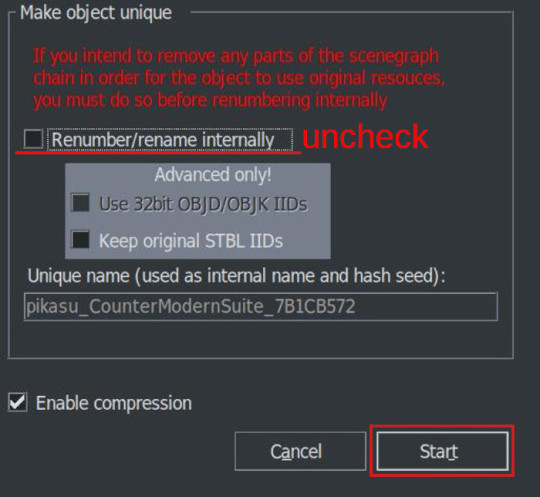
That will open the cloning interface. Make sure you UNCHECK the Renumber/rename internally. We do NOT want to renumber. Then hit Start.
It will ask where you want to save your new package and if you already have a creator name defined earlier it will add it to the package name. If not, it may or may not ask for your creator name. Honestly, I can't remember and I don't think it matters. Anyway, chose a folder - preferably a work folder you created earlier - and keep the name it suggests. It will inform you when it's done.
We cloned our package. Now we need to export the necessary TXTC resources from it. We need the Diffusemap TXTC resource for each part. Start another instance of s3pe and open the package file you've just created which should be something like this: creatorname_CounterModernSuite_someAlphaNumericals.
You'll notice that there are 6 TXTC resources in the resource list. Check the resource names and the Group IDs. You need the DiffuseMap for base, top and corner parts. Click on the resource, then right click and Export.
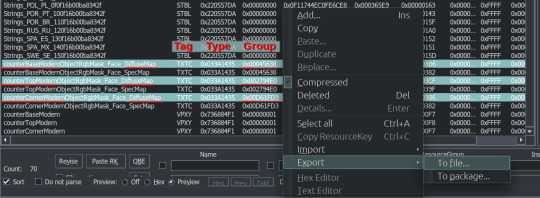
You can export them all at once or create a folder for each if you don't want to get confused. Notice that they all have different Group IDs and names. As we move to the next part keep that in mind.
After exporting, you can close this package. We'll go back to the package we want to fix, in this case, Gosik's New Vintage Kitchen Counter 1. Open the package again or switch to it if it's open in s3pe.
Select the first TXTC resource which is most likely is the DiffuseMap for the base part. Unfortunately, most cc doesn't have a _KEY resource so they don't have resource names. Group ID's come in handy here. For this counter suite Group IDs for parts are like this:
base -> 0x00045638; top -> 0x002794E0; corner -> 0x00D661FD3
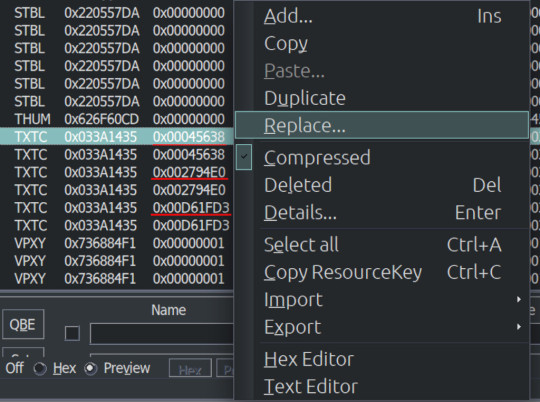
But there are 2 TXTC resources for each Group ID. One of them is SpecMap which is not corrupted. The corrupted one will have a preview like this:
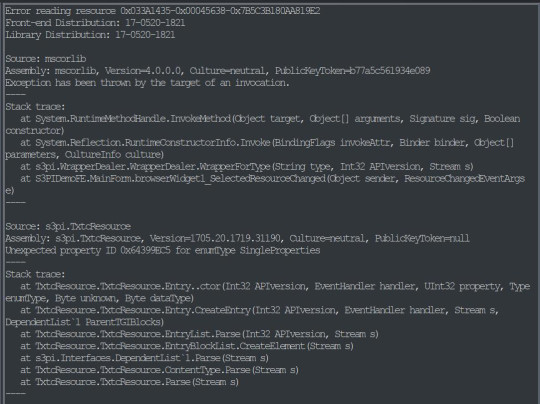
This is simply s3pe telling you it's having an 'Error reading the resource'. My interpretation: The resource is corrupted. So combine this with the right Group ID and right click on the resource and choose Replace. Do not use Import! You need to Replace the resource without changing its instance number. Choose the right resource you exported earlier. Again check the name and Group ID. it should be something like: S3_033A1435_00045638_A85033BB5A059932_counterBaseModernObjectRgbMask_Face_DiffuseMap%%+TXTC
This is for the base object. For top and corner parts, repeat the replacing step with the right resources.
After you replace all the corrupted resources, s3pe will no longer give an error reading those resources when you click on them. And neither will TT3. You will now save your package and close s3pe. A reminder: If the TXTC resources are not corrupted in CC package, skip all and continue as below.
After that you will open your package in TT3 and follow the tutorial here. But a brief rundown would be: select each 'Normal Object' one by one and switch to CASt presets tab after each selection. In this tab, all you have to do is uncheck and then recheck the box next to PatternA and hit Commit. Do it for every preset. Repeat it for every object in the package. Save. Close. Done. :)
For island counters, process is the same but with 4 parts. Base, EndW, EndE and Corner. Also this works for other modular objects like cabinets and sectional sofas.
One last clarification: If the object is cloned from another counter suite, the Group IDs that we used will be different. Also some CC will have Group IDs different from the main object it's cloned from. If that happens, you may need to have a leap of faith.
Usually the order from top to bottom is base, top, corner (counters) and base, endW, endE, corner (islands), starting with the first TXTC resource. So in theory, if you select the corrupt resources from top to bottom, you can replace with that order without the Group IDs.
That's it. I don't think anyone will bother with this. But If you have questions, ask away.
219 notes
·
View notes
Text
Resources for Creating: My Go-To things.
Update: I’ll be updating the list on this page from now on, since Tumblr can’t handle so many hyper-links in one post, on Dreamwidth - right here, so I won't have to update it multiple times. Please note: I keep updating this list, and updates aren't showing up on reblogs. Please check the original post for the most up to date list.
Sooo this is going to be a long comprehensive list. I got back to this game after a long time and with a different computer, with a dedicated graphics card, hurray! It made me want to return to making things, so while gathering back all the necessary stuff, I've complied this list. It might be is updated as I go along, but these are the main things I use. Maby one day i'll even finish something. So here are my go-to resources & tutorials; I'm posting it here for safekeeping, and hopefully others will find it helpful. Everything that's listed is here free. So many wonderful things for free under the cut.
Programs – General:
Creating: Blender. Blender Addons: 3D Print Toolbox – comes with blender, enable it from within the program. Originally for 3d printing. Good for fixing flipped normals, and some quick general repairs. Source Tools And source tools wiki – for exporting as SMD!!!! (SimPe: to enable bump maps for the mesh on import). GMDC Addon for Blender 4.0+ by Nopke.
GIMP. GIMP Addons: G'MIC-Qt. Resynthesizer. Nvidia dds?. Doesn’t it come with Gimp?
Other: Nvidia Texture Tools Exporter (iirc it works with all graphic cards that are compatible, doesn’t require Nvidia). For making Normal / Bump / Cube Maps. For high quality compression.
NormalMaps - Online, For making all types of maps, has good setting menus. A very cool tool.
Converting: Umodel, for Unreal Engine (Static meshes: export as gtlf.2. Animated meshes: export as psk. Requires Add-on). AssetStudio, for Unity. AC Viewer, self implied (+ USD Addon for blender). QuickBMS* and support forum, for basically everything else. (don't forget the required scrips, down the same page). *I haven’t tested it fully yet, but it was recommended here. A tutorial for it is listed further down. Works like a charm.
UV Mapping: UV Mapper, Classic (free) and the most recent Demo (for visualization).
Programs – Sims:
Never Mind the Bollox, Here's Osab and MAGIkarp to the rescue!
Latest version of SimPe, works with a non-default installation path. Chris Hatch's updates.
Home Crafter installation, Post by Huge Lunatic at Sims2Artists.
Repository Wizard, by Pick'N'Mix Mods. A game changer.
DBPF Compare, by Pick'N'Mix Mods.
Object Relocator, also by Pick'N'Mix Mods.
SMD Tools, by Lazy Duchess.
The Compressorizer, by JFade – Lazy Duchess's edit.
Bulk Rename Utility, to change file names in well, bulk. As explained by io here.
Lot Adjustor, by Mootilda at MTS.
Tutorials:
Override the game's graphic settings via Nvidia, as explained by iCad. The settings to Nvidia Profile Inspector she linked to at MTS have been deleted for some reason, here they are via WebArchive.
Meshing in Blender:
Mesh Optimization Info (and links), by Crisps&Kerosene.
Additional - Reducing Polycount:
Tutorial, by Flaming-Chickens (another username on other sites perhaps?)
Edge – Un-subdivide, a quick one by CG Link.
Transfer high poly details to low poly object in Blender, by 3Dnot2D.
Shrinkwrap Modifier - Blender Tutorial for Beginners - Basics, by in2vert.
Placeholder for this Addon that I want to try but haven't found, something for AR that was on facebook's defunct AR.
Scaling tips, by Blender Secrets.
How to fix inverted/ flipped normals, by ipaintsmallthings.
Converting: How to Extract 3D Models, Textures, Music from Unreal Engine Games, by iwanMods.
Extract 2D/3D/SFX Unity Assets fast & easy from your Unity Game, by iwanMods as well.
How to use QuickBMS, by darkhorse.
Guide to Converting 3t2 and 4t2 Part 01 and Part 02, by Chiaroscuro/tenlittlepandas.
Converting TS4 Windows and Doors, by Crisps&Kerosene.
Using Different Material Maps as Shading/Details for Base Texture, in Gimp or Blender, by Pineapple Forest & Crisps&Kerosene: https://www.tumblr.com/crispsandkerosene/764893644571525120/great-info-thats-the-reason-some-conversions?source=share
Texture Editing in GIMP:
Using Gimp Add-ons: G'MicQT. Resynthesizer. Both by Davies Media Design. This guy's channel for Gimp in general – here's a good one to begin with. And another one about layer masks.
Making a texture Tile Seamless: 1. My favorite - How to Make Seamless Textures for Cinema 4D - 3 Levels of Photoshop Wizardry using iPhone Photos, by School of Motion.
2. Simple Trick for More Realistic Texture Patterns in GIMP, by Davies Media Design – Quick and simple, using the Resynthesizer plugin. Good for patterns.
Making walls in SimPe out of a square texture, with minimal quality loss. To be written.
SimPe: Cloneable Objects: A List of Good Objects for Cloning, by IgnorantBliss at MTS.
Huge Lunatic's Tutorials, Her website.
Object Creation for Absolute Beginners, by Moune.
Sims 2 start to finish Object Creation Tutorial, by JWoods, Numenor, Lethe_s & IgnorantBliss.
The Material Definition (TXMT) Guide, by PixelHate – very comprehensive. Part 5 is about Bump/ Normal maps.
Null (Texture-less) Groups, by Skell. For bodyshop, for Objects see an elaboration by Midge the Tree below.
Crisps&Kerosene discovered how to add specular maps to objects! It's incredible there are still new things to discover in this ancient game.
More on Specular Maps, by Pineapple Forest.
Making new flooring & walls with SimPE, by Charisa. Includes adding Bump/Normal maps. She added a file to clone from in the comments below. It works for normal maps as well. Here's cool discovery in the game files.
Expanding footprint: a mini tutorial, by Deedee.
How to add correct drop shadows to objects, by Yuxi, via Wayback Machine.
Making Objects Viewable in Neighborhood View, by iCad.
Making Objects Visible In Build/Buy Mode, Invisible In Live Mode, by Midge the Tree.
Making Seasons-Friendly Trees, by Echo.
Io/ Serabiet's resources list, mainly for Bodyshop but not just.
Pineapple Forest's Tutorials, useful tips for efficiency and optimization.
MTS modding forum in General.
The Sims 2 Tutorials, on Tumblr. A database, is more updated.
Sims2Artists tutorials section.
LeeFish modding forum.
Garden of Shadows, Tree of Knowledge section.
Troubleshooting: What to do if you get a System.OutOfMemoryException Error, SimPe Forum, via WayBack Machine. Thank you @fanseelamb for the find.
How to read object error logs: I just want to know what causes it!!, by Episims.
Common TS2 errors, by Midge the Tree.
General game fuckery: How to Stop Sims 2 Crashing (Memory Allocation Fix and 4GB Patch Repair), by Jessa.
Graphics card problems, LeeFish forum.
Graphics help - DIY, by Kiri. How to fix faulty Texture Memory allocation, and the problems that stem from it. Tumblr can't handle anymore hyper links so here it is: https://celebkiriedhel.tumblr.com/post/189431721483/graphics-help-diy
General: Switching between save folders without renaming them, by Nopke.
Resources:
3D Models Online*: Various furniture designers' websites: Porada, Zanotta, Muuto, Hay, Poltrona Frau, many luxury furniture designer basically.
3D Warehouse, belongs to Sketchfab (get the Collada files).
Scan the World.
Wikimedia Commons. And more.
*(NOT OPTIMIZED).
Textures: Architextures.
Fabrics & Wallpapers: Natural Stones: Wall Plasters:
iCad's Woods. Shastakiss's Cluedo Metals, Yeti Metals, Pirate Woods. Goat's Woods.
Textures from other games: Dishonored, Thieve and much more, by Saricoya at GoS. Dreamfell by io.
Resource sharing threads at Garden of Shadows.
SimPe - General: CEP Extras list, HugeLunatic at Sims2Artists.
TXMT settings for different materials, by Hafiseazale.
Extended SimStandardMaterial Shader for the Sims 2 + Optionally Brighter Sims, by Crisps&Kerosene.
Custom CubeMaps, by Crisps&Kerosene.
Shiny TXMT Settings & Cube Maps Packs, by Pineapple Forest.
Build/ Buy: Templates for Recoloring Maxis items; MTS Templates sction, Hafiseazale (+cc), ZeroDark.
Template for Seasonal Trees, Gwenke at Sims2Artists.
Making Roof Recolors, Tutorial & template by Numenor, great template by iCad.
Pack for making food clutter usable, by DeeDee.
CAS: Default Makeup Packages - BYO Packages, by Huge Lunatic.
Body shape, Io/Serabiet on Tumblr.
Skin template, Io/Serabiet on Tumblr.
Hair texture, iCad.
Color Actions, Pooklet on Tumblr.
That's it for now.
Edit: forgot about CEP extras. Added more links. Edit 02: Added Troubleshooting section under tutorials.
#ts2#ts2 resources#ts2 creation resources#ts2 resources for creators#the sims 2#sims 2#resources#ts2 cc#sims 2 cc#the sims 2 cc#well its cc related#sims 2 resources#the sims 2 resources
70 notes
·
View notes
Text
TOPAZ AI TUTORIAL
i was asked to do a tutorial for Topaz AI (a software that enhances screencaps), so here it is! :)
[tutorial under the cut]
i’m going to gif a 720p YouTube video from 12 years ago as an example. it’s the bottom of the barrel when it comes to image quality, but in the end, you won’t believe it was once so shitty. here’s the gif, without any editing:

THE APPLICATION
Topaz AI is a paid software for image enhancement. you can download it for free, but your images will have watermarks. here's a random link that has nothing to do with this tutorial.
you can use Topaz AI as a Photoshop plugin or use the software separately. i will explain both methods in this tutorial.
USING SEPARATELY
it’s the way i do it because it’s more computer-friendly, the plugin can take a toll on your PC, especially when you’re dealing with a lot of screencaps.
you first take screencaps as you normally would (if you don’t, here’s a tutorial on how to do it). open Topaz AI and select all the images. wait a while for the software to do its thing.

on the left, there is your screencap untouched. on the right, is your edited version. if you click the edited screencap and hold, Topaz will show you the original, that way you can compare the versions even better than just looking at them side by side.
Topaz AI will automatically recognize faces, if any, and enhance them. this can be toggled off, by disabling the “recovering faces” option in the right panel. it’s always on for me, though. you can tweak this feature by clicking on its name, the same thing for the others.
Topaz AI will also automatically upscale your screencaps if they’re too small (less than 4k). it will upscale them to achieve said 4k (in this gif’s case, the original 1280x720 screencaps became 4621x2599). i suggest that you let the app upscale those images, giving you more gif size flexibility. you can change into whatever size you want if you want something less heavy to store. don’t worry though, even these “4k screencaps” are very light megabytes-wise, so you won’t need a supercomputer. it might take a while to render all your screencaps, though, if you’re on a lower-end computer. (the folder with the edited screencaps ended up being 1GB, but that’s because it contains 123 screencaps, which is a lot of screencaps for 4k giffing).
two options won’t be automatically selected, Remove Noise and Sharpening, you will need to enable them to use them. rarely i don’t use Remove Noise, as is the best tool to remove pixelization. the Sharpening option depends on the gif, sometimes your gif will end up too over-sharpened (because of Topaz’s sharpening and later your own). that said, i used the Sharpening option on this gif.

next, select all images by clicking the “select all” button. you will notice that one of the screencaps’s thumbnails (in my case, the first one) will have small icons the others don’t have. this is the screencap you enhanced. you will need to click the dots menu, select “apply”, and then click “apply current settings to selected images”. this way, every screencap will have the same settings. if you don’t do this step, you will end up with one edited screencap and the rest will remain untouched!

all things done, click “save X images”. in the next panel, you can select where to save your new screencaps and how you want to name them. i always choose to add a topaz- prefix so i know what files i’m dealing with while giffing.
just a note: if your way of uploading screencaps to Photoshop is through image sequence, you will need to change the names of your new screencaps so PS can perceive that as a sequence (screencap1, screencap2, etc). you can do that by selecting all the screencaps in your folder, then selecting to rename just one of them and the rest will receive numbers at the end, from first to last. you don’t need to rename them one by one.
here’s the first gif again, without any editing:
without Topaz enhancement but with sharpening:

without sharpening, only the Topaz enhancement:

with Topaz enhancement and sharpening:

her skin is so smooth that it is a bit unrealistic. i could have edited that while tweaking the “Recovering Faces” option and/or the “Remove Noise” option, but i prefer to add noise (filter > noise > add noise) when necessary. this way, i don’t risk not enhancing the quality of the screencaps enough.

i added +3 of noise, making the gif look more natural. it’s a subtle difference, but i thought it necessary one in this case. you can continue to edit your gif as your heart desires.
VOILA! 🥳
AS A PHOTOSHOP PLUGIN
if you have Topaz AI installed on your computer, Photoshop will recognize it. you will find it in filter > Topaz Labs > Topaz AI. while in timeline mode, select the filter. the same Topaz AI window will pop up and you can tweak things the same way you do when you use the software separately. by using the plugin, you don’t need to upload your edited screencaps or use screencaps at all, a video clip (turned into a Smart Layer, that is) will suffice. the downside is that for every little thing you do, Topaz AI will recalculate stuff, so you practically can’t do anything without facing a waiting screen. a solution for that is to edit your gif in shitty quality as you would edit an HD one and at the very end, you enable Topaz AI. or just separately edit the screencaps following the first method.
this is it! it's a very simple software to use. the only downside is that it can take a while to render all screencaps, even with a stronger computer, but nothing too ridiculous.
any questions, feel free to contact me! :)
#*#alielook#usershreyu#userlaro#userchibi#tusernath#usersanshou#userbunneis#userzil#tuserlou#jokerous#usersnat#userdavid#userbuckleys#userbarrow#gif tutorial#completeresources#ps help#resources#*tutorials
274 notes
·
View notes
Text
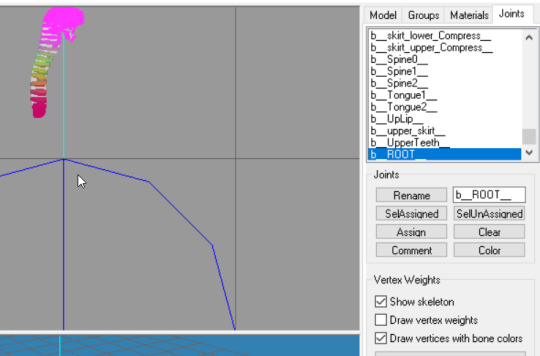
I was asked for a tutorial of making bones to move like this so I've written a small one. I hope it will be easy to understand because I'm awfull in writing intructions (sorry)
I assign weights manually in blender, to do this you need to import a geom file of LOD0 to it. First, you need this plugin, you can read instructions of importing/exporting geom files in description:
To snatch the geom file from your hair you can export it from package in s3pe (doesn't work for me) or export from tsrw as .BIN file
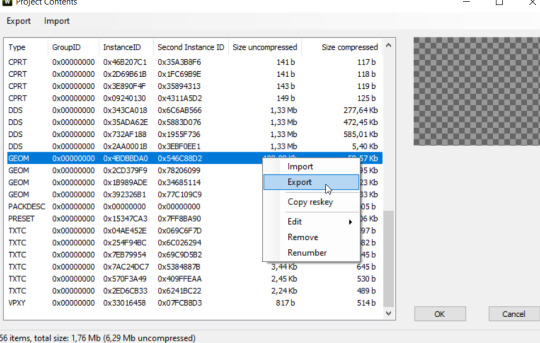
And later just rename it to "(whateverfilename).SIMGEOM". Now it can be imported.
In blender itself I do stuff that TS4 creators do, here are some tutorials showing examples with different bones:
breast bones, guide on transfering weights from another hair (for example original), I don't do this but it's less time consuming, basic head and spine bones, clavicle bones
Names of bones can be snatched from milkshape if you open any rigged .wso
In my conversions I use up to 8 bones. Headnew, Spine2 just for spine, Spine1 for long hair, spine0 for veeeery long hair, breast bones for attaching to breasts and breast slider compatibility and clavicle bones for areas that I want to move with shoulders
When you export finished geom with all weights assigned, you need to import it to your package OR rename back to .BIN and import in tsrw in the place of LOD0. I usually don't trust it as it is and export new .wso from tsrw and use it as a bone reference in meshtoolkit
42 notes
·
View notes
Text
UTILITIES AND PROGRAMS FOR TS1
Basically a continuation to my important TS1 mod compilation which makes the game a bit more user-friendly and easier without the feeling of outright cheating. This time I want to focus on the useful programs for this game, what do they do and how you can use them.
I had already talked about SimEnchancer 3D and The Sim Creator in that previous post, so they wouldn't be on this list.
The list itself is aimed for the casual players (and not the CC-makers), so there wouldn't be programs such as Homecrafter, IFF-pencil, Transmogrifier, FarOut and other editing programs needed for the CC-creation. Most of them are needed for the slight neighborhood editing, CC-organizing and detecting bad CC-files (+SimPose, yes).

EliSims - an executable that you need to install before using. It allows you to create additonal UserData folders if you feel that the 8 established hoods are not enough for you. It basically clones any UserData folder and renames it according to the next number on the list, so you should clone from the UserData folders which were not activated prior. It also allows you to add the custom content and music but I didn't test those features out.


EliSims and Nbhood 9 which I created with it.
SimOrganizer - a powerful, fan-made Buy Mode Catalog editing tool for The Sims 1. Allows you to view the objects from the Buy Mode and edit their catalog placement, price, description and name however you want. I use it sometimes cause a lot of cc-makers tend to overclutter the Miscellanious-Other function category. Makes searching CC in game much easier.

SimOrganizer
Skin Doctor - a handy file manager for your skin files, helps you to get rid of the bad cc-skins and allows you take any in-game skin to edit or to use in the SimPose.

Skin Doctor
Lot Manager - allows you to copy your lot into the other neighborhood. I would recommend to do the backup of your UserData folders before you interact with his program.

Lot Manager
Sims File Cop - a program for detecting broken mods, objects, and skins in The Sims 1. Helps you in case if you can't detect the exact cc file which causes your game to crash

The Sims File Cop
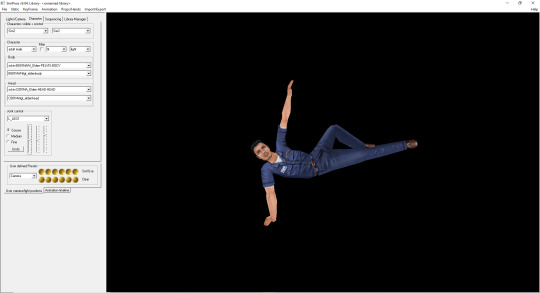
SimPose - a program which allows you to take your sim and pose them however you want. The Sims Depot has a massive tutorial for it in case if you want to learn how to use it!
130 notes
·
View notes
Text
How to Add 3D Models to TS3
Required Applications:
Blender - https://www.blender.org/
TSRW - https://www.thesimsresource.com/workshop/
Milkshape & Plugins - https://sims3tutorialhub.tumblr.com/resources
NVIDIA Texture Tools, Photopea, or GIMP (or anything else that allows you to save an image as a .dds file)
Recommended:
S3PE - https://www.simlogical.com/ContentUploadsRemote/uploads/189/ - Used to make = object base game compatible and available in CAW
Sims3Multi Pack Extractor - https://modthesims.info/d/364038/delphy-s-sims-3-pack-multi-extracter-updated-5th-sept-2009.html - Used to convert a sims3pack into a package file
This will also require showtime, since the object we will be cloning will be from that pack. I'm not sure if there's a base game object with a light/illumination map that we can use. If you don't want the windows of the building(s) to light up or anything lighting up on whatever object you are adding then you can try and find a base game object to clone.
Step 1: Export .obj file from Blender
Step 2: Import .obj into Milkshape
Step 3: Rename object in Milkshape to group_0, then export file as .wso (in order to export it as a .wso, you need to have the TSRW plugins for Milkshape installed)
Step 4: Open TSRW - Create New Project - Choose Object
Step 5: Under The Sims 3 choose Uncategorized Objects under Object by Category. In the search bar, type in 'hill' and choose the 'Sign City Hill' object. Name your project (make sure to rename both project name and title)
Step 6: First, choose where you want your object to show in the catalog. I just choose decor (function category) and miscellaneous decor (function sub category). Go to the mesh tab and using the button of the box with the green arrow, import your .wso file. For the first pop-up click yes. For the second, click no.
Step 7: Under Group 0, click on the three dots beside 'material'. This is where you will import your textures. Before doing so, you must make sure the images are in .dds format. Simply add your image into any application that supports importing/exporting .dds files. I personally save with BC3/DXT5 compression and don't keep mipmaps. Some say to save the mipmaps, but because I use 2K textures it adds a lot more to the file to save them so I don't. Once you've got them in the correct format, import them into the object's materials. For the detail map I simply import a small blank white texture. The diffuse is the main color texture, the multiply map is the ambient occlusion map (if you do not have it, I'm pretty sure you can just add a blank white texture too), and the self illumination map is what allows part of the mesh to light up. If you do not want anything to light up you can just add a plain black texture. Click done and exit out once all textures are replaced.
Step 8: Click the drop down that reads 'high level of detail' and choose the shadow lod. Click on the blue arrows beside the import icon. A pop-up will show; check the box under medium detail and click ok. You will see that once you've done that, the object's shadow will change.
Step 9: Click file - save as and save .wrk file (just in case).
Step 10: Export to Sims3Pack
Extra - Make Object Base Game Compatible
1. Convert .sims3pack to .package using Sims3Multi Pack Extractor
2. Open S3PE and open package file you want to edit
3. Find OBJD tag and double click on it
4. Change group number to 0 and click ok.
5. Save package
Extra 2 - Make object appear in CAW
1. Open S3PE and open package file you want to edit
2. Find OBJD tag and highlight it by clicking on it once
3. At the very bottom of the window, click on 'Grid'
4. Click the arrow beside 'CommonBlock' to open the tab
5. Beside the version, change the C to E and click commit
6. Reopen the 'Grid' and go back into the 'CommonBlock' tab. If you scroll down, you will now see 'IsVisibleInWorldBuilder', change it from false to true.
7. Scroll down until you find 'BuildCategoryFlags'. Replace the number with 0x00008000.
8. Click commit and save the file.
Let me know if you have any questions! TSRW is very finicky and sometimes things can go wrong. There are some things that I may not know how to fix, but I will try my best to help.
50 notes
·
View notes
Text

Rename Worlds Mod

Hi everyone! I'm so happy to retire my old 'mod', which was just a .package file of strings to change, and crappy instructions (I over explain everything!) Now all you need to do is drop this script file into your Mods folder, load up a lot and type rename_world "Current World Name" "New World Name" into the cheat console and press enter! I've created a world_help command so you don't have to remember anything, and a cheat to list all the current names in case you forget the spelling, or name of a world.
This doesn't affect your other saves, only the current one, and you can change the world names whilst you're in game!

🎮Required DLC: None/Base Game Compatible
If you're a vanilla/no cc player, and just want my old instructions for changing names using Sims4Studio, and a .save file, I've uploaded them here. Unfortunately, there's no way of changing the neighborhood names (i.e. Pendula View) per save, due to the way they're coded into the game. You can still change the string names using Sims4Studio for new saves though- Just go to Tools>String Table Lookup, select your language and choose the neighborhood name you want to change. Then Add to package (any name you choose), and edit the name. If you want a package file ready to edit just shoot me a message.

Download to C:\Users\....\Documents\Electronic Arts\The Sims 4\Mods—script files must be no more than 1 folder deep.
Load a lot, bring up the cheat console (Ctrl+Shift+C) and type in world_help to see the commands.
PATREON (free)
#ts4cc#ts4 cc#ts4 mod#ts4 custom content#ts4 download#the sims 4 custom content#thesims4cc#ts4 mods#the sims 4 mods#the sims 4 download#the sims 4 cc#the sims mods#the sims 4#midnitetech gameplay mod
326 notes
·
View notes
Text
Baldur’s Gate 3 Modding Tutorial - How to Swap Your Character’s Head Preset Mid-game
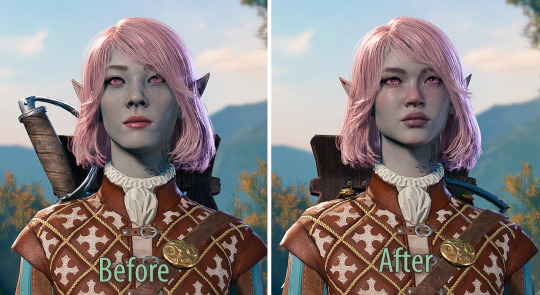
Got a bunch of messages asking how I did this without restarting, so I thought I’d write out a quick tutorial.

1 - Extract the Models.pak file from your game directory's Data folder somewhere using the lslib tool. I don't recommend extracting it to your game directory because you won't need all the files, it can get kinda messy, and it might cause issues in future updates. Just put them in a random folder on your desktop for now or something. I'll refer to this folder as the extracted folder for now.
2 - Figure out which preset your character is currently using (mine was the Elf Female A), and which one you'd like to swap it out for. Keep in mind, you can’t use one from a different gender/race without issues.
*I used one from the “New Character Creation Presets WIP” mod. If also using this mod, you need to install it as normal, then extract the mod's own .pak file before continuing.
3 - Find the .gr2 file of the new preset you want, and copy it into your game's directory. For me, it goes to C:\Program Files (x86)\Steam\steamapps\common\Baldurs Gate 3\Data\Generated\Public\Shared\Assets\Characters\_Anims\Elves\_Female\Resources The exact directory will vary depending on your race/gender (refer to the extracted folders for help). If you don’t have the folders needed inside your game directory, then create them.
4 - Rename the .gr2 file you just moved to be what the old preset was named. For me, Kaari.gr2 became ELF_F_NKD_Head_A.gr2
Optional:
5 - If you want to also use the new head’s skin texture (and/or edit the skin yourself), just copy the three .dds files from your extracted Data\Generated\Public\Shared\Assets\Characters\_Models etc folder, then place them in your game directory. For me, I put them in Data\Generated\Public\Shared\Assets\Characters\_Models\Elves\ELF_F_NKD\ELF_F_Head_A\Resources
6 - Rename accordingly, just like with the .gr2 files. For me, Kaari_CLEA.dds became ELF_F_NKD_Head_A_CLEA.dds and so on. Do this for the other two .dds files as well.
Load your game and that's it! It should now replace the previous head with the new one. Your character's icon will still look like the old one unfortunately. I'll try to find out how to fix it.
#Baldur's Gate#Baldur's Gate 3#Baldur's Gate 3 Modding#BG3#BG3 modding#Blighted mods#Blighted modding#Hope this makes sense!
691 notes
·
View notes