#Focal Length of Spherical Mirrors
Explore tagged Tumblr posts
Visit Tumblr Blog
Explore Tumblr blogs with no restrictions, modern design and the best experience.
Last Seen Tumblr Blogs


Fun Fact
Users from the US are the majority of Tumblr visitors.
Text
Ray Optics and Optical Instruments- Reflection of Light by Spherical Mirrors Class 12 Physics Notes & Concepts
Introduction:
Reflection of light is a fundamental concept in optics that explains how light bounces off surfaces. When it comes to curved surfaces like those of spherical mirrors, the behavior of reflected light leads to fascinating phenomena such as image formation, magnification, and inversion. Understanding the terms associated with spherical mirrors, such as the radius of curvature, focus, and principal axis, is essential for mastering this topic in Class 12 Physics. In this lesson, we’ll explore the intricacies of reflection by spherical mirrors and how they create different types of images.

Have you ever noticed something intriguing when you look in a mirror? Let’s try a small activity. Stand in front of a mirror and move your right hand. Now lift your left hand. Did you notice that in the mirror, the right appears as the left and vice versa? This phenomenon occurs due to the properties of mirrors. Let’s explore more about a specific type of mirror called the spherical mirror.
Spherical Mirror
Imagine you are sitting at a dining table, and you're playing with a spoon. When you look at yourself in the spoon, you might notice something funny: when the spoon is close to your face, your image appears magnified, but when you move it further away, your image becomes inverted. This happens due to the reflective properties of spherical mirrors.
To understand what's happening, let's discuss some key terms associated with spherical mirrors:
Radius of Curvature (R): The distance between the pole (P) and the center of curvature (C). It represents the radius of the sphere from which the mirror is a part.
Center of Curvature (C): This is the center of the sphere from which the mirror segment is taken. It lies on the principal axis and is at a distance equal to the radius of curvature from the pole.
Aperture: The effective diameter of the mirror, which determines the extent of the reflection of light.
Pole (P): The central point of the mirror’s surface. It serves as a reference point for measuring distances along the principal axis.
Focus (F): The point where light rays parallel to the principal axis converge after being reflected by the mirror. It lies halfway between the pole and the center of curvature.
Principal Axis: An imaginary line that passes through both the optical center (pole) and the center of curvature of the spherical mirror.
Focal Length (f): The distance between the pole and the focus. It is related to the radius of curvature by the equation f=R/2.
Conclusion
Spherical mirrors play a crucial role in various optical instruments and everyday applications. By understanding how light reflects off these mirrors and the significance of key terms like focal length and radius of curvature, students can better grasp the principles of image formation. This knowledge not only lays the foundation for more advanced topics in optics but also enhances the ability to apply these concepts in real-world situations.
#Reflection of Light#Spherical Mirrors Class 12#Physics Reflection of Light#Class 12 Physics Notes#Focal Length of Spherical Mirrors#Principal Axis in Spherical Mirrors#vavaclasses#science#Class 12#iit jee#NEET
0 notes
Text
"Answer: f= R / 2
= 20/2
= 10 cm"
0 notes
Text
What are the Characteristics of Convex and Concave Mirror?
In Physics, students often encounter the term, spherical mirrors, while learning about how light is deflected and at what angles. Several concepts and chapters are directly derived from it. There are two types of spherical mirrors, Convex Mirrors and Concave Mirrors.
Convex mirrors and concave mirrors differ in their principles. In simple terms, convex mirrors bulge outside whereas the concave mirror bulges from inside.
Tapering figures represent convex mirrors while broadening ones refer to concave mirrors.
While, both, convex and concave mirrors have different principles, the complexities and comparisons need to be dealt with elaborately. From plane to spherical mirrors, to concave to convex mirrors, the differences attach immense importance to physics students, as well we those who deal with as part of academics as well as profession.
In this article, we are happy to take you through various aspects of convex mirrors and concave mirrors. We cover:
Convex mirror uses
Concave mirror uses
Convex mirror examples
Concave mirror examples
Characteristics of convex mirrors
Characteristics of concave mirrors
Convex mirror diagrams
Concave mirror diagrams
Through ray diagram, as well as formula, we will also help you understand the difference between concave mirror and convex mirror, more clearly
What are Plane Mirror and Spherical Mirror?
However, before we delve into types of convex mirrors and concave mirrors, let us first talk about the basics of Plane Mirrors and Spherical Mirrors, and how they are different from each other, as well as their applications.
Plane Mirror
A plane mirror is a mirror that has a flat and smooth surface, which in turn, always forms a virtual form of the object, with exact shape and size, when it reflects. Commonly, plane mirrors are those which people generally use in dressing rooms or makeup tables. A plane mirror is known for providing exact image.
A plane mirror is used for a wide range of applications and purposes that include periscopes and kaleidoscopes, auto industry, mirrors for domestic use, medical especially dental, and torch lights, besides security-related purposes.
In terms of physics, when light rays hit a plain mirror, the angle of reflection will be the same as the angle of incidence. In plain mirrors, the images are generally laterally inverted, and are erect. The focal length of a plain mirror is counted as infinity.
Spherical Mirror
Spherical mirrors are also referred to as curved mirrors, where they have a shape cut out of the spherical surface. Under a spherical mirror, there are two categories: convex mirror and concave mirror. The spherical mirror and its equation hold significant importance in science, owing to its association with optics.
Unlike plane mirrors, spherical mirrors, both convex mirrors and concave mirrors, have a radius if curvature with a consisting curve, which results in the formation of an image, that can be either virtual or real.
What is a Concave Mirror?
A Spherical Mirror that has a reflective surface inside, is called the converging mirror. The main attribute of the concave mirror is that it focuses on pointing the light from the source falling on it, into a single point. And generally, the image formed by these types of mirrors usually varies based on the size, shape, and position of the object.
Characteristics of Concave Mirror
The major characteristics of concave mirrors are listed below,
Converging: A concave mirror is a converging one because, light rays that hit it reflect on the surface, and merge at a particular point. This point is known as a focal point. Concave mirrors allow light to focus to a point.
Magnification and formation of image: Place a concave mirror close to any object and you will notice that it shows a magnified image that is straight, erect, and of course virtual. The image looks to be larger than the actual size of the object. The concave mirror also looks upright. The reason why concave mirrors feature the formation of virtual images is that the rays that reflect look to diverge from a point located behind the mirror.
Distance and image properties: In concave mirrors, when the distance between the object and the concave mirror increases, the size of the image decreases. At a particular distance, , the image changes to virtual. Under this circumstance, the true image, in an inverted form manifests on the opposite side of the concave mirror.
Image formations: concave mirrors create images of different sizes, and diverse in nature, from real to virtual. These features enhance the importance of concave mirrors, which they are widely used in various applications, from domestic to scientific
Image Formation by Concave Mirror
The image formed by the concave mirror is either real or virtual and can be small and large based on the position of the sources, and the reflecting point.
For example, if the distance of the object from the source is large, then it results in real and inverted images. Whereas for the objects placed close to the source, the images formed are erect and virtual.
Moreover, in this mirror, the light converges at a single point before reflecting, which is referred to as a converging mirror.
Ray Diagram of Concave Mirror
The Ray diagram of concave mirror is shown below along with the object placing.
The object is at Kept at Infinity: When the parallel rays meet or converge at the Principal Focus, F. So when the object is kept at Infinity, the image will form here at the F. The image formed by this ray diagram is a point-sized, highly diminished, inverted, and real image.
Object is placed at infinity and Centre of Curvature: Only diminished images are formed that are either real or inverted.Object at Centre of Curvature(C): The image of the same size is formed, that is inverted or real.
Object between Principal Focus and Centre of Curvature
Object at Principal Focus(F): A highly enlarged image, that is inverted and real.
Object between Principal Focus(F) and Pole(P): Similarly enlarged is formed.
It is the complete description of the ray diagram of concave mirror when the object was placed at various points.
What is a Convex Mirror?
Convex mirror is also a spherical mirror and is exactly opposite of concave mirrors in its properties.
Let us first understand convex mirror through its basic definition:
A convex mirror is a type of spherical mirror that has a reflective surface towards the outside of the bulge, and it is also referred to as diverging mirror. Unlike convex mirrors, in a concave mirror, the light falling on the object diverges as it reflects through the mirror. And generally, as the distance between the source and the object decreases, the size of the image formed increases.
Characteristics of Convex Mirror
Diverging: A convex mirror is a standard diverging mirror because when light rays hit the reflecting surface, they diverge or spread. Unlike concave mirrors, convex mirrors cause the light rays to diverge from the definite focal point.
Types of images – from virtual to diminishing: irrespective of the distance between the object and the convex mirror, the images formed are virtual, uprights, and diminished. The image appears erect and smaller too compared to the actual size of the object. The image also appears on the rear side of the mirror. When you trace it backward, the virtual image forms through the intersection of diverging rays.
View–Wide: Convex mirrors have an incredible feature to offer a broad canvas of view. This is because they possess an outwardly curved shape, and thus convex mirrors capture a wider area in reflection in comparison with flat and concave mirrors. Due to this, concave mirrors are used whenever there is a need for a larger perspective and a more expansive view. These can be large grounds for parking, sporting, meeting, and intersections, and where security, surveillance, and monitoring are involved
Image – magnitude, and distance: convex mirrors are known to produce virtual images that are closer to the mirror than the object. The image that is formed by convex mirrors looks diminished and gives an impression of being smaller than the object’s real size. Due to this reduction, in the size of the image, a more expansive area can be captured for reflection.In summary, through convex mirrors, the light diverges as it strikes the reflecting surface The Convex mirrors always result in diminished, erect, and virtual images, regardless of the distance between the mirror and the object.
Ray Diagram of Convex Mirror
The Ray diagram of convex mirror is shown below along with the object placing.
Object at Infinity: A point-sized image is generally formed at the principal focus behind the convex mirror.
Object is kept between Infinity and Pole: If the object is placed in between the pole and infinity of a convex mirror, a diminished, erect, and virtual image at the pole is located in mid-point, focus, and pole.
It is the complete description of the ray diagram of convex mirror when the object was placed at various points.
Image Formation by convex mirrors and concave mirrors
As we dwell deeper into the ray incidence on concave and convex mirrors, it becomes easier for us to ascertain and understand the characteristics and behavior of light rays. This is particularly helpful in building precise ray diagrams and analyzing image formation processes.
Oblique Incidence: When a ray hits the mirror at its pole, its reflection is oblique, forming the same angle as the principal axis. This ensures the angle of incidence is equal to the angle of reflection, thus extending the symmetry of the reflected rays.
Parallel Incidence: When a ray that is parallel to the principal axis hits the concave mirror or a convex mirror, it takes a definite trajectory. If it is a concave mirror, the ray goes through the focus on the principal axis. If it is for a convex mirror, the reflected ray is born out of the focus on the same side as the incident ray.
Focus Incidence: When a ray passes through the focus and hits the surface of a concave mirror or a convex mirror, it will be seen traveling parallel to the principal axis. This is the same for both concave and convex mirrors.
Centre of Curvature Incidence: When a ray travels through the center of curvature of a spherical mirror it will retrace its path after reflection. This is nothing but going through reflection and following the exact similar path in the opposite direction, when the ray touches the centre of the curvature.
Convex and concave mirrors – important aspects
Pole: The center point of any spherical mirror from where all measurements are made
Aperture: An aperture of a mirror is an origin point of reflection of light
Principal axis: This is an imaginary line passing through the optical center and from the center of curvature of a mirror. Generally, measurements are taken based on this line
Centre of Curvature: this is a point in the center of the surface of a mirror and goes through the mirror curve, having the same tangent and curvature at the point.
The radius of Curvature: This is the linear distance between the pole and the center of curvature.
Principal Focus: This is the Focal Point and is there on the mirror axis.
Focus: It is a point on the principal axis where light rays parallel to the principal axis come together after reflecting from the mirror.
Examples of Concave Mirrors
The examples of concave mirrors are listed below,
Shaving and other domestic mirrors
Telescopes
Ophthalmology
Vehicles as headlights
solar furnaces
Examples of Convex Mirrors
The examples of convex mirrors are listed below,
Office space, industrial complexes, stores, healthcare, and residential buildings
In vehicles as rear-view mirrors��
Security purposes
As magnifying glasses
Large public spaces and grounds
In the above article, we have provided a comprehensive description of both Concave and Convex Mirrors. We hope this article cleared the complete information of Ray Diagrams of concave mirrors and ray diagrams for convex mirrors and the differences. Besides, the types of mirrors, use of convex mirrors, use of concave mirrors.
As you are aware, many topics such as this in Physics are often complex, and the students often end up struggling to understand these topics and subjects. So, in this process, it is wiser to join an online coaching platform that offers various amazing features for the students to get a better grasp of the subject. One such online tutoring platform is Tutoroot, which offers online interactive classes for students in a personalized, yet effective manner. Enroll with Tutoroot today.
#raydiagramofconcavemirror#concavemirror#convexmirror#convexmirrorraydiagram#concavemirrorraydiagram
0 notes
Text
👁️ **Human Eye:**
- Light-sensitive
- Vision
- Eyelid Protection
- Spherical Eyeball
- Layers: Sclera, Choroid, Retina
👀 **Eye Structure:**
- **Sclera:** Outer, Protects
- **Choroid:** Dark, Blood Vessels
- **Cornea:** Allows Light
- **Retina:** Rods (Dim), Cones (Bright)
- Iris, Pupil: Light Regulation
💡 **Lens & Muscles:**
- Crystalline Lens: Transparent
- Ciliary Muscles: Focal Length
👤 **Visually Challenged:**
- Curable & Incurable
- Eye Donation
🔍 **Tech for Blind:**
- Braille
- White Cane
- Talking Devices
- Computers
- Radio Reading
📚 **Light & Reflection:**
- Define Light
- Reflection Phenomenon
- Laws of Reflection
🪞 **Mirror Images:**
- Characteristics
- Lateral Inversion
- Multiple Images
- Uses of Mirrors


💡 **Dispersion & Spectrum:**
- Dispersion of Light
- Spectrum of White Light
#education#notes#school#youtube#studyblr#students#homeschool#latitudes#student life#studying#student#college studyblr#new studyblr#study aesthetic#study hard#study blog#study inspiration#study inspo#study motivation#study notes#study with me#studyblr community#studygram#studyinspo#study tips#studyspiration#studystudystudy#studyspo#university student#studywithme
1 note
·
View note
Text
The Last Naturalists’ Graflex Ever Made – Thomas Evans
The Last Naturalists’ Graflex Ever Made – Thomas Evans
Published in the Graflex Journal, 2023, Issue 1.

The Naturalist Graflex was introduced in 1907, and was produced until 1921. The 1907 Graflex Catalog described the concept behind this unusual design very well:
“The Naturalists’ Graflex Camera is designed especially for naturalists’ work in photographing birds, wild animals, or similar subjects where long-focus or tele-photo lenses are required. The camera in general design and construction is similar to the regular Auto Graflex, but the increased length of the camera accommodates much longer side arms. These arms are made of heavy brass, giving ta liberal extension, yet maintaining absolute rigidity. The focus is obtained by reflection on the upper mirror, and enables the operator to conceal himself behind a stone or log and focus from the rear of the camera without exposing too much of his person, as would be the case in using the ordinary type of Graflex Camera.”
“The Naturalists’ Graflex will accommodate lenses of from 12 ¾ to 26 inches equivalent focus, and is fitted with the regular Graflex Focal Plane Shutter.”
The camera without lens, including one double plate holder was priced at $190.00. The camera with the Bausch & Lomb Zeiss Protar Lens, Series VIIa, No.19, f6.3, was twice as expensive, priced at $378.50. This Protar VIIa lens had a focal length of 13 ¼-inches (336.5mm), and was a combination of two Protar VII lens components of 23 1/8-inches (590.5mm) each. The Protar Lenses were designed to be used in combination, at f/6.3, or each component could be used singly, usually at about f/12.5. And so, this lens could be used at either 13 ¼-inch or 23 1/8-inch focal length. Zeiss, and Bausch & Lomb under contract, made Protar lenses in several focal lengths, and, in theory, some different Protar VII lens components and combinations could be used with this camera.
The 1920 Bausch & Lomb catalog said this about their Protar VIIa lenses:
“The series VIIa lens has satisfactorily solved the problem of variety and convenience; for composed as it is of two series VII single Anastigmats, the doublet resulting from the combined components is simply perfection in all the qualities desired in a photographic lens.”
“As single Anastigmats, the Series VII lenses have a distinct field of their own. They are perfect single lenses, having a speed of F:12.5, which is ample for instantaneous exposures out of doors under favorable light conditions. So perfect are the spherical and astigmatic corrections as to make the single lens almost equal to the doublet, and not only equal, but actually superior to many doublet lenses of other makers…”
In the 1908 catalog, the Naturalists’ Graflex had a new feature: the view finder could be rotated from horizontal to vertical, to allow focusing from the ordinary Graflex position.
The Folmer & Schwing Division offered to fit the customer’s own lens to their cameras. Mike Hanemann, in his first-quarter 2001 Graflex Historic Quarterly article, described a Naturalists’ Graflex that had been fitted with an f:5.6, 20-inch Taylor Telephoto lens, and due to the quality of the workmanship he thought that it must have been done by the factory. The modification involved cutting away the top of the lens box to make room for the lens and to allow access to adjust the lens aperture.
Frank M. Chapman
Frank Chapman, ornithologist and Bird Curator at the American Museum of Natural History, New York City, was an early user of the Naturalists’ Graflex. Mr. Chapman may have been a significant inspiration for the design of this camera. In his 1903 book, “Bird Studies with a Camera”, he described his ideal apparatus for making photographs of birds, which would be a 4x5-inch ‘reflecting’ camera,’ with “… a mirror, set at an angle of forty-five degrees to the plate, is interposed between the latter and the lens, and reflects the image to a ground glass on top of the camera… The mirror, when released, should automatically release a focal plane shutter. Mr. Chapman also recommended that the bird photographer use a convertible Zeiss Anastigmat (Protar), Series VIIa lens, in order to have at hand both a fairly fast normal lens and a lens of about twice the focal length when a single component lens was used. The Naturalists’ Graflex appears to have been designed to make the best use of the B&L Convertible Protar No. 19, as it accommodates both the combined focal length of 13 ¼-inch and the single element focal length of 23 ¼-inch, which are very close to the minimum and maximum focal lengths that can be used with this camera.
In his 1933 Autobiography of a Bird Lover, Mr. Chapman reflected back on his early experiments at bird photography: “There were no reflecting or Graflex cameras available for our work in Florida, and the naturalist photographer was handicapped by the lack of a camera carrying a long-focus lens with which, without pausing to insert a plate, he could make an exposure at the moment of focus.” The camera that he first tried was made for him by John Rowley who worked with him at the museum, which was a 5x7-inch twin-lens-reflex camera, which he described as cumbersome but practical. I suspect that a Naturalists’ Graflex, as large as they were, would seem quite trim and nimble in comparison to this camera.
Frank Chapman was the editor of the Bird Lore Magazine, published under the auspices of the National Association of Audubon Societies, and in the March – April 1908 issue, he included a recommendation for the Naturalists’ Graflex, quoting substantially from the Graflex catalog. This prominent recommendation may have been sought-after by Folmer & Schwing, and must have been much appreciated by the company. As a possible measure of Mr. Chapman’s influence, he was an associate of then President Theodore Roosevelt, and the Naturalists’ Graflex page from the 1908 catalog is among Mr. Roosevelt’s papers.

Naturalists’ Graflex page from Roosevelt’s papers.

Ad for the Naturalists’ Graflex in Bird Lore Magazine.
In the introduction of Mr. Chapman’s 1908 book, Camps and Cruises of an Ornithologist, he described his photographic outfit: “I still use a reflecting camera of the ‘Graflex’ type, and also a tripod camera … a Bausch & Lomb Convertible Series VIIa No. 10, F. 6.3, with a focal length of eight inches, the component lenses having each a focal length of fourteen inches. Although these single lenses are rated with a speed of only F. 12.5, I have found no difficulty in making satisfactory pictures of birds in flight with an exposure one-thousandth of a second, the lens being wide open. … if one can afford a No. 19 lens of the same series with a focal length of thirteen and one-eighth inch focus, the components being each of twenty-three and one-eighth inch focus, he will materially increase his chances of success…” In this book, he mentions using the 23-inch Protar single component lens for photographing birds at greater than 50 yards.
Arthur Radclyffe Dugmore
A Radclyffe Dugmore was another prominent photographer of birds and wildlife who may have had some influence on the design of the Naturalists’ Graflex. As early as 1902, the year that the very first Graflex Camera was introduced, he had praise for the camera: “… The Graflex, which, though expensive, is about all that can be wished for. Being strongly made, it will withstand the rough usage incidental to natural-history photography. Its ling draw of bellows allows of the use of a twelve-inch lens, and for objects up to within about ten feet distant a six-inch lens with hand-camera telephoto attachment can be used. … A bird may be caught on the wing with as much ease and certainty as if it were mounted.”
He goes on to describe his preference in lenses: “The most useful lens for all-round work is one whose two systems or combinations can be used separately. By having such a lens you have practically two in one, the single combination having about double the focal length of the couplet.”
In a latter book, Mr. Dugmore says: “The reflex camera should be so arranged that the focussing hood admits of use from above and from the back. The advantage of this is that it allows the camera to be held level with the eyes so that the immediate foreground is not shown in the picture. When you are in a canoe you can operate this camera with greater freedom and safety as it will not be necessary to stand up or even to kneel in order to clear the adjacent water or the canoe bow which so often obtrudes itself in such pictures.”
I don’t know how closely Mr. William Folmer read such books and magazines by naturalist photographers, looking for ideas, but if he did, the desires of these photographers were there to find and inspire his designs.
Production
Despite its wonderful design and promotion, it appears that the total number of Naturalists’ Graflex Cameras made would be less than 200. There is no existing record of the cameras made from 1907 to 1914, but the existing records do show that 61 4x5-inch Naturalists’ Graflex Cameras, and one 5x7-inch model, were made from 1915 to 1921. If the rate of about nine cameras per year had been held in the first eight years of production, then that would bring the total to about 130 cameras, but there is really no way to know for sure.
Naturalists’ Graflex production orders from the extant serial number book: [61: 4x5” and 1: 5x7”]
Lot Amt. Camera Serial numbers Location
6671 18 4x5 Naturalists’ Graflex Cameras 56760 – 56977 [sheet 4, c.1915]
6677 18 4x5 Naturalists’ Graflex Cameras 76988 – 77005 [sheet 5]
5801 1 5x7 Naturalists’ Graflex Camera 111700 [sheet 17]
6845 12 4x5 Naturalists’ Graflex Cameras 111751 – 111762 [1920 – 1921]
6845 13 4x5 Naturalists’ Graflex Cameras 111787 – 111799 [1920 – 1921]
According to Al Benham’s article: Rural Life Photographer, in the Graflex Journal, Issue 1, 2017, his grandfather, John Calvin Allen, had the 5x7-inch Naturalists’ Graflex, 111700, made-to-order to use to photograph individual beef animals where a long-focus lens must be used to avoid distortion. J. C. Allen wrote of this camera: “The camera will accommodate a 23-inch lens and is focused through a reflector, so the animal is seen on the ground glass until the exposure is made. This is quite an advantage with restless animals, especially in fly time.” Mr. Allen had a rural photographic business in Indiana, as well as running his own farm, and working for a while for Purdue University.
Assuming that the existing production orders were accurate, then the Naturalists’ Graflex Camera that I have, number 111799, was the last one ever made.

Naturalists’ Graflex showing the view finder in horizontal position.
The Last Naturalists’ Graflex

Bausch & Lomb f:6.8, 24-inch, Telestigmat lens.
The camera arrived with some damage, but in overall very good condition. The slide that holds the lens in place on the front standard had come loose, the screws had pulled out, and this heavy lens had apparently banged around in the lens box, splitting the wooden sides of the box. This was fairly easy to repair, and once the focal plane shutter had been lubricated and exercised a bit, the camera works well. The lens is not the B&L Zeiss Protar VIIa No.19, but is instead a Bausch & Lomb 24-inch, f:6.8 Telestigmat. It is a large piece of glass, weighing 4 pounds. The lens board is a hefty 3/8th inch thick, with no step around the edges, and is just under 4 ½” square.
The 1917 Graflex catalog still lists the Protar VIIa No. 19 lens for the Naturalists’ Graflex, but the 1919 catalog lists this 24-inch Telestigmat in its stead. Carl Zeiss Optical Works and Bausch & Lomb had entered into a collaboration in the 1890s under which B&L was licensed to produce lenses according to the Zeiss optical designs, but this corporate alliance ended during World War I. The Telestigmat is marked “Pat. Oct. 24, 1918,” and so was developed during World War I, apparently to be used for aerial reconnaissance. As B&L was no longer under license to Zeiss to make the Protar lenses, a new lens was needed, and the Telestigmat would have been an appropriate and readily available substitute.
In his book “Flight, Action, Camera,” Douglas E. Campbell mentions that in September 1921, the U. S. Navy conducted tests of the 24-inch B&L Telestigmat for use in aerial mapping. Curiously, the Navy concluded that this 24-inch lens did not adequately cover the 4x5-inch format. Later, during World War II and into the 1950s, the U. S. Military did use a B&L 40-inch, f:8 Telestigmat, for aerial reconnaissance, and to photograph nuclear tests.

A second mirror reflects the ground glass image to the view finder when used in the horizontal position.
Using The Naturalists’ Graflex
The Naturalist Graflex does not have a revolving back, and the film is held in the landscape position. The view finder stores away compactly when not in use, and can be used from the rear as well as from the top. When used in the horizontal position, a second 45-degree mirror reflect the image from the ground glass back through the view finder. The main body of the camera is seven inches tall by seven inches wide, including the shutter controls, and eighteen inches long. The view finder at the rear of the camera brings the height to twelve inches, and when opened for viewing it reaches sixteen inches tall when vertical. The view finder adds eight inches to the length when horizontal, reaching twenty six inches. So, the camera is roughly three times the length of the standard 4x5-inch Auto Graflex, or about twice the length of the RB Auto Graflex. When the 24-inch Telestigmat is focused at infinity, because it is a telephoto lens it only needs to be extended three inches beyond the front of the camera, and at this focus the camera is well balanced and easy to use hand-held. However, as one focuses on nearer subjects the camera becomes quite front-heavy. When the bellows is fully extended, the camera will focus on a subject at nine and one-half feet, but the camera is then thirty-one inches long, not counting the view finder if horizontal. At this closest focus the camera is unwieldy hand-held, and it is a challenge to use even on a sturdy tripod. Used on a heavy tripod, this closest focus produces an image on the film that covers an area one foot wide.
Conclusion
The Naturalists’ Graflex is an extraordinary and fascinating camera. It was designed in 1907 with the special needs of the then pioneer naturalist photographer in mind. That is, the field-going photographer needed a portable, hand-held camera that would be self-contained and yet versatile enough to not only allow up-to-the–moment-of-exposure focusing, full image viewing on a ground glass, and shutter speeds of up to 1/1000th second to catch quick movement, but which would also accommodate telephoto and long-focus lenses so that the photographer could secure detailed images of birds and other wildlife, or similarly unapproachable subjects, from a distance. The long-focus lenses also proved to be useful for producing distortion-free images such as were valuable for scientists and commercial photographers. This camera for-shadowed the development of later long-focus cameras such as the Big Bertha.
Being a large and somewhat unwieldly, and expensive, camera probably kept it from being more widely appreciated, but it was well designed for the narrow purpose for which it was intended. Sales were never high, and this plus the loss of the ability of Bausch and Lomb to continue to manufacture the Protar Ser. VIIa lenses, for which the camera appears to have been designed, probably led to the camera being discontinued.
Today, a hundred years after the Naturalist Graflex was discontinued, it is hard to imagine hauling so much camera around while on safari, exploring the swamps of Florida, mountain climbing, or just walking down to the local park. The quality and unimaginable quantity of telephoto and zoom lenses now available for small cameras that produce high resolution images at the touch of a button have removed the need for packing such a large camera, but they have not removed the fascination.

U.S. Army Signal Corps during WWI with a Naturalists' Graflex among other cameras, curtesy of De Miollis Laurent.
Bausch & Lomb Optical Company, 1920 Photographic Lenses. (Pages 37, 58)
Benham, Al. 2017. Rural Life Photographer. Graflex Journal, Issue 1, 2017. (Page 4) (5x7 Naturalists’ Graflex) Available here: https://journal.graflex.org/journal-2017-01.pdf
Campbell, Douglas E. 2014. Flight, Action, Camera, History of U. S. Naval Aviation Photography and Photo-Reconnaissance. Lulu.com (page 59.)
Chapman, Frank M. 1903 Bird Studies with a Camera, with introductory chapters on the outfit and methods of the bird photographer. D. Appleton and Company, New York.
Chapman, Frank M. 1908. Camps and Cruises of an Ornithologist. D. Appleton and Company, New York.
Chapman, Frank M. 1908. Bird Lore Volume X, No. 2. D. Appleton & Company, Harrisburg, PA, New York, NY.
Chapman, Frank M. 1933. Autobiography of a Bird Lover. D. Appleton – Century Co., New York, London.
Dugmore, Arthur Radclyffe. 1902. Nature and the Camera. Doubleday, Page & Co. New York. (Pages 4, 7)
Dugmore, Arthur Radclyffe. 1912. Wild Life and the Camera. J. B. Lippincott Company, Philadelphia, William Heinemann, London. (Page 21)
Graflex and Graphic Cameras, 1907. Folmer & Schwing Co. Rochester New York.
Graflex and Graphic Cameras, 1917. Folmer & Schwing Department, Eastman Kodak Co. Rochester New York.
Graflex and Graphic Cameras, 1919. Folmer & Schwing Department, Eastman Kodak Co. Rochester New York.
Anonymous, (Todd Gustavson?) 2014. The Mystery 5x7 Naturalists’ Graflex, Graflex Historic Quarterly, Volume 19, Issue 2, Second Quarter 2014. (Page 4) Available here: https://ghq.graflex.org/GHQ-19-2.pdf
Hanemann, Mike. 2001. The Graflex Naturalist Camera, Graflex Historic Quarterly, Volume 6, Issue 1, First Quarter 2001. (Page 1).
Harvard University, Collection of Historical Scientific Instruments,
Triple Alliance: Zeiss - Bausch & Lomb – Saegmuller 1908 1915.
http://waywiser.fas.harvard.edu/people/7108/triple-alliance--zeiss--bausch--lomb--saegmuller?fbclid=IwAR07OQmicaoaXid-2tisH839zB1CdIgLh9ROwmMOyufgNKuGo8C2P4RHmGA
Theodore Roosevelt Digital Library TR Center - Print Image (theodorerooseveltcenter.org)
Tuttle, Ronn. 2004. Special Find. Graflex Historic Quarterly, Volume 9, Issue 4, 2004. (Page 4)(The Long Focus Graphic)
Tuttle, Ron. 2015. Two Naturalists’ Cameras. Graflex Journal, Issue 3, 2015. (Page 1) Available here: https://journal.graflex.org/journal-2015-03.pdf
Wikipedia Frank Chapman, Ornithologist https://en.wikipedia.org/wiki/Frank_Chapman_(ornithologist)
Wilson’s Photographic Magazine, 1913, Volume 50, page 316

1908 Kermit Roosevelt with Naturalist Graflex in Africa
4 notes
·
View notes
Text
Focal Length
The Oxford Dictionary defines ‘focal length’ as “the distance between the centre of a lens or a curved mirror and its focus.”
Lenses -
youtube
A lens that is thicker in the centre is known as a Convex lens. When light is shone through this lens, the light rays meet together at the point called the focal point due to them refracting through the lens which means they do not travel in a straight line.

When light rays pass through the lens, the image will be presented to the opposite side from where the light rays initially hit the lens. This is what causes the image to be viewed upside down.

Even though this is able to produce an image, it will not be in focus due to spherical aberration. This means that there is a slight difference in where the light rays pass each other and where they hit together as a focal point.

However, when starting to produce colour light rays the focal point differs for different coloured wave lengths. For example a red wave length has a longer wave length which means its focal point is further away to a blue wave lengths focal point which is shorter. This causes colours to bleed and shift. This is colour aberration

To fix this using technology, combining a different lens called the Concave lens which with the Convex lens due to them being opposite in what they do, they can work together and create a complete focal point. This process is known as Aberration correction. This also corrects the Chromatic Aberration.

This is the basics of how the lenses inside our cameras today work. However we know that there are multiple different lenses that do multiple different things.
A standard lens focal length is usually between 35mm-60mm. This is the first standard lens ever made in 1896. Any modern standard lens are modified around this Planar design

A wide angle lenses have a focal length of usually between 16mm and 35mm and are commonly much more compact than a standard lens. This Biogon wide angle lens was developed in 1936

2 notes
·
View notes
Text
Light:Reflection and Refraction

The cave you fear to enter holds the treasure that you seek.
-Joseph Campbell
One Marks Question
1.A spherical mirror and thin spherical lens have each of focal length of -15 cm. the mirror and lens are likely to be
(a) Both concave
(b) Both convex
(c) The mirror is concave and the lens is convex
(d) The mirror is convex and lens is concave.
Ans. (a) Both concave
2.…
View On WordPress
1 note
·
View note
Text
IIT JEE 2020 Complete Physics Syllabus – Check Here

General
Units and dimensions, dimensional analysis; least count, significant figures; Methods of measurement and error analysis for physical quantities pertaining to the following experiments: Experiments based on using Vernier calipers and screw gauge (micrometer), Determination of g using simple pendulum, Young’s modulus by Searle’s method, Specific heat of a liquid using calorimeter, focal length of a concave mirror and a convex lens using u-v method, Speed of sound using resonance column, Verification of Ohm’s law using voltmeter and ammeter, and specific resistance of the material of a wire using meter bridge and post office box.

Mechanics
Kinematics in one and two dimensions (Cartesian coordinates only), projectiles; Uniform circular motion; Relative velocity. Newton’s laws of motion; Inertial and uniformly accelerated frames of reference; Static and dynamic friction; Kinetic and potential energy; Work and power; Conservation of linear momentum and mechanical energy. Systems of particles; Centre of mass and its motion; Impulse; Elastic and inelastic collisions. Law of gravitation; Gravitational potential and field; Acceleration due to gravity; Motion of planets and satellites in circular orbits; Escape velocity. Rigid body, moment of inertia, parallel and perpendicular axes theorems, moment of inertia of uniform bodies with simple geometrical shapes; Angular momentum; Torque; Conservation of angular momentum; Dynamics of rigid bodies with fixed axis of rotation; Rolling without slipping of rings, cylinders and spheres; Equilibrium of rigid bodies; Collision of point masses with rigid bodies. Linear and angular simple harmonic motions. Hooke’s law, Young’s modulus. Pressure in a fluid; Pascal’s law; Buoyancy; Surface energy and surface tension, capillary rise; Viscosity (Poiseuille’s equation excluded), Stoke’s law; Terminal velocity, Streamline flow, equation of continuity, Bernoulli’s theorem and its applications. Wave motion (plane waves only), longitudinal and transverse waves, superposition of waves; Progressive and stationary waves; Vibration of strings and air columns; Resonance; Beats; Speed of sound in gases; Doppler effect (in sound).
Thermal physics
Thermal expansion of solids, liquids and gases; Calorimetry, latent heat; Heat conduction in one dimension; Elementary concepts of convection and radiation; Newton’s law of cooling; Ideal gas laws; Specific heats (Cv and Cp for monatomic and diatomic gases); Isothermal and adiabatic processes, bulk modulus of gases; Equivalence of heat and work; First law of thermodynamics and its applications (only for ideal gases); Blackbody radiation: absorptive and emissive powers; Kirchhoff’s law; Wien’s displacement law, Stefan’s law.
Electricity and magnetism
Coulomb’s law; Electric field and potential; Electrical potential energy of a system of point charges and of electrical dipoles in a uniform electrostatic field; Electric field lines; Flux of electric field; Gauss’s law and its application in simple cases, such as, to find field due to infinitely long straight wire, uniformly charged infinite plane sheet and uniformly charged thin spherical shell. Capacitance; Parallel plate capacitor with and without dielectrics; Capacitors in series and parallel; Energy stored in a capacitor. Electric current; Ohm’s law; Series and parallel arrangements of resistances and cells; Kirchhoff’s laws and simple applications; Heating effect of current. Biot–Savart’s law and Ampere’s law; Magnetic field near a current-carrying straight wire, along the axis of a circular coil and inside a long straight solenoid; Force on a moving charge and on a current-carrying wire in a uniform magnetic field. Magnetic moment of a current loop; Effect of a uniform magnetic field on a current loop; Moving coil galvanometer, voltmeter, ammeter and their conversions. Electromagnetic induction: Faraday’s law, Lenz’s law; Self and mutual inductance; RC, LR and LC circuits with d.c. and a.c. sources.
Optics
Rectilinear propagation of light; Reflection and refraction at plane and spherical surfaces; Total internal reflection; Deviation and dispersion of light by a prism; Thin lenses; Combinations of mirrors and thin lenses; Magnification. Wave nature of light: Huygen’s principle, interference limited to Young’s double-slit experiment.
Modern physics
Atomic nucleus; α, β and γ radiations; Law of radioactive decay; Decay constant; Half-Life and mean life; Binding energy and its calculation; Fission and fusion processes; Energy calculation in these processes. Photoelectric effect; Bohr’s theory of hydrogen-like atoms; Characteristic and continuous X-rays, Moseley’s law; de Broglie wavelength of matter waves Read the full article
1 note
·
View note
Text
GAZE
Date: 25 January 2023
Meditated 1
Duration: 32 minutes at 1:45 PM
Depth:
This session stands out in the way it made me feel physically. After the session, I had difficulty keeping my eyes open in the way my eyes usually are at 2:17 PM on any given day. My forehead felt heavy. I felt my forehead with the palm of my left hand just to check on the shape of my forehead! Nothing out of place.
My mind wasn’t exactly still through those 32 minutes. However, I experienced Peace in a way that I wouldn’t have, if I had chosen to not meditate. It was an unscheduled session. It was outside of my routine nightly session.
I tried placing my attention at the centre of my eyebrows many times. It is so difficult to make one’s attention do anything at all after the meditation venue shifts from the waking, surface level consciousness of memory. From the first step into the shallowest part of subconscious, it is impossible to consciously guide the attention.
I wasn’t successful at shifting my inner gaze. It has happened before, only once. And I wish for it to happen again. It is nice to behold a spiritual part of one’s own mind. Of course, to behold such depths one requires stillness greater than what I experienced this afternoon.
All the attempts to remain between the eyebrows must have brought some Peace energy to my forehead. Maybe. I don’t have another explanation for my eyes to feel heavy after meditation. They were heavy like as if I had been deep sleeping.
Meditation 2:
Duration: 54 minutes at 10:49 PM
Depth:
This meditation didn’t have that absolute stillness that helps behold the gate through which life forces can begin their trickle out of the body. In other words, I didn’t see the spherical third eye during the meditation last night. My gaze didn’t shift to that focal length within to be able to see the spiritual eye. I am beginning to understand the spiritual third eye to be the ‘out’ gate for pooled energies in the head.
The human gaze has such a wide range of focus. We can focus to see the sun without blinding ourselves, thanks to double dark sunglasses. We can focus on the full moon on a cloudless night. We can focus on the light glinting off a flying machine. In good weather, we can spot the peak of the mountain that we have chosen to scale from the base camp we are temporarily halted at.
We can focus on the top of the tallest tree among a bunch of trees. We can focus on the shrub where the tip of our longest shadow falls. We can focus on our feet without having to bend any part of our bodies, in a mirror. We can focus on our fingertips at the end of our arms held furthest straight.
We are aware of any strands of long untied hair. We know when our eye lashes are wet and blurring the insides of our spectacles. We know if our immediate surroundings are bright or dark even when we have shut our eyes.
We know the difference between a dream and a memory that we peruse with our mind’s eyes. We are able to allow mind’s imagery to pass our attentive gaze without getting involved using our analysing skills. We are able to imagine without being interrupted by passing imagery.
We are able to access those parts of our mind where no image has gone before (and never will). We allow our minds to be at a motionless, silent and meditative Peace. This is when we are blessed with a shift of the inner gaze.
The inner gaze goes from discerning the motion of images to a motionlessness that can behold the gateway to our unearthly, divine Selves. A considerable degree of mental motionlessness is required to behold the Pearly Gates. I didn’t have such motionlessness of mind last night. However, even a relatively still mind is a source of much rest and rejuvenation.
0 notes
Text
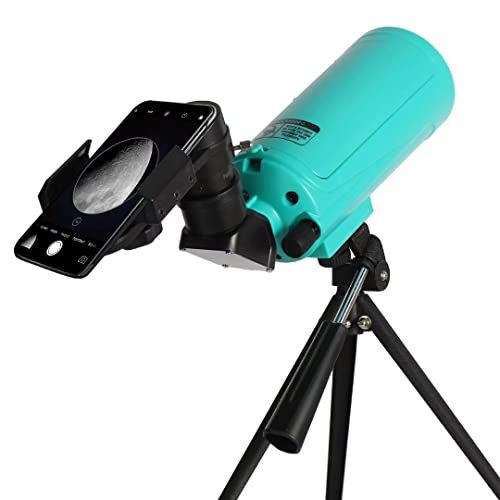
[gallery] Make sure this fits by entering your model number. 【Sharp Crystal-clear Views】This beginner telescope is much more powerful than it looks! Thanks to its Maksutov-Cassegrain design, high-precision fully multi-coated optical glass lens, both spherical and chromatic abberrations are minimized. It not only delivers vivid high-contrast images for daytime viewing such as birds and wildlife, but also enables astronomical exploration including Saturn, Jupiter, craters on the Moon, etc. 【See How It Works Inside】The ingenious design of the detachable lid reveals the internal construction of the telescope and helps you understand how it works. Make it an appealing educational kit for the young minds. But keep in mind not to touch the mirrors with your fingers and avoid making it dusty. 【Compact and Portable】Maksutov-Cassegrain mechanism makes this telescope much more compact than a equivalent refractor or Newtonian. With a long focal length of 750mm, the tube length is only 200mm. Easy to pack and go on a adventure anytime. 【Superior Eyepiece】The included high-quality 20mm eyepiece brings 37.5X magnification, providing high-power sharp views on distant objects. You can see any targets more than 8 meters away. Accessories also include a phone adapter, a tabletop tripod and an erect-image diagonal. 【Satisfaction】This Mak telescope that combines power and simplicity requires no-tool super easy setup. It's a perfect gift for kids or adults astronomy beginners. You will also receive one-year hassel-free warranty and 24-hour friendly customer service. [amz_corss_sell asin="B08P3J14MZ"] https://www.decorishing.com/product/maksutov-cassegrain-telescope-for-adults-kids-astronomy-beginners-sarblue-mak60-catadioptric-compound-telescope-750x60mm-compact-portable-travel-telescope-with-tabletop-tripod-phone-adapter/?feed_id=39330&_unique_id=62893f6b36e2c
0 notes
Text
Exploring Light: Reflection and Refraction - A Comprehensive Guide for Class 10 Students
Unlock the mysteries of light with our comprehensive guide on Light- Reflection and Refraction Class 10 Students. From understanding the laws governing reflection and refraction to exploring the fascinating world of mirrors, lenses, and prisms, this resource provides in-depth insights and practical applications, empowering students to master these fundamental concepts with clarity and confidence.

Introduction to Light:
Light is a form of energy that enables us to see objects around us. It travels in straight lines and at an incredible speed of approximately 3 × 10^8 meters per second in a vacuum.
Reflection of Light:
Reflection is the process where light bounces off a surface. The laws of reflection govern this phenomenon:
1. The incident ray, the reflected ray, and the normal (perpendicular line) to the surface at the point of incidence all lie in the same plane.
2. The angle of incidence is equal to the angle of reflection.
Types of Reflection:
1. Regular Reflection: When light falls on a smooth surface, like a mirror, the reflection is regular, and an image is formed.
2. Diffuse Reflection: When light falls on a rough surface, like paper or wall, the reflection is irregular, and no clear image is formed.
Reflection in Spherical Mirrors:
Spherical mirrors are of two types: concave and convex.
1. Concave Mirror:
A concave mirror is a mirror with a reflecting surface that curves inward.
It can form real or virtual images depending on the position of the object.
When the object is beyond the focus, a real and inverted image is formed between the focus and the mirror.
When the object is between the focus and the mirror, a virtual and erect image is formed beyond the focus.
2. Convex Mirror:
A convex mirror is a mirror with a reflecting surface that curves outward.
It always forms virtual and erect images.
The image formed is smaller in size compared to the object.
Refraction of Light:
Refraction is the bending of light as it passes from one medium to another. It occurs due to the change in speed of light when it moves from one medium to another.
Laws of Refraction:
1. The incident ray, the refracted ray, and the normal to the interface of two transparent media at the point of incidence, all lie in the same plane.
2. The ratio of the sine of the angle of incidence to the sine of the angle of refraction is constant, provided the surrounding medium remains the same. This is known as Snell's Law.
Refraction through a Rectangular Glass Slab:
When light passes through a rectangular glass slab, it undergoes refraction twice: once when entering the slab and once when exiting.
1. Incident ray: The ray of light entering the slab.
2. Emergent ray: The ray of light leaving the slab.
3. Refracted ray: The ray of light inside the slab.
Refraction through Lenses:
Lenses are transparent objects made of glass or transparent plastic. There are two main types of lenses: convex and concave.
1. Convex Lens:
Also known as converging lens.
It converges the incident light rays to a point on the other side of the lens called the focus.
It forms real and inverted images when the object is beyond the focus.
It forms virtual and erect images when the object is within the focus.
2. Concave Lens:
Also known as diverging lens.
It diverges the incident light rays.
It always forms virtual and erect images, regardless of the position of the object.
Lens Formula:
The relationship between the object distance (u), image distance (v), and focal length (f) of a lens is given by the lens formula:
1/f=1/u + 1/v
Where:
f = focal length of the lens
v = image distance
u = object distance
Magnification (m):
The magnification produced by a lens is the ratio of the height of the image to the height of the object.
m = h'/h= -v/u
Where:
m = magnification
h' = height of the image
h = height of the object
Applications of Reflection and Refraction:
1. Mirrors: Used in everyday life for grooming, in telescopes, microscopes, and vehicles.
2. Lenses: Utilized in glasses, cameras, projectors, and microscopes.
3. Prisms: Employed in spectacles, binoculars, and cameras for correcting vision and splitting light into its constituent colors.
Conclusion:
Understanding the principles of reflection and refraction is crucial in comprehending various optical phenomena in our daily lives. From mirrors to lenses, these concepts find applications in a wide range of fields, from astronomy to medicine. By grasping the fundamentals outlined in this guide, Class 10 students can gain a deeper insight into the behavior of light and its interactions with different media.
#class 10#science#11thclass#class 8#botany#chemistry#foundation#11th class#biology#vavaclasses#9thclass#mathematics#physics
1 note
·
View note
Text
What Are the Different Types of Convex Mirrors?
What Are the Different Types of Convex Mirrors?
A convex mirror is a flat-surfaced mirror that bulges towards the light source. A convex object always forms a virtual image, with the image being centered at the focal point and diminishing in size as the object moves away from the convex mirror. This is because the convex mirror cannot focus light. The image produced by a convex product cannot be projected onto a screen or projected through a window, and it is much smaller than the actual object. As the object approaches the convex mirror, the image gets larger and becomes more distorted.
A convex mirror also diverges when light strikes it. This means that no matter how far an object is from the convex mirror, a virtual image will always be formed. They are widely used in vehicles and large buildings to prevent accidents. Their convex properties make them a popular choice for rear-view mirrors. A typical example of a convex mirror is a car's rear-view-mirror.
A convex mirror is used for many different applications. It is most commonly used as a rear-view mirror in a car. The reason for this is that it gives motorists a better view of their surroundings. They are also used in hallways and other public places. They can also be used for surveillance purposes. They are an excellent choice for vehicles. They provide a wide field of vision and prevent collisions.
A convex mirror is similar to a rectangular mirror, except that the reflecting surface is bulged outwards. The latter reflects light in a different direction than a convex mirror. In contrast, a concave mirror is bent inwards and faces the focal point. Hence, the focal point of the image is in the front or behind the object.
A convex mirror is a sphere with a reflecting surface on the outside of the sphere. Its focal length is approximately 12 cm and its focal point is located 6 cm behind it. In this configuration, the size of the image is the same as the object. In contrast, a plane-shaped mirror covers a larger area. A curved one covers a smaller area than a plane-shaped mirror.
A convex mirror has two axes. The first is shaped like the outside of a bowl. It is raised above the edge. The incident ray will always be perpendicular to the principal axis. The second ray will be parallel to the focal point. A convex mirror has a rounded shape. Its image will be erect and virtual.
A divergent convex mirror is a type of convex mirror that has a smaller field of view than a plane. Its image is erect or diminished. If it is convex, the image of the object will be reflected. In addition, a diverging mirror will not produce a virtual image. So, it is a type of a plane.
A convex mirror has a reflecting surface that bulges outward. A concave mirror has a reflecting surface that is curved inward. A diverging convex mirror will have a concave surface. In contrast, a convex mirror will have a flat surface and a spherical surface. A cone is a rectangular shape, with a rounded axis.
The main difference between a convex and a flat concave mirror is how they focus light. A flat, convex mirror has a central point of focus, whereas a flat convex has a focal point at the outside. This way, it will always produce a smaller image than the original object. This type of reflection will be a virtual image that is formed in the focus of the mirror.
Among the various types of convex mirrors, a flat concave mirror is used to reflect light inward. A diverging convex lens is used to reflect light backwards. The result will be an upright image, whereas a case 3 mirror is a vertical, erect image. This type of reflection is a virtual image, so it is impossible to see a ray with a straight-concave lens.
0 notes
Text
What is the Image Formation by Convex Mirrors and Concave Mirrors?
In Physics, students often encounter the term, spherical mirrors, while learning about how light is deflected and at what angles. Several concepts and chapters are directly derived from it. There are two types of spherical mirrors, Convex Mirrors and Concave Mirrors.
Convex mirrors and concave mirrors differ in their principles. In simple terms, convex mirrors bulge outside whereas the concave mirror bulges from inside.
Tapering figures represent convex mirrors while broadening ones refer to concave mirrors.
While, both, convex and concave mirrors have different principles, the complexities and comparisons need to be dealt with elaborately. From plane to spherical mirrors, to concave to convex mirrors, the differences attach immense importance to physics students, as well we those who deal with as part of academics as well as profession.
In this article, we are happy to take you through various aspects of convex mirrors and concave mirrors. We cover:
Convex mirror uses
Concave mirror uses
Convex mirror examples
Concave mirror examples
Characteristics of convex mirrors
Characteristics of concave mirrors
Convex mirror diagrams
Concave mirror diagrams
Through ray diagram, as well as formula, we will also help you understand the difference between concave mirror and convex mirror, more clearly
What are Plane Mirror and Spherical Mirror?
However, before we delve into types of convex mirrors and concave mirrors, let us first talk about the basics of Plane Mirrors and Spherical Mirrors, and how they are different from each other, as well as their applications.
Plane Mirror
A plane mirror is a mirror that has a flat and smooth surface, which in turn, always forms a virtual form of the object, with exact shape and size, when it reflects. Commonly, plane mirrors are those which people generally use in dressing rooms or makeup tables. A plane mirror is known for providing exact image.
A plane mirror is used for a wide range of applications and purposes that include periscopes and kaleidoscopes, auto industry, mirrors for domestic use, medical especially dental, and torch lights, besides security-related purposes.
In terms of physics, when light rays hit a plain mirror, the angle of reflection will be the same as the angle of incidence. In plain mirrors, the images are generally laterally inverted, and are erect. The focal length of a plain mirror is counted as infinity.
Spherical Mirror
Spherical mirrors are also referred to as curved mirrors, where they have a shape cut out of the spherical surface. Under a spherical mirror, there are two categories: convex mirror and concave mirror. The spherical mirror and its equation hold significant importance in science, owing to its association with optics.
Unlike plane mirrors, spherical mirrors, both convex mirrors and concave mirrors, have a radius if curvature with a consisting curve, which results in the formation of an image, that can be either virtual or real.
What is a Concave Mirror?
A Spherical Mirror that has a reflective surface inside, is called the converging mirror. The main attribute of the concave mirror is that it focuses on pointing the light from the source falling on it, into a single point. And generally, the image formed by these types of mirrors usually varies based on the size, shape, and position of the object.
Characteristics of Concave Mirror
The major characteristics of concave mirrors are listed below,
Converging: A concave mirror is a converging one because, light rays that hit it reflect on the surface, and merge at a particular point. This point is known as a focal point. Concave mirrors allow light to focus to a point.
Magnification and formation of image: Place a concave mirror close to any object and you will notice that it shows a magnified image that is straight, erect, and of course virtual. The image looks to be larger than the actual size of the object. The concave mirror also looks upright. The reason why concave mirrors feature the formation of virtual images is that the rays that reflect look to diverge from a point located behind the mirror.
Distance and image properties: In concave mirrors, when the distance between the object and the concave mirror increases, the size of the image decreases. At a particular distance, , the image changes to virtual. Under this circumstance, the true image, in an inverted form manifests on the opposite side of the concave mirror.
Image formations: concave mirrors create images of different sizes, and diverse in nature, from real to virtual. These features enhance the importance of concave mirrors, which they are widely used in various applications, from domestic to scientific
Image Formation by Concave Mirror
The image formed by the concave mirror is either real or virtual and can be small and large based on the position of the sources, and the reflecting point.
For example, if the distance of the object from the source is large, then it results in real and inverted images. Whereas for the objects placed close to the source, the images formed are erect and virtual.
Moreover, in this mirror, the light converges at a single point before reflecting, which is referred to as a converging mirror.
What is a Convex Mirror?
Convex mirror is also a spherical mirror and is exactly opposite of concave mirrors in its properties.
Let us first understand convex mirror through its basic definition:
A convex mirror is a type of spherical mirror that has a reflective surface towards the outside of the bulge, and it is also referred to as diverging mirror. Unlike convex mirrors, in a concave mirror, the light falling on the object diverges as it reflects through the mirror. And generally, as the distance between the source and the object decreases, the size of the image formed increases.
Characteristics of Convex Mirror
Diverging: A convex mirror is a standard diverging mirror because when light rays hit the reflecting surface, they diverge or spread. Unlike concave mirrors, convex mirrors cause the light rays to diverge from the definite focal point.
Types of images – from virtual to diminishing: irrespective of the distance between the object and the convex mirror, the images formed are virtual, uprights, and diminished. The image appears erect and smaller too compared to the actual size of the object. The image also appears on the rear side of the mirror. When you trace it backward, the virtual image forms through the intersection of diverging rays.
View–Wide: Convex mirrors have an incredible feature to offer a broad canvas of view. This is because they possess an outwardly curved shape, and thus convex mirrors capture a wider area in reflection in comparison with flat and concave mirrors. Due to this, concave mirrors are used whenever there is a need for a larger perspective and a more expansive view. These can be large grounds for parking, sporting, meeting, and intersections, and where security, surveillance, and monitoring are involved
Image – magnitude, and distance: convex mirrors are known to produce virtual images that are closer to the mirror than the object. The image that is formed by convex mirrors looks diminished and gives an impression of being smaller than the object’s real size. Due to this reduction, in the size of the image, a more expansive area can be captured for reflection.In summary, through convex mirrors, the light diverges as it strikes the reflecting surface The Convex mirrors always result in diminished, erect, and virtual images, regardless of the distance between the mirror and the object.
Image Formation by convex mirrors and concave mirrors
As we dwell deeper into the ray incidence on concave and convex mirrors, it becomes easier for us to ascertain and understand the characteristics and behavior of light rays. This is particularly helpful in building precise ray diagrams and analyzing image formation processes.
Oblique Incidence: When a ray hits the mirror at its pole, its reflection is oblique, forming the same angle as the principal axis. This ensures the angle of incidence is equal to the angle of reflection, thus extending the symmetry of the reflected rays.
Parallel Incidence: When a ray that is parallel to the principal axis hits the concave mirror or a convex mirror, it takes a definite trajectory. If it is a concave mirror, the ray goes through the focus on the principal axis. If it is for a convex mirror, the reflected ray is born out of the focus on the same side as the incident ray.
Focus Incidence: When a ray passes through the focus and hits the surface of a concave mirror or a convex mirror, it will be seen traveling parallel to the principal axis. This is the same for both concave and convex mirrors.
Centre of Curvature Incidence: When a ray travels through the center of curvature of a spherical mirror it will retrace its path after reflection. This is nothing but going through reflection and following the exact similar path in the opposite direction, when the ray touches the centre of the curvature.
Convex and concave mirrors – important aspects
Pole: The center point of any spherical mirror from where all measurements are made
Aperture: An aperture of a mirror is an origin point of reflection of light
Principal axis: This is an imaginary line passing through the optical center and from the center of curvature of a mirror. Generally, measurements are taken based on this line
Centre of Curvature: this is a point in the center of the surface of a mirror and goes through the mirror curve, having the same tangent and curvature at the point.
The radius of Curvature: This is the linear distance between the pole and the center of curvature.
Principal Focus: This is the Focal Point and is there on the mirror axis.
Focus: It is a point on the principal axis where light rays parallel to the principal axis come together after reflecting from the mirror.
As you are aware, many topics such as this in Physics are often complex, and the students often end up struggling to understand these topics and subjects. So, in this process, it is wiser to join an online coaching platform that offers various amazing features for the students to get a better grasp of the subject. One such online tutoring platform is Tutoroot, which offers online interactive classes for students in a personalized, yet effective manner. Enroll with Tutoroot today
0 notes
Text
👁️ **Human Eye:**
- Light-sensitive
- Vision
- Eyelid Protection
- Spherical Eyeball
- Layers: Sclera, Choroid, Retina
👀 **Eye Structure:**
- **Sclera:** Outer, Protects
- **Choroid:** Dark, Blood Vessels
- **Cornea:** Allows Light
- **Retina:** Rods (Dim), Cones (Bright)
- Iris, Pupil: Light Regulation
💡 **Lens & Muscles:**
- Crystalline Lens: Transparent
- Ciliary Muscles: Focal Length
👤 **Visually Challenged:**
- Curable & Incurable
- Eye Donation
🔍 **Tech for Blind:**
- Braille
- White Cane
- Talking Devices
- Computers
- Radio Reading
📚 **Light & Reflection:**
- Define Light
- Reflection Phenomenon
- Laws of Reflection
🪞 **Mirror Images:**
- Characteristics
- Lateral Inversion
- Multiple Images
- Uses of Mirrors


💡 **Dispersion & Spectrum:**
- Dispersion of Light
- Spectrum of White Light
#education#notes#school#youtube#studyblr#students#homeschool#latitudes#maths#maths tutoring#student life#studying#study#college studyblr#new studyblr#study aesthetic#study blog#study hard#study motivation#study inspiration#study inspo#study tips#study notes#study with me#studyblr community#studyinspo#studygram#studyspiration#studyspo#studystudystudy
0 notes
Text
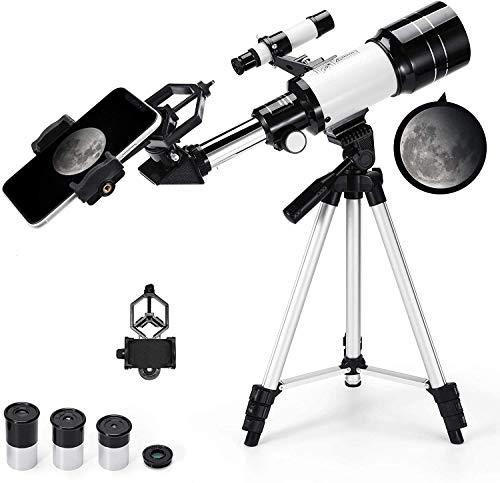
AZOD Telescope for Beginner and Adult, 70mm Aperture 300mm Focal Length, Double Eyepieces,
AZOD Telescope for Beginner and Adult, 70mm Aperture 300mm Focal Length, Double Eyepieces,
Price: (as of – Details) 1. Large-aperture parabolic primary mirror: Refractor telescopes use parabolic primary mirrors, with sharp central image quality, which improves the edge problem of the spherical mirror and ensures sharper and more delicate image quality.2.70MM large-caliber: large-caliber not only improves the resolution, has a stronger light-gathering ability, but also captures more…
View On WordPress
0 notes
Text
Medical ENT instrument examination methods
Types of medical ENT instruments
Ear, nose and throat examinations must be performed with care because the ear, nose and throat are deep, tiny cavities, so special lighting devices and examination instruments must be used for the examination, commonly used are 100-watt examination lights with spotting lenses, medical ENT instruments, otoscopes, tympanic otoscopes, lance forceps, cotton rolls, cerumen hooks, tongue depressors, anterior rhinoscopes, posterior rhinoscopes, indirect laryngoscopes, tuning forks, and Nebulizer, etc.
Medical ENT instruments include ENT knives and chisels, ENT scissors, ENT forceps and clips, ENT hooks and needles, etc. They are mainly used for ENT surgery. otoscope, electric tympanic otoscope lens, electric otoscope, nebulizer, straight tongue depressor, angled tongue depressor, gun forceps, knee forceps, rolled cotton, cerumen hook, posterior rhinoscope, indirect laryngoscope, anterior rhinoscope, tuning fork, etc.
Medical ENT instrument examination methods
The otorhinolaryngological organs are located deep in the head and face, and the cavity is narrow and tortuous, so it is not easy to see directly and clearly. The examination environment should be slightly dark, and curtains should be set up to avoid strong light coming in directly. The patient's chair should be a specialist examination chair or a high-backed reclining chair, so that the patient's head is in an upright or slightly forward position.
A. Light source
With a certain light source can be used, to 100W brightness is appropriate, commonly used light bulbs, with a concentrating lens of the examination lamp is best. Can also be used locally with flashlights, gas lamps, etc. Light source should be movable to facilitate adjustment. The light source should be placed on the side of the examiner's eye, slightly higher than 10-20 cm above the patient's ear.
Second, the use of medical ENT instrument
There is a concave reflector in the medical ENT instrument that can concentrate light, with a focal length of about 25cm and a small hole in the center for peeping, and the mirror body is linked to the frontal band by a double spherical joint with flexible rotation, and the joint is tightened to the extent that the mirror can turn flexibly without loosening. Wear the searchlight in the medical ENT instrument in the forehead, adjust the mirror parallel to the frontal surface, the central mirror hole should be facing the right or left eye of the examiner, first let the light source projected onto the medical ENT instrument, then adjust the mirror so that the light reflects and focuses on the inspection site, at this time the examiner's vision to the front through the mirror hole, see The focus of the reflected light beam is seen. Because it is convenient for light, it is mostly used in surgery. In general, the focus is on the tip of the nose, the throat on the uvula, and the ear on the external auditory canal.
Precautions when using medical ENT instrument diagnostic set:
①Pupil, mirror hole, reflective focus and examination area should be kept in a straight line to make the examination area bright and clear. ②Posture is correct during the examination, do not twist the neck, bend over, or accommodate the light source. ③medical ENT instrument and the examination site should maintain a certain distance, should not be too close or too far. ④ light source projection direction and medical ENT instrument distance, medical ENT instrument reflective angle should be carefully adjusted accurately, otherwise affect the effect.
Third, the inspection equipment
Alcohol lamp, dirty basin, sterilized gauze, sterilized cotton, etc. are also available.
Fourth. Commonly used drugs and dressings
Ephedrine, epinephrine, hydrogen peroxide, phenol glycerin, gentian violet, gauze, cotton balls, cotton sheets, petroleum jelly gauze, etc.
Fifth. Posture during examination
The patient and the examiner are sitting opposite each other, with each leg slightly to the side. The examinee sits upright, leans back against the back of the examination chair, leans forward slightly, waist straight, head straight. When examining a child, the parent can hold the child in their arms, clamping the patient's legs to the child's legs, holding the head in front of the chest with one hand, and holding the two upper limbs and body with the other hand.
0 notes