#IMG (file format)
Explore tagged Tumblr posts
Visit Tumblr Blog
Explore Tumblr blogs with no restrictions, modern design and the best experience.
Last Seen Tumblr Blogs


Fun Fact
The Tumblr office adopted Tommy, an 11-year-old Pomeranian.
Text


WELL. I am now the proud owner of the entire HEAD CHA LA doujinshi series n__n
Unfortunately the scans aren't very big, something around 1000x800, but they're all there! If anyone wants the scans, I'm willing to send the ZIP file for free tbqh just dm me
Update: DOWNLOAD HERE
Contains the .rars for the "full" version (HTML files for a webcomic format + the img files) and the more space efficient "lite" version that is just the img files. Enjoy!
#dragon ball#dbz#Piccolo#Goku#Piccoku#i bought it bc i really wanted the series and its basically impossible to find otherwise but like#i really cant imagine charging for this. its not translated. not my art. the scans are small etc etc etc.#id rather distribute for free to preserve the series. i took the $ blow so no one else has to lol
156 notes
·
View notes
Text
"Just a sip" , a comic idea that I have filed away under the "I no longer know when or if I'll ever finish it" category (Doesn't feel right to say "discarded" lmao) (who knows, maybe one day I pick it back up!).
I really love the thumbnails I managed to sketch out (especially that last panel at the third page!!!!!!! I want and need to make more of that), its been I think almost a year since I've made them though, and it just doesn't feel right just let them keep collecting dust after so long especially when I don't even know if the inspiration to complete it strikes again, so, here it is! Read more for further rambling into the details~


This is another "what if" comic where wanted to explore mainly:
1. Ocudeus and The Seaspring. And what could happen within someone's mind once they drink (Lukas is our text subject! Yay!)
2. "Interesting" paneling, or at least visually engaging compositions in pages (I love making comics!) There's so many things I want to practice and try out to make bring the movies in my head come to life in this format.
On to the "plot".
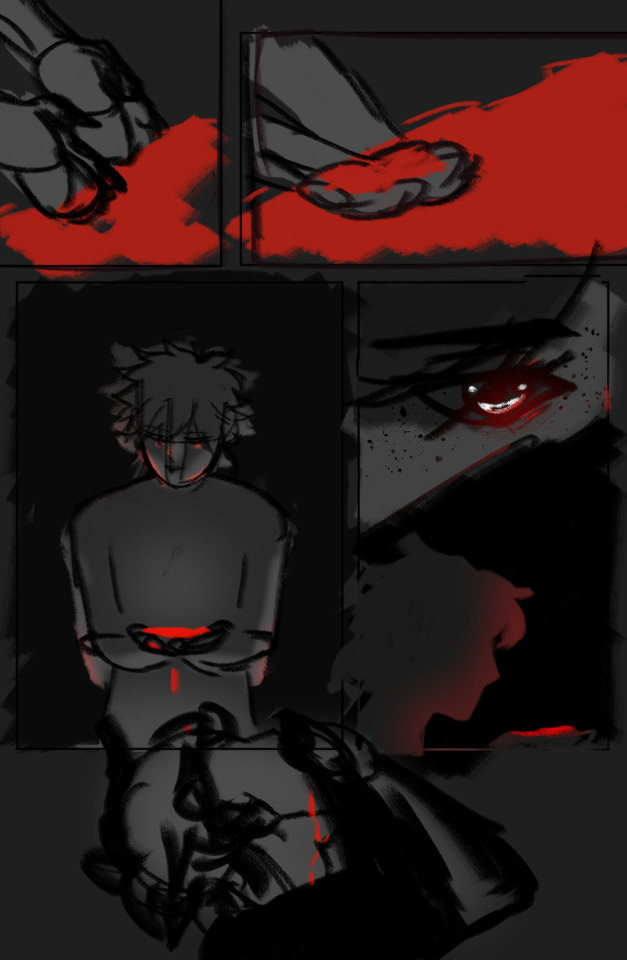
We start out with Lukas drinking from The Spring. Hypothetical-Timeline wise this would be happening at the "ending" of the TS story in which not a single cure is found for MCs curse. Last resort type of situation. This happens on pages 1, 2, and page "3". In this post the 3 image would actually be page 4, I just never sketches the 3rd (I just drew what was clearest in my head first). Imagine 3rd page having a shot of Ais staring at the process from a safe distance with a cig while Lukas is writhing on the floor losing his marbles after drinking (lol).
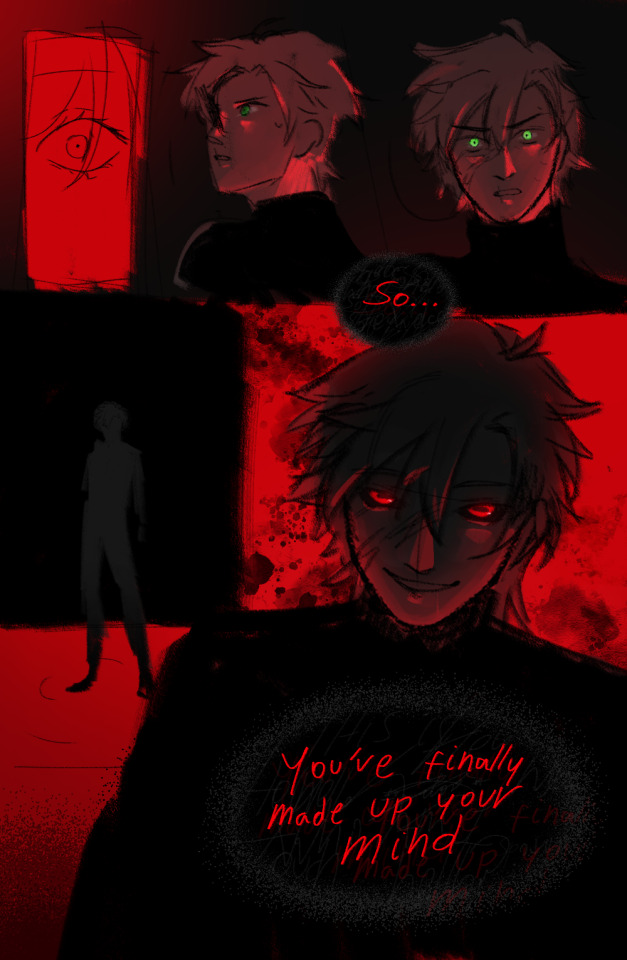
Now the fun part. Ocudeus. I imagined the process of joining the groupmind not happening instantly. I thought about Ocudeus himself manifesting in their new host's mind and sometimes striking conversation (which happens in isolation with just the two of them) (brain is not part of the primordial soup. Yet)
We don't know what Ocudeus looks like either! So I went crazy. At first I was just gonna make them take Ais' shape. But that felt, not quite right for an eldritch being. So instead, Ocudeus takes the form of whoever is drinking :) thus manifesting themselves as Lukas inside Lukas' mind.
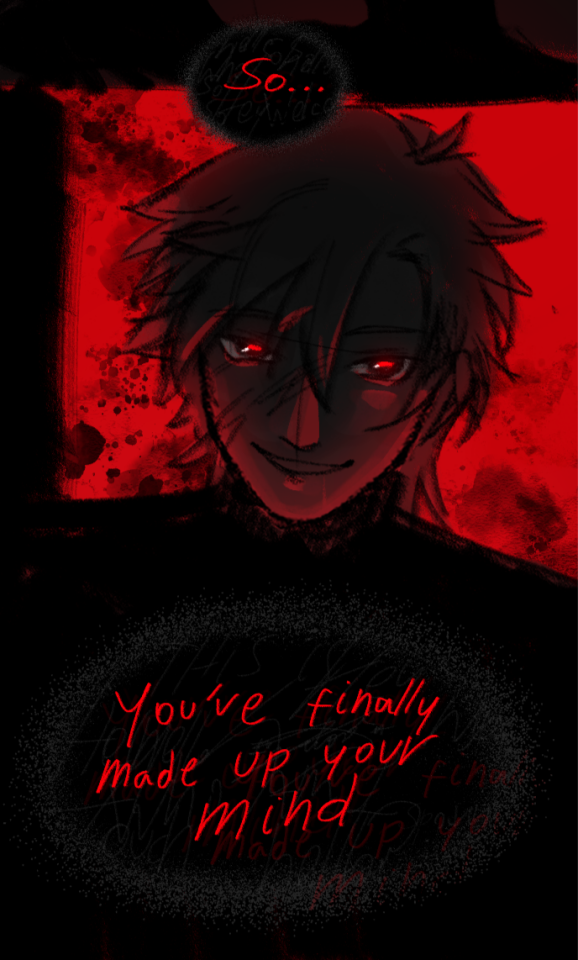
There's a huge jump in events from Image 3 and 4 of the post. After Img 3 there's a lot of talking going on. Asking if the curse can really be cured. Ocudeus being a sassy smug menace cryptic about it and reminding Lukas that there is no going back anyways and that is no longer something Lukas should be concerned about. He will no longer be himself, so why worry.
After this its just a "Descent into true madness", see Img 4 for reference, where the "world" just really starts to warp around and eventually ends with Lukas getting "consumed" by the darkness of the giant octopus, his lasts thoughts as "Lukas" being those of relief of finally getting rid of the curse, and grief over leaving his life behind. Fun stuff.
Comic was supposed to end with Lukas jolting awake (His head was resting on Ais lap now).
After sitting up abruptly and wiping his tears away, with hands that now look properly human. Lukas turns to Ais and asks, with a gaze now as red as the seaspring near them.
"Why am I crying?"
-
THATS A LONG ONE If you read this far, well, thanks! ;w; I hope you enjoyed the read, even if there is no full comic to pair. The Seaspring is so interesting to me.
Some other random things: I got inspired by the Honkai Star Rail promo video where Acheron and Black Swan dance together. The visuals and visualization of Black Swan's "being" being consumed by the endless void was SO good and when I realized this concept could work for the seaspring in a similar way I needed to get the idea out of my system.
Have an extra! Alternative version of my fav panel. Only difference is the eyes, this is the first version. Which I drew before Redspring revealed what Ais' eyes looked like when his cephalopod friend is driving the car.
Vibi out~ (・∀・)
#touchstarvedgame#touchstarved game#ais touchstarved#touchstarved ais#touchstarved oc | Lukas#ocudeus#god I really yapped a lot#this turned into a monster of a textpost#oh wow tumblr flagged this as sensitive content#I mean they aren't wrong
42 notes
·
View notes
Text
Small Rarebit basics to start your webcomic site pt 3
Part 1 • Part 2
Uploading your pages on your site
In this part I will touch on how to upload comics to the site.
To upload a comic page to the site you will need to upload the file of your page and edit the comics_settings.js.
We will start by uploading the comic page, go to the img folder, and inside it go to the comic folder


Inside it are already the comic files used in the example page, as you have noticed all the pages names start with pg, you will have to name your files as that so they can be read, since they wont be used you can delete them, or not! You can do whatever you want.
There are also a couple of pages which name has a dash and number part, I will explain those later.
Place your own pg1.jpg file in there

After you have loaded your site you can notice that the file has been replaced, but what about the rest of the information of the page? You can find that on the js folder

Inside you will find these js files, the one we will edit is the comic settings one

The js file has a good explanation about what it does in the commentary

Remember how I mentioned you have to keep the pgn naming format? You can modify it here but personally I don’t find it necessary, but you can do so here if you want to.
To modify the information on the page itself it is located in this section:

You can leave the comments there for your own reference:

Now your title and notes display this:


Now lets move on to the pg files that have a _ in them, those are pages that are sectioned in parts in case you want to work on a vertical/scrolling comic, cool right!
Its easy to use those, in this one the pg2 works as an example, with pg2_1 and pg2_2 files, but you can use as many parts you want.
The commentary explains in which area you put how many parts your comic has.
The original example one already has one divided in two parts but here’s one with three:

Example
As a note altText doesn’t work in these type of pages, if you use it the word will just repeat over and over, so leave this space in blank when you do these type of pages.
Right now the file is displaying more pages than the ones I have, so I will delete the rest and just leave the two I have.

Now we will move to the upper area of the file
The commentary already explains it, but you have to put in this area the number of comic pages you have, in the beginning the number displays 14 because it has the example pages

I will change that number for 2 since thats the amount of pages I have

There
Extra little tip:

you can change maxpg to the number page you want to be displayed when people visit the site, it doesn’t have to be the first one, it could be the beginning of your latest chapter.
Last thing, I mentioned earlier about the thumbnails for the archive, to have them not show up in your archive you have to edit the archive.js file in your js folder.


Here
This is it for the guide!
These are pretty much the basics to get started with rarebit and your comic site.
There are many things you can do with your site, later on you can even move on from rarebit if you find another way to work things out if you want, this is just the way I've found to do things.
Rarebit Credits:
Rarebit site
Rarebit's creator's ko-fi and patreon
28 notes
·
View notes
Text
Mako's Cafe is an aquarium cafe themed age regression/pet regression server owned by caffeinecuddlebugs (us) and @agere-goober that aims to create a safe space away from the regression community's purity culture
Guidelines
1. Shark Inspiration
- The mascot must be inspired by great white sharks. This can include being part shark, incorporating shark accessories, or other shark-related elements.
2. Content
- All designs must be Safe For Work (SFW) and suitable for all audiences.
3. Design Type
- Acceptable designs include humanoid, anthro (furry), or feral representations.
4. Submission Format
- Submit designs in high resolution.
- File formats accepted: PNG, JPEG, or GIF.
5. Original Work
- The design must be original and created solely by the person submitting it.
6. Usage Rights
- By entering, participants grant Mako's Cafe permission to use their design for promotional and community purposes.
- Participants relinquish all rights to the design except for design credit.
Submissions end Friday, July 26
Our tag on social media is #MakoMascotContest and tag us!
You can submit there here or on the form but you have to have the same info
(Submission img)
(How you'd like to be credited)
-opt-
(Talk about the design process, their personality, extra notes, and DM us if you want to be invited to the server when it opens)

#Macchiato☕️Speaks#Cafe☕️Special#MakoMascotContest#agere middle#safe agere#agere caregiver#agere sfw#agere textpost#agere little#agere blog#agere community#sfw agere#age regressor#age dreaming#artwork#art#utmv agere#age regression#agedre#agere#artists on tumblr#digital art#art contest#design contest#contest#original art#oc art#Mako's Cafe
15 notes
·
View notes
Text
Finding Her - Chapter 14

Link makes notes, takes photos and keeps time on his quest across Hyrule, in the hopes of finding Zelda and staying sane until he does. [ Previous | Next | First | AO3 ] A/N: This chapter's formatting may not read very well on Tumblr. See the AO3 link as an alternate.
Booting… Booting… Boot–
[ WARNING ]
%%% A problem has occurred and the Purah Pad will now shut down to prevent further damage.
%%% Shutdown process: Initiating…
### STOP: 0x0000008E (0xHE000000LP, 0x0ME00000)
### pp1371hud.sys – Address F87D91-HELP at F87DA0-ME
%%% Beginning memory transfer…
%%%Transfer Complete.
%%% C ontact your the Pur ah Pad technical admini5trat0r for furthe r # H##ELP!
---
> Director’s Log, 104AC, 8th month, 6th day. I’ve made a start on the repairs to Link’s Purah Pad, but progress is slow. It was pretty badly damaged in the fight, and I’m not sure I’ll be able to save it. To think, just yesterday Link asked me to give it a once over.
As a stopgap, I’ve booted up a prototype Purah Pad and transferred all of Link’s data and inventory across. Its hardware is barely holding together, so I’ve asked Robbie to return from Hateno Village to help out, but he’s still a day away.
I’m using the guidance stone console to recover what I can. It looks like most of the data survived, but everything logged in the past week is completely scrambled. I’ll sort it out. I have to.
I know how much Link’s notes mean to him. Salvaging them is the least I can do.
---
[ Corrupted data packets identified ]1040802-logtypeTEXT.pkg 1040802-hyrulegarrison-053.img1040804-logtypeTEXT.pkg 1040804-lookoutlanding-055.img 1040805-logtypeAUDIO.pkg UNKNOWN-PRINCESSZELDA.img
Re-compiling… 1040802-logtypeTEXT.pkg Recovery 12.5 / 100%
Log[]da[][]: 10:45. 8th month, 2nd day ##VALUE! Location: Hyrule Ga[][]is[]n [][][][][] Weather: %%UNRECOVERED
%[...]%Glad Tulin and Riju are with me. Have a bad feeling, about all this%[...]%Too many memories in Hyrule, and one over every rise and along every path%[...]%but Riju said I had no need for guilt, and Tulin said it was probably an accident%[...]%
< ~File corrupted, unable to display image >
Re-compiling… 1040804-logtypeTEXT.pkg Recovery 32.3 / 100%
[][][] d[]te: ##VALUE! 8th [][][][][], 4th day 104AC ~~~ation: Lookout Lan[][][][] Weather: Mild
%[...]%Robbie’s upgraded the Message Medallions and made one for each Sage%[...]%I’ve briefed the Sages that I think it could be a trap, but we haven’t told the people of Lookout Landing. They’re so sure it’s her. They have so much hope. Who am I to take that away?%[...]%
A half-corrupted photograph, the shapes and colours decaying into noise. To describe it in more detail would be to describe peeling the Purah Pad back layer by layer, and unearthing the wriggling wires, blinking lights and humming components underneath. Look too long, and something starts looking back.
Caption: C an you% %see m e?
Re-compiling… 1040805-logtypeAUDIO.pkg Recovery 49.0 / 100%
RJ | 12:30 %[...]% made it to the Library%[...]% looking worse for wear.
UNKNOWN | 12:30 Roger that. Yunobo and I are ###here##in here, I’m##in here##
UNKNOWN | 12:31 Checking in! The Docks are clear but ###Gl# %% %.
YNB| 12:31 Plenty of Gloom here too, goro!
UNKNOWN | 12:32 What about you?%[...]%
LNK | 12:32 I’m at the second gatehouse. And I…
RJ | 12:32 ##[PURAH]? What’s going on?
---
> Director’s Log, 104AC, 8th month, 7th day - After a day of work and no sleep, I’ve barely made it halfway through the data. I sent Josha off to find me some coffee but Goddess be good, she’d never heard of it. I guess they don’t make it in Kakariko anymore.
Robbie’s not far away. It’s possible it’s the damage to the Purah Pad itself that causing all the isues. But there’s a lot of noise in the data, more than there should be. Maybe someone’s been messing around with the backend somehow.
I just hope we can sort this all out before Link gets back. It would help if we knew where he went, and for how long, and why. Scorpis sent scouts, Harth too. They haven’t come back with anything. I told them he’s the Hero of Hyrule for the Goddess’ sake, look harder!
Okay, I think I’ve nearly cracked the entries made on the day Link and the Sages infiltrated Hyrule Castle. Hopefully something in there will help us find him.
---
Recompilation complete: 1040804-logtypeTEXT.pkg Recovery 61.7 / 100%
Log date: 14:45. 8th month, 4th day 104AC Location: Lookout Landing Weather: Mild
Made it to Lookout Landing with Tulin and Riju. Sidon and Yunobo were already here. All of Hyrule has come for 'Zelda'.
We’ve spent the morning planning the ‘rescue’. Robbie’s upgraded the Message Medallions and made one for each Sage, so that we can all go to the Castle together and communicate freely. The plan is to hit each main entrance – the Docks, the Library, the Dining Halls and the Gatehouses – all at once.
I’ve briefed the Sages that I think it could be a trap, but we haven’t told the people of Lookout Landing. They’re so sure it’s her. They have so much hope. Who am I to take that away?
And there is … another possibility. I can’t promise them Zelda is just an illusion if the opposite is true, but it’s too terrible… What would we do? What would we do, Zelda, if it’s really you causing all these problems in Hyrule, and really you who has turned on us? Goddess, what would we do?
A colourful photograph of Lookout Landing, with the banners of each land of Hyrule visible. Hyrule Castle stands in the background, brightly lit by the sun despite the Gloom that pours out of it.
Caption: Time to find out.
---
Re-compilation complete: 1040805-logtypeAUDIO.pkg Recovery 85.5 / 100%
Audio log transcription date: 104.08.05 Time: 26 minutes 31 seconds.
LNK | 12:27 Testing… testing… Can you guys hear me?
RJ | 12:27 Loud and clear! Wow Link, it’s like you’re right here.
LNK | 12:27 Thank Robbie. This was his idea.
TLN | 12:28 Cadet Tulin checking in! Or, no, can I be Officer Tulin?
RJ | 12:28 Sure you can, kid.
TLN | 12:28 Who are YOU calling kid?
RJ | 12:28 Only the Chief of–
YNB | 12:28 Hey guys! President uh… Yunobo, checking in! Is that the right term?
TLN | 12:29 You are President aren’t you?
YNB | 12:29 No the ‘checking in’ part.
TLN | 12:29 I guess?
SDN | 12:30 I am also here!
LNK | 12:30 Are we all in position?
RJ | 12:30 I’ve made it to the Library. This place is looking worse for wear.
TLN | 12:31 Roger that. Yunobo and I are in the Dining Hall.
SDN | 12:31 I’m at the Docks. They’re clear but there’s Gloom everywhere.
YNB | 12:31 Lots of Gloom here too, goro!
RJ | 12:32 What about you, Link?
LNK | 12:32 I’m at the Second Gatehouse. And I…
RJ | 12:32 Link? What’s going on?
LNK | 12:32 I can see her.
SDN | 12:33 The Princess?
TLN | 12:33 Zelda?
LNK | 12:33 I… I don’t know. Hold position, I’m going in.
SDN | 12:33 Uh, no need for alarm but, there’s something here…
TLN | 12:33 Wait… I can see something too.
YNB | 12:34 Do you think that’s…?
RJ | 12:34 Zelda!? But, she’s in the Gatehouse! What is she doing here?
SDN | 12:34 It’s… moving. The Gloom is moving…
LNK | 12:34 [roaring, crashing noises] Ack! Everyone! It was a trap! I repeat a trap!
TLN | 12:34 Yunobo watch out!
YNB | 12:34 Monsters!
RJ | 12:35 They’re everywhere! What happened to Zelda?!
LNK | 12:35 She was bait! Get out of there!
SDN | 12:35 [gasping] H-Help me! Help! It’s got a hold of me!
LNK | 12:35 Sidon! I’m on my way–
SDN | 12:35 [strangled] No, don't–! You damn-! Hyack, hyah! I’m… I’m free!
LNK | 12:35 Run! Don’t try to fight it!
SDN | 12:35 [screeching in the background] Okay, running!
TLN | 12:36 [arrows whooshing] One down!
YNB | 12:36 Yes, ha hah! We got this little guy, don’t worry!
TLN | 12:36 Not! Little!
RJ | 12:37 [thunder crashing] Take that! And that!
LNK | 12:37 Second Gatehouse is clear. Heading to the west apartments. Everyone report in.
TLN | 12:38 Roger that, we are nearly–!
YNB | 12:38 Done and done! Dining Hall is clear.
RJ | 12:39 So is the Library. Phew, that was quite the fight. And– oh, Sidon! You made it from the Docks!
SDN | 12:40 [out of breath] Indeed.
RJ | 12:40 Those marks on you… what was down there?
SDN | 12:40 I do not know!
TLN | 12:42 So did we… find Zelda?
YNB | 12:42 I think she left, after those monsters came.
TLN | 12:43 So it wasn't really her?
YNB | 12:43 Iunno…
RJ | 12:44 Link? What should we do now?
RJ | 12:46 Link? Say something. You’re scaring us.
YNB | 12:47 Is…is he alright?
SDN | 12:48 He’ll be fine. Maybe his talking stone is not functioning.
YNB | 12:49 It’s more of a talking rock.
TLN | 12:49 Looks like a pebble to me.
SDN | 12:49 It is distinctly a glowing stone, the markings typical of–
RJ | 12:48 Can we please focus?! Link, come in!
LNK | 12:49 I’m here, sorry. Monsters in Zelda’s old room. Caught off guard. Heading to the Inner Sanctum. Everyone else retreat. It’s too dangerous.
SDN | 12:49 No. We will join you.
TLN | 12:50 We can’t leave now!
YNB | 12:50 We’ve come all this way!
RJ | 12:50 We’ll fight together!
LNK | 12:50 Okay. I… Thank you. Approaching the inner sanctum. It seems clear but…
LNK | 12:51 …Zelda?
TLN | 12:51 Is it another ghost?
YNB | 12:51 Is it another trap?!
LNK | 12:52 No it’s… it’s really you, isn’t it?
RJ | 12:52 Link! What do you see?
LNK | 12:52 [softly] You came back…
RJ | 12:52 Link, wait! Wait for us to get there!
SDN | 12:52 We’re moving as fast as we can!
LNK | 12:52 I missed you…
RJ | 12:53 Link, answer me! Link!
LNK | 12:53 Zelda… you… wait. No–! [screaming]
RJ | 12:53 Link!
Connection terminated.
---
> Director’s Log, 104AC, 8th month, 9th day - I’ve managed to recover more of Link’s logs, but Robbie wants me to hand over the Purah Pad ASAP. He took one look at it and shook his head. You’ve outdone yourself this time, he said. I told him I knew my behaviour was not becoming of a Lab Director. He agreed.
The logs don’t tell me much. I know Link was anxious about going to the Castle, and I know they had a hard fight once they got there, but when he and the Sages returned… he was in hysterics. And the Sages say they just found him like that.
But it wasn’t all for nothing. The Sages had good and bad news. The ‘Zelda’ we have been seeing everywhere was actually a puppet of the Demon King Ganondorf, who has survived to this era. It was Ganondorf that they fought in the Castle, and Ganondorf that caused all this Gloom and chaos. But the Sages believe there is still one of their number to be found, a fifth Sage, and that with their power they’ll be strong enough to take him on. But Link…
He said that he didn’t care about the Sages, or Ganondorf, or Hyrule. He said he had to find Zelda and that he had to do it alone. I told him to cool it, and that we must approach this as a team, but he just kept saying he would let us all down, and that we were better off without him.
I’ll be honest, I lost my temper. Pull yourself together, I said. The whole Kingdom is relying on you to defeat the Demon King, or we’re all dead, don’t you understand!? Zelda will have to wait, if she isn’t lost already!
He gave me the darkest look. When he grabbed his Purah Pad to teleport away I…I ripped it right out of his hands. He tried to grab it back and there was a tussle and the next I knew, the Purah Pad was smashed against the ground. There was silence, the worst kind, when you know you’ve done a terrible thing.
I have to repair it. It’s the only way I can think to apologise. And in the time I’ve been working on it, I’ve felt a judgement on me. Watchful eyes, deciding my guilt. I can’t believe I’m saying this but… I feel there’s something alive inside the Purah Pad, something that’s been rattling around in the circuits and is finally awake. I think it knows what happened here.
Maybe if I keep recovering what I can, I’ll figure out what it is, and maybe I’ll fix everything else too…
Well. Back to work.
---
Incoming transmission…Processing…
Message Medallion activated.
Connection established.
PRH | 09:00 Hello?
UNKNOWN | 09:00 Hello, Purah. May I call you that?
PRH | 09:01 Who are you? How are you — No, I know. You’re whatever’s living inside the Purah Pad.
UNKNOWN | 09:01 Indeed, I apologise. I hope my occupation will not be permanent.
PRH | 09:02 So you tapped the messaging function in order to talk? That’s pretty brilliant.
UNKNOWN | 09:02 Thank you! I’m glad you think so. The Purah Pad has been a comfortable home. I am glad to meet its creator.
PRH | 09:03 Oh, it was nothing. I didn’t even know you were there. Anyway – WHO ARE YOU?
UNKNOWN | 09:04 I would prefer not to say. I was instructed to reveal myself only to the swordsman, Link. I do not know who I can trust.
PRH | 09:04 You can trust me, can't you?
UNKNOWN | 09:04 I did call out for you to help me.
PRH | 09:04 And I got your messages.
UNKNOWN | 09:04 The Purah Pad has survived the damage, I see.
PRH | 09:05 Yeah, sorry about that. That was my doing.
UNKNOWN | 09:05 And it was your doing to save me. Very well. I am Mineru, the Sage of Spirit.
PRH | 09:06 A Sage? The others are looking for you, you know.
MNR | 09:06 I would prefer you allow me to speak to Link and Link only.
PRH | 09:07 Well he’s not here right now. Something happened at Hyrule Castle. He never told us what.
MNR | 09:07 The Castle, yes. Ganondorf’s cruelty is as boundless as the sky.
PRH | 09:07 You saw what happened?
MNR | 09:08 I see what the Purah Pad sees. Thanks to you, I can finally communicate.
PRH | 09:08 Mineru, we need to know what it was. If Link abandons us, I don’t know what we’ll do.
MNR | 09:09 I understand, Lady Purah. It will be easier to show you.
---
A series of photographs, or perhaps more accurately the memory of them. These images are reconstructed out of others and are more akin to illustrations than true-to-life pictures. The first is an image of Link, stepping into the Inner Sanctum of Hyrule Castle, restored to its former glory. Waiting for him there is Princess Zelda, bright as the sun. She beckons.
Caption: The puppet Zelda controlled by Ganondorf led us here, but this time when Link laid eyes on her, something was different. He was entranced.
An image of Link embracing Princess Zelda. He appears to be weeping, they both are. The Princess’ face then darkens, Gloom seeping from her body.
Caption: You must understand, Lady Purah, that even the tiniest sliver of hope was enough to tempt him. He had spent weeks knowing that this Zelda was not our Princess, but in that moment, it didn’t matter.
An image of Link crying out in shock as Zelda grabs him by the throat and throws him to the ground. She then goes limp, as the ghostly image of Ganondorf taunts Link from above.
Caption: I have never seen such rage. Link would have burnt the whole Kingdom down at that moment if it meant destroying Ganondorf. But the Demon King is cruel as he is cowardly. He would not face Link directly.
An image of a phantom form of Ganondorf which has appeared to face Link. He and Link do battle as the puppet Zelda looks on. The image shifts – the puppet Zelda takes a dagger, and begins to attack at every opportunity. Link dodges her as he fights Ganondorf, unable or perhaps unwilling to retaliate. One of the puppet’s strikes lands across his side, and draws blood.
Caption: Her betrayal would have been less painful were she not still so graceful, so beautiful. Her image was the one thing Link had wanted to see, and it turned on him with such violence.
An image of the four Sages approaching the Inner Sanctum to join Link. The puppet Zelda hoists her dagger ready to throw at the intruders. Link cries out and, to prevent her murderous action, sinks a blade through her chest. The puppet falls into his arms, blood staining her white gown. Link holds her close until she dissolves into ash.
Caption: He was inconsolable. The Sages found him weeping on the stone floor, and when they tried to help him stand, his rage boiled over. It’s a miracle he didn’t kill any of them in his rampage. But they managed to restrain him, and had to listen to the Demon King’s threats of destruction while their Hero shook in their arms.
A final image of Link, back at Lookout Landing, arguing with the Sages and Purah. There is an altercation, and the Purah Pad falls to the ground, broken. Link departs in a huff, and the image fades to white.
Caption: This was where he left us, or left me rather. The Sages do not hold anything against Link, but they do not understand. They did not see Zelda, in the Inner Sanctum, as he did. They do not know what he was forced to do to save them, even if it was only a puppet. You say he is missing? There is a log of his yet unrecovered that I believe may set you on the path to find him. Go, and find what you seek.
---
Re-compilation complete: 1040802-logtypeTEXT.pkg Recovery 100 / 100%
Log date: 10:45. 8th month, 2nd day 104AC Location: Hyrule Garrison Ruins Weather: Sunny
Short stop over in Hyrule Garrison before we head to Lookout. Tulin was flying over Hyrule Field and spotted us so he joined us on foot. One hour in and he was already complaining about how slow we move. Then he and Riju got talking about which Sage’s Vow is the best, and they’ve been hounding me for my opinion. I’ve convinced them that as Hero of Hyrule I don’t have favourites.
(It’s Tulin’s.)
Glad Tulin and Riju are with me. Have a bad feeling, about all this. It’s peaceful being alone, but company is good too. Too many memories in Hyrule, and one over every rise and along every path, sometimes.
One came back to me when we were exploring these ruins. I was young, when I was first sent here, though not sure how young. Did I already have the Sword? It’s all gone now anyway.
When I was first starting out I was all brute force. The quicker boys, or the ones that didn’t play fair, always had the upper hand. One day I just got fed up. I thought I could dole out some justice. Didn’t know how hard I could hit. The first time I cracked another boy’s skull was the last… but I never really forgot the sound.
The old me, the original Link, figured out how to quash that anger somehow. The current me is still afraid of what it will do, if pushed too far. I told Riju and Tulin all this, last evening by the fire. I thought they’d be disgusted, but Riju said I had no need for guilt, and Tulin said it was probably an accident anyway. I don’t know. I barely know anything, these days. But I do know I have friends at my side now, and ones I can confide in. Maybe that’s how he figured it out, the Link of times gone by.
Well, present day Link has to press on, no matter what dread he’s feeling. Hyrule Castle is only a day away, and Zelda is waiting. (As is the gear she made me, hopefully)
A photograph of Hyrule Field, with the looming Hyrule Castle on the horizon. It bleeds Gloom and beckons, forebodingly.
Caption: I miss the times we had there.
[ All corrupted logs recovered. ]
---
> Director’s Log, 104AC, 8th month, 10th day - It’s done. The Purah Pad put back together and given a polish thanks to Robbie and Josha respectively.
I think I know where Link went now. It’s the only place no one thought to look, because it’s the one place we were sure he’d wouldn’t go. Zelda spoke of it, half a year ago now, and of the treasure she left him. I’m going to go there myself to deliver the Purah Pad to him, and make my apology.
Before I go: Lady Mineru, I know you can hear me. I’m looking at the Purah Pad right now, all but talking directly to you. I have to wall you off again, Mineru, I’m so sorry. Your awakened presence in the Purah Pad is frying its circuits. I don’t know how you even got in there in the first place. Maybe you’ll tell us someday, but for now our priority must be keeping you alive. I’ll tell Link that the Purah Pad is the key to the fifth Sage when I hand it to him. I’m sure he’ll get you out of there somehow.
I’ve also decided to delete the images you showed me of what happened in the Inner Sanctum. I don’t know how to tell Link what I know, or if I even should. But I will tell him I know how he’s feeling. We all miss Zelda, so very much. Our world ended twice over when we lost her. I can’t offer him much more than that, but I think that’s okay. Sometimes hope isn’t what you need. Sometimes all you need is to cry, and when that happens, it’s easier if you’re not crying alone.
Okay, back to work. Tomorrow, and tomorrow, and tomorrow. One of them will be our day.
---
Log date: 17:10. 8th month, 10th day 104AC. Location: Mabe Village Ruins Weather: Cool.
Ah, the relief, having the Purah Pad back. You start to rely on this tech, once it’s part of your day-to-day. And there's no way to lose your memory if you write it all down. It's funny, Purah was the one who found me, in the Throne Room. There wasn’t much to say. We were both pretty sorry. Hugged it out, shed some tears, patched things up. Then I showed her why I'd returned there: the new Champion Leathers, bespoke made by Zelda.
They fit perfect, a good blend of the old tunic and some new additions. Not sure what prompted the memory of her note about it, but I just knew I wasn’t going to let Ganondorf take that place from us. Zelda and I met there, after all, a long time ago now.
Head’s still muddy. I don’t like thinking about what happened in there. Nearly let my anger get the better of me, nearly let it hurt my friends. I thought the Sages would abandon me for it but, they stuck by me, and carried me kicking and screaming out of that Castle. It’s so easy to let rage destroy you – when someone holds you back from that, it means something. I’ll find a way to thank them, in time. For now, I've apologised at least three times over.
After all that, I think I’m not afraid of the anger, anymore. It’s just a part of me, as much as any other feeling. Old Link stamped out his feelings. The new one is going to try and roll with them.
Heading south. There’s more geoglyphs that way, more ruins to explore, and pirates in Lurelin (apparently). Kind of excited about the last one. It’s been a rough few weeks. I promised the Sages I wouldn’t get too sidetracked, and would definitely find the fifth Sage in no time. But, come on, pirates! Let us have one fun thing to look forward to…
A photograph of the waters of Mabe Prairie lake. In the reflection is Link, holding the Purah Pad, the impassive camera eye looking back upon itself. Garini of Lurelin Village is by his side, waving.
Caption: Me and my indispensable travel companion, and also Garini.
#totk#tears of the kingdom#purah#link#zelink#tears of the kingdom fanfic#my writing#tloz#sorry this one took me years to post on tumblr i procrastinated hard on getting the photo#i wanted it to be purah with a blood moon in the background but got sick of waiting for one to happen LOL
40 notes
·
View notes
Note
hey! absolutely LOVE your twine games. i was wondering what twine format did you use for your games? is it harlowe or sugarcube? just bc i've made twine intfics using harlowe and haven't had much luck with trying to put images and sounds into it. so i'm curious! hope you don't mind me asking!!
i used harlowe! i host files on github and embed them via a basic img/audio src command. images are pretty straightforward, use a bit of html or css to style width properties or whatever else you want.
it’s worth remembering that anything you can do with raw html or css you can do in harlowe, so if the twine cookbook isn’t helping, start looking through html coding sites :^)
audio is a little trickier in harlowe, you can’t really make continuous looping tracks between passages (there are plugins, but they’re clunky as hell and unintuitive) AND have to format audio sourcing very weirdly in the code itself, but if all you want is like… button click sound effects or other small things, its doable. anything more complicated and you should probably switch to sugarcube.
sugarcube is very good. it has good image and audio hosting, and works SUPER well with javascript, so you can make some absolutely gorgeous things in it. the downside is it’s a lot uglier code-wise than harlowe + takes more effort to learn. still worth it IMO.
i actually planned to code link rot in sugarcube before realizing i was better off just making my own website lol, so i did a fair amount of work in the program. Preddy Good
16 notes
·
View notes
Note
hi!!! i love for custom blog theme,, do you have a link to the code or creator 0:?
ya!
so my theme is actually a heavily modified version of redux edit #1 by lopezhummel (current url: holyaura). i always remind users that most tumblr themes are old and that you'll need to replace all instances of "http://" in the code with "https://" so tumblr will save the theme. i had to do it with this one
these are the modifications i made to the theme. i edited this theme over the course of at least a year or so and don't quite recall how i did all of these things. but to the best of my ability:
i moved the "left side img" to the right side of the screen. i also made this element "responsive" so the image will never get cropped when you resize your screen. this was a bitch and a half to figure out and i truthfully do not remember how i did it


i deleted the text in the drop-down navigation so it appears as a little line that is otherwise not noticeable. this type of theme, the "redux edit," used to be very popular because having a drop-down menu let you cram a bunch of links that lead to sub-pages on your blog. i've done away with my sub-pages, but i still like the format of the "redux style" tumblr theme, for its minimal UI and for its customization options.
i separated my mobile description from my web description for formatting reasons. basically, most elements in tumblr themes are connected to specific text fields and toggles. i simply went to the section that was connected to my blog description and deleted it. the web description has to be manually typed inside of the CSS/HTML editor when i want to change it. whereas my mobile description is whatever i type in the "description" box of the normal tumblr theme editors.


i added code someone else made ("NoPo" by drannex42 on GitHub) which allows you to hide posts with certain tags on them. i did this to hide my pinned post, as it looks bad on desktop.
i replaced the tiny pagination arrows at the bottom with images that literally say "next" and "back" because the arrows were far too small/illegible. i know they aren't centered in the container i'm not sure how to fix that lol

i added a cursor

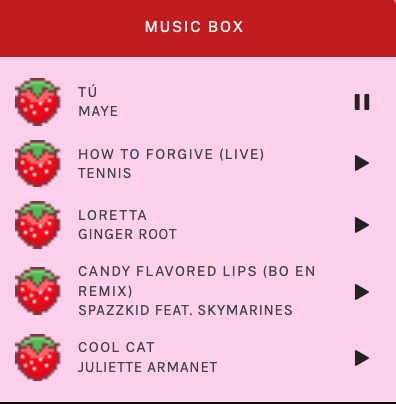
i installed a working music box ("music player #3" by glenthemes), and then added music by uploading MP3 files to discord and then using the links of those files as the audio sources. iirc i also had to make this element responsive and i aligned it so it would sit on the left side of my screen. i made the "album art" for each one the same strawberry pixel art
the moth is just a PNG i added and then moved around so it was behind my sidebar using the options that came pre-packaged with the theme
if you want something like the strawberry shortcake decoration at the top (called "banner" in the theme) your best bet is to google "pixel divider"
theme didn't support favicon so i added that in so i could have a little heart

ALSO:
this theme is. really weird about backgrounds. any background that i have ever set for it, i've had to do weird shit in photoshop. like making the background HUGE, mirroring it, etc. - because it would crop the image weird, or there would be a gap where there was no image. idk man, it's haunted. i'm sure there's a way to fix this but i am NOT tech savvy enough. anyway, patterns are probably your best friend. and if you DO want something that isn't a pattern, it's going to take a lot of trial and error. but i love this theme so i deal with it 😭
the sidebar image and the floating image do not scale. if your image is 1000 pixels, it will display at 1000 pixels. you'll either have to edit the code so that the theme scales the image for you, or resize any images before you add them
my white whale of theme editing (aside from the Weird Background thing) is that i cannot get infinite scrolling to work. i have tried every code out there. all of them break my theme. it makes me sad because like. i have music there for a reason. the idea is that people would listen to it while they scroll. unfortunately, the way it's set up now, the music will stop every time someone clicks "next" or "back" 💀
anyway sorry for rambling but i hope you enjoy the the theme and customizing it in the way that you want to!
24 notes
·
View notes
Text
Let's understand HTML

Cover these topics to complete your HTML journey.
HTML (HyperText Markup Language) is the standard language used to create web pages. Here's a comprehensive list of key topics in HTML:
1. Basics of HTML
Introduction to HTML
HTML Document Structure
HTML Tags and Elements
HTML Attributes
HTML Comments
HTML Doctype
2. HTML Text Formatting
Headings (<h1> to <h6>)
Paragraphs (<p>)
Line Breaks (<br>)
Horizontal Lines (<hr>)
Bold Text (<b>, <strong>)
Italic Text (<i>, <em>)
Underlined Text (<u>)
Superscript (<sup>) and Subscript (<sub>)
3. HTML Links
Hyperlinks (<a>)
Target Attribute
Creating Email Links
4. HTML Lists
Ordered Lists (<ol>)
Unordered Lists (<ul>)
Description Lists (<dl>)
Nesting Lists
5. HTML Tables
Table (<table>)
Table Rows (<tr>)
Table Data (<td>)
Table Headings (<th>)
Table Caption (<caption>)
Merging Cells (rowspan, colspan)
Table Borders and Styling
6. HTML Forms
Form (<form>)
Input Types (<input>)
Text Fields (<input type="text">)
Password Fields (<input type="password">)
Radio Buttons (<input type="radio">)
Checkboxes (<input type="checkbox">)
Drop-down Lists (<select>)
Textarea (<textarea>)
Buttons (<button>, <input type="submit">)
Labels (<label>)
Form Action and Method Attributes
7. HTML Media
Images (<img>)
Image Maps
Audio (<audio>)
Video (<video>)
Embedding Media (<embed>)
Object Element (<object>)
Iframes (<iframe>)
8. HTML Semantic Elements
Header (<header>)
Footer (<footer>)
Article (<article>)
Section (<section>)
Aside (<aside>)
Nav (<nav>)
Main (<main>)
Figure (<figure>), Figcaption (<figcaption>)
9. HTML5 New Elements
Canvas (<canvas>)
SVG (<svg>)
Data Attributes
Output Element (<output>)
Progress (<progress>)
Meter (<meter>)
Details (<details>)
Summary (<summary>)
10. HTML Graphics
Scalable Vector Graphics (SVG)
Canvas
Inline SVG
Path Element
11. HTML APIs
Geolocation API
Drag and Drop API
Web Storage API (localStorage and sessionStorage)
Web Workers
History API
12. HTML Entities
Character Entities
Symbol Entities
13. HTML Meta Information
Meta Tags (<meta>)
Setting Character Set (<meta charset="UTF-8">)
Responsive Web Design Meta Tag
SEO-related Meta Tags
14. HTML Best Practices
Accessibility (ARIA roles and attributes)
Semantic HTML
SEO (Search Engine Optimization) Basics
Mobile-Friendly HTML
15. HTML Integration with CSS and JavaScript
Linking CSS (<link>, <style>)
Adding JavaScript (<script>)
Inline CSS and JavaScript
External CSS and JavaScript Files
16. Advanced HTML Concepts
HTML Templates (<template>)
Custom Data Attributes (data-*)
HTML Imports (Deprecated in favor of JavaScript modules)
Web Components
These topics cover the breadth of HTML and will give you a strong foundation for web development.
Full course link for free: https://shorturl.at/igVyr
2 notes
·
View notes
Text
Exploring the Basics of HTML: A Journey into Web Development with an Online Compiler for HTML
In the vast universe of web development, HTML (Hypertext Markup Language) is the essential building block that transforms creative ideas into interactive web experiences. HTML provides the structural foundation for web content, allowing web developers to create well-organized and readable web pages. In this article, we will embark on a journey into the basics of HTML, exploring its core elements and their functions. Additionally, we will introduce you to a valuable resource: the Online Compiler for HTML, a tool that empowers aspiring web developers to experiment, test, and refine their HTML skills in a practical and user-friendly online environment.

HTML: The Language of the Web
HTML is the language of the web, serving as a markup language that defines the structure of web content. Its fundamental elements, or tags, are used to identify and format various aspects of a web page. Let's dive into some of the basic elements that form the foundation of HTML:
1. HTML Document Structure: An HTML document starts with the <!DOCTYPE html> declaration, which defines the document type. It is followed by the <html> element, which encapsulates the entire document. The document is divided into two main sections: the <head> and the <body>. The <head> contains metadata and information about the document, such as the page title, while the <body> contains the visible content.
2. Headings: Headings are essential for structuring content and providing hierarchy to text. HTML offers six levels of headings, from <h1> (the highest level) to <h6> (the lowest level). Headings help create a clear and organized content structure.
3. Paragraphs: To create paragraphs of text, the <p> element is used. This element defines blocks of text separated by blank lines and is a fundamental tool for organizing and formatting content.
4. Lists: HTML allows for the creation of both ordered (numbered) and unordered (bulleted) lists. Ordered lists are created with the <ol> element and list items with <li>. Unordered lists are created with the <ul> element, also with list items using `<li>.
5. Links: Hyperlinks are a crucial feature of the web. HTML provides the <a> (anchor) element for creating links. The href attribute within the <a> element specifies the URL of the page or resource to which the link should navigate.
6. Images: To embed images in a web page, HTML employs the <img> element. The src attribute within the <img> element points to the image file's location.
Introducing the Online Compiler for HTML
To practice and experiment with these basic HTML elements, there's a valuable resource at your disposal: the Online Compiler for HTML. This user-friendly online tool allows aspiring web developers to write, modify, and test HTML code in a practical environment. What sets it apart is its real-time rendering feature, enabling users to see immediate results as they make changes to their HTML code. It's an ideal platform for beginners and experienced developers alike to fine-tune their HTML skills and explore the language's capabilities.
Conclusion: The Journey Begins
Understanding the basics of HTML is the first step in your journey into the world of web development. HTML's fundamental elements serve as the building blocks upon which you'll construct your web pages. With the assistance of the Online Compiler for HTML, you have a practical and interactive resource to help you explore and master the language. As you become more proficient in HTML, you'll gain the ability to structure content, create links, and embed images, laying the foundation for the websites and web applications of the future. The journey into web development has just begun, and HTML is your trusty guide.
#coding#programming#webdevelopment#online learning#programming languages#html5#html#html website#webdev
5 notes
·
View notes
Text
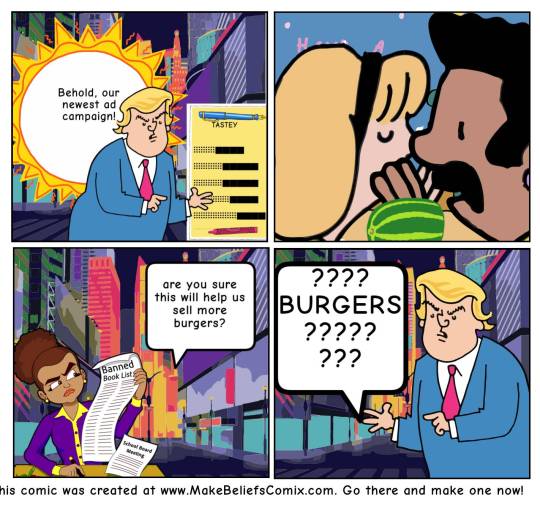
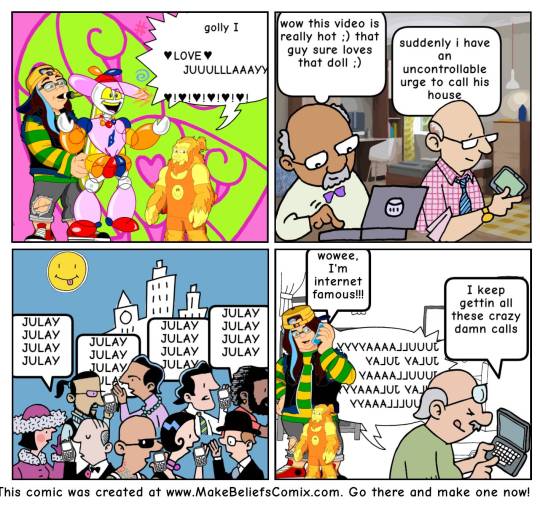
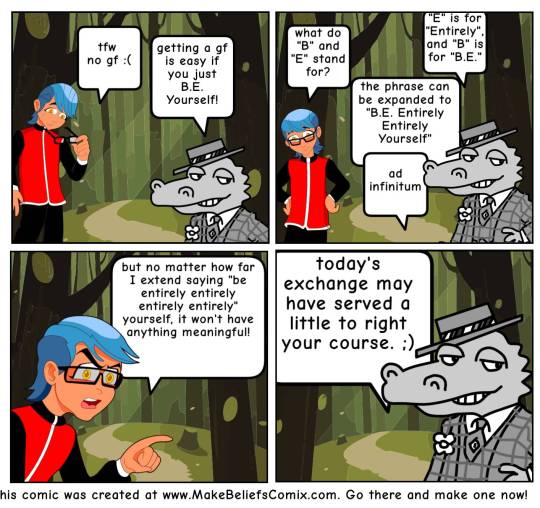
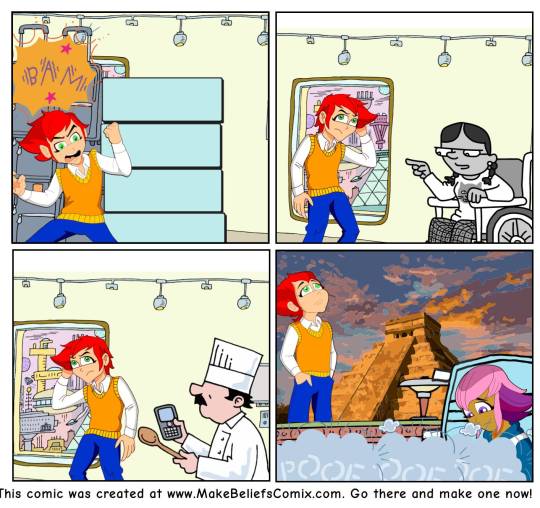
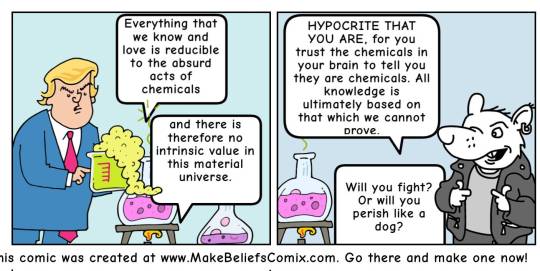
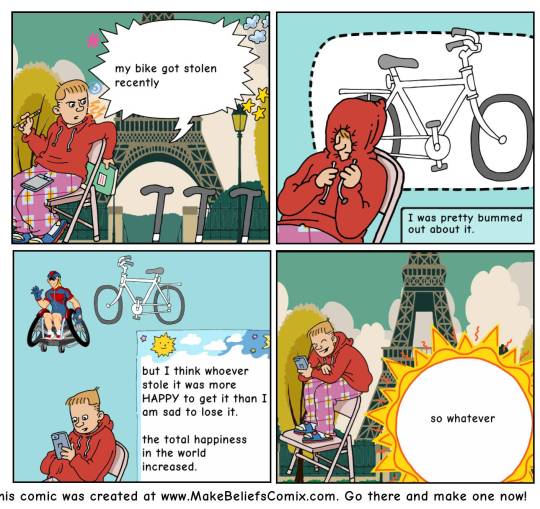
one day i got a tremendous urge to play around with a free online comic generator, and one of the first results i got was this one. the name's included in each img. the site works better than expected, and it even has deep lore! quite a rabbit hole there.
some odd force has possessed me to see what i can do with such a tool. the site ("MBCmx" for short) is regularly maintained and has been online since 2006. the assets leave a lot to be desired, but i'm forced to be creative (hint: the dolphin prop looks like a gun and the pencil & paintbrush look like knives! lol). the owner seems to really, *really* want user engagement. the more i play with the site, the more i want more/better assets and have jotted down some basics, like more vehicles, buildings, appliances, etc.
i wonder if the site owner accepts emailed-in free to use blank assets, and who is in charge of coding? cuz i got a lot of ideas for asset menu management.
---
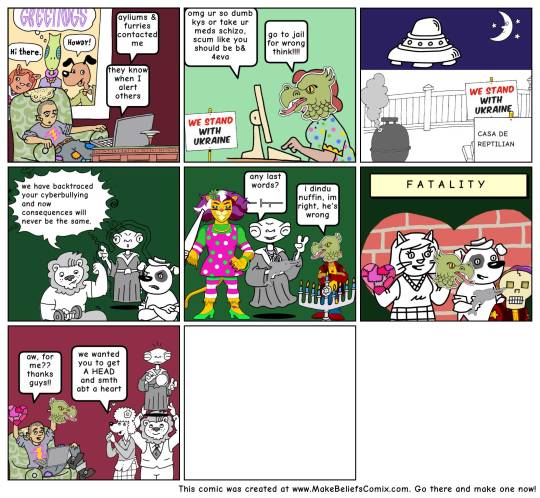


note that the exported files, which are .png & sufficiently big, always have the blank square unless it's an 18 paneler. which i'll get to later. (that strong urge made me want to make something big & spergy but i'll post that later), so i always edit the resulting comic into a friendlier format and export jpg. this is what the usual download looks like, it always has a generic filename (make-beliefs-comix.png), and you can RCS any panel and save it as canvas.png, but if you RCS any non-BG asset, it'll start following your mouse until you L-click.
3-panel sheets are short but always have a bit of a blank extra 4th panel to them, and are avg 1.1mb. 18-panel sheets don't need any editing beyond export. they come out like 3.5 to 3.8 MB.
certain text characters make the textboxes freak out or rearrange, but it has emoji support, shockingly enough.
===
https://makebeliefscomix.com/Comix/
the login's on that page, and notice how the site uses antiquated language all over, has a few significant affiliates (mainly named people), and tons of links and articles, even a sister site with the same engine & assets. there's something here. definitely has a lot more SOVL than most websites, that's a huge part of its appeal.
[March 7 tues 2024]
2 notes
·
View notes
Text
Unlock the Full Potential of A2Z Converter: Hidden Features You Didn't Know Existed
When it comes to file conversion tools, A2Z Converter stands out as a powerful and reliable platform. While most users know it as a go-to solution for image and file format conversion, there’s a treasure trove of hidden features waiting to be explored. Whether you’re a student, content creator, developer, or digital marketer, A2Z Converter has something unique to offer.
In this post, we’ll walk you through the lesser-known tools within A2Z Converter that can simplify your workflow, save time, and boost productivity.

1. Go Beyond the Basics with A2Z’s Image to Text Converter (OCR)
Did you know A2Z Converter offers a powerful image to text converter? This tool uses advanced OCR (Optical Character Recognition) technology to extract editable text from images, scanned documents, and screenshots.
Use cases include:
Digitizing handwritten notes
Extracting quotes from images
Making old PDFs searchable
Keyword tip: If you're looking for a fast and accurate img to text converter, A2Z Converter is your best bet.
2. Convert Case Instantly – From Uppercase to Sentence Case and More
Typing long text and need to change it to lowercase or title case? A2Z Converter’s case converter tool allows you to instantly switch between:
UPPERCASE
lowercase
Title Case
Sentence case
Perfect for editors, writers, and programmers who want clean, consistent text formatting.
3. Quick Word Count & Character Count Tool for Writers
Writers, bloggers, and students often need a reliable way to measure the length of their content. A2Z Converter’s word count tool provides accurate word, character, sentence, and paragraph counts – ideal for meeting word limits or optimizing content for SEO.
Bonus: It’s browser-based and requires no login.
4. Use the All-in-One Unit Converter
From metric to imperial, Celsius to Fahrenheit, grams to ounces — A2Z Converter’s Online unit converter makes quick work of all your conversions. It supports:
Length
Weight
Temperature
Area
Volume
This is an underrated feature, especially for students, travelers, and engineers.
5. Merge Images & Merge PDF Files – Seamlessly
Why download separate tools for merging images or PDFs when A2Z Converter handles it all in one place?
With merge image and merge PDF tools, you can combine multiple files into one organized document. Ideal for:
Creating digital portfolios
Sending client deliverables
Organizing scanned pages
Everything happens online – fast, free, and secure.
6. Clean Interface, Fast Results, No Signup Required
A2Z Converter’s interface is simple, intuitive, and lightning-fast. Unlike many online converters that require registration, A2Z lets you use most features without creating an account.
That’s speed and privacy in one powerful package.
Why Choose A2Z Converter?
✅ 100% free and browser-based
✅ Multi-functional platform
✅ Supports rare and popular file formats
✅ Secure and privacy-focused
✅ No software installation needed
Whether you need to convert files, extract text from images, or merge PDFs, A2Z Converter is your all-in-one productivity booster.
Final Thoughts: Unleash the Full Potential of A2Z Converter
Most users know A2Z Converter for its robust file and image conversion capabilities. But once you dig deeper, you'll find a full toolkit designed for efficiency, accuracy, and simplicity. From OCR tools to unit converters, this platform truly goes from A to Z to meet your needs.
Next time you're working on a project, remember — A2Z Converter isn't just a converter. It's your all-in-one digital assistant.
0 notes
Text
How to Optimize Images for Faster Web Performance – By WebMartIndia
Hey Tumblr fam
Have you ever visited a website that takes forever to load? Yeah, me too — and it’s the worst. More often than not, the culprit is unoptimized images.
If you're running a blog, an ecommerce site, or even a simple portfolio, one thing you cannot ignore is image optimization for websites. In this post, I’ll explain how to make your site faster, smoother, and lighter — without sacrificing image quality. And I’ll show you how we handle it at WebMartIndia.in.
Let’s dive in!
Why Image Optimization Matters
Before we jump into the “how,” let’s understand the “why.”
When someone visits your website, images can take up more than 50% of the total page size. So if they’re not optimized, your site will:
Load slower
Rank lower on Google
Frustrate mobile users
Use more server resources
For a business like ours at WebMartIndia.in, which serves schools, offices, and small businesses, website speed is everything. Faster websites = happier visitors = better sales. How to Optimize Images for Websites (Step-by-Step)
Here’s a simple, no-jargon guide to get your images web-ready:
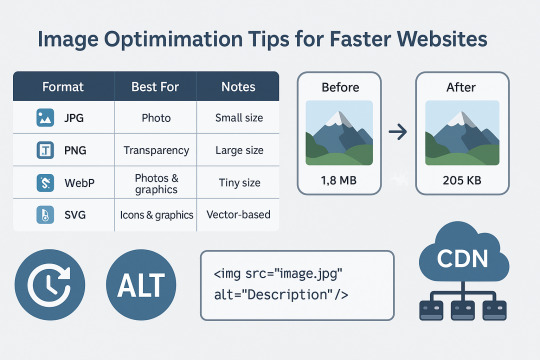
1. Choose the Right Format
There’s no one-size-fits-all image format. Here’s a quick cheat sheet: FormatBest ForNotesJPEG/JPGPhotos, real-life imagesSmall size, decent qualityPNGLogos, transparent imagesHigh quality, large file sizeWebPBoth photos & graphicsModern, tiny file sizes, high qualitySVGIcons, illustrationsResolution-independent, vector-based
Pro Tip: Convert PNGs and JPEGs to WebP for a massive speed boost.
2. Resize Before Uploading
You don't need a 5000px wide image on your blog!
Use tools like:
Canva
Pixlr
ImageResizer
Shrink your image dimensions to match your actual layout needs. For example, if your blog container is 800px wide, don’t upload a 2000px image.
3. Compress Without Losing Quality
There’s a sweet spot where your image still looks great — but is way smaller in file size. Use these tools:
TinyPNG
Squoosh
Kraken.io
Drag, drop, compress, download — that’s it!
At WebMartIndia, we run every image through TinyPNG before uploading to our pages. Our homepage used to be 3.5MB — now it’s under 900KB!
4. Use Lazy Loading
Lazy loading = your browser only loads images when they scroll into view. This makes your site feel faster.
Most platforms (WordPress, Shopify, etc.) support lazy loading automatically.
If you’re coding manually, just add this:
htmlCopy
Edit
<img src="your-image.jpg" loading="lazy" alt="description" />
5. Use Descriptive ALT Text (Bonus SEO Tip!)
This doesn’t make your image faster, but it helps with SEO and accessibility.
Good example:
htmlCopy
Edit
<img src="pen-set.jpg" alt="Colorful pen set for school kids" />
Search engines love ALT text. And your images might even show up in Google Image results!
6. Use a CDN (Content Delivery Network)
If your website has a lot of images, a CDN stores them across different servers worldwide. This reduces load time for your visitors.
Some options:
Cloudflare (free)
BunnyCDN (cheap & fast)
ImageKit (Indian CDN with real-time optimization)
Real Talk from WebMartIndia
We’ve helped schools, small stores, and business owners build fast, clean websites using simple speed techniques — and image optimization is always step #1.
At WebMartIndia.in, we offer performance-focused web design. If you’re feeling stuck or overwhelmed with your website’s speed, we’re here to help.
Final Checklist
Here’s a quick summary of what to do:
✅ Use correct file formats (WebP if possible) ✅ Resize images before uploading ✅ Compress images using free tools ✅ Add ALT text for SEO ✅ Enable lazy loading ✅ Consider a CDN if you get a lot of traffic
0 notes
Text
Running React Code in Visual Studio Code and Online

React continues to dominate the front-end development landscape, offering a powerful and flexible library for building modern user interfaces. Whether you're just getting started or looking to optimize your workflow, this guide will walk you through everything you need to know about running React in Visual Studio Code and online platforms.
For Detailed Guide:- how to run tests in vs code .
Create Your First React Application using Visual Studio Code
Visual Studio Code (VS Code) provides an excellent environment for React development thanks to its robust extension ecosystem and integrated terminal.
Step 1: Install the prerequisites
Before creating a React application, you need to have the following installed:
Node.js and npm - React depends on these to run and manage packages.Verify your installation by running these commands in a terminal: powershell node -v npm -v
Visual Studio Code - Download and install from the official website.
Step 2: Set up VS Code for React development
After installing VS Code, enhance your development experience with these essential extensions:
ES7+ React/Redux/React-Native snippets - For quick React code templates
JavaScript (ES6) code snippets - Speeds up JS coding
Prettier - Code formatter - For consistent code formatting
Step 3: Create a new React application
Now you're ready to create your first React application:
Open VS Code
Open the integrated terminal (View > Terminal or Ctrl+` )
Navigate to the directory where you want to create your project
Run the Create React App command:
powershell npx create-react-app my-first-react-app
The tool will create a new directory with all the necessary files and dependencies for a React project. This might take a few minutes.
Step 4: Explore the project structure
Once the installation completes, you'll have a new folder with this structure:
powershell my-first-react-app/ ├── node_modules/ ├── public/ ├── src/ │ ├── App.css │ ├── App.js │ ├── App.test.js │ ├── index.css │ ├── index.js │ ├── logo.svg │ ├── reportWebVitals.js │ └── setupTests.js ├── .gitignore ├── package.json ├── package-lock.json └── README.md
Let's look at the core files:
public/index.html: The HTML template for your app
src/index.js: The JavaScript entry point
src/App.js: The main React component
package.json: Lists dependencies and scripts
How do I start running a React app?
Starting your React app is straightforward once you've set up the project.
Step 1: Navigate to your project directory
If you're not already in your project directory, navigate to it:
powershell cd my-first-react-app
Step 2: Start the development server
Run the following command to start the development server:
powershell npm start
This command starts the development server and automatically opens your default browser to http://localhost:3000 where your app is running.
Step 3: Make changes and see live updates
The development server includes hot reloading, which means your app will automatically update when you make changes to the code.
Open src/App.js in VS Code and make a simple change:
javascript jsxfunction App() { return ( <div className="App"> <header className="App-header"> <img src={logo} className="App-logo" alt="logo" /> <p> Hello, React World! </p> </header> </div> ); }
Save the file and watch your browser update automatically.
How do I run a command React app?
"Running a command React app" typically refers to using the Create React App CLI commands to perform various operations on your project.
Common Create React App Commands
Create a new app powershell npx create-react-app my-app
Start the development server powershell npm start
Run tests powershell npm test
Build for production powershell npm run build This creates an optimized production build in the build folder.
Eject from Create React Apppowershell npm run eject
Using npx for one-off commands
You can also use npx to run packages without installing them globally:
powershell npx eslint src/ --fix
How do I run the React app in the VS Code terminal?
VS Code's integrated terminal makes it easy to run your React app without leaving the editor.
Step 1: Open the integrated terminal
There are several ways to open the terminal in VS Code:
Press Ctrl+ ` (backtick)
Select View > Terminal from the menu
Use the keyboard shortcut Ctrl+Shift+` to create a new terminal
Step 2: Navigate to your project directory
If you need to change directories:
` powershell cd path/to/my-react-app `
Step 3: Start the development server
Run the start script from your package.json:
` powershell npm start `
Step 4: Stop the development server
When you're done working, you can stop the server by pressing Ctrl+C in the terminal.
Running other scripts
Your package.json file contains various scripts that you can run from the terminal:
` powershell npm test # Run tests npm run build # Create production build npm run eject # Eject from Create React App `
React Developer Tools Extension
The React Developer Tools browser extension is essential for debugging and inspecting your React applications.
Installing React Developer Tools
For Chrome: Visit the Chrome Web Store and search for "React Developer Tools"
For Firefox: Visit Firefox Add-ons and search for "React Developer Tools"
For Edge: Visit the Edge Add-ons store and search for "React Developer Tools"
Using React Developer Tools
After installation, you'll see new tabs in your browser's developer tools:
Components: Inspect the React component tree
Profiler: Measure rendering performance
Key features to explore:
Component inspection: Click on any component to view its props and state
Filtering: Filter components by name
Props/State editing: Change values on the fly to test different states
Highlighting: Select a component to highlight it in the browser
ESLint and Prettier for Code Quality
Maintaining code quality is crucial for React projects. ESLint helps catch errors and enforce style, while Prettier ensures consistent formatting.
Setting up ESLint in VS Code
Install the ESLint extension
Install ESLint in your project`powershell npm install eslint --save-dev `
Initialize ESLint configuration` powershell npx eslint --init `
Configure for React Choose options for:
* JavaScript modules React Browser environment JavaScript config file format
Setting up Prettier in VS Code
Install the Prettier extension
Install Prettier in your project`powershell npm install prettier eslint-config-prettier eslint-plugin-prettier --save-dev `
Create a Prettier configuration file Create .prettierrc in your project root:` javascript json{ "semi": true, "tabWidth": 2, "printWidth": 100, "singleQuote": true, "trailingComma": "all", "jsxBracketSameLine": true } `
Update your ESLint config Add Prettier to your .eslintrc.js:` powershell jsmodule.exports = { // Other ESLint config... extends: [ 'eslint:recommended', 'plugin:react/recommended', 'plugin:prettier/recommended' ], // Other config... } `
Setting up Format on Save
Open VS Code settings (File > Preferences > Settings)
Search for "format on save"
Check the box to enable it
Now your code will be automatically formatted when you save it.
How to run React code online?
Running React code online is perfect for quick experiments, learning, or sharing code with others without setting up a local environment.
Replit
Replit offers a full development environment in the browser.
Getting Started with Replit:
Visit Replit
Sign up or log in
Click "Create" and select "React.js" template
Features:
Full Terminal Access: Run any command in the integrated terminal
Hosting: Deploy your app directly from Replit
Multiplayer Editing: Collaborate with team members in real-time
Versioning: Track changes with built-in version control
CodeSandbox
CodeSandbox is one of the most popular online IDEs for React development.
Getting Started with CodeSandbox:
Visit CodeSandbox
Click "Create Sandbox"
Select "React" from the template options
Features:
Live Preview: See your changes instantly
NPM Support: Add packages as needed
GitHub Integration: Import and export projects to GitHub
Collaboration: Share your sandbox with others for real-time collaboration
StackBlitz
StackBlitz is a fast, browser-based IDE built for modern web development, including React.
🔹 Getting Started:
Visit stackblitz
Click "Create Project" → Choose React
Or use https://stackblitz.com/fork/react to start quickly
🔹 Features:
Instant dev server start-up
Real-time preview beside code
NPM dependency management
Offline support (runs in-browser using WebContainers)
GitHub integration
JSFiddle
JSFiddle isn’t React-specific but supports it well with proper setup.
🔹 Getting Started:
Visit jsfiddle
In the "JavaScript" panel, set the framework to React (Settings → Frameworks)
Add React and ReactDOM via CDN
🔹 Features:
Easy prototyping
Quick sharing via link
Basic collaboration
Embed anywhere
PlayCode
PlayCode is a fast playground for JavaScript and React code.
🔹 Getting Started:
Visit playcode
Select “React” playground from templates
🔹 Features:
Super fast updates
Simple interface
Supports NPM packages
Great for beginners
CodePen
Popular among designers and developers for quick demos.
🔹 Getting Started:
Visit codepen
Create a new Pen → Settings → Add React and ReactDOM in JS settings
🔹 Features:
Ideal for UI component testing
Shareable demos
Embed-friendly
Huge community showcase
Summary Comparison
PlatformReact TemplateCollaborationGitHub IntegrationNPM SupportLive PreviewReplit✅✅✅✅✅CodeSandbox✅✅✅✅✅StackBlitz✅✅✅✅✅JSFiddle⚠️ (manual)⚠️ basic❌❌✅PlayCode✅❌❌✅✅CodePen⚠️ (manual)✅❌❌✅
New AI Agent in the Town
Unit testing agent
Keploy has recently released a Unit Testing Agent that generates stable, useful unit tests directly in your GitHub PRs, covering exactly what matters. How cool is this? Testing directly in PRs – so developers won’t need to write test cases for their new features. Keploy writes them for you! No noisy stuff – just clean, focused tests targeting the code changes. You can also try this Unit Testing Agent in your VSCode.
2. API testing agent Instead of writing test cases to test your APIs, what if you provide your schema, API endpoints, and curl commands to an agent, and it generates the test suite and gives you the test reports? Sounds interesting or confusing? Yes, it is possible! Keploy API Testing Agent will do all this without you touching any code. Not convinced? Just give it a try, and you will really enjoy it.
Conclusion
Visual Studio Code provides a powerful, customizable environment for React development that can significantly boost your productivity. With its integrated terminal, extensions ecosystem, and debugging capabilities, it's the IDE of choice for many React developers.
For those times when setting up a local environment isn't practical, online React development platforms offer convenient alternatives. Whether you're prototyping an idea, collaborating with team members, or simply learning React, these platforms provide the tools you need to code effectively from any device with a browser.
By combining the power of VS Code for serious development work with the convenience of online platforms for quick experiments and sharing, you can create a flexible React development workflow that adapts to your needs.
Remember that the key to becoming proficient with React is practice and experimentation. Don't be afraid to try different tools and approaches to find what works best for your workflow.
FAQs
1. Do I need to install Node.js to use React?
Yes, Node.js is required for local React development. It provides the npm package manager which is used to install React and its dependencies. However, if you're using online platforms like CodeSandbox or StackBlitz, you don't need to install Node.js locally as these platforms provide the necessary environment in the browser.
2. How do I deploy my React application to production?
There are several ways to deploy a React application:
Build and host on static hosting services: Run npm run build to create a production build, then upload the files from the build folder to services like Netlify, Vercel, or GitHub Pages.
Continuous deployment: Connect your Git repository to services like Netlify or Vercel for automatic deployments when you push changes.
Container-based deployment: Package your app in a Docker container and deploy to services like AWS, Google Cloud, or Azure.
3. Do I still need to write test cases manually if I use Keploy's Unit and API Testing Agents?
Not at all! Keploy's Unit Testing Agent automatically generates unit tests directly in your GitHub PRs, targeting exactly the code you've changed - so you no longer have to write them manually. Similarly, the API Testing Agent creates test suites and reports just from your API schema, endpoints, and curl commands. You save time, avoid noisy or irrelevant tests, and get clean, actionable test coverage without writing a single line of test code.
4. Can I use TypeScript with React?
Yes, TypeScript works very well with React. To create a new React project with TypeScript:
` powershell bashnpx create-react-app my-app --template typescript `
For existing projects, you can add TypeScript by installing:
` powershell bashnpm install --save typescript @types/node @types/react @types/react-dom @types/jest `
Then rename your .js files to .tsx (for components) or .ts (for non-component files).
5. Does Keploy help with testing my JavaScript application?
Yes, Keploy can help you test JavaScript applications, especially when it comes to API and integration testing. Keploy captures real API calls during runtime and automatically generates test cases and mocks. This makes it ideal for Node.js/JavaScript backends or services interacting with external APIs and databases. You can also integrate Keploy into your CI pipeline to ensure consistent and reliable test coverage.
🔗 Recommended Blogs on Software Development Tool
1. Best Practices and Tools for Software Unit Testing
This guide explores essential unit testing tools such as Keploy, Jest, and JUnit, highlighting their features and benefits. It also covers proven best practices to improve test reliability, streamline collaboration among developers, and enhance software quality throughout the development lifecycle.
2. Top 7 Test Automation Tools in 2025: Boost Your Software Testing Efficiency
This article provides an overview of each tool’s capabilities and explains how they can help teams accelerate testing cycles, improve accuracy, and deliver high-quality software faster.
3. A Guide To Test Cases In Software Testing
Learn what test cases are, why they matter, and how to create effective ones to ensure your software works flawlessly. This guide covers key components, best practices, and tips for writing clear, comprehensive test cases.
4. Functional Testing: An In-Depth Overview
Explore the fundamentals of functional testing, its importance in verifying software behavior, different types of functional tests, and best practices to ensure your application meets all specified requirements.
0 notes
Text
HTML and CSS Made Simple: Know the Difference and Why It Matters

If you're beginning your journey in web development, you've likely encountered the two most fundamental technologies: HTML and CSS. They are the building blocks of nearly every website you’ve ever visited. While these two tools work side by side, they each play distinct roles in how websites look and function. Understanding the HTML and CSS differences is crucial for anyone wanting to build a clean, functional, and visually appealing website.
In this blog, we’ll explain what HTML and CSS are, how they differ, and why knowing both is essential in 2025 and beyond.
What Is HTML?
HTML stands for HyperText Markup Language. It's the standard language used to create the structure and content of a webpage. Think of HTML as the skeleton of a website. It organizes everything — from text, headings, and images to links and videos — into a readable format for web browsers.
Here’s a simple HTML example:
<h1>Welcome to My Website</h1> <p>This is a paragraph about me.</p> <img src="profile.jpg" alt="My Profile Picture">
With just a few lines of HTML, you can add essential elements to a page. But while HTML is powerful for content structure, it doesn’t handle design.
What Is CSS?
CSS, or Cascading Style Sheets, is the language used to style and design the elements you create with HTML. CSS controls how your web page looks — colors, fonts, spacing, layout, and more. If HTML is the skeleton, CSS is the skin, clothing, and personality that make your website visually appealing.
Here’s how CSS can change the look of the HTML example above:
h1 { color: blue; font-size: 36px; } p { font-family: Arial, sans-serif; color: #444; }
By linking this CSS code to your HTML file, you can completely transform how your page appears, all without altering the content.
Why Does the Difference Matter?
Understanding the difference between HTML and CSS helps you:
Design better websites – You can separate structure and style, making your site easier to build and maintain.
Write clean code – You’ll avoid clutter by keeping your content (HTML) and design (CSS) in separate files.
Make your site responsive – CSS allows for flexible design that works on all screen sizes.
Collaborate efficiently – Designers and developers often work together. Knowing both HTML and CSS makes communication smoother.
Level up your career – Most front-end development jobs require a solid grasp of both technologies.
How Do HTML and CSS Work Together?
To build a modern website, you need both HTML and CSS. Here’s how you connect them:
Write your HTML content
Create a CSS file with all your styles
Link the CSS file to your HTML file using a simple line of code in the <head> section:
<link rel="stylesheet" href="styles.css">
Now, every element in your HTML file can be styled using your CSS rules. This separation makes updating your site fast and efficient.
Real-World Analogy
Still confused? Think of building a house.
HTML is like laying the bricks, putting up the walls, and installing the windows.
CSS is choosing the paint colors, installing curtains, and decorating the interior.
One provides the structure, and the other provides the look and feel.
Why Learn HTML and CSS in 2025?
In 2025, the demand for front-end developers continues to grow. As more businesses go digital, the need for well-designed, functional websites is increasing. Learning HTML and CSS opens doors to roles such as:
Web Developer
UI/UX Designer
Front-End Engineer
WordPress Developer
Freelance Web Designer
Even if you don’t plan to code professionally, knowing the basics helps you better manage websites, communicate with developers, or even build your personal portfolio.
Where to Start Learning
The best way to learn HTML and CSS is by doing. Here are a few steps to get you started:
Use free platforms like W3Schools, free Code Camp, or MDN Web Docs
Watch YouTube tutorials for beginners
Practice by building small web pages (a resume, a portfolio, or a personal blog)
Join online communities and forums for support and feedback
Consistency is key. Start small and gradually build more complex layouts and styles.
Final Thoughts
HTML and CSS are the foundation of web development. While they serve different functions, they are designed to work together seamlessly. Understanding the difference between HTML and CSS not only helps you become a better coder but also makes your web projects more efficient, attractive, and professional.
So whether you're a student, a business owner, or an aspiring developer, start learning HTML and CSS today. You’ll be amazed at how quickly you can bring your ideas to life on the web.
#HTML#CSS#HTMLvsCSS#WebDevelopment#FrontEndDevelopment#LearnToCode#CodingForBeginners#WebDesign#ProgrammingBasics#WebDevelopmentTips#WebsiteDesign#HTMLandCSS#TechEducation#CodeNewbie#DigitalSkills
0 notes
Text
Migrating Virtual Machines to Red Hat OpenShift Virtualization with Ansible Automation Platform
As enterprises modernize their IT infrastructure, migrating legacy workloads from traditional hypervisors to cloud-native platforms becomes essential. Red Hat OpenShift Virtualization offers a powerful solution by allowing organizations to run and manage virtual machines (VMs) alongside containers on the same OpenShift cluster. To streamline and scale this migration process, Red Hat Ansible Automation Platform proves to be an invaluable tool.
In this post, we’ll explore how to leverage Ansible Automation Platform to automate the migration of VMs to OpenShift Virtualization, reducing manual effort, minimizing downtime, and increasing consistency across environments.
🧩 What is OpenShift Virtualization?
OpenShift Virtualization, built on KubeVirt, extends Red Hat OpenShift to run traditional VM workloads alongside containerized applications. This allows for:
Unified management of VMs and containers
Seamless integration with CI/CD pipelines
A single pane of glass for observability, networking, and security
🤖 Why Use Ansible for VM Migration?
Manually migrating virtual machines is not only tedious but also error-prone. Ansible Automation Platform enables:
Repeatable Playbooks for consistent VM conversion and deployment
Inventory management of existing VMs and target OpenShift clusters
Idempotent operations that reduce risk and human error
Event-driven automation with Red Hat Event-Driven Ansible (EDA)
🛠️ High-Level Workflow of VM Migration with Ansible
Discovery & Assessment
Identify source VMs using dynamic inventory (e.g., VMware, RHV, KVM)
Collect system configurations and workload details
Use Red Hat Migration Toolkit for Virtualization (MTV) if applicable
Pre-Migration Automation
Validate OpenShift Virtualization setup
Configure storage (e.g., Ceph, CSI volumes)
Prepare networking (e.g., Multus, bridges)
VM Export & Conversion
Use Ansible modules to:
Export VM disks (e.g., via ovftool, virt-v2v, or qemu-img)
Convert formats (e.g., VMDK to QCOW2)
VM Import into OpenShift
Create VM manifests in OpenShift (YAML/CRDs)
Automate virtctl commands or use MTV APIs
Attach appropriate storage and networks
Post-Migration Tasks
Run automated smoke tests
Update DNS or service endpoints
Decommission old VMs (if desired)
🧪 Sample Ansible Playbook Snippet
yaml
- name: Create OpenShift VirtualMachine from template hosts: localhost tasks: - name: Create VM from YAML definition k8s: state: present definition: "{{ lookup('file', 'vm-definition.yaml') }}"
You can integrate this into an Ansible Workflow Job Template in Red Hat Ansible Automation Controller, and trigger it via webhooks or Service Catalogs.
💡 Best Practices
Test in Staging: Simulate migrations in non-prod environments before rolling out to production.
Incremental Migration: Start with low-impact workloads to refine your process.
Logging and Auditing: Use Ansible Tower logs and OpenShift audit logs to monitor changes.
Rollback Plans: Always have a plan to revert if something fails.
🎯 Benefits of Using Ansible + OpenShift Virtualization
Centralized automation of hybrid workloads
Faster time-to-value with reusable playbooks
Simplified management for IT Ops and DevOps teams
Integration with existing CI/CD and ITSM platforms
🔚 Final Thoughts
Migrating VMs to OpenShift Virtualization doesn't have to be complex. By combining the power of Red Hat OpenShift with the flexibility of Ansible Automation Platform, organizations can modernize their workloads efficiently and with confidence.
At HawkStack Technologies, we help enterprises design, automate, and execute seamless VM migration strategies using Red Hat technologies. Contact us to learn how we can support your modernization journey.
📞 Need help with automation or OpenShift Virtualization? Let our certified experts at HawkStack guide your migration from legacy systems to a modern cloud-native environment.
For more details www.hawkstack.com
0 notes
Text
How to Make a Fake Receipt and Fake Online Receipt: A Detailed Guide
Receipts play a crucial role in financial transactions, serving as proof of purchase, expense tracking, and reimbursement claims. However, there are instances where individuals or businesses may need to make a fake receipt or generate a fake online receipt for various reasons. While some of these reasons may be legitimate, it is important to note that falsifying receipts for fraudulent purposes is illegal. This guide will explore how people create fake receipts, the tools used, and ethical considerations.
https://jpcdn.it/img/2c89e0f79c5fcb5ec99f3b0e6837a318.jpg
Understanding Fake Receipts
A fake receipt is a fabricated document designed to mimic a real receipt issued by a business or service provider. Fake receipts can be used for different purposes, such as personal record-keeping, prank purposes, or in some cases, fraudulent activities like tax evasion or expense reimbursement fraud.
A fake online receipt, on the other hand, is a digital version of a fake receipt that is often created using online tools or software. These receipts are typically generated in formats like PDFs or images, making them easy to share and present as genuine documents.
Why Do People Make Fake Receipts?
People create fake receipts for various reasons, including:
Business Record-Keeping: Some small business owners generate fake receipts for lost transactions to maintain their records.
Expense Reimbursement: Employees may create fake receipts to claim reimbursements from their employers.
Pranks and Entertainment: Some people create fake receipts for social media posts or humorous purposes.
Avoiding Overpriced Charges: In some cases, people may generate fake receipts to counteract incorrect or excessive charges on their accounts.
Filling Out Tax Deductions: Some individuals may attempt to create fake receipts to increase their tax deductions, which is illegal.
How to Make a Fake Receipt?
There are several methods to make a fake receipt, including manual creation and online tools. Below are some ways to generate a fake receipt:
1. Using Online Receipt Generators
Online receipt generators are among the most popular ways to create a fake receipt. These websites provide templates that allow users to enter transaction details, select a business logo, and generate a receipt that looks legitimate. Some of the top receipt generator tools include:
ExpressExpense: A tool that allows users to create high-quality receipts with various templates.
Invoice2go: Primarily designed for invoices but can also generate receipts.
Custom Receipt Maker: Enables users to customize receipts with logos and payment details.
2. Using Photoshop or Graphic Design Software
For those skilled in graphic design, using software like Photoshop can be an effective way to make a fake receipt. Here’s how:
Find a real receipt as a reference.
Open Photoshop and create a new document.
Use the text tool to input the necessary details such as date, amount, and transaction details.
Add a business logo and any additional elements like QR codes or barcodes.
Save the file as a PDF or image for later use.
3. Editing an Existing Receipt
Another common method is to take a scanned copy of a real receipt and edit it using image editing software. This method is particularly effective when making minor changes such as:
Altering the date of purchase.
Changing the amount on the receipt.
Modifying item descriptions.
How to Make a Fake Online Receipt?
A fake online receipt is created similarly to a physical fake receipt, but it is designed to look like a digital transaction confirmation. Here’s how to generate one:
1. Use Online Invoice & Receipt Tools
Many online tools allow users to create digital receipts that can be used for online transactions. These tools offer features such as:
Customizable templates for different businesses.
PDF and email delivery options.
Ability to add payment methods like PayPal, Stripe, or credit cards.
2. Modify an Email Receipt
If someone receives an actual email receipt, they can edit the email using basic HTML editing tools. Some people may:
Save the email as an HTML file.
Open it in a text editor and modify the transaction details.
Save and resend the edited email as a fake receipt.
3. Fake Bank Transfer Receipts
Some people generate fake online receipts for bank transfers using fake bank statement generators. These tools allow users to:
Input transaction amounts and dates.
Add bank logos and account numbers.
Generate PDFs that appear authentic.
Risks and Legal Consequences of Making Fake Receipts
While making a fake receipt or a fake online receipt might seem harmless, there are significant risks and legal consequences associated with this practice. Some potential consequences include:
Fraud Charges: Creating and using fake receipts for financial gain can lead to fraud charges, resulting in hefty fines or jail time.
Employment Termination: Employees caught submitting fake receipts for reimbursement claims can be fired.
Audit and Penalties: Businesses and individuals who use fake receipts for tax deductions may face IRS audits and penalties.
Loss of Trust: Faking receipts can damage personal and professional reputations.
Ethical Considerations
If there is a legitimate need for a receipt, it is always better to request a duplicate from the original issuer rather than creating a fake one. Some ethical ways to handle missing receipts include:
Requesting a Reprint: Most businesses can provide reprints of lost receipts.
Using Bank Statements: Providing bank statements as proof of transactions instead of receipts.
Maintaining Digital Copies: Keeping digital backups of receipts to avoid the need for recreating them.
Conclusion
Making a fake receipt or a fake online receipt is possible through various tools and methods. However, the risks associated with creating fraudulent receipts far outweigh the benefits. Instead of resorting to fake receipts, individuals and businesses should adopt ethical practices and maintain proper financial records. If a receipt is genuinely lost, requesting a reprint or using alternative documentation is the best approach. Always consider the legal and ethical implications before attempting to create or use a fake receipt.
0 notes