#PCB Assembly Machines
Explore tagged Tumblr posts
Visit Tumblr Blog
Explore Tumblr blogs with no restrictions, modern design and the best experience.
Last Seen Tumblr Blogs


Fun Fact
25% of US internet users with an annual income of $80-100K use Tumblr.
Text
The Industrial Workstations are structured and ergonomic settings that enhance productivity, reduce breakdown times, and minimize hazards in workplaces. Investing in an industrial workstation reaps more benefits over a period compared with costs carried at a time, leading to significant savings over time.
#Wave Soldering Machine#Reflow Soldering Machine#Industrial Work Station#Roller Conveyor#Roller Conveyor System#Flat Belt Conveyor#Assembly Conveyor#Inclined Conveyor Belt#Cleated Belt Conveyor#Truck Loading Conveyor#Telescopic Belt Conveyor#PCB Assembly Machines#PCB Manufacturing Machine
0 notes
Text
Rigid Flex PCB PCB or PCBA quotation, please email to [email protected] Learn more: https://lnkd.in/gAhdxTUx
#pcb#pcb assembly#pcb manufacturer#electronic#electrical design#pcb design#assembly#flexible pcb board#flex pcb#hardware#electronic components#components#precision machined components#digikey#mouser
1 note
·
View note
Text
Upgrade Your Wash: Top Pulsator & Roller Options for Hyderabad Washing Machines
Tired of lackluster laundry? Clothes emerging from your washing machine looking a little worse for wear? It might be time to upgrade your Washing Machine Pulsator & Roller in Hyderabad
of clean laundry, and choosing the right ones can make a world of difference in your wash performance.
Aldahome Appliances, Hyderabad's premier destination for washing machine solutions, we have a vibrant array of pulsator and roller options to suit your every need and budget. Whether you're a stain-busting warrior or a time-saving titan, we've got the perfect equipment to transform your laundry game.

ulsator Powerhouse:
Deep-Down Detox: Say goodbye to even the most stubborn grime! Pulsator washing machines harness powerful water currents and pulsating action, penetrating deep into fibers to unleash an unmatched stain-busting performance.
Gentle on Delicates: Don't worry about your delicates falling victim to the pulsator's power. Many modern pulsator models offer gentle wash cycles specifically designed for fragile fabrics.
The Roller Revolution:
Time-Saving Titan: Conquer mountains of laundry in record time with a roller washing machine. These machines boast faster spin speeds, dramatically reducing drying times and freeing up your day for more exciting pursuits.
Family-Friendly Force: Cater to the demands of a boisterous brood with ease. Roller machines often boast larger capacities and powerful cleaning capabilities, tackling your family's laundry needs with unwavering efficiency. From muddy soccer kits to overflowing hampers, no laundry load is too big for a roller's mighty spin.
Choosing the Right Option for You:
With so many fantastic pulsator and roller options available, choosing the right one for your needs can be overwhelming. But fear not, Aldahome Appliances is here to guide you! Our knowledgeable staff
So, what are you waiting for? Upgrade your wash and experience the Aldahome Appliances difference
#affordable washing machine parts in new delhi#wide range of washing machine spares in mirzapur#washing machine gear box gear assembly bangalore#washing machine capacitor & pcb bangalore
0 notes
Text
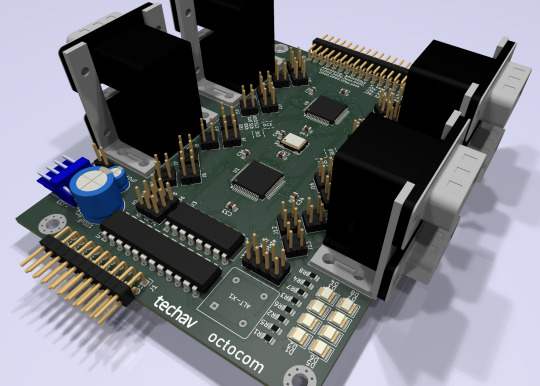
Sharing a Computer with More Friends
A few months ago I built an I/O expansion board for my homebrew 68030 project with a 4-port serial card to go with it, and got BASIC running for four simultaneous users. It worked, but not as well as I had hoped. I wanted to be able to run two of those serial cards to support 8 total users, but it had proven unstable enough that with just the one card I had to slow down the whole system to 8MHz.
So I designed a new serial card.

I had previously been running this computer without any issues at 32MHz with a mezzanine card with FPU & IDE as well as a video card. The main board by itself can clear 56MHz. Having to go all the way down to 8MHz just didn't sit well with me. I want this machine to run as fast as possible for its 8 users.
I put extra time into reviewing worst-case timing for all components and graphing out how signals would propagate. The 16C554 quad UARTs I'm designing around are modern parts that can handle pretty fast bus speeds themselves — easily up to 50MHz with no wait states on the 68030 bus — assuming all the glue logic can get out of the way fast enough.
Signal propagation delays add up quickly.
My first draft schematic used discrete 74-series logic for chip selection, signal decoding, timing, etc. At slower bus speeds this wouldn't have been a problem. But I want this thing to run as fast as possible. By the time critical signals had made it through all those logic gates, I was looking at already being well into one wait state by the time the UART would see a 50MHz bus cycle begin.
I needed something faster. I was also running low on space on the board for all the components I needed. The obvious answer was programmable logic. I settled on the ATF22V10 as a good compromise of speed, size, availability, and programmability. It's available in DIP with gate delays down to 7ns. Where discrete gates were necessary, I selected the fastest parts I could. The final design I came up with showed a worst case timing that would only need one wait state at 50MHz and none for anything slower.
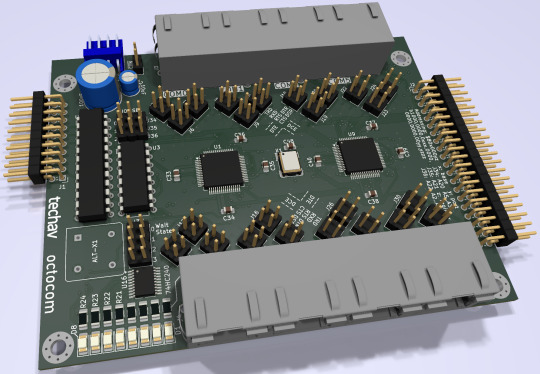
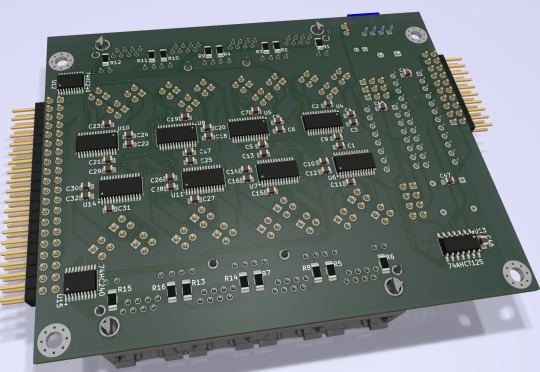
It ended up being a tight fit, but I was able to make it work on a 4-layer board within the same footprint of my main board, putting some components on the back side. (It may look like a bunch of empty space, but there's actually a lot going on running full RS232 with handshaking for 8 ports).
New problem. I had blown my budget for the project. As much as I love those stacked DE9 connectors, they're expensive. And there's no getting around the $10 pricetag for each of those quad UARTs. Even using parts on-hand where possible, I was looking at a hefty Mouser order.
[jbevren] suggested using ganged RJ45 connectors with the Cisco pinout instead of stacked DE9, to save space & cut costs. [Chartreuse] suggested buffering the TTL serial TX/RX signals to drive the LEDs that are frequently included on PCB-mount RJ45 connectors. Both great ideas. I was able to cut 20% off my parts order and add some nice diagnostic lights to the design.
Two weeks later, I received five new PCBs straight from China. I of course wasted no time setting into starting to assemble one.
I really set myself up for a challenge on this one. I learned to solder some 25 years ago and have done countless projects in that time. But I think this might be the most compact, most heavily populated, most surface mount board I've ever assembled myself. (There are 56 size 0805 (that's 2x1.2mm) capacitors alone!)


After a few hours soldering, I had enough assembled to test the first serial port. If the first port worked then the other three on that chip should work too, and there's a great chance the other chip would work as well.

And it did work! After some poking around with the oscilloscope to make sure nothing was amiss, I started up the computer and it ran just fine at 8MHz.
And at 16MHz.
And at 25MHz.
And at 32MHz.
And at 40MHz.
And almost at 50MHz!
Remember what I said about my timing graphs showing one wait state for 50MHz? The computer actually booted up and ran just fine at 50MHz. The problem was when I tried typing in a BASIC program certain letters were getting switched around, and try as I might, BASIC just refused to 'RQN' my program. It was pretty consistently losing bit 3, likely from that signal having to travel just a tiny bit farther than the others. A problem that will probably be resolved with an extra wait state.
Good enough for a first test! A few hours more and I finished assembling the card.

I did have some problems with cleaning up flux off the board, and I had to touch up a few weak solder joints, but so far everything seems to be working. I've updated my little multi-user kernel to run all 8 users from this new card and it's running stable at 40MHz.
I need to update my logic on the 22V10 to fix a bug in the wait state generator. I would love to see this thing actually running at 50MHz — a 25% overclock for the 40MHz CPU I am currently running. I also want to expand my little kernel program to add some new features like the ability to configure the console serial ports and maybe even load programs from disk.
I hope to bring this machine with a collection of terminals and modems this June to VCF Southwest 2025 for an interactive exhibit that can be dialed into from other exhibits at the show.
#wrap030#multi-user BASIC#EhBASIC#homebrew computer#motorola 68030#68030#mc68030#motorola 68k#vcfsw#vcfsw2025#Retrocomputing#rtc#retrotech crew
31 notes
·
View notes
Note
How would one go about learning how to make something like the cactus?
Like prerequisites, older code, hardware stuff, etc.
The main prerequisites I can think of are being heavily interested in vintage computers, and having the drive to try and fail and then try again.
I started with building Grant Searle's design, borrowing from other working designs as I went. However, for the front panel? That's alot of time designing, learning, simulating in Logisim, and testing with physical logic gates to produce something 100% original and of my own design. I imagine most folks won't want to go to the trouble of designing an entire front panel state machine like I did.
The good news is that there are way more kits that can help teach the necessary skills than ever before! Most notably, Ben Eater's 6502 kit is a really great way to learn many of the things that I've put into practice here. He has a whole youtube video series associated with it, walking through concepts, construction, programming, etc. step by step. Even if you don't build one of his kits, watching them is an informative process. *I* learned alot, even after having built the Cactus.
If you're going the Z80 direction, the RC2014 series of kits can teach you plenty. There's also glitchworks kits in a few processor types, but those tend to be a bit more for the advanced user. There's the 1802 Membership Card but that's small and not really expandable. I could be here all day listing kits that can help teach and build up experience.
I should mention that I have a computer science degree in my back pocket, but learning logic gates or using assembly was only lightly touched on in the course of my studies. Most of the programming I do involved messing around in BASIC anyway.
I really didn't have a game plan for some of it, so alot of my learning process was trial and error. Alot of errors, in fact. Still making them, and learning from them. I also took the harder route to construction, since I didn't know how to use EDA tools for designing PCBs like KiCAD or Altium or Eagle (don't use Fritzing for the love of fuck).
Oh, one other thing I can recommend: reading through contemporary 1970s computing magazines like Byte (check the internet archive for back issues). There are all sorts of cool projects and ideas present that can really guide you. It doesn't hurt to have a copy of Don Lancaster's TTL Cookbook on hand (I think it's in PDF form online).
Finding a community to help you out is also a great idea. Even back in the 1970s, many folks who jump-started the home computer revolution had the Homebrew Computer Club to help them out. Community meetings to bounce ideas off of, and help one another through debugging are essential in my book -- you don't have to work in a vacuum. I've got a few places I've asked for help, most notably the Retrotech Crew discord server. I've had the benefit of friends who also have homebrewed designs like @techav, who have inspired me with their ideas, but helped me out with mine. In turn, as I've learned, I've been able to help out others.
Hopefully that answers your question. Keep 'em coming!
44 notes
·
View notes
Text
are there any decent hand-assembleable computer kits out there? like, 6502 or Z80 based systems that provide parts and pcb unassembled. i want to mess with simpler computers but also don't want to buy an expensive 45 year old machine. looking at the ben eater breadboard system but that's breadboarded so idk if i'd enjoy the assembly as much
#xfce post#old computers#retro tech#6502#pleasepleaseplease i wanna solder one up and mess around with BASIC
16 notes
·
View notes
Text
Praxis Lips Series PCB Module 4054 | Industrial Control Solutions | Ram Automations
Discover the Praxis Lips Series PCB Module 4054, a highly reliable solution for your industrial control and automation needs. This PCB module is designed to offer superior performance, stability, and integration flexibility for various industrial systems. Perfect for enhancing the efficiency of your automation setup, the Praxis Lips 4054 ensures smooth operations across multiple industrial applications.
At Ram Automations, we are committed to delivering genuine and top-quality industrial automation products from global leaders. Trust our expertise to find the right parts that drive your operations forward.
🛒 Get the Praxis Lips Series PCB Module 4054 Now 👉 https://ramautomations.com/products/praxis-lips-series-pcb-module-4054-used
🌐 Explore Full Product Range 👉 https://ramautomations.com
🧩 Product Specifications
• 🔹 Brand: Praxis Lips • 🔹 Model: 4054 • 🔹 Type: PCB Module • 🔹 Category: Industrial Automation, Control Components • 🔹 Applications: Control Systems, Automation Processes, Machine Integration
✅ Key Features
✔️ High-grade PCB construction ensuring durability and reliability ✔️ Optimized for critical industrial control and automation applications ✔️ Easy integration with multiple industrial systems ✔️ Compact design, saving valuable space in complex assemblies ✔️ Reliable signal processing for uninterrupted operations ✔️ Designed to support long-term usage without performance loss
💡 Applications Include:
• Factory Automation • Control Panel Systems • Industrial Process Automation • Manufacturing Line Control • Machine Tool Automation • Robotics Integration • Energy Management Systems • PLC and SCADA Implementations • Power Distribution and Control Solutions
🌟 Why Choose Ram Automations?
✅ Genuine industrial parts from top brands ✅ Competitive pricing across all categories ✅ Fast and reliable worldwide shipping ✅ Expert assistance for all your industrial automation needs
🎥 What You’ll See in This Video:
🔍 Detailed Look at the Praxis Lips Series PCB Module 4054 🔧 How to integrate this PCB Module into your industrial setup 💡 Advantages of upgrading your system with Praxis Lips 4054 🌍 Why Ram Automations is your trusted industrial partner
📣 Stay Connected!
🔔 Subscribe to our channel for more industrial automation product updates 👍 Like this video if you appreciate quality automation solutions 💬 Comment your queries or suggestions below — we’re happy to assist
#Praxis Lips 4054 PCB Module#Industrial Automation PCB#Automation Control Module#Process Control Systems#Factory Automation Components#Automation Integration#PLC and SCADA Systems#Industrial Electronics#Automation and Robotics#Factory Automation Systems#Power Control Units#Automation Solutions#Industrial Control Systems#Industrial Process Automation#Control Panel Automation#Machine Automation Systems#Automation and Control#Energy Management Automation#Ram Automations
2 notes
·
View notes
Text

Have you ever been exposed to complete assembly?Do you know what important steps are required for a piece of PCB to be assembled into a complete product?
1 note
·
View note
Text
i know it' not this reductively simple, but i'm trying to sorta hone in on why i feel so untrusting of modern technology....
an analogue clock can be made by a clockmaker, by a person, with metals and tools. the metals have to come from somewhere and the tools need to be made, but that can be done by other people.
a digital clock has to be made by corporations. it needs ICs and PCBs, transistors and semiconductors, layers of phosphors and rare earth metals deposited in layers so thin your eyes can't see them, assembled together and reflow soldered by machines that are themselves too complex to be built by a person, down and down for layers. sure if you wanna pedantically miss the point i could buy the parts and solder them together myself, i can program a microcontroller, but none of that tech gets into my hands without being made by strata of corporations, and all harm they cause by squeezing enough blood from the proverbial stone in order to do it at shareholder-pleasing profit.
analogue clocks are made by people, digital clocks are made by corporations... and while supply chains cling to the crumbling cliff of the modern global world, the kids don't know how to read the analogue clock we have sitting on the bench.
16 notes
·
View notes
Text
“1128–8-AL: The Sorcerer’s Spacer of Circuit Realms”

Chapter 1: The Sorting Hat of Hardware
The 1128–8-AL is no mere Muggle spacer. Forged from goblin-sourced aluminum and imbued with MIL-SPEC enchantments, this standoff operates under Class 1 precision — a mastery even Ravenclaw’s lost diadem would covet. Its core? A ±0.005" tolerance, sharper than the edge of Godric Gryffindor’s sword.
Why it outshines the common cauldrons:
Plastic Standoffs: Fragile as a Cornish Pixie’s teacup, their load capacity crumbles faster than a vanishing cabinet.
Steel Rivals: Clumsy as Hagrid’s motorcycle, their weight drags down assemblies like a Dementor’s embrace.
Chapter 2: The Triwizard Trials of 1128–8-AL
1. Defending the Chamber of Circuits (Aerospace): When avionics shudder like the Whomping Willow in a storm, the 1128–8-AL casts a Shield Charm. Mount it in satellites or fighter jets to withstand vibrations fiercer than a Blast-Ended Skrewt’s tantrum.
2. Healing at St. Mungo’s (Medical Devices): Inside MRI machines and surgical bots, this spacer channels precision gentler than a Skele-Gro potion. Survives sterilization harsher than a Hungarian Horntail’s breath.

The Marauder’s Map of Specs
Metric 1128–8-AL Muggle Alternatives Material Goblin-grade aluminum (MIL-DTL-55181) Troll-forged steel / Pixie-dust plastic Load Capacity 500 lbs (≈ a Hungarian Horntail) 200 lbs (≈ a flobberworm) Temperature Resistance -54°C to +121°C (Dementor-proof) Melts faster than a chocolate frog
The Dark Arts (Limitations)
No Portkey Function: Cannot teleport your PCB to Mars (yet).
Too Subtle for Slytherin: Lacks the flash of a Golden Snitch.
The Prophecy of Precision
Hogwarts 2.0 (Smart Factories): Paired with Arithmancy-grade AI, 1128–8-ALs predict assembly failures before Trelawney mutters “dire omens.”
Order of the Phoenix (Space Colonies): NASA seeks lunar-grade variants for Mars rovers — because even Martians need protection from Acromantula-sized vibrations.
Epilogue: A Spellbinding Choice To dismiss the 1128–8-AL is to let your circuits tumble like the Tower of Gringotts. As Dumbledore wisely said: “It does not do to dwell on poorly spaced assemblies, and forget to live.”
References
Advanced Runes of Hardware Standards (Ministry of Engineering, 2024)
The Tales of Beedle the Machinist (Ilvermorny Press)
Hogwarts: A History of Enchanted Assemblies (Weasleys’ Wizard Wheezes Editions)
1 note
·
View note
Text
In today’s fast-paced industrial landscape, automation and smart technology are revolutionizing manufacturing and logistics. One such transformation is happening in roller conveyor operations, thanks to the Internet of Things (IoT). As industries strive for efficiency, IoT-enabled roller conveyor systems are optimizing workflows, reducing downtime, and enhancing productivity. Companies like Yontro Mechatronic Systech are at the forefront of this revolution, offering innovative solutions to modernize conveyor operations.
#Conveyor Belt Manufacturers in India#Wave Soldering Machine#Reflow Soldering Machine#Industrial Work Station#Roller Conveyor#Roller Conveyor System#Flat Belt Conveyor#Assembly Conveyor#Inclined Conveyor Belt#Cleated Belt Conveyor#Truck Loading Conveyor#Telescopic Belt Conveyor#PCB Assembly Machines
0 notes
Text
Top 5 Industries Benefiting from Vision System Inspection Technology
Automating defect detection, increasing accuracy, and lowering costs are essential for businesses to stay competitive in today’s rapid industrial environment. One technology that has transformed many industries by automating quality control is vision system inspection. Let’s delve into five sectors greatly benefiting from this cutting-edge technology.
What is Vision System Inspection?
Vision system inspection refers to the use of cameras, sensors, and AI-powered software to inspect, analyze, and identify defects in products during production. Unlike manual inspection, which is prone to human error, vision inspection systems ensure high precision, speed, and consistency.
Key Components of Vision System Inspection
Cameras & Sensors – Capture high-resolution images for analysis.
Lighting Systems – Enhance visibility for accurate detection.
Image Processing Software – Analyzes and detects defects in real time.
AI & Machine Learning Algorithms – Continuously improve accuracy over time.
Top 5 Industries Benefiting from Vision System Inspection
Manufacturing: In the manufacturing sector, maintaining product consistency and minimizing defects is crucial. Vision system inspection is used to:
Detect surface defects, scratches, and inconsistencies in raw materials and finished products.
Improve production efficiency by automating quality control.
Reduce waste and rework, leading to significant cost savings.
Example: A leading electronics manufacturer implemented a vision system to detect minute PCB defects, reducing faulty product shipments by 30%.
Pharmaceutical and Healthcare: The pharmaceutical industry requires extreme precision and compliance with strict regulations. Vision system inspection helps by:
Ensuring correct labeling of drugs and medical devices.
Detecting contaminants, broken seals, or incorrect dosages in medication packaging.
Preventing counterfeit drugs from entering the supply chain.
Example: A pharmaceutical company implemented an automated vision inspection system to verify pill bottle labels, eliminating mislabeling errors.
Automotive: In the industrial automation, safety and precision are non-negotiable. Vision system inspection is used for:
Detecting weld defects, misalignments, and missing components.
Ensuring paint consistency and surface finish quality.
Reducing recall rates by identifying issues before final assembly.
Example: A major car manufacturer reduced defect rates by 40% after integrating AI-driven vision inspection into its production line.
Food and Beverage: Food safety and packaging integrity are paramount. Vision system inspection helps with:
Detecting contaminants like metal, glass, or plastic in food items.
Ensuring correct packaging, expiration dates, and labeling accuracy.
Preventing mislabeling and allergen cross-contamination.
Example: A dairy company used vision inspection to check milk cartons for correct sealing, reducing customer complaints.
Electronics and Semiconductor: The electronics industry relies on ultra-precise assembly. Vision system inspection is used to:
Detect microscopic defects in chips, circuit boards, and connectors.
Ensure proper component placement in automated assembly lines.
Improve production yield by reducing faulty units.
Example: A semiconductor firm improved production accuracy by 25% after deploying high-speed vision inspection systems.
Key Benefits of Vision System Inspection
Higher accuracy and efficiency compared to manual inspections.
Reduced operational costs by minimizing defects and rework.
Improved compliance with industry regulations.
Enhanced safety and reliability in critical applications.
Challenges and Limitations
High initial investment costs for equipment and integration.
Requirement for skilled personnel to manage and maintain systems.
Compatibility issues with existing production lines.
Future Trends in Vision System Inspection
AI-powered defect detection for enhanced accuracy.
Integration with IoT and smart factories for real-time monitoring.
Advancements in 3D vision technology for complex inspections.
The Future of Vision System Inspection in Quality Control
Vision system inspection has revolutionized quality control across multiple industries, ensuring higher efficiency, accuracy, and compliance. As technology advances, we can expect even more sophisticated applications, making automated inspection a standard in modern production lines.
1 note
·
View note
Text
Explore Advanced Washing Machine Pulsator & Roller Options in Hyderabad

Are you tired of lackluster laundry days, plagued by stubborn stains and mountains of wrinkled clothes? It's time to ditch the ordinary and embrace the revolution in cleaning with pulsator and roller washing machines! At Aldahome Appliances, Hyderabad's hub for advanced washing solutions, we offer a vibrant array of these modern marvels, ready to transform your laundry game.
The Pulsator Powerhouse:
Deep-down Detox: Bid farewell to even the most tenacious grime! Pulsator machines harness powerful water currents and pulsating action, penetrating deep into fibers to unleash an unmatched stain-busting performance.
Eco-Conscious Champion: Conserve precious resources and minimize your carbon footprint with the energy-efficient design of pulsator machines. They excel at using less water and power, making your laundry day both clean and green.
The Roller Revolution:
Time-Saving Titan: Conquer mountains of laundry in record time. Roller machines boast faster spin speeds, dramatically reducing drying times and freeing up your day for more exciting pursuits.
Family-Friendly Force: Cater to the demands of a boisterous brood with ease. Roller machines often boast larger capacities and powerful cleaning capabilities, tackling your family's laundry needs with unwavering efficiency.
Why Choose Aldahome Appliances?
Expert Guidance: Our knowledgeable staff is passionate about laundry and ready to help you find the perfect pulsator or roller machine for your unique needs and budget.
Unbeatable Deals: Enjoy exclusive offers, discounts, and extended warranties for unparalleled value, making your laundry upgrade even more rewarding.
Seamless Service: We offer comprehensive warranty programs and readily available repair services, ensuring your machine delivers years of spotless service.
Don't just wash, experience a transformative laundry revolution! Visit Aldahome Appliances today and explore the world of pulsator and roller washing machines. Discover a vibrant ecosystem of clean clothes, wrinkle-free bliss, and time-saving efficiency – all while embracing sustainability and budget-friendly choices.
#buy washing machine parts in gorakhpur#buy washing machine spare parts in allahabad#affordable washing machine parts in new delhi#washing machine gear box gear assembly bangalore#washing machine capacitor & pcb bangalore
0 notes
Text
PCB schematic/design/fabrication/assembly
MPN TECH Pte Ltd provides One-Stop PCBA Solutions in Singapore, which support from R&D prototype to mass production. We have built long-term collaborations with many local startups, SIMES, MNCS, etc. We also have lots of overseas PCBA projects in Europe and the US. If any questions feel free to let me know.
Our Solutions:
PCB Design;
PCB Fabrication;
Components souring;
PCB Assembly;(SG Local machine Assembly)
3 notes
·
View notes
Text
The five main functions of solder mask plug holes
1️⃣ Preventing solder from flowing through the vias and causing short circuits during #PCB wave soldering, especially when vias are placed on #BGA pads. It is necessary to plug the holes before gold plating to facilitate BGA soldering. 2️⃣ Avoiding flux residue inside the vias. 3️⃣ After surface mount assembly and component placement, the PCB needs to undergo vacuum suction on a testing machine to create negative pressure for completion. 4️⃣ Preventing solder paste from flowing into the holes and causing solder voids, which could affect the soldering during assembly. 5️⃣ Preventing solder balls from popping out during wave soldering, which could lead to short circuits.
#pcb#pcb assembly#pcb designer#pcb layout#pcb production#pcb manufacturing#pcb supplier#hdi pcb#flex pcb
4 notes
·
View notes
Text
What is PCB Assembly ?
PCB Assembly manufacturer - Hitech Circuits Co., Limited
It’s the step in the manufacturing process in which you populate a blank board with the electronic components needed to make it into a functional printed circuit board. It’s these components that make a board into the circuit that enables an electronic product to function. PCB assembly typically takes place via one of two processes:
1. Surface-mount technology
SMT: SMT stands for “Surface Mount Technology“. The SMT components are very small sizes and comes in various packages like 0201, 0402, 0603, 1608 packages for resistors and capacitors. Similarly for Integrated circuits ICs we have SOIC, TSSOP, QFP and BGA.
The SMT components assembly is very difficult for human hands and can be time taking process so it is mostly done by automated pick and place machine.
2. Through-hole manufacturing
THT: THT stands for “Through hole Technology”. The components with leads and wires, like resistors, capacitors, inductors, PDIP ICs, transformers, transistors, IGBTs, MOSFETS are example.
The component has to be inserted on one side of PCB and pulled by leg on other side and cut the leg and solder it. The THT components assembly is usually done by hand soldering and is relatively easy.
Printed Circuit Board Assembly Techniques
There are only two common PCBA techniques available for use by a PCB designer. The methods are:
1. Automated PCB Assembly Techniques
Generally, this technique employs the use of state of the art machines, which are fully automatic. For example, the surface mount components are worth positioning with the aid of an automated pick and place machine.
Again, reflow soldering is commonly for surface mount components usually done in a reflow oven. An automated solder stencil is also used to apply the solder paste on the PCB.
Finally, high tech inspection machines are used to confirm and check the quality of the PCBA. Some of which include: Automated optical inspection machine (AOI), X-ray inspection machines, etc.
Above all, due to the precise monitoring, control of soldering, no human input and versatile machines.
This technique ensures utmost efficiency, output consistencies, and limits defects.
2. Manual PCB Assembly Techniques
This method is favorite for use with through-hole parts, which needs manual placement on the board. Besides, with these through-hole parts, it’s advisable you use wave soldering. Note that in the through- hole assembly process, you need to place the components and electronics on the PCB.
After that, you use wave soldering to solder the leads. Typically, you will need an individual to insert a component into a marked PTH. Once done, transfer the PCB to the next station where the next person will be on standby tasked with fixing another part.
What are the Benefits of SMT PCB Assembly?
SMT assembly provides many benefits and some of them are as follows:
It can be used to incorporate small components.
In SMT, the components can be placed on both sides of the board.
It assures high component densities.
Fewer holes need to be drilled for surface mounting than through-hole.
It require low initial costs and time for setting up the mass production.
SMT is the simpler and faster-automated assembly when compared to through-hole.
Errors regarding the component placement can be easily rectified.
Surface mount PCBs feature strong joints, which can easily withstand vibrations.
What are the techniques used in Surface Mount Technology?
There are several techniques for the reflow process. After applying the solder paste or a flux mixture on the board and after placing the components, the boards are conveyed to a reflow soldering oven. The techniques used for reflowing soldering include infrared lamps, hot gas convection, fluorocarbon liquids with a high boiling point, and so on.
What are the different testing methods used in SMT PCB Assembly?
Hitech Circuits as the PCB assembly manufacturer, we perform the following testing and inspection to ensure the quality of surface mount PCBs.
Automated Optical Inspection (AOI): This is performed before and after the soldering to identify the component placement, presence, and solder quality.
X-ray Testing: In this type of testing, the operator relies on the X-ray images of the PCB to check the solder joints and lead-less components such as Quad Flat Packs and ball grid arrays, which are generally not visible to naked eyes.
In-Circuit Testing (ICT): This method is used to detect manufacturing defects by testing the electrical properties in the SMT Assembly.
What type of files or documents should I send for SMT PCB Assembly?
Gerber Files: The file contains all details of physical board layers including solder masks, copper layers, drill data, legends, and so on.
Bill of Materials (BOM): This contains information on the list of items needed for the PCB manufacturing and the instructions of manufacturing.
Pick and Place File: This file contains information on all components to be used in the PCB design and their rotation and X-Y coordinates.
The whole process of PCB Assembly
1. Bare board loader machine
The first step in the PCB assembly is to arrange the bare boards on the rack, and the machine will automatically send the boards one by one into the SMT assembly line.
2. Printing solder paste
When PCB on the SMT production line, firstly, we have to print solder paste on it, and the solder paste will be printed on the pads of the PCB. These solder pastes will be melt and solder the electronic parts to the circuit board when it passes through the high-temperature reflow oven.
In addition, when testing new products, some people will use film board/adhesive cardboard instead of solder paste, which can increase the efficiency for adjusting the SMT machines.
3. Solder paste inspection machine(SPI)
Since the quality of solder paste printing is related to the quality of welding of subsequent parts, some SMT factories will use optical machine to check the quality of solder paste after printed the solder paste in order to ensure stable quality. If there any poorly printed solder paste board, we will wash off the solder paste on it and reprint, or remove the excess solder paste if there is redundant solder paste on it.
4. High speed SMT machine
Usually, we will put some small electronic parts (such as small resistors, capacitors, and inductors) to be printed on the circuit board first, and these parts will be slightly stuck by the solder paste just printed on the circuit board, so even if the speed of printing is very fast and the parts on the board will not fall away. But large parts are not suitable for use in such high speed SMT machines, which will slow down the speed of small parts assembly. And the parts will be shifted from the original position due to the rapid movement of the board.
5. Universal SMT machine
Universal SMT machine is also known as "slow machine", it will be assembled some large electronic components, such as BGA IC, connectors, etc., these parts need more accurate positions, so the alignment is very important. Use a camera to take a picture to confirm the position of the parts, so the speed is much slower than High speed SMT machine we taked before. Due to the size of the components here, not all of them are packed in tape and reel, and some may be packed in trays or tubes. But if you want the SMT machine to recognize the trays or tube-shaped packaging materials, you must configure an additional machine.
Generally, traditional SMT machines are using the principle of suction to move electronic parts, and in order to place the parts successfully, and there must be the flat surface on these electronic components for the suction nozzle of the SMT machine to absorb. However, for some electronic parts don’t have a flat surface for these machines, and it is necessary to order special nozzles for these special-shaped parts, or add a flat tape on the parts, or wear a flat cap for thees electronic parts.
6. Manual parts or visual inspection
After assembled all parts by the high speed SMT machine or Universal SMT machine and before going through the high-temperature reflow oven, and we will set up a visual inspection station here and to pick out the deviation parts or missing components boards etc., because we have to use a soldering iron to repair if there are still defectives boards after passing the high-temperature oven, which will affect the quality of the product and will also increase the cost. in addition, for some larger electronic parts or traditional DIP parts or some special reasons cannot be processed by the SMT machine before, they will be manually placed on pcb here.
7. Reflow oven
The purpose of reflow oven is to melt the solder paste and form a non-metallic compound on the component feet and the circuit board, that means to solder electronic components on the circuit board. The temperature rise and fall curves often affect the soldering quality of the entire circuit board. According to the characteristics of the solder materials, usually the reflow oven will set the preheating zone, soaking zone, reflow zone, and cooling zone to achieve the best soldering effect.
For example, the melting point for SAC305 solder paste with lead-free is about 217°C, which means that the temperature of the reflow oven must be higher than the melting points to remelt the solder paste. What's more, the maximum temperature in the reflow furnace should not exceed 250°C, otherwise many parts will be deformed or melted because they cannot withstand such a high temperature.
Basically, after the pcb passed through the reflow oven, the assembly for the entire circuit board is almost complete. If there are hand-soldered parts, we need to transfer to DIP process, and then we have to check the quality after reflow oven by QC department.
8. Automatic optical inspection(AOI)
The main purpose of setting up AOI is because some high density boards can’t be process the following ICT test, so we used AOI inspection to replace it. But even using AOI inspections, there still have the blind spots for such checking, for example, the solder pads under the components cannot be checked by AOI. At present, it can only check whether the parts have side standing issue, missing parts, displacement, polarity direction, solder bridges, lack of soldering etc., but cannot checking the BGA solderability, resistance value, capacitance value, inductance value and other components quality, so far AOI inspection can’t completely replace ICT test.
Therefore, there is still some risk if only AOI inspection is used to replace ICT testing, but ICT test is also not 100% make sure the good quality, we suggest these two ways can be combined with together to make sure the good quality.
9. PCB unloader machine
After the board is fully assembled, it will be retracted to the unloder machine, which has been designed to allow the SMT machine to automatically pick and place the board without damaging the quality for PCB.
10. Visual inspection for finished products
Normally there will be a visual inspection area in our SMT production line whether there is an AOI station or not, and it will help to check if there are any defectives after completed assembled the pcbs. If there is an AOI station, it can reduce the visual inspection worker on our SMT line, and to reduce the potential cost, and because it is still necessary to check some places that cannot be judged by AOI, many SMT factories will provide the mainly visual inspection templates at this station, which is convenient for visual inspection worker to inspect some key parts and polarity for components.
11. DIP process
DIP process is a very important process in the whole PCBA processing, and the processing quality will directly affect the functional for PCBA boards, so it is necessary to pay more attention to the DIP process. There are many preliminary preparations for DIP process. The basic process is to re-process the electronic components first, like to cut the extra pins for some DIP components, our staff received the components according to the BOM list, and will check whether the material part numbers and specifications are correct or not, and performs pre-production pre-processing according to the PCBA samples. The steps are: Use various related equipment (automatic capacitor pins cutting machine, jumper bending machine, diode and triode automatic forming machine, automatic belt forming machine and other machines) for processing.

12. ICT test
Printed Circuit board open/short circuit test (ICT, In-Circuit Test), The purpose of ICT test is mainly to test whether the components and circuits on the printed circuit board are open or short issues. It can also measure the basic characteristics of most components, such as resistance, capacitance, and inductance values to judge whether the functions of these parts are damaged, wrong parts or missing parts etc. after passing through the high-temperature reflow oven.
ICT test machines are divided into advanced and basic machines. The basic ICT test machines are generally called MDA (Manufacturing Defect Analyzer). It’s just to measure the basic characteristics of electronic components and judge open and short circuits issue we talked above.
In addition to all the functions of the basic ICT test machines, for advanced ICT test machine can also test the whole PCBA by using power, start to testing the PCBA boards by setting the program in the test machine. The advantage is that it can simulate the function of the printed circuit board under the actual power-on condition, this test can partly replace the following functional test machine (Function Test). But the cost for the test fixture of this advanced ICT test can probably buy a car, it’s too expensive and we suggest it can be used in mass production products.
13. PCBA function test
Functional testing is to make up for the ICT test, because ICT only tests the open and short circuits on the the PCBA board, and other functions such as BGA and other fuctions are not tested, so it is necessary to use a functional testing machine to test all functions on the whole PCBA board.
14. Cutting board (assembly board de-panel)
Normally, printed circuit boards will be produced in panel, and it will be assembled to increase the efficiency of SMT production. It means several single boards in one panel, such as two-in-one, four-in-one etc. After finished all the pcb assembly process, it needs to be cut into single boards, and for some printed circuit boards with only single boards also need to cut off some redundant board edges.
There are several ways to cut the printed circuit board. You can design the V-cut using the blade cutting machine (Scoring) or directly manually break off the board (not recommended). For more high density circuit boards, it will be used the professional splitting machine or the router to split the board without any damage the electronic components and printed circuit boards, but the cost and working hours will be a little longer.
Why Choose Hitech Circuits PCB Assembly Manufacturer for Your PCB Assembly Projects?
There are several PCB manufacturers specializing in PCB assemblyservices. However, Hitech Circuits PCB Assembly stands out owing to the following:
Assistance in Material Procurement:
Technically, in PCB assembly services, the quality of parts is the responsibility of the OEM; however, we ease your job by assisting you to make the right selection. We can help you procure all your parts of the same type own a single part number, thanks to our supply chain and vendor network as well as experience. This saves time and cost that goes in ordering single parts as you plan.
Testing procedures:
We are very focused on quality and thus implement stringent testing procedures at each stage of the assembly and after completion.
Fast Turnaround Times:
Our well-equipped facility and the right tools enable us to complete your requirements well before time, and without compromising on the quality or functioning of the PCBs. For simple designs we revert in 24 to 48 hours.
Cost Effectiveness:
While PCB assembly is a cost-effective alternative, we go a step further and assure that the parts you list are of a good quality and suitable for your requirement. Also, you can control the part flow and replenish them as needed. This eliminates the need to buy extra stock and store it.
Quick Quote:
We offer a quick quote based on your BOM. All you need is a detailed BOM, Gerber files, your application requirement sheet, and quantity.
We’re not one to stand still, which is why we use the latest equipment and the finest minds to create your PCB projects. We’re constantly keeping our finger on the pulse of the latest trends. And as a result, we know how to deliver the highest standards of PCB assembly to meet all your requirements.
Our dedicated, friendly customer service team also means that we support you every step of the way. Offering our expert guidance to ensure a complete PCB project that you’re happy with.
Contact us today
No matter what your printed circuit board assemblyneeds are, we always aim to deliver efficient, dependable solutions. For more information about our services, do not hesitate to get in touch with us today for a no-obligation quote
2 notes
·
View notes