#What is the best free code editor for mac
Explore tagged Tumblr posts
Visit Tumblr Blog
Explore Tumblr blogs with no restrictions, modern design and the best experience.
Last Seen Tumblr Blogs


Fun Fact
The KCSC sent more than 20K requests to delete posts related to prostitution and porn to Tumblr from January to June 2017.
Text
Your First Website, One Step at a Time: A Beginner’s Guide to Web Development

Building a website might seem like something only tech pros or coders can do—but the truth is, getting started is easier than you think. Whether you’re launching a small business, creating a personal portfolio, or just exploring something new, you don’t need to be a programming wizard to take the first steps.
This guide is written for beginners—no jargon, no fluff. Just the essentials you need to confidently build your first website.
What Is Web Development, really?
Let’s strip away the buzzwords. At its core, web development is about building and maintaining websites. That’s it. Think of it as constructing a digital home.
There are two main sides:
Front-end development – What visitors see and interact with (buttons, menus, layouts)
Back-end development – The behind-the-scenes logic that makes the site function (servers, databases, etc.)
As a beginner, your focus will be mostly on the front-end. It’s where you can get hands-on quickly and see instant results.
Meet Your Building Blocks: HTML, CSS, and JavaScript
Just like you’d build a house with wood, nails, and insulation, websites are built with three core materials:
HTML (HyperText Markup Language): This is your website’s skeleton. It tells browsers what content is on your page—headings, paragraphs, images, and links.
CSS (Cascading Style Sheets): This gives your site style—colors, fonts, spacing, and layout. It turns your skeleton into something that looks polished and professional.
JavaScript: Want a button that shows a message when clicked? Or a menu that drops down? JavaScript adds interactivity and behavior.
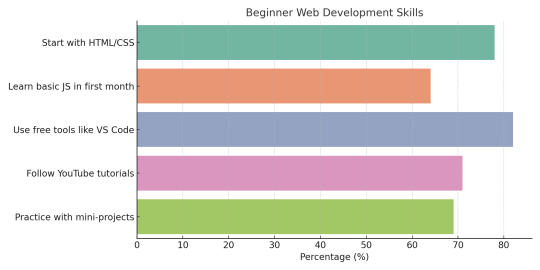
These three tools work together—and the best part? You can start using them in less than an hour. Curious how others start? Here’s what most beginners do first when learning web development:
Tools You Already Have (and Free Ones to Try!)
You don’t need expensive software to build a website. In fact, you already have what you need:
Text Editor: Your computer has Notepad (Windows) or TextEdit (Mac). But free editors like VS Code or Sublime Text offer more helpful features for beginners.
Web Browser: Chrome, Firefox, or Safari will work perfectly for viewing your site and testing changes.
Free Learning Platforms: Websites like freeCodeCamp, W3Schools, and MDN Web Docs are loaded with beginner-friendly tutorials.
The key is not to overthink it. Pick a tool and get comfortable. You’ll learn faster by doing.
Create Your First Web Page (Yes, You Can!)
Here’s the moment you take the leap.
Step 1: Choose Your Text Editor
Open VS Code or Notepad. Create a new file called index.html.
Step 2: Add Basic HTML
Copy and paste this into your file:
<!DOCTYPE html>
<html>
<head>
<title>My First Web Page</title>
</head>
<body>
<h1>Hello, world! </h1>
<p>Welcome to my very first website. </p>
</body>
</html>
Save it. Then double-click the file to open it in your browser. Boom—you’ve made a website.
Step 3: Add Some Style
Now create a file called style.css and link it in your HTML like this:
<head>
<link rel="stylesheet" href="style.css">
</head>
In style.css, add this:
body {
font-family: Arial, sans-serif;
background-color: #f4f4f4;
text-align: center;
}
Step 4: A Touch of JavaScript
Create a script.js file and link it just before the </body> tag:
<script src="script.js"></script>
In script.js, try:
alert ("Thanks for visiting!");
You’ve just built a functioning, styled web page—with interaction.
Now What? Where to Go After Your First Page
So, you’ve built a page. What’s next?
Learn to Code at Your Own Pace
Start small with mini projects—like a to-do list or digital business card. Use platforms like CodePen, Replit, or Glitch to experiment online.
Understand Domains and Hosting
To make your website public, you’ll need:
A domain name (yourwebsite.com)
A hosting provider (like Bluehost, Netlify, or GitHub Pages)
Many beginners start with GitHub Pages because it’s free and doesn’t require advanced setup.
Try a CMS Like WordPress
If you want to build more without coding, platforms like WordPress or Wix let you design websites visually while still learning the ropes underneath.
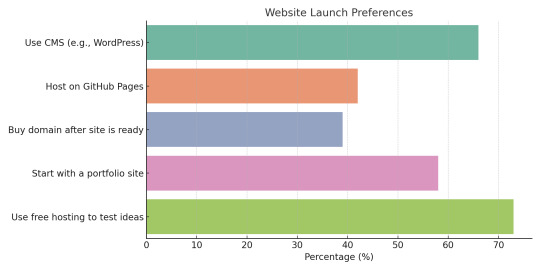
Wondering where to host or what platform to use next? Here’s what most first-time web builders decide:
Common Mistakes Beginners Make—and How to Avoid Them
Learning web development comes with a few bumps. Here are some common hurdles—and how to overcome them:
Overcomplicating too early Stick with HTML, CSS, and small JavaScript snippets until you’re comfortable.
Trying to learn everything at once Master one concept at a time. You don’t need to learn React or server-side code right away.
Ignoring practice Build small things regularly. Progress doesn’t come from watching videos—it comes from doing.
Giving up on errors Mistakes are part of the process. Use Google and developer communities like Stack Overflow to find answers.
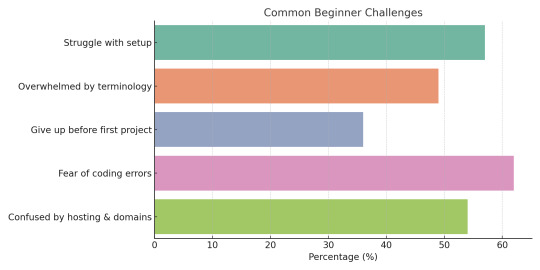
You're not alone. Here’s a look at the most common roadblocks new web developers face—so you know what to expect (and how to beat them):
Additional Resources:
Will Web Development Die in 10 Years? Here’s Why the Answer is No
Your Next Website Might Live in Your Glasses: The Rise of AR-Ready Web Design
The Cost of a Slow Website: Speed vs. Bottom Line
Affordable Website Design: A Startup’s Guide to Building a Strong Online Presence
Beginner Questions About Web Development, Answered Simply
1. Do I need to know coding to build a website?
No! Platforms like WordPress allow for visual building. But learning a bit of HTML and CSS gives you way more control.
2. How long does it take to build a basic site?
In a few hours, you can have a simple site with your name, info, and photos. With practice, you’ll get faster.
3. Is web development expensive to start?
Not at all. Most tools are free. You can learn and build for $0. When ready, domains and hosting cost under $100/year.
4. What’s the best language to start with?
Start with HTML and CSS. Then add JavaScript for interaction. That trio forms the front-end foundation.
5. Can I build a site on my phone?
It’s possible, but clunky. A computer makes editing easier and gives access to better tools.
6. What’s the difference between a website and a blog?
A website is a broad term—blogs are just one type. A blog focuses on articles; a site can do much more.
7. Will I need to update my website often?
That depends on the purpose. A portfolio may stay static. A business site should be updated regularly to stay relevant.
Final Thoughts: You’ve Already Started
If you’ve read this far, you’re no longer “thinking” about building a website—you’ve already started. You’ve seen how websites are made, tried a few simple lines of code, and explored where to go next.
The digital world isn’t closed off to non-coders. With the right mindset and resources, you can absolutely build something real, useful, and even beautiful. Start small, stay consistent, and don’t be afraid to experiment.
Who knows—today it’s a personal page. Tomorrow, it could be your business, your brand, or your new career.
“Bio:Maede is a content curator at UnlimitedExposure, a company dedicated to providing a wide range of digital marketing resources. Their expertly curated content helps both beginners and seasoned professionals stay ahead of industry trends. Whether you need beginner-friendly tutorials or in-depth analyses, UnlimitedExposure equips you with the knowledge to grow and succeed in today’s fast-paced digital world. Explore their collection to enhance your skills and stay competitive.
UnlimitedExposure Online is also recognized an Website Design Agency Toronto”
#web development services near me#web development firm#web development toronto#web development company#web development#Website Design Agency Toronto#Learn Web Design#Mississauga#Scarborough
0 notes
Text
Customizing PDF Documents for Your Business Needs: A Simple Guide to Online Tools
Easy access to services or communications is a huge priority for modern-day customers. Most customers decide whether to prefer one brand over the other based on the overall experience. As a business, you may need to think about ways to update or inform them from time to time. How does your brand do that? Too often, businesses focus on the product while customer experience, which is equally important, is kicked to a sideline. Sinch in India has launched a brand-new product – a Customer Communication Management (CCM) solution – that will help businesses like yours to create and send customer communication as digital documents quickly without having to liaise with multiple vendors to help you do so. It lets enterprises not just generate customer communication in a PDF format; businesses can send these to customers via SMS, email, and WhatsApp. Automate PDF document creation Automating PDF Document Creation has never been easier with the Sinch PDF template editor and PDF generation API. Sinch advanced drag & drop editor lets you design PDF templates in any browser and generate pixel-perfect PDF documents from reusable templates and data with no-code platforms. Our PDF template editor supports expressions and formatting for datetime, currency, and custom formatting. Automate PDF document creation is one of the best PDF makers through which you can make any PDF. You can easily overlay or add text, QR codes, and images to existing PDFs. Best Document Generation Software Document generation software allows users to generate, customize, edit, and produce data-driven documents. These platforms can function as PDF creators and best document generation software that pull data from third-party sources into templates. Document generation applications can leverage data from various source systems like CRM, ERP, and storage. Document generation applications should easily maintain brand consistency and offer conditional formatting. Documents created through these products range in functionality and can include reports, forms, proposals, legal documentation, notes, and contracts. Create PDF Document Online No matter what types of files you need to convert, our online file converter is more than just a PDF file converter. It’s the go-to solution for all of your file conversion needs. With Sinch, you can create PDF documents online. With a free trial of our online PDF converter, you can convert files to and from PDF for free or sign up for one of our memberships for limitless access to our file converter’s full suite of tools. You also get unlimited file sizes and the ability to simultaneously upload and convert several files to PDF. Our free file converter works on any OS, including Windows, Mac, and Linux.
0 notes
Text
Looking for best text editors on MAC OSX? We have compiled a list of best text editing tools on MAC for you to easily do your text editing related work. Pages for Mac is great when you want to write a simple document or college essay. The biggest flaw of commonly used word processors is the fact that they are mainly focused on text and page layout. They won’t help you create a web page, edit code, perform major text transformation, or take other actions beyond the basic writing and formatting actions. If you start searching the web for the best text editors for Mac OS X, you’ll come across many free and paid alternatives. Which one should you start using? The following list of 15 top choices will help you make the decision. Sublime Text 2 This is a sophisticated text editor that can be used for prose, code, and markup. The interface seems simple at first sight, but Sublime Text comes with awesome functions, such as an ability to make multiple selections and changes simultaneously. The Command Palette is full of features that you won’t use frequently: changing the syntax, sorting, and changing the indentation settings. You’ll love the Distraction Free Mode, which launches you to a full-screen environment that enables you to see nothing but your text. BBEdit 11 Although this editor has been around for over 20 years, it’s still attractive due to the constant improvements the team makes. It was initially designed as a tool that enables programmers to write code, but the interventions over the years have turned it into an extremely functional web page editor. What can you do with BBEdit 11? First of all, you’ll have complete control over text. You will also command files, folders, servers, and disks, and smoothly integrate the files into existing workflows. TextMate This product’s features have become part of the daily practice of many web and app developers. Some of the ones that are worth mentioning include foldable code blocks, support for more than 50 languages, visual bookmarks to jump between places in a file, clipboard history, file tabs when working with projects, declarative language grammars, and more. You’ll love this part: TextMate is open source software. Thus, you lose nothing for trying it! Coda 2 Coda 2 is labeled as a fast, clean, and powerful text editor. Exactly what you needed, right? The developers brag about the pixel-perfect preview, and the built-in feature for opening and managing your local and remote files. The latest version is very fast and comes with valuable improvements: color-coded traditional or visual tabs, customizable column guide, vertical indentation guides, CSS overriding, local indexing, and more. Peppermint This is a relatively new text editor that brings advanced editing features at your fingertips: multiple cursors, autocompletion, snippets, advanced search and replace with Regex, incremental search, smart undo-redo, full-fledged CoffeeScript-powered console, and more. GNU Emacs This is a highly customizable text editor that works as an interpreter for Emacs Lisp at its core. However, its text editing extensions are enough to put this software on our list. It supports complete built-in documentation, content-sensitive editing modes, mail and news reader, project planner, and full Unicode support for nearly all human languages and their scripts. Aquamacs The powerful Emacs text editor does have a learning curve, which is rather frustrating for beginners. Aquamacs is a user-friendly version that acts as a modern Mac application. Most programmers prefer Aquamacs over Emacs, mainly because of the greater font selection, standard Mac shortcuts, Unicode support, spell-checking feature, and the dedicated manual. TextWrangler This is BBEdit’s little brother. Although it is built around the same core technology, it is appropriate for Mac users who are looking for a simpler text editing and transformation tool. TextWrangler is more of a general purpose text editor, which features powerful text transforming
and manipulating features, such as Perl-Compatible Regular Expression, comprehensive AppleScript support, text pattern matching, fast multi-file searching and replacing, and more. And it’s free! Brackets This is an open-source text editor that’s maintained by Adobe. It is a lightweight, but powerful program that gets new features and extensions every 3-4 weeks. As a developer, you have an idea of how you want the text editor to work, so you can accept the team’s challenge to hack on Brackets, write extensions, and help translate the software. Some of the most notable features of this text editor are Live Preview, Preprocessor Support, and Inline Editors. Textastic Textastic is based on simplicity, speed, versatility, and ease of use. It supports more than 80 source code and markup languages. You’ll certainly appreciate the support for modern Mac features (such as Auto Save and Versions). If you decide to replace your current text editor with Textastic, you can make a seamless transition thanks to its intuitive design and features. Espresso As a web designer and developer, you’ll certainly appreciate the speed you’ll gain thanks to Espresso. This text editor provides extensive language support, powerful smart snippets, and contextual completion. You will watch your web pages getting updated in real time with the Live Styling feature. Your workflow will be turbo-charged thanks to the distraction-free Zen environment of this editor. Komodo IDE This is a cross-platform IDE that supports all major languages, including HTML, JavaScript, Tcl, Python, Go, Perl, Ruby, and many more. The software is packed with the most awesome functionalities, such as markdown preview, the ability to track changes, collaboration features, skinning, version control, code intelligence, cross-platform function, and unit testing. Komodo Edit Komodo IDE is one of the most functional text editors you could use, but it costs almost $300. Komodo Edit is its free counterpart. Although it lacks some of the most attractive features of the paid version, Komodo Edit is still a very powerful text editor. Its functionalities include multi-language editor, multiple selections, track changes, markdown viewer, skins, minimap, and more. Smultron This is an impressive text editor that costs only $5. It supports multiple human languages, but it also supports syntax colors for over 110 code languages, commands, expressions, text folding, text snippets, line numbers, and much more. Fraise This is an open source text editor that’s based on Smultron. It’s very easy to use, so you’ll avoid all that frustration related to new features. It’s great for script editing, web programming, and simple writing activities. It doesn’t have rich formatting features, but it does enable you to do the work without much fuss. Do you have any other suggestions? Feel free to share! Prepared by Linda Craig, writing enthusiast and a professional editor at assignment writing service AssignmentMasters. Her passions are modern British Literature and digital education tools. Updated On June 2019: Fixed Broken links and updated minor typos.
0 notes
Text
Top 6 Tools For Web Design And Development In California
If you are a small business owner in California or a tech lover in Los Angeles, having the right tools for web design and development is key to standing out in the bustling Golden State market. At WordPress Contractor, we know the magic behind a stunning website isn’t just in the design but also in the tools you use. In this article, you will explore the six best tools that can help you make a successful web design and development in California.
1. WordPress
Speaking of WordPress in web design and development, the brand name is literally household and for a reason: versatile, user-friendly, and perfect for personal blogs and complex e-commerce sites. Trendy California is running trends in the blink of an eye and keeping you way ahead with WordPress, boasting thousands of themes and plugins that can give your site that personal touch with ease. And it's easy to update, so your content can stay fresh without requiring a technology degree.
2. Adobe XD
For the creative heartbeat of California, from LA to San Diego, most of the design for making interactive, beautiful websites is done with the help of Adobe XD. This is a powerful tool for the creation of prototypes and wireframes that literally bring your design ideas to life before you even begin to code. Having an intuitive interface along with robust collaboration features, Adobe XD helps to line up the design process and makes sure everyone on the team is on the same page.
3. Figma
Figma is another great web design and development tool that is quite popular among Californian tech enthusiasts. Its cloud-based platform allows multiple designers to work on the same project at the same time, sending files back and forth! Be it Silicon Valley or Orange County, through real-time collaboration, Figma will make it quite easy for you to create and share your web design ideas with your team, therefore speeding up the design process.
4. Sketch
If you are deep in the tech scene, then Sketch is one of the best options. Though Mac-only and a robust vector graphics editor, it's perfect for high-fidelity web design. Having a wide range of plugins available and a niche in UI design makes it very popular with web designers in hotbeds such as San Francisco. The Design Symbols and reusable components will help you keep projects consistent, organised, and clutter-free.
5. Visual Studio Code
The developers in California just love the flexibility of Visual Studio Code. From hundreds of supported programming languages to its extendable capacity in making any developer even more productive, this code editor is perfect for developers whether they are working on front-end design or back-end development, with debugging capability, integrated Git support within Visual Studio Code will be your go-to tool for coding clean and efficient websites.
6. Google Analytics
Google Analytics is a vital tool that helps to analyse the performance of your website and track customer behaviour. Having access to thorough analytics in the competitive California market can enhance your decision-making for content, design, and marketing strategies, thus aligning your website with your business objectives.
Conclusion
Exploring the various places in California can be just as exciting as developing into the world of Web Design and Development in california. By using the relevant tools, you can create a website that represents your brand and stands out in a competitive online market. It is essential to use tools such as WordPress, Adobe XD, Figma, and Visual Studio Code to develop a unique website. What are you waiting for? Just contact WordPress Contractor and get solutions for designing and developing your business website.
0 notes
Text
Anytype Review: Privacy Focused Alternative Of Notion

Managing tasks, projects, and work manually is difficult. You need a tool that gives you an advantage to manage your work and collaborate with others easily.
You need an all-in-one workspace app that can organize your work easily. Many such tools give these features.
One of the tools is Anytype, a privacy-focused all-in-one workspace app that manages your tasks, notes, wikis, projects, and everything you want to store.
Let’s look at any type of app and see the features, how much it costs, and other alternatives that might be good for you.
Subscribe to Productivity Side Newsletter to get useful productive hacks, tricks, and tips weekly.
What Is Anytype
Anytype is a privacy-focused all-in-one workspace and notetaking that organizes and stores your notes, tasks, projects, wikis, and files locally instead of the cloud.
The app gives you secure and decentralized sync ability with open-source code.
It stores on the local device with your on-device encryption to protect your privacy and data. Anytype is available for Mac, Linux, Windows, Android, and iOS. You can see their doc on how they keep your data safe.
youtube
Pricing
Anytype is free to use with no extra cost. If you host your data on your device, then Anytype is free to use.
For those who want a backup service, you can use Anytype for up to 1GB of storage free. After that, you can pay a certain fee. You can contact them to know the pricing.
Features Of Anytype
Here are some features of Anytype to know what they are offering and how you can use these to store your notes.
Block-based editor
Create workspaces
Take notes privately
Multiple views for projects and tasks
Different templates
Widgets
Graph and database view
There are many features in Anytype you can explore. When you will use the app it you will able to explore more features.
Alternatives Of Anytype
Anytype is surely a powerful tool with its promising features. But let’s look at some alternatives to Anytype to know more about tools like this.
Notion: Due to its many uses, including note-taking, project management, and collaboration, Notion has become incredibly popular. Users can build any type of tool using text, graphics, databases, and more thanks to its block-based structure.
Obsidian: Obsidian is a unique note-taking app that focuses on building a knowledge graph of interconnected ideas and notes. To develop a network of knowledge, it encourages users to establish connections between notes. The platform is well-known for supporting markdown, allowing backlinks, and enabling users to make personal wikis.
ClickUp: ClickUp is a productivity and project management app. There are many features, such as goal monitoring, task management, and document sharing make it powerful. ClickUp serves both individuals and teams looking for a central point for their work because of its collaboration features.
Mem AI: Mem AI is a powerful note-taking app with AI features in it. The software automatically analyses and categorizes notes using machine learning techniques, which helps users retrieve information quickly.
Supernotes: Supernotes’ card-based system offers an innovative way to take notes. Individual notes can be created on cards, which users can then join to create an ideal network. The platform offers an efficient note-taking experience because it is designed to be quick and easy to use.
Agenda Notes: With Agenda Notes, you can arrange your ideas and tasks in a timeline manner. Those who value an organized, time-based information structure may find this app useful.
Twos App: The Twos App offers a simple interface for managing tasks and taking notes quickly. Because it aims to remove distractions, the app is a compelling option for those who want a simple and uncomplicated user experience.
The needs of your projects or tasks, your workflow requirements, and your personal preferences all play a role in selecting the best productivity tool. Every Anytype alternative has advantages and disadvantages of its own, depending on the tastes of the user.
In Conclusion
Anytype is a powerful workspace and note-taking app.
It stands out in a competitive market of productivity tools with its privacy-focused on storing data locally, customization, and collaboration.
The final decision about a productivity platform, however, is based on use cases, and personal preferences.
Before committing to Anytype or any other productivity tool, it’s good to look at the requirements of your workflow.
Choosing an app to store your notes, projects, and ideas can help you improve productivity in both your personal and professional life.
Subscribe to Productivity Side Newsletter to get useful productive hacks, tricks, and tips weekly.
1 note
·
View note
Text
What is the best free code editor for mac

#What is the best free code editor for mac upgrade#
#What is the best free code editor for mac code#
#What is the best free code editor for mac download#
There are many text editors out there why should you spend your time learning about and using Atom?Įditors like Sublime and TextMate offer convenience but only limited extensibility. Keyboard shortcuts make everything smoother.Goto Anything (lightning-fast search/shortcuts).Once you get used to Sublime’s and sublime keyboard shortcuts, you can never leave without them. If you feel confident enough in their product that you’ll like it enough, then you can pay them to support continued development.
#What is the best free code editor for mac upgrade#
You have to deal with upgrade prompts as you open the editor occasionally, but you can use it as long as you wish to evaluate it. The sublime purchase price is $80, but they offer an indefinite, never-ending trial. One of the most significant features users flaunts the ridiculously intuitive keyboard shortcut system. This is because of features like distraction-free writing mode, quick shortcuts/search, split editing, and much more. The UX is probably the tightest of every entry on the list. Maybe the biggest draw is that it puts a premium on user experience.
#What is the best free code editor for mac code#
Sublime Text is a beautiful, feature-rich code editor. Being designed for code, markup, and prose is a big plus. Sublime Text is pretty close to the industry standard for text editors.
Linux (Ubuntu, Fedora, SUSE, Red Hat, and Debian in particular)īefore the release of the Visual Studio Code, I used to work with Sublime Text.
IntelliSense highlighting and autocomplete works like a dream.
It has specific Linux distros for Ubuntu, Fedora, SUSE, Red Hat, and Debian.
It is very lightweight in comparison to other, similarly robust editors.
It is compatible with nearly every programming language.
They have an extensive library of extensions and plugins.
It’s built-in Git (including merge conflicts, diff checking, and modified file tracking from within the editor).
You don’t have to fiddle with them to get them configured well. It works well from the moment you first run it, and the integrated Git and debugger work.
#What is the best free code editor for mac download#
VS Code works great on every platform we’ve tried it on, and there hasn’t been a noticeable difference in performance between the three, either.Įven though VS Code does have a ton of packages you can download to customize the code editor to whatever you want it to be, you don’t have to. If you are a Javascript or TypeScript developer, then VS Code is truly an exception editor. Their support is tremendous, and every month, they are releasing new features to keep up with the latest workflow. Written in Node.js and Electron, you can be sure the code will become outdated or lag behind any time soon. With the VS Code being open-source, that community works exceptionally hard to keep VS Code competitive with the rest of the field. The community support for the VS Code is incredibly passionate, and that works to everyone’s benefit. Not quite an IDE (that’s a separate product altogether), VS Code can take on most of the tasks of the IDE with the right configuration and plugin library. That means that developers on MacOS, Windows, and Linux can use this potent tool. Like most Microsoft products these days, VS Code is available on all the major platforms.
0 notes
Text
Adobe Photoshop Cs6 Crack For Mac/Window Cc
⭐ ⏩⏩⏩️ DOWNLOAD LINK 🔥🔥🔥 Although “Photoshop crack” is a very popular search today, it is one of the most dangerous and illegal ways to use Adobe Photoshop without paying for a. Adobe Photoshop (Version ) Crack With Serial Number With License Code This tutorial has you do it with Photoshop Elements, but the same process. Photoshop cc crack Mac can do everything from changing photographs and compositing to a mechanized gem, works out, and a graphical game-plan. Here's what I think you should know if you want to use Adobe Photoshop CC software for free or a “cracked version”. · Though in my experience, it's not safe to. Adobe Photoshop (Version ) Crack + Incl Product Key (Final ). * **Lightroom** provides a full-featured image management platform. Adobe Crack Photoshop Pre Activated Download Crack Free Full Version For PC Windows 11, 10 reimagine reality with photoshop. What's New In Adobe Photoshop Crack? Adobe Photoshop 23 Serial Number: Pros: Cons: System Requirements Of Adobe Photoshop Crack: Read More. Adobe Photoshop Crack Will assist Tens of millions of designers, photographers, and artists all over the world using adobe photoshop cc Crack to make the. photoshop crack download youtube. What's New In Adobe Photoshop Crack? Adobe Photoshop 23 Serial Number: Pros: Cons: System Requirements Of Adobe Photoshop Crack: Read More. Adobe Photoshop Crack Will assist Tens of millions of designers, photographers, and artists all over the world using adobe photoshop cc Crack to make the. Adobe Photoshop Crack is basically one of the famous software of the Adobe family. Importantly it is graphics designing software. #Adobe Photoshop Crack. Adobe Photoshop Full Version is the world's most powerful photo editing software that provides everything you need to create and edit. Photoshop CC represents a big step away from standalone software for Adobe, and is only available through a monthly or. Adobe Photoshop Crack Will help Millions of designers, photographers, and artists around the world use adobe photoshop cc Crack to make the impossible. Adobe Photoshop CC Crack is the world's best-known software with advanced editing tools for editing and creating images. Adobe Photoshop Crack is the best software. This is a raster graphics editor. Developed and published by Adobe Inc for Windows. Adobe Photoshop CC Crack Adobe recently unveiled the all new Photoshop CC short for Creative Cloud and unlike Photoshop Cc and physical. What can you do with Photoshop? Photoshop is more than graphic design and image editing software — it's what helps you turn your ideas into reality. Here are. photoshop crack download youtube.
Adobe Photoshop CC Crack With Serial Key [Latest]
Photoshop Crack Version: Is It Possible to Crack Photoshop?
Adobe Photoshop Cs6 Crack For Mac/Window Cc
Adobe Photoshop (Version ) Crack With Serial Number With License Code | Football Delhi
Adobe Photoshop Cs6 Crack For Mac/Window Cc
Adobe Photoshop CC v (x64) + Crack [Latest]
How to download photoshop cc crack version ?
Adobe Photoshop CC Crack Full Version Windows
Adobe Photoshop Crack Full Serial Keys [Latest] Updated
3 notes
·
View notes
Text

COMPREHENSIVE GIFFING TUTORIAL (vapoursynth + ps cc 2018) + some tips and tricks on color correction, blending and subtitles
You guys asked for it, so here we are! This is by no means the gold standard to giffing. Rather, this is simply my process and my own preferences. Take it as you will. Additionally since I use a mac some of my controls/panels may look different than what you would see for windows users.
DOWNLOADING YOUR SOURCE
This step is extremely important to the quality of your gifset. If you want high-quality gifs I would recommend giffing sources in 1080p whenever possible (especially if you’re going for larger dimensions). You may get away with 720p for smaller gifs. For kdramas, your go-to source would be dr*maday or torrents. (you can search my faq tag if you’d like to know specifics on finding and downloading torrents).
IMPORTING + PROCESSING YOUR FILES WITH VAPOURSYNTH (VS)
Please note that this tutorial does not cover basic installation and set-up of vs. If you would like to know how to download and set-up vapoursynth (it works for both mac and pc) along with some of it’s basics you can find more information at: https://hackmd.io/@nibreon/vapoursynth-book/%2F%40nibreon%2Fvapoursynth-book
Once you’ve identified what portion of your video you’d like to gif, simply drag your video file into VS. Specify the start time and duration of the clip you’d like to import. Typically you’ll be aiming for ~3-8 second clip depending on how big your gifs will be. I am very lazy when it comes to importing. The less of it I have to do, the better. Therefore, I often import clips that are 10-15 seconds long, sometimes even up to 20 seconds. I wouldn’t recommend going over 15 seconds most of the time though, because this will usually bring you over the 500 frames photoshop allows you to import at once. (when I do go over, I will sometimes import the processed VS file into PS in segments). You can also choose to import the VS output as segments if you want all your gifs on separate canvases. (I'll go into more detail on this later)
Once you’ve imported the clip into VS your screen should roughly look like this once the resizer pops up:
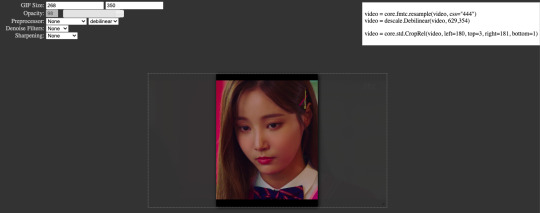
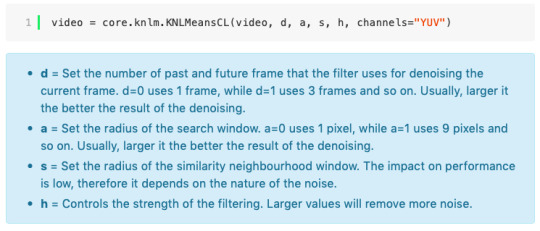
In the top left is where you will be applying your cropping, sharpening and denoising filters. Cropping: Keep in mind the Tumblr dimensions: 540px for full-width gifs and 268px for half size gifs, 177/178/177px for 3 gifs across. The height is completely up to your own preference. Usually I work in 540x300px. Once you edit those parameters you can drag/resize your video file to fit your new canvas. Sharpening + Denoising: You can choose to skip this if you would rather sharpen in ps. I personally do all my cropping, denoising and sharpening in vs. I use finesharp and KNML for sharpening and denoising respectively. Once you select those two filters from their drop down menus, be sure the select the checkbox as well. You should now notice 2 additional lines of code in the top right box. The line that reads: video = core.knlm.KNLMeansCL(video, 0, 6, 4, 1.2, channels="YUV") is where you will adjust your denoising parameters. You will only be adjusting those 4 numbers. I usually use: 0, 1, 0, 1.2. Now find the line that reads: video = hnw.FineSharp(video, sstr=0.22). These are your sharpening parameters. once again we’re only adjusting the number at the end. I typically use somewhere between 0.33-0.55. Depending on the quality of your source and preferences these parameters may change.
Here is a breakdown of the KNML parameters (source: @/nibreon HackMD):
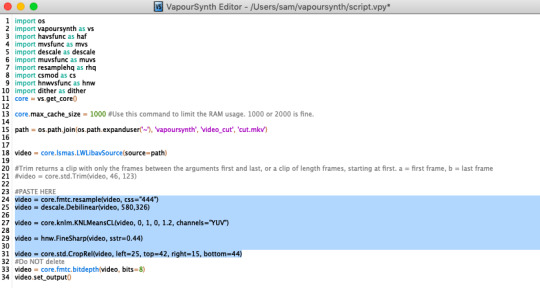
Once you have finalized your parameters, copy all the code in that top right box and paste it into your vapoursynth editor. Note: you can ‘inactivate’ certain lines of code by adding the # symbol at the start the line. That line of code will then be greyed-out. This is what your code should now look like (the highlighted section is the part I just copy and pasted):
If you would like to preview your filters and see if you need to make any adjustments, simply navigate to the top bar and select script > preview. If you like what you see, great! If not, you can adjust the parameters directly in the editor until you see a result you’re happy with. Once you’re happy you can move onto the final step in vs: processing.
Processing: Once again, navigate to the top bar and select script > encode video. Another window should pop up. Make sure you set ‘header’ to ‘Y4M’ then click ‘start’. Patiently wait for that to finish processing. The longer your clip is and the more filters you add, the longer it will take.
IMPORTING YOUR CLIP INTO PHOTOSHOP (PS)
Now you’re done with the vapoursynth section! Not too hard, right? I use the timeline method when I gif. To import your video file into ps navigate to file > import > video frames to layers. Here you can use the sliders to further specify what range you would like to import. Make sure the ‘make frame animation’ box is checked. To optimize smoothness of your gif, avoid checking the ‘limit to every _ frames’ box. Hit ‘OK’ and wait for the frames to import. Depending on the size of your clip, ps may notify you that you are importing a large file and it may take a long time to process, simply say ‘ok’ to this. UNLESS you get a message saying it will limit to 500 frames. This means your clips contained more than 500 frames and you should select a smaller section to avoid cutting out any critical parts. (Note: you can always go back and repeat this process to select a smaller range of frames from the same video clip until you’ve imported all the frames you need).
Timing: You can adjust the timing of your gifs before converting to timeline. Select all the frames (Navigate to the icon with the 4 bars at the bottom right of you screen. Select “select all frames”). Click the drop down next to the timing of any of the frames. Select ‘other’ and input a your preferred timing. I personally use ‘0.04′ but I've seen people use anywhere from 0.4-0.8ms. Also as a note: when you convert your gif to timeline it has a tendency to mess up your timing so even if you input 0.04 or 0.05 it won’t actually be that timing later. If you want the true frame rate you can set your timing right before saving. You can also adjust timing at the end. (see export/saving gif section for more info)
Now the next part can be tedious and for that reason I’ve created numerous actions to speed up this process. But for the sake of this tutorial I will walk you through the steps. At the bottom of your screen is your timeline. As you can see, it defaults to frames, but we want to convert this into a smart object so that all your coloring/edits are made to all of the layers. To do this: 1) Navigate to the icon with the 4 bars at the bottom right of you screen. Select “select all frames” 2) Now select all your layers in your layer panel. On mac you can use cmd + option + A as a shortcut. 3) Back to the icon with the 4 bars, select “convert to video timeline” 4) Right click on all layers (which should still all be selected) and find “convert to smart object”
(Aside: Actions) actions are SUPER helpful to streamlining your giffing process. you can find actions people have made available on resource blogs like itsphotoshop OR you can choose to make your own custom actions. To do this, all you need to do is locate your action panel. Then from the controls at the bottom of the panel select the one that looks like a sheet of paper to “create a new action” Once you’ve named it and hit ‘ok’ the record icon should now be red. PS will now basically ‘record’ whatever you do. To stop recording hit the square icon. Now whenever you want ps to execute the same set of steps you just did, you can locate the action you just made and ‘play’ it by selecting the triangle icon. I highly recommend making an action for the steps I just outlined above to convert your gif into a smart object timeline. It will make your process much faster and more painless.
COLORING
Now the fun part! I focus on emphasizing the colors already present in the video source or getting rid of some less-than desirable overtones when I color. It gives the gif a natural look, but makes everything pop a little more. We will be working with selective color, curves, levels, and brightness/contrast mostly. This is the original gif I will be using to demonstrate coloring:

Curves: I always start with curves. The first curve layer I use to set a desirable black point. To do this, locate the top dropper icon from the curves panel and select the darkest point of your image. This will set that section to “true black” Feel free to play around with this until you find a desirable outcome. Now add another curves layer. This one we will be using to adjust the brightness/contrast. First, I always start off with ‘auto’ and see where that takes me. If you like the outcome, great! If you don’t play around with the different curve points until you get an outcome you like.

Selective Color: This adjustment layer will be your best friend. For me, I will typically work with reds, yellows, and black. If the source has a lot of blue/cyan I will use those too. Basically look at your source and determine which base colors you’d like to emphasize/alter. For blacks I usually up the black by +1-5 depending on the source. For reds, it also depends on the source. But I will typically either decrease cyan (to make red stand out more) or increase cyan (to make the red not look so overexposed). You want to be careful here. Overexposing the red can make your skin tones look like red tomatoes! And for my content base, where most of the actors are of asian descent, we should be emphasizing the yellows and NOT the reds (see aside on color correction + skin tones for more info). After altering the reds to my liking, I do the same process for the yellows. To bring back natural skin tones and color, you will likely want to darken the yellows, expose them a bit more and maybe even up the yellow slider. A common rule of thumb: if you want to make any of the colors less exposed, increase the cyan. If you want to increase exposure on any of the colors, decrease the cyan. If you want a color to appear more strongly or prominently, increase the black. The magentas and yellows I use more to adjust hues. You can add multiple selective color layers to further emphasize your changes.

Levels: Now we will work on the lighting some more. This creates more contrast and depth to your gif, often making them look ‘crisper’ To emphasize the bright parts, move the right-hand slider to the left. The emphasize the dark parts, move the left-hand slider to the right. You may also choose to move the middle slider to adjust more neutral lighting. Do so until you find a setting to your liking.

Miscellaneous: Depending on your gif you may need to play with other adjustment layers. Some other ones I often use are the brightness/contrast and exposure to adjust lighting and add more dimension to the gif. For additional color correction I use color balance and to a lesser extent hue/saturation and vibrance.
(Aside: Color correction + skin tones): We are anti-whitewashing and anti-redwashing when it comes to asian media. Like I mentioned earlier, natural asian skin tones have yellow undertones, not red/pink. Therefore when you’re bringing in color you should be mindful of this delicate balance. Adding more red does NOT equal un-whiteashing. Be VERY careful how you balance the yellows with selective color/hues/color balance.

^^ Here is an example of what I mean by overexposing the reds. Poor seungho is looking as sunburnt as a cherry tomato. Note: if your original source is already overexposed with red, fix it! You can do this by applying the same basic principles I explained earlier. Try upping the cyan on the reds in selective color, or shifting the color balance to favor cyan over red with the color balance adjustment layer. You may also choose to favor the yellow over blue.
^^ Now this is straight-up whitewashing. This is what happens when you are not careful with your correction of yellow. I’m not saying you can’t touch the yellow slider or get rid of some yellow form the overall image (because sometimes it is very much needed), but you should be very mindful how your corrections can affect skin tones. If you decide to decrease saturation of yellows, or decrease yellow in the selective color section of the reds, do so with caution. If your reds are looking too pink, add some yellow in the red selective color, up the yellow and black of the yellow selective color.

^^ If you hit that happy medium, you can emphasize the natural skin tones without overexposure. Here the underlying tones are very much still in the yellow range.
(Aside: Blending): I will very briefly talk about how to blend two gifs together. First make sure you’ve imported both your gifs into ps and converted them into the timeline format. On one of the gifs, right click the gif layer in the layer panel > duplicate layer > select the canvas of the gif you’d like to blend the gif with. On the canvas you just copied your second gif to, you can now drag the two layers around the on the canvas to get your desired positioning. On the top gif apply a layer mask. This can be found in your layers panel at the bottom, and is indicated by the white rectangle with the circle. Next, make sure you select the mask in the layer panel (it will show up as a white rectangle on the layer you applied the mask). Grab your paintbrush tool and make sure your color is set to black. Now you can effectively ‘erase’ the part of the top gif you don’t want to show anymore. I recommend setting your brush hardness to 0% to get a smoother transition. You can also play with the opacity settings. If you want to add back in a part you erased, just switch to a white paintbrush and you will be able to undo what you had just ‘erased’ with the black. When you merge the gifs, they will play the same number of frames. This means your blended gif length is limited by the gif with the fewer number of frames. You can move around your timeline layer and shorten the included portion by dragging either end of the timeline layer in until you get both gifs to play the parts you want.

CAPTIONS/SUBTITLES
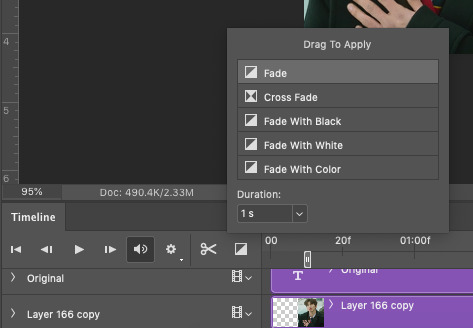
I often get asked about my subtitle font/styling settings. Personally I find the best fonts for subtitles are calibri and arial. I use calibri with the following settings: 12-14px, bold italic plus faux bold, 1px black stroke (optional: drop shadow set to ‘multiply’ at around 85% opacity), and tracking (VA) set to 75. If you would like your subtitles to fade-in or fade-out you can apply the ‘fade effect’. Locate the b/w square icon in your timeline panel. Select fade and drag it onto your text layer in your timeline. You can then right click on the wedge shape to adjust your fade duration. I usually use 0.35s. If you drag and drop the effect towards the beginning of your text you can get the fade-in effect. To get the fade-out, simply drag and drop your fade towards the end of your text layer.
SAVING/EXPORTING YOUR GIF
We’ve reached the final stretch! If you need to adjust your frame rate timing: you will need to revert your timeline to frames. To do this: 1) Navigate to the icon of 4 bars at the right of your timeline panel. Select convert frames > flatten frames into clips. 2) Navigate to the icon of 4 bars at the right of your timeline panel. Select convert frames > convert to frame animation > when promoted hit ’ok’. If at this point you see more than one frame in your timeline panel, delete the frames until only one is left. In the example below I would delete the first frame by hitting the trash icon from the timeline panel.

If there is only one frame, leave it as is. 3) Navigate to the icon of 4 bars at the right of your timeline panel. Select ‘make frames from layers’ You will most likely need to delete the first frame in your timeline panel (it won’t have your coloring). Sometimes ps adds in some ‘blank’ frames as well, delete those too. Now you can adjust your timing.
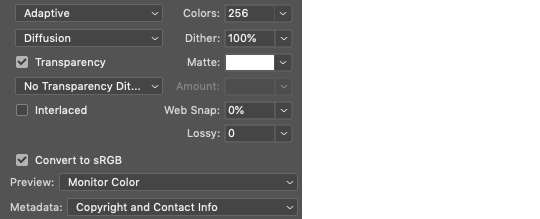
Once your timing is set: When you’re saving your gif, just keep in mind it must be under 10mb. Navigate to file > export > save for web. When it comes to your save settings I typically use either selective diffusion or adaptive diffusion. I also also occasionally use adaptive pattern (I find this is best for dark scenes without a lot of contrast). Set colors to 256, quality to bicubic and looping options to forever. If you want to preview your gif, hit the preview button in the bottom left. Otherwise, go ahead a hit ‘save’ and you’re DONE!

ADDITIONAL RESOURCES
Feel free to check out my ‘ps things’ tag for more photoshop stuff/mini tutorials. Additionally @/nibreon and the hackmd site I linked previously are your best resources for vs questions. If you would like to see my giffing process in motion feel free to check out this video. It’s sped up but you can slow down the playback. Additionally be sure to check out resource blogs like itsphotoshop for more helpful tutorials and resources.
If you reached the end of this beast, kudos to you! I hope this helps and never be afraid to reach out with any questions.
549 notes
·
View notes
Text
What's the best way to start for a programming newbie? Are Python/Django the best?
Although I think Python is a better overall language, if you just want to slap a utilitarian web interface on some backend code for internal use then PHP might be a better language to learn. It's easier to setup on the server, will run on virtually any host, and is a more out of the box solution.
As for Python/Django:
If you have never programmed before, it's definitely worth learning Python before you get to Django. Someone with experience could skip to a Django book/tutorial and pickup Python on the way - it's a simple language with very clear, easy to read and understand code.
How long it takes you to learn what you need to know is highly variable. If you are just trying to write some automation scripts to help cut down some manual labor, then you can probably go from zero to this point in a few weeks (maybe 20-30 hours). If you want to write production quality web apps using Python/Django, it's going to take longer.
Setup The Environment
First download Python if you don't have it. http://www.python.org/getit/ I prefer Linux, but your MacBook will be more than sufficient as a dev machine.
Python is in a state of limbo between the 2.7 release version and 3. While 3 is the future, it introduces some intrinsic changes which many of the popular libraries do not yet support, Django included. Your best bet is to start with 2.7 and switch to Python 3 later. Also, most of the learning material available is still written for Python 2.
You can write code in any text editor. My favorite, and an up-and-coming basic code editor is Sublime Text. It is simple, elegant, and very functional. http://www.sublimetext.com/ It costs $59, but you can use it free for an unlimited amount of time (as of right now). Well worth buying though.
Many Mac developers love and swear by TextMate. It's more developed and further along than Sublime, I think. Costs $54, and has a 30-day trial.
If you get deeper into programming and want a full featured integrated development environment (IDE), then PyCharm is top notch. http://www.jetbrains.com/pycharm/ It costs $99 and has a yearly renewal fee for updates, but is worth it. Something like this has a much steeper learning curve than Sublime Text or TextMate, but they can save you time and keystrokes in the long run.
I'm going to assume you are familiar with working in the terminal, since you have IT experience. If not, this might be a good starting point: http://smokingapples.com/software/tutorials/mac-terminal-tips/
Django apps can be run entirely on your own dev machine, but if you want to put it on the web to be accessed by others on your team, or from other machines you will need a host. There are some good questions on Quora about hosts, but ensure you choose one that allows Python and SSH access. I recommend finding a cheap Virtual Private Server (VPS), although this might be too steep a learning curve for someone without experience. (You say you've done a lot in the IT field, so some of this might be too basic for you, sorry).
I recommend learning and using Source Control. This helps manage your code revisions, and is particularly useful if you have more than one person working on it. I personally use Mercurial, but Git is more popular.
http://hginit.com/ is a good intro guide for Mercurial. http://learn.github.com/p/intro.html looks to be good for Git, but I haven't worked through it yet.
In addition to using Source Control, you'll need a source code repository (you'll learn what this means in one of those tutorials. GitHub (http://www.github.com) is the most popular, with BitBucket (http://www.bitbucket.org) coming in second. You can use Git on either, but GitHub does not support Mercurial. Also, BB has better options for free accounts - unlimited free repos, whereas GitHub limits you.
You might feel overwhelmed trying to learn how to program Python, learning Django, and trying to figure out source control and a myriad of tools all at once. In my opinion it's best to get down a version control workflow early on, rather than putting it off. You'll develop good habits early on that will help you down the stretch.
Where to Learn There are a ton of resources for learning Python, and quite a few for Django. Be sure that whatever you choose, you go with resources that consistently use either Python 2 or 3. Also, stay away from small tutorials and stick with complete references. Learning from piecemeal tutorials will leave you with fragmented knowledge, and they are usually lower quality.
Here is a list of references taken from another Quora question. The key to learning how to program, in my opinion, is to practice a lot. So do the exercises these books contain, and do more programming on your own.
Online Tutorials & Ebooks All free
Recommended: http://www.diveintopython.net/ http://docs.python.org/tutorial/ http://swaroopch.com/notes/Python http://homepage.mac.com/s_lott/books/python/html/index.html Recommended: http://greenteapress.com/thinkpython/thinkpython.html (A higher level look at programming with Python as the tool; highly recommended if you want to be a good programmer) http://python.net/~goodger/projects/pycon/2007/idiomatic/handout.html http://learnpythonthehardway.com/
Videos
http://code.google.com/edu/languages/google-python-class/ http://www.youtube.com/user/thenewboston#g/c/EA1FEF17E1E5C0DA Recommended: http://ocw.mit.edu/courses/electrical-engineering-and-computer-science/6-00-introduction-to-computer-science-and-programming-fall-2008/video-lectures (A higher level look at programming with Python as the tool; highly recommended if you want to be a good programmer)
Books Sometimes having a physical book makes it easier for some people to learn. Many of the above ebooks are available in hard copy.
Dive Into Python Think Python Learn Python the Hard Way A Byte of Python
How do I learn Python?
All of those are Python references. The online material available for Django is more sparse, but there are some good resources.
The Django Book is the starting point for most people: http://www.djangobook.com/
There is, of course, the official tutorial: https://docs.djangoproject.com/en/dev/intro/tutorial01/ I found Django Book more useful. However, get very familiar with the Django docs. They are very good, and you will be spending a lot of time digging into them.
This is a highly recommended hardcopy book for learning, but I've not used it: https://www.packtpub.com/django-1-0-website-development-2nd-edition/book
Prefer video? This series ought to be very good: http://teamtreehouse.com/library/archive/django I have not tried it yet either. There is a $25/mo fee for their service
Getting Assistance Inevitably, when you are learning or attempting to build something, you're going to run into a brick wall at some point.
This is my workflow if I get stuck on a concept, or while programming: Check the Documentation -> Check the Source Code -> Search Google -> Ask on StackOverflow
Asking is always a last resort, quite simply because figuring it out on my own gives more of a sense of pride and accomplishment, and I'm more likely to remember the solution.
Python Docs: http://docs.python.org/ Django Docs: https://docs.djangoproject.com/en/1.3/
#django tutorial#django interview questions#django rest framework#django documentation#django imdb#django python#django framework#django projects#django newbie for#django newbies#django tutorial for beginners#django tutorial javatpoint#django tutorial pdf#django tutorial w3schools#django tutorial geeksforgeeks#django tutorial python#django tutorial for beginners pdf#django tutorial in hindi#django tutorial udemy
5 notes
·
View notes
Text
A little free write...
George and Nick break up. Ned sells The Claw back to George and opens a vintage auto restoration and “specialty repairs” shop. He buys a craftsman mansion near downtown and turns it into a boy's home.
With seed money from Nick and Ryan, George opens a cafe, a pizza parlor and buys Johnny Mac's bar (re-naming it Buddy's) in addition to the Claw. Her sister’s help run what will become their family’s burgeoning hospitality empire. There is tension between George and Jesse who isn't interested in business and wants to go to the JC in hopes of becoming a marine biologist. George buys the Breaker Hotel later in her life. All of her establishments are notoriously (and conveniently) "haunted". Trip advisor stickers on the door and mentions on lonely planet-all the things. George becomes a rags to riches business marketing wonderkind about town. George struggles to be taken seriously by the old money investors and conservative business owners she must rub elbows with now. In the end she'll expand to Boston and NY and get into real estate and have enough money to throw in all their faces for the rest of time just like Nick whom she may reconnect with at some point.
Ryan struggles with alcoholism again, gets a DUI and enters rehab where he becomes interested in art. He gets involved in collecting and patronizing and when he falls in love with an artist he is inspired to become the Cathrine the Great of Horseshoe Bay: investing in culture, the arts and championing the environment and the education of young women in particular. He gets his pilots license and flying in his vintage plane (restored by Nick of course) becomes a favorite hobby of his. He turns the Lilac Inn into the local girl's home. He opens what becomes a renowned museum in honor of the the forgotten historical figures of New England in Boston. With the help of Carson he lobbies NYU to create a journalism scholarship in Lucy’s name. He dies before he turns 60 in a landing accident while returning from a half hour flight he took to observe the bay on a particularly nice day.
Bess acquires a student visa by becoming a cosmetology student at the local JC but doesn’t fit in and becomes an “illegal” resident again when she drops out of beauty school. She’s a part time secretary for Nick and waitress at the claw again. She bungles Nick’s flow and he has to let her go at which point she finds a job in a bookshop after bonding with the manager over a mutual love of AJ Crane novels. She hones an affinity and strong sales numbers for the antique/rare book section and she uses her Newley sharpened expert eye to forge her papers all while angling for an apprenticeship with the mysterious owner which will allow her to begin building clientele amongst the wealthy collectors of Horseshoe Bay and get out of the counterfeit game she's been running on the side to get by. She fully embraces the dark-intellectual trope and pursues her PHD. at a historic, prestigious and secretive private school in Horseshoe Bay. She buys a dope ass queen-anne with a turret that she restores and lives in. She eventually becomes an art dealer (specializing in "rare objects" of course), chief buyer for the Hudson family trust and patron of the historical society. After her eventual death at a ripe old age she gets a statue in her likeness, her house becomes a historic landmark and she becomes a legend in horseshoe bay for being it’s favorite Rich Auntie Supreme. Rumor has it her spirit still walks the town. Local legend says if you happen to see her ghost it’s an omen of good luck to come.
Nancy and Ace briefly open their own PI detective agency in Nick's building downtown. They begin to build a respectable reputation despite their youth. They assist Horseshoe Bay PD on "strange" cases, accept work from the town’s folk, and PI work from Carson. Nancy gets into Columbia and makes the tough choice to leave town for her education. Grant moves in to fill her place at the agency. Things go well for a while but end up sideways when Ace suffers from an opioid addiction. Grant does his best to cover his brother’s tracks for a while but Nancy briefly must return from Columbia at his panicked behest to help him track down Ace when he goes missing on New Years Eve. After a short stint in a detox center Ace decides to join the army on a whim without consulting anybody. He becomes a field medic first and an Army Ranger after that.
With the PI agency dissolved Grant joins the NYPD police academy (like his father *winkwinkwink*) after Ace goes to bootcamp and begins pursuing an advanced degree studying criminal psychology at NYU in hopes of someday working for the FBI as a profiler. He naturally joins the nypd and becomes a rising star in his precinct. He and Nancy develop a close friendship while both living as students in the city and bond over their concern for Ace. Frant often lends her an assist, a quote, a clue or feeds her information for her stories.
Nancy shows up in the city at Columbia quickly becomes the darling of the journalism school and lands an internship at the school paper but after a promising freshman year is kicked out for breaking the school’s code of ethics whilst pursuing evidence that a cult is running a human trafficking ring fronting as a powerful and infamous secret society on campus that has been laundering it's profits through a fraternity's alumni donations by blackmailing a member of their executive board. After her expulsion she continues to pursue the story with encouragement from her friends and family (in particular from Ace whom she maintains regular contact with via WRITTEN letters before he joins RRC. It’s romantic af but everything remains plutonic on the surface as is cannon, of course) She publishes the story online. It goes viral and she's able to enter the workforce as a freelancer without her degree. She takes all kinds of assignments and has become celebrated for her thought pieces on buzzfeed, bellingcat, jezebel etc... but her bread and butter is working the crime beat in NYC.
Her sudden notoriety and reputation for being young, talented, and tenacious mean her colleagues are intimidated by her brilliance and they make her work especially hard for their respect. Despite her commercial success she's a loner and mostly isolated in the field. She's thrilled when Bess shows up to the city looking to lay low for a while after the death of her mentor and burning some bridges in order to get out of the forgery game. She finds that she fits into city life and likes being close with Nancy and Grant after Ace's departure and George and Nick's breakup. She decides to move and she and Nancy become roommates. Bess gets a job as a bartender at Nancy’s favorite spot (a real dime store detective novel dive bar that's open in the middle of the day with low light and brick walls; maybe live music on the weekends but no marble countertops and tapas and shit) while attending Hunter college for her degree in cultural anthropology. Nancy eventually writes a true crime novel that becomes an infamous cult classic based on her experience uncovering her mother's murder and another based on her experiences with Gomber.
Bess’ graduation coincides with Ace’s homecoming and Ryan’s wedding to a renowned local artist. The crew returns to Horseshoe Bay for a couple of weeks before the ceremony for the subsequent reunions/celebrations. While in town, the disappearance of a local girl proves to be the work of a serial killer when her body along with another girl's are found stuffed in a tree in the Gorham Woods. Nancy is hesitant to run down the story even at the behest of her editor’s pleas but decides to stay and investigate at George’s request when an arsonist burns down The Claw the night of Ryan’s reception.
#nancydrew#nancydrewcw#nancy drew fanfiction#acehardy#nancydrewedits#inncorrectnancydrew#ndcw#fanfiction#nace#Bess Marvin#ned nickerson#jancy#nace fanfiction#nancy drew spoilers
8 notes
·
View notes
Text

Why I bought a 2015 MacBook Pro in November 2021
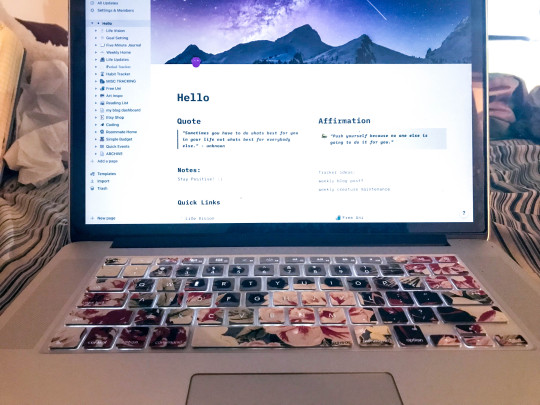
Years back I used to do a lot of graphic design work and had started getting into a bit of coding. Since then, I have abandoned my passions for lack of time and drive. I lost the motivation I had for bettering myself and advancing my skills. Now, for the past year or so, I've been seeing so many people popping up online. Talking about how they launched their careers and broken free of their 9-5 to work from their laptops. So I made the jump. I went out on a mission. I hunted for the best MacBook Pro I could find for about $500 give or take (whatever I could afford to spend on a new laptop).
So, I went out and got a 2015 15.4" MacBook Pro with a quad-core i7 processor 2.5GHz with turbo to 3.7GHz, it also has 16gb of ram and 256 GB of storage. The extra cool part about this model? This is the last model with the extra ports available in the body of the Mac, the storage and ram is also replaceable as well. I ordered it in fair condition off of BlackMarket.com and was not disappointed.
Now, this MacBook is about 6 years old. Within the first 2 days of using it I was able to download 2 IDEs (Visual Studio and Eclipse), a text editor (Atom), along with the entire Adobe suite. How does it run? Beautifully! No hiccups, no issues, runs better than my old laptop did. MacBook Pros are definitely high-end premium machines, they are streamlined for graphic designers and software developers. What I'm trying to prove is that you don't need the latest and greatest to get started. The MacBook Pro with the M1 chip is running at $1,999 for the 16gb ram and 512 GB storage option. $2000 is far more than most people, starting out, can really afford to spend on a laptop. By getting an older model, I was able to get myself a machine with high-end capabilities and processors. Without selling my soul in the process.
I'm making this article to give people hope that there is a way to start following your dreams without going into debt. Sometimes life is unpredictable. When you see opportunities, sometimes, you have to drop everything and chase them. When you look back, they might be gone, in a blink of an eye. To be completely honest with you, I had been thinking about getting myself a new PC for the past few months. When I actually bought my MacBook, it was more of a spur of the moment decision. I decided on the make and model information and found the listing and ordered, all within about 24 hours. I knew if I waited, I would talk myself out of it.
I started here, so I could have the small possibility of something better. Yet, still at the same time have the ability to make something I'm going to be proud of and enjoy making. If I'm successful, someone will read this and see my journey, and it will help them someday to make the same leap.
Link to the exact MacBook Pro I purchased from Black Market.
https://www.backmarket.com/tested-and-certified-used-macbook-pro-retina-154-inch-2015-core-i7-16gb-ssd-256-gb/109319.html#l=12
I honestly purchased mine in fair condition and would do so again because there was little to nothing wrong with it and the price difference is significant. The only thing "wrong" was there was a little bit worn off of some of my keys but thats not even noticeable with my keyboard cover.
#macbook#apple#applepencil#apple macbook#macbook pro 2021#m1 pro#m1#m1 macb#2015 macbook pro#2015 macbook in 2021#best decision of my life#best decision ever#2021#old tech#macbook pro review#tech review#apple review#old macbook pro#vs#comparison#comparison post#review post#review#tech#graphic design#new computer#new macbook pro
2 notes
·
View notes
Text
Free Html Editor For Macs
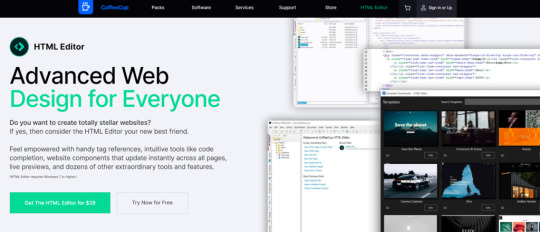
Some of the best HTML editors for Mac OS X are free or available as an evaluation version with no enforced time limit. Sublime Text (the latter) is extremely fast and can be customized without much fiddling. I use Sublime Text 2 as well. However, Brackets also seems to be very interesting. A test will show how good it actually is. HTML5 EDITOR as the name depict is a tool for editing the HTML5 and is developed by SILEX LABS, which is essentially an open source community. The tool is offered freely and enable users to design web pages or even entire websites using interfaces that are easy to use. CoffeeCup – Free edition. Code enthusiasts will enjoy our Free Editor. Though we would be thrilled if you would get the paid version! To show you how cool it is, you’ll get to sample all the power-packed features offered in the premium version for the first 21 days. Get The HTML Editor for $29. Download our Free HTML Editor. Sublime Text is a free HTML text editor for Windows, Mac, and Linux. Advanced functionality, such as a proprietary command palette and syntax highlighting, are included in this cross-platform tool. The editor is mighty and promises excellent results. It has a simple, clutter-free interface that makes it easier to concentrate on your code. Free Html Editor For Mac free download - HTML Editor, CoffeeCup HTML Editor, Sothink HTML Editor, and many more programs.
Free Html Editor For Macs Free
Free Wysiwyg Html Editor For Mac
Html Editor For Mac
Best Html Editors For Mac
Free Html Editor For Mac
Teletype for Atom
Great things happen when developers work together—from teaching and sharing knowledge to building better software. Teletype for Atom makes collaborating on code just as easy as it is to code alone, right from your editor.
Share your workspace and edit code together in real time. To start collaborating, open Teletype in Atom and install the package.
Free Html Editor For Macs Free
GitHub for Atom
A text editor is at the core of a developer’s toolbox, but it doesn't usually work alone. Work with Git and GitHub directly from Atom with the GitHub package.
Create new branches, stage and commit, push and pull, resolve merge conflicts, view pull requests and more—all from within your editor. The GitHub package is already bundled with Atom, so you're ready to go!
Everything you would expect
Cross-platform editing
Atom works across operating systems. Use it on OS X, Windows, or Linux.
Built-in package manager

Search for and install new packages or create your own right from Atom.
Smart autocompletion
Atom helps you write code faster with a smart and flexible autocomplete.
File system browser
Free Wysiwyg Html Editor For Mac
Easily browse and open a single file, a whole project, or multiple projects in one window.
Multiple panes
Split your Atom interface into multiple panes to compare and edit code across files.
Find and replace
Find, preview, and replace text as you type in a file or across all your projects.
Make it your editor
Packages
Choose from thousands of open source packages that add new features and functionality to Atom, or build a package from scratch and publish it for everyone else to use.
Html Editor For Mac
Themes
Atom comes pre-installed with four UI and eight syntax themes in both dark and light colors. Can't find what you're looking for? Install themes created by the Atom community or create your own.
Customization
It's easy to customize and style Atom. Tweak the look and feel of your UI with CSS/Less, and add major features with HTML and JavaScript.
Best Html Editors For Mac
See how to set up Atom
Under the hood
Atom is a desktop application built with HTML, JavaScript, CSS, and Node.js integration. It runs on Electron, a framework for building cross platform apps using web technologies.
Open source
Atom is open source. Be part of the Atom community or help improve your favorite text editor.
Keep in touch
GitHubgithub.com/atomTwitter@AtomEditorDiscussionsGithub DiscussionsStuffAtom GearRSS FeedPackages & Themes
Free Html Editor For Mac
Free Download! Never Expires!
PageBreeze Free HTML Editor is an award-winning HTML Editor which has bothvisual (WYSIWYG) and HTML tag/source modes. PageBreeze Free HTML Editor's design emphasizes simplicity and ease-of-use. You'll find that you'll be creating great looking websites almost instantly--with virtually no learning curve!
PageBreeze Free HTML Editor is a completely free download for personal use and will never expire. Get your free copy now(approx. 8 MB). Version 5.0 is now available!
Images of Xiao © Didade.com, 2013.
A full-featured but easy to use visual (WYSIWYG) HTML editor for creating web pages.
Version 5.0 has a completely updated editor with many new features and support for the latest HTML standards.
Our freeware visual editor is actually powered by Microsoft Internet Explorer. So you can always be sure you are seeing exactly what you will get.
Color-coded HTML source (tag) editor. You can switch between HTML source and visual modes at any time with a click of the mouse, and any changes you have made will instantly be reflected in both modes.
Preview mode lets you instantly see what your finished web page will look like in Microsoft Internet Explorer.
Included webpage templates and direct access to hundreds of free website templates to give you a fast start on creating a great looking site.
Point and click form building tools make it fast and easy to create powerful web forms.
Built-in integration with our form processing service, so you can make your web forms work almost instantly with no programming, scripts, or technical knowledge required.
Built-in in integration with our web knowledgebase, so you can easily add a 24x7 customer service system that will answer your customers' questions instantly.
System Requirements
Any 32- or 64-bit version of Microsoft Windows
Microsoft Internet Explorer 7.0 or later must be installed; however, IE does not need to be your default browser.
License and Distribution of PageBreeze Free HTML Editor
PageBreeze Free HTML Editor is completely free for personal, not-for-profit, or educational use. There no nag screens, no required registration, and the software will never expire . If you use PageBreeze in your job, or in a for-profit business for non-evaluation purposes, you must obtain an inexpensive license for PageBreeze Professional , which includesmany more advanced features.
You may distribute the PageBreeze Free HTML Editor installation file in any way you wish, as long as you make no modifications to it. You are welcome to give PageBreeze to your customers or include it with other products (for example, a web hosting account), as long as you do not sell the software separately.
Get your PageBreeze Free HTML Editor Now!
Download size is about 8 MB.
PageBreeze is a product from FormBreeze.com -- a leading provider of web form processing services.
Other Information for Web Developers:
Free HTML Editor
1 note
·
View note
Text
Top 6 Tools For Web Design And Development In California
If you are a small business owner in California or a tech lover in Los Angeles, having the right tools for web design and development is key to standing out in the bustling Golden State market. At WordPress Contractor, we know the magic behind a stunning website isn’t just in the design but also in the tools you use. In this article, you will explore the six best tools that can help you make a successful web design and development in California.
1. WordPress
Speaking of WordPress in web design and development, the brand name is literally household and for a reason: versatile, user-friendly, and perfect for personal blogs and complex e-commerce sites. Trendy California is running trends in the blink of an eye and keeping you way ahead with WordPress, boasting thousands of themes and plugins that can give your site that personal touch with ease. And it's easy to update, so your content can stay fresh without requiring a technology degree.
2. Adobe XD
For the creative heartbeat of California, from LA to San Diego, most of the design for making interactive, beautiful websites is done with the help of Adobe XD. This is a powerful tool for the creation of prototypes and wireframes that literally bring your design ideas to life before you even begin to code. Having an intuitive interface along with robust collaboration features, Adobe XD helps to line up the design process and makes sure everyone on the team is on the same page.
3. Figma
Figma is another great web design and development tool that is quite popular among Californian tech enthusiasts. Its cloud-based platform allows multiple designers to work on the same project at the same time, sending files back and forth! Be it Silicon Valley or Orange County, through real-time collaboration, Figma will make it quite easy for you to create and share your web design ideas with your team, therefore speeding up the design process.
4. Sketch
If you are deep in the tech scene, then Sketch is one of the best options. Though Mac-only and a robust vector graphics editor, it's perfect for high-fidelity web design. Having a wide range of plugins available and a niche in UI design makes it very popular with web designers in hotbeds such as San Francisco. The Design Symbols and reusable components will help you keep projects consistent, organised, and clutter-free.
5. Visual Studio Code
The developers in California just love the flexibility of Visual Studio Code. From hundreds of supported programming languages to its extendable capacity in making any developer even more productive, this code editor is perfect for developers whether they are working on front-end design or back-end development, with debugging capability, integrated Git support within Visual Studio Code will be your go-to tool for coding clean and efficient websites.
6. Google Analytics
Google Analytics is a vital tool that helps to analyse the performance of your website and track customer behaviour. Having access to thorough analytics in the competitive California market can enhance your decision-making for content, design, and marketing strategies, thus aligning your website with your business objectives.
Conclusion
Exploring the various places in California can be just as exciting as developing into the world of Web Design and Development in california. By using the relevant tools, you can create a website that represents your brand and stands out in a competitive online market. It is essential to use tools such as WordPress, Adobe XD, Figma, and Visual Studio Code to develop a unique website. What are you waiting for? Just contact WordPress Contractor and get solutions for designing and developing your business website.
1 note
·
View note
Text
Bittorrent Mac

Pro Tools 2020.11 Crack for MAC + Windows is Here (Latest)
Bittorrent Mac Update
Bittorrent Mac Catalina
Bittorrent Mac Update
Pro Tools 2020.11 Crack can create, record, mix music and sounds. It has a very simple front which ensures the ease of using this tool in a very useful manner. More music and audio pros use Pro Tools first. than any other digital audio workstation to help them compose, record, edit, and mix music or audio for post-production. Whether you’re a seasoned pro or getting started. open yourself to the possibilities with Pro Tools full version or Windows. It also gives unrivaled power, sound quality, creativity and ease of use. Download your own copy of Pro Tools Apk now.
This is a best Pro Tools 12 Torrent is here now. Pro Tools is a pro audio recording program. The best music creation program that has everything that you need in a music editor. So, click on the below-given link to make your copy full version. If your any friend need music editor please share with him to download. You are here because you need Pro Tools 2019.6 Crack full.
Pro Tools 12 Ultimate Crack Download Now
You ever used the Mac App Store? Of course, you have. But you ever used the second. Best Mac apps: the best macOS apps for your Apple computer. Here you can download via torrent programs for macOS. A huge selection of useful programs for the computer broken down into categories. Software for Mac OS.
Additionally, eye sweet and simple options. So this program is great for the music editor. Create music utilizing digital devices. So, This permits the gathering. So, the impact is critical. For their very own achieve setting for every clip. The quantity of the tune and automation programs.
So, now a day everybody needs some kind of music of his personal option to make his time good with good music. So, right here is the prospect you can too make your personal tracks. Holding the identical want this Avid Pro 2020.11 Serial Key’s for inexperienced persons and for execs too. It’s strongest and manages audio. This Professional Device has a straightforward to make use of the entrance. You may create, report, combine music and sounds of your alternative. It has been utilized by probably the most professional to allow them to report. edit and for compositions. It is usually used as post-production companies as a music mixer. If you’re a professional or a newbie. open potentialities with a beautiful software for your self. It additionally grantees sound high quality, creativity, and ease of use it.
Pro Tools Crack For iPad
So, Free and final direct download links for Pro Tools for Mac. Thus, The latest version of Pro Tools Key with some new features added. So, Pro Tools download comes with the new ultra-efficient audio engine. new HD video workflows, expanded metering, new 64-bit. A huge variety of virtual tools, effects, and plugins. and extra features for music and audio post-production. So we took a look at the new features and decided to give our verdict. Setting this review in context, regular readers of the blog will know that. we’ve not always been impressed with what Avid has done with Pro Tools Torrent ultimate code. Since the announcement of latest crack downloadable.
Bittorrent Mac Catalina
Wow, all BitTorrent Inc. Did was take utorrent 1.0.0.1 and put the BitTorrent logo/icon on it and called it BitTorrent 7.0.0. They should at least add some new features, since the mac version of utorrent is nothing compared to the windows version. Mac OS X Nightly builds Previous Releases. Source Code Nightly tarballs Previous tarballs How to build. Windows (early preview) Nightly builds. SHA256 Hashes Code Signing Policy Windows MSI packages: free code signing provided by SignPath.io, certificate by SignPath Foundation.
So, we want to outline what is new in Pro Tools HD 2020 and then give our comments. It delivers unrivaled highest sound quality, easy scalability. more real sound tools sounds and performance. Pro Tools 12 Serial Patch allows you to process many virtual tools. and effects on the same hardware configurations. can handle bigger mixes with thousands of clips and manage. mixes using a variety of built-in metering.
Key Features:
Full version of Pro Tools 12 (iLok2 required, sold separately)
Can mixes thousands of clips.
Manage, record and edit music.
Custom batch fades and fade presets.
Highest sound quality and power.
Huge variety of effects and plugins.
Rendering tracks in various ways.
Speed up mixing and metering.
Variety of virtual tools.
Work fast and mix easier.
What’s new in Avid Pro Tools 2020.11 Crack?
AAX plug-in support
Virtual Instruments plug-ins
Faster real-time audio bounce
Mixer enhancements
New Mp3 Exports, and many more
System Requirements:
Windows XP/Vista/7/8/8.1/10 (32-bit/64-bit)
Internet connection
500 MB Hard Space
How to Crack Avid Pro Tools?
Disconnect from internet (Must)
Install Pro Tools 2020.11 Crack
Run and register with license key
Run as admin the block file
Don’t run, exit if running
Copy Register *.dll to installation directory
Run and activate with provided Key
That’s it enjoy pro version
Pro Tools 2020 Crack Full Version Free Download 32&64 Bit
(sociallocker)Download(/sociallocker)
1 note
·
View note
Text
Funnelsbot Reviews 2021 - ⚠️Launch Discount & Huge Bonus⚠️
Funnelsbot is the World’s First Futuristic A.I & Machine Learning Powered App That Drives Unlimited Free Buyer Traffic From Social Media And Converts Them Into Red-Hot Customers On Auto-Pilot.
The competition is mounting to the next level in your niche. And there are Only LIMITED buyers. Everyone is trying to sell something. But customers today want MORE than just your products & services. They want your business to be online and available… 24/7/365. In a global survey run by Facebook. More than 70% of people said they expect to be able to message businesses for customer service. More than 81% of respondents message businesses to ask about products or services. Some 75% of respondents message businesses for support.
(BEST ONLINE DEAL 2021) Order Your at an Unbeatable Low Price Now!
In Fact, Customers Today Expect You To Be There & Answer Their Queries ASAP Through All The Stages Of A Purchase. Awareness stage: to know more about the product. Consideration stage: to see which product is the right for them. Transaction stage: to buy. Relationship stage: To seek customer support. You Need To Be There Always For Your Customer To: Deliver quality customer service and increase customer retention. Build trust in your business & brand and gain more recurring profit. Generate high-quality leads and boost conversions. Increase intent to purchase to skyrocket sales. And to make matters worse… your rivals are leaving no stones unturned to edge you out.
That’s why you need to have an All-In-One system that helps you… CAPTURE – ENGAGE – & CONVERT Traffic Into Sales 24/7. Yes, that’s the need of the hour. Well, here’s some GOOD NEWS for you. FunnelsBot just went Live. It’s an AI-based software system that drives UNLIMITED traffic 24/7 From Social Media, And Converts Them Into Red-Hot Customers Consistently 7 Days A Week… Completely Hands-Free.
FunnelsBot Works In Just 3 Dead Easy Steps
Step 1: FunnelsBot CAPTURES your audiences’ attention with stunning ‘done for you’ social media posts & Bots WITH Drag-n-Drop Ease without being a professional designer/writer/social media manager
Step 2: Engage and Communicate with your audience with bots powered by Artificial intelligence, auto comments and auto private reply so you can convert readers into raving fans, and raving fans into customers.
Step 3: That’s it – profit faster by turning your audience into customers or profit by offering traffic and lead generation services to businesses that desperately need more business.
FUNNELSBOT FEATURES
Capture your audiences’ attention with stunning social media posts without hiring a professional designer/ writer/ social media manager
Communicate using built-in hacks for fb messenger, google my business & one time notification broadcasts so you can convert readers into raving fans, and raving fans into customers
Engage your customers using ai-powered chatbots so you don’t have to spend hours interacting with non-buyers
Sell traffic Generation as a service to businesses using the Commercial License and get paid over and over again
Funnelsbot is Easy to use. No Coding or Technical Skills Required. You can turn on the faucet of traffic and fill your business with unlimited traffic with just a few clicks
Fully Cloud Based. Nothing to Install. Auto-Updated.
And many more amazing features…
The BEST part is Comes with Special Limited-Time Launch Offer includes AGENCY Selling Rights with a Full COMMERCIAL License
WHAT FUNNELSBOT CAN DO FOR YOU
Post To Social Media: One-click bulk post to 7 social media: Facebook, Twitter, LinkedI n, Reddit, medium, Blogger, WordPress, Text, link, image & video posting, Campaign scheduling. Bulk Post Planner from CSV File
Post To Facebook: Schedule/Instant Post to Your All Facebook Pages with a Single Click. Text, Image, Multi-image, Video & Link Post. Carousel & Slideshow Post. CTA Button Post. Periodic Re-Posting Ability. Enable Auto Comment Reply Campaign With Post. Full Report on Posting. Emoji Library. Leverage the most popular website on the planet
Automate Pages: Search High converting and most popular pages. Find all the contents. 1 click to social syndication. Share your content massively on autopilot
Powerful Graphics Creator: Drag and Drop Editor. 50+ DFY Eye-Catchy Templates. Free Stock Videos. Free Stock Images. Text, Shape, Elements, Lower Thirds
Social Sharing: 20 Social Sharing Syndication
FUNNELSBOT OTOs & PRICE
Funnelsbot Bundle Deal $297 for:
Funnelsbot FE
Funnelsbot’s All OTOs
All the bonuses
>>>Click here for more information<<<
FRONT-END: FUNNELSBOT ($27)
Facebook Posting (ONE page)
Social Media Posting
Auto Content
Facebook Comment BOT
Instagram Comment BOT
Comment BOT Tools
Automate Pages
Messenger BOT
One Time Notification (OTN) Broadcasting
Powerful Graphics Creator
Social Sharing
Commercial License
Unlimited Ownership Of Our Premium Custom-Made Software For “Creating Digital Order Menus” on Whatsapp
Unlimited Ownership Of Our Premium Custom-Made Software For Making “Contactless Digital Business Card” in Minutes
Practical Backend Training on How to create a 6-figure Income with FunnelsBot
Unlimited Ownership to Our Premium 15-in-1 Youtube Marketing Suite
Full Ownership to a MASSIVE Collection of Done For You Animated Video Templates, Intro & Outro Video Templates
[SEE MORE]
FUNNELSBOT OTO 1: DELUXE UNLIMITED EDITION ($67)
Unlock Your Income Potential To Full With The Powerful FunnelsBot Deluxe Unlimited. 10X Your Profits INSTANTLY With Hidden 11+ New Premium Features & Resources Worth $7999 In FunnelsBot Unlimited.
>> Visit The Official Website Here to Place Your Order!
UNLOCK SMS & EMAIL Marketing Tools Inside Your FunnelsBot Dashboard
Unlimited Page Search
10 Additional Social Sharing Syndication
Find High Engagement ‘Group Lists’ Based On Your Niche
Regular Monthly Updates
Built-In Affiliate System For Passive Income Generation
Unlimited Group Post
UNLOCK The Drag-n-Drop Facebook Messenger Chat Builder
Auto Post On FB Groups And Reach A Wider Audience
PREMIUM Support
Unlimited Social Post Creator & Scheduler
Hashtag Search Enabled
PrimeStocks Integration For Unlimited HD Stock Videos & Images
FREE Commercial Lic. For ALL The NEW Resources & Features
Low One-Time Price For A Limited Period Only
[SEE MORE]
FUNNELSBOT OTO 2: AGENCY LICENSE ($67)
With FunnelsBot Enterprise Suite – Start 5-Figure Agency Business Without Any Hassle! Because it includes EVERYTHING You Would Ever Need To Start Your Very Own Facebook Marketing Agency Business WITHOUT Any Hassle…
Your Own Ready to Use Facebook Marketing Agency Website
Create And Manage Up To 100 Workspaces
Create And Manage Up To 100 Team Members
One-ClickInstallation and Easy to Modify
Commercial Graphics Templates
Commercial HD Stock Videos
Commercial HD Stock Images
Step-by-StepTraining Course on How to Find and Seal Deals with High Paying Clients
[SEE MORE]
FUNNELSBOT OTO 3: HIGH-PERFORMANCE BUNDLE ($67)
UPGRADE To FunnelsBot High-Performance Bundle To UNLOCK Full Automation & Ecom Integrations And Boost Your Profits:
UNLOCK Instagram Reply Enhancers to skyrocket engagement & lead
1-Click seamless integration enabled for your Ecom Stores & WooCommerce Abandoned Cart Recovery
UNLOCK Messenger Bot Enhancers to capture your visitors attention
Never lose a customer to competitors again UNLOCK The Drag-n-Drop Facebook Messenger Chat Builder
UNLOCK User Input & Custom Fields to take user engagement to a whole new level
Commercial License Included. Use these high-performance features for clients and charge them EXTRA for these
(LIMITED SUPPLIES) Click Here To Order From Its Official Website
[SEE MORE]
FUNNELSBOT OTO 4: DONE FOR YOU CLUB TEMPLATES ($37 MONTHLY, $97 YEARLY, $147 ONE-TIME PAYMENT)
Get 40 Done-For-You PREMIUM Chatbot Templates Added To Your Account RIGHT AWAY + 10 More Every Month:
Over 120 Fresh PREMIUM Chatbot Templates Per Year
20+ Different Niches Covered
10+ Different Categories Covered
Request A Template in Any Niche & Get It Delivered Straight To Your Dashboard
Commercial License Freely Use ALL These Templates For Your Clients
Option To Pay Monthly/Yearly Recurring Or A Super Low One-time Price
[SEE MORE]
FUNNELSBOT OTO 5: DEVELOPER LICENSE ($297)
Users Get Full Limited Developer License Rights Only During This Launch Special To Sell FunnelsBot Under THEIR OWN Brand, With THEIR OWN Logo & Pocket 100% of ALL Profits You Make
[SEE MORE]
FUNNELSBOT FAQs
How easy is it to use FunnelsBot? It is easy for both beginners and experts to use. Everything is just a point-n-click easy!
What if I don’t like my FunnelsBot experience? That seems next to impossible but if that is the case simply write to us within 30 days of your purchase and get a full refund from us!
Is FunnelsBot Windows and Mac compatible? It is compatible with every device across both Windows & Mac. It is hosted 100% on the cloud so you can work from anywhere using this powerful tool.
Do you charge any monthly fees? During this exclusive period offer, FunnelsBot is being offered at a one-time cost. No monthly fee & no success tax.
Will I get any training or support for my questions? Absolutely. Their team of experts are accessible to you within minutes to resolve any questions and issues you may have instantly
Do I need to download & install FunnelsBot? Not at all. You can access it on any web browser, so you’ve got nothing to download or install.
Get For a Special Discounted Price Today (In Stock)
1 note
·
View note
Text
FunnelsBot REVIEWS 2021 — ⚠️ Alert Or Scam?⚠️
FUNNELSBOT WHAT IS IT
Funnelsbot is the World’s First Futuristic A.I & Machine Learning Powered App That Drives Unlimited Free Buyer Traffic From Social Media And Converts Them Into Red-Hot Customers On Auto-Pilot.
To Get these EXTRAS Bonuses CLICK HERE
The competition is mounting to the next level in your niche. And there are Only LIMITED buyers. Everyone is trying to sell something. But customers today want MORE than just your products & services. They want your business to be online and available… 24/7/365. In a global survey run by Facebook. More than 70% of people said they expect to be able to message businesses for customer service. More than 81% of respondents message businesses to ask about products or services. Some 75% of respondents message businesses for support.
In Fact, Customers Today Expect You To Be There & Answer Their Queries ASAP Through All The Stages Of A Purchase. Awareness stage: to know more about the product. Consideration stage: to see which product is the right for them. Transaction stage: to buy. Relationship stage: To seek customer support. You Need To Be There Always For Your Customer To: Deliver quality customer service and increase customer retention. Build trust in your business & brand and gain more recurring profit. Generate high-quality leads and boost conversions. Increase intent to purchase to skyrocket sales. And to make matters worse… your rivals are leaving no stones unturned to edge you out.
That’s why you need to have an All-In-One system that helps you… CAPTURE – ENGAGE – & CONVERT Traffic Into Sales 24/7. Yes, that’s the need of the hour. Well, here’s some GOOD NEWS for you. FunnelsBot just went Live. It’s an AI-based software system that drives UNLIMITED traffic 24/7 From Social Media, And Converts Them Into Red-Hot Customers Consistently 7 Days A Week… Completely Hands-Free.
(ACT NOW & SAVE) Click Here to Buy FunnelsBot From The Official Website
FunnelsBot Works In Just 3 Dead Easy Steps
Step 1: FunnelsBot CAPTURES your audiences’ attention with stunning ‘done for you’ social media posts & Bots WITH Drag-n-Drop Ease without being a professional designer/writer/social media manager
Step 2: Engage and Communicate with your audience with bots powered by Artificial intelligence, auto comments and auto private reply so you can convert readers into raving fans, and raving fans into customers.
Step 3: That’s it – profit faster by turning your audience into customers or profit by offering traffic and lead generation services to businesses that desperately need more business.
STOP paying social media managers & agencies right away and CANCEL any monthly subscriptions that you might have been paying for tools that promise you buyer traffic – that you NEVER see. Let FunnelsBot – the new AI-based software put in ACTION Mode. Click the link below to start driving & converting buyer traffic from social media within seconds!
Visit Official Website Of FunnelsBot With 85% Discount! Now Available!
FUNNELSBOT FEATURES
Capture your audiences’ attention with stunning social media posts without hiring a professional designer/ writer/ social media manager
Communicate using built-in hacks for fb messenger, google my business & one time notification broadcasts so you can convert readers into raving fans, and raving fans into customers
Engage your customers using ai-powered chatbots so you don’t have to spend hours interacting with non-buyers
Sell traffic Generation as a service to businesses using the Commercial License and get paid over and over again
Funnelsbot is Easy to use. No Coding or Technical Skills Required. You can turn on the faucet of traffic and fill your business with unlimited traffic with just a few clicks
Fully Cloud Based. Nothing to Install. Auto-Updated.
And many more amazing features…
The BEST part is Comes with Special Limited-Time Launch Offer includes AGENCY Selling Rights with a Full COMMERCIAL License
(LOWEST PRICE ONLINE) Click Here to Buy FunnelsBot From The Official Website
WHAT FUNNELSBOT CAN DO FOR YOU
Post To Social Media: One-click bulk post to 7 social media: Facebook, Twitter, LinkedI n, Reddit, medium, Blogger, WordPress, Text, link, image & video posting, Campaign scheduling. Bulk Post Planner from CSV File
Post To Facebook: Schedule/Instant Post to Your All Facebook Pages with a Single Click. Text, Image, Multi-image, Video & Link Post. Carousel & Slideshow Post. CTA Button Post. Periodic Re-Posting Ability. Enable Auto Comment Reply Campaign With Post. Full Report on Posting. Emoji Library. Leverage the most popular website on the planet
Automate Pages: Search High converting and most popular pages. Find all the contents. 1 click to social syndication. Share your content massively on autopilot
Powerful Graphics Creator: Drag and Drop Editor. 50+ DFY Eye-Catchy Templates. Free Stock Videos. Free Stock Images. Text, Shape, Elements, Lower Thirds
Social Sharing: 20 Social Sharing Syndication
(ACT NOW & SAVE) Click Here to Order FunnelsBot From Its Official Website
FUNNELSBOT FREQUENTLY ASKED QUESTIONS
How easy is it to use FunnelsBot? It is easy for both beginners and experts to use. Everything is just a point-n-click easy!
What if I don’t like my FunnelsBot experience? That seems next to impossible but if that is the case simply write to us within 30 days of your purchase and get a full refund from us!
Is FunnelsBot Windows and Mac compatible? It is compatible with every device across both Windows & Mac. It is hosted 100% on the cloud so you can work from anywhere using this powerful tool.
Do you charge any monthly fees? During this exclusive period offer, FunnelsBot is being offered at a one-time cost. No monthly fee & no success tax.
Will I get any training or support for my questions? Absolutely. Their team of experts are accessible to you within minutes to resolve any questions and issues you may have instantly
Do I need to download & install FunnelsBot? Not at all. You can access it on any web browser, so you’ve got nothing to download or install.
1 note
·
View note