#apple mail backup tool
Explore tagged Tumblr posts
Visit Tumblr Blog
Explore Tumblr blogs with no restrictions, modern design and the best experience.
Last Seen Tumblr Blogs


Fun Fact
Tumblr was attacked by a cross-site scripting worm deployed by the Internet troll group GNAA on Dec 3, 2012.
Text
Backing up Apple Mail Smartly – A Simple yet Powerful Tool
Every email you’ve kept holds something. Like a client’s request, a friend’s promise, a receipt you’ll need someday. But Apple Mail wasn’t designed to safeguard these threads forever. For Apple Mail users, the mailbox grows organically, accumulating not just messages but layers of context. Yet without careful stewardship, these threads can become fragile, scattered across devices or trapped in formats that don’t adapt as needs evolve. This is the reason why Apple Mail backups are so important and often the essential part of the whole email system.

The true measure of an Apple Mail backup tool lies in how effortlessly it preserves this living archive while respecting the rhythms of your workflow.
Backing up Apple Mail comes down to storage. The emails flow constantly, folders expand, attachments multiply, and soon the archives grow larger than you anticipated. Where exactly you choose to store those backups shapes how effortlessly your backups integrate into your workflow. Mail Backup X understands this deeply, offering diverse storage solutions that adapt naturally to the distinct and varied ways you handle Apple Mail data.
Local Storage: Speed at Your Fingertips
Local storage remains the first choice for many, keeping backups within quick reach. Your Mac’s hard drive presents the simplest option. There's no intermediary, no reliance on network connectivity, and backups remain responsive because retrieval happens without delay. Mail Backup X makes local storage straightforward by giving direct access to any folder on your Mac.
It saves backup archives in a compressed .mbs format, neatly packaged and conveniently navigable. You select your preferred folder directly in the tool's interface, and the backups settle smoothly into place.
Mirrored Backups – Add Another Layer of Safety
For many users, an extra layer of storage safety matters. Mail Backup X addresses this through its mirror feature, allowing multiple copies of your Apple Mail backup to exist simultaneously. One copy could live comfortably on your Mac, another securely in the cloud, and yet another perhaps on an external hard drive. Each mirror syncs independently but consistently.
If one storage location becomes inaccessible or corrupted, your data remains safe within its alternate mirror. You never rely solely on a single copy. Mail Backup X maintains data integrity across multiple mirrors without complication.
Distributed Storage: Growing Without Constraints
Local storage, however, isn't always sufficient on its own. Apple Mail backups can expand without pause. As weeks turn into months and then years, storage limits begin to press.
Here, Mail Backup X offers distributed storage, a sophisticated yet uncomplicated answer. Rather than forcing a decision between multiple locations, the tool lets you combine several spaces into one cohesive storage strategy. Each chosen location holds a portion of your backup. When the primary location fills up, Mail Backup X shifts seamlessly to the next available space. It's an elegant solution for managing ever-growing archives without interrupting your routine.
Cloud Storage: Access Without Boundaries
Cloud storage offers advantages unique to itself. Mail Backup X integrates directly with popular cloud services, including Google Drive, Dropbox, and OneDrive. Cloud integration simplifies accessibility. You're no longer confined by hardware limitations or geographical locations.
Accessing your Apple Mail backup archives from different devices or locations becomes straightforward, providing flexibility beyond traditional storage solutions. The tool's intuitive interface guides you smoothly through selecting and configuring cloud spaces, allowing a painless setup process.
Encryption: Your Backup’s Security
If your emails are confidential or sensitive, Mail Backup X feature for encryption is going to be very important for you. Once you enable ‘Encryption’ in Profile settings, the tool automatically encrypts your backups regardless of storage location.
The encryption happens seamlessly in the background, requiring no technical knowledge from you. Your emails remain completely inaccessible to anyone without authorization, even when stored on third-party cloud platforms. There's no need for manual security checks or constant vigilance. Mail Backup X maintains this protection consistently across all your backup copies.
Portable & Isolated: The USB Snapshot Advantage
Another distinct strength of Mail Backup X emerges in its USB snapshot functionality. While all digital backups exist as data, USB drives offer something unique. It becomes a self-contained, movable copy of your emails that exists entirely on your terms. Mail Backup X's snapshot feature turns any external drive into a disconnected safe-deposit box for your Apple Mail backups.
Choosing Your Strategy: It’s About Your Workflow
Each storage solution within Mail Backup X aligns neatly with the specific needs of Apple Mail users.
Local storage prioritizes speed and convenience.
Distributed storage deftly handles expanding data volumes.
Mirrored copies build redundancy for critical data security.
Cloud integration offers unmatched accessibility and encryption layers.
USB snapshots bridge digital convenience with tangible reliability.
How you choose your storage isn't arbitrary. Mail Backup X presents these options clearly, anticipating rather than dictating your choices. The goal is always intuitive integration, avoiding disruption of the established patterns you've developed in managing Apple Mail. The tool’s approach to storage recognizes individual workflows and provides tailored adaptability instead of a one single solution for Apple Mail backups for everyone.
Ultimately, selecting storage for Apple Mail backups involves understanding your relationship with email management itself. If accessibility matters most, cloud solutions offer clear advantages. If security feels paramount, encrypted storage and mirrored backups stand out. For simplicity and immediacy, local or USB drive options resonate deeply. Distributed storage elegantly handles volume and long-term growth without fuss.
Mail Backup X doesn't dictate your backup storage strategy but rather enhances it. By offering clear, flexible choices, the software adapts naturally to diverse usage scenarios.
The emphasis remains on empowering you to backup Apple Mail effectively, respecting your individual preferences and practical necessities.
Backing up Apple Mail becomes a thoughtful practice but never overwhelming. The right storage spaces ensure backups integrate effortlessly into your workflow. Mail Backup X enables precise, practical management of Apple Mail data, always aligning closely with your evolving needs. Your choice of storage location subtly but meaningfully shapes how smoothly your email backups perform and how confidently you navigate your archive.
Experience It Firsthand with the Free Trial
Before committing, why not see how Mail Backup X fits into your workflow? InventPure, the company behind the software, offers a fully functional free trial without any limitations. Back up real emails from your Apple Mail database, test searches, restore messages, and explore every storage option just as you would with the full version.
It’s designed to give you an honest assessment for how the tool handles your actual Apple Mail backups, not just a demo. If it doesn’t make your backup process simpler and more reliable, you’ll know before spending anything or committing to a subscription.
0 notes
Text
An easy process on how to backup apple email
I want to share my experience on apple email backup because most of the mac users are used to apple mailbox like me. There are various reason to support it however; my favourite reason is configuration of other mail clients in apple.
If you are wondering that apple mail supports other email services as well then you should definitely click below link for more information.
Many people still wonder on the subject ‘apple email backup and restore’, may be because they are confused on how to do it.
So, I thought to introduce an apple email backup tool to provide a perfect apple email backup solution.
So, just follow the easy steps of this apple email backup software.
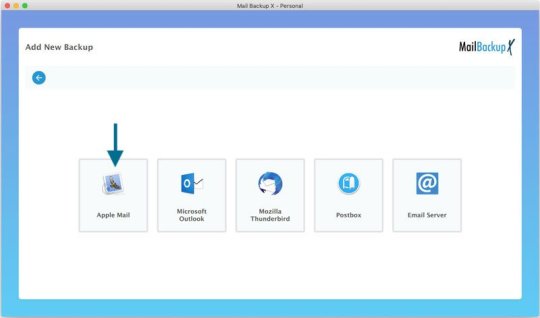
Step 1 Launch the application of Mail Backup X by InventPure, it will display a dashboard on the screen. Select ‘Add new backup’ under Backup Setup for apple mail.
Step 2 After clicking on Add new backup, it will display a list of different IMAP accounts like Office 365, Mozilla Thunderbird, GMAIL, Postbox and so on. Select apple mail from the dialog box.
Step 3 The next step allows the tool to load data from the selected source yahoo mail. The tool will scan through the database and read the email files that are require for archival. It will take few minutesfor the tool to scan the files in your database. In few minutes, you get an actual status of the files and items being scan and procure.
Step 4 The next step is to choose apple email backup folder as the storage and click on done for completion. It allows picking the location where you want to back up the data. You can browse in your folders and choose the right place to store it. You can assign a name to the yahoo backup file to locate it later. You can also choose the option for automatic detection of changes in your database so that they can be sync to the backup. The tool offers this option as an added benefit that can be rarely found in the tool. The tool is loaded with advanced algorithms, which can detect and sync the changes made in the database.
Step 5 The next screen is the Backup confirmation screen which shows the status of the backup that has been completed. It also shows the total number of files that are back up along with a backup log. You can see how many backups being synchronized. This is the final confirmation step that makes yousure that your files have been backed up successfully and with accuracy.
Demo version of the tool eases the selection process

Even if I have produced the steps, it is important to go ahead with the registered version of the tool but not before you test it. It is advised to test the tool with a fifteen days demo version to understand more about the tool and clear your doubts. That is why, I have produced the link of the website below https://www.mailbackupx.com/how-to-backup-apple-mac-mail-mails-on-mac/.
#apple email backup#apple mail#apple mailbox#apple mailbox backup#backup apple mailbox#apple mail tool
0 notes
Text
How VHS to Digital Conversion Works: A Step-by-Step Guide for Alexander Heights Residents
In today’s digital world, many people in Alexander Heights still have old VHS tapes filled with treasured memories. However, VHS tapes are susceptible to deterioration, and VCRs are becoming obsolete. Converting VHS tapes to a digital format is the best way to preserve these precious moments for future generations. Here’s a step-by-step guide on how VHS to digital conversion works and why it’s beneficial.
Step 1: Assess Your VHS Tapes
Before starting the conversion process, gather all your VHS tapes and check their condition. Look for:
Signs of mold, dust, or physical damage.
Faded labels or missing information about the tape’s content.
Signs of tape degradation, such as warping or sticky residue.
If the tapes are in poor condition, professional restoration may be necessary before conversion.
Step 2: Choose a VHS to Digital Conversion Method
There are two primary ways to convert VHS to digital:
DIY Conversion Using VHS-Digital Equipment
Requires a working VCR, a capture device (USB video converter), a computer, and software.
The VHS tape plays on the VCR while the capture device records the video onto your computer.
Requires manual editing and file formatting.
Professional VHS to Digital Services
Professionals use high-quality equipment to ensure better video and audio quality.
They offer additional services such as video enhancement, noise reduction, and cloud storage options.
Ideal for those who lack the technical expertise or equipment.
Step 3: Preparing the Equipment
For DIY conversions, ensure you have:
A VCR in good working condition.
A USB video capture device that connects the VCR to your computer.
Conversion software (e.g., OBS Studio, Roxio, or Elgato Video Capture) to record the video.
Adequate storage space on your computer for digital files.
For professional services, you simply need to drop off or mail your tapes to the service provider.
Step 4: Connecting and Capturing the Video
For DIY conversions:
Connect the VCR to the Computer – Plug the RCA cables (red, white, yellow) from the VCR into the capture device, then connect the device to your computer via USB.
Launch the Capture Software – Open the software and set the video resolution and format (MP4, AVI, MOV, etc.).
Play the VHS Tape – Start playing the tape while the software records the footage in real-time.
Monitor the Process – Ensure the audio and video sync correctly and make adjustments if needed.
Step 5: Editing and Enhancing the Video
Once the video is recorded:
Trim Unwanted Sections – Cut out blank spaces or static noise.
Enhance Quality – Use software tools to adjust brightness, contrast, and color correction.
Remove Background Noise – Some software allows for noise reduction to improve sound quality.
Add Titles or Chapters – Organize videos into sections for easy navigation.
Professional services often provide these enhancements automatically for optimal quality.
Step 6: Choosing a Storage Format
After editing, save your digital files in a preferred format:
MP4 – Best for universal compatibility.
AVI – High quality but larger file size.
MOV – Ideal for Apple devices.
Consider multiple storage options:
USB Flash Drive – Portable and easy to share.
External Hard Drive – Suitable for storing large video collections.
Cloud Storage – Offers remote access and backup security.
DVDs – Traditional but may not be as future-proof as cloud storage.
Step 7: Organizing and Backing Up Files
Create folders labeled by event or year.
Store files in multiple locations for extra security.
Consider cloud services like Google Drive, Dropbox, or OneDrive for remote access.
Why Convert VHS to Digital?
Prevents Tape Degradation – Digital files do not degrade over time.
Saves Space – Eliminates the need for bulky VHS tapes.
Easier Sharing – Share videos with friends and family via email or social media.
Enhances Accessibility – Watch videos on modern devices like smartphones and smart TVs.
Final Thoughts
Converting VHS to digital is a crucial step in preserving your most treasured memories. Whether you choose DIY conversion or professional services in Alexander Heights, ensuring your tapes are digitized will keep your family’s history alive for generations. Don’t wait until your tapes deteriorate—future-proof your memories today!

youtube
#Vhs To Digital Perth#Vhsc To Digital Perth#Convert Vhsc To Digital Perth#Convert Vhs To Digital Perth#Transfer Vhs To Digital Perth#Vhs To Dvd Perth#Vhsc To Dvd Perth#Transfer Cassette To Digital Perth#Convert Audio Cassette To Digital Perth#Convert Audio Tapes To Digital Perth#Youtube
2 notes
·
View notes
Text
With so much happening while we are on the move, being able to have access to our photos, documents, and email through a cloud service can be a blessing. And Apple devices’ users get for free 5GB of storage linked to their Apple ID with their Macs, iPhone, iPads or iPods. This tool called iCloud make possible not only to have an updated backup but also to keep all devices in sync. But how to make the best of it? To help you out on it, you will find below 15 tips and tricks to get more out of your iCloud service Make sure it will work One of the biggest mistakes of those using iCloud is to think that it will set itself up on all your devices as soon as you turn them on. Unfortunately, this isn’t how it works. You will need to active the service on your Mac or mobile devices, and ensure that the items you want are synced, just for starters. Turn it into a more friendly virtual folder To make iCloud looks like a more friendly virtual folder, follow these steps: go to iCloud System Preferences and turn on Documents & Data. Then, open the Finder and tap Command + Shift + G. Type ~/Library in the dialogue box. Scroll down the Mobile Documents, where you will be able to drop down your own files and folders from now on. Make sure your Reading List works To make sure that your Reading Lists feature is functioning properly, ensure that Safari is checked in your iCloud settings on your Mac, or that Bookmarks is checked in your iPhone or iPad. It will make them all sync correctly. Free up storage space If your 5G storage space is running low, go to Settings >> iCloud >> Storage >> Manage Storage. There you will be able to see what is taking your space and decide what you might want to delete. And this is just one way to free up storage space in your iCloud. Manual backup If you haven’t been away from a power source or of a Wi-Fi connection for a while, you might want to backup your files manually. In this scenario, tap Back Up Now (located below your toggle switch) and your backup will be started as soon as you are connected to a Wi-Fi connection. Understand what is on your backup Not everything that you have in your devices will be backed up, as you can imagine. Here is what will and won't really be saved for you (if you set it correctly): Yes: The most recent 1,000 photos from your Photo Stream, but only for 30 days; No: the music you sync; No: purchased music, movies, TV shows, apps, and books (only a link to them in iTunes Store, App Store, and iBookstore, respectively, is saved) Be also aware that iCloud storage space is used for iCloud Backup, iCloud Drive, iCloud Photo Library beta, iCloud Mail, and data from apps. Remember that there is a limit to the file size It isn’t only on the storage space limit that you need to keep one eye. There is also a limit to the size of the files themselves, which can't be more than 15 GB each. They can be of any kind, though. Use the extra limit to send large files If you are using the Yosemite's version of Mail and need to send an attachment of more than 40 MB that shouldn’t be shrunk (as in a photo that would lose its quality if you do so), now you can do it with iCloud and Mail Drop features. As iCloud can handle files up to 5GB, your attachment will be “temporarily” stored there while you send it. You will get a warning message the first time you do it, but just ignore it, click on Send and you check the Mail Drop button on the display option you will get. Enable two-step verification to increase security Of course, it sounds very concerning that all your precious data is out there in the cloud available to anybody hack it. But it shouldn’t worry you much. Apple has a very secure system, and some of the best security apps for iPhone and iPad in the market, rest assured. Still, the company suggests that you enable a two-step verification process, so you can decrease the chances of having your Apple ID hacked. After following a few steps, every time you try to log in your Apple ID, you will receive a four-digit code on your trusted device for verification.
Managing iCloud Family Sharing Now is possible to link more than one iCloud account to a single payment method and make the app, music or book purchased available to download for the entire family. All you need to do is go to Settings >> iCloud menu, and look for a family section. There, you will be able to manage your family members, so they will all be associated with the main device and payment method. Generating strong passwords with iCloud Keychain If you are running out of ideas for strong passwords and have been unable to do effective research online, you can use iCloud Keychain to get some suggestions. When you are asked to add a password to a website (assuming here that you are navigating on the site with your Safari app), tap on the password field and you will see the option “Suggest a Password” above your keyboard. A pop-up menu will show up with a randomly-generated password for you. How to disable Find My Phone (and Activation Lock) If you need to restore your Apple device, you will need to disable Find My Phone first – it will disable Activation Lock as well. And you still can do it even if you don’t have your iPhone, iPad or iPod on you through iCloud. Just open any web browser and go to icloud.com. Then enter your Apple ID and click on Find My Phone. Now, enter your Apple password again, and click on All devices >> Offline device you want to remove >> Remove from account. Final Thoughts iCloud is a powerful tool offered by Apple for free to their clients. If you learn how to make the best of it, you will have plenty of resources in your hands. And if you feel that 5GB is just not enough, just pay extra space and enjoy the freedom of having access to all your files and data anywhere you go and of syncing all your devices together. Diana Beyer is experienced and self-driven media expert who is passionate about writing. Her purpose is to share values amid those interested. She is always seeking to discover new ways for personal and professional growth. Connect with Diana though Twitter or visit her blog.
0 notes
Text
Edit PDF on iPad with Pencil: A Professional’s Guide to Digital Productivity
In today’s mobile-first world, professionals are increasingly turning to tablets for handling documents on the go. Among all tablet ecosystems, the iPad—especially when paired with the Apple Pencil—has become the preferred choice for editing PDFs with precision and ease. If you’re wondering how to edit PDF on iPad with Pencil, this guide will walk you through everything you need to know, from tools and apps to workflows and productivity hacks.
Whether you’re signing contracts, annotating legal documents, grading student assignments, or collaborating on project blueprints, learning how to effectively edit PDF on iPad with Pencil can significantly enhance your efficiency and digital workflow.
Why Use iPad and Apple Pencil to Edit PDFs?
Professionals across industries—legal, education, architecture, healthcare, and creative fields—need to interact with PDFs daily. But what makes the iPad and Apple Pencil such a powerful combo?
Benefits include:
Precision Annotation: Apple Pencil allows fine, natural handwriting and drawing, ideal for detailed markups.
Paperless Workflow: Editing PDFs digitally reduces printing costs and improves file management.
On-the-Go Efficiency: Access, edit, and sign documents from anywhere, no scanner or printer needed.
App Integration: Syncs with cloud services like iCloud, Dropbox, OneDrive, and Google Drive.
Best Apps to Edit PDF on iPad with Pencil
While iPadOS includes basic tools to markup PDFs, the real power comes from professional-grade apps. Here’s a breakdown of the top options for anyone serious about document editing.
1. Apple’s Markup Tool (Built-in)
How it works: Open any PDF in the Files app or Mail, tap the Markup icon (pen tip), and use the Apple Pencil to sign, write, highlight, or draw.
Pros: Free, built-in, quick access.
Cons: Limited editing capabilities; better suited for simple annotations.
2. GoodNotes
Features: Import PDFs, annotate with Apple Pencil, organize notebooks, and search handwritten notes.
Best for: Professionals who like a notebook-style interface and need structured document organization.
3. Notability
Features: PDF annotation, voice notes, multi-note support, and automatic cloud backup.
Best for: Teachers, students, and professionals needing multimedia note integration.
4. PDF Expert by Readdle
Features: Advanced annotation tools, text editing, form filling, password protection, file merging.
Best for: Legal professionals, administrators, and power users who deal with large volumes of documents.
5. Adobe Acrobat Reader
Features: Full PDF support, syncing with Adobe Document Cloud, editing, signing, and commenting.
Best for: Users already embedded in Adobe’s ecosystem.
How to Edit PDF on iPad with Pencil – Step-by-Step
Now, let’s walk through how you can edit PDF on iPad with Pencil using Apple’s native tools and third-party apps. The process is straightforward but varies slightly based on your choice of app.
Using Apple’s Markup Tool:
Open the Files app and locate your PDF.
Tap to open it.
Tap the Markup icon (pen tip in a circle).
Use your Apple Pencil to write, highlight, or draw.
Tap Done to save changes automatically.
Using PDF Expert:
Open the PDF in PDF Expert.
Tap the Annotate tab.
Use the Apple Pencil to highlight, underline, comment, or draw.
To edit text, tap the Edit tool, then select the text field.
Save or export to cloud storage when finished.
Using Notability or GoodNotes:
Import the PDF into the app from Files or a cloud service.
Select the Pen, Highlighter, or Eraser tools.
Annotate freely with your Pencil.
Use the Lasso Tool to move or resize handwritten notes.
Export as a new PDF with annotations included.
Advanced PDF Editing Tasks on iPad
With the right app, you can do much more than just annotate. Here are some advanced capabilities:
✅ Fill Out Forms
Use fillable PDFs to input data directly using the Pencil or keyboard.
Apps like PDF Expert and Adobe Acrobat recognize text fields.
✅ Sign Documents
Create a signature using your Apple Pencil.
Save your signature for quick reuse in future documents.
✅ Merge & Split PDFs
Combine multiple documents into one PDF file.
Extract individual pages as needed for sharing or archiving.
✅ OCR and Search Handwriting
Apps like Notability and GoodNotes convert handwriting to text (OCR).
Useful for creating searchable notes from meeting or class annotations.
Best Practices for Professionals
To make the most of editing PDFs on iPad with Apple Pencil, keep these tips in mind:
1. Use iCloud or Dropbox Syncing
Ensure all your documents are automatically backed up and available across devices.
2. Invest in a Screen Protector (like Paperlike)
This improves writing feel and reduces glare when using the Pencil extensively.
3. Organize with Folders and Tags
Use file naming conventions and folders to keep documents categorized and easy to retrieve.
4. Use Keyboard Shortcuts (iPad Magic Keyboard)
For advanced users, combining the Apple Pencil with a keyboard increases productivity—especially in apps like PDF Expert or Notability.
Use Cases by Profession
📄 Lawyers
Sign contracts.
Highlight key clauses.
Organize client documentation.
🎓 Educators
Grade papers.
Annotate student submissions.
Share feedback instantly.
💼 Business Executives
Approve proposals on the go.
Annotate financial reports during meetings.
Sign NDAs or HR documents.
👩⚕️ Medical Professionals
Fill and annotate patient intake forms.
Share test result summaries.
Record handwritten notes digitally.
Security Considerations
Professionals must prioritize data privacy when editing sensitive PDFs. Here’s how:
Use apps with encryption and password protection (like PDF Expert).
Avoid using public Wi-Fi without a VPN when sharing files.
Turn on Face ID or Touch ID to secure document access.
Future of PDF Editing on iPad with Pencil
Apple continues to evolve iPadOS, and each update brings more powerful features to support professional workflows. Features like Stage Manager, Split View, and Universal Clipboard make it easier than ever to handle multiple documents, copy content between devices, and transition between mobile and desktop environments seamlessly.
Additionally, improvements to the Apple Pencil (like hover detection on iPad Pro M2 models) suggest a future where precision editing and document interaction will be even more intuitive.
Conclusion
Learning to edit PDF on iPad with Pencil is not just a productivity boost—it's a competitive advantage. For professionals across industries, mastering this workflow means faster document turnaround, reduced reliance on printing, and seamless collaboration from anywhere.
Whether you're annotating blueprints, grading reports, or signing NDAs in a client meeting, your iPad and Apple Pencil are all you need to get the job done with precision and style.
Invest in the right apps, follow best practices, and enjoy a truly paperless, high-performance workflow that keeps pace with your professional demands.
0 notes
Text
youtube
How to Convert MBOX to EML File Format?
The need to convert MBOX files to EML arises for several reasons, primarily to facilitate accessibility, compatibility, and ease of sharing. MBOX and EML are two distinct file formats used in different email clients. While MBOX files consolidate multiple emails into a single file, EML files store each email as a standalone file, compatible with a broader range of email applications. In this article, we’ll dive into an in-depth, step-by-step guide on converting MBOX to EML to improve email portability and ease of use.
Understanding MBOX and EML File Formats
What is MBOX?
MBOX (Mailbox) is a file format used by various email applications to store messages collectively within a single file. Commonly supported by Mozilla Thunderbird, Apple Mail, Entourage, and others, MBOX is an open-source format that saves all emails in a single text file.
What is EML?
EML (Email Message) is a more versatile format and widely used due to its compatibility across a larger variety of email clients, including Microsoft Outlook, Outlook Express, Windows Live Mail, and others. Each email is saved as a separate file with the .eml extension, preserving metadata such as sender, recipient, subject, and attachments.
Reasons to Convert MBOX to EML
1. Enhanced Compatibility EML files are compatible with multiple platforms, making them accessible across most email clients.
2. Better Organization Each email is saved as an individual file in EML format, making email management more organized.
3. Easier Backup and Restoration With each email stored individually, EML files allow for more streamlined backups and recovery in case of data loss.
4. Improved Portability You can transfer EML files to different devices easily, allowing users to read emails offline.
Methods to Convert MBOX to EML
There are several ways to convert MBOX to EML, including manual techniques and the use of automated tools. Here’s a look at the most effective methods available.
1. Manual Method Using Mozilla Thunderbird
Mozilla Thunderbird, an open-source email client, offers a simple way to convert MBOX files to EML format.
Steps to Convert MBOX to EML in Thunderbird:
Install Thunderbird: If you haven’t already, download and install Mozilla Thunderbird on your device.
Import MBOX File:
Go to Tools > Add-ons > Extensions.
In Top right you can see “ImportExportTools NG” and install it.
After installation, restart Thunderbird.
Use ImportExportTools NG to Import MBOX File:
In Thunderbird, click on Local Folders > Right-click > ImportExportTools NG > Import MBOX file.
Choose your MBOX file to import that file in thunderbird.
Export Emails to EML Format:
After MBOX import, select the emails or folders you want to export.
Right-click on the selected emails and choose ImportExportTools NG > Export all messages in folder > EML format.
Choose a path where you want to save the EML files.
This method is free and effective but may require more effort if you have multiple MBOX files to convert.
2. Using Dedicated MBOX to EML Conversion Software
For large volumes of emails or multiple MBOX files, you use our MBOX to EML converter tools are highly recommended like Webbyacad MBOX converter software.
Advantages of Using Webbyacad MBOX Converter Software:
Batch Conversion: Convert multiple MBOX files to EML in one click.
Retention of Metadata: Keeps email details intact, such as date, sender, recipient, and attachments.
Using Webbyacad MBOX Converter Software:
Download and Install: Download the Webbyacad MBOX Converter Software and install the software on your system.
Add MBOX Files: Select the Add File option to import MBOX files.
Select EML: Choose the EML option from the dropdown as the export format.
Choose Output Location: Specify where the converted EML files should be saved.
Start Conversion: Click Export to initiate the conversion.
Our software also comes with a free trial version, this allows users to test functionality before committing to purchase.
3. Online MBOX to EML Converters
For users who prefer not to install software, several online conversion tools can help convert MBOX to EML. These tools are typically free for small conversions, but they may have file size limits or lack privacy assurances. Always check privacy policies and limitations before uploading sensitive data.
How to Use an Online Converter:
Go to the Website: Visit the chosen online conversion tool’s website.
Upload MBOX File: Select and upload the MBOX file.
Select EML Format: Choose EML as the output format.
Download Converted Files: Once the conversion is complete, download the EML files to your device.
Note: Be cautious while using online converters, especially if the data is sensitive, as these tools may not guarantee data confidentiality.
Best Practices and Tips for Converting MBOX to EML
Backup Original Files: Always keep a backup of the original MBOX file in case any errors occur during conversion.
Use Reliable Software: When using third-party software, opt for reliable and reputable solutions to avoid data corruption or loss.
Check Compatibility: Ensure that your email client is compatible with EML files before converting.
Test on a Small File First: If you have a large volume of emails, start with a small file to test the conversion accuracy and software functionality.
Common Issues and Troubleshooting Tips
1. File Size Limitations: Some converters have file size limitations. Consider breaking down large MBOX files or using premium tools.
2. Loss of Attachments: Some conversion methods may not retain attachments. Ensure the software you choose explicitly supports attachment preservation.
3. Formatting Issues: After conversion, some emails may display formatting inconsistencies. Preview a few EML files in your email client before transferring the entire batch.
By following this comprehensive guide, you can successfully convert your MBOX files to EML and enjoy the enhanced flexibility, compatibility, and organization offered by the EML format. Choose the method that best suits your needs, considering factors like email volume, operating system, and any security concerns.
#mbox#migrate#mboxconverter#mboxtoeml#exportermboxtoeml#importmboxtoeml#transformmboxtoeml#outlook#tools#email migration#export mbox to eml#tranform mbox to eml#mbox to eml#Youtube
0 notes
Text
Mac Gmail backup facility with no extra efforts on the clients’ part
To carry Gmail backup is quite important if you wish to keep your data secure. It is the methodology that you choose for the same that would determine how the experience goes for you. Before you decide on which facilities you want in the Gmail backup software you should first have thorough information about the mail account, get it here- . Avoid using a freeware as it can cause harm to your precious data and thus cause irrevocable damage.

How to Gmail backup that is regularly effective on a long term?
The Gmail backup tool that can provide the same facility to other mail clients as well- Mail Backup X is the best every software you will come across for mail backup as well as archiving. It has got several superb inbuilt qualities that keep the mail backup process quite smooth and free of hassles. Everyone can try out the software for free for Gmail email backup as a free demo version of it available here.
Gmail backup facility relevant for other mail clients as well
This software functions quite well as a Gmail backup software as well as for other major mail clients. It can be used to backup and archive data from Gmail as well as Hotmail, yahoo mail, apple mail, outcook, postbox and thunderbird. It can also be used to change the format of the data files of these mail clients as it is compatible with them all. It can be thus used to change the format of the data files to and from .eml, .rge, .pst, .olm and .mbox. This makes it quite easy to share data to various platforms.
Auto-USB backup and inbuilt ftp client
The data files stored in usb cables can be automatically updated by this software as it smartly remembers the data folder name and its location in the database. To enhance the safety of the data after the backup they are saved in the pdf form. That procedure also makes them altogether safer and more shareable. Also, they are stored in the proper sequential order so that it does not get tough to find them.
It is possible to carry both primary backup and mirror backup with this software as it comes with an inbuilt ftp client. Keeping that tool active makes it easier to have a copy of all the data ready as it keeps arriving in the system.
Intrinsic ability to save storage space and to find data files instantly
While backing up your data this software also makes sure that you never run out of storage space. It religiously backs up your data, but also makes sure that the files are compressed before being stored. Also, it gets easier for the users to find out data files as there is an ultra-fast data search facility available with it which is also relevant for complex files.
You can get either the free demo version from the link below, and later upgrade to the full version or get the full version directly from the link below www.mailbackupx.com/make-backup-of-gmail-emails/.
youtube
#gmail backup#backup gmail#gmail backup tool#backup gmail mail#gmail backup software#gmail mail backup#gmail email#Youtube
1 note
·
View note
Text
Know the details of Thunderbird backup email here
In order to keep one’s data safe and updated it is vital that one carries Thunderbird backup email on a regular basis. The process however can be complicated and even induce data safety concerns. With the availability of several third-party software, people have given over the idea of manual backup and archiving. However, even with the availability of such software, it is important that one checks them for their reliability and compatibility with data. The first thing you can do in that direction is to educate yourself about Thunderbird, check here- https://en.wikipedia.org/wiki/Mozilla_Thunderbird.
Thunderbird email backup service in alignment with your requirements

You can backup mail Thunderbird with Mail Backup X and carry a lot of associated tasks with it at no extra cost. It is priced quite reasonably considering how wide-ranging the facilities it provides are. It is also quite safe for all types of data, is compatible with all sorts of mail file formats to. To ensure that the user feels safe using this Thunderbird email backup tool it has been designed to work in the offline mode.
How to restore Thunderbird mail backup without moving your fingers
One does not have to be adept at the task of Thunderbird email backup in order to carry it regularly. Using this software on a regular basis will provide the desired results. Also important is the capacity of this software to backup and archive data not only from Thunderbird but from Gmail, Hotmail, apple mail, yahoo mail, outlook, and postbox.
Closely associated with the ability of this software to backup and archive data from various sources is the integrated mail viewer. In order to work with data from several sources one would not have to skip continuously from one platform to another, the mail viewer makes sure of that. It works by bringing data from various sources at one place.
Convert mail file formats and use ftp client for additional safety
As this software supports several mail file formats it is also capable of providing the facility of changing mail file formats. It can be used to change the format of the data files to and from .olm, .eml, .pst, .mbox, and .rge.
The ftp client on the other hand makes sure that one can carry backup of data on a regular basis without themselves intervening. The ftp client continuously backs up data and provides the facilities of primary backup and mirror backup as well.
Faster search results and more storage space
With this software you will have the freedom to backup as many files as you want since it meanwhile also saves storage space. It manages to do that by compressing the files methodically.
One does not have to waste time looking for even a bit of data. The ultra-fast data search module can find out any variety of data within nanoseconds.
You can try these features out immediately by purchasing the software. A free demo version of it is also available www.mailbackupx.com/thunderbird-backup-email/.
1 note
·
View note
Text
Restore email mac mails with zero tolerance data integrity
Data integrity is often misjudged when it comes restore mac email. It is about overall accuracy, completeness and consistency of data. So whenever, data transfer takes place, the tool is expected to transfer or convert eh files with completeness and accuracy.
A non-accurate or incomplete transfer of data means the file is unreadable or unrecognizable or broken. In worst cases, the data files transfer or conversion does not take place.
This makes it very crucial to use a highly skilled restore mac email tool for an efficient transfer with zero tolerance data integrity.
We deliver a highly skilled and well-engineered product Mail Backup X. The one of its own kind to restore email mac mails. A tool that maintains hundred percent data integrity and also restore mac email addresses.
The factor is also visible in the applications of the restore mac email app delivering complete data file without any deviation.
Different particulars are transferred while taking backup of emails from Mac. Therefore. We also make sure that mac users undergo the information on Mac OS and Apple mail for a detailed tour on different aspects of them. So, it is advisable to browse the below links on Mac OS and Apple mail for more information.
Maintain data integrity factor in various applications that restore mac emails
It is indicative of the fact that different applications of this restore mac email software preserves data integrity while taking backup of emails from Mac.
The third party mail archive application supports reading and import of common mail archives file formats like .mbox, .rge, .olm, .olk, .pst, .eml, that store mail data by mail clients like Outlook Mac, Outlook Windows, Office 365, Thunderbird, Postbox, Gmail, Yahoo etc.
The inbuilt mail archive application allows you to view important mails from different mail clients. The product allows you to read and import archive files from Mbox viewer, RGE viewer, OLM viewer, OLK viewer, PST viewer, EML viewer without the need to switch between or open mails with different mail clients.
The third application of inbuilt mail migration application is an advanced mail conversion feature to use mail client of your choice on Mac OS. It permits you convert and export mail data to all major mail data file formats like .mbox, .rge, .olm, .pst, .eml.
Test the tool to explore the best way to restore mac email
The best way to explore the data integrity factor is by testing the tool for a realistic experience.
All you need is to download the demo version of the restore mac email tool and on Mac. Use it for 15 days until the validity expires.Switch to the licensed version of the tool, once satisfied.
For complete access of the product, you can click on the licensed version of the tool along with a product key.
For more details on the software, log on to the below website and get all your queries answered in a systematic manner www.mailbackupx.com/restore-mac-email/.
#mac restore tool#mac mail restore#restore mac mailbox#restore mac folder#restore mac data#restore mac files#restore mac email
1 note
·
View note
Photo

Apple email backup - Experts way to backup Apple emails (on Wattpad) https://www.wattpad.com/1469101573-apple-email-backup-experts-way-to-backup-apple?utm_source=web&utm_medium=tumblr&utm_content=share_reading&wp_uname=michealmayor If you are searching for a way to backup apple emails like an expert then here is good news for you. There is the apple email backup tool called Mail Backup X which lets you backup emails like an expert from day one.
0 notes
Text
Ico microsoft edge download

Ico microsoft edge download software#
Ico microsoft edge download code#
Ico microsoft edge download Offline#
Ico microsoft edge download tv#
Ico microsoft edge freeload#
Make sure you set the security correctly such that you webserver has access to that file. Copy your icon to that place and give it the the name that link is pointing to (you might want to backup the old file). There you will find the directory and the name of the icon file.
Ico microsoft edge download code#
To determine where your new favicon should be, examine and look for code that contains the text If this doesn't work you will need to delete the temporary internet files and the history and then open your page again.
Opera users may need to completely clear their cache in Tools→Preferences.
Konqueror: simply click the Reload button, or press F5.
IE: hold Ctrl while clicking Refresh, or press Ctrl-F5.
Mozilla / Firefox / Safari: hold down Shift while clicking Reload, or press Ctrl-Shift-R (Cmd-Shift-R on Apple Mac).
Even refreshing the page (F5) won't help.
Ico microsoft edge download tv#
An illustration of a heart shape Contact Jobs Volunteer People Search Metadata Search text contents Search TV news captions Search archived websites Advanced Search. Browsers are designed to minimize data traffic, so they don't refresh the favicon every time they show a page. An icon used to represent a menu that can be toggled by interacting with this icon. If not, that doesn't necessarily mean you did anything wrong. Do you see your new icon? If so, congratulations. Copy the file to the /joomla/templates/ directory and name it favicon.ico. The file you created in this way will have the extension.
Ico microsoft edge freeload#
Convert to ico format using free online sites such as:.Alternatively, you can also use an online tool such as
Ico microsoft edge download software#
You may use graphic software such as Photoshop, Gimp, or Windows Paint. To learn more about relationship-based ads, online behavioral advertising and our privacy practices, please review Bank of America Online Privacy Notice and our Online Privacy FAQs.Changing your website's favicon is a relatively easy task. These ads are based on your specific account relationships with us. In addition, financial advisors/Client Managers may continue to use information collected online to provide product and service information in accordance with account agreements.Īlso, if you opt out of online behavioral advertising, you may still see ads when you log in to your account, for example through Online Banking or MyMerrill. If you opt out, though, you may still receive generic advertising. If you prefer that we do not use this information, you may opt out of online behavioral advertising.
Ico microsoft edge download Offline#
This information may be used to deliver advertising on our Sites and offline (for example, by phone, email and direct mail) that's customized to meet specific interests you may have. Here's how it works: We gather information about your online activities, such as the searches you conduct on our Sites and the pages you visit. Relationship-based ads and online behavioral advertising help us do that. We strive to provide you with information about products and services you might find interesting and useful. Programs, rates, terms and conditions are subject to change without notice. Credit and collateral are subject to approval. and affiliated banks, Members FDIC and wholly owned subsidiaries of Bank of America Corporation. (MLLA) and/or Banc of America Insurance Services, Inc., both of which are licensed insurance agencies and wholly-owned subsidiaries of Bank of America Corporation.īanking, credit card, automobile loans, mortgage and home equity products are provided by Bank of America, N.A. Insurance Products are offered through Merrill Lynch Life Agency Inc. Both are indirect subsidiaries of Bank of America Corporation. Trust and fiduciary services are provided by Bank of America, N.A. MLPF&S makes available certain investment products sponsored, managed, distributed or provided by companies that are affiliates of Bank of America Corporation.īank of America Private Bank is a division of Bank of America, N.A., Member FDIC and a wholly owned subsidiary of Bank of America Corporation. Securities products are provided by Merrill Lynch, Pierce, Fenner & Smith Incorporated (also referred to as "MLPF&S", or "Merrill"), a registered broker-dealer, registered investment adviser, Member SIPC layer, and a wholly-owned subsidiary of Bank of America Corporation. You should review any planned financial transactions that may have tax or legal implications with your personal tax or legal advisor. Investing in securities involves risks, and there is always the potential of losing money when you invest in securities.
2 notes
·
View notes
Text
Apple Mail backup- A must do task with telling ben
Email data can become a causality of data theft and corruption. Apple email backup is an all-seasons ally to loosen the stranglehold of data loss. Those who delay the inevitable (email backup) find themselves cornered in a spot of bother, as irrecoverable data loss is an open invitation to downtime, which can derail the mightiest of businesses. Moreover, there are many situations which may temporarily cut off access to email data. These events include server crashes due to an unusually heavy network traffic and network issues. Even though such situations don't amount to data loss, they are no less disruptive to the work flow.
How to backup mail on mac – Final solution
So, it's absolutely essential to run full backups from time to time to be able to restore data when outside situations become conducive for data loss. Full backups are not sufficient in themselves because what about those fresh mails, which arrive after we have run a full backup session. These also need to be backed up to ensure complete data recovery in the event of data loss. Here regular incremental backups do the needy and create ideal conditions for complete data recovery. We must also let this fact sink deep that single site backups are not sufficient. Multiple-site backups are in dispensible to engender data redundancy, which lays the very foundation for complete data recovery. Both offline and online storage locations must be utilized to backup Apple mail. Resource efficiency should also be given due consideration by opting in favor of partial backups in situations where full backups will lead to overstuffing of unnecessary mails into a limited storage space.
Perfecting the strategy to backup Apple mail even more
Now that we know that selective backups can do the needy in situations that don't require full backups, let's discuss various backup patterns that can be utilized to strengthen data security. Portable backups are handy in situations when one needs to access email data while on the move. Portable backups onto 'plug and play' media can be carried home to perform professional duties in a comfy atmosphere. Portable backups can be easily shared with interested parties when you are collaborating on some important project. Likewise, mirror backups play an important role by creating multiple backup copies which sustain our ties with email data when some backup copies are rendered inaccessible by device failure or data corruption. Cloud backups do away with the limitations of storage space and cut down the data storage cost by providing a cheap alternative for storing backups. Some degree of data compression will also do a world of good to us.
How to backup Apple mail in a convenience-rich manner?
If you want to experience utmost convenience in Apple email backup then manual methods have to be dropped with immediate effect. Those with a past experience of employing the manual approach will second that these techniques aren't fail proof and leave a lot to be desired by making things complex. Running regular backups with manual methods is infeasible because these techniques are too slow to get things moving in the right direction. The profound data security available from professional tools is also missing when you employee a manual technique. This makes it crystal clear why more and more people are veering towards automatic tools for advanced email management,
How to backup mail on Mac by identifying the best tool?
As we can clearly deduce that professional tools are more appropriate alternatives to backup Apple mail we have our work cut out.How to identify the best tool? It is easier said than done, because you are seeking a lot of qualities in a deserving tool like ease of usage, diversity and fail-proof operation. Evaluating a tool from all angles without using it is almost impossible. This is why you should always look for free demos of professional tools, as experiencing a free trial period is the best way forward to test out the abilities of an Apple mail backup tool. If you are convinced, then do download the free demo of Mail Backup X, a tool that has everything in its arsenal that makes email management an ease-affording and highly satisfying exercise.
Here are some qualities that you will uncover while using the free demo of this exceptional Apple email backup application
Experience technical finesse at its very best for this tool is a true all-rounder that works on both Windows and Mac.
This tool will not disappoint you because it is versatile, platform independent and works with all popular email clients.
This is a tool will limitless potential that has been realized by offering that something extra to users in the form of different backup patterns like full backup, partial backup, mirror backup, incremental backup, etc.
You can create multiple site backups with ease, speed and efficiency that you have never experienced before.
No need to become a beast of burden by using tiresome manual methods because this tool is all set to bring you technological convenience in its full avatar.
Availability of flexible subscription packages at pocket friendly price will offer true satisfaction.
Round the clock user support will be at your back to help your navigate the features of this tool without getting engulfed in doubts.
The steps to carry out various tasks such as email backup, migration and restore are so simple in nature that you will become addicted to the flawless design of this ease-affording tool.
Immediately restore mails from backups and archives to keep downtime at bay.
This is an all-inclusive solution that delivers it all, be it ultra smooth mail migration or speedy email import/export.
Additional benefits like 3x data compression, PDF archiving, PST splitting and a comprehensive mail viewer will bring you boundless joy.
A free demo will set the tone for things to come. Avail it right away and enjoy substantial benefits that will make a positive change to your email management strategy.
Follow the Step by Step Guide to backup Apple Mail in this Video.
youtube
#apple mail#apple mail backup#backup apple mail#apple mailbox backup#apple email backup#apple backup tool#apple mail backup guide#Youtube
0 notes
Text
Mac email backup is very easy now
It has been a topic of discussion for long on how to mac email backup with an easy to use procedure.
Often it has been seen that Mac users complain about incomplete procedure on mac email backup. The foundation of an appropriate data backup always lies on a well instructed procedure. Therefore, it is very important to use a right, more precisely a professional tool for data backup.
While you may come across endless names for data backup tool, we offer the best in class product Mail Backup X. A well-engineered email backup tool for archiving emails from apple mailbox.
Also, the below links on Mac Operating System and Apple mail will make you understand about the subject in detail.
MacOS and Apple mail gives an idea on selection of the right tool considering different aspects of the mail communication tool.
The best way to mac email backup with clear instructions
Downloadthe mac email backup softwareand install on your Macformac email backup. Please follow the link for installation instructions.
Once the installation is completed, launch the tool from the Applications/ Quick Launch Menu.
You can start the fully functional trial run for 15 days or activate it if you have already purchased a license version of the tool.
You may choose to setup a new backup profile from the dashboard by choosing option “setup a new backup” oryou may click my backup profiles on the left side bar in the dashboard and click “set up a new backup profile”.
The next screen shows options to setup back for a list of mail clients. Choose Apple Mail and proceed to next step.
Once you click and choose Apple Mail to setup a backup you are presented with folder structure from Apple Mail accounts. Please select or deselect the folders out of all the mail accounts configured in Apple Mail.
The next step shows Advanced options like setting
* frequency of Mail backup (select automatic as its recommended or you may choose Manual or recurring at particular intervals).
* secure your backup archive by encrypting the data. So, it can only be viewed on this computer.
* you May also activate the USB Auto Snapshot option by assigning a USB drive. So, whenever you connect the USB drive, it automatically makes a snapshot copy of your local mail backup to the USB Drive in the background automatically.
8. You can set the location of backup to local disk drive or Cloud service by authenticating and adding Cloud Space (at Present Google Drive, DropBox and Microsoft One Drive are supported). Click save.
9. Apple Mail Backup Profile is set up and now your emails should have started to back up as per the options and settings you selected during the previous steps.
Demo is the preliminary answer on how to mac email backup on mac
In order to understand the basics of mac email backup, we recommend you to use the demo version of the tool initially.
The demo tool has various advantages before you proceed with the licensed product.
It is completely free and guides in the most systematic way on how to mac email backup. For more information, do visit the official website for a detailed tool on the software www.mailbackupx.com/how-to-backup-apple-mac-mail-mails-on-mac/.
1 note
·
View note
Text
Best 2 Ways To Convert MBOX To PST
MBOX is the most commonly used file format use by a different email clients like - Thunderbird, Gmail, Apple Mail, etc. This file contains all the data of your mailing account. On the other side, the PST file format is used by Microsoft Outlook. Due to regular improvement and advancement in Outlook Application, most of the users switch to Outlook.
Reason Why User prefer Outlook Over MBOX file support mailing client.
Outlook is an application used for sending and receiving mails. It also helps to manage personal as well as professional mailing data such as calendar, Appointments , Events, Tasks, Contacts, etc.
Outlook provide an option to schedule emails.
You can Create new meetings, appointments, tasks and contacts from one window.
Offer Quick Keyword Short cuts to Compose Mail
Share Calendar with various Contacts
Better Security features and enhancements.
Queries related to MBOX to PST Conversion - "I am working as Accountant, I am using Thunderbird for sending my mails but for past few months my account stop working properly and it's causing a problem. So I search for an alternative mailing client and I find Outlook most suitable for me due to its advanced features. Now I have my Thunderbird backup with me but it is not supporting the file format. How can I solve this issue?" "I have 10 MBOX file which I want to covert in PST. Can you suggest me a reliable solution to convert MBOX files to PST?"
Today I am going to discuss two most reliable ways to convert MBOX file to PST. After that you can Import PST file in Outlook directly
Solution 1 - Advik MBOX Converter Solution 2 - Manual Solution using Thunderbird( Free)
You Can choose any of the above method to convert MBOX into PST file format.
Method 1- Convert MBOX TO PST Using Professional Solution
Advik MBOX Converter software can easily export your MBOX files in PST file format. The software will convert mailbox file without any data loss. You can convert multiple .mbox files to .pst in one fell swoop.
Here are some impresive features of this software;
Advance Email Filter options to convert your specific emails
This application has a user-friendly Interface .
It can Convert multiple MBOX files to PST at once.
Follow the steps below to convert .mbox into .pst ;
Step 1 - Run Advik MBOX To PST Converter
Step 2 - Click " Select File " option and browse .mbox file from your system or hard drive.
Step 3 - Select the saving options from given file format.
Step 4. Now browse the desired path, where you want to save the converted file.
Step 5 - You can also slect Advance Email Filter option ( Date range, From , To, Subject, etc).
Step 6 - Click "Convert" button to start conversion process.
Method 2 - Convert MBOX To PST Using Mozilla Thunderbird
In this segment we discuss how we can convert MBOX files to PST using Mozilla Thunderbird.
Follow the following steps to convert MBOX into PST
Step 1 - To start you have to log in to your Thunderbird Account.
Step 2 - Now click the Gear option on the top right side of your browser window.
Step 3 - Select New > Existing Mail Account.
Step 4 - Login with your Gmail Account Login User id and password.
Step 5 - Select Gear option and then Add-on , a window will open there search for Import/Export Plugin
Step 6 - After that right-click any folder, a menu will open
(Import/Export Tool NG > Import MBOX file) now your Mbox file is exported in Thunderbird.
Step 7 - Your MBOX file is exported to your Gmail Account.
Step 8 - Now you have to configure your Gmail Account to Outlook Account
Step 9 - Login your Outlook Account
Step 10 - Goto File option and select Add Account option.
Step 11 - Add your Gmail user id and password
Step 12 - Outlook launch your Gmail Login window.
Step 13 - Click on done and your both account are syncronised
Your MBOX Files is now Converted into PST files.
Final Word - After checking solution for converting MBOX to PST we see that both the method are efficient but manual method have its limitation so the automated method Advik MBOX Converter is a better option as compared to manual.
1 note
·
View note
Text
Backing up Apple emails shall be much more beneficial than only clearing storage spaces for new data
On a daily basis, it won’t be shocking at all even if you say that you have almost a GB of newly incoming emails. Right now in the 21st century, almost every professional workstation share information among its members through the aid of mailboxes. The use of emails to transfer information has drastically increased during the Covid-19 period. This is because through emails a person needn’t come in contact with another human and the information can also be easily shared from one user to another. All these emails are stored in your computer’s main hard drive. Although quite huge but the drive is bound to be filled up after a few months or years. When such happens, the motherboard has a tendency to start deleting the older emails irrespective of their relevance or importance. Deletion of sensitive data can be really problematic in your personal, social and work lives. Therefore it is very important that you build up a habit of backing up Apple email messages according to their importance level and on a daily basis. These duplicate copies can be stored in external drives so that any action upon the original disk has no effect upon the backup copies. But never form the supposition that these process of duplicating emails and storing them elsewhere has been done only to create new spaces in your hard drive. Having Apple email backups can aid you during both professional and personal problems! Even a primary school child can be greatly benefitted before exams if he/she has duplicate copies of the online transferred study material. Not only in a student’s life but even a person who is a part of a professional organization can save his/her career with the help of mail backups.
Although students can be benefited, but is there an affordable Apple email backup tool for them to purchase?
In the previous paragraph, I have mentioned that both students and working people can reap profits by backing up their mailboxes. The only condition is that to backup the Apple mail files, you need to use a first class tool which shall not hurl errors and problems towards you and your data. But generally such efficient tools are high in price and therefore difficult to be purchased by a non-worker such as a student. Therefore, students are not able to safeguard their mailboxes most of the times. But, not anymore with this new software Mail Backup X.
We all need to thank the InventPure Company for developing the best first grade Apple email backup software and providing it at an affordable price even for the students. This tool is not restricted to only backing up mailboxes as it can perform several other operations such as converting the data from one format to another, mending corrupt files, etc. Not only these, but this new tool is also capable of automatically uploading the data into cloud drives so that they can be accessed from any part of the globe by the allowed users. Claiming for a free trial is extremely easy in this tool wherein you just need to fill in your contact details.
#Backup Apple email#Backup Apple email mailbox#Backup Apple email data#Backup Apple email account#Backup Apple email folders
1 note
·
View note
Photo
If you are looking for instructions on how to backup apple email account and restore to external hard drives, then you are in the right place. In this article, you will get all the necessary information about backing up your Apple Mail data to external storage devices such as USB flash drives, hard drives, etc. Mail Backup X is a well-built tool built in with robust algorithms that helps users to back up Apple email data easily. This tool also makes it easy to back up MBOX files. Just download and install the software on your machine to get started.
1 note
·
View note