#restore mac folder
Explore tagged Tumblr posts
Visit Tumblr Blog
Explore Tumblr blogs with no restrictions, modern design and the best experience.
Last Seen Tumblr Blogs


Fun Fact
When “GIF” was named word of the year in 2012, Oxford Dictionaries U.S.A. credited Tumblr for pushing the word.
Text
Restore email mac mails with zero tolerance data integrity
Data integrity is often misjudged when it comes restore mac email. It is about overall accuracy, completeness and consistency of data. So whenever, data transfer takes place, the tool is expected to transfer or convert eh files with completeness and accuracy.
A non-accurate or incomplete transfer of data means the file is unreadable or unrecognizable or broken. In worst cases, the data files transfer or conversion does not take place.
This makes it very crucial to use a highly skilled restore mac email tool for an efficient transfer with zero tolerance data integrity.
We deliver a highly skilled and well-engineered product Mail Backup X. The one of its own kind to restore email mac mails. A tool that maintains hundred percent data integrity and also restore mac email addresses.
The factor is also visible in the applications of the restore mac email app delivering complete data file without any deviation.
Different particulars are transferred while taking backup of emails from Mac. Therefore. We also make sure that mac users undergo the information on Mac OS and Apple mail for a detailed tour on different aspects of them. So, it is advisable to browse the below links on Mac OS and Apple mail for more information.
Maintain data integrity factor in various applications that restore mac emails
It is indicative of the fact that different applications of this restore mac email software preserves data integrity while taking backup of emails from Mac.
The third party mail archive application supports reading and import of common mail archives file formats like .mbox, .rge, .olm, .olk, .pst, .eml, that store mail data by mail clients like Outlook Mac, Outlook Windows, Office 365, Thunderbird, Postbox, Gmail, Yahoo etc.
The inbuilt mail archive application allows you to view important mails from different mail clients. The product allows you to read and import archive files from Mbox viewer, RGE viewer, OLM viewer, OLK viewer, PST viewer, EML viewer without the need to switch between or open mails with different mail clients.
The third application of inbuilt mail migration application is an advanced mail conversion feature to use mail client of your choice on Mac OS. It permits you convert and export mail data to all major mail data file formats like .mbox, .rge, .olm, .pst, .eml.
Test the tool to explore the best way to restore mac email
The best way to explore the data integrity factor is by testing the tool for a realistic experience.

All you need is to download the demo version of the restore mac email tool and on Mac. Use it for 15 days until the validity expires.Switch to the licensed version of the tool, once satisfied.
For complete access of the product, you can click on the licensed version of the tool along with a product key.
For more details on the software, log on to the below website and get all your queries answered in a systematic manner www.mailbackupx.com/restore-mac-email/.
#mac restore tool#mac mail restore#restore mac mailbox#restore mac folder#restore mac data#restore mac files#restore mac email
1 note
·
View note
Text
Installing Linux (Mint) as a Non-Techy Person
I've wanted Linux for various reasons since college. I tried it once when I no longer had to worry about having specific programs for school, but it did not go well. It was a dedicated PC that was, I believe, poorly made. Anyway.
In the process of deGoogling and deWindows365'ing, I started to think about Linux again. Here is my experience.
Pre-Work: Take Stock
List out the programs you use regularly and those you need. Look up whether or not they work on Linux. For those that don't, look up alternatives.
If the alternative works on Windows/Mac, try it out first.
Make sure you have your files backed up somewhere.
Also, pick up a 5GB minimum USB drive.
Oh and make a system restore point (look it up in your Start menu) and back-up your files.
Step One: Choose a Distro
Dear god do Linux people like to talk about distros. Basically, from what all I've read, if you don't want to fuss a lot with your OS, you've got two options: Ubuntu and Linux Mint. Ubuntu is better known and run by a company called Canonical. Linux Mint is run by a small team and paid for via donations.
I chose Linux Mint. Some of the stuff I read about Ubuntu reminded me too much of my reasons for wanting to leave Windows, basically. Did I second-guess this a half-dozen times? Yes, yes I did.
The rest of this is true for Linux Mint Cinnamon only.
Step Two: Make your Flash Drive
Linux Mint has great instructions. For the most part they work.
Start here:
The trickiest part of creating the flash drive is verifying and authenticating it.
On the same page that you download the Linux .iso file there are two links. Right click+save as both of those files to your computer. I saved them and the .iso file all to my Downloads folder.
Then, once you get to the 'Verify your ISO image' page in their guide and you're on Windows like me, skip down to this link about verifying on Windows.
Once it is verified, you can go back to the Linux Mint guide. They'll direct you to download Etchr and use that to create your flash drive.
If this step is too tricky, then please reconsider Linux. Subsequent steps are both easier and trickier.
Step Three: Restart from your Flash Drive
This is the step where I nearly gave up. The guide is still great, except it doesn't mention certain security features that make installing Linux Mint impossible without extra steps.
(1) Look up your Bitlocker recovery key and have it handy.
I don't know if you'll need it like I did (I did not turn off Bitlocker at first), but better to be safe.
(2) Turn off Bitlocker.
(3) Restart. When on the title screen, press your Bios key. There might be more than one. On a Lenovo, pressing F1 several times gets you to the relevant menu. This is not the menu you'll need to install, though. Turn off "Secure Boot."
(4) Restart. This time press F12 (on a Lenovo). The HDD option, iirc, is your USB. Look it up on your phone to be sure.
Now you can return to the Linux Mint instructions.
Figuring this out via trial-and-error was not fun.
Step Four: Install Mint
Just follow the prompts. I chose to do the dual boot.
You will have to click through some scary messages about irrevocable changes. This is your last chance to change your mind.
I chose the dual boot because I may not have anticipated everything I'll need from Windows. My goal is to work primarily in Linux. Then, in a few months, if it is working, I'll look up the steps for making my machine Linux only.
Some Notes on Linux Mint
Some of the minor things I looked up ahead of time and other miscellany:
(1) HP Printers supposedly play nice with Linux. I have not tested this yet.
(2) Linux Mint can easily access your Windows files. I've read that this does not go both ways. I've not tested it yet.
(3) You can move the taskbar (panel in LM) to the left side of your screen.
(4) You are going to have to download your key programs again.
(5) The LM software manager has most programs, but not all. Some you'll have to download from websites. Follow instructions. If a file leads to a scary wall of strange text, close it and just do the Terminal instructions instead.
(6) The software manager also has fonts. I was able to get Fanwood (my favorite serif) and JetBrains (my favorite mono) easily.
In the end, be prepared for something to go wrong. Just trust that you are not the first person to ever experience the issue and look it up. If that doesn't help, you can always ask. The forums and reddit community both look active.
183 notes
·
View notes
Text
Updated Resource List: UI Edition (Updated 11/10/24)
This is all the mods in my downloads folder that changes the game UI and makes it look better on modern display, removes annoyances etc. My old resource list only listed 3 which have since been replaced.
I play on a 2k monitor with the game set to 1080p with the default UI because I like the nostalgic look.
If you use cleanUI by @greatcheesecakepersona, then many of the widescreen fixes are already included! Many of these also have an alternative version made for cleanUI.
Loading screen replacement:
UC loading screen by @eddysims replace the Fun With Pets logo and removes idle M&G sims on select menu (I use an older version to match the Super Collection for mac, but have combined with this to remove the idle sims).
UC startup strings by @simsllama replace the M&G text strings while loading to fit Ultimate Collection.
M&G to UC program name replacement (MTS) changes the program name to say Ultimate Collection on taskbar, when closing the game and in credits. I use the old original Sims 2 icon in start menu.
More UI mods below my loading screen.

Removed or disabled buttons:
No delete button in Sim Bin by Chris Hatch avoid accidentially deleting a family in the neighborhood.
No delete button in Buy/Build mode by Chris Hatch. I prefer to delete cc in the downloads folder instead.
Edited No useless town buttons by ePSYlord. Removes the AL, FT and Pets buttons from upper select menu in hood view. It also disables Custom Content Browser button to the old sims2 webpage, the camera and video buttons which I never use but always accidentially click.
Removed Auto Login button by ePSYlord. Removes the redundant option in settings.
No delete button in CAS, edited More Columns in CAS by ePSYlord. This is an edit of Chris Hatch's ui mod (cas300Extra) that adds the columns while also removing delete button from all categories. I had difficulty getting it to work for me, but managed after changing load order and removing specific cc hairs.
Remove hood popup dialog box reoploaded on MATY. No more nagging to add subhoods when entering a neighborhood.
Visual annoyances begone:
No CC icon in CAS (MTS) hides the star on custom content.
No pause frame by @simnopke removes the red frame from live, buy and build mode.
Add store icon to CAS by @jawusa. Restore the TS2 Store Edition icon on store content which can all be found here.
Widescreen fixes:
Wider change appearance by Chris Hatch.
Wider buy/plan outfits by Chris Hatch.
Wider family tree by SixAM!
Wider design tool by @lamare-sims.
Wider collections by Chris Hatch.
Menu fixes or addons:
Subhood selection by Mootilda changes menu from big button to list of selections instead. Useful if playing with multiple subhoods.
Select your cemetery (MTS) adds dialog box to move tombstones if all sims on a lot die.
Baby Last Name Chooser by @midgethetree adds dialog box to choose a baby's last name when born.
Marriage Last Name Chooser (MTS) adds dialog box to choose last name after sims gets married.
Misc. UI changes:
Clearer need bars by simnopke. It just looks nicer.
Season icons in color (MTS). Replace the blue with colorful icons.
LTW icons fixed by Lamare. Resizes the Life Time Wants icons to be consistent.
I think that was everything concerning the user interface in my game. A lot more than anticipated and most added in the last year or so. My game looks so nice now!
If you have other UI mods or dialog box addons that isn't on the list, then please leave a suggestion for me 🥰
324 notes
·
View notes
Text
Tag search:
# Buymode stuff
# Lights
# Plants
# Decor items
# Defaults
# Defaults - TS2 Clothing Tweaks
# Custom TS2 Clothing Tweaks
# Bodyshop stuff
# Tutorials
My SFS Folders :
🪴 Decor 🪑 Furniture 💡 Lights 🎨 Recolours
Other: ⚙️ TS2 Defaults 👚CAS Defaults CAS stuff 👱🏽 Just hair | creator resources
All my old MTS2 uploads (if something's not there, it's on SFS already)
Popular WCIF & FAQ
👾 If you’re curious what other games I’m playing here's this almost empty blog.
❕ I create CC for The Sims 2 only. I don't do requests but I'm ok with receiving CC suggestions / ideas (for TS2).
📣 Updates:
06.02.2025 - Fixed issues with Move In and First Kiss scenes in my 'Less effects in cutscenes' mod. If you still have issues with some cutscenes please let me know.
30.01.2025 - I've added alternative download links to all my last year's posts.
07.01.2025
Photo frame overlay replacement now includes caption UI resources so there's no green. Added Box link.
14.11.2024
Alternative version of my Atomic Fireplace Default is available - I've added emissive map to make the burning logs more realistic - Download (SFS) (Standard Material Shader Edit is required). Corrected fireplace height so it doesn't bleed through the floor above.
04.11.2024
Edited Round Wall Lamp from G&B set, light settings switched from white to yellowish.

01.11.2024 05.11.2024 11.11.2024
Updated my edit of Trait Chemistry Mod, fixed Lua script issues so Alien TO, Facial hair TO work. A few more things fixed in upd. 2 & 3
Download (SFS) , (BOX)
03.10.2024
My ko-fi account's up.
30.06.2024
I've shared updated versions of ceiling lamps from my Lamp Collection - lamp canopies are not hidden in the ceiling anymore /Note to ppl playing on Mac: most of these edits are not mac-compatible.
25.06.2024
Fixed outdoor square shadows for my Wicker Lantern Set . Download (SFS)
21.05.2024
Fixed missing texture in 'TightDressMidiSlit' repo recolor number 10. Download (SFS)
07.05.2024
Finally fixed the Bar Surface OMSP I shared along Wedding Bar Default. Please note it's basically a new object but with the same GUID so if you have old version in the game, the objects placed on that one will disappear Download (SFS)
Updated NonSlip Bar Mat mesh included with Bar Decor Set, now it can be placed on all surfaces. Download (SFS)
08.04.2024 - Bar worktop OMSP was edited and now it doesn't block bar functions, I also added second (1 slot) bar OMSP for the lower shelf.
07.04.2024 - Edited Deco guitar floor stand - now it can be placed on surfaces without moveObjects cheat.
26.03.24 - Updated Toast Flute Default - now glasses are already half-full when Sims toast at the table.
11.03.24 - Fixed EM grey repo recolor 01 for 4t2 Dogsill Amari hair. Here's only the fixed file: (SFS), and here's all of it (SFS)
10.03.24 - Night time Decorative fireflies effect is now available - fireflies only show up at night.
09.03.24 - RDN Sleeping bag edit was made compatible with ACR.
27.02.24 - Another update of Bamboo Sconce (Tropical Lamp add-on). When I fixed the shadow I shared some half-assed version of it ?? Now it has warm light color, correct price and description. Download HERE (SFS)
30.11.23 - Updated LL Billie hair recolors, these are now enabled for all clothing categories
12.11.23 - I've updated witch hat & LL Luanne hair combo recolors so those should be now flagged as hats and disabled for Townies
11.11.23 - Updated Restored Car Paint Colors default, Added Finnish, Norwegian and Portuguese/ Brasilian-Portuguese translations
31.10.23 - Updated Bowling Alley defaults, all files are now separate. Added smoother bowling ball
14.07.23 - corrected shoe sound effects for my Long Dress recolours - changed it from heels to normal shoes
10.08.23 - Fixed blue shadow in Bamboo Sconce (Tropical Lamp add-on.
*If you use RPC you probably haven't experienced the blue shadow flashing but I recommend you update the sconce package anyway.
Old updates list is HERE<<
247 notes
·
View notes
Note
Hey, it's me, Alex. I remember your profile had links for art programs like Paint SAI and Adobe Photoshop. Is that archived for me to download?
Accidentally pressed enter while fixing post, am fixing now)) BRUH IM SO HAPPY to even have someone remember this, of course i still have them!! I hope they help! I still remember the day when nothing was stupid subscription~ Here you go!! Folder to Programs (whole overview ) Programs inside include >> - SONY Vegas Pro 13.0 Build 428 (x64) RePack by KpoJIuK - SAI 2.0 (64bit) - SAI 2 RUSSIAN VERSION - PaintTool SAI English Pack - Microsoft Office 2016 VL ProPlus English (x86-x64) June 2016 - Adobe Photoshop 2020 v21.0.1.47 Multilanguage (Pre-Activated) {B4tman} - Adobe Flash Professional CC 2015 - SAI 2.0 (64bit) - Camtasia Studio FULL 8.1.2 + Serials [ThumperDC] - (this restores windows photo viewer if you dont have it on your pc Restore_Windows_Photo_Viewer - (Styxero) Adobe Photoshop CS5 ---------------------------------------- Some of these are a-little older now then when clearly they were posted but should work fine as I still use some of these programs myself. I'm unsure with newer computer models or types. I don't care for mac/apple products so I have no idea if these work for them;; edit- Done anyways i hope any of these are useful for you!!
9 notes
·
View notes
Note
After I deleted a bunch of projects (thankfully non-critical, though representing a great deal of work in total) during a recent fresh OS install, I realized that my backup practices are practically non-existent. Any tips or sources on getting started making, and eventually automating, effective backups?
I am stealing the concept here from jwz's backup guide, but I am recommending different tools, focusing on personal files only, and also addressing Windows. jwz's guide is a good reference:
Doing a way, way better job than most people of backing up one single system is very easy. Let us begin.
The most basic step of having decent backups is getting your hands on two external hard drives at least big enough to hold your entire system, and putting a label on them that says "BACKUP ONLY DO NOT USE FOR ANYTHING ELSE I AM BEING FOR REAL HERE"
Once you've got those, plug one into your system wherever it spends the most time. If you have a desktop then that's solved, if it's a laptop hopefully you already have a USB hub you plug it into when you sit down to work or whatever and you can just leave it there.
Now set up regular scheduled backups to that device. On Windows and Mac, there's a built in tool for backing up your system to an external drive. We'll assume that you just want to back up your user files on Windows and Linux, since doing full system backups isn't tricky but is kind of unnecessary.
(Ugh. Windows seems to be trying to phase out Windows Backup and Restore in favour of their File History thing. That's annoying, let me log in to windows and check how this actually works. Mac in the meantime)
Mac has Time Machine. Time Machine is extremely good, and you can tell Time Machine to save its backups to a disk. Point Time Machine at your external hard drive and tell it to schedule a backup however frequently you want. If anything goes wrong in the future, you can ask Time Machine to look at that backup disk and it'll show you a few versions of whatever you backed up there. I'm not a Mac user but I think you can even use Time Machine to transfer between an old computer and a new one.
Windows now has File History which I have never used in my life, they added it after I stopped using Windows. Same idea though, pick some folders and back them up to an external storage device. If anything goes wrong, use File History to go back through that device and find the version of the file you wanted. I don't know if there's still a way to access the older Backup and Restore system.
On Linux, my favoured way to manage simple desktop backups is Deja Dup, a GUI for Duplicity. Duplicity can do a lot more than just backup to a disk, but we'll start there. Install Deja Dup, open it up, and follow the prompts to back up your user files to the external drive. Deja Dup can also do backups to remote storage servers, Google Drive/Onedrive, and commercial storage providers like Amazon and Backblaze. It will even encrypt your backups if you are worried about Amazon spying on your files or whatever. If something goes wrong, point Deja Dup at your backup drive and it will offer you a suite of restore options covering a few versions.
Now, you have a permanently plugged in hard drive that will always get rolling backups you can restore from. These aren't safe from, say, ransomware, or your house burning down, but at least you won't lose anything when you update a computer or accidentally delete something and have an ohshit moment.
Now you take that other drive you bought, and do the same backup you're already doing to that. Now you go put it somewhere else where it's readily accessible and won't be accidentally used for anything, keep it at the office, give it to your dad, whatever. Set a reminder on your phone for once a month. Once a month, go get that drive, run another backup, and put it back. You now have better backups than many medium sized businesses.
This is impractical to scale beyond one PC, but if we're being honest even when I had like half a dozen laptops, only one contained much of value. Back up the system you care about.
Don't worry too much about making sure your backups are space efficient, like, yeah it would be a good idea to exclude game installs and stuff from your backups to save space but if that sounds daunting or time consuming literally do not do it. Decision paralysis is brain poison, just back it up and sort it out later. 2TB external hard drives are cheap.
FURTHER STEPS YOU CAN TAKE:
Easy Cloud backup: Backblaze personal backup on Windows and Mac is $6/month and pretty easy to use. If you are struggling to keep track of a monthly remote backup, or you want an easy remote backup. Backblaze is a reasonably reliable company and one of the Go To Companies in the world of data reliability. Yes, it's a cloud subscription. If you don't want that don't use it.
Network backup: If you have access to a storage server, that can be a good way to make a remote backup without having to shuttle disks around. That could be a physical server if you maintain some kind of lab, or it could be a cloud storage provider like Backblaze B2 or Onedrive or whatever. Deja Dup specifically supports backing up to a lot of different network storage providers, and even if you only have a fifty or sixty gigabytes of network storage on hand, your most essential personal files can probably fit in there.
Drive failures: Eventually one of your drives will fail, either your storage drive or your backup drive. If the storage drive fails, well, that's what the backup is for, go get a replacement and restore from the backup. If your backup drive fails, well, that's why you have two of them. As soon as humanly possible go get a replacement drive, and substitute it in for the dead one.
101 notes
·
View notes
Text
That 90's Post
Recently, I can’t help but feel a bit of nostalgia towards my childhood in the 1990’s. Nostalgia is one hell of a drug, but there does seem to be something about the 90's which was genuinely terrific. I'm not sure if it was because you could argue that it was the 'last great decade' it was post the cold war and then Berlin wall fell in 1989 and just before the tragedy of 9/11. I can't help but reminisce over just how nice that decade was. And this project is aimed at decoupling from the modern lived experience and back to the 1990’s (within reason). As I recline into my grey wing back chair on an evening, the idea of a life without my phone begins to take effect. However, I then come to the first problem I would have with this idea: I rely on my phone for my alarm and well, everything. So, impulsively after my bed time, I decide to purchase the following alarm clock on Amazon.

This then allows me to fix 2 problems: firstly, I needn’t worry about using my alarm on my phone to wake up (as I can set one on this device) and I can also use it as a replacement for checking the time on my phone. Half of this will be about self-control rather than the physical restoration of household items. Today is a case in point as even though I was able to eat my Frosties and drink some Sunny D, I still just ended up watching YouTube for most of the morning. Not via the TV or PS5, but on my phone. It’s my hope that with the alarm clock I’ll be able to switch off the device and then not need to turn it on again until much later.
Later that evening (around dinner time, it arrives!)

I don’t like seeing the time whenever I’m trying to fall asleep. Therefore, I set it up near enough to get me out of bed on a morning, facing away but also near an outlet.

And with that, I can turn off my phone. When I look at the red numbers looking back at me, I'm reminded of a time when you'd watch that number tick past midnight as you gamed away. It was beautiful, really, and not at all appreciated enough when it was happening to me. I now have a time source in each room of the house so if I'm asked the question 'what time is it?', I'll have a time source close by.
10/06/2025
Not as strong as yesterday and I’ll explain why: I started the day with absolutely no phones. I woke up must before 07:00 so I didn’t need my alarm but I then refused to check it until it was around about 9. At which point, I needed to start work. My partner had a hospital appointment and it wouldn’t be fair to be completely offline. This then highlights a particular tricky issue: phone calls. For transparency, I’m taking a snip of my phone usage as well.

Edit: 28/06/2025 09:38. After watching this video, it inspires the idea in me to try and split out the devices that I use into separate functions and the idea sticks with me for most of the afternoon. So, I begin to take stock of all the Apps on my phone and it occurs to me: in pursuit of convenience, we’d given up autonomy.
As I reflect on the Apps that are on my phone, I then decide to make a folder on Safari (on my mac at home) and remove all social media from my phone and approach it with this mentality: I can access these pages at home, I don't necessarily need them on my phone. I delete Instagram, Threads, TikTok and LinkedIn (Facebook and Facebook Messenger was taken off a while ago).
Reflecting on the video linked above, I realise the issue isn't having a smartphone, it's the reliance on a smartphone as the single point for everything. Therefore, it makes sense to me at least to try and diversify away from that.

I start with note taking: at school in the UK we had these notebooks which were (I believe) for a specific topic at a time. Here I buy some Berol handwriting pens, a pack of 10 Staedtler pencils and 10 BIC pens.
Update: since I made this list, I have added into it:
A Canon Watch
A Physical Calendar/Diary
An iPod Shuffle

I also set up a desktop computer which isn't in this shot. The diary that I have picked up starts on the 28th of July and I'm looking to make that my official 'switch back' day. In that, I reduce the need to use my iPhone. I will continue to use 2FA and MFA but for at that point, that will largely be all it's used for (hopefully).
2 notes
·
View notes
Note
hi if its alright with you can I please ask your stage gif process 🩵 (I don't mind if its not too detailed but if you use vapoursynth or topaz or anything)
hiii! omg thank u for wanting to know 🥺🥺 i actually use two methods, depending on the source file (and how lazy i feel). either vapoursynth or mpv. i'll show u both!
long, the example gif has a flashy background, somewhat clear. i hope.
i source from .ts files on k24hr or twitter, fancams, and then the youtube version (which i then run through handbrake before vs or mpv) if there's absolutely no other choice. i try to avoid show music core because its backgrounds make sharpening hard, but i'm using one from there for this tutorial :) i will also use beyond live / blu-ray files when available (i.e. 4th world tour gifs i did of twice)
vapoursynth:
-> only use the deinterlace (60 slow) when it's 1080i 30fps! i use this on files from k24hrs. if the file is already 60 fps (i.e. those from srghkqud on twitter), i don't deinterlace or preprocess. i use finesharp on .7 any time i use vs!

this gif is 268 x 520 px! i leave the delay at .02 and set frame rate to 60fps. on the left, it is just changed to 60fps and run through vs with the above settings. the gif on the right is sharpened!
i change my sharpening settings on every stage (and most other sets as well)! i use an action, and then adjust by the background and quality of the source! this is using my stage sharpening - but i have removed a smart sharpen and reduced opacity of other filters i use on different (clearer) files!
show music core has these really visible leds in their background, so sharpening it tends to be harder! i avoid using my 500px smart sharpens when it looks like this, and use high pass and bigger radius smaller amount smart sharpens!


sharpening settings for above: 8.0 high pass on soft light blending (40% opacity), 241 .2 smart sharpen (60% opacity), 15 15 smart sharpen (50% opacity) i should also note that on really really pale stages, i use camera raw filter to fix whites / highlights before i add the other sharpening! this does really slow down export time and can be frustrating, so i reserve it for then!
then i color! sometimes i use ezgif (which hasn't lowered quality that i've noticed) to adjust the speed, if i feel it needs it! this gif has a fine speed so i've left it as is, but i normally speed up gifs by 120% on their speed feature to make the choreo look a little faster!


left: unsharpened except vs finesharp, colored right: sharpened, colored
my coloring focus is always restoring skin, everything else is pretty much purely stylistic. i try to leave colors in the background the same! i do really like making blonde hair pinker or more toned (since they're often yellow, i always make a point of essentially toning their hair for them - i.e. tsuki in dang! set)
when i color the rest of the set, i keep the first gif open next to it to make sure everything matches! i normally copy and paste the coloring group and adjust as needed :D
also, i check how it looks in tumblr on desktop + mobile, since web safe colors adjust the look of your gifs a lot (the ones with the little dots in the middle are web safe, everything else isn't) and try to fix what doesn't look quite right. i also ask my friends if something is wrong but i'm not sure what (mainly nini (@withyouth) so shout out to her for putting up w/ me, a big part of the stage gif process)!
mpv: -> i press 'd' and make sure it is deinterlacing (again, only 1080i ones get deinterlaced)! and then i screencap. i followed this guide on setting up mpv, and always use minimal compression settings for everything i screencap.
-> i turn my files into dicom files (you can just rename them on mac, on windows it is multistep) and then scipt->load multiple dicom files (faster than loading image into stack and, in my opinion, clearer too)!
for windows: -> alt+d in your screencap folder, cmd. enter. type ren *.* *.dcm into the window. enter. close the command window!
i make my frame animation + frames to layers. once it is on the timeline, i go ahead and crop before i do anything else. i tried to make the cropping like the vs gif, but it's not identical!
sharpening: since i didn't use finesharp, i can add more in ps. this is my normal stage sharpening with nothing added or removed!


left: deinterlaced, screencapped, cropped right: deinterlaced, screencapped, cropped, sharpened -> 8.0 high pass (soft light, 65%), 500 .3 smart sharpen, 241 .2 smart sharpen (60% opacity), 15 15 smart sharpen (50% opacity)
coloring: same one as the vs gifs!


comparison:
left: vapoursynth, fully complete right: dicom, fully complete
i normally use mpv, but sometimes i don't feel like waiting on the screencaps, or i think finesharp will add texture + depth that the original doesn't have (too smooth of a filter, whatever) so i use vs! my taeyeon mr. mr. and le sserafim rock ver. sets were both done via vapoursynth, though the sharpenings are different from each other and what it shown here (i change sharpening a lot, and sometimes by set... sorry.. KJHDFGJKH)!
anyways i hope this was helpful!!! thank u for asking it means a lot u want to know!! if u want more stuff answered or shown, u can always ask :D and i hope it's clear 😭😭 i know i ramble a lot
#ask#anon#m:tutorial#niniblr#useroro#awekslook#userdoyeons#rosieblr#tuserflora#<- u all can ignore i just thought i should tag ppl KHDFKJGH#flashing tw#long post#resources
26 notes
·
View notes
Text
Reminders for the upcoming TS4 update!
Simmers, the new expansion pack For Rent comes out on December 7th and as we all know, big updates can mess with your game especially if you use mods. I've learned my lesson from the last few updates and I'd like to give some suggestions to help!
Note: I use the EA App for Sims 4, on a Windows computer. The methods I describe here will probably not apply to MAC users. I also don't know if these work for pirated games so just be careful!
-BACK UP YOUR SAVES. Just in case your save gets corrupted or the update somehow manages to lose your saves (this has happened to me- after the update, my saves were gone). Here's what I do:
Navigate to your "Sims 4" folder. In my case it's Documents>Electronic Arts>Sims 4.
Find your "saves" folder and right-click to copy it.
Paste your copy of your saves folder to your desktop (some people paste to their external hard drive as well, but I'm not sure how to do this)
Right click on your copy to rename it. It's a good idea to write the date on which you copied your folder. Here's my current backup:

Your saves are now backed up! If you lose your files in the game or they become corrupted, open up your backup folder, then select and copy all the files in the folder and then paste them into your actual saves folder. Your saves will then be restored! You should do this every so often just in case. I try and back up my saves once a month.
-Turn off automatic updates. This way you can choose when to update your game. I personally wait until mod creators start updating their mods and then update the game.
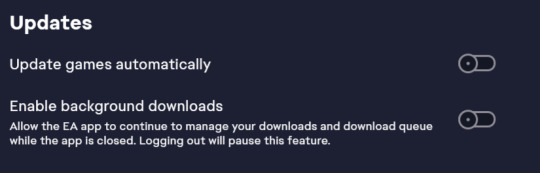
Open the EA App and head to your settings, then the "downloads" tab.
Turn off the "update games automatically" option.
When you're ready, update the game and enjoy!
-Follow mod creators on social media. If you use mods, it's a good idea to keep up with updates and what the creators are up to. When there's a huge Sims update, many mods (especially script mods) tend to break and need to be updated by the creators. Keeping up with them allows you to see what their plans are for updating the mods. Creators use many different platforms, but from what I've seen most tend to use Tumblr, Patreon, and Twitter/X to post updates. If I find a mod I really like, I always follow the creator. They also deserve tons of support for their amazing work!
-Know which mods are broken and updated. In addition to following mod creators, there are multiple threads that log all mods with each update. They tell us which mods are broken, which are updated, and which were unaffected by the update. If you're experiencing a glitch with a mod, you can report it on these threads. Here are examples of threads from previous updates:
Always check these before writing to an official Sims/EA forum about a glitch. If you use script mods, the bugs you're experiencing will most likely be from these mods. Also, if you use UI mods like UI Cheats, don't freak out if your UI looks like this:
Your game isn't corrupted, the mod is just outdated. UI Cheats almost always breaks after a big update. The creator of UI Cheats updates frequently, so make sure to check up on their Patreon page.
-Check in with the community if you have a bug. The Sims Forums, r/Sims4 on Reddit, and Simblr are good places to go if you have a question about a bug you're having. r/Sims4 was a lifesaver for everyone who had the dreaded tooth glitch in Growing Together. If you're having a non-mod related bug, chances are others are having it too, so don't feel afraid to ask!
I hope this helps some of my fellow simmers. Good luck with the new update and pack, I can't wait to see how my favorite Simblrs use it in their stories and gameplays!💖
#sims 4#ts4#sims 4 info#sims 4 update#sims 4 for rent#sims 4 expansion pack#important#the sims#sims#sims 4 mods#simblr#the sims community
13 notes
·
View notes
Text
Are you are a frequent computer user? If so, you may have often accidentally ended up deleting important files and folders. The fact is that data deletion by accident is quite a common problem among computer users. If you’ve accidentally sent your data to the recycle bin, you can restore it with ease. However, the problem comes when you’ve emptied the recycle bin as the permanently deleted data 's hard to repair. To restore them, you might need an active recovery software tool. This is where the EaseUS free data recovery software comes into the equation. Here are some ways to recover your lost files without any major issue: Best Free Data Recovery Software Tools Not many people know that the data you ended up deleting data remains at its location on your drive unless some other data overwrite it. This is where specialist recovery software tools come in handy. You’ll find many such tools on the internet, but not all will successfully recover your lost data. Here are some data recovery software tools which will recover your data. EaseUS Data Recovery Wizard Perhaps the most widely acknowledged and popular free data recovery software tool is Ease Us. Luckily, it can be easily downloaded from the internet and is free to use. Even the free version gives you a handful of features to recover your lost data. Unlike other trial version recovery software tools that will ask you to buy after a week or two, the EaseUS basic version is powerful enough to recover your lost files and restore them at your desired location be it your hard drive, SSD drive or an external flash drive. Not only this, but this free data recovery software will also help you recover your data from a range of sources. For instance, EaseUS will restore your precious data from deleted or formatted partitions, RAW partitions, virus attacks, lost partitions, and OS crashes among others. Additionally, paid subscriptions of EaseUS software are also available for corporate clients and those who want extra features. Will Creating Backup Files Help? In some cases, creating a backup of your documents helps but not always. Still, you must always create a backup of your files regardless of their importance. Doing so won’t take much of your time and will let you access your deleted documents. For instance, if you’ve deleted an important document, check your backup folder, a copy of your document should be in that folder. Syncing your data is another form of backup folder and can be a handy tool for recovering some of the lost data. However, this feature only works in some cases and is not a recommended option. In Built Recovery Software Tools These days, most operating systems come with inbuilt tools for recovering lost data. For instance, users of Apple Mac have access to a recovery tool called Time Machine. The device is built into the Mac operating system and can keep a backup of your lost files on a separate drive. In most cases, the drive should be connected either to the Mac or extreme router. Additionally, Apple Time Capsule is another network storage device that keeps a backup of each of your lost documents. Similarly, Microsoft Windows 7 also sport a similar data recovery tool called System Recovery Tool. This tool will help you restore most of your deleted data. This feature creates what is known as the Shadow Copies of your original documents. However, to be able to recover the lost data, you must mention the exact location or the data on your hard drive. Even if recovered, you cannot access these files directly. Click the right mouse button on that folder, choose Properties and you’ll have a tab on top by the title Previous Versions. Windows 8 also has a similar feature known as File History. It can help you recover some of your lost files and documents. Ironically, the tool is not enabled, and you need to do it yourself. Go to the control panel, look into the file history, and click on the tab by the title Configure File History Settings. Keep in mind that you’ll need to have an external flash drive to be able to utilize the backup.
If you didn’t turn on this feature before losing the document or file, this tool would not help you. None of these tools can actually restore your lost data the way you want. Try using the best recovery tool i.e. EaseUS for data recovery software. You’ll never regret using it.
0 notes
Text
Price: [price_with_discount] (as of [price_update_date] - Details) [ad_1] The iXflash Cube is the ultimate backup solution for Apple iOS devices, like the iPhone & iPad. It’s available with a USB type A connection. Once connected, the iXflash Cube, with the FREE iXflash Cube APP, will automatically backup all of the photos and videos from an iPhone/iPad while charging the iPhone/iPad at the same time. That way you can ensure that your iPhone or iPad will be recharged so you can perform a critical backup function. All the content stored on the iXflash Cube can be transferred to a PC or Mac, another mobile device, or virtually any storage device with an active USB Type A connection. [Backup All Photos and Videos while Charging] While your iPhone or iPad is charging, the iXflash Cube will automatically backup all stored photos and videos (including those stored on your iCloud account when connected to wi-fi). [Won’t Repeat] Only backs up images and content not already loaded onto the iXflash Cube. [Goes into Dark Mode] To prevent further drain on the iPhone or iPad battery, the iXflash can go into dark mode, which reduces power consumption. [Restore content back to iPhone or iPad] Restore all the photos and videos back to your iPhone / iPad, maintaining all the original formats (including Live Photo and Burst), dates, locations, names, and more. [Protects images against loss] It’s very common for users to lose their iPhone or iPad and the iXflash Cube Drive is designed to make it easy to maintain backup images and video and restore those images back onto another iPhone or iPad. [Creates new folders for each user] Use the same iXflash Cube for multiple users and the iXflash Cube will recognize and automatically create different folders for each user. That way all the items backed up will maintain their original grouping for easier access and to ensure no confusion when looking for specific images. [Limited Lifetime Warranty] iXflash Cube comes with a lifetime warranty against manufacture defect. The iXflash Cube is built with a stringent QC process to ensure all elements are of the highest quality and reliability. We stand behind our product with a lifetime warranty because we worked hard to build the systems to a higher standard. [USB Type A Connection] Works just like a standard USB Type A Flash / Pen drive to connect with any device that accepts a standard USB with a Type A connection. [ad_2]
0 notes
Text
Resolving Storage and Internet Issues
Computers are indispensable tools in our daily lives, but they can sometimes present frustrating challenges, such as running out of storage space or losing internet connectivity. These issues can disrupt productivity and cause significant inconvenience. This article explores practical solutions for two common problems: managing a nearly full startup disk on a Mac and addressing internet access issues on a Windows system. By following these steps, users can restore their devices to optimal performance and maintain seamless operation.
Addressing a Full Startup Disk on Mac
When a Mac displays a warning that the startup disk is nearly full, it signals that the primary drive, which houses the operating system and user files, is running out of space. This can lead to sluggish performance, application crashes, and an inability to save new files. How to Fix Your Startup Disk Is Almost Full on Mac begins with understanding the root cause and taking systematic steps to free up space.
The first step is to check how much storage is being used. Navigate to the system menu, select "About This Mac," and click on the storage tab to view a breakdown of space usage. This visual representation helps identify which file categories—such as applications, documents, or media—are consuming the most space. Once you have this overview, prioritize clearing out unnecessary files. Start by emptying the trash, as deleted files often linger there, taking up valuable space. Next, review the downloads folder, where temporary or forgotten files like installers or duplicates tend to accumulate. Deleting these can quickly reclaim space.
Another effective strategy is to manage large files, such as videos or archived projects, which often occupy significant portions of the disk. Use the built-in storage management tool to locate these files and consider moving them to an external drive or cloud storage. For users with extensive photo or video libraries, optimizing storage by enabling cloud-based syncing can offload files while keeping them accessible. Additionally, uninstall unused applications, as they not only consume disk space but may also run background processes that slow down the system.
Clearing system clutter is another critical step. Temporary files, caches, and logs can accumulate over time. Use trusted cleanup tools available in the Mac’s application store to safely remove these without affecting system stability. For advanced users, manually deleting cache files from the library folder can free up space, but caution is advised to avoid deleting essential system files. Regularly performing these maintenance tasks ensures the startup disk remains manageable, preventing future warnings.
Troubleshooting Internet Connectivity on Windows
Losing internet access on a Windows computer can be equally disruptive, whether it’s due to a misconfigured setting, hardware issue, or network problem. How to Fix No Internet Access in Windows involves a step-by-step approach to diagnose and resolve the issue, restoring connectivity efficiently.
Begin by verifying the physical connections. Ensure the Ethernet cable is securely plugged in or that the Wi-Fi adapter is enabled. Restarting the router and modem can resolve temporary glitches, as these devices sometimes encounter conflicts that disrupt connectivity. After rebooting, check the network status in the Windows taskbar. If the system indicates a connection but still shows no internet access, proceed to deeper troubleshooting.
Run the built-in network troubleshooter by accessing the network settings and selecting the option to diagnose problems. This tool automatically detects common issues, such as incorrect IP configurations or disabled services, and applies fixes where possible. If the troubleshooter doesn’t resolve the issue, manually reset the network settings. This can be done by navigating to the network and internet settings, selecting the reset option, and restarting the computer. Be aware that this resets all network adapters, requiring you to reconnect to Wi-Fi networks afterward.
Another potential cause of internet issues is outdated or corrupted network drivers. Visit the device manager, locate the network adapters, and check for any warning indicators. Updating drivers through the system or downloading the latest versions from the manufacturer’s website can resolve connectivity problems. If the issue persists, check for conflicts with security software. Firewalls or antivirus programs sometimes block connections inadvertently. Temporarily disabling these programs can help identify if they are the culprit, but ensure they are re-enabled after testing to maintain system security.
For persistent problems, consider external factors like network congestion or service provider outages. Contacting the internet service provider to confirm the status of the connection can clarify whether the issue is local or network-wide. Testing the connection on another device can also help determine if the problem is specific to the Windows system or a broader network issue.
Proactive Maintenance for Long-Term Performance
Preventing these issues from recurring requires proactive habits. For Mac users, regularly monitoring storage usage and setting up automatic cloud backups can prevent the startup disk from filling up. Scheduling monthly cleanups to remove redundant files and optimizing storage settings ensures the system runs smoothly. For Windows users, maintaining updated drivers and routinely checking network settings can prevent connectivity disruptions. Keeping security software updated and avoiding unnecessary applications also contributes to stable performance.
0 notes
Photo

https://pcsite.co.uk/how-to-find-the-recycle-bin-on-any-device/ Accidentally deleting important files can be stressful. Fortunately, most operating systems include a safety net to recover lost data. The Recycle Bin is a feature designed to store deleted items temporarily, giving users a chance to restore them if needed.Windows, Mac, and mobile devices handle this feature differently. For example, Windows places the Recycle Bin prominently on the desktop, while Mac uses a Trash folder. On Android, deleted files may not have a dedicated bin but can often be re
0 notes
Text
G Suite Mail Backup Tool

Every business and profession faces risks that can take the menacing form of data loss. This is the reason why we must take effective measures to have the better of these risks. Since digital data is the very life force fueling a business, every effort must be made to repel any chances of data loss. A large chunk of digital data is present in the form of emails and these must be well protected by installing antimalware systems. But this is not enough; we also need data backup and recovery systems to keep data loss at bay. Therefore, we must use professional, third party tools which are way cheaper than expert services and way more convenient than manual methods to backup G suite or any other email service.
G suite backup with a tool that caters simplicity in usage
In order to backup emails with ease we so yearn for, we need a tool that caters user friendly features. It must enable users to personalize an email archiving session. No matter what volume of data is thrown at a tool, it must deliver flawless results. It must issue valid usage license to users and should come decked with an easy plus smooth interface. A tool should not shrink our wallets by overcharging us. If you want to backup G suite email with such a features-packed tool, then you cannot go wrong if you stamp your approval on Mail Backup X.
Mail Backup X- a professional G suite mail backup tool with user friendly features
Mail backup X is a tool that beats the exorbitant professional services in the area of pricing with its highly affordable price tag. This tool also beats the professional services when it comes to the sheer range of features on offer. Easy to use even for beginners, this tool maintains its peak and flawless performance on both Windows and Mac devices. It is compatible with a huge number of email services, which makes it a cost effective solution. Another thing that makes it an even more cost effective choice is this tool's untiring ability to cater the whole range of email management tasks like email migration and restore. You can customize an email backup, restore or achieving session in the light of your unique needs. The level of flexibility on offer from this tool is second to none. You can choose between full and selective backups. PDF archiving feature is also present. Your data is duly encrypted to present no chance to internet threats to meddle in your private affairs. You can also G suite mail contacts backup, which evidences the fact that this tool assures complete data retention. It is updated on a regular basis, which explains the reason why its smooth performance on both Windows and Mac is well sustained.
How to backup G suite email in a manner that affords significant savings in storage space?
To reap significant savings in storage space, you can throw the weight of your trust on this tool that has the unique ability of 3x data compression. The data compression algorithm employed by this tool has been fully tested, so there are no question marks about its safety. Even while using such a high degree of compression, you are assured of complete data retention. Even the folder hierarchy is not messed up during this process. 3x data compression will increase the rate of data transfer thereby leading to faster and effortless results.
G suite email backup that is safe as well
No matter how precarious the outside circumstances are, this tool will keep your data safe by using effective remedies against data theft. Encryption takes the top honors when it comes to completely shutting all doors that may become a source of unauthorized data access. Google approved login ensures that whenever you use this tool to source emails from an email client, the connection is always secure with no scope for unauthorized data access. The users are provided with the option to password protect their files tagged highly confidential. An offline mode of this tool gives vent to all data security concerns populating your mind space. To put it in short, you will not find a more secure tool to backup G suite.
Backup G suite mail folders without pounding your head with complexities
A tool may have the best lineup of features and may be highly secure as well, but its overall utility will diminish considerably if it pounds our head with complexities. Ease in use should be the foremost attribute of a tool, everything else matters thereafter. And this tool gets the balance between simplicity and sophistication absolutely right. No more usage of mind numbing technical terminologies. No more encounters with vague instructions that become a grapevine of confusions. No more getting caught up in an unnecessarily long line up of instructions which lead to brewing of confusions. Use this sophisticated yet straightforward tool to get the intended results in an effortless manner. Short and simple instructions, a user friendly interface, complete absence of heavy technical terminologies and usage of simple language, elevate the level of ease users feel while carrying out myriad email management tasks.
These tools has other ease-affording features as well that simplify email management to a great degree. These features include a smart mail viewer, incremental backups, a smart search module along with a live dashboard.
Backup G suite mail data with a free demo of this tool
There is no better way of discovering the trust-invoking qualities of this tool other than trying out its free demo. This tool has been growing in popularity at an unabated pace because it walks the talks by living up to the expectations of users. Even though everything about this tool is very true and transparent, you can get further insights into its user friendly technology by trying out its free demo. So what are you waiting for? Grab this inopportunity without any second thoughts for this tool is tailor-made to fulfill your diverse needs.
0 notes
Text
Expert Apple Technicians Recover Crashed Mac Drives
A crashed Mac drive can stop everything in its tracks locking you out of your system and making essential files seem permanently lost. Whether it’s your work machine, personal laptop, or a studio Mac with years of creative projects, a drive crash can feel like a digital disaster. The good news? Expert Apple technicians recover crashed Mac drives every day using tools and techniques specifically designed for Apple hardware and macOS.
If your Mac suddenly won’t boot, is stuck on a loading screen, or displays disk errors, now is the time to call in certified professionals who know exactly how to restore your system—and your data.
What Causes a Mac Drive to Crash?
A crashed drive can occur due to a number of issues, often without warning. Some of the most common causes include:
Hardware Issues
Aging or worn-out hard drives (especially HDDs)
SSD corruption due to bad memory cells
Power surges or unexpected shutdowns
Overheating or physical damage (e.g., from drops)
Software Problems
Failed macOS updates or installations
File system corruption (APFS, HFS+)
Malware or third-party software conflicts
Improper shutdown or forced restarts
A crash can make your Mac unbootable, freeze on the Apple logo, or display a flashing folder with a question mark—indicating your system can't locate a valid startup disk.
Why Trust Expert Apple Technicians?
When it comes to recovering data from a crashed drive, not all recovery services are created equal. Apple-certified technicians bring unique advantages:
Trained in Apple-Specific Systems
They have expert knowledge of macOS, Apple’s custom hardware, and unique security features like FileVault and the T2/M1/M2 chips. These systems require precise handling for successful recovery.
Access to Specialized Tools
From proprietary Apple diagnostics to advanced recovery utilities, certified technicians use industry-grade tools to recover data without causing further damage.
Safe Handling of Encrypted Drives
If your Mac uses FileVault or has a security chip, standard data recovery attempts may fail. Apple technicians understand the correct protocols to access encrypted data—securely and legally.
High Success Rate
Thanks to their experience and equipment, Apple experts boast much higher recovery rates than generic repair shops or consumer software solutions.
The Recovery Process, Simplified
Apple technicians follow a structured, step-by-step approach to recover crashed Mac drives:
1. Initial Assessment
Technicians begin by diagnosing the drive using Apple’s diagnostic tools and external recovery systems to determine the nature and extent of the crash.
2. Non-Invasive Cloning
If the drive is still accessible, a bit-by-bit clone is created to preserve the data and prevent further corruption during the recovery process.
3. Deep File Recovery
Using specialized tools for APFS, HFS+, and encrypted volumes, technicians extract data from the cloned image or directly from the original drive.
4. Data Verification
Recovered files are checked for completeness and integrity, ensuring they are usable and error-free before delivery.
5. Data Delivery & Backup Solutions
Your recovered files are returned to you on an external drive, cloud storage, or a replacement Mac. Apple experts can also help set up Time Machine or iCloud for ongoing protection.
What Can Be Recovered?
Depending on the condition of the drive, Apple technicians can often retrieve:
Documents, spreadsheets, and PDFs
Photos, videos, and music libraries
Email files and app data
iMovie, Final Cut, and Logic Pro projects
User profiles, preferences, and settings
Complete drive images or partitions
Even partially corrupted or encrypted files may be recoverable with the right tools and experience.
Warning Signs of a Failing Mac Drive
Don’t wait until your Mac crashes completely. Contact an expert if you notice:
Frequent crashes or freezes
Mac is stuck on the Apple logo
Apps take unusually long to open
Disk Utility reports drive errors
Files mysteriously disappear or won’t open
Clicking or buzzing noises (on older HDDs)
Catching these early can significantly improve the chances of a successful recovery.
Tips to Prevent Future Drive Crashes
After recovery, Apple experts often recommend proactive steps to prevent another data loss event:
Use Time Machine: Apple's built-in backup system can automatically protect your files.
Enable iCloud Syncing: Especially for documents, desktop files, and photos.
Avoid Forced Shutdowns: Always power down your Mac properly.
Keep macOS Updated: Regular updates patch security holes and improve disk management.
Don’t Ignore Disk Utility Warnings: Run First Aid regularly to fix minor errors before they grow.
A crashed Mac drive doesn’t mean all is lost. With the help of certified professionals, Apple technicians can recover data from even the most stubborn drive failures. Their deep knowledge of Apple systems, secure practices, and advanced recovery tools ensure you get the best chance at saving your data—quickly and safely.
If your Mac is showing signs of a crash or has already failed, don’t delay. Reach out to certified Apple experts today and take the first step toward recovery and peace of mind.
#iPhone Battery Replacement#Iphone Repair#Macbook Repair#iPad Screen Repair#macbook battery replacement
0 notes
Text
And So It Goes….
Due to some Issues, I have had to reinstall the Sims 2 on both my Mac and PC.
On my Mac, I lost everything: a couple houses I had not yet uploaded, and my entire Downloads folder. I have been restoring, installing CEP, Scriptorium, and the Stuff Packs Huge Lunatic extracted for the Mac.
On my PC, I didn’t lose anything except the CEP and Scriptorium. I have been affected by the latest patch to the Legacy game, though. I cannot change my screen resolution - thank goodness it is remaining at 2460x1600. But in order to take decent screenshots of houses I need to change the resolution to 2460x1440; to make the taskbar visible. Then I can use the Windows screenshot/clipping utility. So I cannot take any pics until that bug is fixed. I can’t post houses without pics. And I can’t create a new lot to build a house, as I have the “no typing” bug, too, if I launch the game a second time without restarting my laptop.
This, too, shall pass. I apologize for the lack of new content. Not my fault this time!
1 note
·
View note