#configure my wifi extender
Explore tagged Tumblr posts
Visit Tumblr Blog
Explore Tumblr blogs with no restrictions, modern design and the best experience.
Last Seen Tumblr Blogs


Fun Fact
Post activity is at the highest at 4:00 pm EDT; notes peak at 10:00 pm EDT.
Text
How to Connect Virgin Media to ISP and WiFi Pods Setup?
The Virgin media is a broadband and networking devices provider which has seamless services for the users. Here you will get to know how to setup its two of the networking devices. One is Virgin media hub and other is WiFi pods. You should follow all instructions to prevent the Virgin Media outage problems.
Virgin Media Hub Setup
The Virgin media hub can act as the modem as well as the router, so we can call it a Modem router. Here in this section, you will get to know how to connect the device to home network and configure it as modem and router mode.
Connection
If you want to connect the device to the ISP directly, then you must use the co-axial cable. Insert cable to the ISP server socket and other end will go in to the hub port. Then you can connect the device to the power and set it as Modem mode.
If you want to connect the device to the home modem, then you must use the Ethernet cable. Connect the cable end to the hub WAN port and modem LAN port. After that, you can connect the device to the power and set it as router mode.
Now, have a look how to configure the device with the help of the simple instructions given in below section;
Configuration
If you want to set it as the modem device, then open the web browser and enter the IP address like 192.168.0.1. This information is given on the label of the device as well as in the user manual. Note the username and password also.
Reach to the interface login page, enter the username and password, and then press the Enter button. You will get to the interface page where you must go in to the Advanced Settings and click on the Management option. Here you will find the Modem mode, just select it and toggle the Enable button. Also here, you can change Virgin Media WiFi password easily.
If you want to set it as the router device, then open the web browser and enter the IP address like 192.168.0.1. This information is given on the label of the device as well as in the user manual. Note the username and password also.
Reach to the interface login page, enter the username and password, and then press the Enter button. You will get to the interface page andwhere you can set disable the modem mode to set it up as the router.
There are more Virgin media devices, which help the user to extend the router hub network and internet signals.
Virgin WiFi Pods Setup
The Virgin WiFi pods are small but very impactful devices that you can connect with the Virgin hub using some simple instructions;
Connection
To connect with the hub, you just have to power the pod in your house within the reach of the hub. Use the power cord to power it on. Then you just have to wait for the some minutes and then use My Virgin Media App or Virgin connect app to configure the device.
Configuration
Just use the Virgin media Email to get the access to the app and start a scan to find the WiFi pods. Then simply tap on the Connect button to establish a link between the devices. now, you must adjust the settings and finish the setup.
End Words
Here, you have seen and learned about how to complete the Virgin media router hub setup and how to connect the WiFi pods to it.
#Virgin Media#Virgin Media outage#can change Virgin Media WiFi password#My Virgin Media App#technology
0 notes
Text
How to Setup TP Link WiFi Extender?

To Setup TP Link WiFi Extender, first, be sure about a reliable internet connection, correct web/IP address, admin details, computer/smartphone, and ethernet cables. To configure your device using the app, first download the Tether app on your smartphone from the App/Play store. Then, open the app and log in using your valid credentials. Next, visit the smart Home Dashboard of your networking device. Hereon, click on the “+” icon and tap on My Devices. Then, choose the Range Extender and then configure your device at the 2.4 GHz frequency bandwidth. Lastly, click on ‘Save’. For more details, drop us a line!
0 notes
Text

1 note
·
View note
Text
why does my wifi disconnect when i turn on vpn
🔒🌍✨ Get 3 Months FREE VPN - Secure & Private Internet Access Worldwide! Click Here ✨🌍🔒
why does my wifi disconnect when i turn on vpn
VPN wifi disconnection causes
Wi-Fi disconnection while using a VPN can be a frustrating experience, especially when trying to browse the internet securely and privately. There are several common causes for VPN disconnections on Wi-Fi networks that users may encounter.
One possible reason for VPN disconnection on Wi-Fi is weak or unstable network signals. Fluctuations in Wi-Fi signals can disrupt the VPN connection, leading to sudden disconnections. Moving closer to the Wi-Fi router or switching to a more stable network can help address this issue.
Another common cause of VPN disconnections on Wi-Fi is network congestion. When multiple devices are connected to the same Wi-Fi network, bandwidth is divided among them, which can result in slower connection speeds and potential VPN drops. Limiting the number of connected devices or opting for a less congested network can improve VPN stability.
Additionally, outdated VPN software or firmware may also lead to disconnections. Ensuring that the VPN client and router firmware are up to date can prevent compatibility issues and maintain a secure connection.
Interference from electronic devices or physical obstacles such as walls or appliances can also disrupt Wi-Fi signals, causing VPN disconnections. Relocating the router to a more central location or using Wi-Fi extenders can help improve signal strength and reduce connection issues.
By understanding these common causes of VPN disconnections on Wi-Fi networks and implementing the appropriate solutions, users can enjoy a more reliable and secure browsing experience with their VPN service.
Troubleshooting VPN wifi connection issues
When you're trying to connect to a VPN over Wi-Fi and encounter issues, it can be frustrating. However, troubleshooting VPN Wi-Fi connection issues can help you get back online securely and privately. Here are some common problems and their solutions to help you troubleshoot VPN Wi-Fi connection issues.
Check your internet connection: Before attempting to connect to the VPN, ensure that your Wi-Fi connection is stable. If the internet is down, your VPN won't work either.
Verify VPN credentials: Double-check your VPN username and password. Small typos can lead to authentication failures. Update your credentials and try connecting again.
Switch servers: Sometimes, VPN servers might be overloaded or facing technical difficulties. Switching to a different server can resolve the connection problem.
Update VPN software: Ensure your VPN software is up to date. Developers frequently release updates to improve performance and fix bugs that could be causing connection issues.
Firewall settings: Check your firewall settings to ensure they aren't blocking the VPN connection. Configure your firewall to allow VPN traffic for a seamless connection.
Restart devices: Restarting your computer, router, and modem can often resolve connectivity issues by refreshing network settings.
Contact VPN support: If you've tried all troubleshooting steps and still can't connect to the VPN over Wi-Fi, reach out to your VPN provider's support team for assistance.
By following these troubleshooting tips, you can effectively address VPN Wi-Fi connection issues and enjoy a secure internet browsing experience. Remember to stay patient and methodical when troubleshooting to identify and resolve the root cause of the problem.
Wifi disconnects when using VPN
When using a Virtual Private Network (VPN), experiencing issues with your Wi-Fi connection dropping can be frustrating. There are several reasons why this may happen, but rest assured, there are also solutions to help resolve this problem.
One common reason why your Wi-Fi disconnects when using a VPN is due to network congestion. When connected to a VPN, your internet traffic is routed through a separate server, which can sometimes lead to increased latency and bandwidth issues. This can cause your Wi-Fi connection to drop intermittently.
Another possible reason is that your VPN client might be outdated or configured incorrectly. It's essential to ensure that you are using the latest version of your VPN client and that the settings are configured correctly to prevent any disruptions to your Wi-Fi connection.
Additionally, your Wi-Fi router or access point may not be able to handle the traffic from the VPN connection effectively, leading to disconnects. In this case, you may need to upgrade your router to a more robust model that can better support the increased demands of a VPN connection.
To help mitigate these issues, try connecting to a different VPN server that may offer better stability and speed. You can also try restarting your router and modem, as well as updating your VPN client to the latest version.
In conclusion, experiencing Wi-Fi disconnects when using a VPN can be a common issue, but with the right troubleshooting steps and solutions, you can help ensure a more stable and reliable internet connection while using your VPN.
Network connectivity problems with VPN
Experiencing network connectivity issues while using a VPN (Virtual Private Network) can be frustrating and disruptive, impacting productivity and online activities. These problems can arise due to various factors, ranging from issues with the VPN client or server to network configuration conflicts. Understanding the common causes and troubleshooting methods can help resolve these issues efficiently.
One of the primary causes of network connectivity problems with VPNs is an unstable internet connection. Fluctuations in internet speed or intermittent connectivity can disrupt the VPN connection, leading to dropped connections or slow performance. In such cases, troubleshooting the underlying internet connection issues, such as resetting the router or contacting the internet service provider, may help restore stable connectivity.
Additionally, compatibility issues between the VPN client software and the operating system or device firmware can contribute to connectivity problems. Ensuring that both the VPN client and the device's software are up to date can mitigate such issues. Similarly, conflicts with firewall settings or antivirus software may block VPN traffic, requiring adjustments to the security settings to allow VPN connections.
Furthermore, network congestion or server overload can affect VPN performance, especially during peak usage times. Switching to a different VPN server or selecting one with lower traffic can alleviate congestion-related issues. It's also advisable to choose VPN servers closer to your physical location to minimize latency and improve connection stability.
In some cases, misconfigurations in the VPN settings or network configurations can cause connectivity problems. Verifying the VPN settings, such as protocols and encryption methods, and ensuring they align with the requirements of the network can help resolve such issues. Additionally, restarting the VPN client or reinstalling it from scratch can sometimes clear up persistent connectivity issues.
Overall, troubleshooting network connectivity problems with VPNs requires a systematic approach, including diagnosing potential causes, adjusting settings, and seeking support from the VPN provider if necessary. By following these steps, users can often resolve connectivity issues and enjoy a reliable VPN experience.
VPN interference with wifi signal
Using a VPN (Virtual Private Network) is a popular way to protect your online privacy and data security. However, some users may experience interference with their Wi-Fi signal while using a VPN.
VPNs work by redirecting your internet connection through remote servers, encrypting your data in the process. This extra layer of security can lead to some slowdown in your internet speed, including your Wi-Fi connection. The encryption and rerouting processes can sometimes cause delays in transmitting data packets between your device and the VPN server, leading to a potential slowdown in your Wi-Fi signal.
Additionally, the distance between your physical location, the VPN server, and the final destination of your online activity can affect the speed and stability of your connection. If the VPN server is located far away from you, it can introduce latency and potentially disrupt your Wi-Fi signal.
To minimize interference with your Wi-Fi signal while using a VPN, you can try connecting to a VPN server that is geographically closer to your location. This can help reduce latency and improve the speed of your connection. You can also consider upgrading your internet plan to a higher speed to accommodate the added encryption and rerouting of data through the VPN.
Overall, while VPN interference with Wi-Fi signal can occur due to the encryption and rerouting processes involved, there are ways to mitigate these issues and enjoy a secure and reliable online experience.
0 notes
Video
youtube
UltraXTend Wifi Review: How UltraXTend Wifi Works - Is it Worth it? Full... UltraXTend Wifi Review How UltraXTend Wifi Works - Is it Worth it? - Full Review of UltraXTend Wifi➡️UltraXTend Official Website: https://bit.ly/3Q1MQCtUltraXTend Wifi Welcome to my comprehensive review of UltraXTend Wifi! In this video, I'll delve into everything you need to know about UltraXTend Wifi, from what it promises, whether it works, and why it's worth it, to its effectiveness in helping you as a wifi amplifier that enhances weak wifi signals in any home. Whether you're considering trying out UltraXTend Wifi or just curious about its benefits, this review has all the information you need. Join me for an honest assessment and share insights that will help you make an informed decision about how UltraXTend Wifi works and whether it's worth purchasing UltraXTend Wifi. I'll also alert you to scams and provide the secure link to the official website, where you can confidently purchase the product.Review of UltraXTend Wifi In this comprehensive analysis of UltraXTend Wifi, as mentioned in the video, it promises to extend the range of your router's Wi-Fi signal to reach all areas of your home. It was designed for busy households with multiple Wi-Fi-enabled devices and a frequent need for multiple connections to the Wi-Fi signal simultaneously. UltraXTend Wifi functions as a WLAN repeater, boosting Internet speed and eliminating Wifi dead zones. The wifi amplifier extends the range and strength of any router's WiFi signal, thus eliminating slow Internet speeds due to weak signal. Having a strong Internet connection is a necessity nowadays. Whether reading emails, streaming your favorite shows, or simply browsing the web – a strong WiFi signal is essential.How does UltraXTend Wifi work? The UltraXTend Wifi Extender simply plugs into your electrical outlet. It picks up the wifi signal from your router and then extends the signal. The setup process for UltraXTend Wifi is straightforward – no technical knowledge required! It's easy to configure and takes just a few minutes. When you set up the wifi amplifier, a new network will appear. You should connect to the new wifi network as it provides a better and faster internet connection.Is it worth buying UltraXTend Wifi? Overall, customers have been very satisfied with the performance of UltraXTend Wifi. Customers report significant improvements in speed and reliability of the UltraXTend Wifi signal since using it. We also achieved good results. This device has been as effective as other signal amplifiers available in the market, at a more competitive price. An UltraXTend Wifi amplifier is an essential addition to any home and is one of the top options overall. Considering the manufacturer offers a money-back guarantee, it's definitely worth trying the device and taking advantage of the special offer. So yes, it's worth buying this UltraXTend Wifi considering its effectiveness! I hope this UltraXTend Wifi Booster review has been helpful to you! #UltraXTendWifiReview #WiFiBooster➡️GET UltraXTend Here: https://bit.ly/3Q1MQCttags: ultraxtend wifi,ultraxtend wifi review,ultraxtend wifi reviews,how does ultraxtend wifi work,is it worth buying ultraxtend wifi,ultraxtend wifi worth it,honest ultraxtend wifi review,where to buy ultraxtend wifi,everything about ultraxtend wifi,ultraxtend wifi amplifier is good,ultraxtend review,ultraxtend wifi is good,ultraxtend wifi signal amplifier,ultraxtend wifi customer reviews,ultraxtend wifi work,the ultraxtend wifi review,the ultraxtend wifi,ultraxtend wifi is reliable,ultraxtend wifi scam.UltraXTend Wifi Review: How UltraXTend Wifi Works - Is it Worth it? - Full Review of UltraXTend Wifi UltraXTend Wifi Review: How UltraXTend Wifi Works - Is it Worth it? - Full Review of UltraXTend Wifi
1 note
·
View note
Text
How Can I Set Up My Victony AC1200?

Setting up your Victony AC1200 setup is quick and straightforward. Begin by connecting the AC1200 to a power source. Once powered on, use a computer or mobile device to locate the Wi-Fi network named “Victony_AC1200.” Connect to this network and open a web browser. In the address bar, enter the default IP address (commonly 192.168.0.1) or “http://victony.setup.” You’ll be prompted to log in; use the default username and password provided in the user manual. Follow the on-screen instructions to select and connect to your existing Wi-Fi network, entering the password when prompted. Complete the setup process, and your Victony AC1200 is ready to extend your Wi-Fi coverage for a stronger and more reliable connection.
How is the manual method for the Victony Ac1200 setup?
Plug your Victony AC1200 into a power outlet and turn it on.
On your computer or mobile device, go to the list of available Wi-Fi networks and connect to the network named “VICTONY_EXT” or similar.
Launch a web browser on your connected device.
In the address bar, enter the default IP address for Victony AC1200, which is typically “192.168.10.1” or as specified in the user manual. Press Enter.
You will be prompted to log in. Use the default username and password provided in the user manual. Common defaults include “admin” for both the username and password.
Within the extender’s configuration interface, locate the wireless settings or setup section. Select your existing WiFi network from the list and enter the password when prompted.
Follow the on-screen instructions to set up additional extender settings if required. This may include choosing a new network name (SSID) or password for the extended network.
Once you’ve entered the necessary information, save the settings, and complete the setup process.
After the setup is complete, your devices will need to reconnect to the extended Wi-Fi network using the new settings.
Read More:-
1 note
·
View note
Text
Unlocking Seamless Connectivity: A Comprehensive Guide to netfun wifi extender setup
Introduction:
Welcome to the ultimate guide for netfun wifi extender setup. In the digital age, a robust Wi-Fi connection is essential. This article delves into the intricacies of setting up a NetFun WiFi extender, ensuring you make the most of your internet connection. Let's embark on this journey to eliminate dead spots and elevate your connectivity.
Understanding the Basics
Setting up a NetFun WiFi extender involves several steps, each crucial for a seamless experience.
What is netfun wifi extender setup?
NetFun WiFi extender setup is the process of expanding your Wi-Fi coverage by installing a NetFun extender. It's designed to eliminate dead zones and boost signal strength in hard-to-reach areas.
Why opt for netfun wifi extender setup?
Discover the benefits of extending your Wi-Fi range. From improved streaming quality to enhanced online gaming experiences, a NetFun extender ensures a reliable connection throughout your space.
Preparing for Installation
Before diving into the installation process, let's get everything ready.
Gathering Essentials for netfun wifi extender setup
Ensure a smooth setup by collecting the necessary items. From the NetFun extender to a reliable internet connection, we've got you covered.
Optimizing Placement for netfun wifi extender setup
Choosing the right location for your extender is crucial. Learn about ideal placements to maximize signal coverage and eliminate dead zones effectively.
Step-by-Step Installation Guide
Now that you're prepared, let's dive into the installation process.
Connecting the NetFun Extender
Unbox your NetFun extender and follow our detailed guide to establish a secure connection. Experience a hassle-free setup with our expert tips.
Configuring netfun wifi extender setup Settings
Explore the settings of netfun wifi extender setup to customize your Wi-Fi network further. Personalize your experience for optimal performance.
Troubleshooting and FAQs
Encountered an issue during netfun wifi extender setup? We've got solutions.
Common Issues in netfun wifi extender setup
Address common problems users face during installation. From connectivity issues to configuration glitches, find solutions to ensure a smooth process.
FAQs for netfun-wifi-extender-setup/
Q: How long does netfun wifi extender setup take?
A: The setup usually takes around 15-20 minutes, depending on your familiarity with the process.
Q: Can I use multiple NetFun extenders for broader coverage?
A: Yes, you can extend your coverage by adding multiple NetFun extenders strategically placed within your space.
Q: What should I do if the signal strength is still weak after setup?
A: Try repositioning the extender or check for interference from other devices. Adjustments in placement often resolve signal strength issues.
Q: Is netfun-wifi-extender-setup/ compatible with all routers?
A: NetFun extenders are compatible with most routers. However, it's advisable to check compatibility before purchasing.
Q: Can I secure my extended network with a password?
A: Absolutely. During the setup process, you'll have the option to secure your extended network with a password for added security.
Q: Are firmware updates necessary for optimal performance?
A: Yes, regularly updating your NetFun extender's firmware ensures you benefit from the latest features and improvements.
Conclusion
Congratulations! You've successfully navigated the netfun wifi extender setup process. Enjoy seamless connectivity, bid farewell to dead zones, and elevate your internet experience. For further assistance, refer to our FAQs or seek professional help.Unlocking Seamless Connectivity: A Comprehensive Guide to netfun wifi extender setup
0 notes
Text
0 notes
Text
Access Affordable Virtual Desktops: Revolutionize Workflows

Cost-effective and secure virtual desktops access is offered via the new Amazon Work Spaces Thin Client
With affordable, safe, and simple-to-manage virtual desktops access, the new Amazon WorkSpaces Thin Client increases end-user and IT staff productivity. The devices arrive preconfigured and ready to use, connect, and deploy right to the end user.
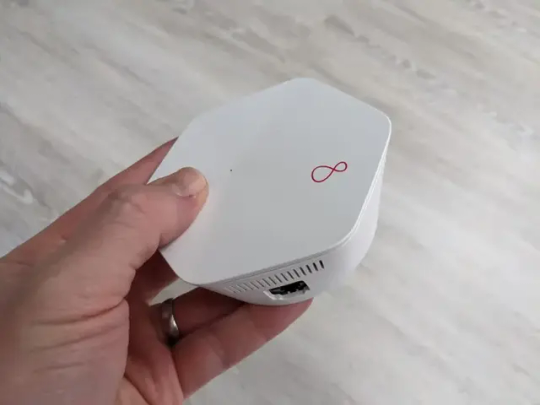
A little cube called the Thin Client may be connected straight to a keyboard, mouse, display, and other USB devices including cameras, microphones, and headphones. It may also drive an additional display when the optional hub is used. Using Active Directory, the administrator may construct environments that allow users to access Amazon WorkSpaces, Amazon WorkSpaces Web, or Amazon AppStream 2.0. These environments provide several choices for managing user identities and credentials.
Thin Clients at Work
you have been using Amazon Work Spaces via a thin client for a very long time, so you excited to inform you about this device and the administrative service that powers it. Despite the fact that switching between clients is easy and preserves her working environment (opening tabs in my browser, running programs, etc.), administrators will find it appealing for other reasons. As an illustration:
Cost: At $195 in the US, the gadget is very affordable compared to a laptop and its accompanying operating system. Further cost savings result from the reduced amount of work that has to be done in the field due to the central configuration and administration of the working environments. Moreover, compared to laptops, the gadgets are significantly simpler and have less elements that might fail or wear out.
Security: To build a relationship of trust with the administrative service, the gadgets come pre-installed with a secure “secret.” The gadget has no data storage and is unable to support malicious programs that could try to steal data. It also helps lower the possibility of data leakage in the event that an employee quits without returning a laptop and Virtual Desktops provided by their business.
Ease of Management: Using the AWS Management Console, administrators can quickly build new environments for individuals or groups of individuals, give them activation codes, and oversee the environment. They are able to monitor users over time, check compliance, and schedule software Virtual Desktops patches and upgrades.
Simple to Use: After connecting and unpacking the devices, users may input their activation codes, log in to their virtual desktops environment, and begin working immediately. They can concentrate on their work since they don’t have to handle installing software updates or patches.
These gadgets have many excellent applications! First, there are instances when frequent access is required over an extended period of time, such as call centers, task workers, training centers, and the like.
Second, there are additional circumstances in which access is required temporarily or transiently, such as large-scale event registration systems, temporary contact centers set up for emergencies or special events, disaster response, and similar scenarios. It makes logical to provide workers cheap devices without local storage, as some do not return laptops to their employers after leaving their jobs.
Let’s go over how to set everything up, first as an administrator and then as a user.
Beginning your career as an administrator
Ordering certain gadgets and having them dispatched to her consumers, along with any needed accessories, is the first step.
Access to a particular virtual desktop service is available in each Amazon WorkSpaces Thin Client configuration.
Beginning a user’s journey
As a user, you go back to my testing configuration, switch it on, quickly choose my keyboard, connect to my house WiFi, and input my activation code:
Tools for administrators
you may use the Thin Client Console to manage environments, devices, and software upgrades for devices as an administrator. you may go over the list of the devices he oversee.
It’s crucial to be aware of the following two points:
Regions: The US East (North Virginia), US West (Oregon), Asia Pacific (Mumbai), Canada (Central), and Europe (Frankfurt, Ireland, Ireland, London) Regions are where you may access the Thin Client Console.
Device Sales: Beginning in the United States, the Amazon WorkSpaces Thin Clients will be accessible in additional nations in early 2024.
Cost: The devices cost $195, or $280 if you want to add an extra hub that lets you utilize a second display. In addition to paying for the underlying virtual desktop service, there is a $6 monthly cost for managing, maintaining, and monitoring each device.
Read more Govindhtech.com
0 notes
Photo
www.mywifiext.net setup/newextendersetup is the web page to configure a netgear device, you must register your device by creating an account to resolve problems with your extender device or simply by contacting our experts for help.
#www.mywifiext.net setup/newextendersetup#mywifiext.net username and password#login to netgear wifi extender#mywifiext.net netgear setup#mywifiext.net new extender setup#Netgear new extender setup page#configure my wifi extender
4 notes
·
View notes
Link
#New Netgear wifi extender setup#Netgear wifi extender new setup#Steps for how to configure Netgear extender#Setup New Netgear wifi extender#mywifiext net new extender setup#Netgear extender setup wizard#Netgear extender setup#my wifi extender setup#mywifiext net setup#Netgear wifi range extender setup#my wifi ext#Netgear wifi extender setup instructions#Netgear wifi extender n300#Netgear wifi extender n300 setup#Netgear wifi extender setup ex6100#www.mywifiext.net new extender setup#Netgear ex2700 setup#how do you connect a wifi extender?#Netgear wifi extender setup website#Netgear setup wn3000rpv3#Netgear plug in wifi extender setup#192.168.1.250 Netgear extender setup#new Netgear wifi range extender setup#netgear wn3000rpv3 setup
5 notes
·
View notes
Link
#New Netgear wifi extender setup#Netgear wifi extender new setup#Setup New Netgear wifi extender#Steps for how to configure Netgear extender#mywifiext net new extender setup#Netgear extender setup wizard#Netgear extender setup#my wifi extender setup#mywifiext net setup#Netgear wifi range extender setup#my wifi ext#Netgear wifi extender setup instructions#Netgear wifi extender n300#Netgear wifi extender n300 setup#Netgear wifi extender setup ex6100#www.mywifiext.net new extender setup#Netgear ex2700 setup#how do you connect a wifi extender?#Netgear wifi extender setup website#Netgear setup wn3000rpv3#Netgear plug in wifi extender setup#192.168.1.250 Netgear extender setup#new Netgear wifi range extender setup#netgear wn3000rpv3 setup
3 notes
·
View notes
Text
NETGEAR Installation — Assistant to Set Up a Netgear Extender
Netgear is one of the most elegant networking brands that offer many similar services. Its routers are quite common with users. This is because of its security and innovations that make it different. Now some cases happen when you face issues while handling them. Although these are simple issues and can be fixed in no time. Now some face problems in configuring area extender setup with Netgear installation assistant. Well, it’s an easy method but seldom gets a bit trickier. Below we have discussed some of the easiest and quick steps to help with this; check out the entire article.
Follow Few Steps to Connect with the Netgear Installation Assistant:
No uncertainty that it’s a confusing process but a doable one; you don’t want to have any special knowledge. You can do this quickly with the help of the given directions and actions. So to make the process of range extender setup with Netgear installation assistant understand the steps:
You initially want to place the extender near a power outlet.
Turn ON the supply and wait for the LED to lighted green.
Later this connects your device using your wifi connection or Ethernet cable. For wifi connection, open the connection manager and find the connection named NETGEAR_EXT.
On this site click the New NETGEAR EXTENDER SETUP button and insert the details in the given field and press the NEXT
In the next step, you need to verify that the Way Point/Extender switch is set to Extender only then proceed to the next step.
Enter the password and head over to the next start.
After this set, the SSID and key of your extender and then move to next.
Now make sure that your extender device is placed midway between your router and other devices. This step will ensure the Netgear installation partner is done successfully.
This is the simple process to configure or complete the Netgear extender setup. You can also take the help of Netgear installation assistant videos. IF you find any problems in the process then try revolving them. The above process will help you in the process of Netgear installation assistant download. At last, you can choose to do a Netgear router reset and then go through these steps.
Queries raised by Netgear Wifi Extender:
How do I set up Netgear WiFi Extender?
Many ways can help you to fix up Netgear wifi extender problems. You can also take the advice of Netgear installation assistant videos. You may want to go through some simple steps like Netgear extender login and then complete the mywifiext setup.
How do I set up my Netgear WiFi Extender without WPS?
If we discuss any specific type of Netgear like Netgear installation assistant ac1200 or Netgear installation assistant ac750 then the best point is that the method is almost related for every extender. You just require to use the common actions and make the setup.
Company: Wifi Extender Hub
Call on 833–666–7003
Email: [email protected]
#netgear installation#netgear extender setup#netgear extender#netgear extender login#netgear installation assistant#netgear#tplink extender setup#wavlink extender setup#range extender#extender#wifi extender#ac1200#ac1900#mywifiext#mywifiext setup#netgear_ext#range extender setup#networking#wifi not working#wifi#wifisetup#wifinetwork#assistant
3 notes
·
View notes
Text
How Do I Access My IP Camera Remotely?
Many people have IP cameras installed in their homes and businesses. IP camera manufacturers make it easy to access the video feed from your camera remotely, but how do you go about accessing your camera feed? This article will talk about three ways that are available for viewing an IP camera remotely: using a mobile device or computer browser, using a smartphone app, and pairing with another Wi-Fi device.
What is an IP Camera?
An IP camera, or Internet Protocol Camera, is a type of video surveillance system that communicates over a computer network and transmits data via an internet connection. IP cameras are often used to monitor traffic intersections for law enforcement agencies or by private security firms. They can also be used in retail stores and residential homes as a form of home monitoring.

As mentioned before, one way to view your remote IP camera is by using a mobile device or computer browser. On these devices you can easily download & install apps and monitor it from mac, iOS and other devices.
Mobile devices have become more and more popular, and many people already own one (or two!). If you want to use your tablet or smartphone to view your IP camera remotely, then read on below!
How to Access Your IP Camera Remotely?

Step One: Use A Mobile Device Or Computer Browser
If you want to access your IP camera feed from a mobile device or computer browser, then read on! We'll talk about how to do this for both the iPhone and Android devices.
iPhone Users If you have an iPhone, all that's required is going into the Safari app (or any other web browsing app) while connected to Wi-Fi at home and typing in "192.168.x.y" where x = number of camera (the first numbers after the word "IP") and y=number of port (i.e., 192). You can also go into Settings > WiFi > Select The Home Network > Tap On Camera Name To View.
Android Users If you have an Android phone, go to the browser and type in "192.168.x.y" where x = number of cameras (the first numbers after the word "IP") and y=number of ports (i.e., 192).
Note: The IP address for a camera is typically located on the back or bottom of your device near the power cord socket, as shown below:
Step Two: Use A Smartphone App
For those with iPhones who don't want to use Safari in order to view their remote camera feed from home while away, there are many different apps available that will do so just search around! One example is called TinyCam Monitor Lite which allows iPhone users for remote viewing and control of their IP camera.
For those with Android phones, there are also many different apps available that will do so - just search around! One example is called "IP Cam Viewer" which allows for remote video monitoring from anywhere in the world
Step Three: Pair Up Your Remote Camera With Another Wi-Fi Device Like A NAS Drive
If you want to remotely access your camera feed without using a mobile device or computer browser, then read on below about pairing up your remote IP camera with another WiFi enabled device like a network attached storage (NAS) drive. In this way, they can communicate wirelessly through wireless connections as needed back and forth between each other without interruption from physical wires.
This has its advantages because you can connect your remote camera to a NAS drive located in the house and then access it remotely using any laptop or desktop computer, even while away from home. One example of this is on top of the refrigerator: since most people don't have their computers there, you could place a wireless printer up there for printing out whatever was seen by that IP Camera - like if someone broke into your front door!
Benefits of Having a Remotely Accessible IP Camera
If you're away from your home for extended periods of time, like when the kids are at school or on a business trip, then it's helpful to be able to check in remotely with things. This can help keep peace of mind and also provide some additional security - as long as you have locked down any other potential vulnerabilities while away!
While many people want an IP camera installed outside their house for monitoring what is happening out front (such as surveying driveway activity), they might not always know how to access that footage if someone breaks into their device. With a remote camera feed, the footage will still be available even if somebody does break into your devices since there would only need to be one Wi-Fi connection between the two.
If you're someone who travels often or just loves to check in on your house when away from home, then having a remote camera feed can provide peace of mind and extra security for the times that you are gone!
Finally, some people install cameras inside their homes so they can see what's going on with pets while they're out - like if there is an animal rummaging through garbage cans outside. With a wireless connection between the two devices (i.e., IP Camera + Wireless Router), these types of situations should be more than manageable without any wires getting in the way at all!
Conclusion
Remotely-accessible IP cameras are a great way to keep tabs on your home or business while you're away. With the right router configuration, you can access and control any networked device from anywhere in the world. If this sounds like something that might interest you, with our help it's easy!
1 note
·
View note
Link
How to log in to my Netgear WIFI Range Extender? The power of your WIFI wireless range-extender is so strong that it can spread the signals up to an area of 10,000 sq. feet. If your WIFI extender has dual-band functionality, it can work with both the bands (2.4 GHz and 5 GHz) having 300N + AC1733 Mbps speed. It also gives you 4x4 MU-MIMO and Beamforming Technology, Cross-Band technology, Pushbutton Connect and Access Point Mode, etc. You can follow the below-given steps to configure your WIFI extender via the www.mywifiext.net login page.
1 note
·
View note
Text
TP-LINK EXTENDER SETUP

You need to be connected to the TP Link Network to set up your TPLink Wi-Fi extension. If you do not set up the tp-link extension, ensure that the original tplinkrepeater.net configuration procedure is connected with your extension next to the home router.
Trying to Install the WIFI Range Extender?
Using Tplinkrepeater.net Web Browser setup
to use Tplinkrepeater.net to configure your extension.
Get a mobile phone, tablet or computer with your wireless device.
Connect the 2.4 Ghz TP-Link with your device.
Open Chrome, Firefox, or Edge browsers.
Enter 192.168.0.254 on Tplinkrepeater.net or hit Type the address bar.
Enter your default password for your username.
Configuring your TP-Link extender
In order to start, you must connect your TP-Link extension to your computer through an Ethernet wire. This allows us to schedule and connect wireless settings.
Connect the power socket to the TP-link extension.
Connect to your PC now with your Tp Link extension.
Go to tplinkrepeater.net and open your computer's browser. If it does not work, try 192.168.0.254. The TP-Link web page should be listed.
Choose Next and Fast Setup.
Select your region and your neighbourhood next.
Allow TP-Link to search the wireless networks available. It may take a minute or two, depending on the number of networks close by.
After selecting the wireless network, pick Next from the list.
Enter your mobile password when requested.
To check network settings in the previous box, click Finish.
How to set up my TP Link WIFI repeater?
Make sure that the repeater is powered before setting the Tp-link extension.
See and click your device's WPS button. Look now. Look now.
On your Wi-Fi or modem, press the same button.
The splashing lights on both your devices are now visible.
If your repeater is connected to your modem or network successfully, On the extender, you can see a strong led light.
Immediately remove the extender and set it where poor internet signals are present.
TP-Link Extender Login 192.168.0.254
The WIFI TP extension IP address is 192.168.0.254. Use the default TP-Link Extensor IP 192.168.0.254, if the http://tplinkrepeater.net web URL does not work for you.
You merely need to open the web browser in the address bar to view the repeater and insert the default IP. This brings you to the default web page where your device may be easily installed and configured. This IP works as the web address of tplinkrepeater.net exclusively for installing your device.
Use a tablet or laptop for the network extension configuration and connect your device to the TP-Link.
Open every web browser when you have an online browser such as Google Chrome, Mozilla Firefox or Microsoft Edge.
And in the address bar type 192.168.0.254 IP.
TPlinkrepeater.net is now available on the setup page.
To access the installation page, create the device login password.
Follow on-screen directions to connect your device to the principal router or modem when you check in.
The 192.168.1.254 class C IP address includes the 192.168.1.1 number and 192.168.1.255 number. The address is included in RFC 1918's private IP address.
Upon accessing this URL, the user received an error notice that "this website cannot be reached" or "it takes too long to react to this URL."
Therefore, the IP address is not available on a public network only in a private area.
Private networks are private range IP packets. Network devices such as routers offer Network Address Translation Is private IP address (NAS). The current router utilises DHCP to assign these addresses. This IP is used for home network applications since 192.168.1.1 is the default IP extension for practically all of the routers. Please contact our support team if you have problems connecting to 192.168.1.254.
TPLINKREPEATER.NET LOGIN
TPlinkrepeater.net is an offline web URL for your wireless connection to your extension. A user may not only use tplinkrepeater.net to link an extension to change repeater settings
Why don't I get to the Tp Link settings page?
If a user cannot connect to the default connection site tplinkrepeater.net, either the error or a serious technical problem is typical.
The site URL is not used correctly.
Slow or incoherent WIFI connectivity.
The web browser version is obsolete.
Not the same extension and router settings.
Problems with Windows firewall setup
SSID and major concerns pre-shared.
The network of range extensors is not connected to you.
On http://tplinkreater.net you can't reach the server.
1 note
·
View note